- Cypress - Home
- Cypress - Introduction
- Cypress - Architecture and Environment Setup
- Cypress - Test Runner
- Cypress - Build First Test
- Cypress - Supported Browsers
- Cypress - Basic Commands
- Cypress - Variables
- Cypress - Aliases
- Cypress - Locators
- Cypress - Assertions
- Cypress - Text Verification
- Cypress - Asynchronous Behavior
- Cypress - Working with XHR
- Cypress - jQuery
- Cypress - Checkbox
- Cypress - Tabs
- Cypress - Dropdown
- Cypress - Alerts
- Cypress - Child Windows
- Cypress - Hidden Elements
- Cypress - Frames
- Cypress - Web Tables
- Cypress - Mouse Actions
- Cypress - Cookies
- Cypress - Get and Post
- Cypress - File Upload
- Cypress - Data Driven Testing
- Cypress - Prompt Pop-up Window
- Cypress - Dashboards
- Cypress - Screenshots and Videos
- Cypress - Debugging
- Cypress - Custom Commands
- Cypress - Fixtures
- Cypress - Environment Variables
- Cypress - Hooks
- Cypress - Configuration of JSON File
- Cypress - Reports
- Cypress - Plugins
- Cypress - GitHub
- Cypress Useful Resources
- Cypress - Quick Guide
- Cypress - Useful Resources
- Cypress - Discussion
Cypress - File Upload
To perform file upload task in Cypress, we have to first install a plugin with the command mentioned below −
npm install dev cypress-file-upload
The following screen will appear on your computer −

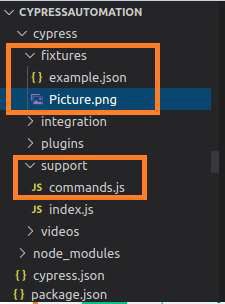
Once the installation is done, we have to add the statement import 'cypress-file-upload' in the command.js file. This file resides inside the support folder within our Cypress project.
Also, we shall add the file that we want to upload within the fixtures folder (Picture.png file). The following screen will be displayed −
To upload a file, we have to use the Cypress command, attachFile and pass the path of the file to be uploaded as a parameter to it.
Implementation
The implementation of the commands for uploading a file in Cypress is as follows −
describe('Tutorialspoint Test', function () {
   // test case
   it('Test Case6', function (){
      //file to be uploaded path in project folder
      const p = 'Picture.png'
      // launch URL
      cy.visit("https://the-internet.herokuapp.com/upload")
      //upload file with attachFile
      cy.get('#file-upload').attachFile(p)
      //click on upload
      cy.get('#file-submit').click()
      //verify uploaded file
      cy.get('#uploaded-files').contains('Picture')
   });
});
Execution Results
The output is as follows −
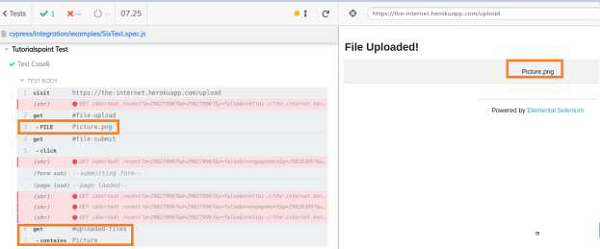
The execution logs show that the file Picture.png got uploaded and the file name got reflected on the page.
