 Data Structure
 Networking
 RDBMS
RDBMS Operating System
 Java
Java MS Excel
 iOS
iOS HTML
HTML CSS
CSS Android
 Python
 C Programming
 C++
C++ C#
C# MongoDB
 MySQL
MySQL Javascript
 PHP
PHP
- Selected Reading
- UPSC IAS Exams Notes
- Developer's Best Practices
- Questions and Answers
- Effective Resume Writing
- HR Interview Questions
- Computer Glossary
- Who is Who
Combobox Widget in Python Tkinter
Tkinter is a Python binding to the Tk GUI toolkit. It is the standard Python interface to the Tk GUI toolkit, and is Python's standard GUI. Tkinter is included with standard Linux, Microsoft Windows and macOS installations of Python. We can create many widgets from python's tkinter module. One of those multiple widgets is Combobox which is a very widely used powerful tool that can be customized to create lists that allow users to select one or more options from a list of given options.
The Combobox widget combines a text input with a drop-down list, allowing the user to type directly into the input box and/or select any item from the list. This widget is used in places where the user has to choose one or more options from a limited number of the given options.
Creating Combobox Widget Usingtkinter
To create this Combobox widget using Python's Tkinter module to create a drop-down list having multiple options We have to follow the below steps -
Step 1: Import the Required Modules
We need to first import modules required to make a Combobox. We have to import tkinter module of python which provides access to advanced Tk widgets.
from tkinter import *
from tkinter import ttk
Step 2: Creating an Instance of Tk Class
Next, we create an instance of the Tk class, defining the size of window and give it a title ?
root = Tk()
root.title("Combobox Example")
root.geometry('300x300')
Step 3: Creating Combobox Widget
We then create a Combobox widget using the ttk.Combobox() method ?
combo = ttk.Combobox(root)
combo.pack()
This will create a combobox widget with no options.
Step 4: Adding Options to the Drop Down Menu
We can add options to the Combobox using the "values" parameter ?
combo = ttk.Combobox(root, values=["Option 1", "Option 2", "Option 3", "Option 4", "Option 5"])
combo.pack()
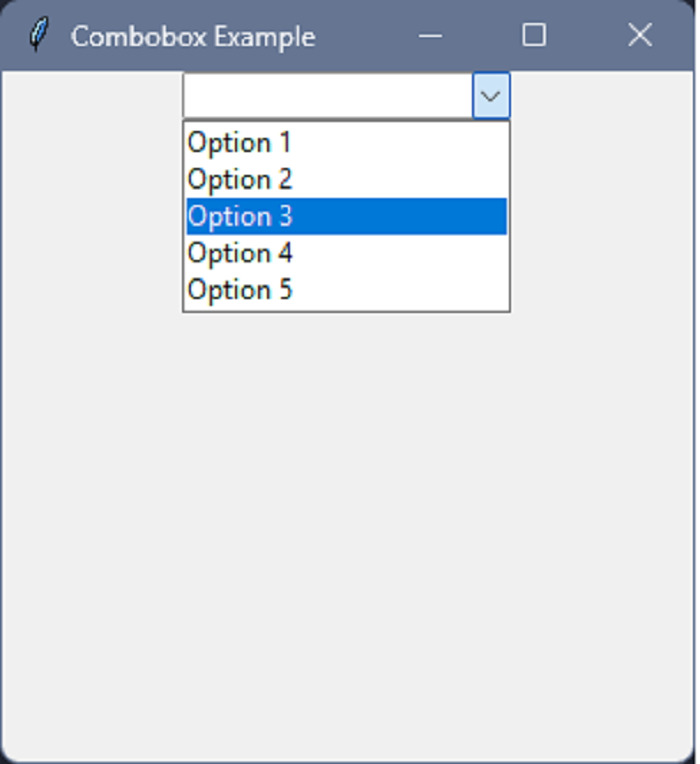
This will create a drop down with 5 options : "Option 1", "Option 2", "Option 3", "Option 4", and "Option 5".
Step 5: Getting and Setting Values
To get the currently selected value from a Combobox, we can use the get() method ?
selected_option = combo.get()
This will return the currently selected option as a string.
Step 6: Handling Events
We can handle events for a Combobox using the bind() method. For example, if we want to execute a function whenever the user selects an option, we can bind the "<<ComboboxSelected>>" event ?
def option_selected(event):
   print(combo.get())
combo.bind("<<ComboboxSelected>>", option_selected)
We have defined a function called option_selected that is executed whenever the user selects an option from the Combobox. This function retrieves the currently selected option using combo.get() and then prints a message using the print() function.
Step 7: Showing the Window
The below line of code will start displaying the GUI of the combobox.
root.mainloop()
Example
Here is the full source code of the program ?
from tkinter import *
from tkinter import ttk
root = Tk()
root.title("Combobox Example")
root.geometry('300x300')
combo = ttk.Combobox(root, values=["Option 1", "Option 2", "Option 3", "Option 4", "Option 5"])
combo.pack()
def option_selected(event):
   selected_option = combo.get()
   print("You selected:", selected_option)
combo.bind("<<ComboboxSelected>>", option_selected)
root.mainloop()
Output
Below is the output for the code written ?

On selecting any of these options from the drop down we will get a message in the terminal as shown below ?
You selected: Option 4
Conclusion
In this article we discussed how we can create a combobox widget in python using its tkinter module. We made a drop down menu list with 5 different options and the user can choose any option. We went through the different steps needed to make a combobox widget like setting a value, handling events etc.
