- AWS Lambda - Home
- AWS Lambda - Overview
- AWS Lambda - Environment Setup
- AWS Lambda - Introduction
- Building the Lambda function
- Function in NODEJS
- Function in Java
- Function in Python
- Function in Go
- Function in C#
- Configuring Lambda Function
- Creating & Deploying using AWS Console
- Creating & Deploying using AWS CLI
- Creating & Deploying using Serverless Framework
- AWS Executing & Invoking Lambda Function
- Deleting Lambda Function
- Working with Amazon API Gateway
- Lambda Function with Amazon S3
- Lambda Function with Amazon DynamoDB
- Lambda Function with Scheduled Events
- Lambda Function with Amazon SNS
- Lambda Function with CloudTrail
- Lambda Function with Amazon Kinesis
- Lambda Function with Custom User Applications
- AWS Lambda@Edge with CloudFront
- Monitoring and TroubleShooting using Cloudwatch
- AWS Lambda - Additional Example
Creating and Deploying using Serverless Framework
AWS Lambda can be created and deployed using serverless framework. It allows you to create AWS Lambda triggers and also deploy the same by creating the required roles. Serverless framework allows to handle big projects in an easier way. The events and resources required are written in one place and just a few commands helps in deploying the full functionality on AWS console.
In this chapter, you will learn in detail how to get started with AWS serverless framework.
Install Serverless Framework using npm install
To begin with, you need to first install nodejs. You can check for nodejs as follows −

You will have to use the following command to install serverless using npm package −
npm install -g serverless

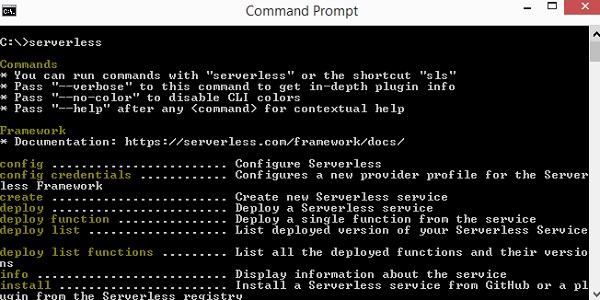
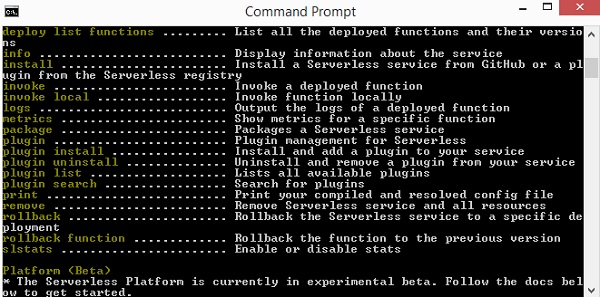
Once npm is done, execute serverless command which shows the list of command to be used to create and deploy AWS Lambda function. Observe the screenshots given below −
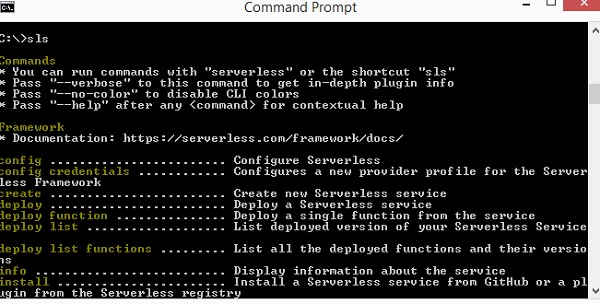
You can also use sls instead of serverless. sls is the shorthand command for serverless.
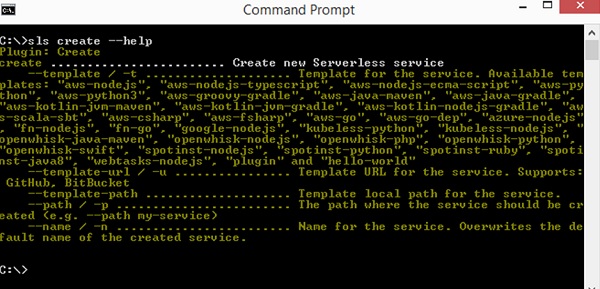
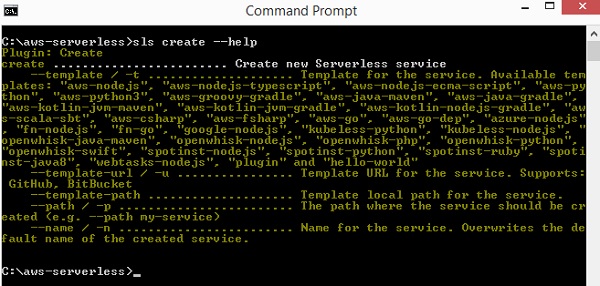
In case you need help on the command sls, you can use the following command −
sls create --help
For creating a serverless framework, you have to follow the steps given below −
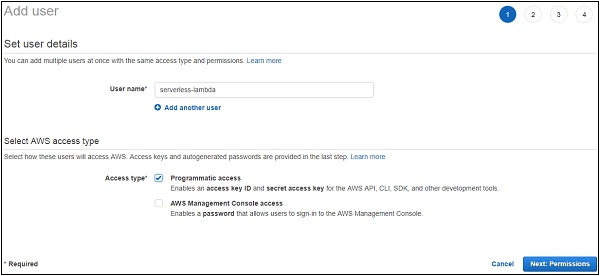
Step 1
To start using serverless framework, we need to add the credentials. By this, you can the user first in AWS console as follows −
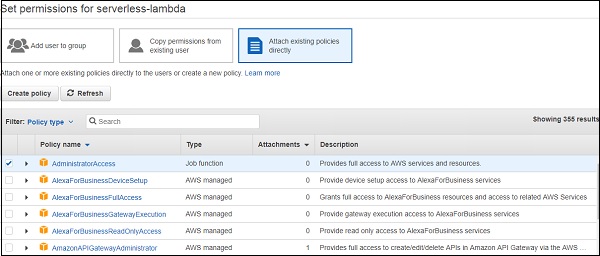
Step 2
Click on Next:Permissions button to add permissions. You will have to attach the existing policies or Administrator Access to this user.
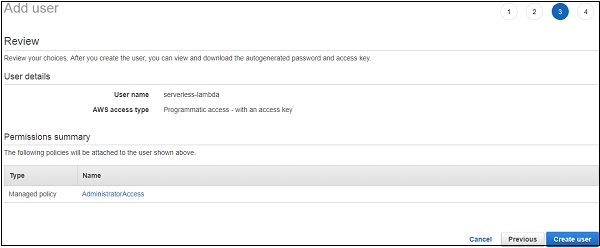
Step 3
Click Create User to add the user. It will display the access key and secret key which we need to configure the serverless framework −

Configure AWS Serverless Framework
Let us see how to configure AWS serverless framework. You can use the following command for this purpose −
sls config credentials --provider aws --key accesskey --secret secretkey
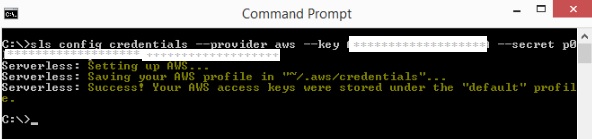
Note that the details of credentials entered, that is the access key and secret key are stored in the file /aws/credentials.
First, create a folder where you want your project files to be stored.
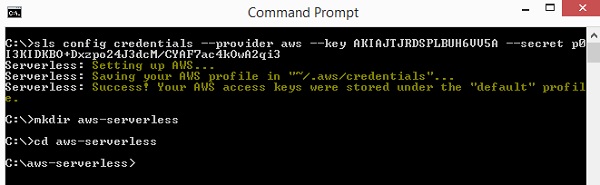
Next, we will start the work in aws-serverless folder.
Create AWS Lambda using Serverless Framework
Now, let us create a Lambda function with the serverless framework using the Steps given below −
Step 1
Following are the details for serverless create command −
Step 2
Now, we need to assign the template which are as follows −
AWS-nodejs, aws-nodejs-typescript, aws-nodejs-ecma-script, aws-python, aws-python3, aws-groovy-gradle etc.
Step 3
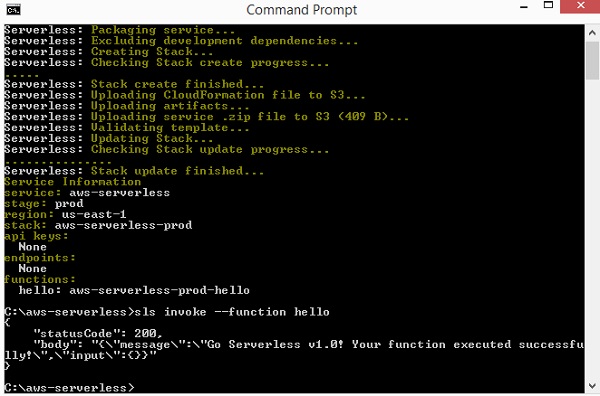
We shall make use of aws-nodejs template to create our first project using serverless framework. The command for the same purpose is as shown here −
sls create --template aws-nodejs
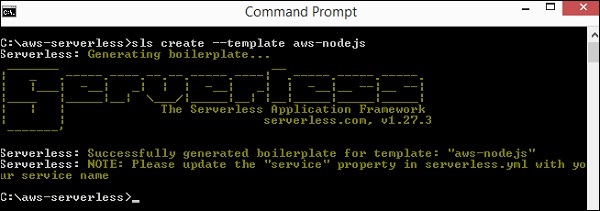
Note that this command creates a boilerplate for template aws-nodejs.
Step 4
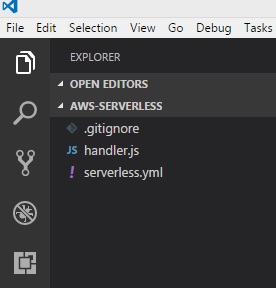
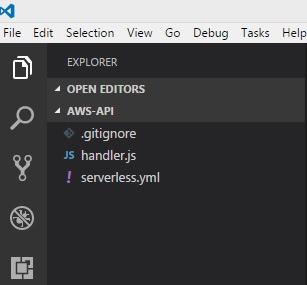
Now, open the folder created in an IDE. Here we are using Visual Studio code and the folder structure is as follows −
Step 5
There are 2 files created: handler.js and Serverless.yml
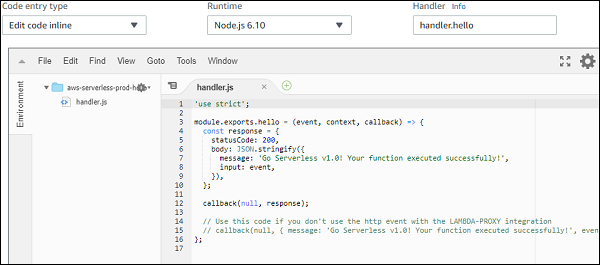
The AWS Lambda basic function details are shown in handler.js as follows −
'use strict';

module.exports.hello = (event, context, callback) => {
   const response = {
      statusCode: 200,
      body: JSON.stringify({
         message: 'Go Serverless v1.0! Your function executed successfully!',
         input: event,
      }),
   };
   callback(null, response);

   // Use this code if you don't use the http event with the LAMBDA-PROXY integration
   // callback(null, { message: 'Go Serverless v1.0! Your function executed successfully!', event });
};
This file Serverless.yml has the configuration details of the serverless framework as shown below −
# Welcome to Serverless!
#
# This file is the main config file for your service.
# It's very minimal at this point and uses default values.
# You can always add more config options for more control.
# We've included some commented out config Examples here.
# Just uncomment any of them to get that config option.
#
# For full config options, check the docs:
#    docs.serverless.com
#
# Happy Coding!
service: aws-nodejs # NOTE: update this with your service name

# You can pin your service to only deploy with a specific Serverless version
# Check out our docs for more details
# frameworkVersion: "=X.X.X"

provider:
 name: aws
 runtime: nodejs6.10

# you can overwrite defaults here
#  stage: dev
#  region: us-east-1

# you can add statements to the Lambda function's IAM Role here
#  iamRoleStatements:
#    - Effect: "Allow"
#      Action:
#        - "s3:ListBucket"
#      Resource: { "Fn::Join" : ["", ["arn:aws:s3:::", { "Ref" : "ServerlessDeploymentBucket" } ] ]  }
#    - Effect: "Allow"
#      Action:
#        - "s3:PutObject"
#      Resource:
#        Fn::Join:
#          - ""
#          - - "arn:aws:s3:::"
#            - "Ref" : "ServerlessDeploymentBucket"
#            - "/*"

# you can define service wide environment variables here
#  environment:
#    variable1: value1

# you can add packaging information here
#package:
#  include:
#    - include-me.js
#    - include-me-dir/**
#  exclude:
#    - exclude-me.js
#    - exclude-me-dir/**

functions:
 hello:
   handler: handler.hello

#    The following are a few example events you can configure
#    NOTE: Please make sure to change your handler code to work with those events
#    Check the event documentation for details
#    events:
#      - http:
#          path: users/create
#          method: get
#      - s3: ${env:BUCKET}
#      - schedule: rate(10 minutes)
#      - sns: greeter-topic
#      - stream: arn:aws:dynamodb:region:XXXXXX:table/foo/stream/1970-01-01T00:00:00.000
#      - alexaSkill: amzn1.ask.skill.xx-xx-xx-xx
#      - alexaSmartHome: amzn1.ask.skill.xx-xx-xx-xx
#      - iot:
#          sql: "SELECT * FROM 'some_topic'"
#      - cloudwatchEvent:
#          event:
#            Example:
#              - "aws.ec2"
#            detail-type:
#              - "EC2 Instance State-change Notification"
#            detail:
#              state:
#                - pending
#      - cloudwatchLog: '/aws/lambda/hello'
#      - cognitoUserPool:
#          pool: MyUserPool
#          trigger: PreSignUp

#    Define function environment variables here
#    environment:
#      variable2: value2

# you can add CloudFormation resource templates here
#resources:
#  resources:
#    NewResource:
#      Type: AWS::S3::Bucket
#      Properties:
#        BucketName: my-new-bucket
#  Outputs:
#     NewOutput:
#       Description: "Description for the output"
#       Value: "Some output value"
Now, we need to add changes in serverless.yml file as per our requirements. You can use the commands as given below −
You can use the following command for Service −
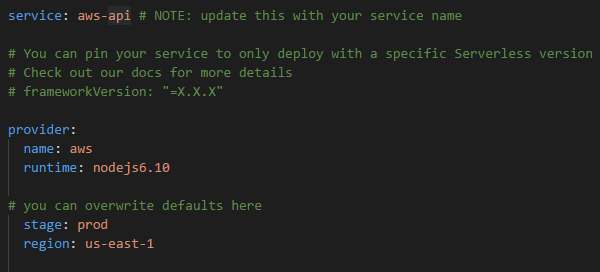
service: aws-nodejs # NOTE: update this with your service name
Now, change the service here and add the name given to our folder as shown −
service: aws-serverless # NOTE: update this with your service name
The provider details are as shown −
provider:
   name: aws
   runtime: nodejs6.10
The provider is aws and runtime is nodejs6.10. We need to add the region in which we will be working and the stage, that is dev or prod environment for the project. So here are the updated details of provider:provider −
name: aws
runtime: nodejs6.10
# you can overwrite defaults here
stage: prod
region: us-east-1
IAM Role
The iam role, that is, the code for permission to work with Lambda is shown here in the .yml file −
#  iamRoleStatements:
#    - Effect: "Allow"
#      Action:
#        - "s3:ListBucket"
#      Resource: { "Fn::Join" : ["", ["arn:aws:s3:::", { "Ref" : "ServerlessDeploymentBucket" } ] ]  }
#    - Effect: "Allow"
#      Action:
#        - "s3:PutObject"
#      Resource:
#        Fn::Join:
#          - ""
#          - - "arn:aws:s3:::"
#            - "Ref" : "ServerlessDeploymentBucket"
#            - "/*"
Note that we need to give the details of the role, that is the permission required with other AWS services, in the above section.
AWS Lambda Handler Details
The name of the export function in handler.js is hello. So the handler is name of the file followed by export name.
functions:
   hello:
      handler: handler.hello
The resource details about the s3 service added as shown below here −
# you can add CloudFormation resource templates here
#resources:
#  resources:
#    NewResource:
#      Type: AWS::S3::Bucket
#      Properties:
#        BucketName: my-new-bucket
#  Outputs:
#     NewOutput:
#       Description: "Description for the output"
#       Value: "Some output value"
Deploy AWS Lambda using Serverless Framework
Let us deploy the above lambda function to AWS console. You can use the following Steps for this purpose −
Step 1
First, you will have to use the following command −
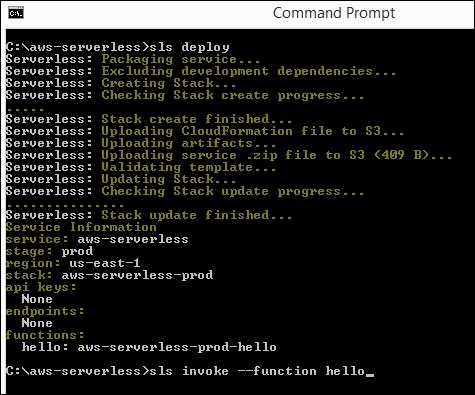
sls deploy
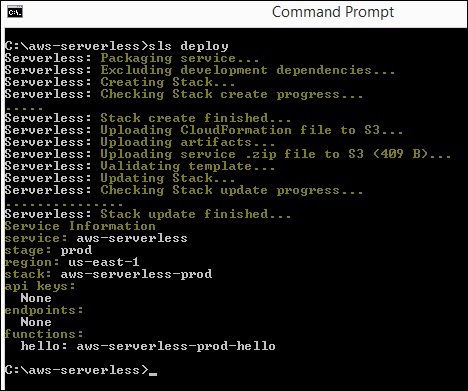
Step 2
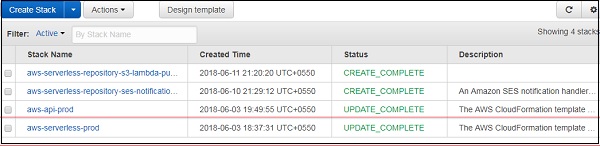
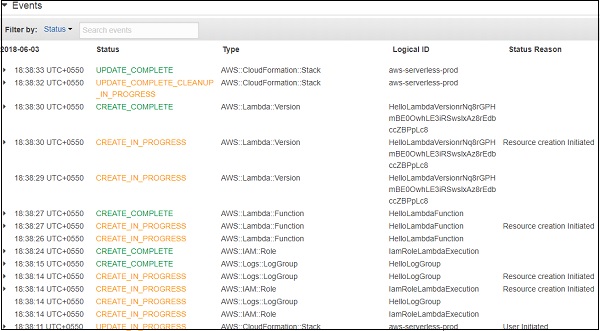
Now, you should see the function in AWS console now as shown. The details of serverless AWS are logged in AWS cloud formation. For this purpose, go to AWS service and select CloudFormation. The details of the AWS Lambda are displayed as follows −
Observe that the name given is project name followed by the stage used.
Step 3
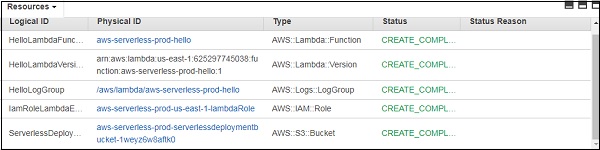
It creates the iam role for AWS Lambda and log group for AWS cloudwatch. S3 bucket is created which has the code details stored and the configuration details.
This is created by the command sls deploy. You need not specify the iam role, instead it is created by default during the deploy stage.
Step 4
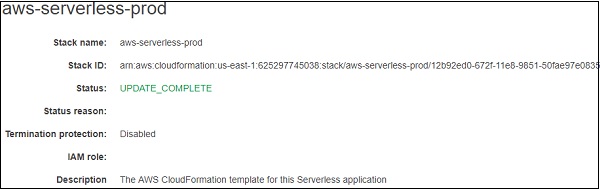
The detailed flow of events is displayed below in the cloud formation service.

AWS Lambda Code
The AWS Lambda code and its execution settings are shown in the screenshot given below −
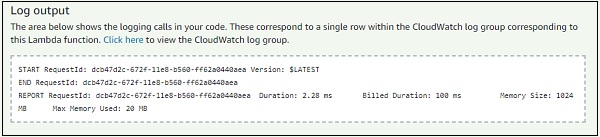
When you test the Lambda function, you can find the following output −
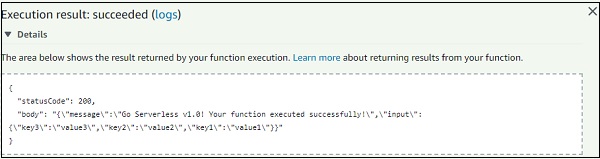
The Log output for the above function is shown here −
We can also test the AWS Lambda function using the serverless command as shown below −
sls invoke --function hello
The syntax of the invoke command is shown here −
sls invoke --function hello
This invoke command triggers the AWS Lambda function and displays the output in the command prompt as shown below −
You can also test the Lambda function before deploying and the command for same using the following command −
sls invoke local --function hello
Please note that it is not always possible to test locally as the resources like S3 andDynanoDB cannot be simulated on the local environment. Only the basic function calls can be tested locally.

Using API Gateway and AWS Lambda with Serverless Framework
Let us see how to create new project to work with Lambda and api gateway. You can use the following command for this purpose −
sls create --template aws-nodejs
Now, open aws-api project in visual code. You can see that the handler.js and serverless.yml files created. Let us do the changes in that for addition of api gateway.
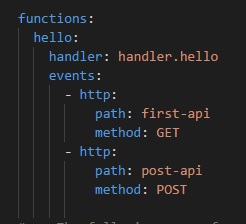
You will have to do the following changes in serverless.yml −
Now, the events details added for api gateway activation with AWS Lambda −
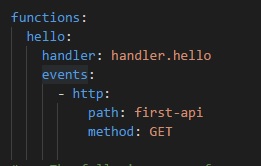
There is a new thing added here called events. We have specified the event as http, along with its path and method.
The path is the end-point which we will use when the api gateway path is created and method used is GET.
Observe that the handler is handler.hello, and hello is the export name from handler.js.

Note that you donot have to deploy the api gateway here, as the serverless framework will perform it.
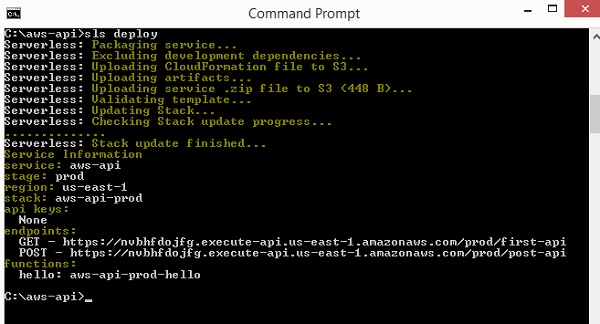
Now, we will run the sls deploy command to create AWS Lambda function with trigger as api gateway.
sls deploy
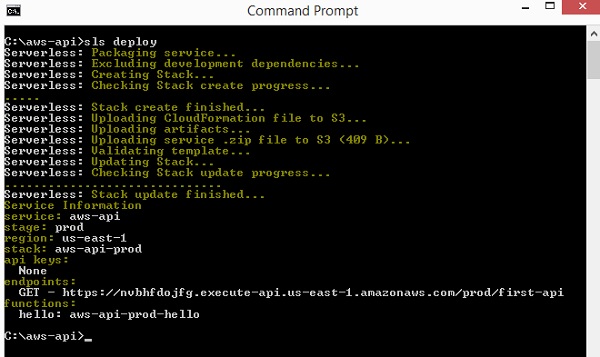
Observe that the deploy details are listed above. It gives the Get url with the end-point as the path details. The stage is prod so same is used in the url. The name of the function is aws-api-prod-hello.
Let us hit the url and see the output. You can see the followings the response we get from the api-gateway get url −

{"message":"Go Serverless v1.0! Your function executed
successfully!","input":{"resource":"/first-api","path":"/first-api","httpMethod":
"GET","headers":{"Accept":"text/html,application/xhtml+xml,application/xml;q=0.9,
image/webp,image/apng,*/*;q=0.8","Accept-Encoding":"gzip, deflate, br","Accept-Language":"en-US,en;q=0.9","CloudFront-Forwarded-Proto":
"https","CloudFront-Is-Desktop-Viewer":"true","CloudFront-Is-Mobile-Viewer":
"false","CloudFront-Is-SmartTV-Viewer":"false","CloudFront-Is-Tablet-Viewer":
"false","CloudFront-Viewer-Country":"IN","Host":"nvbhfdojfg.execute-api.us-east-1.
amazonaws.com","upgrade-insecure-requests":"1","User-Agent":"Mozilla/5.0
(Windows NT 6.3; Win64; x64) AppleWebKit/537.36 (KHTML, like Gecko)
 Chrome/66.0.3359.181 Safari/537.36","Via":"2.0 707912794802dbb4825c79b7d8626a5d.cloudfront.net (CloudFront)","X-Amz-Cf-Id":"j70MMqkWFp6kmvuauzp_nvTbI-WwKIQmm2Jl5hzSoN6gkdvX11hh-g==",
 "X-Amzn-Trace-Id":"Root=1-5b13f9ef-5b012e36b7f40b5013a326fc","X-Forwarded-For":"157.33.133.217, 54.182.242.73","X-Forwarded-Port":"443","X-Forwarded-Proto":"https"},
 "queryStringParameters":null,"pathParameters":null,"stageVariables":null,
 "requestContext":{"resourceId":"pes5sy","resourcePath":"/first-api","httpMethod":
 "GET","extendedRequestId":"H6P9fE-MoAMFdIg=","requestTime":"03/Jun/2018:14:23:
 43 +0000","path":"/prod/first-api","accountId":"625297745038","protocol":"HTTP/1.1",
 "stage":"prod","requestTimeEpoch":1528035823928,"requestId":"b865dbd6-6739-11e8-b135
 -a30269a8ec58","identity":{"cognitoIdentityPoolId":null,"accountId":null,
 "cognitoIdentityId":null,"caller":null,"SourceIp":"157.33.133.217","accessKey":null,
 "cognitoAuthenticationType":null,"cognitoAuthenticationProvider":null,"userArn":null,
 "userAgent":"Mozilla/5.0 (Windows NT 6.3; Win64; x64) AppleWebKit/537.36 (KHTML, like
 Gecko) Chrome/66.0.3359.181 Safari/537.36","user":null},"apiId":"nvbhfdojfg"},"body":null,
 "isBase64Encoded":false}}
The event details are also available in the output when you hit the url. The httpMethod is GET and the queryStringParameters are null as there is nothing passed in the query string. The event details are given to input which we have specified in the AWS Lambda handler −

The output we get from api gateway are only the body details such as message and input. The response is totally controlled by the api gateway and how to display it as output.
Now, let us pass inputs to the GET url in query string and see the display −
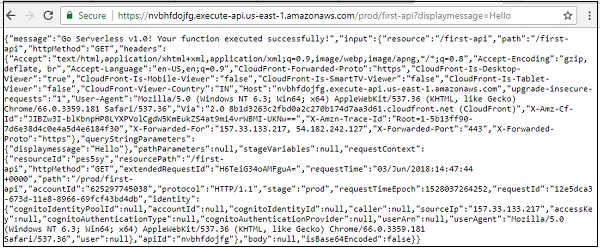
Then you can see the output of querystring as shown below −
{"message":"Go Serverless v1.0! Your function executed
successfully!","input":{"resource":"/first-api","path":"/first-api","httpMethod":
"GET","headers":{"Accept":"text/html,application/xhtml+xml,application/xml;q=0.9,
image/webp,image/apng,*/*;q=0.8","Accept-Encoding":"gzip, deflate,
br","Accept-Language":"en-US,en;q=0.9","CloudFront-Forwarded-Proto":"https",
"CloudFront-Is-Desktop-Viewer":"true","CloudFront-Is-Mobile-Viewer":"false",
"CloudFront-Is-SmartTV-Viewer":"false","CloudFront-Is-Tablet-Viewer":"false",
"CloudFront-Viewer-Country":"IN","Host":"nvbhfdojfg.execute-api.us-east-1.amazonaws.com",
"upgrade-insecure-requests":"1","User-Agent":"Mozilla/5.0 (Windows NT 6.3; Win64; x64)
 AppleWebKit/537.36 (KHTML, like Gecko) Chrome/66.0.3359.181 Safari/537.36","Via":"2.0
 8b1d3263c2fbd0a2c270b174d7aa3d61.cloudfront.net (CloudFront)","X-Amz-Cf-Id":"JIBZw3I-blKbnpHP8LYXPVolCgdW5KmEukZS4at9mi4vrWBMI-UKNw==",
 "X-Amzn-Trace-Id":"Root=1-5b13ff90-7d6e38d4c0e4a5d4e6184f30","X-Forwarded-For":
 "157.33.133.217, 54.182.242.127","X-Forwarded-Port":"443","X-Forwarded-Proto":"https"},"queryString
 Parameters":{"displaymessage":"Hello"},"pathParameters":null,"stageVariables":null,
 "requestContext":{"resourceId":"pes5sy","resourcePath":"/first-api","httpMethod":
 "GET","extendedRequestId":"H6TeiG34oAMFguA=","requestTime":"03/Jun/2018:14:47:44 +0000","path":"/prod/first-api","accountId":"625297745038","protocol":"HTTP/1.1",
"stage":"prod","requestTimeEpoch":1528037264252,"requestId":"12e5dca3-
673d-11e8-8966-69fcf43bd4db","identity":{"cognitoIdentityPoolId":null,"accountId":null,
"cognitoIdentityId":null,"caller":null,"exmpleIp":"157.33.133.217","accessKey":null,
"cognitoAuthenticationType":null,"cognitoAuthenticationProvider":null,"userArn":null,
"userAgent":"Mozilla/5.0 (Windows NT 6.3; Win64; x64) AppleWebKit/537.36 (KHTML, like
 Gecko) Chrome/66.0.3359.181 Safari/537.36","user":null},"apiId":"nvbhfdojfg"},"body":
 null,"isBase64Encoded":false}}
Let us change the AWS Lambda function to just display the querystring details as shown below −
'use strict';
module.exports.hello = (event, context, callback) => {
   const response = {
      statusCode: 200,
      body: JSON.stringify({
         message:(event.queryStringParameters &&     event.queryStringParameters.displaymessage!="") ? event.queryStringParameters.displaymessage : 'Go Serverless v1.0! Your function executed successfully!'
      }),
   };
   callback(null, response);
   // Use this code if you don't use the http event with the LAMBDA-PROXY integration
   // callback(null, { message: 'Go Serverless v1.0! Your function executed successfully!', event });
};
Observe that we have changed the message based on the querystring display message. This will deploy the the function again and check the output. It displays the details present in query string variable display message as shown below.

Let us now add post method to the events created as shown below −
Now, deploy the changes made and you can see the following output from the deploy command −
Note that testing post url in browser directly will not give the details. You should test the post url in postman.
To get postman go to https://www.getpostman.com/apps. Download the app as per your OS. Once installed, you should be able to test your post url as shown below −
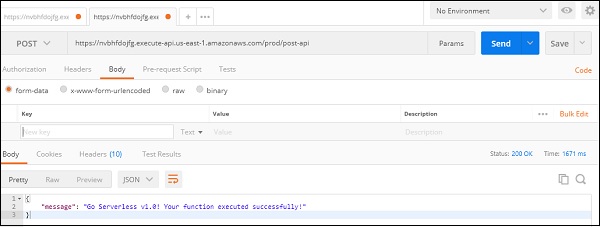
This displays the message we have added in the Lambda function.
