- AWS Lambda - Home
- AWS Lambda - Overview
- AWS Lambda - Environment Setup
- AWS Lambda - Introduction
- Building the Lambda function
- Function in NODEJS
- Function in Java
- Function in Python
- Function in Go
- Function in C#
- Configuring Lambda Function
- Creating & Deploying using AWS Console
- Creating & Deploying using AWS CLI
- Creating & Deploying using Serverless Framework
- AWS Executing & Invoking Lambda Function
- Deleting Lambda Function
- Working with Amazon API Gateway
- Lambda Function with Amazon S3
- Lambda Function with Amazon DynamoDB
- Lambda Function with Scheduled Events
- Lambda Function with Amazon SNS
- Lambda Function with CloudTrail
- Lambda Function with Amazon Kinesis
- Lambda Function with Custom User Applications
- AWS Lambda@Edge with CloudFront
- Monitoring and TroubleShooting using Cloudwatch
- AWS Lambda - Additional Example
AWS Lambda Additional Example
Till now, we have seen working of AWS Lambda with AWS services. Based on that knowledge, let us create a simple user registration form and post the data using API gateway to AWS Lambda. AWS Lambda will get the data from the event or theAPI gateway trigger and will add those details to DynamoDB table.
Example
Let us consider an example and perform the following functionalities on it −
Create DynamoDB Table
Create Form for User Registration
Create AWS Lambda and API gateway to send message to Phone using AWS SNS service
Create AWS Lambda and API gateway to POST form data and insert in DynamoDb table
Create AWS Lambda and API gateway to read data from Dynamodb table
Final Working of the User Registration Form
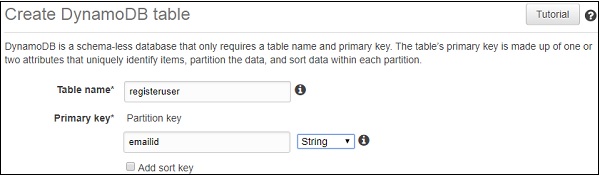
Create DynamoDB Table
The data entered will be stored in DynamodDB table. We will use API gateway to share data entered with AWS Lambda and later AWS Lambda will add the details in DynamoDB.
You can use the following details to create DynamodDB table in AWS console. First, go to AWS Service and click DynamoDB. Click Table to create the table as shown below −
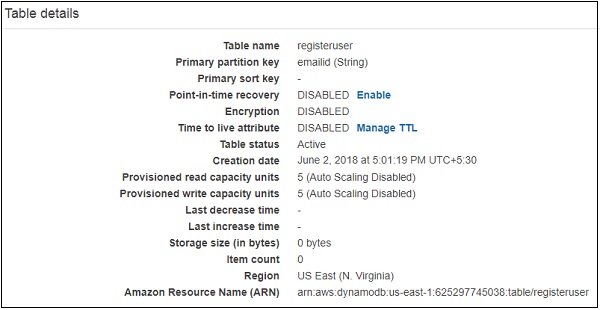
You can use the ARN to create policy for the DynamoDB to be used with AWS Lambda.
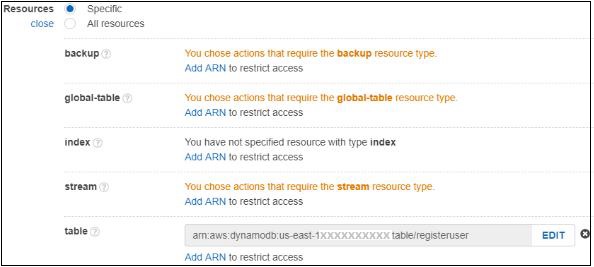
Go to IAM and select Policies. Click Create policy, choose service as DynamodDB as shown below −
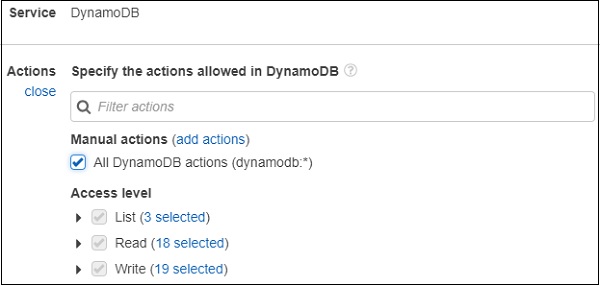
Click All DynamoDB actions as shown above. Choose resource and enter the ARN for table as shown below −
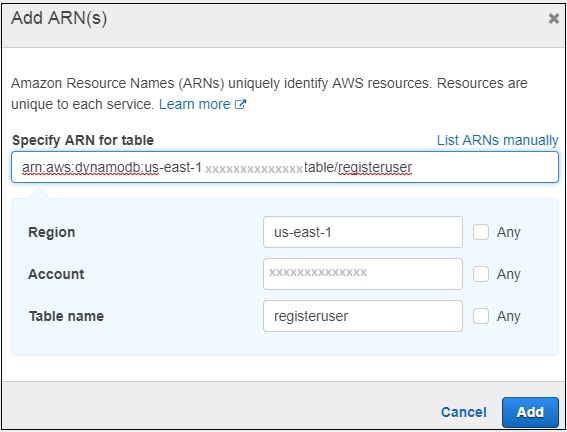
Now, click Add as shown below.
If you click Review policy button at the end of the screen, you can see the following window −
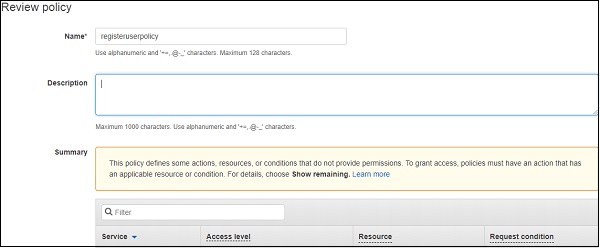
Enter name of the policy and click Create policy button at the end of the page. Now, we need to create role to be used with Lambda. We need permissionsforDynamoDB, APIGateway and Lambda.
Go to AWS services and select IAM. Select Roles from left side and add the required roles.
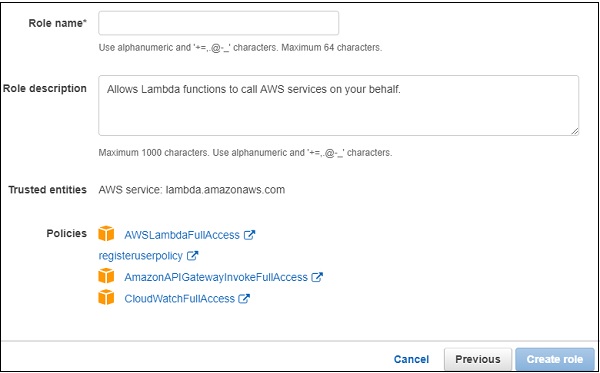
Enter the role name and click Create role. The role created is roleforlambdaexample.
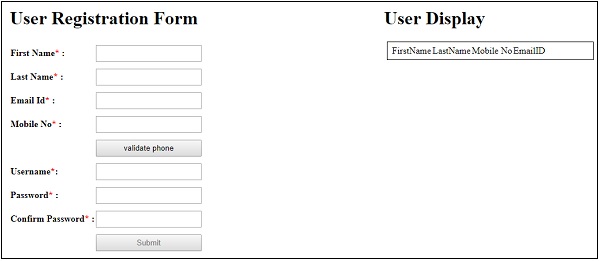
Create Form for User Registration
Here is the display of the user registration form to enter and to read the data from the dynamodb table.
Create AWS Lambda and API Gateway to Send OTP Message to Phone using SNS service
If you see the user registration form, there is a button validate phone. User is suppose to enter phone number and click on validate phone button to validate the phone number.
For this purpose −
When a user clicks this button, the API gateway post method which contains the phone details is called and internally AWS Lambda is triggered.
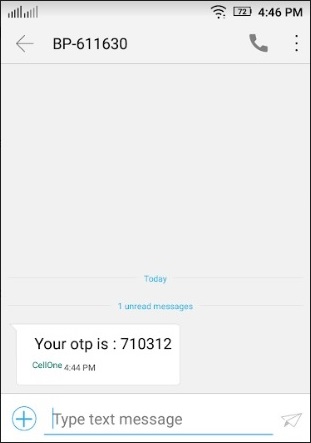
Then, AWS Lambda sendsOTP to the phone number entered using AWS SNS service.
The user receives the OTP and has to enter thisOTP number.
The textbox to enter OTP will appear when the phone number is entered and validate phone button is clicked.
The OTP received from AWS Lambda and the OTP entered by the user has to match, to allow the user to submit the user registration form.
A simple block diagram that explains the working of phone validation is shown here −

The AWS Lambda function created is as shown here −

The corresponding AWS Lambda code is as given below −
const aws =  require("aws-sdk");
const sns = new aws.SNS({
   region:'us-east-1'
});
exports.handler = function(event, context, callback) {
   let phoneno = event.mphone;
   let otp = Math.floor(100000 + Math.random() * 900000);
   let snsmessage = "Your otp is : "+otp;
   sns.publish({
      Message: snsmessage,
      PhoneNumber: "+91"+phoneno
   }, function (err, data) {
      if (err) {
         console.log(err);
         callback(err, null);
      } else {
         console.log(data);
         callback(null, otp);
      }
   });
};
Note that we are using SNS service to send the OTP code. This code is used to validate the mobile number entered by the user in the user registration form. The API gateway created for above phone validation is as follows −
The Lambda function given is phonevalidationexample. We are taking the mobile phone details here to be used inside AWS Lambda. Then, AWS Lambda will send the OTP code to the given mobile number.
Create AWS Lambda and API Gateway to POST Form Data and Insert in DynamoDB Table
For user registration form, all the fields are mandatory. There is anAJAX call made wherein the data entered in the form is posted to the API Gateway URL.
A simple block diagram which explains the working of the submit button is shown here −

Once the form is filled, the submit button will call the API gateway which will trigger AWS Lambda. AWS Lambda will get the details of the form from event or theAPI Gateway and the data will be inserted in the DynamodDB table.
Let us understand the creation of API Gateway and AWS Lambda.
First, go to AWS services and click Lambda. The Lambda function created is as shown here −

Now, to create an API gateway, go to AWS service and select API Gateway. Click on Create API button shown below.
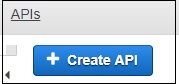
Enter the API name and click on Create API button to add the API.
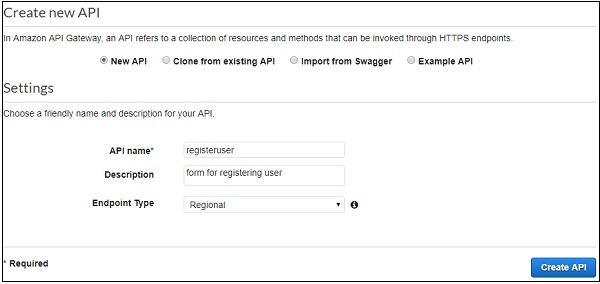
Now, an API is created called as registeruser. Select the API and click Actions dropdown to create Resource.
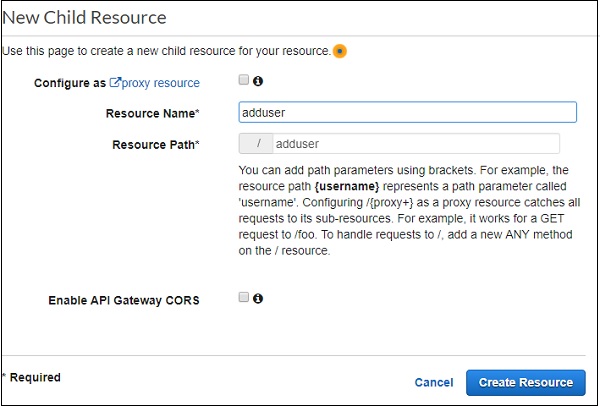
Click Create Resource. Now, let us add the POST method. For this, click on resources created on left side and from Actions dropdown select create method. This will display dropdown as shown below −
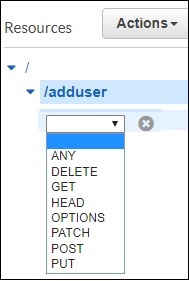
Select the POST method and add the Lambda function that we created above.
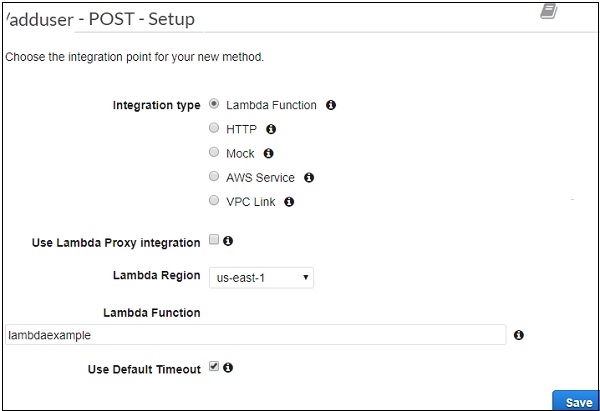
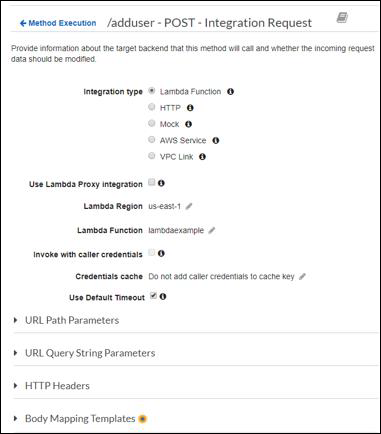
Click Save button to add the method. To send the form details to Lambda function lambdaexample we need to add the Integration Request as shown below −
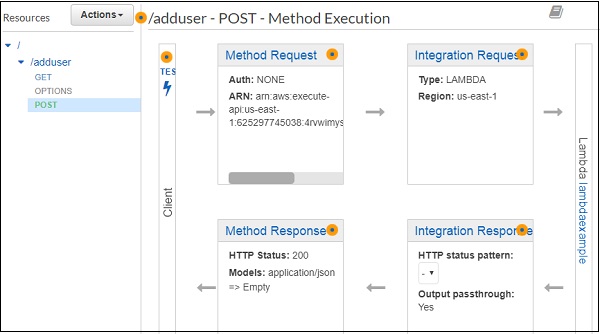
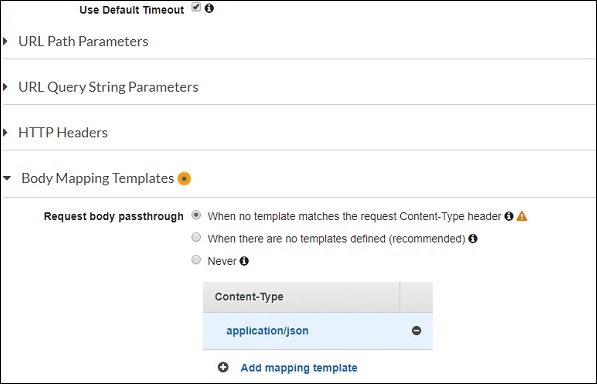
To post the form details, you will have to click Integration Request. It will display below details.
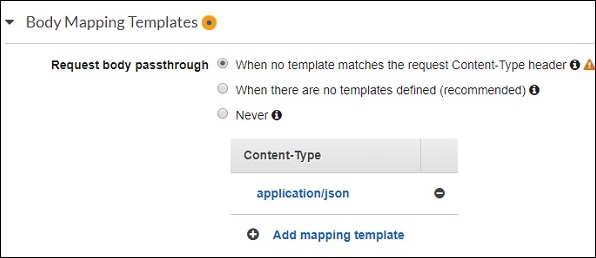
Click Body Mapping Templates to add the form fields to be posted.
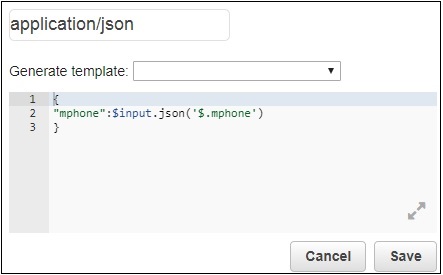
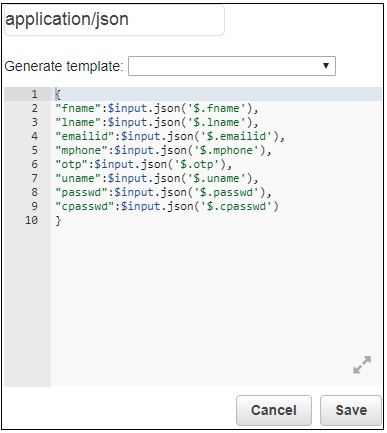
Next, click Add mapping template and enter the content type. Here, we have added application/json as the content type. Click it and here you need to enter the field in json format as shown below −
Now, click the Save button and deploy the API as shown below −
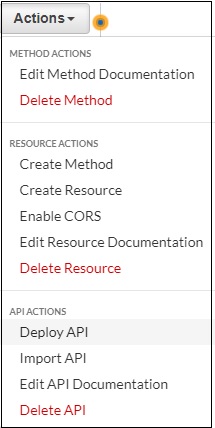
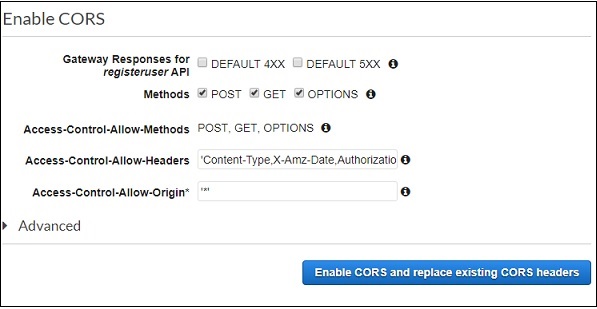
Here is the API created for POST which will use inside our .html file. Please note we need to Enable CORS for the resource created. Will use the api gateway url to make ajax call so the CORS has to enabled.
Select the Methods on which you want to enable the CORS. Click on Enable CORS and replace existing CORS headers.
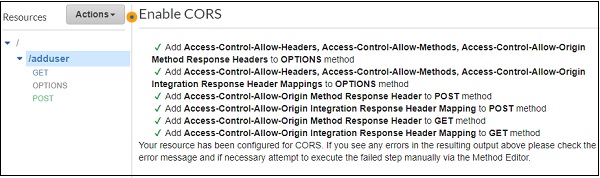
It displays the confirmation screen as follows −
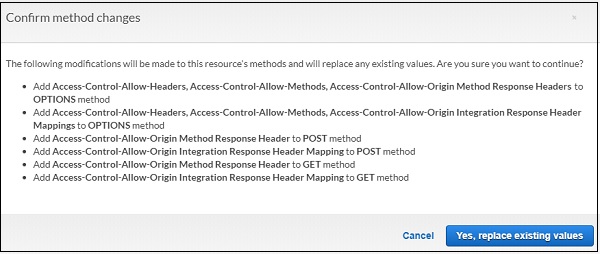
Click Yes, replace existing values to enable CORS.
The AWS Lambda code forPOST API Gateway is as shown here −
const aws =  require("aws-sdk");
const docClient = new aws.DynamoDB.DocumentClient({
   region:'us-east-1'
});
exports.handler = function(event, context, callback) {
   console.log(event);
   console.log("Entering Data");
   var data = {
      TableName : "registeruser",
      Item : {
         first_name:event.fname,
         last_name:event.lname,
         emailid:event.emailid,
         mobile_no : event.mphone,
         otp:event.otp,
         username:event.uname,
         password:event.passwd,
         confirm_password:event.cpasswd
      }
   }
   docClient.put(data, function(err, value) {
      if (err) {
         console.log("Error");
         callback(err, null);
      } else {
         console.log("data added successfully");
         callback(null, value);
      }
   });
}
The event parameter in AWS Lambda handler will have all the details which are added earlier in POST integration request. The details from event are added to the DynamodDB table as shown in the code.
Now, we need to get the service details from AWS-SDK as shown below −
const aws =  require("aws-sdk");
const docClient = new aws.DynamoDB.DocumentClient({
   region:'us-east-1'
});
var data = {
   TableName : "registeruser",
   Item : {
      first_name:event.fname,
      last_name:event.lname,
      emailid:event.emailid,
      mobile_no : event.mphone,
      otp:event.otp,
      username:event.uname,
      password:event.passwd,
      confirm_password:event.cpasswd
   }
}
docClient.put(data, function(err, value) {
   if (err) {
		console.log("Error");
      callback(err, null);
   } else {
      console.log("data added successfully");
      callback(null, value);
   }
});
Create AWS Lambda and API Gateway to Read Data from DynamodDB Table
Now, we will create AWS Lambda function to read data from DynamoDB table. We will trigger APIGateway to the AWS Lambda function which will send data to the html form.
The AWS Lambda function created is as shown below −

The corresponding AWS Lambda code is as follows −
const aws =  require("aws-sdk");
const docClient = new aws.DynamoDB.DocumentClient({
   region:'us-east-1'
});
exports.handler = function(event, context, callback) {
   var readdata = {
      TableName : "registeruser",
      Limit : 10
   }
   docClient.scan(readdata, function(err, data) {
      if (err) {
         console.log("Error");
         callback(err, null);
      } else {
         console.log("Data is " + data);
         callback(null, data);
      }
   });
}
Here the data is read from the DynamoDB table and given to the callback. Now, we will create APIGateway and add AWS Lambda function as the trigger.
We will add get method to the API created earlier.
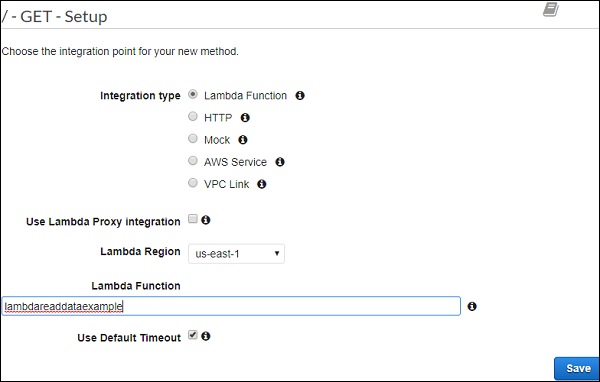
Lambda function added is lambdareaddataexample. Click Save to save the method and deploy the api.
Final Working of the User Registration Form
The final display of the form is as shown below −
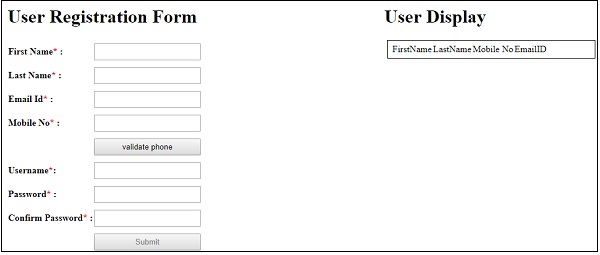
Now, enter the details as shown above. Note that the submit button is disabled. It will be enabled only when all the details are entered as shown −
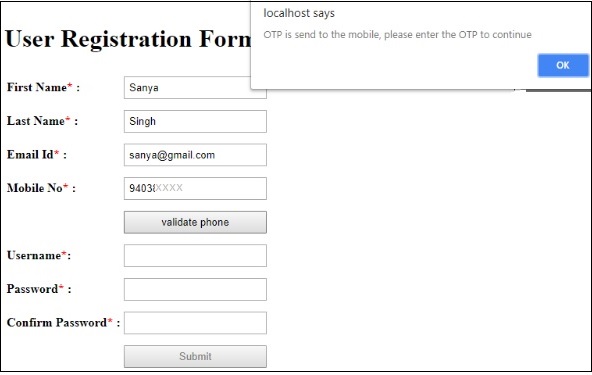
Now, enter the mobile number and click validate phone button. It will display the alert message saying OTP is send to the mobile, please enter the OTP to continue. OTP sent to the mobile number is as follows −
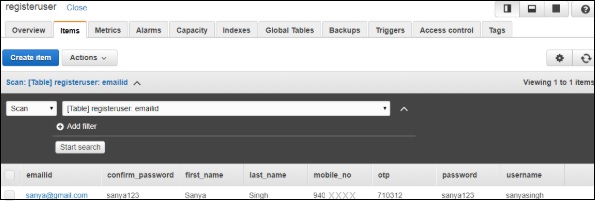
Enter the OTP and remaining details and submit the form.
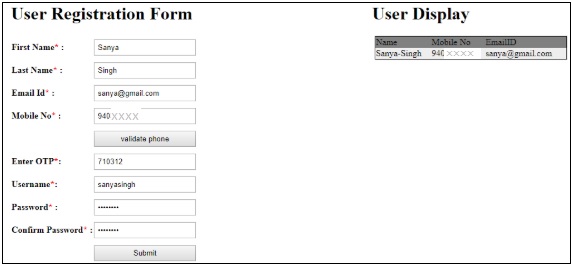
The data in DynamoDB registeruser table after submit is as shown here −
The code details are as given below −
Example1.html
<html>
   <head>
      <script src="https://ajax.googleapis.com/ajax/libs/jquery/3.3.1/jquery.min.js"></script>
      <script type="text/javascript" src="formdet.js"></script>
      <style>
         input[type=text], input[type=password],button {
            width: 100%;
            padding: 5px 5px;
            margin: 5px 0;
            box-sizing: border-box;
         }
         #maincontainer {
            width: 80%;
            margin: auto;
            padding: 10px;
         }
         div#userregistration {
            width: 60%;
            float: left;
         }
         div#userdisplay {
            margin-left: 60%;
         }
      </style>
   </head>

   <body>
      <div id="maincontainer">
         <div id="userregistration">
            <h1>User Registration Form</h1>
            <table border="0">
               <tr>
                  <td><b>First Name<span style="color:red;">*</span> : </b></td>
                  <td><input type="text" value="" name="fname" id="fname" /></td>
                  <td id="tdfname" style="display:none;"><span style="color:red;">Enter First Name</span></td>
               </tr>
               <tr>
                  <td><b>Last Name<span style="color:red;">*</span> : </b></td>
                  <td><input type="text" value="" name="lname" id="lname" /></td>
                  <td id="tdlname" style="display:none;"><span style="color:red;">Enter Last Name</span></td>
               </tr>
               <tr>
                  <td><b>Email Id<span style="color:red;">*</span> : </b></td>
                  <td><input type="text" value="" name="emailid" id="emailid" /></td>
                  <td id="tdemailid" style="display:none;"><span style="color:red;">Enter Email</span></td>
               </tr>
               <tr>
                  <td><b>Mobile No<span style="color:red;">*</span> : </b></td>
                  <td><input type="text" name="mphone" id="mphone"/></td>
                  <td id="tdmphone" style="display:none;"><span style="color:red;">Enter Mobile Number</span></td>
               </tr>
               <tr>
                  <td></td>
                  <td><button id="validatephone">validate phone</button></td>
                  <td></td>
               </tr>
               <tr id="otpdiv" style="display:none;">
                  <td><b>Enter OTP<span style="color:red;">*</span>:</b></td>
                  <td><input type="text" value="" name="otp" id="otp" /></td>
                  <td id="tdotp" style="display:none;"><span style="color:red;">Enter OTP</span></td>
               </tr>
               <tr>
                  <td><b>Username<span style="color:red;">*</span>: </b></td>
                  <td><input type="text" value="" name="uname" id="uname"/></td>
                  <td id="tduname" style="display:none;"><span style="color:red;">Enter Username</span></td>
               </tr>
                  <tr><td><b>Password<span style="color:red;">*</span> :</b></td>
                  <td><input type="password" value="" name="passwd" id="passwd"/></td>
                  <td id="tdpasswd" style="display:none;"><span style="color:red;">Enter Password</span></td>
               </tr>
                  <tr><td><b>Confirm Password<span style="color:red;">*</span> :</b></td>
                  <td><input type="password" value="" name="cpasswd" id="cpasswd"/></td>
                  <td id="tdcpasswd" style="display:none;"><span style="color:red;">Enter Confirm Password</span></td>
               </tr>
               <tr>
                  <td></td>
                  <td><button name="submit" id="submit" style="display:;" disabled="true">Submit</button></td>
                  <td></td>
               </tr>
            </table>
         </div>

         <div id="userdisplay">
            <h1>User Display</h1>
            <table id="displaydetails" style="display:block;width:80%;padding:5px;margin:5px; border: 1px solid black;">
               <tr>
                  <td></td>
                  <td>FirstName</td>
                  <td>LastName</td>
                  <td>Mobile No</td>
                  <td>EmailID</td>
               </tr>
            </table>
         </div>
      </div>
   </body>
</html>
formdet.js
function validateform() {
   var sError="";
   if ($("#fname").val() === "") {
      $("#tdfname").css("display","");
      sError++;
   }
   if ($("#lname").val() === "") {
      $("#tdlname").css("display","");
      sError++;
   }
   if ($("#emailid").val() === "") {
      $("#tdemailid").css("display","");
      sError++;
   }
   if ($("#mphone").val() === "") {
      $("#tdmphone").css("display","");
      sError++;
   }
   if ($("#otp").val() === "") {
      $("#tdotp").css("display","");
      sError++;
   }
   if ($("#uname").val() === "") {
      $("#tduname").css("display","");
      sError++;
   }
   if ($("#passwd").val() === "") {
      $("#tdpasswd").css("display","");
      sError++;
   }
   if ($("#cpasswd").val() === "") {
      $("#tdcpasswd").css("display","");
      sError++;
   }
   if (sError === "") {
      return true;
   } else {
      return false;
   }
}
$("#fname").change(function() {
   if ($("#fname").val() !== "") {
      $("#tdfname").css("display","none");
   } else {
      $("#tdfname").css("display","");
   }
});
$("#lname").change(function() {
   if ($("#lname").val() !== "") {
      $("#tdlname").css("display","none");
   } else {
      $("#tdlname").css("display","");
   }
});
$("#emailid").change(function() {
   if ($("#emailid").val() !== "") {
      $("#tdemailid").css("display","none");
   } else {
      $("#tdemailid").css("display","");
   }
});
$("#mphone").change(function() {
   if ($("#mphone").val() !== "") {
      $("#tdmphone").css("display","none");
   } else {
      $("#tdmphone").css("display","");
   }
});
$("#otp").change(function() {
   if ($("#otp").val() !== "") {
      $("#tdotp").css("display","none");
   } else {
      $("#tdotp").css("display","");
   }
});
$("#uname").change(function() {
   if ($("#uname").val() !== "") {
      $("#tduname").css("display","none");
   } else {
      $("#tduname").css("display","");
   }
});
$("#passwd").change(function() {
   if ($("#passwd").val() !== "") {
      $("#tdpasswd").css("display","none");
   } else {
      $("#tdpasswd").css("display","");
   }
});
$("#cpasswd").change(function() {
   if ($("#cpasswd").val() !== "") {
      $("#tdcpasswd").css("display","none");
   } else {
      $("#tdcpasswd").css("display","");
   }
});

var posturl = "https://4rvwimysc1.execute-api.us-east-1.amazonaws.com/prod/adduser";
var phonevalidationurl = "https://wnvt01y6nc.execute-api.us-east-1.amazonaws.com/prod/validate";
var otpsend = "";
function getdata() {
   var a = 0;
   $.ajax({
      type:'GET',
      url:posturl,
      success: function(data) {
         $("#displaydetails").html('');
         $("#displaydetails").css("display", "");
         console.log(data);
         $("#displaydetails").append('<tr style="padding:5px;margin:5px;background-color:gray;"><td>Name</td><td>Mobile No</td><td>EmailID</td></tr>');
         data.Items.forEach(function(registeruser) {
            var clr = (a%2 === 0) ? "#eee": "white";
            a++;
            $("#displaydetails").append('<tr style="padding:5px;margin:5px;background-color:'+clr+'"><td>'+registeruser.first_name+'-'+registeruser.last_name+'</td><td>'+registeruser.mobile_no+'</td><td>'+registeruser.emailid+'</td></tr>');
         });
      },
      error: function(err) {
         console.log(err);
      }
   });
}

$(document).ready(function() {
   $("#otp").on("change", function() {
      var otpentered = $("#otp").val();
      if (otpsend == otpentered) {
         document.getElementById("submit").disabled = false;
      } else {
         alert("OTP is not valid.Please enter the valid one or validate phone again to continue!");
         document.getElementById("submit").disabled = true;
      }
   });
   $("#validatephone").on("click", function() {
      $.ajax({
         type:'POST',
         url:phonevalidationurl,
         data:JSON.stringify({
            "mphone":$("#mphone").val()
         }),
         success: function(data) {
            $("#otpdiv").css("display", "");
            alert("OTP is send to the mobile, please enter to continue");
            console.log(data);
            otpsend = data;
         },
         error : function(err) {
            $("#otpdiv").css("display", "none");
            alert("Invalid mobile no.");
         }
      });
   });
   $("#submit").on("click", function() {
      if (validateform()) {
         $.ajax({
            type:'POST',
            url:posturl,
            data:JSON.stringify({
               "fname": $("#fname").val(),
               "lname": $("#lname").val(),
               "emailid":$("#emailid").val(),
               "mphone":$("#mphone").val(),
               "otp":$("#otp").val(),
               "uname":$("#uname").val(),
               "passwd":$("#passwd").val(),
               "cpasswd":$("#cpasswd").val()
            }),
            success: function(data) {
               alert("Data added successfully");
               console.log(data);
               getdata();
            }
         });
      }
   });
   getdata();
});
Till now, we have done AJAX call to the API created and posted the data as shown above.
The AJAX call to add the data to the table is as follows −
var posturl = "https://4rvwimysc1.execute-api.us-east-1.amazonaws.com/prod/adduser";
$(document).ready(function() {
   $("#submit").on("click", function() {
      if (validateform()) {
         $.ajax({
            type:'POST',
            url:posturl,
            data:JSON.stringify({
               "fname": $("#fname").val(),
               "lname": $("#lname").val(),
               "emailid":$("#emailid").val(),
               "mphone":$("#mphone").val(),
               "otp":$("#otp").val(),
               "uname":$("#uname").val(),
               "passwd":$("#passwd").val(),
               "cpasswd":$("#cpasswd").val()
            }),
            success: function(data) {
               alert("Data added successfully");
               console.log(data);
               getdata();
            }
         });
      }
   });
});
Note that to read the data, a function is called, whose code is given below −
function getdata() {
   var a = 0;
   $.ajax({
      type:'GET',
      url:posturl,
      success: function(data) {
         $("#displaydetails").html('');
         $("#displaydetails").css("display", "");
         console.log(data);
         $("#displaydetails").append('<tr style="padding:5px;margin:5px;background-color:gray;"><td>Name</td><td>Mobile No</td><td>EmailID</td></tr>');
         data.Items.forEach(function(registeruser) {
            var clr = (a%2 === 0) ? "#eee": "white";
            a++;
            $("#displaydetails").append('<tr style="padding:5px;margin:5px;background-color:'+clr+'"><td>'+registeruser.first_name+'-'+registeruser.last_name+'</td><td>'+registeruser.mobile_no+'</td><td>'+registeruser.emailid+'</td></tr>');
         });
      },
      error: function(err) {
         console.log(err);
      }
   });
}
When you click mobile number validate button, the following code is called and sends the mobile number −
var phonevalidationurl = "https://wnvt01y6nc.execute-api.us-east-1.amazonaws.com/prod/validate";
var otpsend = "";
$("#validatephone").on("click", function() {
   $.ajax({
      type:'POST',
      url:phonevalidationurl,
      data:JSON.stringify({
         "mphone":$("#mphone").val()
      }),
      success: function(data) {
         $("#otpdiv").css("display", "");
         alert("OTP is send to the mobile, please enter the OTP to continue");
         console.log(data);
         otpsend = data;
      },
      error : function(err) {
         $("#otpdiv").css("display", "none");
         alert("Invalid mobile no.");
      }
   });
});

// Validate otp
$("#otp").on("change", function() {
   var otpentered = $("#otp").val();
   if (otpsend == otpentered) {
      document.getElementById("submit").disabled = false;
   } else {
      alert("OTP is not valid.Please enter the valid one or validate phone again to continue!");
      document.getElementById("submit").disabled = true;
   }
}
