 Data Structure
 Networking
 RDBMS
RDBMS Operating System
 Java
Java MS Excel
 iOS
iOS HTML
HTML CSS
CSS Android
 Python
 C Programming
 C++
C++ C#
C# MongoDB
 MySQL
MySQL Javascript
 PHP
PHP
- Selected Reading
- UPSC IAS Exams Notes
- Developer's Best Practices
- Questions and Answers
- Effective Resume Writing
- HR Interview Questions
- Computer Glossary
- Who is Who
Attach a vertical scrollbar to a treeview using Tkinter
When creating GUI applications using Tkinter, you may often need to display tabular data in a tree-like format. The TreeView widget is an excellent choice for this, as it allows you to display data in a hierarchical format, similar to a file explorer or directory tree.
However, when the amount of data is large and cannot fit in the visible area of the treeview, it becomes necessary to add a scrollbar to enable users to navigate through the data. In this article, we'll explore how to attach a vertical scrollbar to a treeview using Tkinter.
Before deep diving into it, first let's learn how to create a Treeview widget in Tkinter.
Creating a Treeview
Before we can attach a scrollbar to a treeview, we need to first create the treeview widget itself.
Example
Here's some example code to create a simple treeview widget with two columns
import tkinter as tk
from tkinter import ttk

# create a tkinter window
window = tk.Tk()
window.geometry("720x250")
window.title("Adding a Vertical Scrollbar to a Treeview Widget")

# create a treeview
tree = ttk.Treeview(window, columns=('Name', 'Age'))

# define the columns
tree.heading('#0', text='ID')
tree.heading('Name', text='Name')
tree.heading('Age', text='Age')

# add some data to the treeview
tree.insert('', 'end', '1', text='1', values=('Ram', 25))
tree.insert('', 'end', '2', text='2', values=('Mohan', 30))
tree.insert('', 'end', '3', text='3', values=('Shayam', 35))

# pack the treeview
tree.pack()

# start the main loop
window.mainloop()
In the above code, we first create a tkinter window, then create a TreeView widget using ttk.Treeview(). We also specify the columns to be used in the treeview using the columns attribute.
Next, we define the headings for each column using the heading() method, and add some sample data to the treeview using the insert() method.
Finally, we pack the treeview widget and start the main loop.
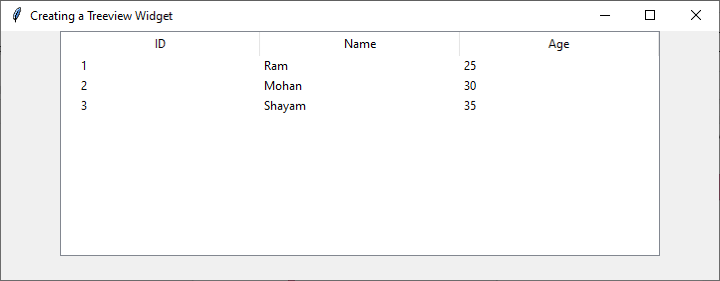
Output
When you run this code, you'll see a TreView widget with two columns as below

Adding a Vertical Scrollbar
Now that we have our treeview widget, we can add a vertical scrollbar to it. To do this, we'll create a Scrollbar widget and connect it to the treeview using the yscrollcommand option.
Example
Here's an example of how to add a vertical scrollbar to our existing treeview widget
import tkinter as tk
from tkinter import ttk

# create a tkinter window
window = tk.Tk()
window.geometry("720x250")
window.title("Adding a Vertical Scrollbar to a Treeview Widget")

# create a treeview
tree = ttk.Treeview(window, columns=('Name', 'Age'))

# define the columns
tree.heading('#0', text='ID')
tree.heading('Name', text='Name')
tree.heading('Age', text='Age')

# add some data to the treeview
tree.insert('', 'end', '1', text='1', values=('Ram', 25))
tree.insert('', 'end', '2', text='2', values=('Mohan', 30))
tree.insert('', 'end', '3', text='3', values=('Shayam', 35))
tree.insert('', 'end', '4', text='4', values=('Rahul', 29))
tree.insert('', 'end', '5', text='5', values=('Sohan', 36))
tree.insert('', 'end', '6', text='6', values=('Navya', 39))
tree.insert('', 'end', '7', text='7', values=('Divya', 35))
tree.insert('', 'end', '8', text='8', values=('Mohit', 32))
tree.insert('', 'end', '9', text='9', values=('Raj', 31))
tree.insert('', 'end', '10', text='10', values=('Gaurav', 34))
tree.insert('', 'end', '11', text='11', values=('Aarav', 29))
tree.insert('', 'end', '12', text='12', values=('Sahil', 25))
tree.insert('', 'end', '13', text='13', values=('Sakshi', 36))
tree.insert('', 'end', '14', text='14', values=('Puja', 32))
tree.insert('', 'end', '15', text='15', values=('Arnav', 28))

# add a vertical scrollbar
scrollbar = ttk.Scrollbar(window, orient='vertical', command=tree.yview)
tree.configure(yscrollcommand=scrollbar.set)
scrollbar.pack(side='right', fill='y')

# pack the treeview
tree.pack()

# start the main loop
window.mainloop()
In this code, we first create a Scrollbar widget with the orient attribute set to 'vertical', and specify the command to be called when the scrollbar is used using the command option.
Next, we connect the scrollbar to the treeview widget by setting the yscrollcommand attribute of the treeview to the ` set method of the scrollbar. This method is called whenever the scrollbar is moved, and it sets the view of the treeview accordingly.
Finally, we pack the scrollbar widget on the right side of the window and set its fill attribute to 'y' to ensure it takes up the full vertical space.
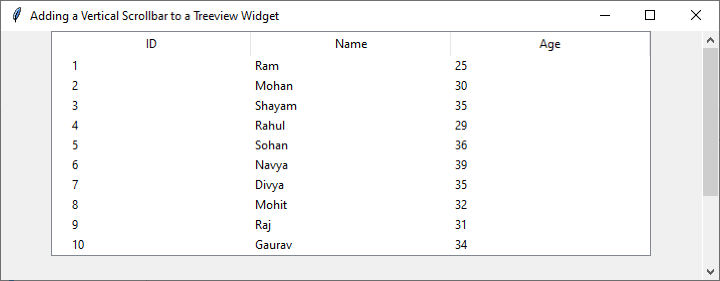
Now when we run the code, we'll see that a vertical scrollbar has been added to the treeview widget, allowing us to navigate through the data even when it extends beyond the visible area of the widget.
Output
When you run this code, you'll see a TreView widget having two columns, 15 entries and a vertical scrollbar as below

Conclusion
Attaching a vertical scrollbar to a treeview widget using Tkinter is a simple process that can greatly enhance the user experience when displaying large amounts of data. By following the steps outlined in this article, you can easily create a scrollbar that allows users to navigate through your data with ease.
Remember that you can also customize the appearance of the scrollbar to match the look and feel of your application using the ttk.Style object. With this knowledge, you can create intuitive and stylish GUI applications that meet the needs of your users.

