
Article Categories
- All Categories
-
 Data Structure
-
 Networking
-
 RDBMS
RDBMS
-
 Operating System
-
 Java
Java
-
 MS Excel
-
 iOS
iOS
-
 HTML
HTML
-
 CSS
CSS
-
 Android
-
 Python
-
 C Programming
-
 C++
C++
-
 C#
C#
-
 MongoDB
-
 MySQL
MySQL
-
 Javascript
-
 PHP
PHP
Android UI Layouts
Introduction
UI Layouts in android are used to define the user interface which is being displayed to the user when the mobile application is being used. It is generally used to display what the user will see on the screen. Every android application consists of one or more UI layouts present within it. Every activity which is being created within an android application consists of different types of UI layouts within it. UI Layouts are generally used as a parent component which holds all the widgets within the application whether it may be text view, image view or others. Layouts in Android are also referred to as View Groups which hold all the views present within it. In this article we will take a look at different types of UI Layouts present in Android.
Different types of UI Layouts in Android.
Constraint Layout.
Relative Layout.
Linear Layout.
Frame Layout.
Table Layout.
Absolute Layout.
We will be creating a simple project for the demonstration of each layout.
Constraint Layout
Constraint Layout is one of the mostly used UI Layouts within any android application. It is used to position and size widgets within the view group in a flexible way. We can specify the position of layout constraints for each child within this view group relative to the other view present.
Example for Constraint Layout
Navigate to aactivity_main.xml and add below code to it.
<?xml version="1.0" encoding="utf-8"?>
<androidx.constraintlayout.widget.ConstraintLayout xmlns:android="http://schemas.android.com/apk/res/android"
   xmlns:app="http://schemas.android.com/apk/res-auto"
   xmlns:tools="http://schemas.android.com/tools"
   android:layout_width="match_parent"
   android:layout_height="match_parent"
   tools:context=".MainActivity">

   <TextView
      android:id="@+id/textView"
      android:layout_width="match_parent"
      android:layout_height="wrap_content"
      android:text="Layouts in Android"
      android:textAlignment="center"
      android:textColor="#FF000000"
      android:textSize="20sp"
      android:textStyle="bold"
      app:layout_constraintBottom_toBottomOf="parent"
      app:layout_constraintTop_toTopOf="parent" />

   <TextView
      android:layout_width="match_parent"
      android:layout_height="wrap_content"
      android:id="@+id/idTVSubHeading"
      android:text="Constraint Layout in Android"
      android:textAlignment="center"
      android:textColor="#FF000000"
      app:layout_constraintBottom_toBottomOf="parent"
      app:layout_constraintTop_toBottomOf="@id/textView" />
</androidx.constraintlayout.widget.ConstraintLayout>
Output for Constraint Layout

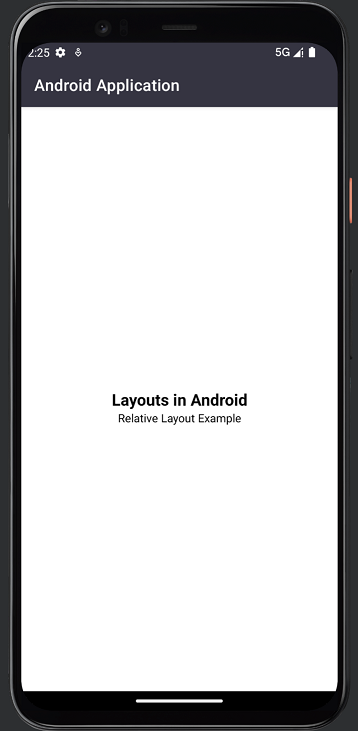
Relative Layout
A Relative layout is a layout where the position of the widgets present within this view group can be described in relation to each other or to the parent. With the help of this layout we can align the elements relative to each other with the help of ids of that specific widgets.
Example for Relative Layout
Navigate to aactivity_main.xml and add below code to it.
<?xml version="1.0" encoding="utf-8"?>
<RelativeLayout xmlns:android="http://schemas.android.com/apk/res/android"
   xmlns:tools="http://schemas.android.com/tools"
   android:layout_width="match_parent"
   android:layout_height="match_parent"
   tools:context=".MainActivity">

   <TextView
      android:id="@+id/idTVHeading"
      android:layout_width="match_parent"
      android:layout_height="wrap_content"
      android:layout_centerInParent="true"
      android:text="Layouts in Android"
      android:textAlignment="center"
      android:textColor="#FF000000"
      android:textSize="20sp"
      android:textStyle="bold" />

   <TextView
      android:layout_width="match_parent"
      android:layout_height="wrap_content"
      android:layout_below="@id/idTVHeading"
      android:text="Relative Layout Example"
      android:textAlignment="center"
      android:textColor="#FF000000" />

</RelativeLayout>
Output for Relative Layout
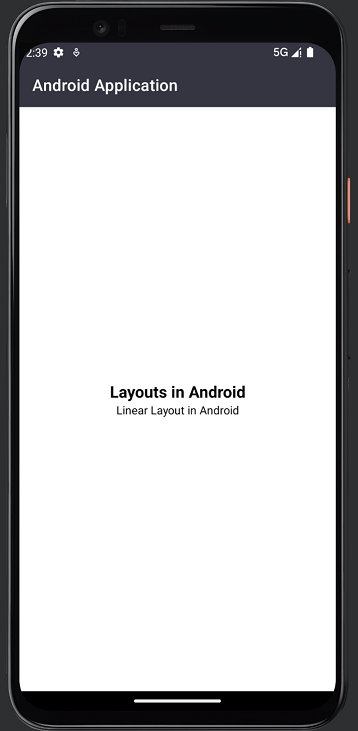
Linear Layout
A linear layout is a type of layout in which we can arrange the widgets or views displayed within this view either horizontally in a single row or vertically in a single column. For specifying the orientation of the linear layout whether we have to display it horizontally or vertically we can set it using the orientation parameter within our Linear layout.
Example for Linear Layout
Navigate to aactivity_main.xml and add below code to it.
<?xml version="1.0" encoding="utf-8"?>
<LinearLayout xmlns:android="http://schemas.android.com/apk/res/android"
   xmlns:app="http://schemas.android.com/apk/res-auto"
   xmlns:tools="http://schemas.android.com/tools"
   android:layout_width="match_parent"
   android:layout_height="match_parent"
   android:gravity="center"
   android:orientation="vertical"
   tools:context=".MainActivity">

   <TextView
      android:layout_width="match_parent"
      android:layout_height="wrap_content"
      android:text="Layouts in Android"
      android:textAlignment="center"
      android:textColor="#FF000000"
      android:textSize="20sp"
      android:textStyle="bold" />

   <TextView
      android:id="@+id/idTVSubHeading"
      android:layout_width="match_parent"
      android:layout_height="wrap_content"
      android:text="Vertical Linear Layout in Android"
      android:textAlignment="center"
      android:textColor="#FF000000" />

</LinearLayout>
Output for Linear Layout
Frame Layout
Frame Layout is a type of layout which is designed to block the specific area of the screen to display a single item. In most of the cases Frame Layout is used to hold a single child view. We can use multiple views within the frame layout and we can control their position within it by assigning the gravity to each widget which is being displayed within our Frame Layout.
Example for Frame Layout
Navigate to aactivity_main.xml and add below code to it.
<?xml version="1.0" encoding="utf-8"?>
<FrameLayout xmlns:android="http://schemas.android.com/apk/res/android"
   xmlns:app="http://schemas.android.com/apk/res-auto"
   xmlns:tools="http://schemas.android.com/tools"
   android:layout_width="match_parent"
   android:layout_height="wrap_content"
   android:layout_gravity="center"
   tools:context=".MainActivity">

   <TextView
      android:layout_width="match_parent"
      android:layout_height="wrap_content"
      android:text="Layouts in Android"
      android:textAlignment="center"
      android:textColor="#FF000000"
      android:textSize="20sp"
      android:textStyle="bold" />

   <TextView
      android:id="@+id/idTVSubHeading"
      android:layout_width="match_parent"
      android:layout_height="wrap_content"
      android:layout_marginTop="30dp"
      android:text="Frame Layout in Android"
      android:textAlignment="center"
      android:textColor="#FF000000" />

</FrameLayout>
Output for Frame Layout

Table Layout
Table Layout the name itself suggests that this layout is used to align the widgets within it in tabular format. This view group consists of table rows each of them defines the row which may contain any number of cells. Similarly the table layout also consists of table columns each of them defines the columns which may contain any number of columns. The column width with the table layout is defined by the widest cell in that column.
Example for Table Layout
Navigate to aactivity_main.xml and add below code to it.
<?xml version="1.0" encoding="utf-8"?>
<TableLayout xmlns:android="http://schemas.android.com/apk/res/android"
   xmlns:app="http://schemas.android.com/apk/res-auto"
   xmlns:tools="http://schemas.android.com/tools"
   android:layout_width="match_parent"
   android:layout_height="wrap_content"
   android:layout_gravity="center"
   tools:context=".MainActivity">

   <TableRow
      android:layout_width="match_parent"
      android:layout_height="wrap_content"
      android:layout_gravity="center"
      android:gravity="center">

      <TextView
         android:layout_width="match_parent"
         android:layout_height="wrap_content"
         android:layout_gravity="center"
         android:text="Layouts in Android"
         android:textAlignment="center"
         android:textColor="#FF000000"
         android:textSize="20sp"
         android:textStyle="bold" />

   </TableRow>

   <TableRow
      android:layout_width="match_parent"
      android:layout_height="wrap_content"
      android:layout_gravity="center"
      android:gravity="center">

      <TextView
         android:id="@+id/idTVSubHeading"
         android:layout_width="match_parent"
         android:layout_height="wrap_content"
         android:text="Table Layout in Android"
         android:textAlignment="center"
         android:textColor="#FF000000" />

   </TableRow>
</TableLayout>
Output for Table Layout

Conclusion
In the above tutorial we learn What is UI layout in Android and what are the different types of Android UI Layouts present within android application which we can use.

864 Views
