- Amazon RDS - Home
- Amazon RDS - Overview
- Amazon RDS - Environment
- Amazon RDS - Interfaces
- Amazon RDS - DB Instances
- Amazon RDS - DB Storages
- Amazon RDS - MS SQL features
- Amazon RDS - MS SQL creating DB
- Amazon RDS - MS SQL Connecting to DB
- Amazon RDS - MS SQL DB Export Import
- Amazon RDS - MS SQL DB with SSL
- Amazon RDS - MS SQL DBA Tasks
- Amazon RDS - Oracle Features
- Amazon RDS - Oracle Creating DB
- Amazon RDS - Oracle Connecting to DB
- Amazon RDS - Oracle DB Data Import
- Amazon RDS - Oracle DBA Tasks
- Amazon RDS - MariaDB Features
- Amazon RDS - MariaDB Creating DB
- Amazon RDS - MariaDB Connecting to DB
- Amazon RDS - MariaDB Data Import
- Amazon RDS - PostgreSQL Features
- Amazon RDS - PostgreSQL creating DB
- Amazon RDS - PostgreSQL Connecting to DB
- Amazon RDS - PostgreSQL Data Import
- Amazon RDS - MySQL Features
- Amazon RDS - MySQL Creating DB
- Amazon RDS - MySQL Connecting to DB
- Amazon RDS - MySQL DB Export Import
- Amazon RDS - MySQL DBA Tasks
- Amazon RDS - Multi-AZ Deployments
- Amazon RDS - DB Snapshots
- Amazon RDS - DB Monitoring
- Amazon RDS - Event Notifications
- Amazon RDS - DB Access Control
Amazon RDS - MySQL DB Export Import
Amazon RDS MySQL provides easy ways of importing data into the DB and exporting data from the DB. After we are able to successfully connect to the MySQL database we can use CLI tools to run the import and export commands to get the data from other sources in and out of the RDS database. Below are the scenarios to consider when deciding on the approach to the import the data into the Amazon RDS - MySQL database.
From an Existing MySQL Database
An existing MySQL DB can be present on premise or in another EC2 instance. Diagrammatically what we do is shown below.
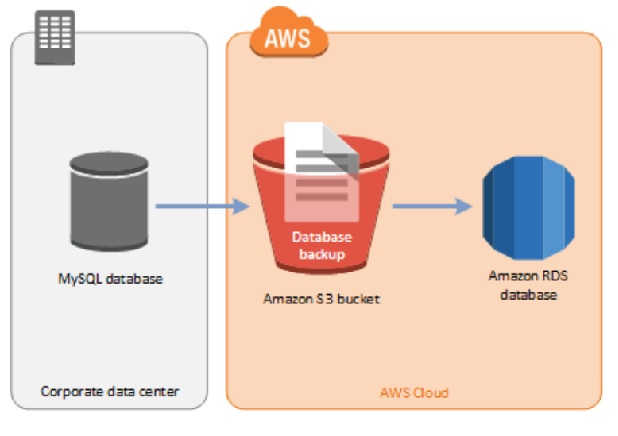
Creating a backup from On-Premise DB
As a first step we create a backup of the on-premise database using the below command.
mysqldump -u user -p[user_password] [database_name] > backupfile.sql
A file with name backupfile.sql is created which contains the table structure along with the data to be used.
Storing the backup file in S3.
Upload the backup file created above to a pre-decided Amazon S3 bucket in the same region where the target RDS MySQL DB database is present. You can follow this link to learn about how to upload.
Import data from Amazon S3 to RDS MySQL database
You can use the following Amazon CLI command to import the data from S3 to MySQL DB.
aws rds restore-db-instance-from-s3 \
--allocated-storage 125 \
--db-instance-identifier tddbidentifier \
--db-instance-class db.m4.small \
--engine mysql \
--master-user-name masterawsuser \
--master-user-password masteruserpassword \
--s3-bucket-name tpbucket \
--s3-ingestion-role-arn arn:aws:iam::account-number:role/rolename \
--s3-prefix bucketprefix \
--source-engine mysql \
--source-engine-version 5.6.27
From Another RDS-MySQL Instance
There may be scenarios when you want data from an existing RDS MYSQL DB to be taken into another RDS MYSQL DB. For example, to cerate a Disaster recovery DB or create a DB only for business reporting etc. In such scenario, we create read replicas which are a copy of their source DB and then promote that read replica to a new DB instance. They are used to prevent direct heavy read from the original source DB when we want to copy the data.
create a read-replica
aws rds create-db-instance-read-replica \
    --db-instance-identifier myreadreplica \
    --source-db-instance-identifier mydbinstance
Promote a Read replica to DB Instance
Now as we have the replica, we can promote it to a standalone DB instance. This will serve our end need of importing data from o RDS Mysql DB to a new one. The following command is used to complete the promotion of a read replica to a db instance.
aws rds create-db-instance-read-replica \
    --db-instance-identifier readreplica_name \
    --region target_region_name
    --db-subnet-group-name subnet_name
    --source-db-instance-identifier arn:aws:rds:region_name:11323467889012:db:mysql_instance1
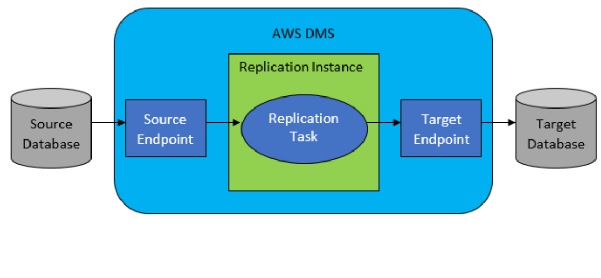
From Any Database
In order to import data from any other database to Amazon RDS MySQL, we have to use the amazon Data Migration Service also called Amazon DMS. It uses Schema conversion tool to translate the existing data base to a the MYSQL platform. The below diagram explains the overall process. Also it works on the similar principle of replication as described in the previous section.
Exporting Data from MySQL
Exporting of data from Amazon RDS Mysql DB is a straight forwards process where it works on the same replication principle we have seen above. Below are the steps to carry out the export process.
- Start the instance of MySQL running external to Amazon RDS.
- Designate the MySQL DB instance to be the replication source.
- Use mysqldump to transfer the database from the Amazon RDS instance to the instance external to Amazon RDS.
Below is the code for the mysqldum command
mysqldump -h RDS instance endpoint \
    -u user \
    -p password \
    --port=3306 \
    --single-transaction \
    --routines \
    --triggers \
    --databases  database database2 \
    --compress  \
    --compact | mysql \
        -h MySQL host \
        -u master user \
        -p password \
        --port 3306
