
- Zend Framework Tutorial
- Zend Framework - Home
- Zend Framework - Introduction
- Zend Framework - Installation
- Skeleton Application
- Zend Framework - MVC Architecture
- Zend Framework - Concepts
- Zend Framework - Service Manager
- Zend Framework - Event Manager
- Zend Framework - Module System
- Application Structure
- Zend Framework - Creating Module
- Zend Framework - Controllers
- Zend Framework - Routing
- Zend Framework - View Layer
- Zend Framework - Layout
- Models & Database
- Different Databases
- Forms & Validation
- Zend Framework - File Uploading
- Zend Framework - Ajax
- Cookie Management
- Session Management
- Zend Framework - Authentication
- Email Management
- Zend Framework - Unit Testing
- Zend Framework - Error Handling
- Zend Framework - Working Example
- Zend Framework Useful Resources
- Zend Framework - Quick Guide
- Zend Framework - Useful Resources
- Zend Framework - Discussion
Zend Framework - Working Example
In this chapter, we will learn how to create a complete MVC based Employee Application in Zend Framework. Follow the steps given below.
Step 1: Module.php
First, we should create an Employee module inside the – myapp/module/Employee/src/ directory and then implement the ConfigProviderInterface interface.
The complete code for the Module class is as follows −
<?php
namespace Employee;
use Zend\ModuleManager\Feature\ConfigProviderInterface;
class Module implements ConfigProviderInterface {
   public function getConfig() {
      return include __DIR__ . '/../config/module.config.php';
   }
}
Step 2: composer.json
Configure the Tutorial module in composer.json under the autoload section by using the following code.
"autoload": {
   "psr-4": {
      "Application\\": "module/Application/src/",
      "Tutorial\\": "module/Tutorial/src/",
      "Employee\\": "module/Employee/src/"
   }
}
Now, update the application using a composer update command.
composer update
The Composer command will do the necessary changes to the application and show the logs as shown in the command prompt below.
Loading composer repositories with package information
Updating dependencies (including require-dev)
   - Removing zendframework/zend-component-installer (0.3.0)
   - Installing zendframework/zend-component-installer (0.3.1)
   Downloading: 100%

   - Removing zendframework/zend-stdlib (3.0.1)
   - Installing zendframework/zend-stdlib (3.1.0)
   Loading from cache

   - Removing zendframework/zend-eventmanager (3.0.1)
   - Installing zendframework/zend-eventmanager (3.1.0)
   Downloading: 100%

   - Removing zendframework/zend-view (2.8.0)
   - Installing zendframework/zend-view (2.8.1)
   Loading from cache

   - Removing zendframework/zend-servicemanager (3.1.0)
   - Installing zendframework/zend-servicemanager (3.2.0)
   Downloading: 100%

   - Removing zendframework/zend-escaper (2.5.1)
   - Installing zendframework/zend-escaper (2.5.2)
   Loading from cache

   - Removing zendframework/zend-http (2.5.4)
   - Installing zendframework/zend-http (2.5.5)
   Loading from cache

   - Removing zendframework/zend-mvc (3.0.1)
   - Installing zendframework/zend-mvc (3.0.4)
   Downloading: 100%

   - Removing phpunit/phpunit (5.7.4)
   - Installing phpunit/phpunit (5.7.5)
   Downloading: 100%

Writing lock file
Generating autoload files
Step 3: module.config.php for the Employee Module
Create the module configuration file, “module.config.php” under the myapp/module/Employee/config with the following code.
<?php
namespace Employee;
use Zend\ServiceManager\Factory\InvokableFactory;
use Zend\Router\Http\Segment;
return [
   'controllers' => [
      'factories' => [
         Controller\EmployeeController::class => InvokableFactory::class,
      ],
   ],
   'view_manager' => [
      'template_path_stack' => ['employee' => __DIR__ . '/../view',],
   ],
];
Now, configure the Employee module in the application level configuration file – myapp/config/modules.config.php.
return ['Zend\Router', 'Zend\Validator', 'Application', 'Tutorial', 'Employee'];
Step 4: EmployeeController
Create a new PHP class, EmployeeController by extending the AbstractActionController and place it at the myapp/module/Employee/src/Controller directory.
The complete code listing is as follows −
<?php
namespace Employee\Controller;
use Zend\Mvc\Controller\AbstractActionController;
use Zend\View\Model\ViewModel;
class EmployeeController extends AbstractActionController {
   public function indexAction() {
      return new ViewModel();
   }
}
Step 5: Router Configuration
Let us add a segment route in our Employee module. Update the employee module configuration file, module.config.php available at myapp/module/Employee/config.
<?php
namespace Employee;
use Zend\ServiceManager\Factory\InvokableFactory;
use Zend\Router\Http\Segment;
return [
   'controllers' => [
      'factories' => [
         Controller\EmployeeController::class => InvokableFactory::class,
      ],
   ],
   'router' => [
      'routes' => [
         'employee' => [
            'type' => Segment::class,
            'options' => [
               'route' => '/employee[/:action[/:id]]',
               'constraints' => [
                  'action' => '[a-zA-Z][a-zA-Z0-9_-]*',
                  'id' => '[0-9]+',
               ],
               'defaults' => [
                  'controller' => Controller\EmployeeController::class,
                  'action' => 'index',
               ],
            ],
         ],
      ],
   ],
   'view_manager' => [
      'template_path_stack' => [
         'employee' => __DIR__ . '/../view',
      ],
   ],
];
We have successfully added the routing for our Employee module. The next step is to create a view script for the Employee application.
Step 6: Create ViewModel
Create a file called as “index.phtml” under the myapp/module/Employee/view/employee/employee directory.
Add the following changes in the file −
<div class = "row content">
   <h3>This is my first Zend application</h3>
</div>
Move to “EmployeeController.php” file and edit the following changes,

<?php
namespace Employee\Controller;
use Zend\Mvc\Controller\AbstractActionController;
use Zend\View\Model\ViewModel;
class EmployeeController extends AbstractActionController {
   public function indexAction() {
      return new ViewModel();
   }
}
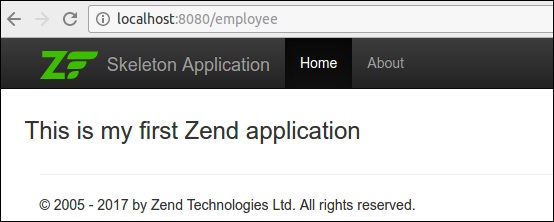
Finally, we have successfully completed the Employee module. we can access it using the following url − http://localhost:8080/employee.
Result
In the next step, we will perform add, edit and delete data operations in the employee application. To perform these operations, we should first create a database model. It is described in the next step.
Step 7: Create a Model
Let us create a model, Employee in our module src directory. Generally, models are grouped under the Model folder (myapp/module/Employee/src/Model/Employee.php)
<?php
namespace Employee\Model;
class Employee {
   public $id;
   public $emp_name;
   public $emp_job;
}
Step 8: MySQL Table
Create a database named as tutorials in the local MYSQL server using the following command −
create database tutorials;
Let us create a table named as employee in the database using following SQL command −
use tutorials;
CREATE TABLE employee (
   id int(11) NOT NULL auto_increment,
   emp_name varchar(100) NOT NULL,
   emp_job varchar(100) NOT NULL,
   PRIMARY KEY (id)
);
Insert data into the employee table using the following query −
INSERT INTO employee (emp_name, emp_job) VALUES ('Adam',  'Tutor');
INSERT INTO employee (emp_name, emp_job) VALUES ('Bruce',  'Programmer');
INSERT INTO employee (emp_name, emp_job) VALUES ('David',  'Designer');
Step 9: Update the Database Configuration
Update the Global Configuration file, myapp/config/autoload/global.php with the necessary database drive information.
return [
   'db' => [
      'driver' => 'Pdo',
      'dsn' => 'mysql:dbname = tutorials;host=localhost',
      'driver_options' => [PDO::MYSQL_ATTR_INIT_COMMAND => 'SET NAMES \'UTF8\''],
   ],
];
Now, Update the database credentials in the local configuration file – myapp/config/autoload/local.php. In this way, we can separate local and live database connection credentials.
<?php
return array(
   'db' => array('username' => '<user_name>', 'password' => '<password>',),
);
Step 10: Implement exchangeArray
Implement exchangeArray function in Employee model.
<?php
namespace Employee\Model;
class Employee {
   public $id;
   public $emp_name;
   public $emp_job;
   public function exchangeArray($data) {
      $this->id = (!empty($data['id'])) ? $data['id'] : null;
      $this->emp_name = (!empty($data['emp_name'])) ? $data['emp_name'] : null;
      $this->emp_job = (!empty($data['emp_job'])) ? $data['emp_job'] : null;
   }
}
Step 11: Use TableGateway to fetch the Employee Data
Create the class, EmployeeTable in the Model folder itself. It is defined in the following code block.
<?php
namespace Employee\Model;
use Zend\Db\TableGateway\TableGatewayInterface;
class EmployeeTable {
   protected $tableGateway;
   public function __construct(TableGatewayInterface $tableGateway) {
      $this->tableGateway = $tableGateway;
   }
   public function fetchAll() {
      $resultSet = $this->tableGateway->select();
      return $resultSet;
   }
}
Step 12: Configure EmployeeTable Class
Update employee service in Module.php using getServiceConfig() method
<?php
namespace Employee;
use Zend\Db\Adapter\AdapterInterface;
use Zend\Db\ResultSet\ResultSet;
use Zend\Db\TableGateway\TableGateway;
use Zend\ModuleManager\Feature\ConfigProviderInterface;

class Module implements ConfigProviderInterface {
   public function getConfig() {
      return include __DIR__ . '/../config/module.config.php';
   }
   public function getServiceConfig() {
      return [
         'factories' => [
            Model\EmployeeTable::class => function (    $container) {
               $tableGateway = $container>get( Model\EmployeeTableGateway::class);
               $table = new Model\EmployeeTable($tableGateway);
               return $table;
            },
            Model\EmployeeTableGateway::class => function ($container) {
               $dbAdapter = $container->get(AdapterInterface::class);
               $resultSetPrototype = new ResultSet();
               $resultSetPrototype->setArrayObjectPrototype(new Model\Employee());
               return new TableGateway('employee', $dbAdapter, null, $resultSetPrototype);
            },
         ],
      ];
   }
}
Step 13: Add Employee Service in Controller
Update the controller section of the Employee Module Configuration in − myapp/module/config/module.config.php as shown below.
'controllers' => [
   'factories' => [
      Controller\EmployeeController::class => function($container) {
         return new Controller\EmployeeController(
            $container->get(Model\EmployeeTable::class)
         );
      },
   ],
]
Step 14: Add Constructor for EmployeeController
Add the constructor with EmployeeTable as the argument and edit the following changes.
<?php
namespace Employee\Controller;
use Zend\Mvc\Controller\AbstractActionController;
use Zend\View\Model\ViewModel;
use Employee\Model\Employee;
use Employee\Model\EmployeeTable;

class EmployeeController extends AbstractActionController {
   private $table;
   public function __construct(EmployeeTable $table) {
      $this->table = $table;
   }
   public function indexAction() {
      $view = new ViewModel([
         'data' => $this->table->fetchAll(),
      ]);
      return $view;
   }
}
Step 15: Display Employee Information in the view script “index.phtml”
Move to the file − index.phtml and make the following changes −
<?php
$title = 'Employee application';
$this->headTitle($title);
?>

<table class="table">
   <tr>
      <th>Employee Name</th>
      <th>Employee Job</th>
      <th>Edit/Delete operations</th>
   </tr>
   <?php foreach ($data as $empdata) : ?>
   <tr>
      <td><?php echo $this->escapeHtml($empdata->emp_name);?></td>
      <td><?php echo $this->escapeHtml($empdata->emp_job);?></td>
      <td>
         <a href="<?php echo $this->url('employee',
            array('action'=>'edit', 'id' =>$empdata->id));?>">Edit</a>
         <a href="<?php echo $this->url('employee',
            array('action'=>'delete', 'id' => $empdata->id));?>">Delete</a>
      </td>
   </tr>
   <?php endforeach; ?>
</table>
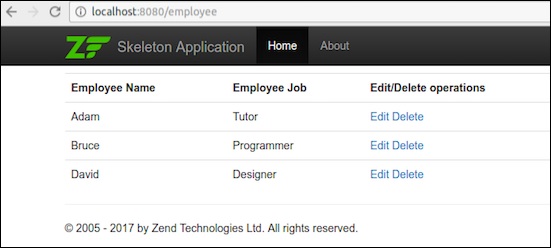
Now we have successfully created a database model and can fetch the records within the application.
Request the application using the url − http://localhost:8080/employee.
Result
The next step explains about the insert, edit and delete data operations in the employee module.
Step 16: Create an Employee Form
Create a file called EmployeeForm.php in myapp/module/Employee/src/Form directory. It is described in the code block below.
<?php
namespace Employee\Form;
use Zend\Form\Form;

class EmployeeForm extends Form {
   public function __construct($name = null) {
      /
      / we want to ignore the name passed
      parent::__construct('employee');
      $this->add(array(
         'name' => 'id',
         'type' => 'Hidden',
      ));
      $this->add(array(
         'name' => 'emp_name',
         'type' => 'Text',
         'options' => array(
            'label' => 'Name',
         ),
      ));
      $this->add(array(
         'name' => 'emp_job',
         'type' => 'Text',
         'options' => array(
            'label' => 'Job',
         ),
      ));
      $this->add(array(
         'name' => 'submit',
         'type' => 'Submit',
         'attributes' => array(
            'value' => 'Go',
            'id' => 'submitbutton',
         ),
      ));
   }
}
Step 17: Update the Employee Model
Update the employee model and implement the InputFilterAwareInterface. Move to the directory myapp/module/Employee/src/Employee/Model and add the following changes in the Employee.phpfile.
<?php
namespace Employee\Model;

// Add these import statements
use Zend\InputFilter\InputFilter;
use Zend\InputFilter\InputFilterAwareInterface;
use Zend\InputFilter\InputFilterInterface;

class Employee implements InputFilterAwareInterface {
   public $id;
   public $emp_name;
   public $emp_job;
   protected $inputFilter;
   public function exchangeArray($data) {
      $this->id = (isset($data['id'])) ? $data['id'] : null;
      $this->emp_name = (isset($data['emp_name'])) ? $data['emp_name'] : null;
      $this->emp_job = (isset($data['emp_job']))  ? $data['emp_job'] : null;
   }

   // Add content to these methods:
   public function setInputFilter(InputFilterInterface $inputFilter) {
      throw new \Exception("Not used");
   }
   public function getInputFilter() {
      if (!$this->inputFilter) {
         $inputFilter = new InputFilter();
         $inputFilter->add(array(
            'name' => 'id',
            'required' => true,
            'filters' => array(
               array('name' => 'Int'),
            ),
         ));
         $inputFilter->add(array(
            'name' => 'emp_name',
            'required' => true,
            'filters' => array(
               array('name' => 'StripTags'),
               array('name' => 'StringTrim'),
            ),
            'validators' => array(
               array('name' => 'StringLength',
                        'options' => array(
                           'encoding' => 'UTF-8',
                           'min' => 1,
                           'max' => 50,
                        ),
                    ),
                ),
            ));
         $inputFilter->add(array(
            'name' => 'emp_job',
            'required' => true,
            'filters' => array(
               array('name' => 'StripTags'),
               array('name' => 'StringTrim'),
            ),
            'validators' => array(
               array('name' => 'StringLength',
                  'options' => array(
                     'encoding' => 'UTF-8',
                     'min' => 1,
                     'max' => 50,
                  ),
                  ),
               ),
         ));
         $this->inputFilter = $inputFilter;
      }
      return $this->inputFilter;
   }
}
Step 18: Add addAction in the Employee Controller
Add the following changes in the EmployeeController class.
<?php
use Zend\Mvc\Controller\AbstractActionController;
use Zend\View\Model\ViewModel;
use Employee\Model\Employee;
use Employee\Model\EmployeeTable;
use Employee\Form\EmployeeForm;

public function addAction() {
   $form = new EmployeeForm();
   $form->get('submit')->setValue('Add');
   $request = $this->getRequest();

   if ($request->isPost()) {
      $employee = new Employee();
      $form->setInputFilter($employee->getInputFilter());
      $form->setData($request->getPost());

      if ($form->isValid()) {
         $employee->exchangeArray($form->getData());
         $this->table->saveEmployee($employee);

         // Redirect to list of employees
         return $this->redirect()->toRoute('employee');
      }
   }
   return array('form' => $form);
}
Step 19: Add save functionality in the EmployeeTable class
Add the following two functions in the EmployeeTable class – myapp/module/Employee/src/Model/EmployeeTable.php
public function getEmployee($id) {
   $id  = (int) $id;
   $rowset = $this->tableGateway->select(array('id' => $id));
   $row = $rowset->current();
   if (!$row) {
      throw new \Exception("Could not find row $id");
   }
   return $row;
}
public function saveEmployee(Employee $employee) {
   $data = array (
      'emp_name' => $employee->emp_name,
      'emp_job'  => $employee->emp_job,
   );
   $id = (int) $employee->id;
   if ($id == 0) {
      $this->tableGateway->insert($data);
   } else {
      if ($this->getEmployee($id)) {
         $this->tableGateway->update($data, array('id' => $id));
      } else {
         throw new \Exception('Employee id does not exist');
      }
   }
}
Step 20: Create View script for AddAction method, Add.phtml
Add the following changes in the “Add.phtml” file in the − myapp/module/view/employee/employee.
<?php
   $title = 'Add new employee';
   $this->headTitle($title);
?>
<h1><?php echo $this->escapeHtml($title); ?></h1>

<?php
   $form->setAttribute('action', $this->url('employee', array('action' => 'add')));
   $form->prepare();
   echo $this->form()->openTag($form);
   echo $this->formHidden($form->get('id'));
   echo $this->formRow($form->get('emp_name'))."<br>";
   echo $this->formRow($form->get('emp_job'))."<br>";
   echo $this->formSubmit($form->get('submit'));
   echo $this->form()->closeTag();
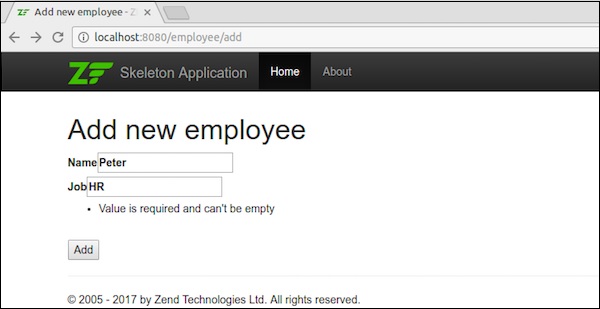
Request the application using the url, http://localhost:8080/employee/add
Result
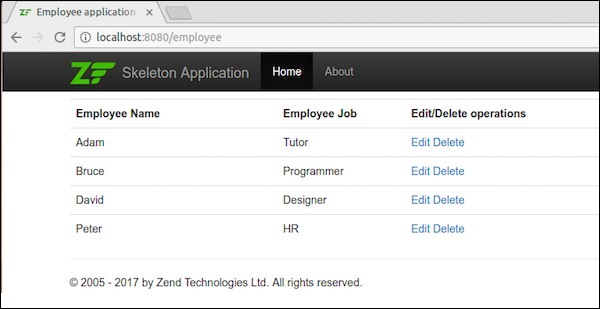
Once the data has been added, it will redirect to the home page.
Step 21: Edit Employee Records
Let us perform the editing data operations in the Employee module. Update the following changes in the Employeecontroller.php.
public function editAction() {
   $id = (int) $this->params()->fromRoute('id', 0);
   if (!$id) {
      return $this->redirect()->toRoute('employee', array(
         'action' => 'add'
      ));
   }
   try {
      $employee = $this->table->getEmployee($id);
   } catch (\Exception $ex) {
      return $this->redirect()->toRoute('employee', array(
         'action' => 'index'
      ));
   }
   $form = new EmployeeForm();
   $form->bind($employee);
   $form->get('submit')->setAttribute('value', 'Edit');
   $request = $this->getRequest();

   if ($request->isPost()) {
      $form->setInputFilter($employee->getInputFilter());
      $form->setData($request->getPost());
      if ($form->isValid()) {
         $this->table->saveEmployee($employee);

         // Redirect to list of employees
         return $this->redirect()->toRoute('employee');
      }
   }
   return array('id' => $id, 'form' => $form,);
}
Here, we look for the id, which is in the matched route and then load the employee details for the editing operation.
Step 22: Employee.php
Now add the following changes in the “Employee.php” file, which resides in the − myapp/module/Employee/src/Employee/Model/ directory.
public function getArrayCopy() {
   return get_object_vars($this);
}
Here, the Zend\Stdlib\Hydrator\ArraySerializable expects to find two methods in the model: getArrayCopy() and exchangeArray().
In which, the exchangeArray() is used for iteration. This function is used for binding the data from the employee table.
Now, we need to create a view script for editAction().
Step 23: Create Edit.phtml
Create a view script file in the module/Employee/view/employee/employee/edit.phtml
<?php
   $title = 'Edit employee records';
   $this->headTitle($title);
?>
<h1><?php echo $this->escapeHtml($title); ?></h1>

<?php
$form = $this->form;
$form->setAttribute('action', $this->url(
   'employee',
   array('action' => 'edit', 'id' => $this->id,)
));
$form->prepare();
echo $this->form()->openTag($form);
echo $this->formHidden($form->get('id'));
echo $this->formRow($form->get('emp_name'))."<br>";
echo $this->formRow($form->get('emp_job'))."<br>";
echo $this->formSubmit($form->get('submit'));
echo $this->form()->closeTag();
Editing the employee details is shown in the following screenshot.
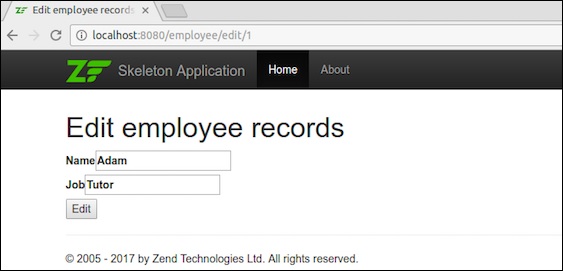
Once the data has been edited, it will redirect to the home page.
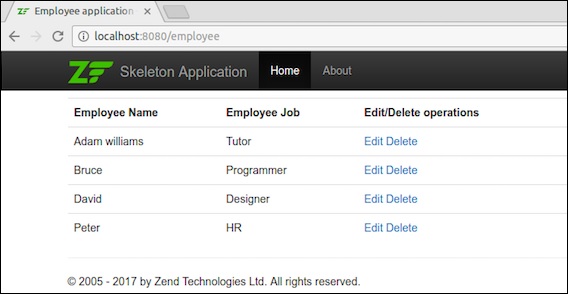
Step 24: Add deleteEmployee method
Add the deleteEmployee method in the EmployeeTable class – myapp/module/Employee/src/Model/EmployeeTable.php
public function deleteEmployee($id) {
   $this->tableGateway->delete(['id' => (int) $id]);
}
Step 25: Delete the Employee Records
Let us now perform the deleting data operations in the Employee module. Add the following method, deleteAction in the EmployeeController class.
public function deleteAction() {
   $id = (int) $this->params()->fromRoute('id', 0);
   if (!$id) {
      return $this->redirect()->toRoute('employee');
   }
   $request = $this->getRequest();
   if ($request->isPost()) {
      $del = $request->getPost('del', 'No');
      if ($del == 'Yes') {
         $id = (int) $request->getPost('id');
         $this->table->deleteEmployee($id);
      }
      return $this->redirect()->toRoute('employee');
   }
   return array(
      'id' => $id,
      'employee' => $this->table->getEmployee($id)
   );
}
Here, the deleteEmployee() method deletes the employee by his id and redirects to the employees list page (home page).
Let us now create a corresponding view scripts for the deleteAction() method.
Step 26: Create a View Script
Create a file named delete.phtml in the − myapp/module/Employee/view/employee/employee/delete.phtml and add the following code in it.
<?php
   $title = 'Delete an employee record';
   $this->headTitle($title);
?>
<h1><?php echo $this->escapeHtml($title); ?></h1>

'<?php echo $this->escapeHtml($employee->emp_name); ?>' by
'<?php echo $this->escapeHtml($employee->emp_job); ?&'?
<?php
   $url = $this->url('employee', array('action' => 'delete', 'id' => $this->id,));
?>

<form action ="<?php echo $url; ?>" method = "post">
   <div>
      <input type = "hidden" name = "id" value = "<?php echo (int) $employee->id; ?>" />
      <input type = "submit" name = "del" value = "Yes" />
      <input type = "submit" name = "del" value = "No" />
   </div>
</form>
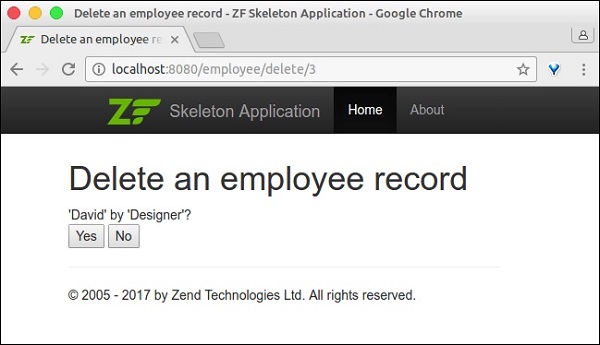
Now, delete any employee using the edit link in the home page and the result will be as shown in the following screenshot.
Result
We have successfully completed the Employee module by implementing all necessary features.
Conclusion
In the current competitive environment, Zend framework is placed at the top spot by the developer. It provides abstractions to any program or any type of an application in the PHP language. It is a matured framework and supports modern PHP language features. It is fun, professional, evolving and keeping pace with the current technology.
To Continue Learning Please Login