
- Servlets Tutorial
- Servlets - Home
- Servlets - Overview
- Servlets - Environment Setup
- Servlets - Life Cycle
- Servlets - Examples
- Servlets - Form Data
- Servlets - Client Request
- Servlets - Server Response
- Servlets - Http Codes
- Servlets - Writing Filters
- Servlets - Exceptions
- Servlets - Cookies Handling
- Servlets - Session Tracking
- Servlets - Database Access
- Servlets - File Uploading
- Servlets - Handling Date
- Servlets - Page Redirect
- Servlets - Hits Counter
- Servlets - Auto Refresh
- Servlets - Sending Email
- Servlets - Packaging
- Servlets - Debugging
- Servlets - Internationalization
- Servlets - Annotations
- Servlets Useful Resources
- Servlets - Questions and Answers
- Servlets - Quick Guide
- Servlets - Useful Resources
- Servlets - Discussion
Servlets - Quick Guide
Servlets - Overview
What are Servlets?
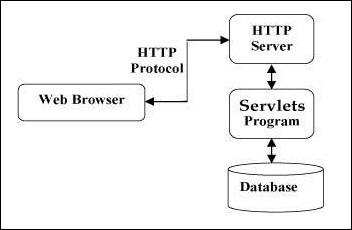
Java Servlets are programs that run on a Web or Application server and act as a middle layer between a requests coming from a Web browser or other HTTP client and databases or applications on the HTTP server.
Using Servlets, you can collect input from users through web page forms, present records from a database or another source, and create web pages dynamically.
Java Servlets often serve the same purpose as programs implemented using the Common Gateway Interface (CGI). But Servlets offer several advantages in comparison with the CGI.
Performance is significantly better.
Servlets execute within the address space of a Web server. It is not necessary to create a separate process to handle each client request.
Servlets are platform-independent because they are written in Java.
Java security manager on the server enforces a set of restrictions to protect the resources on a server machine. So servlets are trusted.
The full functionality of the Java class libraries is available to a servlet. It can communicate with applets, databases, or other software via the sockets and RMI mechanisms that you have seen already.
Servlets Architecture
The following diagram shows the position of Servlets in a Web Application.
Servlets Tasks
Servlets perform the following major tasks −
Read the explicit data sent by the clients (browsers). This includes an HTML form on a Web page or it could also come from an applet or a custom HTTP client program.
Read the implicit HTTP request data sent by the clients (browsers). This includes cookies, media types and compression schemes the browser understands, and so forth.
Process the data and generate the results. This process may require talking to a database, executing an RMI or CORBA call, invoking a Web service, or computing the response directly.
Send the explicit data (i.e., the document) to the clients (browsers). This document can be sent in a variety of formats, including text (HTML or XML), binary (GIF images), Excel, etc.
Send the implicit HTTP response to the clients (browsers). This includes telling the browsers or other clients what type of document is being returned (e.g., HTML), setting cookies and caching parameters, and other such tasks.
Servlets Packages
Java Servlets are Java classes run by a web server that has an interpreter that supports the Java Servlet specification.
Servlets can be created using the javax.servlet and javax.servlet.http packages, which are a standard part of the Java's enterprise edition, an expanded version of the Java class library that supports large-scale development projects.
These classes implement the Java Servlet and JSP specifications. At the time of writing this tutorial, the versions are Java Servlet 2.5 and JSP 2.1.
Java servlets have been created and compiled just like any other Java class. After you install the servlet packages and add them to your computer's Classpath, you can compile servlets with the JDK's Java compiler or any other current compiler.
What is Next?
I would take you step by step to set up your environment to start with Servlets. So fasten your belt for a nice drive with Servlets. I'm sure you are going to enjoy this tutorial very much.
Servlets - Environment Setup
A development environment is where you would develop your Servlet, test them and finally run them.
Like any other Java program, you need to compile a servlet by using the Java compiler javac and after compilation the servlet application, it would be deployed in a configured environment to test and run..
This development environment setup involves the following steps −
Setting up Java Development Kit
This step involves downloading an implementation of the Java Software Development Kit (SDK) and setting up PATH environment variable appropriately.
You can download SDK from Oracle's Java site − Java SE Downloads.
Once you download your Java implementation, follow the given instructions to install and configure the setup. Finally set PATH and JAVA_HOME environment variables to refer to the directory that contains java and javac, typically java_install_dir/bin and java_install_dir respectively.
If you are running Windows and installed the SDK in C:\jdk1.8.0_65, you would put the following line in your C:\autoexec.bat file.
set PATH = C:\jdk1.8.0_65\bin;%PATH%
set JAVA_HOME = C:\jdk1.8.0_65
Alternatively, on Windows NT/2000/XP, you could also right-click on My Computer, select Properties, then Advanced, then Environment Variables. Then, you would update the PATH value and press the OK button.
On Unix (Solaris, Linux, etc.), if the SDK is installed in /usr/local/jdk1.8.0_65 and you use the C shell, you would put the following into your .cshrc file.
setenv PATH /usr/local/jdk1.8.0_65/bin:$PATH
setenv JAVA_HOME /usr/local/jdk1.8.0_65
Alternatively, if you use an Integrated Development Environment (IDE) like Borland JBuilder, Eclipse, IntelliJ IDEA, or Sun ONE Studio, compile and run a simple program to confirm that the IDE knows where you installed Java.
Setting up Web Server − Tomcat
A number of Web Servers that support servlets are available in the market. Some web servers are freely downloadable and Tomcat is one of them.
Apache Tomcat is an open source software implementation of the Java Servlet and Java Server Pages technologies and can act as a standalone server for testing servlets and can be integrated with the Apache Web Server. Here are the steps to setup Tomcat on your machine −
Download latest version of Tomcat from https://tomcat.apache.org/.
Once you downloaded the installation, unpack the binary distribution into a convenient location. For example in C:\apache-tomcat-8.0.28 on windows, or /usr/local/apache-tomcat-8.0.289 on Linux/Unix and create CATALINA_HOME environment variable pointing to these locations.
Tomcat can be started by executing the following commands on windows machine −
%CATALINA_HOME%\bin\startup.bat
or
C:\apache-tomcat-8.0.28\bin\startup.bat
Tomcat can be started by executing the following commands on Unix (Solaris, Linux, etc.) machine −
$CATALINA_HOME/bin/startup.sh
or
/usr/local/apache-tomcat-8.0.28/bin/startup.sh
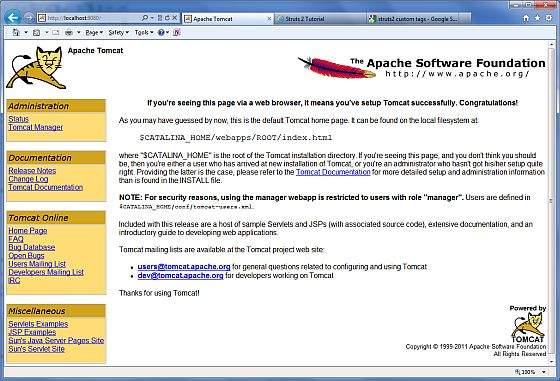
After startup, the default web applications included with Tomcat will be available by visiting http://localhost:8080/. If everything is fine then it should display following result −
Further information about configuring and running Tomcat can be found in the documentation included here, as well as on the Tomcat web site − http://tomcat.apache.org
Tomcat can be stopped by executing the following commands on windows machine −
C:\apache-tomcat-8.0.28\bin\shutdown
Tomcat can be stopped by executing the following commands on Unix (Solaris, Linux, etc.) machine −
/usr/local/apache-tomcat-8.0.28/bin/shutdown.sh
Setting Up the CLASSPATH
Since servlets are not part of the Java Platform, Standard Edition, you must identify the servlet classes to the compiler.
If you are running Windows, you need to put the following lines in your C:\autoexec.bat file.
set CATALINA = C:\apache-tomcat-8.0.28
set CLASSPATH = %CATALINA%\common\lib\servlet-api.jar;%CLASSPATH%
Alternatively, on Windows NT/2000/XP, you could go to My Computer −> Properties −> Advanced −> Environment Variables. Then, you would update the CLASSPATH value and press the OK button.
On Unix (Solaris, Linux, etc.), if you are using the C shell, you would put the following lines into your .cshrc file.
setenv CATALINA = /usr/local/apache-tomcat-8.0.28
setenv CLASSPATH $CATALINA/common/lib/servlet-api.jar:$CLASSPATH
NOTE − Assuming that your development directory is C:\ServletDevel (Windows) or /usr/ServletDevel (Unix) then you would need to add these directories as well in CLASSPATH in similar way as you have added above.
Servlets - Life Cycle
A servlet life cycle can be defined as the entire process from its creation till the destruction. The following are the paths followed by a servlet.
The servlet is initialized by calling the init() method.
The servlet calls service() method to process a client's request.
The servlet is terminated by calling the destroy() method.
Finally, servlet is garbage collected by the garbage collector of the JVM.
Now let us discuss the life cycle methods in detail.
The init() Method
The init method is called only once. It is called only when the servlet is created, and not called for any user requests afterwards. So, it is used for one-time initializations, just as with the init method of applets.
The servlet is normally created when a user first invokes a URL corresponding to the servlet, but you can also specify that the servlet be loaded when the server is first started.
When a user invokes a servlet, a single instance of each servlet gets created, with each user request resulting in a new thread that is handed off to doGet or doPost as appropriate. The init() method simply creates or loads some data that will be used throughout the life of the servlet.
The init method definition looks like this −
public void init() throws ServletException {
   // Initialization code...
}
The service() Method
The service() method is the main method to perform the actual task. The servlet container (i.e. web server) calls the service() method to handle requests coming from the client( browsers) and to write the formatted response back to the client.
Each time the server receives a request for a servlet, the server spawns a new thread and calls service. The service() method checks the HTTP request type (GET, POST, PUT, DELETE, etc.) and calls doGet, doPost, doPut, doDelete, etc. methods as appropriate.
Here is the signature of this method −
public void service(ServletRequest request, ServletResponse response)
   throws ServletException, IOException {
}
The service () method is called by the container and service method invokes doGet, doPost, doPut, doDelete, etc. methods as appropriate. So you have nothing to do with service() method but you override either doGet() or doPost() depending on what type of request you receive from the client.
The doGet() and doPost() are most frequently used methods with in each service request. Here is the signature of these two methods.
The doGet() Method
A GET request results from a normal request for a URL or from an HTML form that has no METHOD specified and it should be handled by doGet() method.
public void doGet(HttpServletRequest request, HttpServletResponse response)
   throws ServletException, IOException {
   // Servlet code
}
The doPost() Method
A POST request results from an HTML form that specifically lists POST as the METHOD and it should be handled by doPost() method.
public void doPost(HttpServletRequest request, HttpServletResponse response)
   throws ServletException, IOException {
   // Servlet code
}
The destroy() Method
The destroy() method is called only once at the end of the life cycle of a servlet. This method gives your servlet a chance to close database connections, halt background threads, write cookie lists or hit counts to disk, and perform other such cleanup activities.
After the destroy() method is called, the servlet object is marked for garbage collection. The destroy method definition looks like this −
public void destroy() {
   // Finalization code...
}
Architecture Diagram
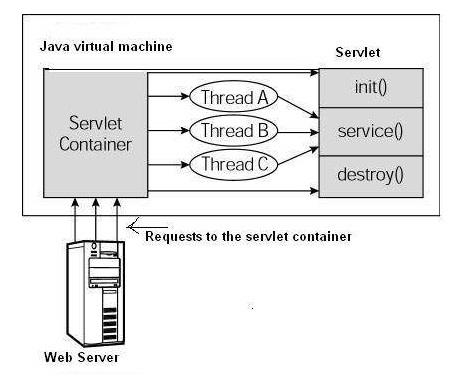
The following figure depicts a typical servlet life-cycle scenario.
First the HTTP requests coming to the server are delegated to the servlet container.
The servlet container loads the servlet before invoking the service() method.
Then the servlet container handles multiple requests by spawning multiple threads, each thread executing the service() method of a single instance of the servlet.
Servlets - Examples
Servlets are Java classes which service HTTP requests and implement the javax.servlet.Servlet interface. Web application developers typically write servlets that extend javax.servlet.http.HttpServlet, an abstract class that implements the Servlet interface and is specially designed to handle HTTP requests.
Sample Code
Following is the sample source code structure of a servlet example to show Hello World −
// Import required java libraries
import java.io.*;
import javax.servlet.*;
import javax.servlet.http.*;

// Extend HttpServlet class
public class HelloWorld extends HttpServlet {

   private String message;

   public void init() throws ServletException {
      // Do required initialization
      message = "Hello World";
   }

   public void doGet(HttpServletRequest request, HttpServletResponse response)
      throws ServletException, IOException {

      // Set response content type
      response.setContentType("text/html");

      // Actual logic goes here.
      PrintWriter out = response.getWriter();
      out.println("<h1>" + message + "</h1>");
   }

   public void destroy() {
      // do nothing.
   }
}
Compiling a Servlet
Let us create a file with name HelloWorld.java with the code shown above. Place this file at C:\ServletDevel (in Windows) or at /usr/ServletDevel (in Unix). This path location must be added to CLASSPATH before proceeding further.
Assuming your environment is setup properly, go in ServletDevel directory and compile HelloWorld.java as follows −
$ javac HelloWorld.java
If the servlet depends on any other libraries, you have to include those JAR files on your CLASSPATH as well. I have included only servlet-api.jar JAR file because I'm not using any other library in Hello World program.
This command line uses the built-in javac compiler that comes with the Sun Microsystems Java Software Development Kit (JDK). For this command to work properly, you have to include the location of the Java SDK that you are using in the PATH environment variable.
If everything goes fine, above compilation would produce HelloWorld.class file in the same directory. Next section would explain how a compiled servlet would be deployed in production.
Servlet Deployment
By default, a servlet application is located at the path <Tomcat-installationdirectory>/webapps/ROOT and the class file would reside in <Tomcat-installationdirectory>/webapps/ROOT/WEB-INF/classes.
If you have a fully qualified class name of com.myorg.MyServlet, then this servlet class must be located in WEB-INF/classes/com/myorg/MyServlet.class.
For now, let us copy HelloWorld.class into <Tomcat-installationdirectory>/webapps/ROOT/WEB-INF/classes and create following entries in web.xml file located in <Tomcat-installation-directory>/webapps/ROOT/WEB-INF/
<servlet>
   <servlet-name>HelloWorld</servlet-name>
   <servlet-class>HelloWorld</servlet-class>
</servlet>

<servlet-mapping>
   <servlet-name>HelloWorld</servlet-name>
   <url-pattern>/HelloWorld</url-pattern>
</servlet-mapping>
Above entries to be created inside <web-app>...</web-app> tags available in web.xml file. There could be various entries in this table already available, but never mind.
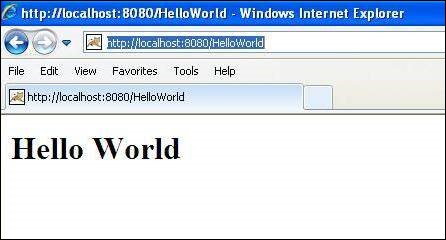
You are almost done, now let us start tomcat server using <Tomcat-installationdirectory>\bin\startup.bat (on Windows) or <Tomcat-installationdirectory>/bin/startup.sh (on Linux/Solaris etc.) and finally type http://localhost:8080/HelloWorld in the browser's address box. If everything goes fine, you would get the following result
Servlets - Form Data
You must have come across many situations when you need to pass some information from your browser to web server and ultimately to your backend program. The browser uses two methods to pass this information to web server. These methods are GET Method and POST Method.
GET Method
The GET method sends the encoded user information appended to the page request. The page and the encoded information are separated by the ? (question mark) symbol as follows −
http://www.test.com/hello?key1 = value1&key2 = value2
The GET method is the default method to pass information from browser to web server and it produces a long string that appears in your browser's Location:box. Never use the GET method if you have password or other sensitive information to pass to the server. The GET method has size limitation: only 1024 characters can be used in a request string.
This information is passed using QUERY_STRING header and will be accessible through QUERY_STRING environment variable and Servlet handles this type of requests using doGet() method.
POST Method
A generally more reliable method of passing information to a backend program is the POST method. This packages the information in exactly the same way as GET method, but instead of sending it as a text string after a ? (question mark) in the URL it sends it as a separate message. This message comes to the backend program in the form of the standard input which you can parse and use for your processing. Servlet handles this type of requests using doPost() method.
Reading Form Data using Servlet
Servlets handles form data parsing automatically using the following methods depending on the situation −
getParameter() − You call request.getParameter() method to get the value of a form parameter.
getParameterValues() − Call this method if the parameter appears more than once and returns multiple values, for example checkbox.
getParameterNames() − Call this method if you want a complete list of all parameters in the current request.
GET Method Example using URL
Here is a simple URL which will pass two values to HelloForm program using GET method.
http://localhost:8080/HelloForm?first_name = ZARA&last_name = ALIGiven below is the HelloForm.java servlet program to handle input given by web browser. We are going to use getParameter() method which makes it very easy to access passed information −
// Import required java libraries
import java.io.*;
import javax.servlet.*;
import javax.servlet.http.*;

// Extend HttpServlet class
public class HelloForm extends HttpServlet {

   public void doGet(HttpServletRequest request, HttpServletResponse response)
      throws ServletException, IOException {

      // Set response content type
      response.setContentType("text/html");

      PrintWriter out = response.getWriter();
      String title = "Using GET Method to Read Form Data";
      String docType =
         "<!doctype html public \"-//w3c//dtd html 4.0 " + "transitional//en\">\n";

      out.println(docType +
         "<html>\n" +
            "<head><title>" + title + "</title></head>\n" +
            "<body bgcolor = \"#f0f0f0\">\n" +
               "<h1 align = \"center\">" + title + "</h1>\n" +
               "<ul>\n" +
                  "  <li><b>First Name</b>: "
                  + request.getParameter("first_name") + "\n" +
                  "  <li><b>Last Name</b>: "
                  + request.getParameter("last_name") + "\n" +
               "</ul>\n" +
            "</body>" +
         "</html>"
      );
   }
}
Assuming your environment is set up properly, compile HelloForm.java as follows −
$ javac HelloForm.java
If everything goes fine, above compilation would produce HelloForm.class file. Next you would have to copy this class file in <Tomcat-installationdirectory>/webapps/ROOT/WEB-INF/classes and create following entries in web.xml file located in <Tomcat-installation-directory>/webapps/ROOT/WEB-INF/
<servlet>
   <servlet-name>HelloForm</servlet-name>
   <servlet-class>HelloForm</servlet-class>
</servlet>

<servlet-mapping>
   <servlet-name>HelloForm</servlet-name>
   <url-pattern>/HelloForm</url-pattern>
</servlet-mapping>
Now type http://localhost:8080/HelloForm?first_name=ZARA&last_name=ALI in your browser's Location:box and make sure you already started tomcat server, before firing above command in the browser. This would generate following result −
Using GET Method to Read Form Data
- First Name: ZARA
- Last Name: ALI
GET Method Example Using Form
Here is a simple example which passes two values using HTML FORM and submit button. We are going to use same Servlet HelloForm to handle this input.
<html>
   <body>
      <form action = "HelloForm" method = "GET">
         First Name: <input type = "text" name = "first_name">
         <br />
         Last Name: <input type = "text" name = "last_name" />
         <input type = "submit" value = "Submit" />
      </form>
   </body>
</html>
Keep this HTML in a file Hello.htm and put it in <Tomcat-installationdirectory>/webapps/ROOT directory. When you would access http://localhost:8080/Hello.htm, here is the actual output of the above form.
Try to enter First Name and Last Name and then click submit button to see the result on your local machine where tomcat is running. Based on the input provided, it will generate similar result as mentioned in the above example.
POST Method Example Using Form
Let us do little modification in the above servlet, so that it can handle GET as well as POST methods. Below is HelloForm.java servlet program to handle input given by web browser using GET or POST methods.
// Import required java libraries
import java.io.*;
import javax.servlet.*;
import javax.servlet.http.*;

// Extend HttpServlet class
public class HelloForm extends HttpServlet {

   // Method to handle GET method request.
   public void doGet(HttpServletRequest request, HttpServletResponse response)
      throws ServletException, IOException {

      // Set response content type
      response.setContentType("text/html");

      PrintWriter out = response.getWriter();
      String title = "Using GET Method to Read Form Data";
      String docType =
         "<!doctype html public \"-//w3c//dtd html 4.0 " +
         "transitional//en\">\n";

      out.println(docType +
         "<html>\n" +
            "<head><title>" + title + "</title></head>\n" +
            "<body bgcolor = \"#f0f0f0\">\n" +
               "<h1 align = \"center\">" + title + "</h1>\n" +
               "<ul>\n" +
                  "  <li><b>First Name</b>: "
                  + request.getParameter("first_name") + "\n" +
                  "  <li><b>Last Name</b>: "
                  + request.getParameter("last_name") + "\n" +
               "</ul>\n" +
            "</body>"
         "</html>"
      );
   }

   // Method to handle POST method request.
   public void doPost(HttpServletRequest request, HttpServletResponse response)
      throws ServletException, IOException {

      doGet(request, response);
   }
}
Now compile and deploy the above Servlet and test it using Hello.htm with the POST method as follows −
<html>
   <body>
      <form action = "HelloForm" method = "POST">
         First Name: <input type = "text" name = "first_name">
         <br />
         Last Name: <input type = "text" name = "last_name" />
         <input type = "submit" value = "Submit" />
      </form>
   </body>
</html>
Here is the actual output of the above form, Try to enter First and Last Name and then click submit button to see the result on your local machine where tomcat is running.
Based on the input provided, it would generate similar result as mentioned in the above examples.
Passing Checkbox Data to Servlet Program
Checkboxes are used when more than one option is required to be selected.
Here is example HTML code, CheckBox.htm, for a form with two checkboxes
<html>
   <body>
      <form action = "CheckBox" method = "POST" target = "_blank">
         <input type = "checkbox" name = "maths" checked = "checked" /> Maths
         <input type = "checkbox" name = "physics"  /> Physics
         <input type = "checkbox" name = "chemistry" checked = "checked" />
                                          Chemistry
         <input type = "submit" value = "Select Subject" />
      </form>
   </body>
</html>
The result of this code is the following form
Given below is the CheckBox.java servlet program to handle input given by web browser for checkbox button.
// Import required java libraries
import java.io.*;
import javax.servlet.*;
import javax.servlet.http.*;

// Extend HttpServlet class
public class CheckBox extends HttpServlet {

   // Method to handle GET method request.
   public void doGet(HttpServletRequest request, HttpServletResponse response)
      throws ServletException, IOException {

      // Set response content type
      response.setContentType("text/html");

      PrintWriter out = response.getWriter();
      String title = "Reading Checkbox Data";
      String docType =
         "<!doctype html public \"-//w3c//dtd html 4.0 " + "transitional//en\">\n";

      out.println(docType +
         "<html>\n" +
            "<head><title>" + title + "</title></head>\n" +
            "<body bgcolor = \"#f0f0f0\">\n" +
               "<h1 align = \"center\">" + title + "</h1>\n" +
               "<ul>\n" +
                  "  <li><b>Maths Flag : </b>: "
                  + request.getParameter("maths") + "\n" +
                  "  <li><b>Physics Flag: </b>: "
                  + request.getParameter("physics") + "\n" +
                  "  <li><b>Chemistry Flag: </b>: "
                  + request.getParameter("chemistry") + "\n" +
               "</ul>\n" +
            "</body>"
         "</html>"
      );
   }

   // Method to handle POST method request.
   public void doPost(HttpServletRequest request, HttpServletResponse response)
      throws ServletException, IOException {

      doGet(request, response);
   }
}
For the above example, it would display following result −
Reading Checkbox Data
- Maths Flag : : on
- Physics Flag: : null
- Chemistry Flag: : on
Reading All Form Parameters
Following is the generic example which uses getParameterNames() method of HttpServletRequest to read all the available form parameters. This method returns an Enumeration that contains the parameter names in an unspecified order
Once we have an Enumeration, we can loop down the Enumeration in standard way by, using hasMoreElements() method to determine when to stop and using nextElement() method to get each parameter name.
// Import required java libraries
import java.io.*;
import javax.servlet.*;
import javax.servlet.http.*;
import java.util.*;

// Extend HttpServlet class
public class ReadParams extends HttpServlet {

   // Method to handle GET method request.
   public void doGet(HttpServletRequest request, HttpServletResponse response)
      throws ServletException, IOException {

      // Set response content type
      response.setContentType("text/html");

      PrintWriter out = response.getWriter();
      String title = "Reading All Form Parameters";
      String docType =
         "<!doctype html public \"-//w3c//dtd html 4.0 " + "transitional//en\">\n";

      out.println(docType +
         "<html>\n" +
         "<head><title>" + title + "</title></head>\n" +
         "<body bgcolor = \"#f0f0f0\">\n" +
         "<h1 align = \"center\">" + title + "</h1>\n" +
         "<table width = \"100%\" border = \"1\" align = \"center\">\n" +
         "<tr bgcolor = \"#949494\">\n" +
            "<th>Param Name</th>"
            "<th>Param Value(s)</th>\n"+
         "</tr>\n"
      );

      Enumeration paramNames = request.getParameterNames();

      while(paramNames.hasMoreElements()) {
         String paramName = (String)paramNames.nextElement();
         out.print("<tr><td>" + paramName + "</td>\n<td>");
         String[] paramValues = request.getParameterValues(paramName);

         // Read single valued data
         if (paramValues.length == 1) {
            String paramValue = paramValues[0];
            if (paramValue.length() == 0)
               out.println("<i>No Value</i>");
               else
               out.println(paramValue);
         } else {
            // Read multiple valued data
            out.println("<ul>");

            for(int i = 0; i < paramValues.length; i++) {
               out.println("<li>" + paramValues[i]);
            }
            out.println("</ul>");
         }
      }
      out.println("</tr>\n</table>\n</body></html>");
   }

   // Method to handle POST method request.
   public void doPost(HttpServletRequest request, HttpServletResponse response)
      throws ServletException, IOException {

      doGet(request, response);
   }
}
Now, try the above servlet with the following form −
<html>
   <body>
      <form action = "ReadParams" method = "POST" target = "_blank">
         <input type = "checkbox" name = "maths" checked = "checked" /> Maths
         <input type = "checkbox" name = "physics"  /> Physics
         <input type = "checkbox" name = "chemistry" checked = "checked" /> Chem
         <input type = "submit" value = "Select Subject" />
      </form>
   </body>
</html>
Now calling servlet using the above form would generate the following result −
Reading All Form Parameters


Param Name
Param Value(s)


maths
on


chemistry
on
You can try the above servlet to read any other form's data having other objects like text box, radio button or drop down box etc.
Servlets - Client HTTP Request
When a browser requests for a web page, it sends lot of information to the web server which cannot be read directly because this information travel as a part of header of HTTP request. You can check HTTP Protocol for more information on this.
Following is the important header information which comes from browser side and you would use very frequently in web programming −
| Sr.No. | Header & Description |
|---|---|
| 1 | Accept This header specifies the MIME types that the browser or other clients can handle. Values of image/png or image/jpeg are the two most common possibilities. |
| 2 | Accept-Charset This header specifies the character sets the browser can use to display the information. For example ISO-8859-1. |
| 3 | Accept-Encoding This header specifies the types of encodings that the browser knows how to handle. Values of gzip or compress are the two most common possibilities. |
| 4 | Accept-Language This header specifies the client's preferred languages in case the servlet can produce results in more than one language. For example en, en-us, ru, etc |
| 5 | Authorization This header is used by clients to identify themselves when accessing password-protected Web pages. |
| 6 | Connection This header indicates whether the client can handle persistent HTTP connections. Persistent connections permit the client or other browser to retrieve multiple files with a single request. A value of Keep-Alive means that persistent connections should be used. |
| 7 | Content-Length This header is applicable only to POST requests and gives the size of the POST data in bytes. |
| 8 | Cookie This header returns cookies to servers that previously sent them to the browser. |
| 9 | Host This header specifies the host and port as given in the original URL. |
| 10 | If-Modified-Since This header indicates that the client wants the page only if it has been changed after the specified date. The server sends a code, 304 which means Not Modified header if no newer result is available. |
| 11 | If-Unmodified-Since This header is the reverse of If-Modified-Since; it specifies that the operation should succeed only if the document is older than the specified date. |
| 12 | Referer This header indicates the URL of the referring Web page. For example, if you are at Web page 1 and click on a link to Web page 2, the URL of Web page 1 is included in the Referrer header when the browser requests Web page 2. |
| 13 | User-Agent This header identifies the browser or other client making the request and can be used to return different content to different types of browsers. |
Methods to read HTTP Header
There are following methods which can be used to read HTTP header in your servlet program. These methods are available with HttpServletRequest object
| Sr.No. | Method & Description |
|---|---|
| 1 | Cookie[] getCookies() Returns an array containing all of the Cookie objects the client sent with this request. |
| 2 | Enumeration getAttributeNames() Returns an Enumeration containing the names of the attributes available to this request. |
| 3 | Enumeration getHeaderNames() Returns an enumeration of all the header names this request contains. |
| 4 | Enumeration getParameterNames() Returns an Enumeration of String objects containing the names of the parameters contained in this request |
| 5 | HttpSession getSession() Returns the current session associated with this request, or if the request does not have a session, creates one. |
| 6 | HttpSession getSession(boolean create) Returns the current HttpSession associated with this request or, if if there is no current session and value of create is true, returns a new session. |
| 7 | Locale getLocale() Returns the preferred Locale that the client will accept content in, based on the Accept-Language header. |
| 8 | Object getAttribute(String name) Returns the value of the named attribute as an Object, or null if no attribute of the given name exists. |
| 9 | ServletInputStream getInputStream() Retrieves the body of the request as binary data using a ServletInputStream. |
| 10 | String getAuthType() Returns the name of the authentication scheme used to protect the servlet, for example, "BASIC" or "SSL," or null if the JSP was not protected. |
| 11 | String getCharacterEncoding() Returns the name of the character encoding used in the body of this request. |
| 12 | String getContentType() Returns the MIME type of the body of the request, or null if the type is not known. |
| 13 | String getContextPath() Returns the portion of the request URI that indicates the context of the request. |
| 14 | String getHeader(String name) Returns the value of the specified request header as a String. |
| 15 | String getMethod() Returns the name of the HTTP method with which this request was made, for example, GET, POST, or PUT. |
| 16 | String getParameter(String name) Returns the value of a request parameter as a String, or null if the parameter does not exist. |
| 17 | String getPathInfo() Returns any extra path information associated with the URL the client sent when it made this request |
| 18 | String getProtocol() Returns the name and version of the protocol the request. |
| 19 | String getQueryString() Returns the query string that is contained in the request URL after the path. |
| 20 | String getRemoteAddr() Returns the Internet Protocol (IP) address of the client that sent the request. |
| 21 | String getRemoteHost() Returns the fully qualified name of the client that sent the request. |
| 22 | String getRemoteUser() Returns the login of the user making this request, if the user has been authenticated, or null if the user has not been authenticated. |
| 23 | String getRequestURI() Returns the part of this request's URL from the protocol name up to the query string in the first line of the HTTP request. |
| 24 | String getRequestedSessionId() Returns the session ID specified by the client. |
| 25 | String getServletPath() Returns the part of this request's URL that calls the JSP. |
| 26 | String[] getParameterValues(String name) Returns an array of String objects containing all of the values the given request parameter has, or null if the parameter does not exist. |
| 27 | boolean isSecure() Returns a Boolean indicating whether this request was made using a secure channel, such as HTTPS. |
| 28 | int getContentLength() Returns the length, in bytes, of the request body and made available by the input stream, or -1 if the length is not known. |
| 29 | int getIntHeader(String name) Returns the value of the specified request header as an int. |
| 30 | int getServerPort() Returns the port number on which this request was received. |
HTTP Header Request Example
Following is the example which uses getHeaderNames() method of HttpServletRequest to read the HTTP header information. This method returns an Enumeration that contains the header information associated with the current HTTP request.
Once we have an Enumeration, we can loop down the Enumeration in the standard manner, using hasMoreElements() method to determine when to stop and using nextElement() method to get each parameter name
// Import required java libraries
import java.io.*;
import javax.servlet.*;
import javax.servlet.http.*;
import java.util.*;

// Extend HttpServlet class
public class DisplayHeader extends HttpServlet {

   // Method to handle GET method request.
   public void doGet(HttpServletRequest request, HttpServletResponse response)
      throws ServletException, IOException {

      // Set response content type
      response.setContentType("text/html");

      PrintWriter out = response.getWriter();
      String title = "HTTP Header Request Example";
      String docType =
         "<!doctype html public \"-//w3c//dtd html 4.0 " + "transitional//en\">\n";

      out.println(docType +
         "<html>\n" +
         "<head><title>" + title + "</title></head>\n"+
         "<body bgcolor = \"#f0f0f0\">\n" +
         "<h1 align = \"center\">" + title + "</h1>\n" +
         "<table width = \"100%\" border = \"1\" align = \"center\">\n" +
         "<tr bgcolor = \"#949494\">\n" +
         "<th>Header Name</th><th>Header Value(s)</th>\n"+
         "</tr>\n"
      );

      Enumeration headerNames = request.getHeaderNames();

      while(headerNames.hasMoreElements()) {
         String paramName = (String)headerNames.nextElement();
         out.print("<tr><td>" + paramName + "</td>\n");
         String paramValue = request.getHeader(paramName);
         out.println("<td> " + paramValue + "</td></tr>\n");
      }
      out.println("</table>\n</body></html>");
   }

   // Method to handle POST method request.
   public void doPost(HttpServletRequest request, HttpServletResponse response)
      throws ServletException, IOException {

      doGet(request, response);
   }
}
Now calling the above servlet would generate the following result −
HTTP Header Request Example


Header Name
Header Value(s)


accept
*/*


accept-language
en-us


user-agent
Mozilla/4.0 (compatible; MSIE 7.0; Windows NT 5.1; Trident/4.0; InfoPath.2; MS-RTC LM 8)


accept-encoding
gzip, deflate


host
localhost:8080


connection
Keep-Alive


cache-control
no-cache
Servlets - Server HTTP Response
As discussed in the previous chapter, when a Web server responds to an HTTP request, the response typically consists of a status line, some response headers, a blank line, and the document. A typical response looks like this −
HTTP/1.1 200 OK
Content-Type: text/html
Header2: ...
...
HeaderN: ...
   (Blank Line)
<!doctype ...>
<html>
   <head>...</head>
   <body>
      ...
   </body>
</html>
The status line consists of the HTTP version (HTTP/1.1 in the example), a status code (200 in the example), and a very short message corresponding to the status code (OK in the example).
Following is a summary of the most useful HTTP 1.1 response headers which go back to the browser from web server side and you would use them very frequently in web programming −
| Sr.No. | Header & Description |
|---|---|
| 1 | Allow This header specifies the request methods (GET, POST, etc.) that the server supports. |
| 2 | Cache-Control This header specifies the circumstances in which the response document can safely be cached. It can have values public, private or no-cache etc. Public means document is cacheable, Private means document is for a single user and can only be stored in private (non-shared) caches and nocache means document should never be cached. |
| 3 | Connection This header instructs the browser whether to use persistent in HTTP connections or not. A value of close instructs the browser not to use persistent HTTP connections and keepalive means using persistent connections. |
| 4 | Content-Disposition This header lets you request that the browser ask the user to save the response to disk in a file of the given name. |
| 5 | Content-Encoding This header specifies the way in which the page was encoded during transmission. |
| 6 | Content-Language This header signifies the language in which the document is written. For example en, en-us, ru, etc |
| 7 | Content-Length This header indicates the number of bytes in the response. This information is needed only if the browser is using a persistent (keep-alive) HTTP connection. |
| 8 | Content-Type This header gives the MIME (Multipurpose Internet Mail Extension) type of the response document. |
| 9 | Expires This header specifies the time at which the content should be considered out-of-date and thus no longer be cached. |
| 10 | Last-Modified This header indicates when the document was last changed. The client can then cache the document and supply a date by an If-Modified-Since request header in later requests. |
| 11 | Location This header should be included with all responses that have a status code in the 300s. This notifies the browser of the document address. The browser automatically reconnects to this location and retrieves the new document. |
| 12 | Refresh This header specifies how soon the browser should ask for an updated page. You can specify time in number of seconds after which a page would be refreshed. |
| 13 | Retry-After This header can be used in conjunction with a 503 (Service Unavailable) response to tell the client how soon it can repeat its request. |
| 14 | Set-Cookie This header specifies a cookie associated with the page. |
Methods to Set HTTP Response Header
There are following methods which can be used to set HTTP response header in your servlet program. These methods are available with HttpServletResponse object.
| Sr.No. | Method & Description |
|---|---|
| 1 | String encodeRedirectURL(String url) Encodes the specified URL for use in the sendRedirect method or, if encoding is not needed, returns the URL unchanged. |
| 2 | String encodeURL(String url) Encodes the specified URL by including the session ID in it, or, if encoding is not needed, returns the URL unchanged. |
| 3 | boolean containsHeader(String name) Returns a Boolean indicating whether the named response header has already been set. |
| 4 | boolean isCommitted() Returns a Boolean indicating if the response has been committed. |
| 5 | void addCookie(Cookie cookie) Adds the specified cookie to the response. |
| 6 | void addDateHeader(String name, long date) Adds a response header with the given name and date-value. |
| 7 | void addHeader(String name, String value) Adds a response header with the given name and value. |
| 8 | void addIntHeader(String name, int value) Adds a response header with the given name and integer value. |
| 9 | void flushBuffer() Forces any content in the buffer to be written to the client. |
| 10 | void reset() Clears any data that exists in the buffer as well as the status code and headers. |
| 11 | void resetBuffer() Clears the content of the underlying buffer in the response without clearing headers or status code. |
| 12 | void sendError(int sc) Sends an error response to the client using the specified status code and clearing the buffer. |
| 13 | void sendError(int sc, String msg) Sends an error response to the client using the specified status. |
| 14 | void sendRedirect(String location) Sends a temporary redirect response to the client using the specified redirect location URL. |
| 15 | void setBufferSize(int size) Sets the preferred buffer size for the body of the response. |
| 16 | void setCharacterEncoding(String charset) Sets the character encoding (MIME charset) of the response being sent to the client, for example, to UTF-8. |
| 17 | void setContentLength(int len) Sets the length of the content body in the response In HTTP servlets, this method sets the HTTP Content-Length header. |
| 18 | void setContentType(String type) Sets the content type of the response being sent to the client, if the response has not been committed yet. |
| 19 | void setDateHeader(String name, long date) Sets a response header with the given name and date-value. |
| 20 | void setHeader(String name, String value) Sets a response header with the given name and value. |
| 21 | void setIntHeader(String name, int value) Sets a response header with the given name and integer value |
| 22 | void setLocale(Locale loc) Sets the locale of the response, if the response has not been committed yet. |
| 23 | void setStatus(int sc) Sets the status code for this response |
HTTP Header Response Example
You already have seen setContentType() method working in previous examples and following example would also use same method, additionally we would use setIntHeader() method to set Refresh header.
// Import required java libraries
import java.io.*;
import javax.servlet.*;
import javax.servlet.http.*;
import java.util.*;

// Extend HttpServlet class
public class Refresh extends HttpServlet {

   // Method to handle GET method request.
   public void doGet(HttpServletRequest request, HttpServletResponse response)
      throws ServletException, IOException {

      // Set refresh, autoload time as 5 seconds
      response.setIntHeader("Refresh", 5);

      // Set response content type
      response.setContentType("text/html");

      // Get current time
      Calendar calendar = new GregorianCalendar();
      String am_pm;
      int hour = calendar.get(Calendar.HOUR);
      int minute = calendar.get(Calendar.MINUTE);
      int second = calendar.get(Calendar.SECOND);

      if(calendar.get(Calendar.AM_PM) == 0)
         am_pm = "AM";
      else
         am_pm = "PM";

      String CT = hour+":"+ minute +":"+ second +" "+ am_pm;

      PrintWriter out = response.getWriter();
      String title = "Auto Refresh Header Setting";
      String docType =
         "<!doctype html public \"-//w3c//dtd html 4.0 " + "transitional//en\">\n";

      out.println(docType +
         "<html>\n" +
         "<head><title>" + title + "</title></head>\n"+
         "<body bgcolor = \"#f0f0f0\">\n" +
         "<h1 align = \"center\">" + title + "</h1>\n" +
         "<p>Current Time is: " + CT + "</p>\n"
      );
   }

   // Method to handle POST method request.
   public void doPost(HttpServletRequest request, HttpServletResponse response)
      throws ServletException, IOException {

      doGet(request, response);
   }
}
Now calling the above servlet would display current system time after every 5 seconds as follows. Just run the servlet and wait to see the result −
Auto Refresh Header Setting
Current Time is: 9:44:50 PM
Servlets - Http Status Codes
The format of the HTTP request and HTTP response messages are similar and will have following structure −
An initial status line + CRLF ( Carriage Return + Line Feed i.e. New Line )
Zero or more header lines + CRLF
A blank line, i.e., a CRLF
An optional message body like file, query data or query output.
For example, a server response header looks as follows −
HTTP/1.1 200 OK
Content-Type: text/html
Header2: ...
...
HeaderN: ...
   (Blank Line)
<!doctype ...>
<html>
   <head>...</head>
   <body>
      ...
   </body>
</html>
The status line consists of the HTTP version (HTTP/1.1 in the example), a status code (200 in the example), and a very short message corresponding to the status code (OK in the example).
Following is a list of HTTP status codes and associated messages that might be returned from the Web Server −
| Code | Message | Description |
|---|---|---|
| 100 | Continue | Only a part of the request has been received by the server, but as long as it has not been rejected, the client should continue with the request |
| 101 | Switching Protocols | The server switches protocol. |
| 200 | OK | The request is OK |
| 201 | Created | The request is complete, and a new resource is created |
| 202 | Accepted | The request is accepted for processing, but the processing is not complete. |
| 203 | Non-authoritative Information | |
| 204 | No Content | |
| 205 | Reset Content | |
| 206 | Partial Content | |
| 300 | Multiple Choices | A link list. The user can select a link and go to that location. Maximum five addresses |
| 301 | Moved Permanently | The requested page has moved to a new url |
| 302 | Found | The requested page has moved temporarily to a new url |
| 303 | See Other | The requested page can be found under a different url |
| 304 | Not Modified | |
| 305 | Use Proxy | |
| 306 | Unused | This code was used in a previous version. It is no longer used, but the code is reserved |
| 307 | Temporary Redirect | The requested page has moved temporarily to a new url. |
| 400 | Bad Request | The server did not understand the request |
| 401 | Unauthorized | The requested page needs a username and a password |
| 402 | Payment Required | You cannot use this code yet |
| 403 | Forbidden | Access is forbidden to the requested page |
| 404 | Not Found | The server cannot find the requested page. |
| 405 | Method Not Allowed | The method specified in the request is not allowed. |
| 406 | Not Acceptable | The server can only generate a response that is not accepted by the client. |
| 407 | Proxy Authentication Required | You must authenticate with a proxy server before this request can be served. |
| 408 | Request Timeout | The request took longer than the server was prepared to wait. |
| 409 | Conflict | The request could not be completed because of a conflict. |
| 410 | Gone | The requested page is no longer available. |
| 411 | Length Required | The "Content-Length" is not defined. The server will not accept the request without it. |
| 412 | Precondition Failed | The precondition given in the request evaluated to false by the server. |
| 413 | Request Entity Too Large | The server will not accept the request, because the request entity is too large. |
| 414 | Request-url Too Long | The server will not accept the request, because the url is too long. Occurs when you convert a "post" request to a "get" request with a long query information. |
| 415 | Unsupported Media Type | The server will not accept the request, because the media type is not supported. |
| 417 | Expectation Failed | |
| 500 | Internal Server Error | The request was not completed. The server met an unexpected condition. |
| 501 | Not Implemented | The request was not completed. The server did not support the functionality required. |
| 502 | Bad Gateway | The request was not completed. The server received an invalid response from the upstream server. |
| 503 | Service Unavailable | The request was not completed. The server is temporarily overloading or down. |
| 504 | Gateway Timeout | The gateway has timed out. |
| 505 | HTTP Version Not Supported | The server does not support the "http protocol" version. |
Methods to Set HTTP Status Code
The following methods can be used to set HTTP Status Code in your servlet program. These methods are available with HttpServletResponse object.
| Sr.No. | Method & Description |
|---|---|
| 1 | public void setStatus ( int statusCode ) This method sets an arbitrary status code. The setStatus method takes an int (the status code) as an argument. If your response includes a special status code and a document, be sure to call setStatus before actually returning any of the content with the PrintWriter. |
| 2 | public void sendRedirect(String url) This method generates a 302 response along with a Location header giving the URL of the new document |
| 3 | public void sendError(int code, String message) This method sends a status code (usually 404) along with a short message that is automatically formatted inside an HTML document and sent to the client. |
HTTP Status Code Example
Following is the example which would send a 407 error code to the client browser and browser would show you "Need authentication!!!" message.
// Import required java libraries
import java.io.*;
import javax.servlet.*;
import javax.servlet.http.*;
import java.util.*;

// Extend HttpServlet class
public class showError extends HttpServlet {

   // Method to handle GET method request.
   public void doGet(HttpServletRequest request, HttpServletResponse response)
      throws ServletException, IOException {

      // Set error code and reason.
      response.sendError(407, "Need authentication!!!" );
   }

   // Method to handle POST method request.
   public void doPost(HttpServletRequest request, HttpServletResponse response)
      throws ServletException, IOException {

      doGet(request, response);
   }
}
Now calling the above servlet would display the following result −
HTTP Status 407 - Need authentication!!!
type Status report
messageNeed authentication!!!
descriptionThe client must first authenticate itself with the proxy (Need authentication!!!).
Apache Tomcat/5.5.29
Servlets - Writing Filters
Servlet Filters are Java classes that can be used in Servlet Programming for the following purposes −
To intercept requests from a client before they access a resource at back end.
To manipulate responses from server before they are sent back to the client.
There are various types of filters suggested by the specifications −
- Authentication Filters.
- Data compression Filters.
- Encryption Filters.
- Filters that trigger resource access events.
- Image Conversion Filters.
- Logging and Auditing Filters.
- MIME-TYPE Chain Filters.
- Tokenizing Filters .
- XSL/T Filters That Transform XML Content.
Filters are deployed in the deployment descriptor file web.xml and then map to either servlet names or URL patterns in your application's deployment descriptor.
When the web container starts up your web application, it creates an instance of each filter that you have declared in the deployment descriptor. The filters execute in the order that they are declared in the deployment descriptor.
Servlet Filter Methods
A filter is simply a Java class that implements the javax.servlet.Filter interface. The javax.servlet.Filter interface defines three methods −
| Sr.No. | Method & Description |
|---|---|
| 1 | public void doFilter (ServletRequest, ServletResponse, FilterChain) This method is called by the container each time a request/response pair is passed through the chain due to a client request for a resource at the end of the chain. |
| 2 | public void init(FilterConfig filterConfig) This method is called by the web container to indicate to a filter that it is being placed into service. |
| 3 | public void destroy() This method is called by the web container to indicate to a filter that it is being taken out of service. |
Servlet Filter − Example
Following is the Servlet Filter Example that would print the clients IP address and current date time. This example would give you basic understanding of Servlet Filter, but you can write more sophisticated filter applications using the same concept −
// Import required java libraries
import java.io.*;
import javax.servlet.*;
import javax.servlet.http.*;
import java.util.*;

// Implements Filter class
public class LogFilter implements Filter  {
   public void  init(FilterConfig config) throws ServletException {

      // Get init parameter
      String testParam = config.getInitParameter("test-param");

      //Print the init parameter
      System.out.println("Test Param: " + testParam);
   }

   public void  doFilter(ServletRequest request, ServletResponse response,
      FilterChain chain) throws java.io.IOException, ServletException {

      // Get the IP address of client machine.
      String ipAddress = request.getRemoteAddr();

      // Log the IP address and current timestamp.
      System.out.println("IP "+ ipAddress + ", Time " + new Date().toString());

      // Pass request back down the filter chain
      chain.doFilter(request,response);
   }

   public void destroy( ) {
      /* Called before the Filter instance is removed from service by the web container*/
   }
}
Compile LogFilter.java in usual way and put your class file in <Tomcat-installationdirectory>/webapps/ROOT/WEB-INF/classes
Servlet Filter Mapping in Web.xml
Filters are defined and then mapped to a URL or Servlet, in much the same way as Servlet is defined and then mapped to a URL pattern. Create the following entry for filter tag in the deployment descriptor file web.xml
<filter>
   <filter-name>LogFilter</filter-name>
   <filter-class>LogFilter</filter-class>
   <init-param>
      <param-name>test-param</param-name>
      <param-value>Initialization Paramter</param-value>
   </init-param>
</filter>

<filter-mapping>
   <filter-name>LogFilter</filter-name>
   <url-pattern>/*</url-pattern>
</filter-mapping>
The above filter would apply to all the servlets because we specified /* in our configuration. You can specicy a particular servlet path if you want to apply filter on few servlets only.
Now try to call any servlet in usual way and you would see generated log in your web server log. You can use Log4J logger to log above log in a separate file.
Using Multiple Filters
Your web application may define several different filters with a specific purpose. Consider, you define two filters AuthenFilter and LogFilter. Rest of the process would remain as explained above except you need to create a different mapping as mentioned below −
<filter>
   <filter-name>LogFilter</filter-name>
   <filter-class>LogFilter</filter-class>
   <init-param>
      <param-name>test-param</param-name>
      <param-value>Initialization Paramter</param-value>
   </init-param>
</filter>

<filter>
   <filter-name>AuthenFilter</filter-name>
   <filter-class>AuthenFilter</filter-class>
   <init-param>
      <param-name>test-param</param-name>
      <param-value>Initialization Paramter</param-value>
   </init-param>
</filter>

<filter-mapping>
   <filter-name>LogFilter</filter-name>
   <url-pattern>/*</url-pattern>
</filter-mapping>

<filter-mapping>
   <filter-name>AuthenFilter</filter-name>
   <url-pattern>/*</url-pattern>
</filter-mapping>
Filters Application Order
The order of filter-mapping elements in web.xml determines the order in which the web container applies the filter to the servlet. To reverse the order of the filter, you just need to reverse the filter-mapping elements in the web.xml file.
For example, above example would apply LogFilter first and then it would apply AuthenFilter to any servlet but the following example would reverse the order −
<filter-mapping>
   <filter-name>AuthenFilter</filter-name>
   <url-pattern>/*</url-pattern>
</filter-mapping>

<filter-mapping>
   <filter-name>LogFilter</filter-name>
   <url-pattern>/*</url-pattern>
</filter-mapping>
Servlets - Exception Handling
When a servlet throws an exception, the web container searches the configurations in web.xml that use the exception-type element for a match with the thrown exception type.
You would have to use the error-page element in web.xml to specify the invocation of servlets in response to certain exceptions or HTTP status codes.
web.xml Configuration
Consider, you have an ErrorHandler servlet which would be called whenever there is any defined exception or error. Following would be the entry created in web.xml.
<!-- servlet definition -->
<servlet>
   <servlet-name>ErrorHandler</servlet-name>
   <servlet-class>ErrorHandler</servlet-class>
</servlet>

<!-- servlet mappings -->
<servlet-mapping>
   <servlet-name>ErrorHandler</servlet-name>
   <url-pattern>/ErrorHandler</url-pattern>
</servlet-mapping>

<!-- error-code related error pages -->
<error-page>
   <error-code>404</error-code>
   <location>/ErrorHandler</location>
</error-page>

<error-page>
   <error-code>403</error-code>
   <location>/ErrorHandler</location>
</error-page>

<!-- exception-type related error pages -->
<error-page>
   <exception-type>
      javax.servlet.ServletException
   </exception-type >
   <location>/ErrorHandler</location>
</error-page>

<error-page>
   <exception-type>java.io.IOException</exception-type >
   <location>/ErrorHandler</location>
</error-page>
If you want to have a generic Error Handler for all the exceptions then you should define following error-page instead of defining separate error-page elements for every exception −
<error-page>
   <exception-type>java.lang.Throwable</exception-type >
   <location>/ErrorHandler</location>
</error-page>
Following are the points to be noted about above web.xml for Exception Handling −
The servlet ErrorHandler is defined in usual way as any other servlet and configured in web.xml.
If there is any error with status code either 404 (Not Found) or 403 (Forbidden ), then ErrorHandler servlet would be called.
If the web application throws either ServletException or IOException, then the web container invokes the /ErrorHandler servlet.
You can define different Error Handlers to handle different type of errors or exceptions. Above example is very much generic and hope it serve the purpose to explain you the basic concept.
Request Attributes − Errors/Exceptions
Following is the list of request attributes that an error-handling servlet can access to analyze the nature of error/exception.
| Sr.No. | Attribute & Description |
|---|---|
| 1 | javax.servlet.error.status_code This attribute give status code which can be stored and analyzed after storing in a java.lang.Integer data type. |
| 2 | javax.servlet.error.exception_type This attribute gives information about exception type which can be stored and analysed after storing in a java.lang.Class data type. |
| 3 | javax.servlet.error.message This attribute gives information exact error message which can be stored and analyzed after storing in a java.lang.String data type. |
| 4 | javax.servlet.error.request_uri This attribute gives information about URL calling the servlet and it can be stored and analysed after storing in a java.lang.String data type. |
| 5 | javax.servlet.error.exception This attribute gives information about the exception raised, which can be stored and analysed. |
| 6 | javax.servlet.error.servlet_name This attribute gives servlet name which can be stored and analyzed after storing in a java.lang.String data type. |
Error Handler Servlet Example
This example would give you basic understanding of Exception Handling in Servlet, but you can write more sophisticated filter applications using the same concept −
// Import required java libraries
import java.io.*;
import javax.servlet.*;
import javax.servlet.http.*;
import java.util.*;

// Extend HttpServlet class
public class ErrorHandler extends HttpServlet {

   // Method to handle GET method request.
   public void doGet(HttpServletRequest request, HttpServletResponse response)
      throws ServletException, IOException {

      // Analyze the servlet exception
      Throwable throwable = (Throwable)
      request.getAttribute("javax.servlet.error.exception");
      Integer statusCode = (Integer)
      request.getAttribute("javax.servlet.error.status_code");
      String servletName = (String)
      request.getAttribute("javax.servlet.error.servlet_name");

      if (servletName == null) {
         servletName = "Unknown";
      }
      String requestUri = (String)
      request.getAttribute("javax.servlet.error.request_uri");

      if (requestUri == null) {
         requestUri = "Unknown";
      }

      // Set response content type
      response.setContentType("text/html");

      PrintWriter out = response.getWriter();
      String title = "Error/Exception Information";
      String docType =
         "<!doctype html public \"-//w3c//dtd html 4.0 " +
         "transitional//en\">\n";

      out.println(docType +
         "<html>\n" +
         "<head><title>" + title + "</title></head>\n" +
         "<body bgcolor = \"#f0f0f0\">\n");

      if (throwable == null && statusCode == null) {
         out.println("<h2>Error information is missing</h2>");
         out.println("Please return to the <a href=\"" +
            response.encodeURL("http://localhost:8080/") +
            "\">Home Page</a>.");
      } else if (statusCode != null) {
         out.println("The status code : " + statusCode);
      } else {
         out.println("<h2>Error information</h2>");
         out.println("Servlet Name : " + servletName + "</br></br>");
         out.println("Exception Type : " + throwable.getClass( ).getName( ) + "</br></br>");
         out.println("The request URI: " + requestUri + "<br><br>");
         out.println("The exception message: " + throwable.getMessage( ));
      }
      out.println("</body>");
      out.println("</html>");
   }

   // Method to handle POST method request.
   public void doPost(HttpServletRequest request, HttpServletResponse response)
      throws ServletException, IOException {

      doGet(request, response);
   }
}
Compile ErrorHandler.java in usual way and put your class file in
Let us add the following configuration in web.xml to handle exceptions −
<servlet>
   <servlet-name>ErrorHandler</servlet-name>
   <servlet-class>ErrorHandler</servlet-class>
</servlet>

<!-- servlet mappings -->
<servlet-mapping>
   <servlet-name>ErrorHandler</servlet-name>
   <url-pattern>/ErrorHandler</url-pattern>
</servlet-mapping>

<error-page>
   <error-code>404</error-code>
   <location>/ErrorHandler</location>
</error-page>

<error-page>
   <exception-type>java.lang.Throwable</exception-type >
   <location>/ErrorHandler</location>
</error-page>
Now try to use a servlet which raise any exception or type a wrong URL, this would trigger Web Container to call ErrorHandler servlet and display an appropriate message as programmed. For example, if you type a wrong URL then it would display the following result −
The status code : 404
The above code may not work with some web browsers. So try with Mozilla and Safari and it should work.
Servlets - Cookies Handling
Cookies are text files stored on the client computer and they are kept for various information tracking purpose. Java Servlets transparently supports HTTP cookies.
There are three steps involved in identifying returning users −
Server script sends a set of cookies to the browser. For example name, age, or identification number etc.
Browser stores this information on local machine for future use.
When next time browser sends any request to web server then it sends those cookies information to the server and server uses that information to identify the user.
This chapter will teach you how to set or reset cookies, how to access them and how to delete them.
The Anatomy of a Cookie
Cookies are usually set in an HTTP header (although JavaScript can also set a cookie directly on a browser). A servlet that sets a cookie might send headers that look something like this −
HTTP/1.1 200 OK
Date: Fri, 04 Feb 2000 21:03:38 GMT
Server: Apache/1.3.9 (UNIX) PHP/4.0b3
Set-Cookie: name = xyz; expires = Friday, 04-Feb-07 22:03:38 GMT;
   path = /; domain = tutorialspoint.com
Connection: close
Content-Type: text/html
As you can see, the Set-Cookie header contains a name value pair, a GMT date, a path and a domain. The name and value will be URL encoded. The expires field is an instruction to the browser to "forget" the cookie after the given time and date.
If the browser is configured to store cookies, it will then keep this information until the expiry date. If the user points the browser at any page that matches the path and domain of the cookie, it will resend the cookie to the server. The browser's headers might look something like this −
GET / HTTP/1.0
Connection: Keep-Alive
User-Agent: Mozilla/4.6 (X11; I; Linux 2.2.6-15apmac ppc)
Host: zink.demon.co.uk:1126
Accept: image/gif, */*
Accept-Encoding: gzip
Accept-Language: en
Accept-Charset: iso-8859-1,*,utf-8
Cookie: name = xyz
A servlet will then have access to the cookie through the request method request.getCookies() which returns an array of Cookie objects.
Servlet Cookies Methods
Following is the list of useful methods which you can use while manipulating cookies in servlet.
| Sr.No. | Method & Description |
|---|---|
| 1 | public void setDomain(String pattern) This method sets the domain to which cookie applies, for example tutorialspoint.com. |
| 2 | public String getDomain() This method gets the domain to which cookie applies, for example tutorialspoint.com. |
| 3 | public void setMaxAge(int expiry) This method sets how much time (in seconds) should elapse before the cookie expires. If you don't set this, the cookie will last only for the current session. |
| 4 | public int getMaxAge() This method returns the maximum age of the cookie, specified in seconds, By default, -1 indicating the cookie will persist until browser shutdown. |
| 5 | public String getName() This method returns the name of the cookie. The name cannot be changed after creation. |
| 6 | public void setValue(String newValue) This method sets the value associated with the cookie |
| 7 | public String getValue() This method gets the value associated with the cookie. |
| 8 | public void setPath(String uri) This method sets the path to which this cookie applies. If you don't specify a path, the cookie is returned for all URLs in the same directory as the current page as well as all subdirectories. |
| 9 | public String getPath() This method gets the path to which this cookie applies. |
| 10 | public void setSecure(boolean flag) This method sets the boolean value indicating whether the cookie should only be sent over encrypted (i.e. SSL) connections. |
| 11 | public void setComment(String purpose) This method specifies a comment that describes a cookie's purpose. The comment is useful if the browser presents the cookie to the user. |
| 12 | public String getComment() This method returns the comment describing the purpose of this cookie, or null if the cookie has no comment. |
Setting Cookies with Servlet
Setting cookies with servlet involves three steps −
(1) Creating a Cookie object − You call the Cookie constructor with a cookie name and a cookie value, both of which are strings.
Cookie cookie = new Cookie("key","value");
Keep in mind, neither the name nor the value should contain white space or any of the following characters −
[ ] ( ) = , " / ? @ : ;
(2) Setting the maximum age − You use setMaxAge to specify how long (in seconds) the cookie should be valid. Following would set up a cookie for 24 hours.
cookie.setMaxAge(60 * 60 * 24);
(3) Sending the Cookie into the HTTP response headers − You use response.addCookie to add cookies in the HTTP response header as follows −
response.addCookie(cookie);
Example
Let us modify our Form Example to set the cookies for first and last name.
// Import required java libraries
import java.io.*;
import javax.servlet.*;
import javax.servlet.http.*;

// Extend HttpServlet class
public class HelloForm extends HttpServlet {

   public void doGet(HttpServletRequest request, HttpServletResponse response)
      throws ServletException, IOException {

      // Create cookies for first and last names.
      Cookie firstName = new Cookie("first_name", request.getParameter("first_name"));
      Cookie lastName = new Cookie("last_name", request.getParameter("last_name"));

      // Set expiry date after 24 Hrs for both the cookies.
      firstName.setMaxAge(60*60*24);
      lastName.setMaxAge(60*60*24);

      // Add both the cookies in the response header.
      response.addCookie( firstName );
      response.addCookie( lastName );

      // Set response content type
      response.setContentType("text/html");

      PrintWriter out = response.getWriter();
      String title = "Setting Cookies Example";
      String docType =
         "<!doctype html public \"-//w3c//dtd html 4.0 " + "transitional//en\">\n";

      out.println(docType +
         "<html>\n" +
            "<head>
               <title>" + title + "</title>
            </head>\n" +

            "<body bgcolor = \"#f0f0f0\">\n" +
               "<h1 align = \"center\">" + title + "</h1>\n" +
               "<ul>\n" +
                  "  <li><b>First Name</b>: "
                  + request.getParameter("first_name") + "\n" +
                  "  <li><b>Last Name</b>: "
                  + request.getParameter("last_name") + "\n" +
               "</ul>\n" +
            "</body>
         </html>"
      );
   }
}
Compile the above servlet HelloForm and create appropriate entry in web.xml file and finally try following HTML page to call servlet.
<html>
   <body>
      <form action = "HelloForm" method = "GET">
         First Name: <input type = "text" name = "first_name">
         <br />
         Last Name: <input type = "text" name = "last_name" />
         <input type = "submit" value = "Submit" />
      </form>
   </body>
</html>
Keep above HTML content in a file Hello.htm and put it in <Tomcat-installationdirectory>/webapps/ROOT directory. When you would access http://localhost:8080/Hello.htm, here is the actual output of the above form.
Try to enter First Name and Last Name and then click submit button. This would display first name and last name on your screen and same time it would set two cookies firstName and lastName which would be passed back to the server when next time you would press Submit button.
Next section would explain you how you would access these cookies back in your web application.
Reading Cookies with Servlet
To read cookies, you need to create an array of javax.servlet.http.Cookie objects by calling the getCookies() method of HttpServletRequest. Then cycle through the array, and use getName() and getValue() methods to access each cookie and associated value.
Example
Let us read cookies which we have set in previous example −
// Import required java libraries
import java.io.*;
import javax.servlet.*;
import javax.servlet.http.*;

// Extend HttpServlet class
public class ReadCookies extends HttpServlet {

   public void doGet(HttpServletRequest request, HttpServletResponse response)
      throws ServletException, IOException {

      Cookie cookie = null;
      Cookie[] cookies = null;

      // Get an array of Cookies associated with this domain
      cookies = request.getCookies();

      // Set response content type
      response.setContentType("text/html");

      PrintWriter out = response.getWriter();
      String title = "Reading Cookies Example";
      String docType =
         "<!doctype html public \"-//w3c//dtd html 4.0 " +
         "transitional//en\">\n";

      out.println(docType +
         "<html>\n" +
         "<head><title>" + title + "</title></head>\n" +
         "<body bgcolor = \"#f0f0f0\">\n" );

      if( cookies != null ) {
         out.println("<h2> Found Cookies Name and Value</h2>");

         for (int i = 0; i < cookies.length; i++) {
            cookie = cookies[i];
            out.print("Name : " + cookie.getName( ) + ",  ");
            out.print("Value: " + cookie.getValue( ) + " <br/>");
         }
      } else {
         out.println("<h2>No cookies founds</h2>");
      }
      out.println("</body>");
      out.println("</html>");
   }
}
Compile above servlet ReadCookies and create appropriate entry in web.xml file. If you would have set first_name cookie as "John" and last_name cookie as "Player" then running http://localhost:8080/ReadCookies would display the following result −
 Found Cookies Name and Value
Name : first_name, Value: John

Name : last_name,  Value: Player
Delete Cookies with Servlet
To delete cookies is very simple. If you want to delete a cookie then you simply need to follow up following three steps −
Read an already existing cookie and store it in Cookie object.
Set cookie age as zero using setMaxAge() method to delete an existing cookie
Add this cookie back into response header.
Example
The following example would delete and existing cookie named "first_name" and when you would run ReadCookies servlet next time it would return null value for first_name.
// Import required java libraries
import java.io.*;
import javax.servlet.*;
import javax.servlet.http.*;

// Extend HttpServlet class
public class DeleteCookies extends HttpServlet {

   public void doGet(HttpServletRequest request, HttpServletResponse response)
      throws ServletException, IOException {

      Cookie cookie = null;
      Cookie[] cookies = null;

      // Get an array of Cookies associated with this domain
      cookies = request.getCookies();

      // Set response content type
      response.setContentType("text/html");

      PrintWriter out = response.getWriter();
      String title = "Delete Cookies Example";
      String docType =
         "<!doctype html public \"-//w3c//dtd html 4.0 " + "transitional//en\">\n";

      out.println(docType +
         "<html>\n" +
         "<head><title>" + title + "</title></head>\n" +
         "<body bgcolor = \"#f0f0f0\">\n" );

      if( cookies != null ) {
         out.println("<h2> Cookies Name and Value</h2>");

         for (int i = 0; i < cookies.length; i++) {
            cookie = cookies[i];

            if((cookie.getName( )).compareTo("first_name") == 0 ) {
               cookie.setMaxAge(0);
               response.addCookie(cookie);
               out.print("Deleted cookie : " + cookie.getName( ) + "<br/>");
            }
            out.print("Name : " + cookie.getName( ) + ",  ");
            out.print("Value: " + cookie.getValue( )+" <br/>");
         }
      } else {
         out.println("<h2>No cookies founds</h2>");
      }
      out.println("</body>");
      out.println("</html>");
   }
}
Compile above servlet DeleteCookies and create appropriate entry in web.xml file. Now running http://localhost:8080/DeleteCookies would display the following result −
Cookies Name and Value
Deleted cookie : first_name
Name : first_name, Value: John
Name : last_name,  Value: Player
Now try to run http://localhost:8080/ReadCookies and it would display only one cookie as follows −
 Found Cookies Name and Value
Name : last_name,  Value: Player
You can delete your cookies in Internet Explorer manually. Start at the Tools menu and select Internet Options. To delete all cookies, press Delete Cookies.
Servlets - Session Tracking
HTTP is a "stateless" protocol which means each time a client retrieves a Web page, the client opens a separate connection to the Web server and the server automatically does not keep any record of previous client request.
Still there are following three ways to maintain session between web client and web server −
Cookies
A webserver can assign a unique session ID as a cookie to each web client and for subsequent requests from the client they can be recognized using the recieved cookie.
This may not be an effective way because many time browser does not support a cookie, so I would not recommend to use this procedure to maintain the sessions.
Hidden Form Fields
A web server can send a hidden HTML form field along with a unique session ID as follows −
<input type = "hidden" name = "sessionid" value = "12345">
This entry means that, when the form is submitted, the specified name and value are automatically included in the GET or POST data. Each time when web browser sends request back, then session_id value can be used to keep the track of different web browsers.
This could be an effective way of keeping track of the session but clicking on a regular (<A HREF...>) hypertext link does not result in a form submission, so hidden form fields also cannot support general session tracking.
URL Rewriting
You can append some extra data on the end of each URL that identifies the session, and the server can associate that session identifier with data it has stored about that session.
For example, with http://tutorialspoint.com/file.htm;sessionid = 12345, the session identifier is attached as sessionid = 12345 which can be accessed at the web server to identify the client.
URL rewriting is a better way to maintain sessions and it works even when browsers don't support cookies. The drawback of URL re-writing is that you would have to generate every URL dynamically to assign a session ID, even in case of a simple static HTML page.
The HttpSession Object
Apart from the above mentioned three ways, servlet provides HttpSession Interface which provides a way to identify a user across more than one page request or visit to a Web site and to store information about that user.
The servlet container uses this interface to create a session between an HTTP client and an HTTP server. The session persists for a specified time period, across more than one connection or page request from the user.
You would get HttpSession object by calling the public method getSession() of HttpServletRequest, as below −
HttpSession session = request.getSession();
You need to call request.getSession() before you send any document content to the client. Here is a summary of the important methods available through HttpSession object −
| Sr.No. | Method & Description |
|---|---|
| 1 | public Object getAttribute(String name) This method returns the object bound with the specified name in this session, or null if no object is bound under the name. |
| 2 | public Enumeration getAttributeNames() This method returns an Enumeration of String objects containing the names of all the objects bound to this session. |
| 3 | public long getCreationTime() This method returns the time when this session was created, measured in milliseconds since midnight January 1, 1970 GMT. |
| 4 | public String getId() This method returns a string containing the unique identifier assigned to this session. |
| 5 | public long getLastAccessedTime() This method returns the last accessed time of the session, in the format of milliseconds since midnight January 1, 1970 GMT |
| 6 | public int getMaxInactiveInterval() This method returns the maximum time interval (seconds), that the servlet container will keep the session open between client accesses. |
| 7 | public void invalidate() This method invalidates this session and unbinds any objects bound to it. |
| 8 | public boolean isNew( This method returns true if the client does not yet know about the session or if the client chooses not to join the session. |
| 9 | public void removeAttribute(String name) This method removes the object bound with the specified name from this session. |
| 10 | public void setAttribute(String name, Object value) This method binds an object to this session, using the name specified. |
| 11 | public void setMaxInactiveInterval(int interval) This method specifies the time, in seconds, between client requests before the servlet container will invalidate this session. |
Session Tracking Example
This example describes how to use the HttpSession object to find out the creation time and the last-accessed time for a session. We would associate a new session with the request if one does not already exist.
// Import required java libraries
import java.io.*;
import javax.servlet.*;
import javax.servlet.http.*;
import java.util.*;

// Extend HttpServlet class
public class SessionTrack extends HttpServlet {

   public void doGet(HttpServletRequest request, HttpServletResponse response)
      throws ServletException, IOException {

      // Create a session object if it is already not  created.
      HttpSession session = request.getSession(true);

      // Get session creation time.
      Date createTime = new Date(session.getCreationTime());

      // Get last access time of this web page.
      Date lastAccessTime = new Date(session.getLastAccessedTime());

      String title = "Welcome Back to my website";
      Integer visitCount = new Integer(0);
      String visitCountKey = new String("visitCount");
      String userIDKey = new String("userID");
      String userID = new String("ABCD");

      // Check if this is new comer on your web page.
      if (session.isNew()) {
         title = "Welcome to my website";
         session.setAttribute(userIDKey, userID);
      } else {
         visitCount = (Integer)session.getAttribute(visitCountKey);
         visitCount = visitCount + 1;
         userID = (String)session.getAttribute(userIDKey);
      }
      session.setAttribute(visitCountKey,  visitCount);

      // Set response content type
      response.setContentType("text/html");
      PrintWriter out = response.getWriter();

      String docType =
         "<!doctype html public \"-//w3c//dtd html 4.0 " +
         "transitional//en\">\n";

      out.println(docType +
         "<html>\n" +
            "<head><title>" + title + "</title></head>\n" +

            "<body bgcolor = \"#f0f0f0\">\n" +
               "<h1 align = \"center\">" + title + "</h1>\n" +
               "<h2 align = \"center\">Session Infomation</h2>\n" +
               "<table border = \"1\" align = \"center\">\n" +

                  "<tr bgcolor = \"#949494\">\n" +
                     "  <th>Session info</th><th>value</th>
                  </tr>\n" +

                  "<tr>\n" +
                     "  <td>id</td>\n" +
                     "  <td>" + session.getId() + "</td>
                  </tr>\n" +

                  "<tr>\n" +
                     "  <td>Creation Time</td>\n" +
                     "  <td>" + createTime + "  </td>
                  </tr>\n" +

                  "<tr>\n" +
                     "  <td>Time of Last Access</td>\n" +
                     "  <td>" + lastAccessTime + "  </td>
                  </tr>\n" +

                  "<tr>\n" +
                     "  <td>User ID</td>\n" +
                     "  <td>" + userID + "  </td>
                  </tr>\n" +

                  "<tr>\n" +
                     "  <td>Number of visits</td>\n" +
                     "  <td>" + visitCount + "</td>
                  </tr>\n" +
               "</table>\n" +
            "</body>
         </html>"
      );
   }
}
Compile the above servlet SessionTrack and create appropriate entry in web.xml file. Now running http://localhost:8080/SessionTrack would display the following result when you would run for the first time −
Welcome to my website
Session Infomation


Session info
value


id
0AE3EC93FF44E3C525B4351B77ABB2D5


Creation Time
Tue Jun 08 17:26:40 GMT+04:00 2010


Time of Last Access
Tue Jun 08 17:26:40 GMT+04:00 2010


User ID
ABCD


Number of visits
0
Now try to run the same servlet for second time, it would display following result.
Welcome Back to my website
Session Infomation


info type
value


id
0AE3EC93FF44E3C525B4351B77ABB2D5


Creation Time
Tue Jun 08 17:26:40 GMT+04:00 2010


Time of Last Access
Tue Jun 08 17:26:40 GMT+04:00 2010


User ID
ABCD


Number of visits
1
Deleting Session Data
When you are done with a user's session data, you have several options −
Remove a particular attribute − You can call public void removeAttribute(String name) method to delete the value associated with a particular key.
Delete the whole session − You can call public void invalidate() method to discard an entire session.
Setting Session timeout − You can call public void setMaxInactiveInterval(int interval) method to set the timeout for a session individually.
Log the user out − The servers that support servlets 2.4, you can call logout to log the client out of the Web server and invalidate all sessions belonging to all the users.
web.xml Configuration − If you are using Tomcat, apart from the above mentioned methods, you can configure session time out in web.xml file as follows.
<session-config>
   <session-timeout>15</session-timeout>
</session-config>
The timeout is expressed as minutes, and overrides the default timeout which is 30 minutes in Tomcat.
The getMaxInactiveInterval( ) method in a servlet returns the timeout period for that session in seconds. So if your session is configured in web.xml for 15 minutes, getMaxInactiveInterval( ) returns 900.
Servlets - Database Access
This tutorial assumes you have understanding on how JDBC application works. Before starting with database access through a servlet, make sure you have proper JDBC environment setup along with a database.
For more detail on how to access database using JDBC and its environment setup you can go through our JDBC Tutorial.
To start with basic concept, let us create a simple table and create few records in that table as follows −
Create Table
To create the Employees table in TEST database, use the following steps −
Step 1
Open a Command Prompt and change to the installation directory as follows −
C:\>
C:\>cd Program Files\MySQL\bin
C:\Program Files\MySQL\bin>
Step 2
Login to database as follows
C:\Program Files\MySQL\bin>mysql -u root -p
Enter password: ********
mysql>
Step 3
Create the table Employee in TEST database as follows −
mysql> use TEST;
mysql> create table Employees (
   id int not null,
   age int not null,
   first varchar (255),
   last varchar (255)
);
Query OK, 0 rows affected (0.08 sec)
mysql>
Create Data Records
Finally you create few records in Employee table as follows −
mysql> INSERT INTO Employees VALUES (100, 18, 'Zara', 'Ali');
Query OK, 1 row affected (0.05 sec)

mysql> INSERT INTO Employees VALUES (101, 25, 'Mahnaz', 'Fatma');
Query OK, 1 row affected (0.00 sec)

mysql> INSERT INTO Employees VALUES (102, 30, 'Zaid', 'Khan');
Query OK, 1 row affected (0.00 sec)

mysql> INSERT INTO Employees VALUES (103, 28, 'Sumit', 'Mittal');
Query OK, 1 row affected (0.00 sec)

mysql>
Accessing a Database
Here is an example which shows how to access TEST database using Servlet.
// Loading required libraries
import java.io.*;
import java.util.*;
import javax.servlet.*;
import javax.servlet.http.*;
import java.sql.*;

public class DatabaseAccess extends HttpServlet{

   public void doGet(HttpServletRequest request, HttpServletResponse response)
      throws ServletException, IOException {

      // JDBC driver name and database URL
      static final String JDBC_DRIVER = "com.mysql.jdbc.Driver";
      static final String DB_URL="jdbc:mysql://localhost/TEST";

      //  Database credentials
      static final String USER = "root";
      static final String PASS = "password";

      // Set response content type
      response.setContentType("text/html");
      PrintWriter out = response.getWriter();
      String title = "Database Result";

      String docType =
         "<!doctype html public \"-//w3c//dtd html 4.0 " + "transitional//en\">\n";

      out.println(docType +
         "<html>\n" +
         "<head><title>" + title + "</title></head>\n" +
         "<body bgcolor = \"#f0f0f0\">\n" +
         "<h1 align = \"center\">" + title + "</h1>\n");
      try {
         // Register JDBC driver
         Class.forName("com.mysql.jdbc.Driver");

         // Open a connection
         Connection conn = DriverManager.getConnection(DB_URL, USER, PASS);

         // Execute SQL query
         Statement stmt = conn.createStatement();
         String sql;
         sql = "SELECT id, first, last, age FROM Employees";
         ResultSet rs = stmt.executeQuery(sql);

         // Extract data from result set
         while(rs.next()){
            //Retrieve by column name
            int id  = rs.getInt("id");
            int age = rs.getInt("age");
            String first = rs.getString("first");
            String last = rs.getString("last");

            //Display values
            out.println("ID: " + id + "<br>");
            out.println(", Age: " + age + "<br>");
            out.println(", First: " + first + "<br>");
            out.println(", Last: " + last + "<br>");
         }
         out.println("</body></html>");

         // Clean-up environment
         rs.close();
         stmt.close();
         conn.close();
      } catch(SQLException se) {
         //Handle errors for JDBC
         se.printStackTrace();
      } catch(Exception e) {
         //Handle errors for Class.forName
         e.printStackTrace();
      } finally {
         //finally block used to close resources
         try {
            if(stmt!=null)
               stmt.close();
         } catch(SQLException se2) {
         } // nothing we can do
         try {
            if(conn!=null)
            conn.close();
         } catch(SQLException se) {
            se.printStackTrace();
         } //end finally try
      } //end try
   }
}
Now let us compile above servlet and create following entries in web.xml
....
<servlet>
   <servlet-name>DatabaseAccess</servlet-name>
   <servlet-class>DatabaseAccess</servlet-class>
</servlet>

<servlet-mapping>
   <servlet-name>DatabaseAccess</servlet-name>
   <url-pattern>/DatabaseAccess</url-pattern>
</servlet-mapping>
....
Now call this servlet using URL http://localhost:8080/DatabaseAccess which would display following response −
Database Result
ID: 100, Age: 18, First: Zara, Last: Ali
ID: 101, Age: 25, First: Mahnaz, Last: Fatma
ID: 102, Age: 30, First: Zaid, Last: Khan
ID: 103, Age: 28, First: Sumit, Last: Mittal
Servlets - File Uploading
A Servlet can be used with an HTML form tag to allow users to upload files to the server. An uploaded file could be a text file or image file or any document.
Creating a File Upload Form
The following HTM code below creates an uploader form. Following are the important points to be noted down −
The form method attribute should be set to POST method and GET method can not be used
The form enctype attribute should be set to multipart/form-data.
The form action attribute should be set to a servlet file which would handle file uploading at backend server. Following example is using UploadServlet servlet to upload file.
To upload a single file you should use a single <input .../> tag with attribute type="file". To allow multiple files uploading, include more than one input tags with different values for the name attribute. The browser associates a Browse button with each of them.
<html>
   <head>
      <title>File Uploading Form</title>
   </head>

   <body>
      <h3>File Upload:</h3>
      Select a file to upload: <br />
      <form action = "UploadServlet" method = "post" enctype = "multipart/form-data">
         <input type = "file" name = "file" size = "50" />
         <br />
         <input type = "submit" value = "Upload File" />
      </form>
   </body>
</html>
This will display following result which would allow to select a file from local PC and when user would click at "Upload File", form would be submitted along with the selected fil −
File Upload:
Select a file to upload:


NOTE: This is just dummy form and would not work.
Writing Backend Servlet
Following is the servlet UploadServlet which would take care of accepting uploaded file and to store it in directory <Tomcat-installation-directory>/webapps/data. This directory name could also be added using an external configuration such as a context-param element in web.xml as follows −
<web-app>
   ....
   <context-param>
      <description>Location to store uploaded file</description>
      <param-name>file-upload</param-name>
      <param-value>
         c:\apache-tomcat-5.5.29\webapps\data\
     </param-value>
   </context-param>
   ....
</web-app>
Following is the source code for UploadServlet which can handle multiple file uploading at a time. Before proceeding you have make sure the followings −
Following example depends on FileUpload, so make sure you have the latest version of commons-fileupload.x.x.jar file in your classpath. You can download it from https://commons.apache.org/fileupload/.
FileUpload depends on Commons IO, so make sure you have the latest version of commons-io-x.x.jar file in your classpath. You can download it from https://commons.apache.org/io/.
While testing following example, you should upload a file which has less size than maxFileSize otherwise file would not be uploaded.
Make sure you have created directories c:\temp and c:\apache-tomcat8.0.28\webapps\data well in advance.
// Import required java libraries
import java.io.*;
import java.util.*;

import javax.servlet.ServletConfig;
import javax.servlet.ServletException;
import javax.servlet.http.HttpServlet;
import javax.servlet.http.HttpServletRequest;
import javax.servlet.http.HttpServletResponse;

import org.apache.commons.fileupload.FileItem;
import org.apache.commons.fileupload.FileUploadException;
import org.apache.commons.fileupload.disk.DiskFileItemFactory;
import org.apache.commons.fileupload.servlet.ServletFileUpload;
import org.apache.commons.io.output.*;

public class UploadServlet extends HttpServlet {

   private boolean isMultipart;
   private String filePath;
   private int maxFileSize = 50 * 1024;
   private int maxMemSize = 4 * 1024;
   private File file ;

   public void init( ){
      // Get the file location where it would be stored.
      filePath = getServletContext().getInitParameter("file-upload");
   }

   public void doPost(HttpServletRequest request, HttpServletResponse response)
      throws ServletException, java.io.IOException {

      // Check that we have a file upload request
      isMultipart = ServletFileUpload.isMultipartContent(request);
      response.setContentType("text/html");
      java.io.PrintWriter out = response.getWriter( );

      if( !isMultipart ) {
         out.println("<html>");
         out.println("<head>");
         out.println("<title>Servlet upload</title>");
         out.println("</head>");
         out.println("<body>");
         out.println("<p>No file uploaded</p>");
         out.println("</body>");
         out.println("</html>");
         return;
      }

      DiskFileItemFactory factory = new DiskFileItemFactory();

      // maximum size that will be stored in memory
      factory.setSizeThreshold(maxMemSize);

      // Location to save data that is larger than maxMemSize.
      factory.setRepository(new File("c:\\temp"));

      // Create a new file upload handler
      ServletFileUpload upload = new ServletFileUpload(factory);

      // maximum file size to be uploaded.
      upload.setSizeMax( maxFileSize );

      try {
         // Parse the request to get file items.
         List fileItems = upload.parseRequest(request);

         // Process the uploaded file items
         Iterator i = fileItems.iterator();

         out.println("<html>");
         out.println("<head>");
         out.println("<title>Servlet upload</title>");
         out.println("</head>");
         out.println("<body>");

         while ( i.hasNext () ) {
            FileItem fi = (FileItem)i.next();
            if ( !fi.isFormField () ) {
               // Get the uploaded file parameters
               String fieldName = fi.getFieldName();
               String fileName = fi.getName();
               String contentType = fi.getContentType();
               boolean isInMemory = fi.isInMemory();
               long sizeInBytes = fi.getSize();

               // Write the file
               if( fileName.lastIndexOf("\\") >= 0 ) {
                  file = new File( filePath + fileName.substring( fileName.lastIndexOf("\\"))) ;
               } else {
                  file = new File( filePath + fileName.substring(fileName.lastIndexOf("\\")+1)) ;
               }
               fi.write( file ) ;
               out.println("Uploaded Filename: " + fileName + "<br>");
            }
         }
         out.println("</body>");
         out.println("</html>");
         } catch(Exception ex) {
            System.out.println(ex);
         }
      }

      public void doGet(HttpServletRequest request, HttpServletResponse response)
         throws ServletException, java.io.IOException {

         throw new ServletException("GET method used with " +
            getClass( ).getName( )+": POST method required.");
      }
   }
}
Compile and Running Servlet
Compile above servlet UploadServlet and create required entry in web.xml file as follows.
<servlet>
   <servlet-name>UploadServlet</servlet-name>
   <servlet-class>UploadServlet</servlet-class>
</servlet>

<servlet-mapping>
   <servlet-name>UploadServlet</servlet-name>
   <url-pattern>/UploadServlet</url-pattern>
</servlet-mapping>
Now try to upload files using the HTML form which you created above. When you would try http://localhost:8080/UploadFile.htm, it would display following result which would help you uploading any file from your local machine.
File Upload:Select a file to upload:
If your servlet script works fine, your file should be uploaded in c:\apache-tomcat8.0.28\webapps\data\ directory.
Servlets - Handling Date
One of the most important advantages of using Servlet is that you can use most of the methods available in core Java. This tutorial would take you through Java provided Date class which is available in java.util package, this class encapsulates the current date and time.
The Date class supports two constructors. The first constructor initializes the object with the current date and time.
Date( )
The following constructor accepts one argument that equals the number of milliseconds that have elapsed since midnight, January 1, 1970
Date(long millisec)
Once you have a Date object available, you can call any of the following support methods to play with dates −
| Sr.No. | Methods & Description |
|---|---|
| 1 | boolean after(Date date) Returns true if the invoking Date object contains a date that is later than the one specified by date, otherwise, it returns false. |
| 2 | boolean before(Date date) Returns true if the invoking Date object contains a date that is earlier than the one specified by date, otherwise, it returns false. |
| 3 | Object clone( ) Duplicates the invoking Date object. |
| 4 | int compareTo(Date date) Compares the value of the invoking object with that of date. Returns 0 if the values are equal. Returns a negative value if the invoking object is earlier than date. Returns a positive value if the invoking object is later than date. |
| 5 | int compareTo(Object obj) Operates identically to compareTo(Date) if obj is of class Date. Otherwise, it throws a ClassCastException. |
| 6 | boolean equals(Object date) Returns true if the invoking Date object contains the same time and date as the one specified by date, otherwise, it returns false. |
| 7 | long getTime( ) Returns the number of milliseconds that have elapsed since January 1, 1970. |
| 8 | int hashCode( ) Returns a hash code for the invoking object. |
| 9 | void setTime(long time) Sets the time and date as specified by time, which represents an elapsed time in milliseconds from midnight, January 1, 1970. |
| 10 | String toString( ) Converts the invoking Date object into a string and returns the result. |
Getting Current Date & Time
This is very easy to get current date and time in Java Servlet. You can use a simple Date object with toString() method to print current date and time as follows −
// Import required java libraries
import java.io.*;
import java.util.Date;
import javax.servlet.*;
import javax.servlet.http.*;

// Extend HttpServlet class
public class CurrentDate extends HttpServlet {

   public void doGet(HttpServletRequest request, HttpServletResponse response)
      throws ServletException, IOException {

      // Set response content type
      response.setContentType("text/html");

      PrintWriter out = response.getWriter();
      String title = "Display Current Date & Time";
      Date date = new Date();
      String docType = "<!doctype html public \"-//w3c//dtd html 4.0 " + "transitional//en\">\n";

      out.println(docType +
         "<html>\n" +
            "<head><title>" + title + "</title></head>\n" +
            "<body bgcolor = \"#f0f0f0\">\n" +
               "<h1 align = \"center\">" + title + "</h1>\n" +
               "<h2 align = \"center\">" + date.toString() + "</h2>\n" +
            "</body>
         </html>"
      );
   }
}
Now let us compile above servlet and create appropriate entries in web.xml and then call this servlet using URL http://localhost:8080/CurrentDate. This would produce following result −
Display Current Date & Time
Mon Jun 21 21:46:49 GMT+04:00 2010
Try to refresh URL http://localhost:8080/CurrentDate and you would find difference in seconds every time you would refresh.
Date Comparison
As I mentioned above you can use all the available Java methods in your Servlet. In case you need to compare two dates, following are the methods −
You can use getTime( ) to obtain the number of milliseconds that have elapsed since midnight, January 1, 1970, for both objects and then compare these two values.
You can use the methods before( ), after( ), and equals( ). Because the 12th of the month comes before the 18th, for example, new Date(99, 2, 12).before(new Date (99, 2, 18)) returns true.
You can use the compareTo( ) method, which is defined by the Comparable interface and implemented by Date.
Date Formatting using SimpleDateFormat
SimpleDateFormat is a concrete class for formatting and parsing dates in a localesensitive manner. SimpleDateFormat allows you to start by choosing any user-defined patterns for date-time formatting.
Let us modify above example as follows −
// Import required java libraries
import java.io.*;
import java.text.*;
import java.util.Date;
import javax.servlet.*;
import javax.servlet.http.*;

// Extend HttpServlet class
public class CurrentDate extends HttpServlet {

   public void doGet(HttpServletRequest request, HttpServletResponse response)
      throws ServletException, IOException {

      // Set response content type
      response.setContentType("text/html");

      PrintWriter out = response.getWriter();
      String title = "Display Current Date & Time";
      Date dNow = new Date( );
      SimpleDateFormat ft = new SimpleDateFormat ("E yyyy.MM.dd 'at' hh:mm:ss a zzz");
      String docType = "<!doctype html public \"-//w3c//dtd html 4.0 " + "transitional//en\">\n";

      out.println(docType +
         "<html>\n" +
            "<head><title>" + title + "</title></head>\n" +
            "<body bgcolor = \"#f0f0f0\">\n" +
               "<h1 align = \"center\">" + title + "</h1>\n" +
               "<h2 align = \"center\">" + ft.format(dNow) + "</h2>\n" +
            "</body>
         </html>"
      );
   }
}
Compile above servlet once again and then call this servlet using URL http://localhost:8080/CurrentDate. This would produce following result −
Display Current Date & Time
Mon 2010.06.21 at 10:06:44 PM GMT+04:00
Simple DateFormat Format Codes
To specify the time format use a time pattern string. In this pattern, all ASCII letters are reserved as pattern letters, which are defined as the following −
| Character | Description | Example |
|---|---|---|
| G | Era designator | AD |
| y | Year in four digits | 2001 |
| M | Month in year | July or 07 |
| d | Day in month | 10 |
| h | Hour in A.M./P.M. (1~12) | 12 |
| H | Hour in day (0~23) | 22 |
| m | Minute in hour | 30 |
| s | Second in minute | 55 |
| S | Millisecond | 234 |
| E | Day in week | Tuesday |
| D | Day in year | 360 |
| F | Day of week in month | 2 (second Wed. in July) |
| w | Week in year | 40 |
| W | Week in month | 1 |
| a | A.M./P.M. marker | PM |
| k | Hour in day (1~24) | 24 |
| K | Hour in A.M./P.M. (0~11) | 10 |
| z | Time zone | Eastern Standard Time |
| ' | Escape for text | Delimiter |
| " | Single quote | ` |
For a complete list of constant available methods to manipulate date, you can refer to standard Java documentation.
Servlets - Page Redirection
Page redirection is a technique where the client is sent to a new location other than requested. Page redirection is generally used when a document moves to a new location or may be because of load balancing.
The simplest way of redirecting a request to another page is using method sendRedirect() of response object. Following is the signature of this method −
public void HttpServletResponse.sendRedirect(String location)
throws IOException
This method sends back the response to the browser along with the status code and new page location. You can also use setStatus() and setHeader() methods together to achieve the same −
....
String site = "http://www.newpage.com" ;
response.setStatus(response.SC_MOVED_TEMPORARILY);
response.setHeader("Location", site);
....
Example
This example shows how a servlet performs page redirection to another location −
import java.io.*;
import java.sql.Date;
import java.util.*;
import javax.servlet.*;
import javax.servlet.http.*;

public class PageRedirect extends HttpServlet {

   public void doGet(HttpServletRequest request, HttpServletResponse response)
      throws ServletException, IOException {

      // Set response content type
      response.setContentType("text/html");

      // New location to be redirected
      String site = new String("http://www.photofuntoos.com");

      response.setStatus(response.SC_MOVED_TEMPORARILY);
      response.setHeader("Location", site);
   }
}
Now let us compile above servlet and create following entries in web.xml
....
<servlet>
   <servlet-name>PageRedirect</servlet-name>
   <servlet-class>PageRedirect</servlet-class>
</servlet>

<servlet-mapping>
   <servlet-name>PageRedirect</servlet-name>
   <url-pattern>/PageRedirect</url-pattern>
</servlet-mapping>
....
Now call this servlet using URL http://localhost:8080/PageRedirect. This would redirect you to URL http://www.photofuntoos.com.
Servlets - Hits Counter
Hit Counter for a Web Page
Many times you would be interested in knowing total number of hits on a particular page of your website. It is very simple to count these hits using a servlet because the life cycle of a servlet is controlled by the container in which it runs.
Following are the steps to be taken to implement a simple page hit counter which is based on Servlet Life Cycle −
Initialize a global variable in init() method.
Increase global variable every time either doGet() or doPost() method is called.
If required, you can use a database table to store the value of global variable in destroy() method. This value can be read inside init() method when servlet would be initialized next time. This step is optional.
If you want to count only unique page hits with-in a session then you can use isNew() method to check if same page already have been hit with-in that session. This step is optional.
You can display value of the global counter to show total number of hits on your web site. This step is also optional.
Here I'm assuming that the web container will not be restarted. If it is restarted or servlet destroyed, the hit counter will be reset.
Example
This example shows how to implement a simple page hit counter −
import java.io.*;
import java.sql.Date;
import java.util.*;
import javax.servlet.*;
import javax.servlet.http.*;

public class PageHitCounter extends HttpServlet {

   private int hitCount;

   public void init() {
      // Reset hit counter.
      hitCount = 0;
   }

   public void doGet(HttpServletRequest request, HttpServletResponse response)
      throws ServletException, IOException {

      // Set response content type
      response.setContentType("text/html");

      // This method executes whenever the servlet is hit
      // increment hitCount
      hitCount++;
      PrintWriter out = response.getWriter();
      String title = "Total Number of Hits";
      String docType = "<!doctype html public \"-//w3c//dtd html 4.0 " + "transitional//en\">\n";

      out.println(docType +
         "<html>\n" +
            "<head><title>" + title + "</title></head>\n" +
            "<body bgcolor = \"#f0f0f0\">\n" +
               "<h1 align = \"center\">" + title + "</h1>\n" +
               "<h2 align = \"center\">" + hitCount + "</h2>\n" +
            "</body>
         </html>"
      );
   }

   public void destroy() {
      // This is optional step but if you like you
      // can write hitCount value in your database.
   }
}
Now let us compile above servlet and create following entries in web.xml
<servlet>
   <servlet-name>PageHitCounter</servlet-name>
   <servlet-class>PageHitCounter</servlet-class>
</servlet>

<servlet-mapping>
   <servlet-name>PageHitCounter</servlet-name>
   <url-pattern>/PageHitCounter</url-pattern>
</servlet-mapping>
....
Now call this servlet using URL http://localhost:8080/PageHitCounter. This would increase counter by one every time this page gets refreshed and it would display following result −
Total Number of Hits
6
Hit Counter for a Website:
Many times you would be interested in knowing total number of hits on your whole website. This is also very simple in Servlet and we can achieve this using filters.
Following are the steps to be taken to implement a simple website hit counter which is based on Filter Life Cycle −
Initialize a global variable in init() method of a filter.
Increase global variable every time doFilter method is called.
If required, you can use a database table to store the value of global variable in destroy() method of filter. This value can be read inside init() method when filter would be initialized next time. This step is optional.
Here I'm assuming that the web container will not be restarted. If it is restarted or servlet destroyed, the hit counter will be reset.
Example
This example shows how to implement a simple website hit counter −
// Import required java libraries
import java.io.*;
import javax.servlet.*;
import javax.servlet.http.*;
import java.util.*;

public class SiteHitCounter implements Filter {

   private int hitCount;

   public void  init(FilterConfig config) throws ServletException {
      // Reset hit counter.
      hitCount = 0;
   }

   public void  doFilter(ServletRequest request, ServletResponse response, FilterChain chain)
      throws java.io.IOException, ServletException {

      // increase counter by one
      hitCount++;

      // Print the counter.
      System.out.println("Site visits count :"+ hitCount );

      // Pass request back down the filter chain
      chain.doFilter(request,response);
   }

   public void destroy() {
      // This is optional step but if you like you
      // can write hitCount value in your database.
   }
}
Now let us compile the above servlet and create the following entries in web.xml
....
<filter>
   <filter-name>SiteHitCounter</filter-name>
   <filter-class>SiteHitCounter</filter-class>
</filter>

<filter-mapping>
   <filter-name>SiteHitCounter</filter-name>
   <url-pattern>/*</url-pattern>
</filter-mapping>
....
Now call any URL like URL http://localhost:8080/. This would increase counter by one every time any page gets a hit and it would display following message in the log −
Site visits count : 1
Site visits count : 2
Site visits count : 3
Site visits count : 4
Site visits count : 5
..................
Servlets - Auto Page Refresh
Consider a webpage which is displaying live game score or stock market status or currency exchange ration. For all such type of pages, you would need to refresh your web page regularly using refresh or reload button with your browser.
Java Servlet makes this job easy by providing you a mechanism where you can make a webpage in such a way that it would refresh automatically after a given interval.
The simplest way of refreshing a web page is using method setIntHeader() of response object. Following is the signature of this method −
public void setIntHeader(String header, int headerValue)
This method sends back header "Refresh" to the browser along with an integer value which indicates time interval in seconds.
Auto Page Refresh Example
This example shows how a servlet performs auto page refresh using setIntHeader() method to set Refresh header.
// Import required java libraries
import java.io.*;
import javax.servlet.*;
import javax.servlet.http.*;
import java.util.*;

// Extend HttpServlet class
public class Refresh extends HttpServlet {

   // Method to handle GET method request.
   public void doGet(HttpServletRequest request, HttpServletResponse response)
      throws ServletException, IOException {

      // Set refresh, autoload time as 5 seconds
      response.setIntHeader("Refresh", 5);

      // Set response content type
      response.setContentType("text/html");

      // Get current time
      Calendar calendar = new GregorianCalendar();
      String am_pm;
      int hour = calendar.get(Calendar.HOUR);
      int minute = calendar.get(Calendar.MINUTE);
      int second = calendar.get(Calendar.SECOND);

      if(calendar.get(Calendar.AM_PM) == 0)
        am_pm = "AM";
      else
        am_pm = "PM";

      String CT = hour+":"+ minute +":"+ second +" "+ am_pm;

      PrintWriter out = response.getWriter();
      String title = "Auto Page Refresh using Servlet";
      String docType =
         "<!doctype html public \"-//w3c//dtd html 4.0 " + "transitional//en\">\n";

      out.println(docType +
         "<html>\n" +
         "<head><title>" + title + "</title></head>\n"+
         "<body bgcolor = \"#f0f0f0\">\n" +
         "<h1 align = \"center\">" + title + "</h1>\n" +
         "<p>Current Time is: " + CT + "</p>\n"
      );
   }

   // Method to handle POST method request.
   public void doPost(HttpServletRequest request, HttpServletResponse response)
      throws ServletException, IOException {

      doGet(request, response);
   }
}
Now let us compile the above servlet and create the following entries in web.xml
....
 <servlet>
     <servlet-name>Refresh</servlet-name>
     <servlet-class>Refresh</servlet-class>
 </servlet>

 <servlet-mapping>
     <servlet-name>Refresh</servlet-name>
     <url-pattern>/Refresh</url-pattern>
 </servlet-mapping>
....
Now call this servlet using URL http://localhost:8080/Refresh which would display current system time after every 5 seconds as follows. Just run the servlet and wait to see the result −
Auto Page Refresh using Servlet
Current Time is: 9:44:50 PM
Servlets - Sending Email
To send an email using your a Servlet is simple enough but to start with you should have JavaMail API and Java Activation Framework (JAF) installed on your machine.
You can download latest version of JavaMail (Version 1.2) from Java's standard website.
You can download latest version of JAF (Version 1.1.1) from Java's standard website.
Download and unzip these files, in the newly created top level directories you will find a number of jar files for both the applications. You need to add mail.jar and activation.jar files in your CLASSPATH.
Send a Simple Email
Here is an example to send a simple email from your machine. Here it is assumed that your localhost is connected to the internet and capable enough to send an email. Same time make sure all the jar files from Java Email API package and JAF package are available in CLASSPATH.
// File Name SendEmail.java
import java.io.*;
import java.util.*;
import javax.servlet.*;
import javax.servlet.http.*;
import javax.mail.*;
import javax.mail.internet.*;
import javax.activation.*;

public class SendEmail extends HttpServlet {

   public void doGet(HttpServletRequest request, HttpServletResponse response)
      throws ServletException, IOException {

      // Recipient's email ID needs to be mentioned.
      String to = "abcd@gmail.com";

      // Sender's email ID needs to be mentioned
      String from = "web@gmail.com";

      // Assuming you are sending email from localhost
      String host = "localhost";

      // Get system properties
      Properties properties = System.getProperties();

      // Setup mail server
      properties.setProperty("mail.smtp.host", host);

      // Get the default Session object.
      Session session = Session.getDefaultInstance(properties);

      // Set response content type
      response.setContentType("text/html");
      PrintWriter out = response.getWriter();

      try {
         // Create a default MimeMessage object.
         MimeMessage message = new MimeMessage(session);

         // Set From: header field of the header.
         message.setFrom(new InternetAddress(from));

         // Set To: header field of the header.
         message.addRecipient(Message.RecipientType.TO, new InternetAddress(to));

         // Set Subject: header field
         message.setSubject("This is the Subject Line!");

         // Now set the actual message
         message.setText("This is actual message");

         // Send message
         Transport.send(message);
         String title = "Send Email";
         String res = "Sent message successfully....";
         String docType =
            "<!doctype html public \"-//w3c//dtd html 4.0 " + "transitional//en\">\n";

         out.println(docType +
            "<html>\n" +
               "<head><title>" + title + "</title></head>\n" +
               "<body bgcolor = \"#f0f0f0\">\n" +
                  "<h1 align = \"center\">" + title + "</h1>\n" +
                  "<p align = \"center\">" + res + "</p>\n" +
               "</body>
            </html>"
         );
      } catch (MessagingException mex) {
         mex.printStackTrace();
      }
   }
}
Now let us compile the above servlet and create the following entries in web.xml
....
 <servlet>
   <servlet-name>SendEmail</servlet-name>
   <servlet-class>SendEmail</servlet-class>
</servlet>

<servlet-mapping>
   <servlet-name>SendEmail</servlet-name>
   <url-pattern>/SendEmail</url-pattern>
</servlet-mapping>
....
Now call this servlet using URL http://localhost:8080/SendEmail which would send an email to given email ID abcd@gmail.com and would display following response −
Send Email
Sent message successfully....
If you want to send an email to multiple recipients then following methods would be used to specify multiple email IDs −
void addRecipients(Message.RecipientType type, Address[] addresses)
throws MessagingException
Here is the description of the parameters −
type − This would be set to TO, CC or BCC. Here CC represents Carbon Copy and BCC represents Black Carbon Copy. Example Message.RecipientType.TO
addresses − This is the array of email ID. You would need to use InternetAddress() method while specifying email IDs.
Send an HTML Email
Here is an example to send an HTML email from your machine. Here it is assumed that your localhost is connected to the internet and capable enough to send an email. At the same time, make sure all the jar files from Java Email API package and JAF package are available in CLASSPATH.
This example is very similar to previous one, except here we are using setContent() method to set content whose second argument is "text/html" to specify that the HTML content is included in the message.
Using this example, you can send as big as HTML content you like.
// File Name SendEmail.java
import java.io.*;
import java.util.*;
import javax.servlet.*;
import javax.servlet.http.*;
import javax.mail.*;
import javax.mail.internet.*;
import javax.activation.*;

public class SendEmail extends HttpServlet {

   public void doGet(HttpServletRequest request, HttpServletResponse response)
      throws ServletException, IOException {

      // Recipient's email ID needs to be mentioned.
      String to = "abcd@gmail.com";

      // Sender's email ID needs to be mentioned
      String from = "web@gmail.com";

      // Assuming you are sending email from localhost
      String host = "localhost";

      // Get system properties
      Properties properties = System.getProperties();

      // Setup mail server
      properties.setProperty("mail.smtp.host", host);

      // Get the default Session object.
      Session session = Session.getDefaultInstance(properties);

      // Set response content type
      response.setContentType("text/html");
      PrintWriter out = response.getWriter();

      try {

         // Create a default MimeMessage object.
         MimeMessage message = new MimeMessage(session);

         // Set From: header field of the header.
         message.setFrom(new InternetAddress(from));

         // Set To: header field of the header.
         message.addRecipient(Message.RecipientType.TO, new InternetAddress(to));
         // Set Subject: header field
         message.setSubject("This is the Subject Line!");

         // Send the actual HTML message, as big as you like
         message.setContent("<h1>This is actual message</h1>", "text/html" );

         // Send message
         Transport.send(message);
         String title = "Send Email";
         String res = "Sent message successfully....";
         String docType =
         "<!doctype html public \"-//w3c//dtd html 4.0 " + "transitional//en\">\n";

         out.println(docType +
            "<html>\n" +
               "<head><title>" + title + "</title></head>\n" +
               "<body bgcolor = \"#f0f0f0\">\n" +
                  "<h1 align = \"center\">" + title + "</h1>\n" +
                  "<p align = \"center\">" + res + "</p>\n" +
               "</body>
            </html>"
         );
      } catch (MessagingException mex) {
         mex.printStackTrace();
      }
   }
}
Compile and run the above servlet to send HTML message on a given email ID.
Send Attachment in Email
Here is an example to send an email with attachment from your machine. Here it is assumed that your localhost is connected to the internet and capable enough to send an email.
// File Name SendEmail.java
import java.io.*;
import java.util.*;
import javax.servlet.*;
import javax.servlet.http.*;
import javax.mail.*;
import javax.mail.internet.*;
import javax.activation.*;

public class SendEmail extends HttpServlet {

   public void doGet(HttpServletRequest request, HttpServletResponse response)
      throws ServletException, IOException {

      // Recipient's email ID needs to be mentioned.
      String to = "abcd@gmail.com";

      // Sender's email ID needs to be mentioned
      String from = "web@gmail.com";

      // Assuming you are sending email from localhost
      String host = "localhost";

      // Get system properties
      Properties properties = System.getProperties();

      // Setup mail server
      properties.setProperty("mail.smtp.host", host);

      // Get the default Session object.
      Session session = Session.getDefaultInstance(properties);

	  // Set response content type
      response.setContentType("text/html");
      PrintWriter out = response.getWriter();

      try {
         // Create a default MimeMessage object.
         MimeMessage message = new MimeMessage(session);

         // Set From: header field of the header.
         message.setFrom(new InternetAddress(from));

         // Set To: header field of the header.
         message.addRecipient(Message.RecipientType.TO, new InternetAddress(to));

         // Set Subject: header field
         message.setSubject("This is the Subject Line!");

         // Create the message part
         BodyPart messageBodyPart = new MimeBodyPart();

         // Fill the message
         messageBodyPart.setText("This is message body");

         // Create a multipar message
         Multipart multipart = new MimeMultipart();

         // Set text message part
         multipart.addBodyPart(messageBodyPart);

         // Part two is attachment
         messageBodyPart = new MimeBodyPart();
         String filename = "file.txt";
         DataSource source = new FileDataSource(filename);
         messageBodyPart.setDataHandler(new DataHandler(source));
         messageBodyPart.setFileName(filename);
         multipart.addBodyPart(messageBodyPart);

         // Send the complete message parts
         message.setContent(multipart );

         // Send message
         Transport.send(message);
         String title = "Send Email";
         String res = "Sent message successfully....";
         String docType =
         "<!doctype html public \"-//w3c//dtd html 4.0 " + "transitional//en\">\n";

         out.println(docType +
            "<html>\n" +
               "<head><title>" + title + "</title></head>\n" +
               "<body bgcolor = \"#f0f0f0\">\n" +
                  "<h1 align = \"center\">" + title + "</h1>\n" +
                  "<p align = \"center\">" + res + "</p>\n" +
               "</body>
            </html>"
         );
      } catch (MessagingException mex) {
         mex.printStackTrace();
      }
   }
}
Compile and run above servlet to send a file as an attachment along with a message on a given email ID.
User Authentication Part
If it is required to provide user ID and Password to the email server for authentication purpose then you can set these properties as follows −
 props.setProperty("mail.user", "myuser");
 props.setProperty("mail.password", "mypwd");
Rest of the email sending mechanism would remain as explained above.
Servlets - Packaging
The web application structure involving the WEB-INF subdirectory is standard to all Java web applications and specified by the servlet API specification. Given a top-level directory name of myapp. Here is how this directory structure looks like −
/myapp
   /images
   /WEB-INF
      /classes
      /lib
The WEB-INF subdirectory contains the application's deployment descriptor, named web.xml. All the HTML files should be kept in the top-level directory which is myapp. For admin user, you would find ROOT directory as parent directory.
Creating Servlets in Packages
The WEB-INF/classes directory contains all the servlet classes and other class files, in a structure that matches their package name. For example, If you have a fully qualified class name of com.myorg.MyServlet, then this servlet class must be located in the following directory −
/myapp/WEB-INF/classes/com/myorg/MyServlet.class
Following is the example to create MyServlet class with a package name com.myorg
// Name your package
package com.myorg;

// Import required java libraries
import java.io.*;
import javax.servlet.*;
import javax.servlet.http.*;

public class MyServlet extends HttpServlet {

   private String message;

   public void init() throws ServletException {
      // Do required initialization
      message = "Hello World";
   }

   public void doGet(HttpServletRequest request, HttpServletResponse response)
      throws ServletException, IOException {

      // Set response content type
      response.setContentType("text/html");

      // Actual logic goes here.
      PrintWriter out = response.getWriter();
      out.println("<h1>" + message + "</h1>");
   }

   public void destroy() {
      // do nothing.
   }
}
Compiling Servlets in Packages
There is nothing much different to compile a class available in package. The simplest way is to keep your java file in fully qualified path, as mentioned above class would be kept in com.myorg. You would also need to add this directory in CLASSPATH.
Assuming your environment is setup properly, go in <Tomcat-installationdirectory>/webapps/ROOT/WEB-INF/classes directory and compile MyServlet.java as follows
$ javac MyServlet.java
If the servlet depends on any other libraries, you have to include those JAR files on your CLASSPATH as well. I have included only servlet-api.jar JAR file because I'm not using any other library in Hello World program.
This command line uses the built-in javac compiler that comes with the Sun Microsystems Java Software Development Kit (JDK). For this command to work properly, you have to include the location of the Java SDK that you are using in the PATH environment variable.
If everything goes fine, above compilation would produce MyServlet.class file in the same directory. Next section would explain how a compiled servlet would be deployed in production.
Packaged Servlet Deployment
By default, a servlet application is located at the path <Tomcat-installationdirectory>/webapps/ROOT and the class file would reside in <Tomcat-installationdirectory>/webapps/ROOT/WEB-INF/classes.
If you have a fully qualified class name of com.myorg.MyServlet, then this servlet class must be located in WEB-INF/classes/com/myorg/MyServlet.class and you would need to create following entries in web.xml file located in <Tomcat-installationdirectory>/webapps/ROOT/WEB-INF/
<servlet>
   <servlet-name>MyServlet</servlet-name>
   <servlet-class>com.myorg.MyServlet</servlet-class>
</servlet>

<servlet-mapping>
   <servlet-name>MyServlet</servlet-name>
   <url-pattern>/MyServlet</url-pattern>
</servlet-mapping>
Above entries to be created inside <web-app>...</web-app> tags available in web.xml file. There could be various entries in this table already available, but never mind.
You are almost done, now let us start tomcat server using <Tomcat-installationdirectory>\bin\startup.bat (on windows) or <Tomcat-installationdirectory>/bin/startup.sh (on Linux/Solaris etc.) and finally type http://localhost:8080/MyServlet in browser's address box. If everything goes fine, you would get following result −
Hello World
Servlets - Debugging
It is always difficult to testing/debugging a servlets. Servlets tend to involve a large amount of client/server interaction, making errors likely but hard to reproduce.
Here are a few hints and suggestions that may aid you in your debugging.
System.out.println()
System.out.println() is easy to use as a marker to test whether a certain piece of code is being executed or not. We can print out variable values as well. Additionally −
Since the System object is part of the core Java objects, it can be used everywhere without the need to install any extra classes. This includes Servlets, JSP, RMI, EJB's, ordinary Beans and classes, and standalone applications.
Stopping at breakpoints technique stops the normal execution hence takes more time. Whereas writing to System.out doesn't interfere much with the normal execution flow of the application, which makes it very valuable when timing is crucial.
Following is the syntax to use System.out.println() −
System.out.println("Debugging message");
All the messages generated by above syntax would be logged in web server log file.
Message Logging
It is always great idea to use proper logging method to log all the debug, warning and error messages using a standard logging method. I use log4J to log all the messages.
The Servlet API also provides a simple way of outputting information by using the log() method as follows −
// Import required java libraries
import java.io.*;
import javax.servlet.*;
import javax.servlet.http.*;

public class ContextLog extends HttpServlet {
   public void doGet(HttpServletRequest request, HttpServletResponse response)
      throws ServletException, java.io.IOException {

      String par = request.getParameter("par1");

      //Call the two ServletContext.log methods
      ServletContext context = getServletContext( );

      if (par == null || par.equals(""))
         //log version with Throwable parameter
         context.log("No message received:", new IllegalStateException("Missing parameter"));
      else
         context.log("Here is the visitor's message: " + par);

      response.setContentType("text/html");
      java.io.PrintWriter out = response.getWriter( );
      String title = "Context Log";
      String docType =
         "<!doctype html public \"-//w3c//dtd html 4.0 " + "transitional//en\">\n";

      out.println(docType +
         "<html>\n" +
            "<head><title>" + title + "</title></head>\n" +
            "<body bgcolor = \"#f0f0f0\">\n" +
               "<h1 align = \"center\">" + title + "</h1>\n" +
               "<h2 align = \"center\">Messages sent</h2>\n" +
            "</body>
         </html>"
      );
   } //doGet
}
The ServletContext logs its text messages to the servlet container's log file. With Tomcat these logs are found in <Tomcat-installation-directory>/logs.
The log files do give an indication of new emerging bugs or the frequency of problems. For that reason it's good to use the log() function in the catch clause of exceptions which should normally not occur.
Using JDB Debugger
You can debug servlets with the same jdb commands you use to debug an applet or an application.
To debug a servlet, we debug sun.servlet.http.HttpServer and carefully watch as HttpServer executes servlets in response to HTTP requests made from browser. This is very similar to how applets are debugged. The difference is that with applets, the actual program being debugged is sun.applet.AppletViewer.
Most debuggers hide this detail by automatically knowing how to debug applets. Until they do the same for servlets, you have to help your debugger by doing the following −
Set your debugger's classpath so that it can find sun.servlet.http.Http-Server and associated classes.
Set your debugger's classpath so that it can also find your servlets and support classes, typically server_root/servlets and server_root/classes.
You normally wouldn't want server_root/servlets in your classpath because it disables servlet reloading. This inclusion, however, is useful for debugging. It allows your debugger to set breakpoints in a servlet before the custom servlet loader in HttpServer loads the servlet.
Once you have set the proper classpath, start debugging sun.servlet.http.HttpServer. You can set breakpoints in whatever servlet you're interested in debugging, then use a web browser to make a request to the HttpServer for the given servlet (http://localhost:8080/servlet/ServletToDebug). You should see execution being stopped at your breakpoints.
Using Comments
Comments in your code can help the debugging process in various ways. Comments can be used in lots of other ways in the debugging process.
The Servlet uses Java comments and single line (// ...) and multiple line (/* ... */) comments can be used to temporarily remove parts of your Java code. If the bug disappears, take a closer look at the code you just commented and find out the problem.
Client and Server Headers
Sometimes when a servlet doesn't behave as expected, it's useful to look at the raw HTTP request and response. If you're familiar with the structure of HTTP, you can read the request and response and see exactly what exactly is going with those headers.
Important Debugging Tips
Here is a list of some more debugging tips on servlet debugging −
Remember that server_root/classes doesn't reload and that server_root/servlets probably does.
Ask a browser to show the raw content of the page it is displaying. This can help identify formatting problems. It's usually an option under the View menu.
Make sure the browser isn't caching a previous request's output by forcing a full reload of the page. With Netscape Navigator, use Shift-Reload; with Internet Explorer use Shift-Refresh.
Verify that your servlet's init() method takes a ServletConfig parameter and calls super.init(config) right away.
Servlets - Internationalization
Before we proceed, let me explain three important terms −
Internationalization (i18n) − This means enabling a web site to provide different versions of content translated into the visitor's language or nationality
Localization (l10n) − This means adding resources to a web site to adapt to a particular geographical or cultural region.
locale − This is a particular cultural or geographical region. It is usually referred to as a language symbol followed by a country symbol which is separated by an underscore. For example "en_US" represents English locale for US.
There are number of items which should be taken care while building up a global website. This tutorial would not give you complete detail on this but it would give you a good example on how you can offer your web page in different languages to internet community by differentiating their location i.e. locale.
A servlet can pickup appropriate version of the site based on the requester's locale and provide appropriate site version according to the local language, culture and requirements. Following is the method of request object which returns Locale object.
java.util.Locale request.getLocale()
Detecting Locale
Following are the important locale methods which you can use to detect requester's location, language and of course locale. All the below methods display country name and language name set in requester's browser.
| Sr.No. | Method & Description |
|---|---|
| 1 | String getCountry() This method returns the country/region code in upper case for this locale in ISO 3166 2-letter format. |
| 2 | String getDisplayCountry() This method returns a name for the locale's country that is appropriate for display to the user. |
| 3 | String getLanguage() This method returns the language code in lower case for this locale in ISO 639 format. |
| 4 | String getDisplayLanguage() This method returns a name for the locale's language that is appropriate for display to the user. |
| 5 | String getISO3Country() This method returns a three-letter abbreviation for this locale's country. |
| 6 | String getISO3Language() This method returns a three-letter abbreviation for this locale's language. |
Example
This example shows how you display a language and associated country for a request −
import java.io.*;
import javax.servlet.*;
import javax.servlet.http.*;
import java.util.Locale;

public class GetLocale extends HttpServlet {

   public void doGet(HttpServletRequest request, HttpServletResponse response)
      throws ServletException, IOException {

      //Get the client's Locale
      Locale locale = request.getLocale();
      String language = locale.getLanguage();
      String country = locale.getCountry();

      // Set response content type
      response.setContentType("text/html");
      PrintWriter out = response.getWriter();

      String title = "Detecting Locale";
      String docType =
         "<!doctype html public \"-//w3c//dtd html 4.0 " + "transitional//en\">\n";

      out.println(docType +
         "<html>\n" +
            "<head><title>" + title + "</title></head>\n" +
            "<body bgcolor = \"#f0f0f0\">\n" +
               "<h1 align = \"center\">" + language + "</h1>\n" +
               "<h2 align = \"center\">" + country + "</h2>\n" +
         "</body>
         </html>"
      );
   }
}
Languages Setting
A servlet can output a page written in a Western European language such as English, Spanish, German, French, Italian, Dutch etc. Here it is important to set ContentLanguage header to display all the characters properly.
Second point is to display all the special characters using HTML entities, For example, "ñ" represents "ñ", and "¡" represents "¡" as follows:
import java.io.*;
import javax.servlet.*;
import javax.servlet.http.*;
import java.util.Locale;
public class DisplaySpanish extends HttpServlet {
public void doGet(HttpServletRequest request, HttpServletResponse response)
throws ServletException, IOException {
// Set response content type
response.setContentType("text/html");
PrintWriter out = response.getWriter();
// Set spanish language code.
response.setHeader("Content-Language", "es");
String title = "En Español";
String docType =
"<!doctype html public \"-//w3c//dtd html 4.0 " + "transitional//en\">\n";
out.println(docType +
"<html>\n" +
"<head><title>" + title + "</title></head>\n" +
"<body bgcolor = \"#f0f0f0\">\n" +
"<h1>" + "En Español:" + "</h1>\n" +
"<h1>" + "¡Hola Mundo!" + "</h1>\n" +
"</body>
</html>"
);
}
}
Locale Specific Dates
You can use the java.text.DateFormat class and its static getDateTimeInstance() method to format date and time specific to locale. Following is the example which shows how to format dates specific to a given locale −
import java.io.*;
import javax.servlet.*;
import javax.servlet.http.*;
import java.util.Locale;
import java.text.DateFormat;
import java.util.Date;

public class DateLocale extends HttpServlet {

   public void doGet(HttpServletRequest request, HttpServletResponse response)
      throws ServletException, IOException {

      // Set response content type
      response.setContentType("text/html");
      PrintWriter out = response.getWriter();

      //Get the client's Locale
      Locale locale = request.getLocale( );
      String date = DateFormat.getDateTimeInstance(DateFormat.FULL,
         DateFormat.SHORT, locale).format(new Date( ));

      String title = "Locale Specific Dates";
      String docType =
         "<!doctype html public \"-//w3c//dtd html 4.0 " + "transitional//en\">\n";

      out.println(docType +
         "<html>\n" +
            "<head><title>" + title + "</title></head>\n" +
            "<body bgcolor = \"#f0f0f0\">\n" +
               "<h1 align = \"center\">" + date + "</h1>\n" +
            "</body>
         </html>"
      );
   }
}
Locale Specific Currency
You can use the java.txt.NumberFormat class and its static getCurrencyInstance() method to format a number, such as a long or double type, in a locale specific currency. Following is the example which shows how to format currency specific to a given locale −
import java.io.*;
import javax.servlet.*;
import javax.servlet.http.*;
import java.util.Locale;
import java.text.NumberFormat;
import java.util.Date;

public class CurrencyLocale extends HttpServlet {

   public void doGet(HttpServletRequest request, HttpServletResponse response)
      throws ServletException, IOException {

      // Set response content type
      response.setContentType("text/html");
      PrintWriter out = response.getWriter();

      //Get the client's Locale
      Locale locale = request.getLocale( );
      NumberFormat nft = NumberFormat.getCurrencyInstance(locale);
      String formattedCurr = nft.format(1000000);

      String title = "Locale Specific Currency";
      String docType =
         "<!doctype html public \"-//w3c//dtd html 4.0 " + "transitional//en\">\n";

      out.println(docType +
         "<html>\n" +
            "<head><title>" + title + "</title></head>\n" +
            "<body bgcolor = \"#f0f0f0\">\n" +
               "<h1 align = \"center\">" + formattedCurr + "</h1>\n" +
            "</body>
         </html>"
      );
   }
}
Locale Specific Percentage
You can use the java.txt.NumberFormat class and its static getPercentInstance() method to get locale specific percentage. Following is the example which shows how to format percentage specific to a given locale −
import java.io.*;
import javax.servlet.*;
import javax.servlet.http.*;
import java.util.Locale;
import java.text.NumberFormat;
import java.util.Date;

public class PercentageLocale extends HttpServlet {

   public void doGet(HttpServletRequest request, HttpServletResponse response)
      throws ServletException, IOException {

      // Set response content type
      response.setContentType("text/html");
      PrintWriter out = response.getWriter();

      //Get the client's Locale
      Locale locale = request.getLocale( );
      NumberFormat nft = NumberFormat.getPercentInstance(locale);
      String formattedPerc = nft.format(0.51);

      String title = "Locale Specific Percentage";
      String docType =
      "<!doctype html public \"-//w3c//dtd html 4.0 " + "transitional//en\">\n";

      out.println(docType +
         "<html>\n" +
            "<head><title>" + title + "</title></head>\n" +
            "<body bgcolor = \"#f0f0f0\">\n" +
               "<h1 align = \"center\">" + formattedPerc + "</h1>\n" +
            "</body>
         </html>"
      );
   }
}
Servlets - Annotations
So far, you have learnt how Servlet uses the deployment descriptor (web.xml file) for deploying your application into a web server. Servlet API 3.0 has introduced a new package called javax.servlet.annotation. It provides annotation types which can be used for annotating a servlet class. If you use annotation, then the deployment descriptor (web.xml) is not required. But you should use tomcat7 or any later version of tomcat.
Annotations can replace equivalent XML configuration in the web deployment descriptor file (web.xml) such as servlet declaration and servlet mapping. Servlet containers will process the annotated classes at deployment time.
The annotation types introduced in Servlet 3.0 are −
| Sr.No. | Annotation & Description |
|---|---|
| 1 | @WebServlet To declare a servlet. |
| 2 | @WebInitParam To specify an initialization parameter. |
| 3 | @WebFilter To declare a servlet filter. |
| 4 | @WebListener To declare a WebListener |
| 5 | @HandlesTypes To declare the class types that a ServletContainerInitializer can handle. |
| 6 | @HttpConstraint This annotation is used within the ServletSecurity annotation to represent the security constraints to be applied to all HTTP protocol methods for which a corresponding HttpMethodConstraint element does NOT occur within the ServletSecurity annotation. |
| 7 | @HttpMethodConstraint This annotation is used within the ServletSecurity annotation to represent security constraints on specific HTTP protocol messages. |
| 8 | @MultipartConfig Annotation that may be specified on a Servlet class, indicating that instances of the Servlet expect requests that conform to the multipart/form-data MIME type. |
| 9 | @ServletSecurity This annotation is used on a Servlet implementation class to specify security constraints to be enforced by a Servlet container on HTTP protocol messages. |
Here we have discussed some of the Annotations in detail.
@WebServlet
The @WebServlet is used to declare the configuration of a Servlet with a container. The following table contains the list of attributes used for WebServlet annotation.
| Sr.No. | Attribute & Description |
|---|---|
| 1 | String name Name of the Servlet |
| 2 | String[] value Array of URL patterns |
| 3 | String[] urlPatterns Array of URL patterns to which this Filter applies |
| 4 | Int loadOnStartup The integer value gives you the startup ordering hint |
| 5 | WebInitParam[] initParams Array of initialization parameters for this Servlet |
| 6 | Boolean asyncSupported Asynchronous operation supported by this Servlet |
| 7 | String smallIcon Small icon for this Servlet, if present |
| 8 | String largeIcon Large icon for this Servlet, if present |
| 9 | String description Description of this Servlet, if present |
| 10 | String displayName Display name of this Servlet, if present |
At least one URL pattern MUST be declared in either the value or urlPattern attribute of the annotation, but not both.
The value attribute is recommended for use when the URL pattern is the only attribute being set, otherwise the urlPattern attribute should be used.
Example
The following example describes how to use @WebServlet annotation. It is a simple servlet that displays the text Hello Servlet.
import java.io.IOException;
import java.io.PrintWriter;
import javax.servlet.ServletException;
import javax.servlet.annotation.WebInitParam;
import javax.servlet.annotation.WebServlet;
import javax.servlet.http.HttpServlet;
import javax.servlet.http.HttpServletRequest;
import javax.servlet.http.HttpServletResponse;
@WebServlet(value = "/Simple")
public class Simple extends HttpServlet {

   private static final long serialVersionUID = 1L;

   protected void doGet(HttpServletRequest request, HttpServletResponse response)
      throws ServletException, IOException {

      response.setContentType("text/html");
      PrintWriter out = response.getWriter();
      out.print("<html><body>");
      out.print("<h3>Hello Servlet</h3>");
      out.print("</body></html>");
   }
}
Compile Simple.java in the usual way and put your class file in <Tomcat-installationdirectory>/webapps/ROOT/WEB-INF/classes.
Now try to call any servlet by just running http://localhost:8080/Simple. You will see the following output on the web page.
Hello servlet
@WebInitParam
The @WebInitParam annotation is used for specifying an initialization parameter for a Servlet or a Filter. It is used within a WebFilter or WebSevlet annotations. The following table contains the list of attributes used for WebInitParam annotation.
| Sr.No. | Attribute & Description |
|---|---|
| 1 | String name Name of the initialization parameter |
| 2 | String value Value of the initialization parameter |
| 3 | String description Description of the initialization parameter |
Example
The following example describes how to use @WeInitParam annotation along with @WebServlet annotation. It is a simple servlet that displays the text Hello Servlet and the string value Hello World! which are taken from the init parameters.
import java.io.IOException;
import java.io.PrintWriter;
import javax.servlet.ServletException;
import javax.servlet.annotation.WebInitParam;
import javax.servlet.annotation.WebServlet;
import javax.servlet.http.HttpServlet;
import javax.servlet.http.HttpServletRequest;
import javax.servlet.http.HttpServletResponse;

@WebServlet(value = "/Simple", initParams = {
   @WebInitParam(name = "foo", value = "Hello "),
   @WebInitParam(name = "bar", value = " World!")
})
public class Simple extends HttpServlet {

   private static final long serialVersionUID = 1L;

   protected void doGet(HttpServletRequest request, HttpServletResponse response)
      throws ServletException, IOException {

      response.setContentType("text/html");
      PrintWriter out = response.getWriter();
      out.print("<html><body>");
      out.print("<h3>Hello Servlet</h3>");
      out.println(getInitParameter("foo"));
      out.println(getInitParameter("bar"));
      out.print("</body></html>");
   }
}
Compile Simple.java in the usual way and put your class file in <Tomcat-installationdirectory>;/webapps/ROOT/WEB-INF/classes.
Now try to call any servlet by just running http://localhost:8080/Simple. You will see the following output on the web page.
Hello Servlet

Hello World!
@Webfilter
This is the annotation used to declare a servlet filter. It is processed by the container at deployment time, and the corresponding filter applied to the specified URL patterns, servlets, and dispatcher types.
The @WebFilter annotation defines a filter in a web application. This annotation is specified on a class and contains metadata about the filter being declared. The annotated filter must specify at least one URL pattern. The following table lists the attributes used for WebFilter annotation.
| Sr.No. | Attribute & Description |
|---|---|
| 1 | String filterName Name of the filter |
| 2 | String[] urlPatterns Provides array of values or urlPatterns to which the filter applies |
| 3 | DispatcherType[] dispatcherTypes Specifies the types of dispatcher (Request/Response) to which the filter applies |
| 4 | String[] servletNames Provides an array of servlet names |
| 5 | String displayName Name of the filter |
| 6 | String description Description of the filter |
| 7 | WebInitParam[] initParams Array of initialization parameters for this filter |
| 8 | Boolean asyncSupported Asynchronous operation supported by this filter |
| 9 | String smallIcon Small icon for this filter, if present |
| 10 | String largeIcon Large icon for this filter, if present |
Example
The following example describes how to use @WebFilter annotation. It is a simple LogFilter that displays the value of Init-param test-param and the current time timestamp on the console. That means, the filter works like an interface layer between the request and the response. Here we use "/*" for urlPattern. It means, this filter is applicable for all the servlets.
import java.io.IOException;
import javax.servlet.annotation.WebFilter;
import javax.servlet.annotation.WebInitParam;
import javax.servlet.*;
import java.util.*;

// Implements Filter class

@WebFilter(urlPatterns = {"/*"}, initParams = {
   @WebInitParam(name = "test-param", value = "Initialization Paramter")})
public class LogFilter implements Filter {

   public void init(FilterConfig config) throws ServletException {
      // Get init parameter
      String testParam = config.getInitParameter("test-param");

      //Print the init parameter
      System.out.println("Test Param: " + testParam);
   }

   public void doFilter(ServletRequest request, ServletResponse response,
      FilterChain chain) throws IOException, ServletException {

      // Log the current timestamp.
      System.out.println("Time " + new Date().toString());

      // Pass request back down the filter chain
      chain.doFilter(request,response);
   }

   public void destroy( ) {
      /* Called before the Filter instance is removed
      from service by the web container*/
   }
}
Compile Simple.java in the usual way and put your class file in <Tomcat-installationdirectory>/webapps/ROOT/WEB-INF/classes.
Now try to call any servlet by just running http://localhost:8080/Simple. You will see the following output on the web page.
Hello Servlet

Hello World!
Now, open the servlet console. There, you will find the value of the init parameter testparam and the current timestamp along with servlet notification messages.