- Lua Tutorial
- Lua - Home
- Lua Basics Tutorial
- Lua - Overview
- Lua - Environment
- Lua - Basic Syntax
- Lua - Variables
- Lua - Data Types
- Lua - Operators
- Lua - Loops
- Lua - Decision Making
- Lua - Functions
- Lua - Strings
- Lua - Arrays
- Lua - Iterators
- Lua - Tables
- Lua - Modules
- Lua - Metatables
- Lua - Coroutines
- Lua - File I/O
- Lua - Error Handling
- Lua Advanced
- Lua - Debugging
- Lua - Garbage Collection
- Lua - Object Oriented
- Lua - Web Programming
- Lua - Database Access
- Lua - Game Programing
- Lua Useful Resources
- Lua - Quick Guide
- Lua - Useful Resources
- Lua - Discussion
Lua - Quick Guide
Lua - Overview
Lua is an extensible, lightweight programming language written in C. It started as an in-house project in 1993 by Roberto Ierusalimschy, Luiz Henrique de Figueiredo, and Waldemar Celes.
It was designed from the beginning to be a software that can be integrated with the code written in C and other conventional languages. This integration brings many benefits. It does not try to do what C can already do but aims at offering what C is not good at: a good distance from the hardware, dynamic structures, no redundancies, ease of testing and debugging. For this, Lua has a safe environment, automatic memory management, and good facilities for handling strings and other kinds of data with dynamic size.
Features
Lua provides a set of unique features that makes it distinct from other languages. These include −
- Extensible
- Simple
- Efficient
- Portable
- Free and open
Example Code
print("Hello World!")
How Lua is Implemented?
Lua consists of two parts - the Lua interpreter part and the functioning software system. The functioning software system is an actual computer application that can interpret programs written in the Lua programming language. The Lua interpreter is written in ANSI C, hence it is highly portable and can run on a vast spectrum of devices from high-end network servers to small devices.
Both Lua's language and its interpreter are mature, small, and fast. It has evolved from other programming languages and top software standards. Being small in size makes it possible for it to run on small devices with low memory.
Learning Lua
The most important point while learning Lua is to focus on the concepts without getting lost in its technical details.
The purpose of learning a programming language is to become a better programmer; that is, to become more effective in designing and implementing new systems and at maintaining old ones.
Some Uses of Lua
Game Programming
Scripting in Standalone Applications
Scripting in Web
Extensions and add-ons for databases like MySQL Proxy and MySQL WorkBench
Security systems like Intrusion Detection System.
Lua - Environment
Local Environment Setup
If you are still willing to set up your environment for Lua programming language, you need the following softwares available on your computer - (a) Text Editor, (b) The Lua Interpreter, and (c) Lua Compiler.
Text Editor
You need a text editor to type your program. Examples of a few editors include Windows Notepad, OS Edit command, Brief, Epsilon, EMACS, and vim or vi.
Name and version of the text editor can vary on different operating systems. For example, Notepad will be used on Windows, and vim or vi can be used on Windows as well as Linux or UNIX.
The files you create with your editor are called source files and these files contain the program source code. The source files for Lua programs are typically named with the extension ".lua".
The Lua Interpreter
It is just a small program that enables you to type Lua commands and have them executed immediately. It stops the execution of a Lua file in case it encounters an error unlike a compiler that executes fully.
The Lua Compiler
When we extend Lua to other languages/applications, we need a Software Development Kit with a compiler that is compatible with the Lua Application Program Interface.
Installation on Windows
There is a separate IDE named "SciTE" developed for the windows environment, which can be downloaded from https://code.google.com/p/luaforwindows/ download section.
Run the downloaded executable to install the Lua IDE.
Since it’s an IDE, you can both create and build the Lua code using the same.
In case, you are interested in installing Lua in command line mode, you need to install MinGW or Cygwin and then compile and install Lua in windows.
Installation on Linux
To download and build Lua, use the following command −
$ wget http://www.lua.org/ftp/lua-5.2.3.tar.gz
$ tar zxf lua-5.2.3.tar.gz
$ cd lua-5.2.3
$ make linux test
In order to install on other platforms like aix, ansi, bsd, generic linux, mingw, posix, solaris by replacing Linux in make Linux, test with the corresponding platform name.
We have a helloWorld.lua, in Lua as follows −
print("Hello World!")
Now, we can build and run a Lua file say helloWorld.lua, by switching to the folder containing the file using cd, and then using the following command −
$ lua helloWorld
We can see the following output.
Hello World!
Installation on Mac OS X
To build/test Lua in the Mac OS X, use the following command −
$ curl -R -O http://www.lua.org/ftp/lua-5.2.3.tar.gz
$ tar zxf lua-5.2.3.tar.gz
$ cd lua-5.2.3
$ make macosx test
In certain cases, you may not have installed the Xcode and command line tools. In such cases, you won’t be able to use the make command. Install Xcode from mac app store. Then go to Preferences of Xcode, and then switch to Downloads and install the component named "Command Line Tools". Once the process is completed, make command will be available to you.
It is not mandatory for you to execute the "make macosx test" statement. Even without executing this command, you can still use Lua in Mac OS X.
We have a helloWorld.lua, in Lua, as follows −
print("Hello World!")
Now, we can build and run a Lua file say helloWorld.lua by switching to the folder containing the file using cd and then using the following command −
$ lua helloWorld
We can see the following output −
Hello World!
Lua IDE
As mentioned earlier, for Windows SciTE, Lua IDE is the default IDE provided by the Lua creator team. The alternate IDE available is from ZeroBrane Studio, which is available across multiple platforms like Windows, Mac and Linux.
There are also plugins for eclipse that enable the Lua development. Using IDE makes it easier for development with features like code completion and is highly recommended. The IDE also provides interactive mode programming similar to the command line version of Lua.
Lua - Basic Syntax
Let us start creating our first Lua program!
First Lua Program
Interactive Mode Programming
Lua provides a mode called interactive mode. In this mode, you can type in instructions one after the other and get instant results. This can be invoked in the shell by using the lua -i or just the lua command. Once you type in this, press Enter and the interactive mode will be started as shown below.
$ lua -i
$ Lua 5.1.4  Copyright (C) 1994-2008 Lua.org, PUC-Rio
quit to end; cd, dir and edit also available
You can print something using the following statement −
print("test")
Once you press enter, you will get the following output −
test
Default Mode Programming
Invoking the interpreter with a Lua file name parameter begins execution of the file and continues until the script is finished. When the script is finished, the interpreter is no longer active.
Let us write a simple Lua program. All Lua files will have extension .lua. So put the following source code in a test.lua file.
print("test")
Assuming, lua environment is setup correctly, let’s run the program using the following code −
$ lua test.lua
We will get the following output −
test
Let's try another way to execute a Lua program. Below is the modified test.lua file −
#!/usr/local/bin/lua

print("test")
Here, we have assumed that you have Lua interpreter available in your /usr/local/bin directory. The first line is ignored by the interpreter, if it starts with # sign. Now, try to run this program as follows −
$ chmod a+rx test.lua
$./test.lua
We will get the following output.
test
Let us now see the basic structure of Lua program, so that it will be easy for you to understand the basic building blocks of the Lua programming language.
Tokens in Lua
A Lua program consists of various tokens and a token is either a keyword, an identifier, a constant, a string literal, or a symbol. For example, the following Lua statement consists of three tokens −
io.write("Hello world, from ",_VERSION,"!\n")
The individual tokens are −
io.write
(
   "Hello world, from ",_VERSION,"!\n"
)
Comments
Comments are like helping text in your Lua program and they are ignored by the interpreter. They start with --[[ and terminates with the characters --]] as shown below −
--[[ my first program in Lua --]]
Identifiers
A Lua identifier is a name used to identify a variable, function, or any other user-defined item. An identifier starts with a letter ‘A to Z’ or ‘a to z’ or an underscore ‘_’ followed by zero or more letters, underscores, and digits (0 to 9).
Lua does not allow punctuation characters such as @, $, and % within identifiers. Lua is a case sensitive programming language. Thus Manpower and manpower are two different identifiers in Lua. Here are some examples of the acceptable identifiers −
mohd         zara      abc     move_name    a_123
myname50     _temp     j       a23b9        retVal
Keywords
The following list shows few of the reserved words in Lua. These reserved words may not be used as constants or variables or any other identifier names.
| and | break | do | else |
| elseif | end | false | for |
| function | if | in | local |
| nil | not | or | repeat |
| return | then | true | until |
| while |
Whitespace in Lua
A line containing only whitespace, possibly with a comment, is known as a blank line, and a Lua interpreter totally ignores it.
Whitespace is the term used in Lua to describe blanks, tabs, newline characters and comments. Whitespace separates one part of a statement from another and enables the interpreter to identify where one element in a statement, such as int ends, and the next element begins. Therefore, in the following statement −
local age
There must be at least one whitespace character (usually a space) between local and age for the interpreter to be able to distinguish them. On the other hand, in the following statement −
fruit = apples + oranges --get the total fruit
No whitespace characters are necessary between fruit and =, or between = and apples, although you are free to include some if you wish for readability purpose.
Lua - Variables
A variable is nothing but a name given to a storage area that our programs can manipulate. It can hold different types of values including functions and tables.
The name of a variable can be composed of letters, digits, and the underscore character. It must begin with either a letter or an underscore. Upper and lowercase letters are distinct because Lua is case-sensitive. There are eight basic types of values in Lua −
In Lua, though we don't have variable data types, we have three types based on the scope of the variable.
Global variables − All variables are considered global unless explicitly declared as a local.
Local variables − When the type is specified as local for a variable then its scope is limited with the functions inside their scope.
Table fields − This is a special type of variable that can hold anything except nil including functions.
Variable Definition in Lua
A variable definition means to tell the interpreter where and how much to create the storage for the variable. A variable definition have an optional type and contains a list of one or more variables of that type as follows −
type variable_list;
Here, type is optionally local or type specified making it global, and variable_list may consist of one or more identifier names separated by commas. Some valid declarations are shown here −
local    i, j
local    i
local    a,c
The line local i, j both declares and defines the variables i and j; which instructs the interpreter to create variables named i, j and limits the scope to be local.
Variables can be initialized (assigned an initial value) in their declaration. The initializer consists of an equal sign followed by a constant expression as follows −
type variable_list = value_list;
Some examples are −
local d , f = 5 ,10     --declaration of d and f as local variables.
d , f = 5, 10;          --declaration of d and f as global variables.
d, f = 10               --[[declaration of d and f as global variables.
                           Here value of f is nil --]]
For definition without an initializer: variables with static storage duration are implicitly initialized with nil.
Variable Declaration in Lua
As you can see in the above examples, assignments for multiples variables follows a variable_list and value_list format. In the above example local d, f = 5,10 we have d and f in variable_list and 5 and 10 in values list.
Value assigning in Lua takes place like first variable in the variable_list with first value in the value_list and so on. Hence, the value of d is 5 and the value of f is 10.
Example
Try the following example, where variables have been declared at the top, but they have been defined and initialized inside the main function −
-- Variable definition:
local a, b

-- Initialization
a = 10
b = 30

print("value of a:", a)

print("value of b:", b)

-- Swapping of variables
b, a = a, b

print("value of a:", a)

print("value of b:", b)

f = 70.0/3.0
print("value of f", f)
When the above code is built and executed, it produces the following result −
value of a:	10
value of b:	30
value of a:	30
value of b:	10
value of f	23.333333333333
Lvalues and Rvalues in Lua
There are two kinds of expressions in Lua −
lvalue − Expressions that refer to a memory location is called "lvalue" expression. An lvalue may appear as either the left-hand or right-hand side of an assignment.
rvalue − The term rvalue refers to a data value that is stored at some address in memory. An rvalue is an expression that cannot have a value assigned to it, which means an rvalue may appear on the right-hand side, but not on the left-hand side of an assignment.
Variables are lvalues and so may appear on the left-hand side of an assignment. Numeric literals are rvalues and so may not be assigned and cannot appear on the left-hand side. Following is a valid statement −
g = 20
But following is not a valid statement and would generate a build-time error −
10 = 20
In Lua programming language, apart from the above types of assignment, it is possible to have multiple lvalues and rvalues in the same single statement. It is shown below.
g,l = 20,30
In the above statement, 20 is assigned to g and 30 is assigned to l.
Lua - Data Types
Lua is a dynamically typed language, so the variables don't have types, only the values have types. Values can be stored in variables, passed as parameters and returned as results.
In Lua, though we don't have variable data types, but we have types for the values. The list of data types for values are given below.
| Sr.No | Value Type & Description |
|---|---|
| 1 | nil Used to differentiate the value from having some data or no(nil) data. |
| 2 | boolean Includes true and false as values. Generally used for condition checking. |
| 3 | number Represents real(double precision floating point) numbers. |
| 4 | string Represents array of characters. |
| 5 | function Represents a method that is written in C or Lua. |
| 6 | userdata Represents arbitrary C data. |
| 7 | thread Represents independent threads of execution and it is used to implement coroutines. |
| 8 | table Represent ordinary arrays, symbol tables, sets, records, graphs, trees, etc., and implements associative arrays. It can hold any value (except nil). |
Type Function
In Lua, there is a function called ‘type’ that enables us to know the type of the variable. Some examples are given in the following code.
print(type("What is my type"))   --> string
t = 10

print(type(5.8*t))               --> number
print(type(true))                --> boolean
print(type(print))               --> function
print(type(nil))                 --> nil
print(type(type(ABC)))           --> string
When you build and execute the above program, it produces the following result on Linux −
string
number
boolean
function
nil
string
By default, all the variables will point to nil until they are assigned a value or initialized. In Lua, zero and empty strings are considered to be true in case of condition checks. Hence, you have to be careful when using Boolean operations. We will know more using these types in the next chapters.
Lua - Operators
An operator is a symbol that tells the interpreter to perform specific mathematical or logical manipulations. Lua language is rich in built-in operators and provides the following type of operators −
- Arithmetic Operators
- Relational Operators
- Logical Operators
- Misc Operators
This tutorial will explain the arithmetic, relational, logical, and other miscellaneous operators one by one.
Arithmetic Operators
Following table shows all the arithmetic operators supported by Lua language. Assume variable A holds 10 and variable B holds 20 then −
| Operator | Description | Example |
|---|---|---|
| + | Adds two operands | A + B will give 30 |
| - | Subtracts second operand from the first | A - B will give -10 |
| * | Multiply both operands | A * B will give 200 |
| / | Divide numerator by de-numerator | B / A will give 2 |
| % | Modulus Operator and remainder of after an integer division | B % A will give 0 |
| ^ | Exponent Operator takes the exponents | A^2 will give 100 |
| - | Unary - operator acts as negation | -A will give -10 |
Relational Operators
Following table shows all the relational operators supported by Lua language. Assume variable A holds 10 and variable B holds 20 then −
| Operator | Description | Example |
|---|---|---|
| == | Checks if the value of two operands are equal or not, if yes then condition becomes true. | (A == B) is not true. |
| ~= | Checks if the value of two operands are equal or not, if values are not equal then condition becomes true. | (A ~= B) is true. |
| > | Checks if the value of left operand is greater than the value of right operand, if yes then condition becomes true. | (A > B) is not true. |
| < | Checks if the value of left operand is less than the value of right operand, if yes then condition becomes true. | (A < B) is true. |
| >= | Checks if the value of left operand is greater than or equal to the value of right operand, if yes then condition becomes true. | (A >= B) is not true. |
| <= | Checks if the value of left operand is less than or equal to the value of right operand, if yes then condition becomes true. | (A <= B) is true. |
Logical Operators
Following table shows all the logical operators supported by Lua language. Assume variable A holds true and variable B holds false then −
| Operator | Description | Example |
|---|---|---|
| and | Called Logical AND operator. If both the operands are non zero then condition becomes true. | (A and B) is false. |
| or | Called Logical OR Operator. If any of the two operands is non zero then condition becomes true. | (A or B) is true. |
| not | Called Logical NOT Operator. Use to reverses the logical state of its operand. If a condition is true then Logical NOT operator will make false. | !(A and B) is true. |
Misc Operators
Miscellaneous operators supported by Lua Language include concatenation and length.
| Operator | Description | Example |
|---|---|---|
| .. | Concatenates two strings. | a..b where a is "Hello " and b is "World", will return "Hello World". |
| # | An unary operator that return the length of the a string or a table. | #"Hello" will return 5 |
Operators Precedence in Lua
Operator precedence determines the grouping of terms in an expression. This affects how an expression is evaluated. Certain operators have higher precedence than others; for example, the multiplication operator has higher precedence than the addition operator −
For example, x = 7 + 3 * 2; Here x is assigned 13, not 20 because operator * has higher precedence than + so it first get multiplied with 3*2 and then adds into 7.
Here, operators with the highest precedence appear at the top of the table, those with the lowest appear at the bottom. Within an expression, higher precedence operators will be evaluated first.
| Category | Operator | Associativity |
|---|---|---|
| Unary | not # - | Right to left |
| Concatenation | .. | Right to left |
| Multiplicative | * / % | Left to right |
| Additive | + - | Left to right |
| Relational | < > <= >= == ~= | Left to right |
| Equality | == ~= | Left to right |
| Logical AND | and | Left to right |
| Logical OR | or | Left to right |
Lua - Loops
There may be a situation when you need to execute a block of code several number of times. In general, statements are executed sequentially: the first statement in a function is executed first, followed by the second, and so on.
Programming languages provide various control structures that allow for more complicated execution paths.
A loop statement allows us to execute a statement or group of statements multiple times. Following is the general form of a loop statement in most of the programming languages −
Lua provides the following types of loops to handle looping requirements.
| Sr.No. | Loop Type & Description |
|---|---|
| 1 | while loop
Repeats a statement or group of statements while a given condition is true. It tests the condition before executing the loop body. |
| 2 | for loop
Executes a sequence of statements multiple times and abbreviates the code that manages the loop variable. |
| 3 | repeat...until loop
Repeats the operation of group of statements till the until condition is met. |
| 4 | nested loops
You can use one or more loop inside any another while, for or do..while loop. |
Loop Control Statement
Loop control statement changes execution from its normal sequence. When execution leaves a scope, all automatic objects that were created in that scope are destroyed.
Lua supports the following control statements.
| Sr.No. | Control Statement & Description |
|---|---|
| 1 | break statement
Terminates the loop and transfers execution to the statement immediately following the loop or switch. |
The Infinite Loop
A loop becomes infinite loop if a condition never becomes false. The while loop is often used for this purpose. Since we directly give true for the condition, it keeps executing forever. We can use the break statement to break this loop.
while( true )
do
   print("This loop will run forever.")
end
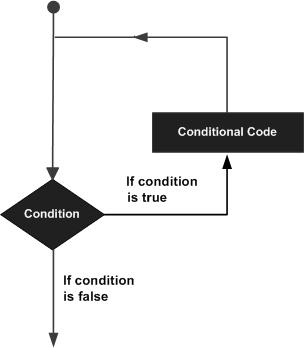
Lua - Decision Making
Decision making structures require that the programmer specifies one or more conditions to be evaluated or tested by the program, along with a statement or statements to be executed, if the condition is determined to be true, and optionally, other statements to be executed if the condition is determined to be false.
Following is the general form of a typical decision making structure found in most of the programming languages −
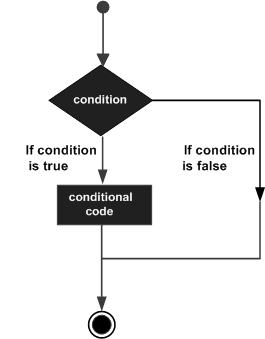
Lua programming language assumes any combination of Boolean true and non-nil values as true, and if it is either boolean false or nil, then it is assumed as false value. It is to be noted that in Lua, zero will be considered as true.
Lua programming language provides the following types of decision making statements.
| Sr.No. | Statement & Description |
|---|---|
| 1 | if statement
An if statement consists of a boolean expression followed by one or more statements. |
| 2 | if...else statement
An if statement can be followed by an optional else statement, which executes when the boolean expression is false. |
| 3 | nested if statements
You can use one if or else if statement inside another if or else if statement(s). |
Lua - Functions
A function is a group of statements that together perform a task. You can divide up your code into separate functions. How you divide up your code among different functions is up to you, but logically the division usually unique, is so each function performs a specific task.
The Lua language provides numerous built-in methods that your program can call. For example, method print() to print the argument passed as input in console.
A function is known with various names like a method or a sub-routine or a procedure etc.
Defining a Function
The general form of a method definition in Lua programming language is as follows −
optional_function_scope function function_name( argument1, argument2, argument3........,
argumentn)
function_body
return result_params_comma_separated
end
A method definition in Lua programming language consists of a method header and a method body. Here are all the parts of a method −
Optional Function Scope − You can use keyword local to limit the scope of the function or ignore the scope section, which will make it a global function.
Function Name − This is the actual name of the function. The function name and the parameter list together constitute the function signature.
Arguments − An argument is like a placeholder. When a function is invoked, you pass a value to the argument. This value is referred to as the actual parameter or argument. The parameter list refers to the type, order, and number of the arguments of a method. Arguments are optional; that is, a method may contain no argument.
Function Body − The method body contains a collection of statements that define what the method does.
Return − In Lua, it is possible to return multiple values by following the return keyword with the comma separated return values.
Example
Following is the source code for a function called max(). This function takes two parameters num1 and num2 and returns the maximum between the two −
--[[ function returning the max between two numbers --]]
function max(num1, num2)

   if (num1 > num2) then
      result = num1;
   else
      result = num2;
   end

   return result;
end
Function Arguments
If a function is to use arguments, it must declare the variables that accept the values of the arguments. These variables are called the formal parameters of the function.
The formal parameters behave like other local variables inside the function and are created upon entry into the function and destroyed upon exit.
Calling a Function
While creating a Lua function, you give a definition of what the function has to do. To use a method, you will have to call that function to perform the defined task.
When a program calls a function, program control is transferred to the called function. A called function performs the defined task and when its return statement is executed or when its function's end is reached, it returns program control back to the main program.
To call a method, you simply need to pass the required parameters along with the method name and if the method returns a value, then you can store the returned value. For example −
function max(num1, num2)

   if (num1 > num2) then
      result = num1;
   else
      result = num2;
   end

   return result;
end

-- calling a function
print("The maximum of the two numbers is ",max(10,4))
print("The maximum of the two numbers is ",max(5,6))
When we run the above code, we will get the following output.
The maximum of the two numbers is 	10
The maximum of the two numbers is 	6
Assigning and Passing Functions
In Lua, we can assign the function to variables and also can pass them as parameters of another function. Here is a simple example for assigning and passing a function as parameter in Lua.
myprint = function(param)
   print("This is my print function -   ##",param,"##")
end

function add(num1,num2,functionPrint)
   result = num1 + num2
   functionPrint(result)
end

myprint(10)
add(2,5,myprint)
When we run the above code, we will get the following output.
This is my print function -   ##	10	##
This is my print function -   ##	7	##
Function with Variable Argument
It is possible to create functions with variable arguments in Lua using '...' as its parameter. We can get a grasp of this by seeing an example in which the function will return the average and it can take variable arguments.
function average(...)
   result = 0
   local arg = {...}
   for i,v in ipairs(arg) do
      result = result + v
   end
   return result/#arg
end

print("The average is",average(10,5,3,4,5,6))
When we run the above code, we will get the following output.
The average is 5.5
Lua - Strings
String is a sequence of characters as well as control characters like form feed. String can be initialized with three forms which includes −
- Characters between single quotes
- Characters between double quotes
- Characters between [[ and ]]
An example for the above three forms are shown below.
string1 = "Lua"
print("\"String 1 is\"",string1)

string2 = 'Tutorial'
print("String 2 is",string2)

string3 = [["Lua Tutorial"]]
print("String 3 is",string3)
When we run the above program, we will get the following output.
"String 1 is" Lua
String 2 is	Tutorial
String 3 is	"Lua Tutorial"
Escape sequence characters are used in string to change the normal interpretation of characters. For example, to print double inverted commas (""), we have used \" in the above example. The escape sequence and its use is listed below in the table.
| Escape Sequence | Use |
|---|---|
| \a | Bell |
| \b | Backspace |
| \f | Formfeed |
| \n | New line |
| \r | Carriage return |
| \t | Tab |
| \v | Vertical tab |
| \\ | Backslash |
| \" | Double quotes |
| \' | Single quotes |
| \[ | Left square bracket |
| \] | Right square bracket |
String Manipulation
Lua supports string to manipulate strings −
| Sr.No. | Method & Purpose |
|---|---|
| 1 | string.upper(argument) Returns a capitalized representation of the argument. |
| 2 | string.lower(argument) Returns a lower case representation of the argument. |
| 3 | string.gsub(mainString,findString,replaceString) Returns a string by replacing occurrences of findString with replaceString. |
| 4 | string.find(mainString,findString, optionalStartIndex,optionalEndIndex) Returns the start index and end index of the findString in the main string and nil if not found. |
| 5 | string.reverse(arg) Returns a string by reversing the characters of the passed string. |
| 6 | string.format(...) Returns a formatted string. |
| 7 | string.char(arg) and string.byte(arg) Returns internal numeric and character representations of input argument. |
| 8 | string.len(arg) Returns a length of the passed string. |
| 9 | string.rep(string, n)) Returns a string by repeating the same string n number times. |
| 10 | .. Thus operator concatenates two strings. |
Now, let's dive into a few examples to exactly see how these string manipulation functions behave.
Case Manipulation
A sample code for manipulating the strings to upper and lower case is given below.
string1 = "Lua";

print(string.upper(string1))
print(string.lower(string1))
When we run the above program, we will get the following output.
LUA
lua
Replacing a Substring
A sample code for replacing occurrences of one string with another is given below.
string = "Lua Tutorial"

-- replacing strings
newstring = string.gsub(string,"Tutorial","Language")
print("The new string is "..newstring)
When we run the above program, we will get the following output.
The new string is Lua Language
Finding and Reversing
A sample code for finding the index of substring and reversing string is given below.
string = "Lua Tutorial"

-- replacing strings
print(string.find(string,"Tutorial"))
reversedString = string.reverse(string)
print("The new string is",reversedString)
When we run the above program, we will get the following output.
5	12
The new string is	lairotuT auL
Formatting Strings
Many times in our programming, we may need to print strings in a formatted way. You can use the string.format function to format the output as shown below.
string1 = "Lua"
string2 = "Tutorial"

number1 = 10
number2 = 20

-- Basic string formatting
print(string.format("Basic formatting %s %s",string1,string2))

-- Date formatting
date = 2; month = 1; year = 2014
print(string.format("Date formatting %02d/%02d/%03d", date, month, year))

-- Decimal formatting
print(string.format("%.4f",1/3))
When we run the above program, we will get the following output.
Basic formatting Lua Tutorial
Date formatting 02/01/2014
0.3333
Character and Byte Representations
A sample code for character and byte representation, which is used for converting the string from string to internal representation and vice versa.
-- Byte conversion

-- First character
print(string.byte("Lua"))

-- Third character
print(string.byte("Lua",3))

-- first character from last
print(string.byte("Lua",-1))

-- Second character
print(string.byte("Lua",2))

-- Second character from last
print(string.byte("Lua",-2))

-- Internal Numeric ASCII Conversion
print(string.char(97))
When we run the above program, we will get the following output.
76
97
97
117
117
a
Other Common Functions
The common string manipulations include string concatenation, finding length of string and at times repeating the same string multiple times. The example for these operations is given below.
string1 = "Lua"
string2 = "Tutorial"

-- String Concatenations using ..
print("Concatenated string",string1..string2)

-- Length of string
print("Length of string1 is ",string.len(string1))

-- Repeating strings
repeatedString = string.rep(string1,3)
print(repeatedString)
When we run the above program, we will get the following output.
Concatenated string	LuaTutorial
Length of string1 is 	3
LuaLuaLua
Lua - Arrays
Arrays are ordered arrangement of objects, which may be a one-dimensional array containing a collection of rows or a multi-dimensional array containing multiple rows and columns.
In Lua, arrays are implemented using indexing tables with integers. The size of an array is not fixed and it can grow based on our requirements, subject to memory constraints.
One-Dimensional Array
A one-dimensional array can be represented using a simple table structure and can be initialized and read using a simple for loop. An example is shown below.
array = {"Lua", "Tutorial"}

for i = 0, 2 do
   print(array[i])
end
When we run the above code, we wil get the following output.
nil
Lua
Tutorial
As you can see in the above code, when we are trying to access an element in an index that is not there in the array, it returns nil. In Lua, indexing generally starts at index 1. But it is possible to create objects at index 0 and below 0 as well. Array using negative indices is shown below where we initialize the array using a for loop.
array = {}

for i= -2, 2 do
   array[i] = i *2
end

for i = -2,2 do
   print(array[i])
end
When we run the above code, we will get the following output.
-4
-2
0
2
4
Multi-Dimensional Array
Multi-dimensional arrays can be implemented in two ways.
- Array of arrays
- Single dimensional array by manipulating indices
An example for multidimensional array of 3. 3 is shown below using array of arrays.
-- Initializing the array
array = {}

for i=1,3 do
   array[i] = {}

   for j=1,3 do
      array[i][j] = i*j
   end

end

-- Accessing the array

for i=1,3 do

   for j=1,3 do
      print(array[i][j])
   end

end
When we run the above code, we will get the following output.
1
2
3
2
4
6
3
6
9
An example for multidimensional array is shown below using manipulating indices.
-- Initializing the array

array = {}

maxRows = 3
maxColumns = 3

for row=1,maxRows do

   for col=1,maxColumns do
      array[row*maxColumns +col] = row*col
   end

end

-- Accessing the array

for row=1,maxRows do

   for col=1,maxColumns do
      print(array[row*maxColumns +col])
   end

end
When we run the above code, we will get the following output.
1
2
3
2
4
6
3
6
9
As you can see in the above example, data is stored based on indices. It is possible to place the elements in a sparse way and it is the way Lua implementation of a matrix works. Since it does not store nil values in Lua, it is possible to save lots of memory without any special technique in Lua as compared to special techniques used in other programming languages.
Lua - Iterators
Iterator is a construct that enables you to traverse through the elements of the so called collection or container. In Lua, these collections often refer to tables, which are used to create various data structures like array.
Generic For Iterator
A generic for iterator provides the key value pairs of each element in the collection. A simple example is given below.
array = {"Lua", "Tutorial"}

for key,value in ipairs(array)
do
   print(key, value)
end
When we run the above code, we will get the following output −
1  Lua
2  Tutorial
The above example uses the default ipairs iterator function provided by Lua.
In Lua we use functions to represent iterators. Based on the state maintenance in these iterator functions, we have two main types −
- Stateless Iterators
- Stateful Iterators
Stateless Iterators
By the name itself we can understand that this type of iterator function does not retain any state.
Let us now see an example of creating our own iterator using a simple function that prints the squares of n numbers.
function square(iteratorMaxCount,currentNumber)

   if currentNumber<iteratorMaxCount
   then
      currentNumber = currentNumber+1
      return currentNumber, currentNumber*currentNumber
   end

end

for i,n in square,3,0
do
   print(i,n)
end
When we run the above program, we will get the following output.
1	1
2	4
3	9
The above code can be modified slightly to mimic the way ipairs function of iterators work. It is shown below.
function square(iteratorMaxCount,currentNumber)

   if currentNumber<iteratorMaxCount
   then
      currentNumber = currentNumber+1
      return currentNumber, currentNumber*currentNumber
   end

end

function squares(iteratorMaxCount)
   return square,iteratorMaxCount,0
end

for i,n in squares(3)
do
   print(i,n)
end
When we run the above program, we will get the following output.
1	1
2	4
3	9
Stateful Iterators
The previous example of iteration using function does not retain the state. Each time the function is called, it returns the next element of the collection based on a second variable sent to the function. To hold the state of the current element, closures are used. Closure retain variables values across functions calls. To create a new closure, we create two functions including the closure itself and a factory, the function that creates the closure.
Let us now see an example of creating our own iterator in which we will be using closures.
array = {"Lua", "Tutorial"}

function elementIterator (collection)

   local index = 0
   local count = #collection

   -- The closure function is returned

   return function ()
      index = index + 1

      if index <= count
      then
         -- return the current element of the iterator
         return collection[index]
      end

   end

end

for element in elementIterator(array)
do
   print(element)
end
When we run the above program, we will get the following output.
Lua
Tutorial
In the above example, we can see that elementIterator has another method inside that uses the local external variables index and count to return each of the element in the collection by incrementing the index each time the function is called.
We can create our own function iterators using closure as shown above and it can return multiple elements for each of the time we iterate through the collection.
Lua - Tables
Introduction
Tables are the only data structure available in Lua that helps us create different types like arrays and dictionaries. Lua uses associative arrays and which can be indexed with not only numbers but also with strings except nil. Tables have no fixed size and can grow based on our need.
Lua uses tables in all representations including representation of packages. When we access a method string.format, it means, we are accessing the format function available in the string package.
Representation and Usage
Tables are called objects and they are neither values nor variables. Lua uses a constructor expression {} to create an empty table. It is to be known that there is no fixed relationship between a variable that holds reference of table and the table itself.
--sample table initialization
mytable = {}

--simple table value assignment
mytable[1]= "Lua"

--removing reference
mytable = nil

-- lua garbage collection will take care of releasing memory
When we have a table a with set of elements and if we assign it to b, both a and b refer to the same memory. No separate memory is allocated separately for b. When a is set to nil, table will be still accessible to b. When there are no reference to a table, then garbage collection in Lua takes care of cleaning up process to make these unreferenced memory to be reused again.
An example is shown below for explaining the above mentioned features of tables.
-- Simple empty table
mytable = {}
print("Type of mytable is ",type(mytable))

mytable[1]= "Lua"
mytable["wow"] = "Tutorial"

print("mytable Element at index 1 is ", mytable[1])
print("mytable Element at index wow is ", mytable["wow"])

-- alternatetable and mytable refers to same table
alternatetable = mytable

print("alternatetable Element at index 1 is ", alternatetable[1])
print("alternatetable Element at index wow is ", alternatetable["wow"])

alternatetable["wow"] = "I changed it"

print("mytable Element at index wow is ", mytable["wow"])

-- only variable released and and not table
alternatetable = nil
print("alternatetable is ", alternatetable)

-- mytable is still accessible
print("mytable Element at index wow is ", mytable["wow"])

mytable = nil
print("mytable is ", mytable)
When we run the above program we will get the following output −
Type of mytable is 	table
mytable Element at index 1 is 	Lua
mytable Element at index wow is 	Tutorial
alternatetable Element at index 1 is 	Lua
alternatetable Element at index wow is 	Tutorial
mytable Element at index wow is 	I changed it
alternatetable is 	nil
mytable Element at index wow is 	I changed it
mytable is 	nil
Table Manipulation
There are in built functions for table manipulation and they are listed in the following table.
| Sr.No. | Method & Purpose |
|---|---|
| 1 | table.concat (table [, sep [, i [, j]]]) Concatenates the strings in the tables based on the parameters given. See example for detail. |
| 2 | table.insert (table, [pos,] value) Inserts a value into the table at specified position. |
| 3 | table.maxn (table) Returns the largest numeric index. |
| 4 | table.remove (table [, pos]) Removes the value from the table. |
| 5 | table.sort (table [, comp]) Sorts the table based on optional comparator argument. |
Let us see some samples of the above functions.
Table Concatenation
We can use the concat function to concatenate two tables as shown below −
fruits = {"banana","orange","apple"}

-- returns concatenated string of table
print("Concatenated string ",table.concat(fruits))

--concatenate with a character
print("Concatenated string ",table.concat(fruits,", "))

--concatenate fruits based on index
print("Concatenated string ",table.concat(fruits,", ", 2,3))
When we run the above program we will get the following output −
Concatenated string 	bananaorangeapple
Concatenated string 	banana, orange, apple
Concatenated string 	orange, apple
Insert and Remove
Insertion and removal of items in tables is most common in table manipulation. It is explained below.
fruits = {"banana","orange","apple"}

-- insert a fruit at the end
table.insert(fruits,"mango")
print("Fruit at index 4 is ",fruits[4])

--insert fruit at index 2
table.insert(fruits,2,"grapes")
print("Fruit at index 2 is ",fruits[2])

print("The maximum elements in table is",table.maxn(fruits))

print("The last element is",fruits[5])

table.remove(fruits)
print("The previous last element is",fruits[5])
When we run the above program, we will get the following output −
Fruit at index 4 is 	mango
Fruit at index 2 is 	grapes
The maximum elements in table is	5
The last element is	mango
The previous last element is	nil
Sorting Tables
We often require to sort a table in a particular order. The sort functions sort the elements in a table alphabetically. A sample for this is shown below.
fruits = {"banana","orange","apple","grapes"}

for k,v in ipairs(fruits) do
   print(k,v)
end

table.sort(fruits)
print("sorted table")

for k,v in ipairs(fruits) do
   print(k,v)
end
When we run the above program we will get the following output −
1	banana
2	orange
3	apple
4	grapes
sorted table
1	apple
2	banana
3	grapes
4	orange
Lua - Modules
What is a Module?
Module is like a library that can be loaded using require and has a single global name containing a table. This module can consist of a number of functions and variables. All these functions and variables are wrapped in to the table, which acts as a namespace. Also, a well behaved module has necessary provisions to return this table on require.
Specialty of Lua Modules
The usage of tables in modules helps us in numerous ways and enables us to manipulate the modules in the same way we manipulate any other Lua table. As a result of the ability to manipulate modules, it provides extra features for which other languages need special mechanisms. Due to this free mechanism of modules in Lua, a user can call the functions in Lua in multiple ways. A few of them are shown below.
-- Assuming we have a module printFormatter
-- Also printFormatter has a funtion simpleFormat(arg)
-- Method 1
require "printFormatter"
printFormatter.simpleFormat("test")

-- Method 2
local formatter = require "printFormatter"
formatter.simpleFormat("test")

-- Method 3
require "printFormatter"
local formatterFunction = printFormatter.simpleFormat
formatterFunction("test")
In the above sample code, you can see how flexible programming in Lua is, without any special additional code.
The require Function
Lua has provided a high level function called require to load all the necessary modules. It is kept as simple as possible to avoid having too much information on module to load it. The require function just assumes the modules as a chunk of code that defines some values, which is actually functions or tables containing functions.
Example
Let us consider a simple example, where one function has the math functions. Let's call this module as mymath and filename being mymath.lua. The file content is as follows −
local mymath =  {}

function mymath.add(a,b)
   print(a+b)
end

function mymath.sub(a,b)
   print(a-b)
end

function mymath.mul(a,b)
   print(a*b)
end

function mymath.div(a,b)
   print(a/b)
end

return mymath
Now, in order to access this Lua module in another file, say, moduletutorial.lua, you need to use the following code segment.
mymathmodule = require("mymath")
mymathmodule.add(10,20)
mymathmodule.sub(30,20)
mymathmodule.mul(10,20)
mymathmodule.div(30,20)
In order to run this code, we need to place the two Lua files in the same directory or alternatively, you can place the module file in the package path and it needs additional setup. When we run the above program, we will get the following output.
30
10
200
1.5
Things to Remember
Place both the modules and the file you run in the same directory.
Module name and its file name should be the same.
It is a best practice to return modules for require function and hence the module should be preferably implemented as shown above eventhough you can find other types of implementations elsewhere.
Old Way of Implementing Modules
Let me now rewrite the same example in the older way, which uses package.seeall type of implementation. This was used in Lua versions 5.1 and 5.0. The mymath module is shown below.
module("mymath", package.seeall)

function mymath.add(a,b)
   print(a+b)
end

function mymath.sub(a,b)
   print(a-b)
end

function mymath.mul(a,b)
   print(a*b)
end

function mymath.div(a,b)
   print(a/b)
end
The usage of modules in moduletutorial.lua is shown below.
require("mymath")
mymath.add(10,20)
mymath.sub(30,20)
mymath.mul(10,20)
mymath.div(30,20)
When we run the above, we will get the same output. But it is advised on to use the older version of the code and it is assumed to less secure. Many SDKs that use Lua for programming like Corona SDK has deprecated the use of this.
Lua - Metatables
A metatable is a table that helps in modifying the behavior of a table it is attached to with the help of a key set and related meta methods. These meta methods are powerful Lua functionality that enables features like −
Changing/adding functionalities to operators on tables.
Looking up metatables when the key is not available in the table using __index in metatable.
There are two important methods that are used in handling metatables which includes −
setmetatable(table,metatable) − This method is used to set metatable for a table.
getmetatable(table) − This method is used to get metatable of a table.
Let's first look at how to set one table as metatable of another. It is shown below.
mytable = {}
mymetatable = {}
setmetatable(mytable,mymetatable)
The above code can be represented in a single line as shown below.
mytable = setmetatable({},{})
_index
A simple example of metatable for looking up the meta table when it's not available in table is shown below.
mytable = setmetatable({key1 = "value1"}, {
   __index = function(mytable, key)

      if key == "key2" then
         return "metatablevalue"
      else
         return mytable[key]
      end
   end
})

print(mytable.key1,mytable.key2)
When we run the above program, we will get the following output.
value1 metatablevalue
Let us explain what happened in the above example in steps.
The table mytable here is {key1 = "value1"}.
Metatable is set for mytable that contains a function for __index, which we call as a metamethod.
The metamethod does a simple job of looking up for an index "key2", if it's found, it returns "metatablevalue", otherwise returns mytable's value for corresponding index.
We can have a simplified version of the above program as shown below.
mytable = setmetatable({key1 = "value1"},
   { __index = { key2 = "metatablevalue" } })
print(mytable.key1,mytable.key2)
__newindex
When we add __newindex to metatable, if keys are not available in the table, the behavior of new keys will be defined by meta methods. A simple example where metatable's index is set when index is not available in the main table is given below.
mymetatable = {}
mytable = setmetatable({key1 = "value1"}, { __newindex = mymetatable })

print(mytable.key1)

mytable.newkey = "new value 2"
print(mytable.newkey,mymetatable.newkey)

mytable.key1 = "new  value 1"
print(mytable.key1,mymetatable.newkey1)
When you run the above program, you get the following output.
value1
nil	new value 2
new  value 1	nil
You can see in the above program, if a key exists in the main table, it just updates it. When a key is not available in the maintable, it adds that key to the metatable.
Another example that updates the same table using rawset function is shown below.
mytable = setmetatable({key1 = "value1"}, {

   __newindex = function(mytable, key, value)
      rawset(mytable, key, "\""..value.."\"")
   end
})

mytable.key1 = "new value"
mytable.key2 = 4

print(mytable.key1,mytable.key2)
When we run the above program we will get the following output.
new value "4"
rawset sets value without using __newindex of metatable. Similarly there is rawget that gets value without using __index.
Adding Operator Behavior to Tables
A simple example to combine two tables using + operator is shown below −
mytable = setmetatable({ 1, 2, 3 }, {
   __add = function(mytable, newtable)

      for i = 1, table.maxn(newtable) do
         table.insert(mytable, table.maxn(mytable)+1,newtable[i])
      end
      return mytable
   end
})

secondtable = {4,5,6}

mytable = mytable + secondtable

for k,v in ipairs(mytable) do
   print(k,v)
end
When we run the above program, we will get the following output.
1	1
2	2
3	3
4	4
5	5
6	6
The __add key is included in the metatable to add behavior of operator +. The table of keys and corresponding operator is shown below.
| Sr.No. | Mode & Description |
|---|---|
| 1 | __add Changes the behavior of operator '+'. |
| 2 | __sub Changes the behavior of operator '-'. |
| 3 | __mul Changes the behavior of operator '*'. |
| 4 | __div Changes the behavior of operator '/'. |
| 5 | __mod Changes the behavior of operator '%'. |
| 6 | __unm Changes the behavior of operator '-'. |
| 7 | __concat Changes the behavior of operator '..'. |
| 8 | __eq Changes the behavior of operator '=='. |
| 9 | __lt Changes the behavior of operator '<'. |
| 10 | __le Changes the behavior of operator '<='. |
__call
Adding behavior of method call is done using __call statement. A simple example that returns the sum of values in main table with the passed table.
mytable = setmetatable({10}, {
   __call = function(mytable, newtable)
   sum = 0

      for i = 1, table.maxn(mytable) do
         sum = sum + mytable[i]
      end

      for i = 1, table.maxn(newtable) do
         sum = sum + newtable[i]
      end

      return sum
   end
})

newtable = {10,20,30}
print(mytable(newtable))
When we run the above program, we will get the following output.
70
__tostring
To change the behavior of the print statement, we can use the __tostring metamethod. A simple example is shown below.
mytable = setmetatable({ 10, 20, 30 }, {
   __tostring = function(mytable)
   sum = 0

      for k, v in pairs(mytable) do
         sum = sum + v
      end

      return "The sum of values in the table is " .. sum
   end
})
print(mytable)
When we run the above program, we will get the following output.
The sum of values in the table is 60
If you know the capabilities of meta table fully, you can really perform a lot of operations that would be very complex without using it. So, try to work more on using metatables with different options available in meta tables as explained in the samples and also create your own samples.
Lua - Coroutines
Introduction
Coroutines are collaborative in nature, which allows two or more methods to execute in a controlled manner. With coroutines, at any given time, only one coroutine runs and this running coroutine only suspends its execution when it explicitly requests to be suspended.
The above definition may look vague. Let us assume we have two methods, one the main program method and a coroutine. When we call a coroutine using resume function, its starts executing and when we call yield function, it suspends executing. Again the same coroutine can continue executing with another resume function call from where it was suspended. This process can continue till the end of execution of the coroutine.
Functions Available in Coroutines
The following table lists all the available functions for coroutines in Lua and their corresponding use.
| Sr.No. | Method & Purpose |
|---|---|
| 1 | coroutine.create (f) Creates a new coroutine with a function f and returns an object of type "thread". |
| 2 | coroutine.resume (co [, val1, ...]) Resumes the coroutine co and passes the parameters if any. It returns the status of operation and optional other return values. |
| 3 | coroutine.running () Returns the running coroutine or nil if called in the main thread. |
| 4 | coroutine.status (co) Returns one of the values from running, normal, suspended or dead based on the state of the coroutine. |
| 5 | coroutine.wrap (f) Like coroutine.create, the coroutine.wrap function also creates a coroutine, but instead of returning the coroutine itself, it returns a function that, when called, resumes the coroutine. |
| 6 | coroutine.yield (...) Suspends the running coroutine. The parameter passed to this method acts as additional return values to the resume function. |
Example
Let's look at an example to understand the concept of coroutines.
co = coroutine.create(function (value1,value2)
   local tempvar3 = 10
   print("coroutine section 1", value1, value2, tempvar3)

   local tempvar1 = coroutine.yield(value1+1,value2+1)
   tempvar3 = tempvar3 + value1
   print("coroutine section 2",tempvar1 ,tempvar2, tempvar3)

   local tempvar1, tempvar2= coroutine.yield(value1+value2, value1-value2)
   tempvar3 = tempvar3 + value1
   print("coroutine section 3",tempvar1,tempvar2, tempvar3)
   return value2, "end"

end)

print("main", coroutine.resume(co, 3, 2))
print("main", coroutine.resume(co, 12,14))
print("main", coroutine.resume(co, 5, 6))
print("main", coroutine.resume(co, 10, 20))
When we run the above program, we will get the following output.
coroutine section 1	3	2	10
main	true	4	3
coroutine section 2	12	nil	13
main	true	5	1
coroutine section 3	5	6	16
main	true	2	end
main	false	cannot resume dead coroutine
What Does the Above Example Do?
As mentioned before, we use the resume function to start the operation and yield function to stop the operation. Also, you can see that there are multiple return values received by resume function of coroutine.
First, we create a coroutine and assign it to a variable name co and the coroutine takes in two variables as its parameters.
When we call the first resume function, the values 3 and 2 are retained in the temporary variables value1 and value2 till the end of the coroutine.
To make you understand this, we have used a tempvar3, which is 10 initially and it gets updated to 13 and 16 by the subsequent calls of the coroutines since value1 is retained as 3 throughout the execution of the coroutine.
The first coroutine.yield returns two values 4 and 3 to the resume function, which we get by updating the input params 3 and 2 in the yield statement. It also receives the true/false status of coroutine execution.
Another thing about coroutines is how the next params of resume call is taken care of, in the above example; you can see that the variable the coroutine.yield receives the next call params which provides a powerful way of doing new operation with the retentionship of existing param values.
Finally, once all the statements in the coroutines are executed, the subsequent calls will return in false and "cannot resume dead coroutine" statement as response.
Another Coroutine Example
Let us look at a simple coroutine that returns a number from 1 to 5 with the help of yield function and resume function. It creates coroutine if not available or else resumes the existing coroutine.
function getNumber()
   local function getNumberHelper()
      co = coroutine.create(function ()
      coroutine.yield(1)
      coroutine.yield(2)
      coroutine.yield(3)
      coroutine.yield(4)
      coroutine.yield(5)
      end)
      return co
   end

   if(numberHelper) then
      status, number = coroutine.resume(numberHelper);

      if coroutine.status(numberHelper) == "dead" then
         numberHelper = getNumberHelper()
         status, number = coroutine.resume(numberHelper);
      end

      return number
   else
      numberHelper = getNumberHelper()
      status, number = coroutine.resume(numberHelper);
      return number
   end

end

for index = 1, 10 do
   print(index, getNumber())
end
When we run the above program, we will get the following output.
1	1
2	2
3	3
4	4
5	5
6	1
7	2
8	3
9	4
10	5
There is often a comparison of coroutines with the threads of multiprogramming languages, but we need to understand that coroutines have similar features of thread but they execute only one at a time and never execute concurrently.
We control the program execution sequence to meet the needs with the provision of retaining certain information temporarily. Using global variables with coroutines provides even more flexibility to coroutines.
Lua - File I/O
I/O library is used for reading and manipulating files in Lua. There are two kinds of file operations in Lua namely implicit file descriptors and explicit file descriptors.
For the following examples, we will use a sample file test.lua as shown below.
-- sample test.lua
-- sample2 test.lua
A simple file open operation uses the following statement.
file = io.open (filename [, mode])
The various file modes are listed in the following table.
| Sr.No. | Mode & Description |
|---|---|
| 1 | "r" Read-only mode and is the default mode where an existing file is opened. |
| 2 | "w" Write enabled mode that overwrites the existing file or creates a new file. |
| 3 | "a" Append mode that opens an existing file or creates a new file for appending. |
| 4 | "r+" Read and write mode for an existing file. |
| 5 | "w+" All existing data is removed if file exists or new file is created with read write permissions. |
| 6 | "a+" Append mode with read mode enabled that opens an existing file or creates a new file. |
Implicit File Descriptors
Implicit file descriptors use the standard input/ output modes or using a single input and single output file. A sample of using implicit file descriptors is shown below.
-- Opens a file in read
file = io.open("test.lua", "r")

-- sets the default input file as test.lua
io.input(file)

-- prints the first line of the file
print(io.read())

-- closes the open file
io.close(file)

-- Opens a file in append mode
file = io.open("test.lua", "a")

-- sets the default output file as test.lua
io.output(file)

-- appends a word test to the last line of the file
io.write("-- End of the test.lua file")

-- closes the open file
io.close(file)
When you run the program, you will get an output of the first line of test.lua file. For our program, we got the following output.
-- Sample test.lua
This was the first line of the statement in test.lua file for us. Also the line "-- End of the test.lua file" would be appended to the last line of the test.lua code.
In the above example, you can see how the implicit descriptors work with file system using the io."x" methods. The above example uses io.read() without the optional parameter. The optional parameter can be any of the following.
| Sr.No. | Mode & Description |
|---|---|
| 1 | "*n" Reads from the current file position and returns a number if exists at the file position or returns nil. |
| 2 | "*a" Returns all the contents of file from the current file position. |
| 3 | "*l" Reads the line from the current file position, and moves file position to next line. |
| 4 | number Reads number of bytes specified in the function. |
Other common I/O methods includes,
io.tmpfile() − Returns a temporary file for reading and writing that will be removed once the program quits.
io.type(file) − Returns whether file, closed file or nil based on the input file.
io.flush() − Clears the default output buffer.
io.lines(optional file name) − Provides a generic for loop iterator that loops through the file and closes the file in the end, in case the file name is provided or the default file is used and not closed in the end of the loop.
Explicit File Descriptors
We often use explicit file descriptor which allows us to manipulate multiple files at a time. These functions are quite similar to implicit file descriptors. Here, we use file:function_name instead of io.function_name. The following example of the file version of the same implicit file descriptors example is shown below.
-- Opens a file in read mode
file = io.open("test.lua", "r")

-- prints the first line of the file
print(file:read())

-- closes the opened file
file:close()

-- Opens a file in append mode
file = io.open("test.lua", "a")

-- appends a word test to the last line of the file
file:write("--test")

-- closes the open file
file:close()
When you run the program, you will get a similar output as the implicit descriptors example.
-- Sample test.lua
All the modes of file open and params for read for external descriptors is same as implicit file descriptors.
Other common file methods includes,
file:seek(optional whence, optional offset) − Whence parameter is "set", "cur" or "end". Sets the new file pointer with the updated file position from the beginning of the file. The offsets are zero-based in this function. The offset is measured from the beginning of the file if the first argument is "set"; from the current position in the file if it's "cur"; or from the end of the file if it's "end". The default argument values are "cur" and 0, so the current file position can be obtained by calling this function without arguments.
file:flush() − Clears the default output buffer.
io.lines(optional file name) − Provides a generic for loop iterator that loops through the file and closes the file in the end, in case the file name is provided or the default file is used and not closed in the end of the loop.
An example to use the seek method is shown below. It offsets the cursor from the 25 positions prior to the end of file. The read function prints remainder of the file from seek position.
-- Opens a file in read
file = io.open("test.lua", "r")

file:seek("end",-25)
print(file:read("*a"))

-- closes the opened file
file:close()
You will get some output similar to the following.
sample2 test.lua
--test
You can play around all the different modes and parameters to know the full ability of the Lua file operations.
Lua - Error Handling
Need for Error Handling
Error handling is quite critical since real-world operations often require the use of complex operations, which includes file operations, database transactions and web service calls.
In any programming, there is always a requirement for error handling. Errors can be of two types which includes,
- Syntax errors
- Run time errors
Syntax Errors
Syntax errors occur due to improper use of various program components like operators and expressions. A simple example for syntax error is shown below.
a == 2
As you know, there is a difference between the use of a single "equal to" and double "equal to". Using one instead of the other can lead to an error. One "equal to" refers to assignment while a double "equal to" refers to comparison. Similarly, we have expressions and functions having their predefined ways of implementation.
Another example for syntax error is shown below −
for a= 1,10
   print(a)
end
When we run the above program, we will get the following output −
lua: test2.lua:2: 'do' expected near 'print'
Syntax errors are much easier to handle than run time errors since, the Lua interpreter locates the error more clearly than in case of runtime error. From the above error, we can know easily that adding a do statement before print statement is required as per the Lua structure.
Run Time Errors
In case of runtime errors, the program executes successfully, but it can result in runtime errors due to mistakes in input or mishandled functions. A simple example to show run time error is shown below.
function add(a,b)
   return a+b
end

add(10)
When we build the program, it will build successfully and run. Once it runs, shows a run time error.
lua: test2.lua:2: attempt to perform arithmetic on local 'b' (a nil value)
stack traceback:
	test2.lua:2: in function 'add'
	test2.lua:5: in main chunk
	[C]: ?
This is a runtime error, which had occurred due to not passing two variables. The b parameter is expected and here it is nil and produces an error.
Assert and Error Functions
In order to handle errors, we often use two functions − assert and error. A simple example is shown below.
local function add(a,b)
   assert(type(a) == "number", "a is not a number")
   assert(type(b) == "number", "b is not a number")
   return a+b
end

add(10)
When we run the above program, we will get the following error output.
lua: test2.lua:3: b is not a number
stack traceback:
	[C]: in function 'assert'
	test2.lua:3: in function 'add'
	test2.lua:6: in main chunk
	[C]: ?
The error (message [, level]) terminates the last protected function called and returns message as the error message. This function error never returns. Usually, error adds some information about the error position at the beginning of the message. The level argument specifies how to get the error position. With level 1 (the default), the error position is where the error function was called. Level 2 points the error to where the function that called error was called; and so on. Passing a level 0 avoids the addition of error position information to the message.
pcall and xpcall
In Lua programming, in order to avoid throwing these errors and handling errors, we need to use the functions pcall or xpcall.
The pcall (f, arg1, ...) function calls the requested function in protected mode. If some error occurs in function f, it does not throw an error. It just returns the status of error. A simple example using pcall is shown below.
function myfunction ()
   n = n/nil
end

if pcall(myfunction) then
   print("Success")
else
	print("Failure")
end
When we run the above program, we will get the following output.
Failure
The xpcall (f, err) function calls the requested function and also sets the error handler. Any error inside f is not propagated; instead, xpcall catches the error, calls the err function with the original error object, and returns a status code.
A simple example for xpcall is shown below.
function myfunction ()
   n = n/nil
end

function myerrorhandler( err )
   print( "ERROR:", err )
end

status = xpcall( myfunction, myerrorhandler )
print( status)
When we run the above program, we will get the following output.
ERROR:	test2.lua:2: attempt to perform arithmetic on global 'n' (a nil value)
false
As a programmer, it is most important to ensure that you take care of proper error handling in the programs you write. Using error handling can ensure that unexpected conditions beyond the boundary conditions are handled without disturbing the user of the program.
Lua - Debugging
Lua provides a debug library, which provides all the primitive functions for us to create our own debugger. Even though, there is no in-built Lua debugger, we have many debuggers for Lua, created by various developers with many being open source.
The functions available in the Lua debug library are listed in the following table along with its uses.
| Sr.No. | Method & Purpose |
|---|---|
| 1 | debug() Enters interactive mode for debugging, which remains active till we type in only cont in a line and press enter. User can inspect variables during this mode using other functions. |
| 2 | getfenv(object) Returns the environment of object. |
| 3 | gethook(optional thread) Returns the current hook settings of the thread, as three values − the current hook function, the current hook mask, and the current hook count. |
| 4 | getinfo(optional thread, function or stack level, optional flag) Returns a table with info about a function. You can give the function directly, or you can give a number as the value of function, which means the function running at level function of the call stack of the given thread − level 0 is the current function (getinfo itself); level 1 is the function that called getinfo; and so on. If function is a number larger than the number of active functions, then getinfo returns nil. |
| 5 | getlocal(optional thread, stack level, local index) Returns the name and the value of the local variable with index local of the function at level of the stack.Returns nil if there is no local variable with the given index, and raises an error when called with a level out of range. |
| 6 | getmetatable(value) Returns the metatable of the given object or nil if it does not have a metatable. |
| 7 | getregistry() Returns the registry table,a pre-defined table that can be used by any C code to store whatever Lua value it needs to store. |
| 8 | getupvalue(function, upvalue index) This function returns the name and the value of the upvalue with index up of the function func. The function returns nil if there is no upvalue with the given index. |
| 9 | setfenv(function or thread or userdata, environment table) Sets the environment of the given object to the given table. Returns object. |
| 10 | sethook(optional thread, hook function, hook mask string with "c" and/or "r" and/or "l", optional instruction count) Sets the given function as a hook. The string mask and the number count describes when the hook will be called. Here, c, r and l are called every time Lua calls, returns, and enters every line of code in a function respectively. |
| 11 | setlocal(optional thread, stack level, local index, value) Assigns the value to the local variable with index local of the function at level of the stack. The function returns nil if there is no local variable with the given index, and raises an error when called with a level out of range. Otherwise, it returns the name of the local variable. |
| 12 | setmetatable(value, metatable) Sets the metatable for the given object to the given table (which can be nil). |
| 13 | setupvalue(function, upvalue index, value) This function assigns the value to the upvalue with index up of the function func. The function returns nil if there is no upvalue with the given index. Otherwise, it returns the name of the upvalue. |
| 14 | traceback(optional thread, optional message string, optional level argument) Builds an extended error message with a traceback. |
The above list is the complete list of debug functions in Lua and we often use a library that uses the above functions and provides easier debugging. Using these functions and creating our own debugger is quite complicated and is not preferable. Anyway, we will see an example of simple use of debugging functions.
function myfunction ()
   print(debug.traceback("Stack trace"))
   print(debug.getinfo(1))
   print("Stack trace end")

   return 10
end

myfunction ()
print(debug.getinfo(1))
When we run the above program, we will get the stack trace as shown below.
Stack trace
stack traceback:
	test2.lua:2: in function 'myfunction'
	test2.lua:8: in main chunk
	[C]: ?
table: 0054C6C8
Stack trace end
In the above sample program, the stack trace is printed by using the debug.trace function available in the debug library. The debug.getinfo gets the current table of the function.
Debugging - Example
We often need to know the local variables of a function for debugging. For that purpose, we can use getupvalue and to set these local variables, we use setupvalue. A simple example for this is shown below.
function newCounter ()
   local n = 0
   local k = 0

   return function ()
      k = n
      n = n + 1
      return n
   end

end

counter = newCounter ()

print(counter())
print(counter())

local i = 1

repeat
   name, val = debug.getupvalue(counter, i)

   if name then
      print ("index", i, name, "=", val)

      if(name == "n") then
         debug.setupvalue (counter,2,10)
      end

      i = i + 1
   end -- if

until not name

print(counter())
When we run the above program, we will get the following output.
1
2
index	1	k	=	1
index	2	n	=	2
11
In this example, the counter updates by one each time it is called. We can see the current state of the local variable using the getupvalue function. We then set the local variable to a new value. Here, n is 2 before the set operation is called. Using setupvalue function, it is updated to 10. Now when we call the counter function, it will return 11 instead of 3.
Debugging Types
- Command line debugging
- Graphical debugging
Command Line Debugging
Command line debugging is the type of debugging that uses command line to debug with the help of commands and print statements. There are many command line debuggers available for Lua of which a few are listed below.
RemDebug − RemDebug is a remote debugger for Lua 5.0 and 5.1. It lets you control the execution of another Lua program remotely, setting breakpoints and inspecting the current state of the program. RemDebug can also debug CGILua scripts.
clidebugger − A simple command line interface debugger for Lua 5.1 written in pure Lua. It's not dependent on anything other than the standard Lua 5.1 libraries. It was inspired by RemDebug but does not have its remote facilities.
ctrace − A tool for tracing Lua API calls.
xdbLua − A simple Lua command line debugger for the Windows platform.
LuaInterface - Debugger − This project is a debugger extension for LuaInterface. It raises the built in Lua debug interface to a higher level. Interaction with the debugger is done by events and method calls.
Rldb − This is a remote Lua debugger via socket, available on both Windows and Linux. It can give you much more features than any existing one.
ModDebug − This allows in controlling the execution of another Lua program remotely, set breakpoints, and inspect the current state of the program.
Graphical Debugging
Graphical debugging is available with the help of IDE where you are provided with visual debugging of various states like variable values, stack trace and other related information. There is a visual representation and step by step control of execution with the help of breakpoints, step into, step over and other buttons in the IDE.
There are number of graphical debuggers for Lua and it includes the following.
SciTE − The default windows IDE for Lua provides multiple debugging facilities like breakpoints, step, step into, step over, watch variables and so on.
Decoda − This is a graphical debugger with remote debugging support.
ZeroBrane Studio − Lua IDE with integrated remote debugger, stack view, watch view, remote console, static analyzer, and more. Works with LuaJIT, Love2d, Moai, and other Lua engines; Windows, OSX, and Linux. Open source.
akdebugger − Debugger and editor Lua plugin for Eclipse.
luaedit − This features remote debugging, local debugging, syntax highlighting, completion proposal list, parameter proposition engine, advance breakpoint management (including condition system on breakpoints and hit count), function listing, global and local variables listing, watches, solution oriented management.
Lua - Garbage Collection
Lua uses automatic memory management that uses garbage collection based on certain algorithms that is in-built in Lua. As a result of automatic memory management, as a developer −
- No need to worry about allocating memory for objects.
- No need to free them when no longer needed except for setting it to nil.
Lua uses a garbage collector that runs from time to time to collect dead objects when they are no longer accessible from the Lua program.
All objects including tables, userdata, functions, thread, string and so on are subject to automatic memory management. Lua uses incremental mark and sweep collector that uses two numbers to control its garbage collection cycles namely garbage collector pause and garbage collector step multiplier. These values are in percentage and value of 100 is often equal to 1 internally.
Garbage Collector Pause
Garbage collector pause is used for controlling how long the garbage collector needs to wait, before; it is called again by the Lua's automatic memory management. Values less than 100 would mean that Lua will not wait for the next cycle. Similarly, higher values of this value would result in the garbage collector being slow and less aggressive in nature. A value of 200, means that the collector waits for the total memory in use to double before starting a new cycle. Hence, depending on the nature and speed of application, there may be a requirement to alter this value to get best performance in Lua applications.
Garbage Collector Step Multiplier
This step multiplier controls the relative speed of garbage collector to that of memory allocation in Lua program. Larger step values will lead to garbage collector to be more aggressive and it also increases the step size of each incremental step of garbage collection. Values less than 100 could often lead to avoid the garbage collector not to complete its cycle and its not generally preferred. The default value is 200, which means the garbage collector runs twice as the speed of memory allocation.
Garbage Collector Functions
As developers, we do have some control over the automatic memory management in Lua. For this, we have the following methods.
collectgarbage("collect") − Runs one complete cycle of garbage collection.
collectgarbage("count") − Returns the amount of memory currently used by the program in Kilobytes.
collectgarbage("restart") − If the garbage collector has been stopped, it restarts it.
collectgarbage("setpause") − Sets the value given as second parameter divided by 100 to the garbage collector pause variable. Its uses are as discussed a little above.
collectgarbage("setstepmul") − Sets the value given as second parameter divided by 100 to the garbage step multiplier variable. Its uses are as discussed a little above.
collectgarbage("step") − Runs one step of garbage collection. The larger the second argument is, the larger this step will be. The collectgarbage will return true if the triggered step was the last step of a garbage-collection cycle.
collectgarbage("stop") − Stops the garbage collector if its running.
A simple example using the garbage collector example is shown below.
mytable = {"apple", "orange", "banana"}

print(collectgarbage("count"))

mytable = nil

print(collectgarbage("count"))

print(collectgarbage("collect"))

print(collectgarbage("count"))
When we run the above program, we will get the following output. Please note that this result will vary due to the difference in type of operating system and also the automatic memory management feature of Lua.
23.1455078125   149
23.2880859375   295
0
22.37109375     380
You can see in the above program, once garbage collection is done, it reduced the memory used. But, it's not mandatory to call this. Even if we don't call them, it will be executed automatically at a later stage by Lua interpreter after the predefined period.
Obviously, we can change the behavior of the garbage collector using these functions if required. These functions provide a bit of additional capability for the developer to handle complex situations. Depending on the type of memory need for the program, you may or may not use this feature. But it is very useful to know the memory usage in the applications and check it during the programming itself to avoid undesired results after deployment.
Lua - Object Oriented
Introduction to OOP
Object Oriented Programming (OOP), is one the most used programming technique that is used in the modern era of programming. There are a number of programming languages that support OOP which include,
- C++
- Java
- Objective-C
- Smalltalk
- C#
- Ruby
Features of OOP
Class − A class is an extensible template for creating objects, providing initial values for state (member variables) and implementations of behavior.
Objects − It is an instance of class and has separate memory allocated for itself.
Inheritance − It is a concept by which variables and functions of one class is inherited by another class.
Encapsulation − It is the process of combining the data and functions inside a class. Data can be accessed outside the class with the help of functions. It is also known as data abstraction.
OOP in Lua
You can implement object orientation in Lua with the help of tables and first class functions of Lua. By placing functions and related data into a table, an object is formed. Inheritance can be implemented with the help of metatables, providing a look up mechanism for nonexistent functions(methods) and fields in parent object(s).
Tables in Lua have the features of object like state and identity that is independent of its values. Two objects (tables) with the same value are different objects, whereas an object can have different values at different times, but it is always the same object. Like objects, tables have a life cycle that is independent of who created them or where they were created.
A Real World Example
The concept of object orientation is widely used but you need to understand it clearly for proper and maximum benefit.
Let us consider a simple math example. We often encounter situations where we work on different shapes like circle, rectangle and square.
The shapes can have a common property Area. So, we can extend other shapes from the base object shape with the common property area. Each of the shapes can have its own properties and functions like a rectangle can have properties length, breadth, area as its properties and printArea and calculateArea as its functions.
Creating a Simple Class
A simple class implementation for a rectangle with three properties area, length, and breadth is shown below. It also has a printArea function to print the area calculated.
-- Meta class
Rectangle = {area = 0, length = 0, breadth = 0}

-- Derived class method new

function Rectangle:new (o,length,breadth)
   o = o or {}
   setmetatable(o, self)
   self.__index = self
   self.length = length or 0
   self.breadth = breadth or 0
   self.area = length*breadth;
   return o
end

-- Derived class method printArea

function Rectangle:printArea ()
   print("The area of Rectangle is ",self.area)
end
Creating an Object
Creating an object is the process of allocating memory for the class instance. Each of the objects has its own memory and share the common class data.
r = Rectangle:new(nil,10,20)
Accessing Properties
We can access the properties in the class using the dot operator as shown below −
print(r.length)
Accessing Member Function
You can access a member function using the colon operator with the object as shown below −
r:printArea()
The memory gets allocated and the initial values are set. The initialization process can be compared to constructors in other object oriented languages. It is nothing but a function that enables setting values as shown above.
Complete Example
Lets look at a complete example using object orientation in Lua.
-- Meta class
Shape = {area = 0}

-- Base class method new

function Shape:new (o,side)
   o = o or {}
   setmetatable(o, self)
   self.__index = self
   side = side or 0
   self.area = side*side;
   return o
end

-- Base class method printArea

function Shape:printArea ()
   print("The area is ",self.area)
end

-- Creating an object
myshape = Shape:new(nil,10)

myshape:printArea()
When you run the above program, you will get the following output.
The area is 100
Inheritance in Lua
Inheritance is the process of extending simple base objects like shape to rectangles, squares and so on. It is often used in the real world to share and extend the basic properties and functions.
Let us see a simple class extension. We have a class as shown below.
-- Meta class
Shape = {area = 0}

-- Base class method new

function Shape:new (o,side)
   o = o or {}
   setmetatable(o, self)
   self.__index = self
   side = side or 0
   self.area = side*side;
   return o
end

-- Base class method printArea

function Shape:printArea ()
   print("The area is ",self.area)
end
We can extend the shape to a square class as shown below.
Square = Shape:new()

-- Derived class method new

function Square:new (o,side)
   o = o or Shape:new(o,side)
   setmetatable(o, self)
   self.__index = self
   return o
end
Over-riding Base Functions
We can override the base class functions that is instead of using the function in the base class, derived class can have its own implementation as shown below −
-- Derived class method printArea

function Square:printArea ()
   print("The area of square is ",self.area)
end
Inheritance Complete Example
We can extend the simple class implementation in Lua as shown above with the help of another new method with the help of metatables. All the member variables and functions of base class are retained in the derived class.
-- Meta class
Shape = {area = 0}

-- Base class method new

function Shape:new (o,side)
   o = o or {}
   setmetatable(o, self)
   self.__index = self
   side = side or 0
   self.area = side*side;
   return o
end

-- Base class method printArea

function Shape:printArea ()
   print("The area is ",self.area)
end

-- Creating an object
myshape = Shape:new(nil,10)
myshape:printArea()

Square = Shape:new()

-- Derived class method new

function Square:new (o,side)
   o = o or Shape:new(o,side)
   setmetatable(o, self)
   self.__index = self
   return o
end

-- Derived class method printArea

function Square:printArea ()
   print("The area of square is ",self.area)
end

-- Creating an object
mysquare = Square:new(nil,10)
mysquare:printArea()

Rectangle = Shape:new()

-- Derived class method new

function Rectangle:new (o,length,breadth)
   o = o or Shape:new(o)
   setmetatable(o, self)
   self.__index = self
   self.area = length * breadth
   return o
end

-- Derived class method printArea

function Rectangle:printArea ()
    print("The area of Rectangle is ",self.area)
end

-- Creating an object

myrectangle = Rectangle:new(nil,10,20)
myrectangle:printArea()
When we run the above program, we will get the following output −
The area is 	100
The area of square is 	100
The area of Rectangle is 	200
In the above example, we have created two derived classes − Rectangle and Square from the base class Square. It is possible to override the functions of the base class in derived class. In this example, the derived class overrides the function printArea.
Lua - Web Programming
Lua is a highly flexible language and it is often used in multiple platforms including web applications. The Kepler community that was formed in 2004 to provide open source web components in Lua.
Even though, there are other web frameworks using Lua that have been developed, we will be primarily focusing on the components provided by Kepler community.
Applications and Frameworks
Orbit is an MVC web framework for Lua, based on WSAPI.
WSAPI is the API that abstracts the web host server from Lua web applications and is the base for many projects.
Xavante is a Lua Web server that offers a WSAPI interface.
Sputnik is a wiki/CMS developed over WSAPI on Kepler Project used for humor and entertainment.
CGILua offers LuaPages and LuaScripts web page creation, based on WSAPI but no longer supported. Use Orbit, Sputnik or WSAPI instead.
In this tutorial, we will try to make you understand what Lua can do and to know more about its installation and usage, refer kepler the website
Orbit
Orbit is an MVC web framework for Lua. It completely abandons the CGILua model of "scripts" in favor of applications, where each Orbit application can fit in a single file, but you can split it into multiple files if you want.
All Orbit applications follow the WSAPI protocol, so they currently work with Xavante, CGI and Fastcgi. It includes a launcher that makes it easy to launch a Xavante instance for development.
The easiest way to install Orbit is using LuaRocks. Luarocks install orbit is the command for installing. For this, you need to install LuaRocks first.
If you haven't installed all the dependencies, here are the steps to be followed to setup Orbit in Unix/Linux environment.
Installing Apache
Connect to your server. Install Apache2, its support modules and enable required Apache2 modules using −
$ sudo apt-get install apache2 libapache2-mod-fcgid libfcgi-dev build-essential
$ sudo a2enmod rewrite
$ sudo a2enmod fcgid
$ sudo /etc/init.d/apache2 force-reload
Install LuaRocks
$ sudo apt-get install luarocks
Install WSAPI, FCGI, Orbit, and Xavante
$ sudo luarocks install orbit
$ sudo luarocks install wsapi-xavante
$ sudo luarocks install wsapi-fcgi
Setting up Apache2
$ sudo raj /etc/apache2/sites-available/default
Add this following section below the <Directory /var/www/> section of the config file. If this section has an 'AllowOverride None' then you need to change the 'None' to 'All' so that the .htaccess file can override the configuration locally.
<IfModule mod_fcgid.c>

   AddHandler fcgid-script .lua
   AddHandler fcgid-script .ws
   AddHandler fcgid-script .op

   FCGIWrapper "/usr/local/bin/wsapi.fcgi" .ws
   FCGIWrapper "/usr/local/bin/wsapi.fcgi" .lua
   FCGIWrapper "/usr/local/bin/op.fcgi" .op

   #FCGIServer "/usr/local/bin/wsapi.fcgi" -idle-timeout 60 -processes 1
   #IdleTimeout 60
   #ProcessLifeTime 60

</IfModule>
Restart the server to ensure the changes made comes into effect.
To enable your application, you need to add +ExecCGI to an .htaccess file in the root of your Orbit application − in this case, /var/www.
Options +ExecCGI
DirectoryIndex index.ws
Simple Example − Orbit
#!/usr/bin/env index.lua

-- index.lua
require"orbit"

-- declaration
module("myorbit", package.seeall, orbit.new)

-- handler

function index(web)
   return my_home_page()
end

-- dispatch
myorbit:dispatch_get(index, "/", "/index")

-- Sample page

function my_home_page()

   return [[
      <head></head>
      <html>
         <h2>First Page</h2>
      </html>
   ]]

end
Now, you should be able to launch your web browser. Go to http://localhost:8080/ and you should see the following output −
First Page
Orbit provides another option, i.e., Lua code can generate html.
#!/usr/bin/env index.lua

-- index.lua
require"orbit"

function generate()
   return html {
      head{title "HTML Example"},

      body{
         h2{"Here we go again!"}
      }
   }
end

orbit.htmlify(generate)

print(generate())
Creating Forms
A simple form example is shown below −
#!/usr/bin/env index.lua
require"orbit"

function wrap (inner)
   return html{ head(), body(inner) }
end

function test ()
   return wrap(form (H'table' {
      tr{td"First name",td( input{type = 'text', name='first'})},
      tr{td"Second name",td(input{type = 'text', name='second'})},
      tr{ td(input{type = 'submit', value = 'Submit!'}),
         td(input{type = 'submit',value = 'Cancel'})
      },
   }))
end

orbit.htmlify(wrap,test)

print(test())
WSAPI
As mentioned earlier, WSAPI acts as the base for many projects and have multiple features embedded in it. You can use WSAPI and support the following platforms,
- Windows
- UNIX-based systems
The supported servers and interfaces by WSAPI includes,
- CGI
- FastCGI
- Xavante
WSAPI provides a number of libraries, which makes it easier for us in web programming using Lua. Some of the supported features in Lua includes,
- Request processing
- Output buffering
- Authentication
- File uploads
- Request isolation
- Multiplexing
A simple example of WSAPI is shown below −
#!/usr/bin/env wsapi.cgi

module(..., package.seeall)
function run(wsapi_env)
   local headers = { ["Content-type"] = "text/html" }

   local function hello_text()
      coroutine.yield("<html><body>")
      coroutine.yield("<p>Hello Wsapi!</p>")
      coroutine.yield("<p>PATH_INFO: " .. wsapi_env.PATH_INFO .. "</p>")
      coroutine.yield("<p>SCRIPT_NAME: " .. wsapi_env.SCRIPT_NAME .. "</p>")
      coroutine.yield("</body></html>")
   end

   return 200, headers, coroutine.wrap(hello_text)
end
You can see in the above code a simple html page is formed and returned. You can see the usage of coroutines that makes it possible to return statement by statement to calling function. Finally, html status code(200), headers and html page is returned.
Xavante
Xavante is a Lua HTTP 1.1 Web server that uses a modular architecture based on URI mapped handlers. Xavante currently offers,
- File handler
- Redirect handler
- WSAPI handler
File handler is used for general files. Redirect handler enables URI remapping and WSAPI handler for handing with WSAPI applications.
A simple example is shown below.
require "xavante.filehandler"
require "xavante.cgiluahandler"
require "xavante.redirecthandler"

-- Define here where Xavante HTTP documents scripts are located
local webDir = XAVANTE_WEB

local simplerules = {

   { -- URI remapping example
      match = "^[^%./]*/$",
      with = xavante.redirecthandler,
      params = {"index.lp"}
   },

   { -- cgiluahandler example
      match = {"%.lp$", "%.lp/.*$", "%.lua$", "%.lua/.*$" },
      with = xavante.cgiluahandler.makeHandler (webDir)
   },

   { -- filehandler example
      match = ".",
      with = xavante.filehandler,
      params = {baseDir = webDir}
   },
}

xavante.HTTP{
   server = {host = "*", port = 8080},

   defaultHost = {
      rules = simplerules
   },
}
To use virtual hosts with Xavante, the call to xavante.HTTP would be changed to something like as follows −
xavante.HTTP{
   server = {host = "*", port = 8080},

   defaultHost = {},

   virtualhosts = {
      ["www.sitename.com"] = simplerules
   }
}
Lua Web Components
Copas, a dispatcher based on coroutines that can be used by TCP/IP servers.
Cosmo, a "safe templates" engine that protects your application from arbitrary code in the templates.
Coxpcall encapsulates Lua native pcall and xpcall with coroutine compatible ones.
LuaFileSystem, a portable way to access the underlying directory structure and file attributes.
Rings, a library which provides a way to create new Lua states from within Lua.
Ending Note
There are so many Lua based web frameworks and components available for us and based on the need, it can be chosen. There are other web frameworks available which include the following −
Moonstalk enables efficient development and hosting of dynamically generated web-based projects built with the Lua language; from basic pages to complex applications.
Lapis, a framework for building web applications using MoonScript (or Lua) that runs inside of a customized version of Nginx called OpenResty.
Lua Server Pages, a Lua scripting engine plug-in that blows away any other approach to embedded web development, offers a dramatic short cut to traditional C server pages.
These web frameworks can leverage your web applications and help you in doing powerful operations.
Lua - Database Access
For simple data operations, we may use files, but, sometimes, these file operations may not be efficient, scalable, and powerful. For this purpose, we may often switch to using databases. LuaSQL is a simple interface from Lua to a number of database management systems. LuaSQL is the library, which provides support for different types of SQL. This include,
- SQLite
- Mysql
- ODBC
In this tutorial, we will be covering database handling of MySQL an SQLite in Lua. This uses a generic interface for both and should be possible to port this implementation to other types of databases as well. First let see how you can do the operations in MySQL.
MySQL db Setup
In order to use the following examples to work as expected, we need the initial db setup. The assumptions are listed below.
You have installed and setup MySQL with default user as root and password as '123456'.
You have created a database test.
You have gone through MySQL tutorial to understand MySQL Basics.
Importing MySQL
We can use a simple require statement to import the sqlite library assuming that your Lua implementation was done correctly.
mysql = require "luasql.mysql"
The variable mysql will provide access to the functions by referring to the main mysql table.
Setting up Connection
We can set up the connection by initiating a MySQL environment and then creating a connection for the environment. It is shown below.
local env  = mysql.mysql()
local conn = env:connect('test','root','123456')
The above connection will connect to an existing MySQL file and establishes the connection with the newly created file.
Execute Function
There is a simple execute function available with the connection that will help us to do all the db operations from create, insert, delete, update and so on. The syntax is shown below −
conn:execute([[ 'MySQLSTATEMENT' ]])
In the above syntax, we need to ensure that conn is open and existing MySQL connection and replace the 'MySQLSTATEMENT' with the correct statement.
Create Table Example
A simple create table example is shown below. It creates a table with two parameters id of type integer and name of type varchar.
mysql = require "luasql.mysql"

local env  = mysql.mysql()
local conn = env:connect('test','root','123456')

print(env,conn)

status,errorString = conn:execute([[CREATE TABLE sample2 (id INTEGER, name TEXT);]])
print(status,errorString )
When you run the above program, a table named sample will be created with two columns namely, id and name.
MySQL environment (004BB178)	MySQL connection (004BE3C8)
0	nil
In case there is any error, you would be returned an error statement instead of nil. A simple error statement is shown below.
LuaSQL: Error executing query. MySQL: You have an error in your SQL syntax; check the manual that corresponds to your MySQL server version for the right syntax to use near '"id INTEGER, name TEXT)' at line 1
Insert Statement Example
An insert statement for MySQL is shown below.
conn:execute([[INSERT INTO sample values('11','Raj')]])
Update Statement Example
An update statement for MySQL is shown below.
conn:execute([[UPDATE sample3 SET name='John' where id ='12']])
Delete Statement Example
A delete statement for MySQL is shown below.
conn:execute([[DELETE from sample3 where id ='12']])
Select Statement Example
As far as select statement is concerned, we need to loop through each of the rows and extract the required data. A simple select statement is shown below.
cursor,errorString = conn:execute([[select * from sample]])
row = cursor:fetch ({}, "a")

while row do
   print(string.format("Id: %s, Name: %s", row.id, row.name))
   -- reusing the table of results
   row = cursor:fetch (row, "a")
end
In the above code, conn is an open MySQL connection. With the help of the cursor returned by the execute statement, you can loop through the table response and fetch the required select data.
A Complete Example
A complete example including all the above statements is given below.
mysql = require "luasql.mysql"

local env  = mysql.mysql()
local conn = env:connect('test','root','123456')
print(env,conn)

status,errorString = conn:execute([[CREATE TABLE sample3 (id INTEGER, name TEXT)]])
print(status,errorString )

status,errorString = conn:execute([[INSERT INTO sample3 values('12','Raj')]])
print(status,errorString )

cursor,errorString = conn:execute([[select * from sample3]])
print(cursor,errorString)

row = cursor:fetch ({}, "a")

while row do
   print(string.format("Id: %s, Name: %s", row.id, row.name))
   row = cursor:fetch (row, "a")
end

-- close everything
cursor:close()
conn:close()
env:close()
When you run the above program, you will get the following output.
MySQL environment (0037B178)	MySQL connection (0037EBA8)
0	nil
1	nil
MySQL cursor (003778A8)	nil
Id: 12, Name: Raj
Performing Transactions
Transactions are a mechanism that ensures data consistency. Transactions should have the following four properties −
Atomicity − Either a transaction completes or nothing happens at all.
Consistency − A transaction must start in a consistent state and leave the system in a consistent state.
Isolation − Intermediate results of a transaction are not visible outside the current transaction.
Durability − Once a transaction was committed, the effects are persistent, even after a system failure.
Transaction starts with START TRANSACTION; and ends with commit or rollback statement.
Start Transaction
In order to initiate a transaction, we need to execute the following statement in Lua, assuming conn is an open MySQL connection.
conn:execute([[START TRANSACTION;]])
Rollback Transaction
We need to execute the following statement to rollback changes made after start transaction is executed.
conn:execute([[ROLLBACK;]])
Commit Transaction
We need to execute the following statement to commit changes made after start transaction is executed.
conn:execute([[COMMIT;]])
We have known about MySQL in the above and following section explains about basic SQL operations. Remember transactions, though not explained again for SQLite3 but the same statements should work for SQLite3 as well.
Importing SQLite
We can use a simple require statement to import the SQLite library assuming that your Lua implementation was done correctly. During installation, a folder libsql that contains the database related files.
sqlite3 = require "luasql.sqlite3"
The variable sqlite3 will provide access to the functions by referring to the main sqlite3 table.
Setting Up Connection
We can set up the connection by initiating an SQLite environment and then creating a connection for the environment. It is shown below.
local env  = sqlite3.sqlite3()
local conn = env:connect('mydb.sqlite')
The above connection will connect to an existing SQLite file or creates a new SQLite file and establishes the connection with the newly created file.
Execute Function
There is a simple execute function available with the connection that will help us to do all the db operations from create, insert, delete, update and so on. The syntax is shown below −
conn:execute([[ 'SQLite3STATEMENT' ]])
In the above syntax we need to ensure that conn is open and existing sqlite3 connection and replace the 'SQLite3STATEMENT' with the correct statement.
Create Table Example
A simple create table example is shown below. It creates a table with two parameters id of type integer and name of type varchar.
sqlite3 = require "luasql.sqlite3"

local env  = sqlite3.sqlite3()
local conn = env:connect('mydb.sqlite')
print(env,conn)

status,errorString = conn:execute([[CREATE TABLE sample ('id' INTEGER, 'name' TEXT)]])
print(status,errorString )
When you run the above program, a table named sample will be created with two columns namely, id and name.
SQLite3 environment (003EC918)	SQLite3 connection (00421F08)
0	nil
In case of an error, you would be returned a error statement instead of nil. A simple error statement is shown below.
LuaSQL: unrecognized token: ""'id' INTEGER, 'name' TEXT)"
Insert Statement Example
An insert statement for SQLite is shown below.
conn:execute([[INSERT INTO sample values('11','Raj')]])
Select Statement Example
As far as select statement is concerned, we need to loop through each of the rows and extract the required data. A simple select statement is shown below.
cursor,errorString = conn:execute([[select * from sample]])
row = cursor:fetch ({}, "a")

while row do
   print(string.format("Id: %s, Name: %s", row.id, row.name))
   -- reusing the table of results
   row = cursor:fetch (row, "a")
end
In the above code, conn is an open sqlite3 connection. With the help of the cursor returned by the execute statement, you can loop through the table response and fetch the required select data.
A Complete Example
A complete example including all the above statements is given below.
sqlite3 = require "luasql.sqlite3"

local env  = sqlite3.sqlite3()
local conn = env:connect('mydb.sqlite')
print(env,conn)

status,errorString = conn:execute([[CREATE TABLE sample ('id' INTEGER, 'name' TEXT)]])
print(status,errorString )

status,errorString = conn:execute([[INSERT INTO sample values('1','Raj')]])
print(status,errorString )

cursor,errorString = conn:execute([[select * from sample]])
print(cursor,errorString)

row = cursor:fetch ({}, "a")

while row do
   print(string.format("Id: %s, Name: %s", row.id, row.name))
   row = cursor:fetch (row, "a")
end

-- close everything
cursor:close()
conn:close()
env:close()
When you run the above program, you will get the following output.
SQLite3 environment (005EC918)	SQLite3 connection (005E77B0)
0	nil
1	nil
SQLite3 cursor (005E9200)	nil
Id: 1, Name: Raj
We can execute all the available queries with the help of this libsql library. So, please don't stop with these examples. Experiment various query statement available in respective MySQL, SQLite3 and other supported db in Lua.
Lua - Game Programing
Lua is used in a lot of game engines due to its simple language structure and syntax. The garbage collection feature is often quite useful in games which consume a lot of memory due to rich graphics that is used. Some game engines that use Lua includes −
- Corona SDK
- Gideros Mobile
- ShiVa3D
- Moai SDK
- LOVE
- CryEngine
Each of these game engines are based on Lua and there is a rich set of API available in each of these engines. We will look at the capabilities of each in brief.
Corona SDK
Corona SDK is a cross platform mobile game engine that supports iPhone, iPad, and Android platforms. There is a free version of Corona SDK that can be used for small games with limited features. You can upgrade to other versions when needed.
Corona SDK provides a number of features which includes the following −
- Physics and Collision handling APIs
- Web and Network APIs
- Game Network API
- Ads API
- Analytics API
- Database and File System APIs
- Crypto and Math APIs
- Audio and Media APIs
It is easier and faster to develop an application using the above APIs rather than using the native APIs separately for iOS and Android.
Gideros Mobile
Gideros provides the cross-platform SDK to create games for iOS and Android. It is free to use with a made with Gideros splash. Some of the striking advantages in Gideoros includes, the following −
Development IDE − It provides its own IDE which makes it easier to develop Gideros apps.
Instant testing − While developing your game, it can be tested on a real device through Wifi in only 1 second. You don't need to waste your time with an export or deploy process.
Plugins − You can easily extend the core with plugins. Import your existing (C, C++, Java or Obj-C) code, bind to Lua and interpret them directly. Dozens of open-source plugins are already developed and ready to use.
Clean OOP approach − Gideros provides its own class system with all the basic OOP standards, enabling you to write clean and reusable code for any of your future games.
Native speed − Developed on top of C/C++ and OpenGL, your game runs at native speed and fully utilizes the power of CPUs and GPUs underneath.
ShiVa3D
ShiVa3D is one of 3D game engines which provides a graphical editor designed to create applications and video games for the Web, Consoles and Mobile devices. It supports multiple platforms which includes, Windows, Mac, Linux, iOS, Android, BlackBerry, Palm OS, Wii and WebOS.
Some of the major features include
- Standard plugins
- Mesh modification API
- IDE
- Built-in Terrain, Ocean and animation editor
- ODE physics engine support
- Full lightmap control
- Live preview for materials, particles, trails and HUDs
- Collada exchange format support
The web edition of Shiva3d is completely free and other editions you have subscribe.
Moai SDK
Moai SDK is a cross platform mobile game engine that supports iPhone, iPad, and Android platforms. Moai platform initially consisted of Moai SDK, an open source game engine, and Moai Cloud, a cloud platform as a service for the hosting and deployment of game services. Now the Moai Cloud is shutdown and only the game engine is available.
Moai SDK runs on multiple platforms including iOS, Android, Chrome, Windows, Mac and Linux.
LOVE
LOVE is a framework that you can use to make 2D games. It is free and open-source. It supports Windows, Mac OS X and Linux platforms.
It provides multiple features which include,
- Audio API
- File System API
- Keyboard and Joystick APIs
- Math API
- Window and Mouse APIs
- Physics API
- System and timer APIs
CryEngine
CryEngine is a game engine developed by the German game developer Crytek. It has evolved from generation 1 to generation 4 and is an advanced development solution. It supports PC, Xbox 360, PlayStation3 and WiiU games.
It provides multiple features which include,
Visual effects like Natural Lighting & Dynamic Soft Shadows, Real-time Dynamic Global Illumination, Light Propagation Volume, Particle Shading, Tessellation and so on.
Character Animation System and Character Individualization System.
Parametric Skeletal Animation and Unique Dedicated Facial Animation Editor
AI Systems like Multi-Layer Navigation Mesh and Tactical Point System. Also provides Designer-Friendly AI Editing System.
In Game Mixing & Profiling, Data-driven Sound System Dynamic Sounds & Interactive Music and so on.
Physics features like Procedural Deformation and Advanced Rope Physics.
An Ending Note
Each of these Game SDKs/frameworks have their own advantages and disadvantages. A proper choice between them makes your task easier and you can have a better time with it. So, before using it, you need to know the requirements for your game and then analyze which satisfies all your needs and then should use them.
Lua - Standard Libraries
Lua standard libraries provide a rich set of functions that is implemented directly with the C API and is in-built with Lua programming language. These libraries provide services within the Lua programming language and also outside services like file and db operations.
These standard libraries built in official C API are provided as separate C modules. It includes the following −
- Basic library, which includes the coroutine sub-library
- Modules library
- String manipulation
- Table manipulation
- Math library
- File Input and output
- Operating system facilities
- Debug facilities
Basic Library
We have used the basic library throughout the tutorial under various topics. The following table provides links of related pages and lists the functions that are covered in various part of this Lua tutorial.
| Sr.No. | Library / Method & Purpose |
|---|---|
| 1 | Error Handling Includes error handling functions like assert, error as explained in Lua - Error Handling. |
| 2 | Memory Management Includes the automatic memory management functions related to garbage collection as explained in Lua - Garbage Collection. |
| 3 | dofile ([filename]) It opens the file and executes the contents of the file as a chunk. If no parameter is passed, then this function executes the contents of standard input. The errors will be propagated to the caller. |
| 4 | _G Thus is the global variable that holds the global environment (that is, _G._G = _G). Lua itself does not use this variable. |
| 5 | getfenv ([f]) Returns the current environment in use by the function. f can be a Lua function or a number that specifies the function at that stack level − Level 1 is the function calling getfenv. If the given function is not a Lua function, or if f is 0, getfenv returns the global environment. The default for f is 1. |
| 6 | getmetatable (object) If object does not have a metatable, returns nil. Otherwise, if the object's metatable has a "__metatable" field, returns the associated value. Otherwise, returns the metatable of the given object. |
| 7 | ipairs (t) This functions fetches the indices and values of tables. |
| 8 | load (func [, chunkname]) Loads a chunk using function func to get its pieces. Each call to func must return a string that concatenates with previous results. |
| 9 | loadfile ([filename])) Similar to load, but gets the chunk from file filename or from the standard input, if no file name is given. |
| 10 | loadstring (string [, chunkname]) Similar to load, but gets the chunk from the given string. |
| 11 | next (table [, index]) Allows a program to traverse all fields of a table. Its first argument is a table and its second argument is an index in this table. next returns the next index of the table and its associated value. |
| 12 | pairs (t) Suspends the running coroutine. The parameter passed to this method acts as additional return values to the resume function. |
| 13 | print (...) Suspends the running coroutine. The parameter passed to this method acts as additional return values to the resume function. |
| 14 | rawequal (v1, v2) Checks whether v1 is equal to v2, without invoking any metamethod. Returns a boolean. |
| 15 | rawget (table, index) Gets the real value of table[index], without invoking any metamethod. table must be a table; index may be any value. |
| 16 | rawset (table, index, value) Sets the real value of table[index] to value, without invoking any metamethod. table must be a table, index any value different from nil, and value any Lua value. This function returns table. |
| 17 | select (index, ...) If index is a number, returns all arguments after argument number index. Otherwise, index must be the string "#", and select returns the total number of extra arguments it received. |
| 18 | setfenv (f, table) Sets the environment to be used by the given function. f can be a Lua function or a number that specifies the function at that stack level − Level 1 is the function calling setfenv. setfenv returns the given function. As a special case, when f is 0 setfenv changes the environment of the running thread. In this case, setfenv returns no values. |
| 19 | setmetatable (table, metatable) Sets the metatable for the given table. (You cannot change the metatable of other types from Lua, only from C.) If metatable is nil, removes the metatable of the given table. If the original metatable has a "__metatable" field, raises an error. This function returns table. |
| 20 | tonumber (e [, base]) Tries to convert its argument to a number. If the argument is already a number or a string convertible to a number, then tonumber returns this number; otherwise, it returns nil. |
| 21 | tostring (e) Receives an argument of any type and converts it to a string in a reasonable format. For complete control of how numbers are converted, use string.format. |
| 22 | type (v) Returns the type of its only argument, coded as a string. The possible results of this function are "nil" (a string, not the value nil), "number", "string", "boolean", "table", "function", "thread", and "userdata". |
| 23 | unpack (list [, i [, j]]) Returns the elements from the given table. |
| 24 | _VERSION A global variable (not a function) that holds a string containing the current interpreter version. The current contents of this variable is "Lua 5.1". |
| 25 | Coroutines Includes the coroutine manipulation functions as explained in Lua - Coroutines. |
Modules Library
The modules library provides the basic functions for loading modules in Lua. It exports one function directly in the global environment: require. Everything else is exported in a table package. The details about the modules library is explained in the earlier chapter Lua - Modules tutorial.
String manipulation
Lua provides a rich set of string manipulation functions. The earlier Lua - Strings tutorial covers this in detail.
Table manipulation
Lua depends on tables in almost every bit of its operations. The earlier Lua - Tables tutorial covers this in detail.
File Input and output
We often need data storage facility in programming and this is provided by standard library functions for file I/O in Lua. It is discussed in earlier Lua - File I/O tutorial.
Debug facilities
Lua provides a debug library which provides all the primitive functions for us to create our own debugger. It is discussed in earlier Lua - Debugging tutorial.
Lua - Math library
We often need math operations in scientific and engineering calculations and we can avail this using the standard Lua library math. The list of functions available in math library is shown in the following table.
| Sr.No. | Library / Method & Purpose |
|---|---|
| 1 | math.abs (x) Returns the absolute value of x. |
| 2 | math.acos (x) Returns the arc cosine of x (in radians). |
| 3 | math.asin (x) Returns the arc sine of x (in radians). |
| 4 | math.atan (x) Returns the arc tangent of x (in radians). |
| 5 | math.atan2 (y, x) Returns the arc tangent of y/x (in radians), but uses the signs of both parameters to find the quadrant of the result. (It also handles correctly the case of x being zero.) |
| 6 | math.ceil (x) Returns the smallest integer larger than or equal to x. |
| 7 | math.cos (x) Returns the cosine of x (assumed to be in radians). |
| 8 | math.cosh (x) Returns the hyperbolic cosine of x. |
| 9 | math.deg (x) Returns the angle x (given in radians) in degrees. |
| 10 | math.exp (x) Returns the value e power x. |
| 11 | math.floor (x) Returns the largest integer smaller than or equal to x. |
| 12 | math.fmod (x, y) Returns the remainder of the division of x by y that rounds the quotient towards zero. |
| 13 | math.frexp (x) Returns m and e such that x = m2e, e is an integer and the absolute value of m is in the range [0.5, 1) (or zero when x is zero). |
| 14 | math.huge The value HUGE_VAL, a value larger than or equal to any other numerical valu. |
| 15 | math.ldexp (m, e) Returns m2e (e should be an integer). |
| 16 | math.log (x) Returns the natural logarithm of x. |
| 17 | math.log10 (x) Returns the base-10 logarithm of x. |
| 18 | math.max (x, ...) Returns the maximum value among its arguments. |
| 19 | math.min (x, ...) Returns the minimum value among its arguments. |
| 20 | math.modf (x) Returns two numbers, the integral part of x and the fractional part of x. |
| 21 | math.pi The value of pi. |
| 22 | math.pow (x, y) Returns xy. (You can also use the expression x^y to compute this value.) |
| 23 | math.rad (x) Returns the angle x (given in degrees) in radians. |
| 24 | math.random ([m [, n]]) This function is an interface to the simple pseudo-random generator function rand provided by ANSI C.When called without arguments, returns a uniform pseudo-random real number in the range [0,1). When called with an integer number m, math.random returns a uniform pseudo-random integer in the range [1, m]. When called with two integer numbers m and n, math.random returns a uniform pseudo-random integer in the range [m, n]. |
| 25 | math.randomseed (x) Sets x as the "seed" for the pseudo-random generator: equal seeds produce equal sequences of numbers. |
| 26 | math.sin (x) Returns the sine of x (assumed to be in radians). |
| 27 | math.sinh (x) Returns the hyperbolic sine of x. |
| 28 | math.sqrt (x) Returns the square root of x. (You can also use the expression x^0.5 to compute this value.) |
| 29 | math.tan (x) Returns the tangent of x (assumed to be in radians). |
| 30 | math.tanh (x) Returns the hyperbolic tangent of x. |
Trigonometric functions
A simple example using trigonometric function is shown below.
radianVal = math.rad(math.pi / 2)

io.write(radianVal,"\n")

-- Sin value of 90(math.pi / 2) degrees
io.write(string.format("%.1f ", math.sin(radianVal)),"\n")

-- Cos value of 90(math.pi / 2) degrees
io.write(string.format("%.1f ", math.cos(radianVal)),"\n")

-- Tan value of 90(math.pi / 2) degrees
io.write(string.format("%.1f ", math.tan(radianVal)),"\n")

-- Cosh value of 90(math.pi / 2) degrees
io.write(string.format("%.1f ", math.cosh(radianVal)),"\n")

-- Pi Value in degrees
io.write(math.deg(math.pi),"\n")
When we run the above program, we will get the following output.
0.027415567780804
0.0
1.0
0.0
1.0
180
Other common math functions
A simple example using common math functions is shown below.
-- Floor
io.write("Floor of 10.5055 is ", math.floor(10.5055),"\n")

-- Ceil
io.write("Ceil of 10.5055 is ", math.ceil(10.5055),"\n")

-- Square root
io.write("Square root of 16 is ",math.sqrt(16),"\n")

-- Power
io.write("10 power 2 is ",math.pow(10,2),"\n")
io.write("100 power 0.5 is ",math.pow(100,0.5),"\n")

-- Absolute
io.write("Absolute value of -10 is ",math.abs(-10),"\n")

--Random
math.randomseed(os.time())
io.write("Random number between 1 and 100 is ",math.random(),"\n")

--Random between 1 to 100
io.write("Random number between 1 and 100 is ",math.random(1,100),"\n")

--Max
io.write("Maximum in the input array is ",math.max(1,100,101,99,999),"\n")

--Min
io.write("Minimum in the input array is ",math.min(1,100,101,99,999),"\n")
When we run the above program, we will get the following output.
Floor of 10.5055 is 10
Ceil of 10.5055 is 11
Square root of 16 is 4
10 power 2 is 100
100 power 0.5 is 10
Absolute value of -10 is 10
Random number between 1 and 100 is 0.22876674703207
Random number between 1 and 100 is 7
Maximum in the input array is 999
Minimum in the input array is 1
The above examples are just a few of the common examples, we can use math library based on our need, so try using all the functions to be more familiar.
Lua - Operating System Facilities
In any application, it is often required for to access Operating System level functions and it is made available with Operating System library. The list of functions available are listed in the following table.
| Sr.No. | Library / Method & Purpose |
|---|---|
| 1 | os.clock () Returns an approximation of the amount in seconds of CPU time used by the program. |
| 2 | os.date ([format [, time]]) Returns a string or a table containing date and time, formatted according to the given string format. |
| 3 | os.difftime (t2, t1) Returns the number of seconds from time t1 to time t2. In POSIX, Windows, and some other systems, this value is exactly t2-t1. |
| 4 | os.execute ([command]) This function is equivalent to the ANSI C function system. It passes command to be executed by an operating system shell. Its first result is true if the command terminated successfully, or nil otherwise. |
| 5 | os.exit ([code [, close]) Calls the ANSI C function exit to terminate the host program. If code is true, the returned status is EXIT_SUCCESS; if code is false, the returned status is EXIT_FAILURE; if code is a number, the returned status is this number. |
| 6 | os.getenv (varname) Returns the value of the process environment variable varname, or nil if the variable is not defined. |
| 7 | os.remove (filename) Deletes the file (or empty directory, on POSIX systems) with the given name. If this function fails, it returns nil, plus a string describing the error and the error code. |
| 8 | os.rename (oldname, newname) Renames file or directory named oldname to newname. If this function fails, it returns nil, plus a string describing the error and the error code. |
| 9 | os.setlocale (locale [, category]) Sets the current locale of the program. locale is a system-dependent string specifying a locale; category is an optional string describing which category to change: "all", "collate", "ctype", "monetary", "numeric", or "time"; the default category is "all". The function returns the name of the new locale, or nil if the request cannot be honored. |
| 10 | os.time ([table]) Returns the current time when called without arguments, or a time representing the date and time specified by the given table. This table must have fields year, month, and day, and may have fields hour (default is 12), min (default is 0), sec (default is 0), and isdst (default is nil). For a description of these fields, see the os.date function. |
| 11 | os.tmpname () Returns a string with a file name that can be used for a temporary file. The file must be explicitly opened before its use and explicitly removed when no longer needed. |
Common OS functions
A simple example using common math functions is shown below.
-- Date with format
io.write("The date is ", os.date("%m/%d/%Y"),"\n")

-- Date and time
io.write("The date and time is ", os.date(),"\n")

-- Time
io.write("The OS time is ", os.time(),"\n")

-- Wait for some time
for i=1,1000000 do
end

-- Time since Lua started
io.write("Lua started before ", os.clock(),"\n")
When we run the above program, we will get similar output to the following.
The date is 01/25/2014
The date and time is 01/25/14 07:38:40
The OS time is 1390615720
Lua started before 0.013
The above examples are just a few of the common examples, we can use OS library based on our need, so try using all the functions to be more familiar. There are functions like remove which helps in removing file, execute that helps us executing OS commands as explained above.