- JUnit Tutorial
- JUnit - Home
- JUnit - Overview
- JUnit - Environment Setup
- JUnit - Test Framework
- JUnit - Basic Usage
- JUnit - API
- JUnit - Writing a Tests
- JUnit - Using Assertion
- JUnit - Execution Procedure
- JUnit - Executing Tests
- JUnit - Suite Test
- JUnit - Ignore Test
- JUnit - Time Test
- JUnit - Exceptions Test
- JUnit - Parameterized Test
- JUnit - Plug with Ant
- JUnit - Plug with Eclipse
- JUnit - Extensions
- JUnit Useful Resources
- JUnit - Questions and Answers
- JUnit - Quick Guide
- JUnit - Useful Resources
- JUnit - Discussion
JUnit - Quick Guide
JUnit - Overview
Testing is the process of checking the functionality of an application to ensure it runs as per requirements. Unit testing comes into picture at the developers’ level; it is the testing of single entity (class or method). Unit testing plays a critical role in helping a software company deliver quality products to its customers.
Unit testing can be done in two ways − manual testing and automated testing.
| Manual Testing | Automated Testing |
|---|---|
| Executing a test cases manually without any tool support is known as manual testing. | Taking tool support and executing the test cases by using an automation tool is known as automation testing. |
| Time-consuming and tedious − Since test cases are executed by human resources, it is very slow and tedious. | Fast − Automation runs test cases significantly faster than human resources. |
| Huge investment in human resources − As test cases need to be executed manually, more testers are required in manual testing. | Less investment in human resources − Test cases are executed using automation tools, so less number of testers are required in automation testing. |
| Less reliable − Manual testing is less reliable, as it has to account for human errors. | More reliable − Automation tests are precise and reliable. |
| Non-programmable − No programming can be done to write sophisticated tests to fetch hidden information. | Programmable − Testers can program sophisticated tests to bring out hidden information. |
What is JUnit ?
JUnit is a unit testing framework for Java programming language. It plays a crucial role test-driven development, and is a family of unit testing frameworks collectively known as xUnit.
JUnit promotes the idea of "first testing then coding", which emphasizes on setting up the test data for a piece of code that can be tested first and then implemented. This approach is like "test a little, code a little, test a little, code a little." It increases the productivity of the programmer and the stability of program code, which in turn reduces the stress on the programmer and the time spent on debugging.
Features of JUnit
JUnit is an open source framework, which is used for writing and running tests.
Provides annotations to identify test methods.
Provides assertions for testing expected results.
Provides test runners for running tests.
JUnit tests allow you to write codes faster, which increases quality.
JUnit is elegantly simple. It is less complex and takes less time.
JUnit tests can be run automatically and they check their own results and provide immediate feedback. There's no need to manually comb through a report of test results.
JUnit tests can be organized into test suites containing test cases and even other test suites.
JUnit shows test progress in a bar that is green if the test is running smoothly, and it turns red when a test fails.
What is a Unit Test Case ?
A Unit Test Case is a part of code, which ensures that another part of code (method) works as expected. To achieve the desired results quickly, a test framework is required. JUnit is a perfect unit test framework for Java programming language.
A formal written unit test case is characterized by a known input and an expected output, which is worked out before the test is executed. The known input should test a precondition and the expected output should test a post-condition.
There must be at least two unit test cases for each requirement − one positive test and one negative test. If a requirement has sub-requirements, each sub-requirement must have at least two test cases as positive and negative.
JUnit - Environment Setup
Local Environment Setup
JUnit is a framework for Java, so the very first requirement is to have JDK installed in your machine.
System Requirement
| JDK | 1.5 or above. |
|---|---|
| Memory | No minimum requirement. |
| Disk Space | No minimum requirement. |
| Operating System | No minimum requirement. |
Step 1: Verify Java Installation in Your Machine
First of all, open the console and execute a java command based on the operating system you are working on.
| OS | Task | Command |
|---|---|---|
| Windows | Open Command Console | c:\> java -version |
| Linux | Open Command Terminal | $ java -version |
| Mac | Open Terminal | machine:~ joseph$ java -version |
Let's verify the output for all the operating systems −
| OS | Output |
|---|---|
| Windows | java version "1.8.0_101" Java(TM) SE Runtime Environment (build 1.8.0_101) |
| Linux | java version "1.8.0_101" Java(TM) SE Runtime Environment (build 1.8.0_101) |
| Mac | java version "1.8.0_101" Java(TM) SE Runtime Environment (build 1.8.0_101) |
If you do not have Java installed on your system, then download the Java Software Development Kit (SDK) from the following link https://www.oracle.com. We are assuming Java 1.8.0_101 as the installed version for this tutorial.
Step 2: Set JAVA Environment
Set the JAVA_HOME environment variable to point to the base directory location where Java is installed on your machine. For example.
| OS | Output |
|---|---|
| Windows | Set the environment variable JAVA_HOME to C:\Program Files\Java\jdk1.8.0_101 |
| Linux | export JAVA_HOME = /usr/local/java-current |
| Mac | export JAVA_HOME = /Library/Java/Home |
Append Java compiler location to the System Path.
| OS | Output |
|---|---|
| Windows | Append the string C:\Program Files\Java\jdk1.8.0_101\bin at the end of the system variable, Path. |
| Linux | export PATH = $PATH:$JAVA_HOME/bin/ |
| Mac | not required |
Verify Java installation using the command java -version as explained above.
Step 3: Download JUnit Archive
Download the latest version of JUnit jar file from http://www.junit.org. At the time of writing this tutorial, we have downloaded Junit-4.12.jar and copied it into C:\>JUnit folder.
| OS | Archive name |
|---|---|
| Windows | junit4.12.jar |
| Linux | junit4.12.jar |
| Mac | junit4.12.jar |
Step 4: Set JUnit Environment
Set the JUNIT_HOME environment variable to point to the base directory location where JUNIT jar is stored on your machine. Let’s assuming we've stored junit4.12.jar in the JUNIT folder.
| Sr.No | OS & Description |
|---|---|
| 1 | Windows Set the environment variable JUNIT_HOME to C:\JUNIT |
| 2 | Linux export JUNIT_HOME = /usr/local/JUNIT |
| 3 | Mac export JUNIT_HOME = /Library/JUNIT |
Step 5: Set CLASSPATH Variable
Set the CLASSPATH environment variable to point to the JUNIT jar location.
| Sr.No | OS & Description |
|---|---|
| 1 | Windows Set the environment variable CLASSPATH to %CLASSPATH%;%JUNIT_HOME%\junit4.12.jar;.; |
| 2 | Linux export CLASSPATH = $CLASSPATH:$JUNIT_HOME/junit4.12.jar:. |
| 3 | Mac export CLASSPATH = $CLASSPATH:$JUNIT_HOME/junit4.12.jar:. |
Step 6: Test JUnit Setup
Create a java class file name TestJunit in C:\>JUNIT_WORKSPACE
import org.junit.Test;
import static org.junit.Assert.assertEquals;

public class TestJunit {
   @Test

   public void testAdd() {
      String str = "Junit is working fine";
      assertEquals("Junit is working fine",str);
   }
}
Create a java class file name TestRunner in C:\>JUNIT_WORKSPACE to execute test case(s).
import org.junit.runner.JUnitCore;
import org.junit.runner.Result;
import org.junit.runner.notification.Failure;

public class TestRunner {
   public static void main(String[] args) {
      Result result = JUnitCore.runClasses(TestJunit.class);

      for (Failure failure : result.getFailures()) {
         System.out.println(failure.toString());
      }

      System.out.println(result.wasSuccessful());
   }
}
Step 7: Verify the Result
Compile the classes using javac compiler as follows −
C:\JUNIT_WORKSPACE>javac TestJunit.java TestRunner.java
Now run the Test Runner to see the result as follows −
C:\JUNIT_WORKSPACE>java TestRunner
Verify the output.
true
JUnit - Test Framework
JUnit is a Regression Testing Framework used by developers to implement unit testing in Java, and accelerate programming speed and increase the quality of code. JUnit Framework can be easily integrated with either of the following −
- Eclipse
- Ant
- Maven
Features of JUnit Test Framework
JUnit test framework provides the following important features −
- Fixtures
- Test suites
- Test runners
- JUnit classes
Fixtures
Fixtures is a fixed state of a set of objects used as a baseline for running tests. The purpose of a test fixture is to ensure that there is a well-known and fixed environment in which tests are run so that results are repeatable. It includes −
- setUp() method, which runs before every test invocation.
- tearDown() method, which runs after every test method.
Let's check one example −
import junit.framework.*;

public class JavaTest extends TestCase {
   protected int value1, value2;

   // assigning the values
   protected void setUp(){
      value1 = 3;
      value2 = 3;
   }

   // test method to add two values
   public void testAdd(){
      double result = value1 + value2;
      assertTrue(result == 6);
   }
}
Test Suites
A test suite bundles a few unit test cases and runs them together. In JUnit, both @RunWith and @Suite annotation are used to run the suite test. Given below is an example that uses TestJunit1 & TestJunit2 test classes.
import org.junit.runner.RunWith;
import org.junit.runners.Suite;

//JUnit Suite Test
@RunWith(Suite.class)

@Suite.SuiteClasses({
   TestJunit1.class ,TestJunit2.class
})

public class JunitTestSuite {
}
import org.junit.Test;
import org.junit.Ignore;
import static org.junit.Assert.assertEquals;

public class TestJunit1 {

   String message = "Robert";
   MessageUtil messageUtil = new MessageUtil(message);

   @Test
   public void testPrintMessage() {
      System.out.println("Inside testPrintMessage()");
      assertEquals(message, messageUtil.printMessage());
   }
}
import org.junit.Test;
import org.junit.Ignore;
import static org.junit.Assert.assertEquals;

public class TestJunit2 {

   String message = "Robert";
   MessageUtil messageUtil = new MessageUtil(message);

   @Test
   public void testSalutationMessage() {
      System.out.println("Inside testSalutationMessage()");
      message = "Hi!" + "Robert";
      assertEquals(message,messageUtil.salutationMessage());
   }
}
Test Runners
Test runner is used for executing the test cases. Here is an example that assumes the test class TestJunit already exists.
import org.junit.runner.JUnitCore;
import org.junit.runner.Result;
import org.junit.runner.notification.Failure;

public class TestRunner {
   public static void main(String[] args) {
      Result result = JUnitCore.runClasses(TestJunit.class);

      for (Failure failure : result.getFailures()) {
         System.out.println(failure.toString());
      }

      System.out.println(result.wasSuccessful());
   }
}
JUnit Classes
JUnit classes are important classes, used in writing and testing JUnits. Some of the important classes are −
Assert − Contains a set of assert methods.
TestCase − Contains a test case that defines the fixture to run multiple tests.
TestResult − Contains methods to collect the results of executing a test case.
JUnit - Basic Usage
Let us now have a basic example to demonstrate the step-by-step process of using JUnit.
Create a Class
Create a java class to be tested, say, MessageUtil.java in C:\>JUNIT_WORKSPACE
/*
* This class prints the given message on console.
*/

public class MessageUtil {

   private String message;

   //Constructor
   //@param message to be printed

   public MessageUtil(String message){
      this.message = message;
   }

   // prints the message
   public String printMessage(){
      System.out.println(message);
      return message;
   }
}
Create Test Case Class
- Create a java test class, say, TestJunit.java.
- Add a test method testPrintMessage() to your test class.
- Add an Annotaion @Test to method testPrintMessage().
- Implement the test condition and check the condition using assertEquals API of JUnit.
Create a java class file name TestJunit.java in C:\>JUNIT_WORKSPACE.
import org.junit.Test;
import static org.junit.Assert.assertEquals;

public class TestJunit {

   String message = "Hello World";
   MessageUtil messageUtil = new MessageUtil(message);

   @Test
   public void testPrintMessage() {
      assertEquals(message,messageUtil.printMessage());
   }
}
Create Test Runner Class
- Create a TestRunner java class.
- Use runClasses method of JUnitCore class of JUnit to run the test case of the above created test class.
- Get the result of test cases run in Result Object.
- Get failure(s) using the getFailures() method of Result object.
- Get Success result using the wasSuccessful() method of Result object.
Create a java class file named TestRunner.java in C:\>JUNIT_WORKSPACE to execute test case(s).
import org.junit.runner.JUnitCore;
import org.junit.runner.Result;
import org.junit.runner.notification.Failure;

public class TestRunner {
   public static void main(String[] args) {
      Result result = JUnitCore.runClasses(TestJunit.class);

      for (Failure failure : result.getFailures()) {
         System.out.println(failure.toString());
      }

      System.out.println(result.wasSuccessful());
   }
}
Compile the MessageUtil, Test case and Test Runner classes using javac.
C:\JUNIT_WORKSPACE>javac MessageUtil.java TestJunit.java TestRunner.java
Now run the Test Runner, which will run the test case defined in the provided Test Case class.
C:\JUNIT_WORKSPACE>java TestRunner
Verify the output.
Hello World
true
Now update TestJunit in C:\>JUNIT_WORKSPACE so that the test fails. Change the message string.
import org.junit.Test;
import static org.junit.Assert.assertEquals;

public class TestJunit {

   String message = "Hello World";
   MessageUtil messageUtil = new MessageUtil(message);

   @Test
   public void testPrintMessage() {
      message = "New Word";
      assertEquals(message,messageUtil.printMessage());
   }
}
Let's keep the rest of the classes as is, and try to run the same Test Runner.
import org.junit.runner.JUnitCore;
import org.junit.runner.Result;
import org.junit.runner.notification.Failure;

public class TestRunner {

   public static void main(String[] args) {
      Result result = JUnitCore.runClasses(TestJunit.class);

      for (Failure failure : result.getFailures()) {
         System.out.println(failure.toString());
      }

      System.out.println(result.wasSuccessful());
   }
}
Now run the Test Runner, which will run the test case defined in the provided Test Case class.
C:\JUNIT_WORKSPACE>java TestRunner
Verify the output.
Hello World
testPrintMessage(TestJunit): expected:<[New Wor]d> but was:<[Hello Worl]d>
false
JUnit - API
The most important package in JUnit is junit.framework, which contains all the core classes. Some of the important classes are as follows −
| Sr.No. | Class Name | Functionality |
|---|---|---|
| 1 | Assert | A set of assert methods. |
| 2 | TestCase | A test case defines the fixture to run multiple tests. |
| 3 | TestResult | A TestResult collects the results of executing a test case. |
| 4 | TestSuite | A TestSuite is a composite of tests. |
Assert Class
Following is the declaration for org.junit.Assert class −
public class Assert extends java.lang.Object
This class provides a set of assertion methods useful for writing tests. Only failed assertions are recorded. Some of the important methods of Assert class are as follows −
| Sr.No. | Methods & Description |
|---|---|
| 1 | void assertEquals(boolean expected, boolean actual) Checks that two primitives/objects are equal. |
| 2 | void assertFalse(boolean condition) Checks that a condition is false. |
| 3 | void assertNotNull(Object object) Checks that an object isn't null. |
| 4 | void assertNull(Object object) Checks that an object is null. |
| 5 | void assertTrue(boolean condition) Checks that a condition is true. |
| 6 | void fail() Fails a test with no message. |
Let's use some of the above-mentioned methods in an example. Create a java class file named TestJunit1.java in C:\>JUNIT_WORKSPACE.
import org.junit.Test;
import static org.junit.Assert.*;

public class TestJunit1 {
   @Test
   public void testAdd() {
      //test data
      int num = 5;
      String temp = null;
      String str = "Junit is working fine";

      //check for equality
      assertEquals("Junit is working fine", str);

      //check for false condition
      assertFalse(num > 6);

      //check for not null value
      assertNotNull(temp);
   }
}
Next, create a java class file named TestRunner1.java in C:\>JUNIT_WORKSPACE to execute test case(s).
import org.junit.runner.JUnitCore;
import org.junit.runner.Result;
import org.junit.runner.notification.Failure;

public class TestRunner1 {
   public static void main(String[] args) {
      Result result = JUnitCore.runClasses(TestJunit1.class);

      for (Failure failure : result.getFailures()) {
         System.out.println(failure.toString());
      }

      System.out.println(result.wasSuccessful());
   }
}
Compile the test case and Test Runner classes using javac.
C:\JUNIT_WORKSPACE>javac TestJunit1.java TestRunner1.java
Now run the Test Runner, which will run the test case defined in the provided Test Case class.
C:\JUNIT_WORKSPACE>java TestRunner1
Verify the output.
true
TestCase Class
Following is the declaration for org.junit.TestCase class −
public abstract class TestCase extends Assert implements Test
A test case defines the fixture to run multiple tests. Some of the important methods of TestCase class are as follows −
| Sr.No. | Methods & Description |
|---|---|
| 1 | int countTestCases() Counts the number of test cases executed by run(TestResult result). |
| 2 | TestResult createResult() Creates a default TestResult object. |
| 3 | String getName() Gets the name of a TestCase. |
| 4 | TestResult run() A convenience method to run this test, collecting the results with a default TestResult object. |
| 5 | void run(TestResult result) Runs the test case and collects the results in TestResult. |
| 6 | void setName(String name) Sets the name of a TestCase. |
| 7 | void setUp() Sets up the fixture, for example, open a network connection. |
| 8 | void tearDown() Tears down the fixture, for example, close a network connection. |
| 9 | String toString() Returns a string representation of the test case. |
Let's use some of the above-mentioned methods in an example. Create a java class file named TestJunit2.java in C:\>JUNIT_WORKSPACE.
import junit.framework.TestCase;
import org.junit.Before;
import org.junit.Test;

public class TestJunit2 extends TestCase  {
   protected double fValue1;
   protected double fValue2;

   @Before
   public void setUp() {
      fValue1 = 2.0;
      fValue2 = 3.0;
   }

   @Test
   public void testAdd() {
      //count the number of test cases
      System.out.println("No of Test Case = "+ this.countTestCases());

      //test getName
      String name = this.getName();
      System.out.println("Test Case Name = "+ name);

      //test setName
      this.setName("testNewAdd");
      String newName = this.getName();
      System.out.println("Updated Test Case Name = "+ newName);
   }

   //tearDown used to close the connection or clean up activities
   public void tearDown(  ) {
   }
}
Next, create a java class file named TestRunner2.java in C:\>JUNIT_WORKSPACE to execute test case(s).
import org.junit.runner.JUnitCore;
import org.junit.runner.Result;
import org.junit.runner.notification.Failure;

public class TestRunner2 {
   public static void main(String[] args) {
      Result result = JUnitCore.runClasses(TestJunit2.class);

      for (Failure failure : result.getFailures()) {
         System.out.println(failure.toString());
      }

      System.out.println(result.wasSuccessful());
   }
}
Compile the test case and Test Runner classes using javac.
C:\JUNIT_WORKSPACE>javac TestJunit2.java TestRunner2.java
Now run the Test Runner, which will run the test case defined in the provided Test Case class.
C:\JUNIT_WORKSPACE>java TestRunner2
Verify the output.
No of Test Case = 1
Test Case Name = testAdd
Updated Test Case Name = testNewAdd
true
TestResult Class
Following is the declaration for org.junit.TestResult class −
public class TestResult extends Object
A TestResult collects the results of executing a test case. It is an instance of the Collecting Parameter pattern. The test framework distinguishes between failures and errors. A failure is anticipated and checked for with assertions. Errors are unanticipated problems like an ArrayIndexOutOfBoundsException. Some of the important methods of TestResult class are as follows −
| Sr.No. | Methods & Description |
|---|---|
| 1 | void addError(Test test, Throwable t) Adds an error to the list of errors. |
| 2 | void addFailure(Test test, AssertionFailedError t) Adds a failure to the list of failures. |
| 3 | void endTest(Test test) Informs the result that a test was completed. |
| 4 | int errorCount() Gets the number of detected errors. |
| 5 | Enumeration<TestFailure> errors() Returns an Enumeration for the errors. |
| 6 | int failureCount() Gets the number of detected failures. |
| 7 | void run(TestCase test) Runs a TestCase. |
| 8 | int runCount() Gets the number of run tests. |
| 9 | void startTest(Test test) Informs the result that a test will be started. |
| 10 | void stop() Marks that the test run should stop. |
Create a java class file named TestJunit3.java in C:\>JUNIT_WORKSPACE.
import org.junit.Test;
import junit.framework.AssertionFailedError;
import junit.framework.TestResult;

public class TestJunit3 extends TestResult {
   // add the error
   public synchronized void addError(Test test, Throwable t) {
      super.addError((junit.framework.Test) test, t);
   }

   // add the failure
   public synchronized void addFailure(Test test, AssertionFailedError t) {
      super.addFailure((junit.framework.Test) test, t);
   }

   @Test
   public void testAdd() {
      // add any test
   }

   // Marks that the test run should stop.
   public synchronized void stop() {
      //stop the test here
   }
}
Next, create a java class file named TestRunner3.java in C:\>JUNIT_WORKSPACE to execute test case(s).
import org.junit.runner.JUnitCore;
import org.junit.runner.Result;
import org.junit.runner.notification.Failure;

public class TestRunner3 {
   public static void main(String[] args) {
      Result result = JUnitCore.runClasses(TestJunit3.class);

      for (Failure failure : result.getFailures()) {
         System.out.println(failure.toString());
      }

      System.out.println(result.wasSuccessful());
   }
}
Compile the test case and Test Runner classes using javac.
C:\JUNIT_WORKSPACE>javac TestJunit3.java TestRunner3.java
Now run the Test Runner, which will run the test case defined in the provided Test Case class.
C:\JUNIT_WORKSPACE>java TestRunner3
Verify the output.
true
TestSuite Class
Following is the declaration for org.junit.TestSuite class:
public class TestSuite extends Object implements Test
A TestSuite is a Composite of tests. It runs a collection of test cases. Some of the important methods of TestSuite class are as follows −
| Sr.No. | Methods & Description |
|---|---|
| 1 | void addTest(Test test) Adds a test to the suite. |
| 2 | void addTestSuite(Class<? extends TestCase> testClass) Adds the tests from the given class to the suite. |
| 3 | int countTestCases() Counts the number of test cases that will be run by this test. |
| 4 | String getName() Returns the name of the suite. |
| 5 | void run(TestResult result) Runs the tests and collects their result in a TestResult. |
| 6 | void setName(String name) Sets the name of the suite. |
| 7 | Test testAt(int index) Returns the test at the given index. |
| 8 | int testCount() Returns the number of tests in this suite. |
| 9 | static Test warning(String message) Returns a test which will fail and log a warning message. |
Create a java class file named JunitTestSuite.java in C:\>JUNIT_WORKSPACE to create Test suite.
import junit.framework.*;

public class JunitTestSuite {
   public static void main(String[] a) {
      // add the test's in the suite
      TestSuite suite = new TestSuite(TestJunit1.class, TestJunit2.class, TestJunit3.class );
      TestResult result = new TestResult();
      suite.run(result);
      System.out.println("Number of test cases = " + result.runCount());
   }
}
Compile the Test suite classes using javac.
C:\JUNIT_WORKSPACE>javac JunitTestSuite.java
Now run the Test Suite.
C:\JUNIT_WORKSPACE>java JunitTestSuite
Verify the output.
No of Test Case = 1
Test Case Name = testAdd
Updated Test Case Name = testNewAdd
Number of test cases = 3
JUnit - Writing a Test
Here we will see one complete example of JUnit testing using POJO class, Business logic class, and a test class, which will be run by the test runner.
Create EmployeeDetails.java in C:\>JUNIT_WORKSPACE, which is a POJO class.
public class EmployeeDetails {

   private String name;
   private double monthlySalary;
   private int age;

   /**
   * @return the name
   */

   public String getName() {
      return name;
   }

   /**
   * @param name the name to set
   */

   public void setName(String name) {
      this.name = name;
   }

   /**
   * @return the monthlySalary
   */

   public double getMonthlySalary() {
      return monthlySalary;
   }

   /**
   * @param monthlySalary the monthlySalary to set
   */

   public void setMonthlySalary(double monthlySalary) {
      this.monthlySalary = monthlySalary;
   }

   /**
   * @return the age
   */
   public int getAge() {
      return age;
   }

   /**
   * @param age the age to set
   */
   public void setAge(int age) {
      this.age = age;
   }
}
EmployeeDetails class is used to −
- get/set the value of employee's name.
- get/set the value of employee's monthly salary.
- get/set the value of employee's age.
Create a file called EmpBusinessLogic.java in C:\>JUNIT_WORKSPACE, which contains the business logic.
public class EmpBusinessLogic {
   // Calculate the yearly salary of employee
   public double calculateYearlySalary(EmployeeDetails employeeDetails) {
      double yearlySalary = 0;
      yearlySalary = employeeDetails.getMonthlySalary() * 12;
      return yearlySalary;
   }

   // Calculate the appraisal amount of employee
   public double calculateAppraisal(EmployeeDetails employeeDetails) {
      double appraisal = 0;

      if(employeeDetails.getMonthlySalary() < 10000){
         appraisal = 500;
      }else{
         appraisal = 1000;
      }

      return appraisal;
   }
}
EmpBusinessLogic class is used for calculating −
- the yearly salary of an employee.
- the appraisal amount of an employee.
Create a file called TestEmployeeDetails.java in C:\>JUNIT_WORKSPACE, which contains the test cases to be tested.
import org.junit.Test;
import static org.junit.Assert.assertEquals;

public class TestEmployeeDetails {
   EmpBusinessLogic empBusinessLogic = new EmpBusinessLogic();
   EmployeeDetails employee = new EmployeeDetails();

   //test to check appraisal
   @Test
   public void testCalculateAppriasal() {
      employee.setName("Rajeev");
      employee.setAge(25);
      employee.setMonthlySalary(8000);

      double appraisal = empBusinessLogic.calculateAppraisal(employee);
      assertEquals(500, appraisal, 0.0);
   }

   // test to check yearly salary
   @Test
   public void testCalculateYearlySalary() {
      employee.setName("Rajeev");
      employee.setAge(25);
      employee.setMonthlySalary(8000);

      double salary = empBusinessLogic.calculateYearlySalary(employee);
      assertEquals(96000, salary, 0.0);
   }
}
TestEmployeeDetails class is used for testing the methods of EmpBusinessLogic class. It
- tests the yearly salary of the employee.
- tests the appraisal amount of the employee.
Next, create a java class filed named TestRunner.java in C:\>JUNIT_WORKSPACE to execute test case(s).
import org.junit.runner.JUnitCore;
import org.junit.runner.Result;
import org.junit.runner.notification.Failure;

public class TestRunner {
   public static void main(String[] args) {
      Result result = JUnitCore.runClasses(TestEmployeeDetails.class);

      for (Failure failure : result.getFailures()) {
         System.out.println(failure.toString());
      }

      System.out.println(result.wasSuccessful());
   }
}
Compile the test case and Test Runner classes using javac.
C:\JUNIT_WORKSPACE>javac EmployeeDetails.java
EmpBusinessLogic.java TestEmployeeDetails.java TestRunner.java
Now run the Test Runner, which will run the test case defined in the provided Test Case class.
C:\JUNIT_WORKSPACE>java TestRunner
Verify the output.
true
JUnit - Using Assertion
Assertion
All the assertions are in the Assert class.
public class Assert extends java.lang.Object
This class provides a set of assertion methods, useful for writing tests. Only failed assertions are recorded. Some of the important methods of Assert class are as follows −
| Sr.No. | Methods & Description |
|---|---|
| 1 | void assertEquals(boolean expected, boolean actual) Checks that two primitives/objects are equal. |
| 2 | void assertTrue(boolean condition) Checks that a condition is true. |
| 3 | void assertFalse(boolean condition) Checks that a condition is false. |
| 4 | void assertNotNull(Object object) Checks that an object isn't null. |
| 5 | void assertNull(Object object) Checks that an object is null. |
| 6 | void assertSame(object1, object2) The assertSame() method tests if two object references point to the same object. |
| 7 | void assertNotSame(object1, object2) The assertNotSame() method tests if two object references do not point to the same object. |
| 8 | void assertArrayEquals(expectedArray, resultArray); The assertArrayEquals() method will test whether two arrays are equal to each other. |
Let's use some of the above-mentioned methods in an example. Create a java class file named TestAssertions.java in C:\>JUNIT_WORKSPACE.
import org.junit.Test;
import static org.junit.Assert.*;

public class TestAssertions {

   @Test
   public void testAssertions() {
      //test data
      String str1 = new String ("abc");
      String str2 = new String ("abc");
      String str3 = null;
      String str4 = "abc";
      String str5 = "abc";

      int val1 = 5;
      int val2 = 6;

      String[] expectedArray = {"one", "two", "three"};
      String[] resultArray =  {"one", "two", "three"};

      //Check that two objects are equal
      assertEquals(str1, str2);

      //Check that a condition is true
      assertTrue (val1 < val2);

      //Check that a condition is false
      assertFalse(val1 > val2);

      //Check that an object isn't null
      assertNotNull(str1);

      //Check that an object is null
      assertNull(str3);

      //Check if two object references point to the same object
      assertSame(str4,str5);

      //Check if two object references not point to the same object
      assertNotSame(str1,str3);

      //Check whether two arrays are equal to each other.
      assertArrayEquals(expectedArray, resultArray);
   }
}
Next, create a java class file named TestRunner.java in C:\>JUNIT_WORKSPACE to execute test case(s).
import org.junit.runner.JUnitCore;
import org.junit.runner.Result;
import org.junit.runner.notification.Failure;

public class TestRunner2 {
   public static void main(String[] args) {
      Result result = JUnitCore.runClasses(TestAssertions.class);

      for (Failure failure : result.getFailures()) {
         System.out.println(failure.toString());
      }

      System.out.println(result.wasSuccessful());
   }
}
Compile the Test case and Test Runner classes using javac.
C:\JUNIT_WORKSPACE>javac TestAssertions.java TestRunner.java
Now run the Test Runner, which will run the test case defined in the provided Test Case class.
C:\JUNIT_WORKSPACE>java TestRunner
Verify the output.
true
Annotation
Annotations are like meta-tags that you can add to your code, and apply them to methods or in class. These annotations in JUnit provide the following information about test methods −
- which methods are going to run before and after test methods.
- which methods run before and after all the methods, and.
- which methods or classes will be ignored during the execution.
The following table provides a list of annotations and their meaning in JUnit −
| Sr.No. | Annotation & Description |
|---|---|
| 1 | @Test The Test annotation tells JUnit that the public void method to which it is attached can be run as a test case. |
| 2 | @Before Several tests need similar objects created before they can run. Annotating a public void method with @Before causes that method to be run before each Test method. |
| 3 | @After If you allocate external resources in a Before method, you need to release them after the test runs. Annotating a public void method with @After causes that method to be run after the Test method. |
| 4 | @BeforeClass Annotating a public static void method with @BeforeClass causes it to be run once before any of the test methods in the class. |
| 5 | @AfterClass This will perform the method after all tests have finished. This can be used to perform clean-up activities. |
| 6 | @Ignore The Ignore annotation is used to ignore the test and that test will not be executed. |
Create a java class file named JunitAnnotation.java in C:\>JUNIT_WORKSPACE to test annotation.
import org.junit.After;
import org.junit.AfterClass;

import org.junit.Before;
import org.junit.BeforeClass;

import org.junit.Ignore;
import org.junit.Test;

public class JunitAnnotation {

   //execute before class
   @BeforeClass
   public static void beforeClass() {
      System.out.println("in before class");
   }

   //execute after class
   @AfterClass
   public static void  afterClass() {
      System.out.println("in after class");
   }

   //execute before test
   @Before
   public void before() {
      System.out.println("in before");
   }

   //execute after test
   @After
   public void after() {
      System.out.println("in after");
   }

   //test case
   @Test
   public void test() {
      System.out.println("in test");
   }

   //test case ignore and will not execute
   @Ignore
   public void ignoreTest() {
      System.out.println("in ignore test");
   }
}
Next, create a java class file named TestRunner.java in C:\>JUNIT_WORKSPACE to execute annotations.
import org.junit.runner.JUnitCore;
import org.junit.runner.Result;
import org.junit.runner.notification.Failure;

public class TestRunner {
   public static void main(String[] args) {
      Result result = JUnitCore.runClasses(JunitAnnotation.class);

      for (Failure failure : result.getFailures()) {
         System.out.println(failure.toString());
      }

      System.out.println(result.wasSuccessful());
   }
}
Compile the Test case and Test Runner classes using javac.
C:\JUNIT_WORKSPACE>javac JunitAnnotation.java TestRunner.java
Now run the Test Runner, which will run the test case defined in the provided Test Case class.
C:\JUNIT_WORKSPACE>java TestRunner
Verify the output.
in before class
in before
in test
in after
in after class
true
JUnit - Execution Procedure
This chapter explains the execution procedure of methods in JUnit, which defines the order of the methods called. Discussed below is the execution procedure of the JUnit test API methods with example.
Create a java class file named ExecutionProcedureJunit.java in C:\>JUNIT_WORKSPACE to test annotation.
import org.junit.After;
import org.junit.AfterClass;

import org.junit.Before;
import org.junit.BeforeClass;

import org.junit.Ignore;
import org.junit.Test;

public class ExecutionProcedureJunit {

   //execute only once, in the starting
   @BeforeClass
   public static void beforeClass() {
      System.out.println("in before class");
   }

   //execute only once, in the end
   @AfterClass
   public static void  afterClass() {
      System.out.println("in after class");
   }

   //execute for each test, before executing test
   @Before
   public void before() {
      System.out.println("in before");
   }

   //execute for each test, after executing test
   @After
   public void after() {
      System.out.println("in after");
   }

   //test case 1
   @Test
   public void testCase1() {
      System.out.println("in test case 1");
   }

   //test case 2
   @Test
   public void testCase2() {
      System.out.println("in test case 2");
   }
}
Next, create a java class file named TestRunner.java in C:\>JUNIT_WORKSPACE to execute annotations.
import org.junit.runner.JUnitCore;
import org.junit.runner.Result;
import org.junit.runner.notification.Failure;

public class TestRunner {
   public static void main(String[] args) {
      Result result = JUnitCore.runClasses(ExecutionProcedureJunit.class);

      for (Failure failure : result.getFailures()) {
         System.out.println(failure.toString());
      }

      System.out.println(result.wasSuccessful());
   }
}
Compile the Test case and Test Runner classes using javac.
C:\JUNIT_WORKSPACE>javac ExecutionProcedureJunit.java TestRunner.java
Now run the Test Runner, which will run the test case defined in the provided Test Case class.
C:\JUNIT_WORKSPACE>java TestRunner
Verify the output.
in before class
in before
in test case 1
in after
in before
in test case 2
in after
in after class
See the above output. The execution procedure is as follows −
- First of all, the beforeClass() method executes only once.
- The afterClass() method executes only once.
- The before() method executes for each test case, but before executing the test case.
- The after() method executes for each test case, but after the execution of test case.
- In between before() and after(), each test case executes.
JUnit - Executing Tests
The test cases are executed using JUnitCore class. JUnitCore is a facade for running tests. It supports running JUnit 4 tests, JUnit 3.8.x tests, and mixtures. To run tests from the command line, run java org.junit.runner.JUnitCore <TestClass>. For one-shot test runs, use the static method runClasses(Class[]).
Following is the declaration for org.junit.runner.JUnitCore class:
public class JUnitCore extends java.lang.Object
Here we will see how to execute the tests with the help of JUnitCore.
Create a Class
Create a java class to be tested, say, MessageUtil.java, in C:\>JUNIT_WORKSPACE.
/*
* This class prints the given message on console.
*/

public class MessageUtil {

   private String message;

   //Constructor
   //@param message to be printed
   public MessageUtil(String message){
      this.message = message;
   }

   // prints the message
   public String printMessage(){
      System.out.println(message);
      return message;
   }

}
Create Test Case Class
Create a java test class, say, TestJunit.java.
Add a test method testPrintMessage() to your test class.
Add an Annotaion @Test to the method testPrintMessage().
Implement the test condition and check the condition using assertEquals API of JUnit.
Create a java class file named TestJunit.java in C:\>JUNIT_WORKSPACE.
import org.junit.Test;
import static org.junit.Assert.assertEquals;

public class TestJunit {

   String message = "Hello World";
   MessageUtil messageUtil = new MessageUtil(message);

   @Test
   public void testPrintMessage() {
      assertEquals(message,messageUtil.printMessage());
   }
}
Create Test Runner Class
Now create a java class file named TestRunner.java in C:\>JUNIT_WORKSPACE to execute test case(s). It imports the JUnitCore class and uses the runClasses() method that takes the test class name as its parameter.
import org.junit.runner.JUnitCore;
import org.junit.runner.Result;
import org.junit.runner.notification.Failure;

public class TestRunner {
   public static void main(String[] args) {
      Result result = JUnitCore.runClasses(TestJunit.class);

      for (Failure failure : result.getFailures()) {
         System.out.println(failure.toString());
      }

      System.out.println(result.wasSuccessful());
   }
}
Compile the Test case and Test Runner classes using javac.
C:\JUNIT_WORKSPACE>javac MessageUtil.java TestJunit.java TestRunner.java
Now run the Test Runner, which will run the test case defined in the provided Test Case class.
C:\JUNIT_WORKSPACE>java TestRunner
Verify the output.
Hello World
true
JUnit - Suite Test
Test suite is used to bundle a few unit test cases and run them together. In JUnit, both @RunWith and @Suite annotations are used to run the suite tests. This chapter takes an example having two test classes, TestJunit1 & TestJunit2, that run together using Test Suite.
Create a Class
Create a java class to be tested, say, MessageUtil.java in C:\>JUNIT_WORKSPACE.
/*
* This class prints the given message on console.
*/

public class MessageUtil {

   private String message;

   //Constructor
   //@param message to be printed
   public MessageUtil(String message){
      this.message = message;
   }

   // prints the message
   public String printMessage(){
      System.out.println(message);
      return message;
   }

   // add "Hi!" to the message
   public String salutationMessage(){
      message = "Hi!" + message;
      System.out.println(message);
      return message;
   }
}
Create Test Case Classes
Create a java class file named TestJunit1.java in C:\>JUNIT_WORKSPACE.
import org.junit.Test;
import org.junit.Ignore;
import static org.junit.Assert.assertEquals;

public class TestJunit1 {

   String message = "Robert";
   MessageUtil messageUtil = new MessageUtil(message);

   @Test
   public void testPrintMessage() {
      System.out.println("Inside testPrintMessage()");
      assertEquals(message, messageUtil.printMessage());
   }
}
Create a java class file named TestJunit2.java in C:\>JUNIT_WORKSPACE.
import org.junit.Test;
import org.junit.Ignore;
import static org.junit.Assert.assertEquals;

public class TestJunit2 {

   String message = "Robert";
   MessageUtil messageUtil = new MessageUtil(message);

   @Test
   public void testSalutationMessage() {
      System.out.println("Inside testSalutationMessage()");
      message = "Hi!" + "Robert";
      assertEquals(message,messageUtil.salutationMessage());
   }
}
Create Test Suite Class
- Create a java class.
- Attach @RunWith(Suite.class) Annotation with the class.
- Add reference to JUnit test classes using @Suite.SuiteClasses annotation.
Create a java class file named TestSuite.java in C:\>JUNIT_WORKSPACE to execute test case(s).
import org.junit.runner.RunWith;
import org.junit.runners.Suite;

@RunWith(Suite.class)

@Suite.SuiteClasses({
   TestJunit1.class,
   TestJunit2.class
})

public class JunitTestSuite {
}
Create Test Runner Class
Create a java class file named TestRunner.java in C:\>JUNIT_WORKSPACE to execute test case(s).
import org.junit.runner.JUnitCore;
import org.junit.runner.Result;
import org.junit.runner.notification.Failure;

public class TestRunner {
   public static void main(String[] args) {
      Result result = JUnitCore.runClasses(JunitTestSuite.class);

      for (Failure failure : result.getFailures()) {
         System.out.println(failure.toString());
      }

      System.out.println(result.wasSuccessful());
   }
}
Compile all the java classes using javac.
C:\JUNIT_WORKSPACE>javac MessageUtil.java TestJunit1.java
TestJunit2.java JunitTestSuite.java TestRunner.java
Now run the Test Runner, which will run the test case defined in the provided Test Case class.
C:\JUNIT_WORKSPACE>java TestRunner
Verify the output.
Inside testPrintMessage()
Robert
Inside testSalutationMessage()
Hi Robert
true
JUnit - Ignore Test
Sometimes it so happens that our code is not completely ready while running a test case. As a result, the test case fails. The @Ignore annotation helps in this scenario.
A test method annotated with @Ignore will not be executed.
If a test class is annotated with @Ignore, then none of its test methods will be executed.
Now let's see @Ignore in action.
Create a Class
Create a java class to be tested, say, MessageUtil.java in C:\>JUNIT_WORKSPACE.
/*
* This class prints the given message on console.
*/

public class MessageUtil {

   private String message;

   //Constructor
   //@param message to be printed
   public MessageUtil(String message){
      this.message = message;
   }

   // prints the message
   public String printMessage(){
      System.out.println(message);
      return message;
   }

   // add "Hi!" to the message
   public String salutationMessage(){
      message = "Hi!" + message;
      System.out.println(message);
      return message;
   }

}
Create Test Case Class
Create a java test class, say, TestJunit.java.
Add a test method testPrintMessage() or testSalutationMessage() to your test class.
Add an Annotaion @Ignore to method testPrintMessage().
Create a java class file named TestJunit.java in C:\ JUNIT_WORKSPACE.
import org.junit.Test;
import org.junit.Ignore;
import static org.junit.Assert.assertEquals;

public class TestJunit {

   String message = "Robert";
   MessageUtil messageUtil = new MessageUtil(message);

   @Ignore
   @Test
   public void testPrintMessage() {
      System.out.println("Inside testPrintMessage()");
      message = "Robert";
      assertEquals(message,messageUtil.printMessage());
   }

   @Test
   public void testSalutationMessage() {
      System.out.println("Inside testSalutationMessage()");
      message = "Hi!" + "Robert";
      assertEquals(message,messageUtil.salutationMessage());
   }

}
Create Test Runner Class
Create a java class file named TestRunner.java in C:\>JUNIT_WORKSPACE to execute test case(s).
import org.junit.runner.JUnitCore;
import org.junit.runner.Result;
import org.junit.runner.notification.Failure;

public class TestRunner {
   public static void main(String[] args) {
      Result result = JUnitCore.runClasses(TestJunit.class);

      for (Failure failure : result.getFailures()) {
         System.out.println(failure.toString());
      }

      System.out.println(result.wasSuccessful());
   }
}
Compile the MessageUtil, Test case and Test Runner classes using javac.
C:\JUNIT_WORKSPACE>javac MessageUtil.java TestJunit.java TestRunner.java
Now run the Test Runner, which will not run the testPrintMessage() test case defined in the provided Test Case class.
C:\JUNIT_WORKSPACE>java TestRunner
Verify the output. testPrintMessage() test case is not tested.
Inside testSalutationMessage()
Hi!Robert
true
Now, update TestJunit in C:\>JUNIT_WORKSPACE to ignore all test cases. Add @Ignore at class level.
import org.junit.Test;
import org.junit.Ignore;
import static org.junit.Assert.assertEquals;

@Ignore
public class TestJunit {

   String message = "Robert";
   MessageUtil messageUtil = new MessageUtil(message);

   @Test
   public void testPrintMessage() {
      System.out.println("Inside testPrintMessage()");
      message = "Robert";
      assertEquals(message,messageUtil.printMessage());
   }

   @Test
   public void testSalutationMessage() {
      System.out.println("Inside testSalutationMessage()");
      message = "Hi!" + "Robert";
      assertEquals(message,messageUtil.salutationMessage());
   }

}
Compile the test case using javac.
C:\JUNIT_WORKSPACE>javac TestJunit.java
Keep your Test Runner unchanged as follows −
import org.junit.runner.JUnitCore;
import org.junit.runner.Result;
import org.junit.runner.notification.Failure;

public class TestRunner {
   public static void main(String[] args) {
      Result result = JUnitCore.runClasses(TestJunit.class);

      for (Failure failure : result.getFailures()) {
         System.out.println(failure.toString());
      }

      System.out.println(result.wasSuccessful());
   }
}
Now run the Test Runner, which will not run any test case defined in the provided Test Case class.
C:\JUNIT_WORKSPACE>java TestRunner
Verify the output. No test case is tested.
true
JUnit - Time Test
JUnit provides a handy option of Timeout. If a test case takes more time than the specified number of milliseconds, then JUnit will automatically mark it as failed. The timeout parameter is used along with @Test annotation. Let us see the @Test(timeout) in action.
Create a Class
Create a java class to be tested, say, MessageUtil.java in C:\>JUNIT_WORKSPACE.
Add an infinite while loop inside the printMessage() method.
/*
* This class prints the given message on console.
*/

public class MessageUtil {

   private String message;

   //Constructor
   //@param message to be printed
   public MessageUtil(String message){
      this.message = message;
   }

   // prints the message
   public void printMessage(){
      System.out.println(message);
      while(true);
   }

   // add "Hi!" to the message
   public String salutationMessage(){
      message = "Hi!" + message;
      System.out.println(message);
      return message;
   }
}
Create Test Case Class
Create a java test class, say, TestJunit.java. Add a timeout of 1000 to testPrintMessage() test case.
Create a java class file named TestJunit.java in C:\>JUNIT_WORKSPACE.
import org.junit.Test;
import org.junit.Ignore;
import static org.junit.Assert.assertEquals;

public class TestJunit {

   String message = "Robert";
   MessageUtil messageUtil = new MessageUtil(message);

   @Test(timeout = 1000)
   public void testPrintMessage() {
      System.out.println("Inside testPrintMessage()");
      messageUtil.printMessage();
   }

   @Test
   public void testSalutationMessage() {
      System.out.println("Inside testSalutationMessage()");
      message = "Hi!" + "Robert";
      assertEquals(message,messageUtil.salutationMessage());
   }
}
Create Test Runner Class
Create a java class file named TestRunner.java in C:\>JUNIT_WORKSPACE to execute test case(s).
import org.junit.runner.JUnitCore;
import org.junit.runner.Result;
import org.junit.runner.notification.Failure;

public class TestRunner {
   public static void main(String[] args) {
      Result result = JUnitCore.runClasses(TestJunit.class);

      for (Failure failure : result.getFailures()) {
         System.out.println(failure.toString());
      }

      System.out.println(result.wasSuccessful());
   }
}
Compile the MessageUtil, Test case and Test Runner classes using javac.
C:\JUNIT_WORKSPACE>javac MessageUtil.java TestJunit.java TestRunner.java
Now run the Test Runner, which will run the test cases defined in the provided Test Case class.
C:\JUNIT_WORKSPACE>java TestRunner
Verify the output. testPrintMessage() test case will mark the unit testing failed.
Inside testPrintMessage()
Robert
Inside testSalutationMessage()
Hi!Robert
testPrintMessage(TestJunit): test timed out after 1000 milliseconds
false
JUnit - Exceptions Test
JUnit provides an option of tracing the exception handling of code. You can test whether the code throws a desired exception or not. The expected parameter is used along with @Test annotation. Let us see @Test(expected) in action.
Create a Class
Create a java class to be tested, say, MessageUtil.java in C:\> JUNIT_WORKSPACE.
Add an error condition inside the printMessage() method.
/*
* This class prints the given message on console.
*/

public class MessageUtil {

   private String message;

   //Constructor
   //@param message to be printed
   public MessageUtil(String message){
      this.message = message;
   }

   // prints the message
   public void printMessage(){
      System.out.println(message);
      int a = 0;
      int b = 1/a;
   }

   // add "Hi!" to the message
   public String salutationMessage(){
      message = "Hi!" + message;
      System.out.println(message);
      return message;
   }
}
Create Test Case Class
Create a java test class called TestJunit.java. Add an expected exception ArithmeticException to the testPrintMessage() test case.
Create a java class file named TestJunit.java in C:\>JUNIT_WORKSPACE.
import org.junit.Test;
import org.junit.Ignore;
import static org.junit.Assert.assertEquals;

public class TestJunit {

   String message = "Robert";
   MessageUtil messageUtil = new MessageUtil(message);

   @Test(expected = ArithmeticException.class)
   public void testPrintMessage() {
      System.out.println("Inside testPrintMessage()");
      messageUtil.printMessage();
   }

   @Test
   public void testSalutationMessage() {
      System.out.println("Inside testSalutationMessage()");
      message = "Hi!" + "Robert";
      assertEquals(message,messageUtil.salutationMessage());
   }
}
Create Test Runner Class
Create a java class file named TestRunner.java in C:\>JUNIT_WORKSPACE to execute test case(s).
import org.junit.runner.JUnitCore;
import org.junit.runner.Result;
import org.junit.runner.notification.Failure;

public class TestRunner {
   public static void main(String[] args) {
      Result result = JUnitCore.runClasses(TestJunit.class);

      for (Failure failure : result.getFailures()) {
         System.out.println(failure.toString());
      }

      System.out.println(result.wasSuccessful());
   }
}
Compile the MessageUtil, Test case and Test Runner classes using javac.
C:\JUNIT_WORKSPACE>javac MessageUtil.java TestJunit.java TestRunner.java
Now run the Test Runner, which will run the test cases defined in the provided Test Case class.
C:\JUNIT_WORKSPACE>java TestRunner
Verify the output. testPrintMessage() test case will be passed.
Inside testPrintMessage()
Robert
Inside testSalutationMessage()
Hi!Robert
true
JUnit - Parameterized Test
JUnit 4 has introduced a new feature called parameterized tests. Parameterized tests allow a developer to run the same test over and over again using different values. There are five steps that you need to follow to create a parameterized test.
Annotate test class with @RunWith(Parameterized.class).
Create a public static method annotated with @Parameters that returns a Collection of Objects (as Array) as test data set.
Create a public constructor that takes in what is equivalent to one "row" of test data.
Create an instance variable for each "column" of test data.
Create your test case(s) using the instance variables as the source of the test data.
The test case will be invoked once for each row of data. Let us see parameterized tests in action.
Create a Class
Create a java class to be tested, say, PrimeNumberChecker.java in C:\>JUNIT_WORKSPACE.
public class PrimeNumberChecker {
   public Boolean validate(final Integer primeNumber) {
      for (int i = 2; i < (primeNumber / 2); i++) {
         if (primeNumber % i == 0) {
            return false;
         }
      }
      return true;
   }
}
Create Parameterized Test Case Class
Create a java test class, say, PrimeNumberCheckerTest.java. Create a java class file named PrimeNumberCheckerTest.java in C:\>JUNIT_WORKSPACE.
import java.util.Arrays;
import java.util.Collection;

import org.junit.Test;
import org.junit.Before;

import org.junit.runners.Parameterized;
import org.junit.runners.Parameterized.Parameters;
import org.junit.runner.RunWith;
import static org.junit.Assert.assertEquals;

@RunWith(Parameterized.class)
public class PrimeNumberCheckerTest {
   private Integer inputNumber;
   private Boolean expectedResult;
   private PrimeNumberChecker primeNumberChecker;

   @Before
   public void initialize() {
      primeNumberChecker = new PrimeNumberChecker();
   }

   // Each parameter should be placed as an argument here
   // Every time runner triggers, it will pass the arguments
   // from parameters we defined in primeNumbers() method

   public PrimeNumberCheckerTest(Integer inputNumber, Boolean expectedResult) {
      this.inputNumber = inputNumber;
      this.expectedResult = expectedResult;
   }

   @Parameterized.Parameters
   public static Collection primeNumbers() {
      return Arrays.asList(new Object[][] {
         { 2, true },
         { 6, false },
         { 19, true },
         { 22, false },
         { 23, true }
      });
   }

   // This test will run 4 times since we have 5 parameters defined
   @Test
   public void testPrimeNumberChecker() {
      System.out.println("Parameterized Number is : " + inputNumber);
      assertEquals(expectedResult,
      primeNumberChecker.validate(inputNumber));
   }
}
Create Test Runner Class
Create a java class file named TestRunner.java in C:\>JUNIT_WORKSPACE to execute test case(s).
import org.junit.runner.JUnitCore;
import org.junit.runner.Result;
import org.junit.runner.notification.Failure;

public class TestRunner {
   public static void main(String[] args) {
      Result result = JUnitCore.runClasses(PrimeNumberCheckerTest.class);

      for (Failure failure : result.getFailures()) {
         System.out.println(failure.toString());
      }

      System.out.println(result.wasSuccessful());
   }
}
Compile the PrimeNumberChecker, PrimeNumberCheckerTest and Test Runner classes using javac.
C:\JUNIT_WORKSPACE>javac PrimeNumberChecker.java PrimeNumberCheckerTest.java
TestRunner.java
Now run the Test Runner, which will run the test cases defined in the provided Test Case class.
C:\JUNIT_WORKSPACE>java TestRunner
Verify the output.
Parameterized Number is : 2
Parameterized Number is : 6
Parameterized Number is : 19
Parameterized Number is : 22
Parameterized Number is : 23
true
JUnit - Plug with ANT
We will have an example to demonstrate how to run JUnit using ANT. Follow the steps given below.
Step 1: Download Apache Ant
Download Apache Ant based on the operating system you are working on.
| OS | Archive Name |
|---|---|
| Windows | apache-ant-1.8.4-bin.zip |
| Linux | apache-ant-1.8.4-bin.tar.gz |
| Mac | apache-ant-1.8.4-bin.tar.gz |
Step 2: Set Ant Environment
Set the ANT_HOME environment variable to point to the base directory location, where the ANT libraries are stored on your machine. Let us assume the Ant libraries are stored in the folder apache-ant-1.8.4.
| Sr.No. | OS & Description |
|---|---|
| 1 | Windows Set the environment variable ANT_HOME to C:\Program Files\Apache Software Foundation\apache-ant-1.8.4 |
| 2 | Linux export ANT_HOME = /usr/local/apache-ant-1.8.4 |
| 3 | Mac export ANT_HOME = /Library/apache-ant-1.8.4 |
Append Ant compiler location to the System Path as follows −
| OS | Output |
|---|---|
| Windows | Append the string %ANT_HOME\bin at the end of the system variable, Path. |
| Linux | export PATH = $PATH:$ANT_HOME/bin/ |
| Mac | not required |
Step 3: Download JUnit Archive
Download a JUnit Archive that suits your operating system.
| OS | Archive Name |
|---|---|
| Windows | junit4.10.jar |
| Linux | junit4.10.jar |
| Mac | junit4.10.jar |
Step 4: Create Project Structure
Create a folder TestJunitWithAnt in C:\>JUNIT_WORKSPACE.
Create a folder src in C:\>JUNIT_WORKSPACE>TestJunitWithAnt.
Create a folder test in C:\>JUNIT_WORKSPACE>TestJunitWithAnt.
Create a folder lib in C:\>JUNIT_WORKSPACE>TestJunitWithAnt.
Create MessageUtil class in C:\>JUNIT_WORKSPACE>TestJunitWithAnt> srcfolder.
/*
* This class prints the given message on console.
*/

public class MessageUtil {

   private String message;

   //Constructor
   //@param message to be printed
   public MessageUtil(String message){
      this.message = message;
   }

   // prints the message
   public String printMessage(){
      System.out.println(message);
      return message;
   }

   // add "Hi!" to the message
   public String salutationMessage(){
      message = "Hi!" + message;
      System.out.println(message);
      return message;
   }
}
Create TestMessageUtil class in the folder C:\>JUNIT_WORKSPACE>TestJunitWithAnt>src.
import org.junit.Test;
import org.junit.Ignore;
import static org.junit.Assert.assertEquals;

public class TestMessageUtil {

   String message = "Robert";
   MessageUtil messageUtil = new MessageUtil(message);

   @Test
   public void testPrintMessage() {
      System.out.println("Inside testPrintMessage()");
      assertEquals(message,messageUtil.printMessage());
   }

   @Test
   public void testSalutationMessage() {
      System.out.println("Inside testSalutationMessage()");
      message = "Hi!" + "Robert";
      assertEquals(message,messageUtil.salutationMessage());
   }
}
Copy junit-4.10.jar onto the folder C:\>JUNIT_WORKSPACE>TestJunitWithAnt>lib.
Create ANT Build.xml
We'll be using <junit> task in Ant to execute our JUnit test cases.
<project name = "JunitTest" default = "test" basedir = ".">
   <property name = "testdir" location = "test" />
   <property name = "srcdir" location = "src" />
   <property name = "full-compile" value = "true" />

   <path id = "classpath.base"/>

   <path id = "classpath.test">
      <pathelement location = "lib/junit-4.10.jar" />
      <pathelement location = "${testdir}" />
      <pathelement location = "${srcdir}" />
      <path refid = "classpath.base" />
   </path>

   <target name = "clean" >
      <delete verbose = "${full-compile}">
         <fileset dir = "${testdir}" includes = "**/*.class" />
      </delete>
   </target>

   <target name = "compile" depends = "clean">
      <javac srcdir = "${srcdir}" destdir = "${testdir}"
         verbose = "${full-compile}">
         <classpath refid = "classpath.test"/>
      </javac>
   </target>

   <target name = "test" depends = "compile">
      <junit>
         <classpath refid = "classpath.test" />
         <formatter type = "brief" usefile = "false" />
         <test name = "TestMessageUtil" />
      </junit>
   </target>

</project>
Run the following Ant command.
C:\JUNIT_WORKSPACE\TestJunitWithAnt>ant
Verify the output.
Buildfile: C:\JUNIT_WORKSPACE\TestJunitWithAnt\build.xml

clean:

compile:
   [javac] Compiling 2 source files to C:\JUNIT_WORKSPACE\TestJunitWithAnt\test
   [javac] [parsing started C:\JUNIT_WORKSPACE\TestJunitWithAnt\src\
      MessageUtil.java]
   [javac] [parsing completed 18ms]
   [javac] [parsing started C:\JUNIT_WORKSPACE\TestJunitWithAnt\src\
      TestMessageUtil.java]
   [javac] [parsing completed 2ms]
   [javac] [search path for source files: C:\JUNIT_WORKSPACE\
      TestJunitWithAnt\src]
   [javac] [loading java\lang\Object.class(java\lang:Object.class)]
   [javac] [loading java\lang\String.class(java\lang:String.class)]
   [javac] [loading org\junit\Test.class(org\junit:Test.class)]
   [javac] [loading org\junit\Ignore.class(org\junit:Ignore.class)]
   [javac] [loading org\junit\Assert.class(org\junit:Assert.class)]
   [javac] [loading java\lang\annotation\Retention.class
      (java\lang\annotation:Retention.class)]
   [javac] [loading java\lang\annotation\RetentionPolicy.class
      (java\lang\annotation:RetentionPolicy.class)]
   [javac] [loading java\lang\annotation\Target.class
      (java\lang\annotation:Target.class)]
   [javac] [loading java\lang\annotation\ElementType.class
      (java\lang\annotation:ElementType.class)]
   [javac] [loading java\lang\annotation\Annotation.class
      (java\lang\annotation:Annotation.class)]
   [javac] [checking MessageUtil]
   [javac] [loading java\lang\System.class(java\lang:System.class)]
   [javac] [loading java\io\PrintStream.class(java\io:PrintStream.class)]
   [javac] [loading java\io\FilterOutputStream.class
      (java\io:FilterOutputStream.class)]
   [javac] [loading java\io\OutputStream.class(java\io:OutputStream.class)]
   [javac] [loading java\lang\StringBuilder.class
      (java\lang:StringBuilder.class)]
   [javac] [loading java\lang\AbstractStringBuilder.class
      (java\lang:AbstractStringBuilder.class)]
   [javac] [loading java\lang\CharSequence.class(java\lang:CharSequence.class)]
   [javac] [loading java\io\Serializable.class(java\io:Serializable.class)]
   [javac] [loading java\lang\Comparable.class(java\lang:Comparable.class)]
   [javac] [loading java\lang\StringBuffer.class(java\lang:StringBuffer.class)]
   [javac] [wrote C:\JUNIT_WORKSPACE\TestJunitWithAnt\test\MessageUtil.class]
   [javac] [checking TestMessageUtil]
   [javac] [wrote C:\JUNIT_WORKSPACE\TestJunitWithAnt\test\TestMessageUtil.class]
   [javac] [total 281ms]

test:
    [junit] Testsuite: TestMessageUtil
    [junit] Tests run: 2, Failures: 0, Errors: 0, Time elapsed: 0.008 sec
    [junit]
    [junit] ------------- Standard Output ---------------
    [junit] Inside testPrintMessage()
    [junit] Robert
    [junit] Inside testSalutationMessage()
    [junit] Hi!Robert
    [junit] ------------- ---------------- ---------------

BUILD SUCCESSFUL
Total time: 0 seconds
JUnit - Plug with Eclipse
To set up JUnit with eclipse, follow the steps given below.
Step 1: Download JUnit Archive
Download a JUnit jar based on the operating system you have on your system.
| OS | Archive Name |
|---|---|
| Windows | junit4.10.jar |
| Linux | junit4.10.jar |
| Mac | junit4.10.jar |
Assume you have copied the above JAR file onto the folder C:\>JUnit.
Step 2: Set Eclipse Environment
Open eclipse → right click on project and click on property > Build Path > Configure Build Path and add the junit-4.10.jar in the libraries using the button Add External Jar.
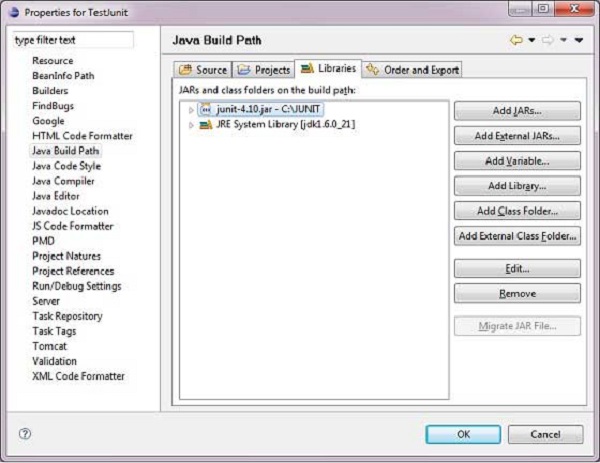
We assume that your Eclipse has inbuilt JUnit plugin. If it is not available in C:\>eclipse\plugins directory, then you can download it from JUnit Plugin. Unzip the downloaded zip file in the plugin folder of the Eclipse. Finally restart Eclipse.
Now your Eclipse is ready for the development of JUnit test cases.
Step 3: Verify JUnit installation in Eclipse
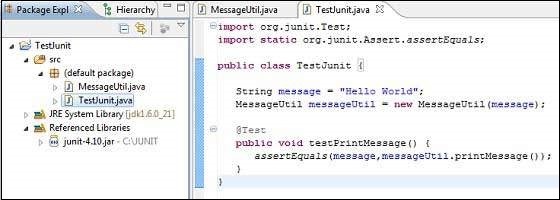
Create a project TestJunit in Eclipse at any location. Then create a class MessageUtil to test in the project.
/*
* This class prints the given message on console.
*/

public class MessageUtil {

   private String message;

   //Constructor
   //@param message to be printed
   public MessageUtil(String message){
      this.message = message;
   }

   // prints the message
   public String printMessage(){
      System.out.println(message);
      return message;
   }
}
Create a test class TestJunit in the project.
import org.junit.Test;
import static org.junit.Assert.assertEquals;

public class TestJunit {

   String message = "Hello World";
   MessageUtil messageUtil = new MessageUtil(message);

   @Test
   public void testPrintMessage() {
      assertEquals(message,messageUtil.printMessage());
   }
}
Following should be the project structure −
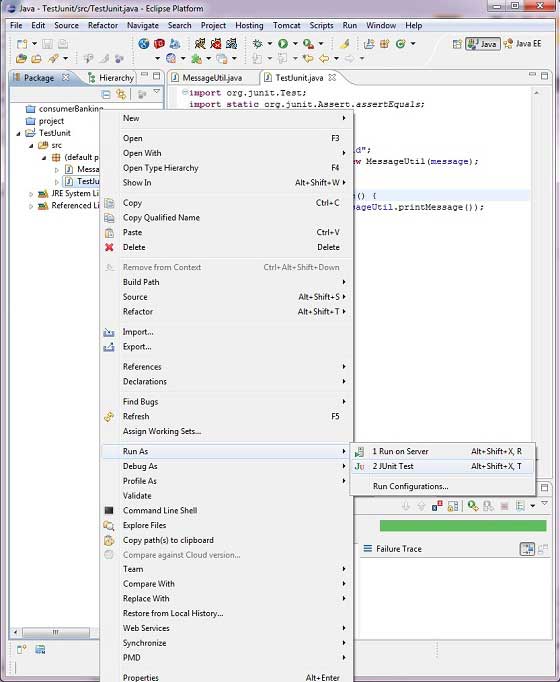
Finally, right click the program and run as JUnit to verify the output of the program.
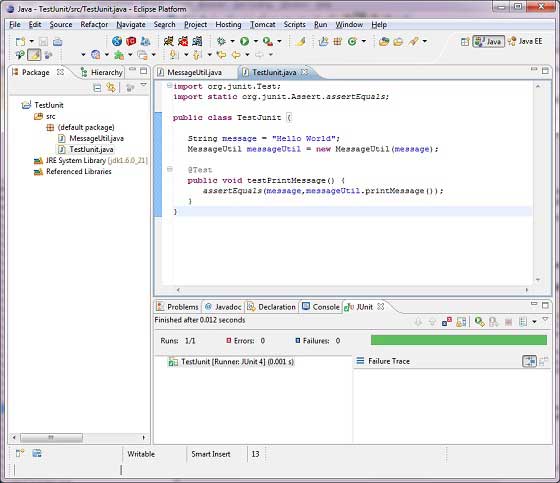
Verify the result.
JUnit - Extensions
Following are the JUnit extensions −
- Cactus
- JWebUnit
- XMLUnit
- MockObject
Cactus
Cactus is a simple test framework for unit testing server-side java code (Servlets, EJBs, Tag Libs, Filters). The intent of Cactus is to lower the cost of writing tests for server-side code. It uses JUnit and extends it. Cactus implements an in-container strategy that executes the tests inside a container.
Cactus ecosystem is made of several components −
Cactus Framework is the heart of Cactus. It is the engine that provides the API to write Cactus tests.
Cactus Integration Modules are front-ends and frameworks that provide easy ways of using the Cactus Framework (Ant scripts, Eclipse plugin, and Maven plugin).
The following code demonstrates how Cactus can be used.
import org.apache.cactus.*;
import junit.framework.*;

public class TestSampleServlet extends ServletTestCase {
   @Test
   public void testServlet() {
      // Initialize class to test
      SampleServlet servlet = new SampleServlet();

      // Set a variable in session as the doSomething()
      // method that we are testing
      session.setAttribute("name", "value");

      // Call the method to test, passing an
      // HttpServletRequest object (for example)
      String result = servlet.doSomething(request);

      // Perform verification that test was successful
      assertEquals("something", result);
      assertEquals("otherValue", session.getAttribute("otherName"));
   }
}
JWebUnit
JWebUnit is a Java-based testing framework for web applications. It wraps existing testing frameworks such as HtmlUnit and Selenium with a unified, simple testing interface to test the correctness of your web applications.
JWebUnit provides a high-level Java API for navigating a web application combined with a set of assertions to verify the application's correctness. This includes navigation via links, form entry and submission, validation of table contents, and other typical business web application features.
The simple navigation methods and ready-to-use assertions allow for more rapid test creation than using only JUnit or HtmlUnit. And if you want to switch from HtmlUnit to other plugins such as Selenium (available soon), there is no need to rewrite your tests.
Here is a sample code.
import junit.framework.TestCase;
import net.sourceforge.jwebunit.WebTester;

public class ExampleWebTestCase extends TestCase {
   private WebTester tester;

   public ExampleWebTestCase(String name) {
      super(name);
      tester = new WebTester();
   }

   //set base url
   public void setUp() throws Exception {
      getTestContext().setBaseUrl("http://myserver:8080/myapp");
   }

   // test base info
   @Test
   public void testInfoPage() {
      beginAt("/info.html");
   }
}
XMLUnit
XMLUnit provides a single JUnit extension class, XMLTestCase, and a set of supporting classes that allow assertions to be made about −
The differences between two pieces of XML (via Diff and DetailedDiff classes).
The validity of a piece of XML (via Validator class).
The outcome of transforming a piece of XML using XSLT (via Transform class).
The evaluation of an XPath expression on a piece of XML (via classes implementing the XpathEngine interface).
Individual nodes in a piece of XML that are exposed by DOM Traversal (via NodeTest class).
Let us assume we have two pieces of XML that we wish to compare and assert that they are equal. We could write a simple test class like this −
import org.custommonkey.xmlunit.XMLTestCase;

public class MyXMLTestCase extends XMLTestCase {

   // this test method compare two pieces of the XML
   @Test
   public void testForXMLEquality() throws Exception {
      String myControlXML = "<msg><uuid>0x00435A8C</uuid></msg>";
      String myTestXML = "<msg><localId>2376</localId></msg>";
      assertXMLEqual("Comparing test xml to control xml", myControlXML, myTestXML);
   }
}
MockObject
In a unit test, mock objects can simulate the behavior of complex, real (non-mock) objects and are therefore useful when a real object is impractical or impossible to incorporate into a unit test.
The common coding style for testing with mock objects is to −
- Create instances of mock objects.
- Set state and expectations in the mock objects.
- Invoke domain code with mock objects as parameters.
- Verify consistency in the mock objects.
Given below is an example of MockObject using Jmock.
import org.jmock.Mockery;
import org.jmock.Expectations;

class PubTest extends TestCase {
   Mockery context = new Mockery();
   public void testSubReceivesMessage() {
      // set up
      final Sub sub = context.mock(Sub.class);

      Pub pub = new Pub();
      pub.add(sub);

      final String message = "message";

      // expectations
      context.checking(new Expectations() {
         oneOf (sub).receive(message);
      });

      // execute
      pub.publish(message);

      // verify
      context.assertIsSatisfied();
   }
}