- ES6 Tutorial
- ES6 - Home
- ES6 - Overview
- ES6 - Environment
- ES6 - Syntax
- ES6 - Variables
- ES6 - Operators
- ES6 - Decision Making
- ES6 - Loops
- ES6 - Functions
- ES6 - Events
- ES6 - Cookies
- ES6 - Page Redirect
- ES6 - Dialog Boxes
- ES6 - Void Keyword
- ES6 - Page Printing
- ES6 - Objects
- ES6 - Number
- ES6 - Boolean
- ES6 - Strings
- ES6 - Symbol
- ES6 - New String Methods
- ES6 - Arrays
- ES6 - Date
- ES6 - Math
- ES6 - RegExp
- ES6 - HTML DOM
- ES6 - Iterator
- ES6 - Collections
- ES6 - Classes
- ES6 - Maps And Sets
- ES6 - Promises
- ES6 - Modules
- ES6 - Error Handling
- ES6 - Object Extensions
- ES6 - Reflect API
- ES6 - Proxy API
- ES6 - Validations
- ES6 - Animation
- ES6 - Multimedia
- ES6 - Debugging
- ES6 - Image Map
- ES6 - Browsers
- ES7 - New Features
- ES8 - New Features
- ES9 - New Features
- ES6 Useful Resources
- ES6 - Quick Guide
- ES6 - Useful Resources
- ES6 - Discussion
ES6 - Quick Guide
ES6 - Overview
ECMAScript (ES) is a scripting language specification standardized by ECMAScript International. It is used by applications to enable client-side scripting. The specification is influenced by programming languages like Self, Perl, Python, Java etc. Languages like JavaScript, Jscript and ActionScript are governed by this specification.
This tutorial introduces you to ES6 implementation in JavaScript.
JavaScript
JavaScript was developed by Brendan Eich, a developer at Netscape Communications Corporation, in 1995.JavaScript started life with the name Mocha, and was briefly named LiveScript before being officially renamed to JavaScript. It is a scripting language that is executed by the browser, i.e. on the client’s end. It is used in conjunction with HTML to develop responsive webpages.
ECMA Script6’s implementation discussed here covers the following new features −
- Support for constants
- Block Scope
- Arrow Functions
- Extended Parameter Handling
- Template Literals
- Extended Literals
- Enhanced Object Properties
- De-structuring Assignment
- Modules
- Classes
- Iterators
- Generators
- Collections
- New built in methods for various classes
- Promises
ECMAScript Versions
There are nine editions of ECMA-262 which are as follows −
| Edition | Name | Description |
|---|---|---|
| 1 | ECMAScript 1 | First Edition released in 1997 |
| 2 | ECMAScript 2 | Second Edition released in 1998, minor changes to meet ISO/IEC 16262 standard |
| 3 | ECMAScript 3 | Third Edition released in 1999 with language enhancements |
| 4 | ECMAScript 4 | Fourth Edition release plan was dropped, few features added later in ES6 & other complex features dropped |
| 5 | ECMAScript 5 | Fifth Edition released in 2009 |
| 5.1 | ECMAScript 5.1 | 5.1 Edition released in 2011, minor changes to meet ISO/IEC 16262:2011 standard |
| 6 | ECMAScript 2015/ES6 | Sixth Edition released in 2015, see ES6 chapters for new features |
| 7 | ECMAScript 2016/ES7 | Seventh Edition released in 2016, see ES7 chapters for new features |
| 8 | ECMAScript 2017/ES8 | Eight Edition released in 2017, see ES8 chapters for new features |
| 9 | ECMAScript 2018/ES9 | Ninth Edition released in 2018, see ES9 chapters for new features |
ES6 - Environment
In this chapter, we will discuss the setting up of the environment for ES6.
Local Environment Setup
JavaScript can run on any browser, any host, and any OS. You will need the following to write and test a JavaScript program standard −
Text Editor
The text editor helps you to write your source code. Examples of few editors include Windows Notepad, Notepad++, Emacs, vim or vi etc. Editors used may vary with the operating systems. The source files are typically named with the extension.js
Installing Node.js
Node.js is an open source, cross-platform runtime environment for server-side JavaScript. Node.js is required to run JavaScript without a browser support. It uses Google V8 JavaScript engine to execute the code. You may download Node.js source code or a pre-built installer for your platform. Node is available at https://nodejs.org/en/download
Installation on Windows
Download and run the .msi installer for Node
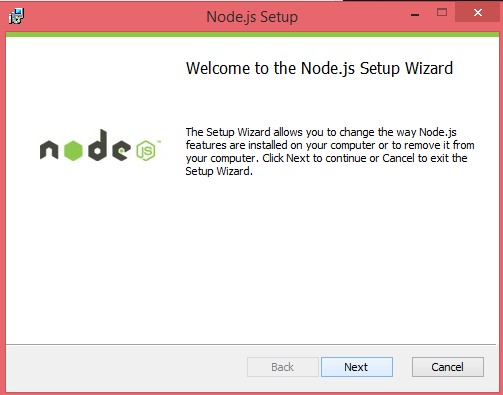
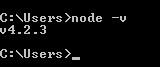
To verify if the installation was successful, enter the command node –v in the terminal window.
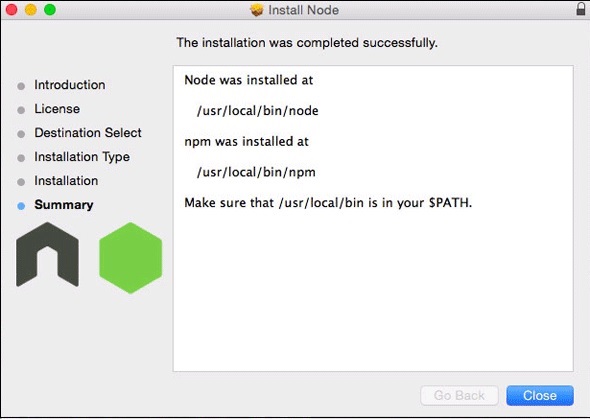
Installation on Mac OS X
To install node.js on OS X you can download a pre-compiled binary package which makes a nice and easy installation. Head over to www.nodejs.org and click the install button to download the latest package.

Install the package from the .dmg by following along the install wizard which will install both node and npm. npm is the Node Package Manager which facilitates installs of additional packages for Node.js.
Installation on Linux
You need to install a number of dependencies before you can install Node.js and npm.
Ruby and GCC. You’ll need Ruby 1.8.6 or newer and GCC 4.2 or newer
Homebrew. Homebrew is a package manager originally for the Mac, but it’s been ported to Linux as Linuxbrew. You can learn more about Homebrew at the http://brew.sh/ at the http://brew.sh/linuxbrew.
Integrated Development Environment (IDE) Support
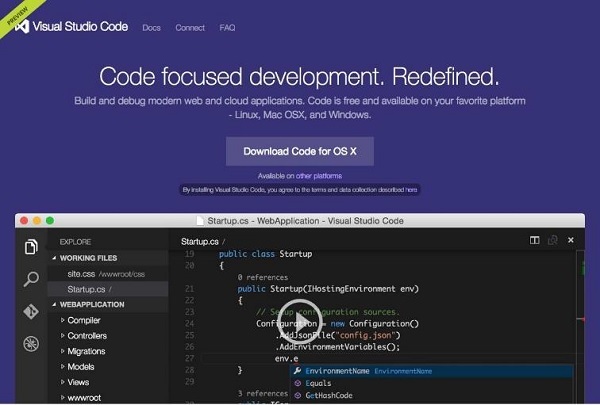
JavaScript can be built on a plethora of development environments like Visual Studio, Sublime Text 2, WebStorm/PHPStorm, Eclipse, Brackets, etc. The Visual Studio Code and Brackets IDE is discussed in this section. The development environment used here is Visual Studio Code (Windows platform).
Visual Studio Code
This is open source IDE from Visual Studio. It is available for Mac OS X, Linux, and Windows platforms. VScode is available at https://code.visualstudio.com.
Installation on Windows
Download Visual Studio Code for Windows.
Double-click on VSCodeSetup.exe  to launch the setup process. This will only take a minute.
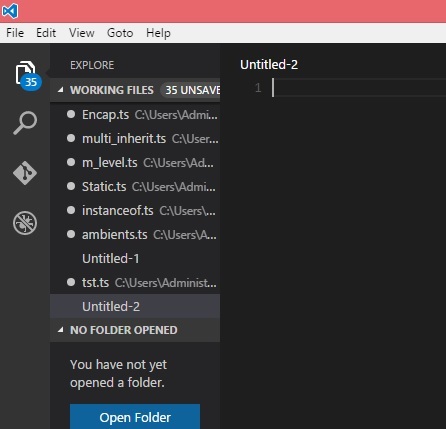
Following is the screenshot of the IDE.
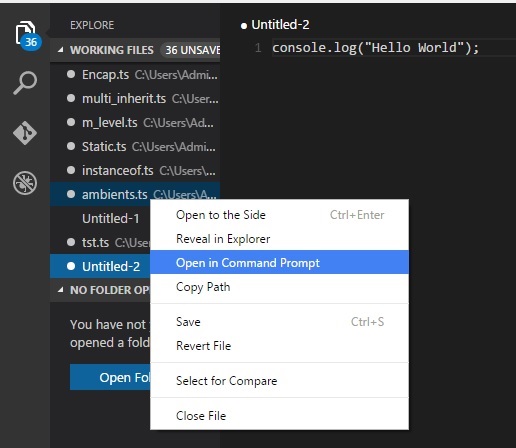
You may directly traverse to the file’s path by a right-click on the file → open in command prompt. Similarly, the Reveal in Explorer option shows the file in the File Explorer.
Installation on Mac OS X
Visual Studio Code’s Mac OS X specific installation guide can be found at https://code.visualstudio.com/docs/setup/setup-overview
Installation on Linux
Linux specific installation guide for Visual Studio Code can be found at https://code.visualstudio.com/Docs/editor/setup.
Brackets
Brackets is a free open-source editor for web development, created by Adobe Systems. It is available for Linux, Windows and Mac OS X. Brackets is available at http://brackets.io.
You can run DOS prompt/Shell within Brackets itself by adding one more extension Brackets Shell.

Upon installation, you will find an icon of shell on the right hand side of the editor  . Once you click on the icon, you will see the shell window as shown in the following screenshot.
You are all set!!!
ES6 - Syntax
Syntax defines the set of rules for writing programs. Every language specification defines its own syntax.
A JavaScript program can be composed of −
Variables − Represents a named memory block that can store values for the program.
Literals − Represents constant/fixed values.
Operators − Symbols that define how the operands will be processed.
Keywords − Words that have a special meaning in the context of a language.
The following table lists some keywords in JavaScript. Some commonly used keywords are listed in the following table.
| break | as | any | Switch |
| case | if | throw | Else |
| var | number | string | Get |
| module | type | instanceof | Typeof |
| finally | for | enum | Export |
| while | void | this | New |
| null | super | Catch | let |
| static | return | True | False |
Modules − Represents code blocks that can be reused across different programs/scripts.
Comments − Used to improve code readability. These are ignored by the JavaScript engine.
Identifiers − These are the names given to elements in a program like variables, functions, etc. The rules for identifiers are −
Identifiers can include both, characters and digits. However, the identifier cannot begin with a digit.
Identifiers cannot include special symbols except for underscore (_) or a dollar sign ($).
Identifiers cannot be keywords. They must be unique.
Identifiers are case sensitive. Identifiers cannot contain spaces.
The following table illustrates some valid and invalid identifiers.
| Examples of valid identifiers | Examples of invalid identifiers |
|---|---|
firstName first_name num1 $result |
Var# first name first-name 1number |
Whitespace and Line Breaks
ES6 ignores spaces, tabs, and newlines that appear in programs. You can use spaces, tabs, and newlines freely in your program and you are free to format and indent your programs in a neat and consistent way that makes the code easy to read and understand.
JavaScript is Case-sensitive
JavaScript is case-sensitive. This means that JavaScript differentiates between the uppercase and the lowercase characters.
Semicolons are Optional
Each line of instruction is called a statement. Semicolons are optional in JavaScript.
Example
console.log("hello world")
console.log("We are learning ES6")
A single line can contain multiple statements. However, these statements must be separated by a semicolon.
Comments in JavaScript
Comments are a way to improve the readability of a program. Comments can be used to include additional information about a program like the author of the code, hints about a function/construct, etc. Comments are ignored by the compiler.
JavaScript supports the following types of comments −
Single-line comments (//) − Any text between a // and the end of a line is treated as a comment.
Multi-line comments (/* */) − These comments may span multiple lines.
Example
//this is single line comment
/* This is a
Multi-line comment
*/
Your First JavaScript Code
Let us start with the traditional “Hello World” example".
var message = "Hello World"
console.log(message)
The program can be analyzed as −
Line 1 declares a variable by the name message. Variables are a mechanism to store values in a program.
Line 2 prints the variable’s value to the prompt. Here, the console refers to the terminal window. The function log () is used to display the text on the screen.
Executing the Code
We shall use Node.js to execute our code.
Step 1 − Save the file as Test.js
Step 2 − Right-click the Test.js file under the working files option in the project-explorer window of the Visual Studio Code.
Step 3 − Select Open in Command Prompt option.
Step 4 − Type the following command in Node’s terminal window.
node Test.js
The following output is displayed on successful execution of the file.
Hello World
Node.js and JS/ES6
ECMAScript 2015(ES6) features are classified into three groups −
For Shipping − These are features that V8 considers stable.
Staged Features − These are almost completed features but not considered stable by the V8 team.
In Progress − These features should be used only for testing purposes.
The first category of features is fully supported and turned on by default by node. Staged features require a runtime - - harmony flag to execute.
A list of component specific CLI flags for Node.js can be found here − https://nodejs.org/api/cli.html
The Strict Mode
The fifth edition of the ECMAScript specification introduced the Strict Mode. The Strict Mode imposes a layer of constraint on JavaScript. It makes several changes to normal JavaScript semantics.
The code can be transitioned to work in the Strict Mode by including the following −
// Whole-script strict mode syntax
"use strict";
 v = "Hi!  I'm a strict mode script!";  // ERROR: Variable v is not declared
In the above snippet, the entire code runs as a constrained variant of JavaScript.
JavaScript also allows to restrict, the Strict Mode within a block’s scope as that of a function. This is illustrated as follows −
v = 15
function f1() {
   "use strict";
   var v = "Hi!  I'm a strict mode script!";
}
In, the above snippet, any code outside the function will run in the non-strict mode. All statements within the function will be executed in the Strict Mode.
ES6 and Hoisting
The JavaScript engine, by default, moves declarations to the top. This feature is termed as hoisting. This feature applies to variables and functions. Hoisting allows JavaScript to use a component before it has been declared. However, the concept of hoisting does not apply to scripts that are run in the Strict Mode.
Variable Hoisting and Function Hoisting are explained in the subsequent chapters.
ES6 - Variables
A variable, by definition, is “a named space in the memory” that stores values. In other words, it acts as a container for values in a program. Variable names are called identifiers. Following are the naming rules for an identifier −
Identifiers cannot be keywords.
Identifiers can contain alphabets and numbers.
Identifiers cannot contain spaces and special characters, except the underscore (_) and the dollar ($) sign.
Variable names cannot begin with a number.
Type Syntax
A variable must be declared before it is used. ES5 syntax used the var keyword to achieve the same. The ES5 syntax for declaring a variable is as follows.
//Declaration using var keyword
var  variable_name
ES6 introduces the following variable declaration syntax −
- Using the let.
- Using the const.
Variable initialization refers to the process of storing a value in the variable. A variable may be initialized either at the time of its declaration or at a later point in time.
The traditional ES5 type syntax for declaring and initializing a variable is as follows −
//Declaration using var keyword
var variable_name = value
Example : Using Variables
var name = "Tom"
console.log("The value in the variable is: "+name)
The above example declares a variable and prints its value.
The following output is displayed on successful execution.
The value in the variable is Tom
JavaScript and Dynamic Typing
JavaScript is an un-typed language. This means that a JavaScript variable can hold a value of any data type. Unlike many other languages, you don't have to tell JavaScript during variable declaration what type of value the variable will hold. The value type of a variable can change during the execution of a program and JavaScript takes care of it automatically. This feature is termed as dynamic typing.
JavaScriptVariable Scope
The scope of a variable is the region of your program in which it is defined. Traditionally, JavaScript defines only two scopes-global and local.
Global Scope − A variable with global scope can be accessed from within any part of the JavaScript code.
Local Scope − A variable with a local scope can be accessed from within a function where it is declared.
Example : Global vs. Local Variable
The following example declares two variables by the name num - one outside the function (global scope) and the other within the function (local scope).
var num = 10
function test() {
   var num = 100
   console.log("value of num in test() "+num)
}
console.log("value of num outside test() "+num)
test()
The variable when referred to within the function displays the value of the locally scoped variable. However, the variable num when accessed outside the function returns the globally scoped instance.
The following output is displayed on successful execution.
value of num outside test() 10
value of num in test() 100
ES6 defines a new variable scope - The Block scope.
The Let and Block Scope
The block scope restricts a variable’s access to the block in which it is declared. The var keyword assigns a function scope to the variable. Unlike the var keyword, the let keyword allows the script to restrict access to the variable to the nearest enclosing block.
"use strict"
function test() {
   var num = 100
   console.log("value of num in test() "+num) {
      console.log("Inner Block begins")
      let num = 200
      console.log("value of num : "+num)
   }
}
test()
The script declares a variable num within the local scope of a function and re-declares it within a block using the let keyword. The value of the locally scoped variable is printed when the variable is accessed outside the inner block, while the block scoped variable is referred to within the inner block.
Note − The strict mode is a way to opt in to a restricted variant of JavaScript.
The following output is displayed on successful execution.
value of num in test() 100
Inner Block begins
value of num : 200
Example: let v/s var
var no = 10;
var no = 20;
console.log(no);
The following output is displayed on successful execution of the above code.
20
Let us re-write the same code using the let keyword.
let no = 10;
let no = 20;
console.log(no);
The above code will throw an error: Identifier 'no' has already been declared. Any variable declared using the let keyword is assigned the block scope.
let and block level safety
If we try to declare a let variable twice within the same block, it will throw an error. Consider the following example −
<script>
   let balance = 5000 // number type
   console.log(typeof balance)
   let balance = {message:"hello"} // changing number to object type
   console.log(typeof balance)
</script>
The above code will result in the following error −
Uncaught SyntaxError: Identifier 'balance' has already been declared
let and multiple blocks
However, the same let variable can be used in different block level scopes without any syntax errors.
Example
<script>
   let count = 100
   for (let count = 1;count <= 10;count++){
      //inside for loop brackets ,count value starts from 1
      console.log("count value inside loop is ",count);
   }
   //outside for loop brackets ,count value is 100
   console.log("count value after loop is",count);

   if(count == 100){
      //inside if brackets ,count value is 50
      let count = 50;
      console.log("count inside if block",count);
   }
   console.log(count);
</script>
The output of the above code will be as follows −
count value inside loop is 1
count value inside loop is 2
count value inside loop is 3
count value inside loop is 4
count value inside loop is 5
count value inside loop is 6
count value inside loop is 7
count value inside loop is 8
count value inside loop is 9
count value inside loop is 10
count value after loop is 100
count inside if block 50
100
The const
The const declaration creates a read-only reference to a value. It does not mean the value it holds is immutable, just that the variable identifier cannot be reassigned. Constants are block-scoped, much like variables defined using the let statement. The value of a constant cannot change through re-assignment, and it can't be re-declared.
The following rules hold true for a variable declared using the const keyword −
- Constants cannot be reassigned a value.
- A constant cannot be re-declared.
- A constant requires an initializer. This means constants must be initialized during its declaration.
- The value assigned to a const variable is mutable.
Example
const x = 10
x = 12 // will result in an error!!
The above code will return an error since constants cannot be reassigned a value. Constants variable are immutable.
Constants are Immutable
Unlike variables declared using let keyword, constants are immutable. This means its value cannot be changed. For example, if we try to change value of the constant variable, an error will be displayed.
<script>
   let income = 100000
   const INTEREST_RATE = 0.08
   income += 50000 // mutable
   console.log("changed income value is ",income)
   INTEREST_RATE += 0.01
   console.log("changed rate is ",INTEREST_RATE) //Error: not mutable
</script>
The output of the above code will be as follows −
changed income value is 150000
Uncaught TypeError: Assignment to constant variable
const and arrays
The following example shows how to create an immutable array. New elements can be added to the array. However, reinitializing the array will result in an error as shown below −
<script>
   const DEPT_NOS = [10,20,30,50]
   DEPT_NOS.push(40)
   console.log('dept numbers is ',DEPT_NOS)

   const EMP_IDS = [1001,1002,1003]
   console.log('employee ids',EMP_IDS)
   //re assigning variable employee ids
   EMP_IDS = [2001,2002,2003]
   console.log('employee ids after changing',EMP_IDS)
</script>
The output of the above code will be as shown below −
dept numbers is (5) [10, 20, 30, 50, 40]
employee ids (3) [1001, 1002, 1003]
Uncaught TypeError: Assignment to constant variable.
The var keyword
Prior to ES6, the var keyword was used to declare a variable in JavaScript. Variables declared using var do not support block level scope. This means if a variable is declared in a loop or if block it can be accessed outside the loop or the if block. This is because the variables declared using the var keyword support hoisting.
var and hoisting
Variable hoisting allows the use of a variable in a JavaScript program, even before it is declared. Such variables will be initialized to undefined by default. JavaScript runtime will scan for variable declarations and put them to the top of the function or script. Variables declared with var keyword get hoisted to the top. Consider the following example −
<script>
   variable company is hoisted to top , var company = undefined
   console.log(company); // using variable before declaring
   var company = "TutorialsPoint"; // declare and initialized here
   console.log(company);
</script>
The output of the above code will be as shown below −
undefined
TutorialsPoint
var and block scope
The block scope restricts a variable’s access to the block in which it is declared. The var keyword assigns a function scope to the variable. Variables declared using the var keyword do not have a block scope. Consider the following example −
<script>
   //hoisted to top ; var i = undefined
   for (var i = 1;i <= 5;i++){
      console.log(i);
   }
   console.log("after the loop i value is "+i);
</script>
The output of the above code will be as follows −
1
2
3
4
5
after the loop i value is 6
The variable i is declared inside the for loop using the var keyword. The variable i is accessible outside the loop. However, at times, there might be a need to restrict a variable's access within a block. We cannot use the var keyword in this scenario. ES6 introduces the let keyword to overcome this limitation.
var and block level safety
If we declare the same variable twice using the var keyword within a block, the compiler will not throw an error. However, this may lead to unexpected logical errors at runtime.
<script>
   var balance = 5000
   console.log(typeof balance)
   var balance = {message:"hello"}
   console.log(typeof balance)
</script>
The output of the above code is as shown below −
number
object
ES6 - Operators
An expression is a special kind of statement that evaluates to a value. Every expression is composed of −
Operands − Represents the data.
Operator − Defines how the operands will be processed to produce a value.
Consider the following expression- 2 + 3. Here in the expression, 2 and 3 are operands and the symbol + (plus) is the operator. JavaScript supports the following types of operators −
- Arithmetic operators
- Logical operators
- Relational operators
- Bitwise operators
- Assignment operators
- Ternary/conditional operators
- String operators
- Type operators
- The void operator
Arithmetic Operators
Assume the values in variables a and b are 10 and 5 respectively.
| Operator | Function | Example |
|---|---|---|
| + | Addition
Returns the sum of the operands. |
a + b is 15 |
| - | Subtraction
Returns the difference of the values. |
a-b is 5 |
| * | Multiplication
Returns the product of the values. |
a*b is 50 |
| / | Division
Performs a division operation and returns the quotient. |
a/b is 2 |
| % | Modulus
Performs a division and returns the remainder. |
a%b is 0 |
| ++ | Increment
Increments the value of the variable by one. |
a++ is 11 |
| -- | Decrement
Decrements the value of the variable by one. |
a-- is 9 |
Relational Operators
Relational operators test or define the kind of relationship between two entities. Relational operators return a boolean value, i.e. true/false.
Assume the value of A is 10 and B is 20.
| Operators | Description | Example |
|---|---|---|
| > | Greater than | (A > B) is False |
| < | Lesser than | (A < B) is True |
| >= | Greater than or equal to | (A >= B) is False |
| <= | Lesser than or equal to | (A <= B) is True |
| == | Equality | (A == B) is False |
| != | Not Equal | (A!= B) is True |
Logical Operators
Logical operators are used to combine two or more conditions. Logical operators, too, return a Boolean value. Assume the value of variable A is 10 and B is 20.
| Operators | Description | Example |
|---|---|---|
| && |
And
The operator returns true only if all the expressions specified return true. |
(A > 10 && B > 10) is False |
| || |
Or
The operator returns true if at least one of the expressions specified return true. |
(A > 10 || B > 10) is True |
| ! |
Not
The operator returns the inverse of the expression’s result. For E.g.: !(7>5) returns false. |
!(A > 10) is True |
Bitwise Operators
JavaScript supports the following bitwise operators. The following table summarizes JavaScript's bitwise operators.
| Operators | Usage | Description |
|---|---|---|
| Bitwise AND | a & b | Returns a one in each bit position for which the corresponding bits of both operands are ones |
| Bitwise OR | a | b | Returns a one in each bit position for which the corresponding bits of either or both operands are ones |
| Bitwise XOR | a^b | Returns a one in each bit position for which the corresponding bits of either but not both operands are ones |
| Bitwise NOT | ~ a | Inverts the bits of its operand |
| Left shift | a << b | Shifts a in binary representation b (< 32) bits to the left, shifting in zeroes from the right |
| Sign-propagating right shift | a >> b | Shifts a in binary representation b (< 32) bits to the right, discarding bits shifted off |
| Zero-fill right shift | a >>> b | Shifts a in binary representation b (< 32) bits to the right, discarding bits shifted off, and shifting in zeroes from the left |
Assignment Operators
The following table summarizes Assignment operators.
| Sr.No | Operator & Description |
|---|---|
| 1 |
= (Simple Assignment) Assigns values from the right side operand to the left side operand. Example − C = A + B will assign the value of A + B into C |
| 2 |
+= (Add and Assignment) It adds the right operand to the left operand and assigns the result to the left operand. Example − C += A is equivalent to C = C + A |
| 3 |
-= (Subtract and Assignment) It subtracts the right operand from the left operand and assigns the result to the left operand. Example C -= A is equivalent to C = C - A |
| 4 |
*= (Multiply and Assignment) It multiplies the right operand with the left operand and assigns the result to the left operand. Example C *= A is equivalent to C = C * A |
| 5 |
/= (Divide and Assignment) It divides the left operand with the right operand and assigns the result to the left operand. |
Note − The same logic applies to Bitwise operators, so they will become <<=, >>=, >>=, &=, |= and ^=.
Miscellaneous Operators
Following are some of the miscellaneous operators.
The negation operator (-)
Changes the sign of a value. The following program is an example of the same.
var x = 4
var y = -x;
console.log("value of x: ",x); //outputs 4
console.log("value of y: ",y); //outputs -4
The following output is displayed on successful execution of the above program.
value of x: 4
value of y: -4
String Operators : Concatenation operator (+)
The + operator when applied to strings appends the second string to the first. The following program helps to understand this concept.
var msg = "hello"+"world"
console.log(msg)
The following output is displayed on successful execution of the above program.
helloworld
The concatenation operation doesn’t add a space between the strings. Multiple strings can be concatenated in a single statement.
Conditional Operator (?)
This operator is used to represent a conditional expression. The conditional operator is also sometimes referred to as the ternary operator. Following is the syntax.
Test ? expr1 : expr2
Where,
Test − Refers to the conditional expression
expr1 − Value returned if the condition is true
expr2 − Value returned if the condition is false
Example
var num = -2
var result = num > 0 ?"positive":"non-positive"
console.log(result)
Line 2 checks whether the value in the variable num is greater than zero. If num is set to a value greater than zero, it returns the string “positive” else a “non-positive” string is returned.
The following output is displayed on successful execution of the above program.
non-positive
typeof operator
It is a unary operator. This operator returns the data type of the operand. The following table lists the data types and the values returned by the typeof operator in JavaScript.
| Type | String Returned by typeof |
|---|---|
| Number | "number" |
| String | "string" |
| Boolean | "boolean" |
| Object | "object" |
The following example code displays the number as the output.
var num = 12
console.log(typeof num); //output: number
The following output is displayed on successful execution of the above code.
number
Spread Operator
ES6 provides a new operator called the spread operator. The spread operator is represented by three dots “...” . The spread operator converts an array into individual array elements.
Spread operator and function
The following example illustrates the use of spread operators in a function
<script>
   function addThreeNumbers(a,b,c){
      return a+b+c;
   }
   const arr = [10,20,30]
   console.log('sum is :',addThreeNumbers(...arr))
   console.log('sum is ',addThreeNumbers(...[1,2,3]))
</script>
The output of the above code will be as seen below −
sum is : 60
sum is 6
Spread operator and Array copy and concat
The spread operator can be used to copy one array into another. It can also be used to concatenate two or more arrays. This is shown in the example below −
Example
<script>
   //copy array using spread operator
   let source_arr = [10,20,30]
   let dest_arr = [...source_arr]
   console.log(dest_arr)

   //concatenate two arrays
   let arr1 = [10,20,30]
   let arr2 =[40,50,60]
   let arr3 = [...arr1,...arr2]
   console.log(arr3)
</script>
The output of the above code will be as stated below −
[10, 20, 30]
[10, 20, 30, 40, 50, 60]
Spread Operator and Object copy and concatenation
The spread operator can be used to copy one object into another. It can also be used to concatenate two or more objects. This is shown in the example below −
<script>
   //copy object
   let student1 ={firstName:'Mohtashim',company:'TutorialsPoint'}
   let student2 ={...student1}
   console.log(student2)
   //concatenate objects
   let student3 = {lastName:'Mohammad'}
   let student4 = {...student1,...student3}
   console.log(student4)
</script>
The output of the above code will be as given below −
{firstName: "Mohtashim", company: "TutorialsPoint"}
{firstName: "Mohtashim", company: "TutorialsPoint", lastName: "Mohammad"}
ES6 - Decision Making
A conditional/decision-making construct evaluates a condition before the instruction/s are executed.
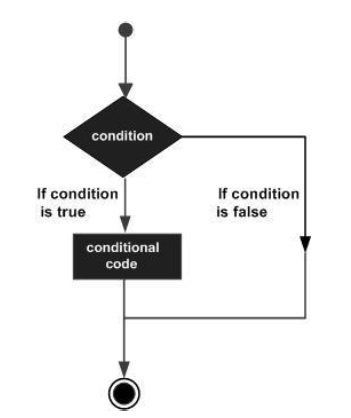
Conditional constructs in JavaScript are classified in the following table.
| Sr.No | Statement & Description |
|---|---|
| 1 | if Statement
An ‘if’ statement consists of a Boolean expression followed by one or more statements . |
| 2 | if…else Statement
An ‘if’ statement can be followed by an optional ‘else’ statement, which executes when the Boolean expression is false. |
| 3 | The else.. if ladder/nested if statements
The else…if ladder is useful to test multiple conditions. Following is the syntax of the same. |
| 4 | switch…case Statement
The switch statement evaluates an expression, matches the expression’s value to a case clause and executes the statements associated with that case. |
ES6 - Loops
At times, certain instructions require repeated execution. Loops are an ideal way to do the same. A loop represents a set of instructions that must be repeated. In a loop’s context, a repetition is termed as an iteration.
The following figure illustrates the classification of loops −
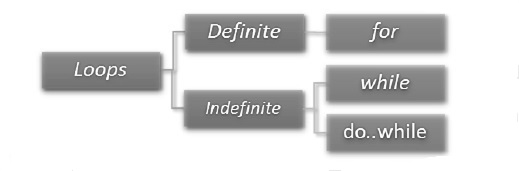
Definite Loop
A loop whose number of iterations are definite/fixed is termed as a definite loop. The ‘for loop’ is an implementation of a definite loop.
for (initial_count_value; termination-condition; step) {
   //statements
}
| Sr.No | Definite Loop & Description |
|---|---|
| 1 | The ‘for’ loop
The for loop executes the code block for a specified number of times. |
| 2 | The for…in loop
The for...in loop is used to loop through an object's properties. |
| 3 | The for…of loop
The for…of loop is used to iterate iterables instead of object literals. |
Indefinite Loop
An indefinite loop is used when the number of iterations in a loop is indeterminate or unknown.
Indefinite loops can be implemented using −
| Sr.No | Indefinite Loop & Description |
|---|---|
| 1 | The while loop
The while loop executes the instructions each time the condition specified evaluates to true. |
| 2 | The do…while loop
The do…while loop is similar to the while loop except that the do...while loop doesn’t evaluate the condition for the first time the loop executes. |
The Loop Control Statements
| Sr.No | Loop Control Statements & Description |
|---|---|
| 1 | The break statement
The break statement is used to take the control out of a construct. |
| 2 | The continue statement
The continue statement skips the subsequent statements in the current iteration and takes the control back to the beginning of the loop. |
Using Labels to Control the Flow
A label is simply an identifier followed by a colon (:) that is applied to a statement or a block of code. A label can be used with break and continue to control the flow more precisely.
Line breaks are not allowed between the ‘continue’ or ‘break’ statement and its label name. Also, there should not be any other statement in between a label name and an associated loop
| Sr.No | Label & Description |
|---|---|
| 1 | Label with Break
A label can be used with break and continue to control the flow more precisely. |
| 2 | Label with Continue
Line breaks are not allowed between the ‘continue’ or ‘break’ statement and its label name. |
ES6 - Functions
Functions are the building blocks of readable, maintainable, and reusable code. Functions are defined using the function keyword. Following is the syntax for defining a standard function.
function function_name() {
   // function body
}
To force execution of the function, it must be called. This is called as function invocation. Following is the syntax to invoke a function.
function_name()
Example : Simple function definition
//define a  function
function test() {
   console.log("function called")
}
//call the function
test()
The example defines a function test(). A pair of delimiters ( { } ) define the function body. It is also called as the function scope. A function must be invoked to force its execution.
The following output is displayed on successful execution of the above code.
function called
Classification of Functions
Functions may be classified as Returning and Parameterized functions.
Returning functions
Functions may also return the value along with control, back to the caller. Such functions are called as returning functions.
Following is the syntax for the returning function.
function function_name() {
   //statements
   return value;
}
A returning function must end with a return statement.
A function can return at the most one value. In other words, there can be only one return statement per function.
The return statement should be the last statement in the function.
The following code snippet is an example of a returning function −
function retStr() {
   return "hello world!!!"
}
var val = retStr()
console.log(val)
The above Example defines a function that returns the string “hello world!!!” to the caller. The following output is displayed on successful execution of the above code.
hello world!!!
Parameterized functions
Parameters are a mechanism to pass values to functions. Parameters form a part of the function’s signature. The parameter values are passed to the function during its invocation. Unless explicitly specified, the number of values passed to a function must match the number of parameters defined.
Following is the syntax defining a parameterized function.
function func_name( param1,param2 ,…..paramN) {
   ......
   ......
}
Example − Parameterized Function
The Example defines a function add that accepts two parameters n1 and n2 and prints their sum. The parameter values are passed to the function when it is invoked.
function add( n1,n2) {
   var sum = n1 + n2
   console.log("The sum of the values entered "+sum)
}
add(12,13)
The following output is displayed on successful execution of the above code.
The sum of the values entered 25
Default function parameters
In ES6, a function allows the parameters to be initialized with default values, if no values are passed to it or it is undefined. The same is illustrated in the following code.
function add(a, b = 1) {
   return a+b;
}
console.log(add(4))
The above function, sets the value of b to 1 by default. The function will always consider the parameter b to bear the value 1 unless a value has been explicitly passed. The following output is displayed on successful execution of the above code.
5
The parameter’s default value will be overwritten if the function passes a value explicitly.
function add(a, b = 1) {
   return a + b;
}
console.log(add(4,2))
The above code sets the value of the parameter b explicitly to 2, thereby overwriting its default value. The following output is displayed on successful execution of the above code.
6
For better understanding, let us consider the below example.
Example 1
The following example shows a function which takes two parameters and returns their sum. The second parameter has a default value of 10. This means, if no value is passed to the second parameter, its value will be 10.
<script>
   function addTwoNumbers(first,second = 10){
      console.log('first parameter is :',first)
      console.log('second parameter is :',second)
      return first+second;
   }

   console.log("case 1 sum:",addTwoNumbers(20)) // no value
   console.log("case 2 sum:",addTwoNumbers(2,3))
   console.log("case 3 sum:",addTwoNumbers())
   console.log("case 4 sum",addTwoNumbers(1,null))//null passed
   console.log("case 5 sum",addTwoNumbers(3,undefined))
</script>
The output of the above code will be as mentioned below −
first parameter is : 20
second parameter is : 10
case 1 sum: 30
first parameter is : 2
second parameter is : 3
case 2 sum: 5
first parameter is : undefined
second parameter is : 10
case 3 sum: NaN
first parameter is : 1
second parameter is : null
case 4 sum 1
first parameter is : 3
second parameter is : 10
case 5 sum 13
Example 2
<script>
   let DEFAULT_VAL = 30
      function addTwoNumbers(first,second = DEFAULT_VAL){
         console.log('first parameter is :',first)
         console.log('second parameter is :',second)
         return first+second;
      }
      console.log("case 1 sum",addTwoNumbers(1))
      console.log("case 2 sum",addTwoNumbers(3,undefined))
</script>
The output of the above code will be as shown below −
first parameter is : 1
second parameter is : 30
case 1 sum 31
first parameter is : 3
second parameter is : 30
case 2 sum 33
Rest Parameters
Rest parameters are similar to variable arguments in Java. Rest parameters doesn’t restrict the number of values that you can pass to a function. However, the values passed must all be of the same type. In other words, rest parameters act as placeholders for multiple arguments of the same type.
To declare a rest parameter, the parameter name is prefixed with three periods, known as the spread operator. The following example illustrates the same.
function fun1(...params) {
   console.log(params.length);
}
fun1();
fun1(5);
fun1(5, 6, 7);
The following output is displayed on successful execution of the above code.
0
1
3
Note − Rest parameters should be the last in a function’s parameter list.
Anonymous Function
Functions that are not bound to an identifier (function name) are called as anonymous functions. These functions are dynamically declared at runtime. Anonymous functions can accept inputs and return outputs, just as standard functions do. An anonymous function is usually not accessible after its initial creation.
Variables can be assigned an anonymous function. Such an expression is called a function expression.
Following is the syntax for anonymous function.
var res = function( [arguments] ) { ... }
Example − Anonymous Function
var f = function(){ return "hello"}
console.log(f())
The following output is displayed on successful execution of the above code.
hello
Example − Anonymous Parameterized Function
var func = function(x,y){ return x*y };
function product() {
   var result;
   result = func(10,20);
   console.log("The product : "+result)
}
product()
The following output is displayed on successful execution of the above code.
The product : 200
The Function Constructor
The function statement is not the only way to define a new function; you can define your function dynamically using Function() constructor along with the new operator.
Following is the syntax to create a function using Function() constructor along with the new operator.
var variablename = new Function(Arg1, Arg2..., "Function Body");
The Function() constructor expects any number of string arguments. The last argument is the body of the function – it can contain arbitrary JavaScript statements, separated from each other by semicolons.
The Function() constructor is not passed any argument that specifies a name for the function it creates.
Example − Function Constructor
var func = new Function("x", "y", "return x*y;");
function product() {
   var result;
   result = func(10,20);
   console.log("The product : "+result)
}
product()
In the above example, the Function() constructor is used to define an anonymous function. The function accepts two parameters and returns their product.
The following output is displayed on successful execution of the above code.
The product : 200
Recursion and JavaScript Functions
Recursion is a technique for iterating over an operation by having a function call itself repeatedly until it arrives at a result. Recursion is best applied when you need to call the same function repeatedly with different parameters from within a loop.
Example − Recursion
function factorial(num) {
   if(num <= 0) {
      return 1;
   } else {
      return (num * factorial(num-1)  )
   }
}
console.log(factorial(6))
In the above example the function calls itself. The following output is displayed on successful execution of the above code.
720
Example − Anonymous Recursive Function
(function() {
   var msg = "Hello World"
   console.log(msg)
})()
The function calls itself using a pair of parentheses (). The following output is displayed on successful execution of the above code.
Hello World
Lambda Functions
Lambda refers to anonymous functions in programming. Lambda functions are a concise mechanism to represent anonymous functions. These functions are also called as Arrow functions.
Lambda Function - Anatomy
There are 3 parts to a Lambda function −
Parameters − A function may optionally have parameters.
The fat arrow notation/lambda notation (=>): It is also called as the goes to operator.
Statements − Represents the function’s instruction set.
Tip − By convention, the use of a single letter parameter is encouraged for a compact and precise function declaration.
Lambda Expression
It is an anonymous function expression that points to a single line of code. Following is the syntax for the same.
([param1, parma2,…param n] )=>statement;
Example − Lambda Expression
var foo = (x)=>10+x
console.log(foo(10))
The Example declares a lambda expression function. The function returns the sum of 10 and the argument passed.
The following output is displayed on successful execution of the above code.
20
Lambda Statement
It is an anonymous function declaration that points to a block of code. This syntax is used when the function body spans multiple lines. Following is the syntax of the same.
( [param1, parma2,…param n] )=> {
   //code block
}
Example − Lambda Statement
var msg = ()=> {
   console.log("function invoked")
}
msg()
The function’s reference is returned and stored in the variable msg. The following output is displayed on successful execution of the above code.
function invoked
Syntactic Variations
Optional parentheses for a single parameter.
var msg = x=> {
   console.log(x)
}
msg(10)
Optional braces for a single statement. Empty parentheses for no parameter.
var disp = ()=>console.log("Hello World")
disp();
Function Expression and Function Declaration
Function expression and function declaration are not synonymous. Unlike a function expression, a function declaration is bound by the function name.
The fundamental difference between the two is that, function declarations are parsed before their execution. On the other hand, function expressions are parsed only when the script engine encounters it during an execution.
When the JavaScript parser sees a function in the main code flow, it assumes function declaration. When a function comes as a part of a statement, it is a function expression.
Function Hoisting
Like variables, functions can also be hoisted. Unlike variables, function declarations when hoisted, hoists the function definition rather than just hoisting the function’s name.
The following code snippet, illustrates function hoisting in JavaScript.
hoist_function();
function hoist_function() {
   console.log("foo");
}
The following output is displayed on successful execution of the above code.
foo
However, function expressions cannot be hoisted. The following code snippet illustrates the same.
hoist_function(); // TypeError: hoist_function() is not a function
var hoist_function() = function() {
   console.log("bar");
};
Immediately Invoked Function Expression
Immediately Invoked Function Expressions (IIFEs) can be used to avoid variable hoisting from within blocks. It allows public access to methods while retaining privacy for variables defined within the function. This pattern is called as a self-executing anonymous function. The following two examples better explain this concept.
Example 1 : IIFE
var main = function() {
   var loop = function() {
      for(var x = 0;x<5;x++) {
         console.log(x);
      }
   }();
   console.log("x can not be accessed outside the block scope x value is :"+x);
}
main();
Example 2 : IIFE
var main = function() {
   (function() {
      for(var x = 0;x<5;x++) {
         console.log(x);
      }
   })();
   console.log("x can not be accessed outside the block scope x value is :"+x);
}
main();
Both the Examples will render the following output.
0
1
2
3
4
Uncaught ReferenceError: x is not define
Generator Functions
When a normal function is invoked, the control rests with the function called until it returns. With generators in ES6, the caller function can now control the execution of a called function. A generator is like a regular function except that −
The function can yield control back to the caller at any point.
When you call a generator, it doesn’t run right away. Instead, you get back an iterator. The function runs as you call the iterator’s next method.
Generators are denoted by suffixing the function keyword with an asterisk; otherwise, their syntax is identical to regular functions.
The following example illustrates the same.
"use strict"
function* rainbow() {
   // the asterisk marks this as a generator
   yield 'red';
   yield 'orange';
   yield 'yellow';
   yield 'green';
   yield 'blue';
   yield 'indigo';
   yield 'violet';
}
for(let color of rainbow()) {
   console.log(color);
}
Generators enable two-way communication between the caller and the called function. This is accomplished by using the yield keyword.
Consider the following example −
function* ask() {
   const name = yield "What is your name?";
   const sport = yield "What is your favorite sport?";
   return `${name}'s favorite sport is ${sport}`;
}
const it = ask();
console.log(it.next());
console.log(it.next('Ethan'));
console.log(it.next('Cricket'));
Sequence of the generator function is as follows −
Generator started in paused stated; iterator is returned.
The it.next() yields “What is your name”. The generator is paused. This is done by the yield keyword.
The call it.next(“Ethan”) assigns the value Ethan to the variable name and yields “What is your favorite sport?” Again the generator is paused.
The call it.next(“Cricket”) assigns the value Cricket to the variable sport and executes the subsequent return statement.
Hence, the output of the above code will be −
{
   value: 'What is your name?', done: false
}
{
   value: 'What is your favorite sport?', done: false
}
{
   value: 'Ethan\'s favorite sport is Cricket', done: true
}
Note − Generator functions cannot be represented using arrow functions.
Arrow Functions
Arrow functions which are introduced in ES helps in writing the functions in JavaScript in a concise manner. Let us now learn about the same in detail.
ES5 and Anonymous functions
JavaScript makes heavy use of anonymous functions. An anonymous function is a function that does not have a name attached to it. Anonymous functions are used during function callback. The following example illustrates the use of an anonymous function in ES5 −
<script>
   setTimeout(function(){
      console.log('Learning at TutorialsPoint is fun!!')
   },1000)
</script>
The above example passes an anonymous function as a parameter to the predefined setTimeout() function. The setTimeout() function will callback the anonymous function after 1 second.
The following output is shown after 1 second −
Learning at TutorialsPoint is fun!!
Arrow Function Syntax
ES6 introduces the concept of arrow function to simplify the usage of anonymous function. There are 3 parts to an arrow function which are as follows −
Parameters − An arrow function may optionally have parameters
The fat arrow notation (=>) − It is also called as the goes to operator
Statements − Represents the function’s instruction set
Tip − By convention, the use of a single letter parameter is encouraged for a compact and precise arrow function declaration.
Syntax
//Arrow function that points to a single line of code
()=>some_expression
OR
//Arrow function that points to a block of code
()=> { //some statements }`
OR
//Arrow function with parameters
(param1,param2)=>{//some statement}
Example: Arrow function in ES6
The following example defines two function expressions add and isEven using arrow function
<script>
   const add = (n1,n2) => n1+n2
   console.log(add(10,20))

   const isEven = (n1) => {
      if(n1%2 == 0)
         return true;
      else
         return false;
   }
   console.log(isEven(10))
</script>
The output of the above code will be as mentioned below −
30
true
Array.prototype.map() and arrow function
In the following example, an arrow function is passed as a parameter to the Array.prototype.map() function. The map() function executes the arrow function for each element in the array. The arrow function in this case, displays each element in the array and its index.
<script>
   const names = ['TutorialsPoint','Mohtashim','Bhargavi','Raja']
   names.map((element,index)=> {
      console.log('inside arrow function')
      console.log('index is '+index+' element value is :'+element)
   })
</script>
The output of the above code will be as given below −
inside arrow function
index is 0 element value is :TutorialsPoint
inside arrow function
index is 1 element value is :Mohtashim
inside arrow function
index is 2 element value is :Bhargavi
inside arrow function
index is 3 element value is :Raja
Example: window.setTimeout() and arrow function
The following example passes an arrow function as a parameter to the predefined setTimeout() function. The setTimeout() function will callback the arrow function after 1 second.
<script>
   setTimeout(()=>{
      console.log('Learning at TutorialsPoint is fun!!')
   },1000)
</script>
The following output is shown after 1 second −
Learning at TutorialsPoint is fun!!
Arrow function and “this”
Inside an arrow function if we use this pointer, it will point to the enclosing lexical scope. This means arrow functions do not create a new this pointer instance whenever it is invoked. Arrow functions makes use of its enclosing scope. To understand this, let us see an example.
<script>
   //constructor function
   function Student(rollno,firstName,lastName) {
      this.rollno = rollno;
      this.firstName = firstName;
      this.lastName = lastName;
      this.fullNameUsingAnonymous = function(){
         setTimeout(function(){
            //creates a new instance of this ,hides outer scope of this
            console.log(this.firstName+ " "+this.lastName)
         },2000)
      }
      this.fullNameUsingArrow = function(){
         setTimeout(()=>{
            //uses this instance of outer scope
            console.log(this.firstName+ " "+this.lastName)
         },3000)
      }
   }
   const s1 = new Student(101,'Mohammad','Mohtashim')
   s1.fullNameUsingAnonymous();
   s1.fullNameUsingArrow();
</script>
When an anonymous function is used with setTimeout(), the function gets invoked after 2000 milliseconds. A new instance of “this” is created and it shadows the instance of the Student function. So, the value of this.firstName and this.lastName will be undefined. The function doesn't use the lexical scope or the context of current execution. This problem can be solved by using an arrow function.
The output of the above code will be as follows −
undefined undefined
Mohammad Mohtashim
ES6 - Events
JavaScript is meant to add interactivity to your pages. JavaScript does this using a mechanism using events. Events are a part of the Document Object Model (DOM) Level 3 and every HTML element contains a set of events that can trigger JavaScript Code.
An event is an action or occurrence recognized by the software. It can be triggered by a user or the system. Some common examples of events include a user clicking on a button, loading the web page, clicking on a hyperlink and so on. Following are some of the common HTML events.
Event Handlers
On the occurrence of an event, the application executes a set of related tasks. The block of code that achieves this purpose is called the eventhandler. Every HTML element has a set of events associated with it. We can define how the events will be processed in JavaScript by using event handlers.
onclick Event Type
This is the most frequently used event type which occurs when a user clicks the left button of his mouse. You can put your validation, warning, etc. against this event type.
Example
<html>
   <head>
      <script type = "text/javascript">
         function sayHello() {
            document.write ("Hello World")
         }
      </script>
   </head>

   <body>
      <p> Click the following button and see result</p>
      <input type = "button" onclick = "sayHello()" value = "Say Hello" />
   </body>
</html>
The following output is displayed on successful execution of the above code.

onsubmitEvent Type
onsubmit is an event that occurs when you try to submit a form. You can put your form validation against this event type.
The following example shows how to use onsubmit. Here we are calling a validate() function before submitting a form data to the webserver. If validate() function returns true, the form will be submitted, otherwise it will not submit the data.
Example
<html>
   <head>
      <script type = "text/javascript">
         function validation() {
            all validation goes here
            .........
            return either true or false
         }
      </script>
   </head>

   <body>
      <form method = "POST" action = "t.cgi" onsubmit = "return validate()">
         .......
         <input type = "submit" value = "Submit" />
      </form>
   </body>
</html>
onmouseover and onmouseout
These two event types will help you create nice effects with images or even with text as well. The onmouseover event triggers when you bring your mouse over any element and the onmouseout triggers when you move your mouse out from that element.
Example
<html>
   <head>
      <script type = "text/javascript">
         function over() {
            document.write ("Mouse Over");
         }
         function out() {
            document.write ("Mouse Out");
         }
      </script>
   </head>

   <body>
      <p>Bring your mouse inside the division to see the result:</p>
      <div onmouseover = "over()" onmouseout = "out()">
         <h2> This is inside the division </h2>
      </div>
   </body>
</html>
The following output is displayed on successful execution of the above code.

HTML 5 Standard Events
The standard HTML 5 events are listed in the following table for your reference. The script indicates a JavaScript function to be executed against that event.
| Attribute | Value | Description |
|---|---|---|
| offline | script | Triggers when the document goes offline |
| onabort | script | Triggers on an abort event |
| onafterprint | script | Triggers after the document is printed |
| onbeforeonload | script | Triggers before the document load |
| onbeforeprint | script | Triggers before the document is printed |
| onblur | script | Triggers when the window loses focus |
| oncanplay | script | Triggers when the media can start play, but might have to stop for buffering |
| oncanplaythrough | script | Triggers when the media can be played to the end, without stopping for buffering |
| onchange | script | Triggers when an element changes |
| onclick | script | Triggers on a mouse click |
| oncontextmenu | script | Triggers when a context menu is triggered |
| ondblclick | script | Triggers on a mouse double-click |
| ondrag | script | Triggers when an element is dragged |
| ondragend | script | Triggers at the end of a drag operation |
| ondragenter | script | Triggers when an element has been dragged to a valid drop target |
| ondragleave | script | Triggers when an element leaves a valid drop target |
| ondragover | script | Triggers when an element is being dragged over a valid drop target |
| ondragstart | script | Triggers at the start of a drag operation |
| ondrop | script | Triggers when the dragged element is being dropped |
| ondurationchange | script | Triggers when the length of the media is changed |
| onemptied | script | Triggers when a media resource element suddenly becomes empty |
| onended | script | Triggers when the media has reached the end |
| onerror | script | Triggers when an error occurs |
| onfocus | script | Triggers when the window gets focus |
| onformchange | script | Triggers when a form changes |
| onforminput | script | Triggers when a form gets user input |
| onhaschange | script | Triggers when the document has changed |
| oninput | script | Triggers when an element gets user input |
| oninvalid | script | Triggers when an element is invalid |
| onkeydown | script | Triggers when a key is pressed |
| onkeypress | script | Triggers when a key is pressed and released |
| onkeyup | script | Triggers when a key is released |
| onload | script | Triggers when the document loads |
| onloadeddata | script | Triggers when media data is loaded |
| onloadedmetadata | script | Triggers when the duration and other media data of a media element is loaded |
| onloadstart | script | Triggers when the browser starts to load the media data |
| onmessage | script | Triggers when the message is triggered |
| onmousedown | script | Triggers when a mouse button is pressed |
| onmousemove | script | Triggers when the mouse pointer moves |
| onmouseout | script | Triggers when the mouse pointer moves out of an element |
| onmouseover | script | Triggers when the mouse pointer moves over an element |
| onmouseup | script | Triggers when a mouse button is released |
| onmousewheel | script | Triggers when the mouse wheel is being rotated |
| onoffline | script | Triggers when the document goes offline |
| ononline | script | Triggers when the document comes online |
| onpagehide | script | Triggers when the window is hidden |
| onpageshow | script | Triggers when the window becomes visible |
| onpause | script | Triggers when the media data is paused |
| onplay | script | Triggers when the media data is going to start playing |
| onplaying | script | Triggers when the media data has start playing |
| onpopstate | script | Triggers when the window's history changes |
| onprogress | script | Triggers when the browser is fetching the media data |
| onratechange | script | Triggers when the media data's playing rate has changed |
| onreadystatechange | script | Triggers when the ready-state changes |
| onredo | script | Triggers when the document performs a redo |
| onresize | script | Triggers when the window is resized |
| onscroll | script | Triggers when an element's scrollbar is being scrolled |
| onseeked | script | Triggers when a media element's seeking attribute is no longer true, and the seeking has ended |
| onseeking | script | Triggers when a media element's seeking attribute is true, and the seeking has begun |
| onselect | script | Triggers when an element is selected |
| onstalled | script | Triggers when there is an error in fetching media data |
| onstorage | script | Triggers when a document loads |
| onsubmit | script | Triggers when a form is submitted |
| onsuspend | script | Triggers when the browser has been fetching media data, but stopped before the entire media file was fetched |
| ontimeupdate | script | Triggers when the media changes its playing position |
| onundo | script | Triggers when a document performs an undo |
| onunload | script | Triggers when the user leaves the document |
| onvolumechange | script | Triggers when the media changes the volume, also when the volume is set to "mute" |
| onwaiting | script | Triggers when the media has stopped playing, but is expected to resume |
ES6 - Cookies
Web Browsers and Servers use HTTP protocol to communicate. HTTP is stateless protocol, i.e., it doesn’t maintain the client’s data across multiple requests made by the client. This complete request-response cycle between the client and the server is defined as a session. Cookies are the default mechanism used by browsers to store data pertaining to a user’s session.
How It Works?
Your server sends some data to the visitor's browser in the form of a cookie. The browser may accept the cookie. If it does, it is stored as a plain text record on the visitor's hard drive. Now, when the visitor arrives at another page on your site, the browser sends the same cookie to the server for retrieval. Once retrieved, your server knows/remembers what was stored earlier.
Cookies are plain text data record of 5 variable-length fields.
Expires − The date the cookie will expire. If this is blank, the cookie will expire when the visitor quits the browser.
Domain − The domain name of your site.
Path − The path to the directory or web page that sets the cookie. This may be blank, if you want to retrieve the cookie from any directory or page.
Secure − If this field contains the word "secure", then the cookie may only be retrieved with a secure server. If this field is blank, no such restriction exists.
Name = Value − Cookies are set and retrieved in the form of key-value pairs.
Cookies were originally designed for CGI programming. The data contained in a cookie is automatically transmitted between the web browser and the web server, so CGI scripts on the server can read and write cookie values that are stored on the client side.
JavaScript can also manipulate cookies using the cookie property of the Document object. JavaScript can read, create, modify, and delete the cookies that apply to the current web page.
Storing Cookies
The simplest way to create a cookie is to assign a string value to the document.cookie object, which looks like this.
"document.cookie = "key1 = value1; key2 = value2; expires = date";
Here, the ‘expires’ attribute is optional. If you provide this attribute with a valid date or time, then the cookie will expire on the given date or time and thereafter, the cookies' value will not be accessible.
Note − Cookie values may not include semicolons, commas, or whitespace. For this reason, you may want to use the JavaScript escape() function to encode the value before storing it in the cookie. If you do this, you will also have to use the corresponding unescape() function when you read the cookie value.
Example
<html>
   <head>
      <script type = "text/javascript">
         function WriteCookie() {
            if( document.myform.customer.value == "" ){
               alert ("Enter some value!");
               return;
            }
            cookievalue =  escape(document.myform.customer.value) + ";";
            document.cookie = "name = " + cookievalue;
            document.write ("Setting Cookies : " + "name = " + cookievalue );
         }
      </script>
   </head>

   <body>
      <form name = "myform" action = "">
         Enter name: <input type = "text" name = "customer"/>
         <input type = "button" value = "Set" onclick = "WriteCookie();"/>
      </form>
   </body>
</html>
The following output is displayed on successful execution of the above code.

Now your machine has a cookie called name. You can set multiple cookies using multiple key = value pairs separated by comma.
Reading Cookies
Reading a cookie is just as simple as writing one, because the value of the document.cookie object is the cookie. So you can use this string whenever you want to access the cookie. The document.cookie string will keep a list of name = value pairs separated by semicolons, where the name is the name of a cookie and the value is its string value.
You can use strings' split() function to break a string into key and values as shown in the following example.
Example
<html>
   <head>
      <script type = "text/javascript">
         function ReadCookie() {
            var allcookies  =  document.cookie;
            document.write ("All Cookies : " + allcookies );
         }
         // Get all the cookies pairs in an array
         cookiearray = allcookies.split(';');

         // Now take key value pair out of this array
         for(var i = 0; i<cookiearray.length; i++) {
            name  =  cookiearray[i].split('=')[0];
            value = cookiearray[i].split('=')[1];
            document.write ("Key is : " + name + " and Value is : " + value);
         }
      </script>
   </head>

   <body>
      <form name = "myform" action = "">
         <p> click the following button and see the result:</p>
         <input type = "button" value = "Get Cookie" onclick = "ReadCookie()"/>
      </form>
   </body>
</html>
Note − Here, length is a method of Array class which returns the length of an array.
There may be some other cookies already set on your machine. The above code will display all the cookies set on your machine.
The following output is displayed on successful execution of the above code.

Setting Cookies Expiry Date
You can extend the life of a cookie beyond the current browser session by setting an expiry date and saving the expiry date within the cookie. This can be done by setting the ‘expires’ attribute to a date and time. The following example illustrates how to extend the expiry date of a cookie by 1 month.
Example
<html>
   <head>
      <script type = "text/javascript">
         function WriteCookie() {
            var now = new Date();
            now.setMonth( now.getMonth() + 1 );
            cookievalue = escape(document.myform.customer.value) + ";"
            document.cookie = "name = " + cookievalue;
            document.cookie = "expires = " + now.toUTCString() + ";"
            document.write ("Setting Cookies : " + "name = " + cookievalue );
         }
      </script>
   </head>

   <body>
      <form name = "formname" action = "">
         Enter Cookie Name: <input type = "text" name = "customer"/>
         <input type = "button" value = "Set Cookie" onclick = "WriteCookie()"/>
      </form>
   </body>
</html>
The following output is displayed on successful execution of the above code.

Deleting a Cookie
Sometimes you will want to delete a cookie so that subsequent attempts to read the cookie return nothing. To do this, you just need to set the expiry date to a time in the past. The following example illustrates how to delete a cookie by setting its expiry date to one month behind the current date.
Example
<html>
   <head>
      <script type = "text/javascript">
         function WriteCookie() {
            var now = new Date();
            now.setMonth( now.getMonth() - 1 );
            cookievalue = escape(document.myform.customer.value) + ";"
            document.cookie = "name=" + cookievalue;
            document.cookie = "expires = " + now.toUTCString() + ";"
            document.write("Setting Cookies : " + "name = " + cookievalue );
         }
      </script>
   </head>

   <body>
      <form name = "formname" action = "">
         Enter Cookie Name: <input type = "text" name = "customer"/>
         <input type = "button" value = "Set Cookie" onclick = "WriteCookie()"/>
      </form>
   </body>
</html>
The following output is displayed on successful execution of the above code.

ES6 - Page Redirect
Redirect is a way to send both users and search engines to a different URL from the one they originally requested. Page redirection is a way to automatically redirect a web page to another web page. The redirected page is often on the same website, or it can be on a different website or a web server.
JavaScript Page Redirection
window.location and window.location.href
In JavaScript, you can use many methods to redirect a web page to another one. Almost all methods are related to window.location object, which is a property of the Window object. It can be used to get the current URL address (web address) and to redirect the browser to a new page. Both usages are same in terms of behavior. window.location returns an object. If .href is not set, window.location defaults to change the parameter .href.
Example
<!DOCTYPE html>
<html>
   <head>
      <script>
         function newLocation() {
            window.location = "http://www.xyz.com";
         }
      </script>
   </head>

   <body>
      <input type = "button" value = "Go to new location" onclick = "newLocation()">
   </body>
</html>
location.replace()
The other most frequently used method is the replace() method of window.location object, it will replace the current document with a new one. In replace() method, you can pass a new URL to replace() method and it will perform an HTTP redirect.
Following is the syntax for the same.
window.location.replace("http://www.abc.com
location.assign()
The location.assign() method loads a new document in the browser window.
Following is the syntax for the same.
window.location.assign("http://www.abc.org");
assign() vs. replace()
The difference between assign() and replace() method is that the location.replace() method deletes the current URL from the document history, so it is unable to navigate back to the original document. You can't use the browsers "Back" button in this case. If you want to avoid this situation, you should use location.assign() method, because it loads a new Document in the browser.
location.reload()
The location.reload() method reloads the current document in the browser window.
Following is the syntax for the same.
window.location.reload("http://www.yahoo.com");
window.navigate()
The window.navigate() method is similar to assigning a new value to the window.location.href property. Because it is only available in MS Internet Explorer, so you should avoid using this in cross-browser development.
Following is the syntax for the same.
window.navigate("http://www.abc.com");
Redirection and Search Engine Optimization
If you want to notify the search engines (SEO) about your URL forwarding, you should add the rel = "canonical" meta tag to your website head part because search engines don't analyze JavaScript to check the redirection.
Following is the syntax for the same.
<link rel = "canonical" href = "http://abc.com/" />
ES6 - Dialog Boxes
JavaScript supports three important types of dialog boxes. These dialog boxes can be used to raise and alert, or to get confirmation on any input or to have a kind of input from the users. Here we will discuss each dialog box one by one.
Alert Dialog Box
An alert dialog box is mostly used to send a warning message to the users. For example, if one input field requires to enter some text but the user does not provide any input, then as a part of validation, you can use an alert box to send a warning message.
Nonetheless, an alert box can still be used for friendlier messages. Alert box provides only one button "OK" to select and proceed.
Example
<html>
   <head>
      <script type = "text/javascript">
         function Warn() {
            alert ("This is a warning message!");
            document.write ("This is a warning message!");
         }
      </script>
   </head>

   <body>
      <p>Click the following button to see the result: </p>
      <form>
         <input type = "button" value = "Click Me" onclick = "Warn();" />
      </form>
   </body>
</html>
The following output is displayed on successful execution of the above code.

Confirmation Dialog Box
A confirmation dialog box is mostly used to take the user's consent on any option. It displays a dialog box with two buttons: OK and Cancel.
If the user clicks on the OK button, the window method confirm() will return true. If the user clicks on the Cancel button, then confirm() returns false. You can use a confirmation dialog box as follows.
Example
<html>
   <head>
      <script type = "text/javascript">
         function getConfirmation(){
            var retVal = confirm("Do you want to continue ?");

            if( retVal == true ){
               document.write ("User wants to continue!");
               return true;
            } else {
               Document.write ("User does not want to continue!");
               return false;
            }
         }
      </script>
   </head>

   <body>
      <p>Click the following button to see the result: </p>
      <form>
         <input type = "button" value = "Click Me" onclick = "getConfirmation();" />
      </form>
   </body>
</html>
The following output is displayed on successful execution of the above code.

Prompt Dialog Box
The prompt dialog box is very useful when you want to pop-up a text box to get a user input. Thus, it enables you to interact with the user. The user needs to fill in the field and then click OK.
This dialog box is displayed using a method called prompt() which takes two parameters: (i) a label which you want to display in the text box and (ii) a default string to display in the text box.
This dialog box has two buttons: OK and Cancel. If the user clicks the OK button, the window method prompt() will return the entered value from the text box. If the user clicks the Cancel button, the window method prompt() returns null.
Example
<html>
   <head>
      <script type = "text/javascript">
         function getValue(){
            var retVal = prompt("Enter your name : ", "your name here");
            document.write("You have entered : " + retVal);
         }
      </script>
   </head>

   <body>
      <p>Click the following button to see the result: </p>
      <form>
         <input type = "button" value = "Click Me" onclick = "getValue();" />
      </form>
   </body>
</html>
The following output is displayed on successful execution of the above code.

ES6 - void Keyword
void is an important keyword in JavaScript which can be used as a unary operator that appears before its single operand, which may be of any type. This operator specifies an expression to be evaluated without returning a value. The operator evaluates a given expression and then returns undefined.
Following is the syntax for the same.
void expression
Void and Immediately Invoked Function Expressions
When using an immediately-invoked function expression, void can be used to force the function keyword to be treated as an expression instead of a declaration.
Consider the following example −
void function iife_void() {
   var msg = function () {console.log("hello world")};
   msg();
}();
The following output is displayed on successful execution of the above code.
hello world
Void and JavaScript URIs
The JavaScript: URI is a commonly encountered syntax in a HTML page. The browser evaluates the URI and replaces the content of the page with the value returned. This is true unless the value returned is undefined. The most common use of this operator is in a client-side JavaScript: URL, where it allows you to evaluate an expression for its side effects without the browser displaying the value of the evaluated expression.
Consider the following code snippet −
<a href = "javascript:void(javascript:alert('hello world!!'))">
  Click here to do nothing
</a>
<br/><br/><br/>
<a href = "javascript:alert('hello');">Click here for an alert</a>
Save the above file as an HTML document and open it in the browser. The first hyperlink, when clicked evaluates the javascript :alert(“hello”) and is passed to the void() operator. However, since the void operator returns undefined, no result is displayed on the page.
On the other hand, the second hyperlink when clicked displays an alert dialog.
ES6 - Page Printing
Many times you would like to place a button on your webpage to print the content of that web page via an actual printer. JavaScript helps you implement this functionality using the print function of the window object.
The JavaScript print function window.print() prints the current webpage when executed. You can call this function directly using the onclick event as shown in the following example.
Example
<html>
   <body>
      <form>
         <input type = "button" value = "Print" onclick = "window.print()"/>
      </form>
   </body>
</html>
The following output is displayed on successful execution of the above code.

ES6 - Objects
JavaScript supports extending data types. JavaScript objects are a great way to define custom data types.
An object is an instance which contains a set of key value pairs. Unlike primitive data types, objects can represent multiple or complex values and can change over their life time. The values can be scalar values or functions or even array of other objects.
The syntactic variations for defining an object is discussed further.
Object Initializers
Like the primitive types, objects have a literal syntax: curly bracesv ({and}). Following is the syntax for defining an object.
var identifier = {
   Key1:value, Key2: function () {
      //functions
   },
   Key3: [“content1”,” content2”]
}
The contents of an object are called properties (or members), and properties consist of a name (or key) and value. Property names must be strings or symbols, and values can be any type (including other objects).
Like all JavaScript variables, both the object name (which could be a normal variable) and the property name are case sensitive. You access the properties of an object with a simple dot-notation.
Following is the syntax for accessing Object Properties.
objectName.propertyName
Example: Object Initializers
var person = {
   firstname:"Tom",
   lastname:"Hanks",
   func:function(){return "Hello!!"},
};
//access the object values
console.log(person.firstname)
console.log(person.lastname)
console.log(person.func())
The above Example, defines an object person. The object has three properties. The third property refers to a function.
The following output is displayed on successful execution of the above code.
Tom
Hanks
Hello!!
In ES6, assigning a property value that matches a property name, you can omit the property value.
Example
var foo = 'bar'
var baz = { foo }
console.log(baz.foo)
The above code snippet defines an object baz. The object has a property foo. The property value is omitted here as ES6 implicitly assigns the value of the variable foo to the object’s key foo.
Following is the ES5 equivalent of the above code.
var foo = 'bar'
var baz = { foo:foo }
console.log(baz.foo)
The following output is displayed on successful execution of the above code.
bar
With this shorthand syntax, the JS engine looks in the containing scope for a variable with the same name. If it is found, that variable’s value is assigned to the property. If it is not found, a Reference Error is thrown.
The Object() Constructor
JavaScript provides a special constructor function called Object() to build the object. The new operator is used to create an instance of an object. To create an object, the new operator is followed by the constructor method.
Following is the syntax for defining an object.
var obj_name = new Object();
obj_name.property = value;
OR
obj_name["key"] = value
Following is the syntax for accessing a property.
Object_name.property_key
OR
Object_name["property_key"]
Example
var myCar = new Object();
myCar.make = "Ford"; //define an object
myCar.model = "Mustang";
myCar.year = 1987;

console.log(myCar["make"]) //access the object property
console.log(myCar["model"])
console.log(myCar["year"])
The following output is displayed on successful execution of the above code.
Ford
Mustang
1987
Unassigned properties of an object are undefined.
Example
var myCar = new Object();
myCar.make = "Ford";
console.log(myCar["model"])
The following output is displayed on successful execution of the above code.
undefined
Note − An object property name can be any valid JavaScript string, or anything that can be converted to a string, including the empty string. However, any property name that is not a valid JavaScript identifier (for example, a property name that has a space or a hyphen, or that starts with a number) can only be accessed using the square bracket notation.
Properties can also be accessed by using a string value that is stored in a variable. In other words, the object’s property key can be a dynamic value. For example: a variable. The said concept is illustrated in the following example.
Example
var myCar = new Object()
var propertyName = "make";
myCar[propertyName] = "Ford";
console.log(myCar.make)
The following output is displayed on successful execution of the above code.
Ford
Constructor Function
An object can be created using the following two steps −
Step 1 − Define the object type by writing a constructor function.
Following is the syntax for the same.
function function_name() {
   this.property_name = value
}
The ‘this’ keyword refers to the current object in use and defines the object’s property.
Step 2 − Create an instance of the object with the new syntax.
var Object_name= new function_name()
//Access the property value

Object_name.property_name
The new keyword invokes the function constructor and initializes the function’s property keys.
Example − Using a Function Constructor
function Car() {
   this.make = "Ford"
   this.model = "F123"
}
var obj = new Car()
console.log(obj.make)
console.log(obj.model)
The above example uses a function constructor to define an object.
The following output is displayed on successful execution of the above code.
Ford
F123
A new property can always be added to a previously defined object. For example, consider the following code snippet −
function Car() {
   this.make = "Ford"
}
var obj = new Car()
obj.model = "F123"
console.log(obj.make)
console.log(obj.model)
The following output is displayed on successful execution of the above code.
Ford
F123
The Object.create Method
Objects can also be created using the Object.create() method. It allows you to create the prototype for the object you want, without having to define a constructor function.
Example
var roles = {
   type: "Admin", // Default value of properties
   displayType : function() {
      // Method which will display type of role
      console.log(this.type);
   }
}
// Create new role type called super_role
var super_role = Object.create(roles);
super_role.displayType(); // Output:Admin

// Create new role type called Guest
var guest_role = Object.create(roles);
guest_role.type = "Guest";
guest_role.displayType(); // Output:Guest
The above example defines an object -roles and sets the default values for the properties. Two new instances are created that override the default properties value for the object.
The following output is displayed on successful execution of the above code.
Admin
Guest
The Object.assign() Function
The Object.assign() method is used to copy the values of all enumerable own properties from one or more source objects to a target object. It will return the target object.
Following is the syntax for the same.
Object.assign(target, ...sources)
Example − Cloning an Object
"use strict"
var det = { name:"Tom", ID:"E1001" };
var copy = Object.assign({}, det);
console.log(copy);
for (let val in copy) {
   console.log(copy[val])
}
The following output is displayed on successful execution of the above code.
Tom
E1001
Example − Merging Objects
var o1 = { a: 10 };
var o2 = { b: 20 };
var o3 = { c: 30 };
var obj = Object.assign(o1, o2, o3);
console.log(obj);
console.log(o1);
The following output is displayed on successful execution of the above code.
{ a: 10, b: 20, c: 30 }
{ a: 10, b: 20, c: 30 }
Note − Unlike copying objects, when objects are merged, the larger object doesn’t maintain a new copy of the properties. Rather it holds the reference to the properties contained in the original objects. The following example explains this concept.
var o1 = { a: 10 };
var obj = Object.assign(o1);
obj.a++
console.log("Value of 'a' in the Merged object after increment  ")
console.log(obj.a);
console.log("value of 'a' in the Original Object after increment ")
console.log(o1.a);
The following output is displayed on successful execution of the above code.
Value of 'a' in the Merged object after increment
11
value of 'a' in the Original Object after increment
11
Deleting Properties
You can remove a property by using the delete operator. The following code shows how to remove a property.
Example
// Creates a new object, myobj, with two properties, a and b.
var myobj = new Object;
myobj.a = 5;
myobj.b = 12;

// Removes the ‘a’ property
delete myobj.a;
console.log ("a" in myobj) // yields "false"
The following output is displayed on successful execution of the above code.
false
The code snippet deletes the property from the object. The example prints false as the in operator doesn’t find the property in the object.
Comparing Objects
In JavaScript, objects are a reference type. Two distinct objects are never equal, even if they have the same properties. This is because, they point to a completely different memory address. Only those objects that share a common reference yields true on comparison.
Example 1 − Different Object References
var val1 = {name: "Tom"};
var val2 = {name: "Tom"};
console.log(val1 == val2)  // return false
console.log(val1 === val2)  // return false
In the above example, val1 and val2 are two distinct objects that refer to two different memory addresses. Hence on comparison for equality, the operator will return false.
Example 2 − Single Object Reference
var val1 = {name: "Tom"};
var val2 = val1

console.log(val1 == val2) // return true
console.log(val1 === val2) // return true
In the above example, the contents in val1 are assigned to val2, i.e. the reference of the properties in val1 are shared with val2. Since, the objects now share the reference to the property, the equality operator will return true for two distinct objects that refer to two different memory addresses. Hence on comparison for equality, the operator will return false.
Object De-structuring
The term destructuring refers to breaking up the structure of an entity. The destructuring assignment syntax in JavaScript makes it possible to extract data from arrays or objects into distinct variables. The same is illustrated in the following example.
Example 1
When destructuring an object the variable names and the object property names must match.
<script>
let student = {
   rollno:20,
   name:'Prijin',
   cgpa:7.2
}

//destructuring to same property name
   let {name,cgpa} = student
   console.log(name)
   console.log(cgpa)

//destructuring to different name
   let {name:student_name,cgpa:student_cgpa}=student
   console.log(student_cgpa)
   console.log("student_name",student_name)
</script>
The output of the above code will be as seen below −
Prijin
7.2
7.2
student_name Prijin
Example 2
If the variable and assignment are in two different steps, then the destructuring object syntax will be surrounded by () as shown in the example ({rollno} = student) −
<script>
   let student = {
      rollno:20,
      name:'Prijin',
      cgpa:7.2
   }

   // destructuring to already declared variable
   let rollno;
   ({rollno} = student)
   console.log(rollno)

   // assign default values to variables

   let product ={ id:1001,price:2000} //discount is not product property
   let {id,price,discount=.10} = product
   console.log(id)
   console.log(price)
   console.log(discount)
</script>
The output of the above code will be as mentioned below −
20
1001
2000
0.1
Example 3
The below example shows destructuring using the rest operator and how to destruct nested objects.
<script>
   // rest operator with object destructuring
   let customers= {
      c1:101,
      c2:102,
      c3:103
   }

   let {c1,...others} = customers
   console.log(c1)
   console.log(others)

   //nested objects
   let emp = {
      id:101,
      address:{
         city:'Mumbai',
         pin:1234
      }
   }
   let {address} = emp;

   console.log(address)
   let {address:{city,pin}} = emp
   console.log(city)
</script>
The output of the above code will be as mentioned below −
101
{c2: 102, c3: 103}
{city: "Mumbai", pin: 1234}
Mumbai
ES6 - Number
The Number object represents numerical date, either integers or floating-point numbers. In general, you do not need to worry about Number objects because the browser automatically converts number literals to instances of the number class.
Following is the syntax for creating a number object.
var val = new Number(number);
In the place of number, if you provide any non-number argument, then the argument cannot be converted into a number, it returns NaN (Not-a-Number).
Number Properties
| Sr.No | Property & Description |
|---|---|
| 1 |
Number.EPSILON
The smallest interval between two representable numbers. |
| 2 |
Number.MAX_SAFE_INTEGER
The maximum safe integer in JavaScript (2^53 - 1). |
| 3 |
Number.MAX_VALUE
The largest positive representable number. |
| 4 |
MIN_SAFE_INTEGER
The minimum safe integer in JavaScript (-(2^53 - 1)). |
| 5 |
Number.MIN_VALUE
The smallest positive representable number - that is, the positive number closest to zero (without actually being zero) |
| 6 |
Number.Nan
Special "not a number" value |
| 7 |
Number.NEGATIVE_INFINITY
Special value representing negative infinity; returned on overflow |
| 8 |
Number.POSITIVE_INFINITY
Special value representing infinity; returned on overflow |
| 9 |
Number.prototype
Special value representing infinity; returned on overflow |
Number Methods
| Sr.No | Method & Description |
|---|---|
| 1 |
Number.isNaN()
Determines whether the passed value is NaN. |
| 2 |
Number.isFinite()
Determines whether the passed value is a finite number. |
| 3 |
Number.isInteger()
Determines whether the passed value is an integer. |
| 4 |
Number.isSafeInteger()
Determines whether the passed value is a safe integer (number between -(253 - 1) and 253- 1) |
| 5 |
Number.parseFloat()
The value is the same as parseFloat() of the global object |
| 6 |
Number.parseInt()
The value is the same as parseInt() of the global object |
Number Instances Methods
The Number object contains only the default methods that are a part of every object's definition.
| Sr.No | Instance Method & Description |
|---|---|
| 1 | toExponential()
Returns a string representing the number in exponential notation |
| 2 | toFixed()
Returns a string representing the number in fixed-point notation |
| 3 |
toLocaleString()
Returns a string with a language sensitive representation of this number |
| 4 |
toPrecision()
Returns a string representing the number to a specified precision in fixed-point or exponential notation |
| 5 |
toString()
Returns a string representing the specified object in the specified radix (base) |
| 6 |
valueOf()
Returns the primitive value of the specified object. |
Binary and Octal Literals
Before ES6, your best bet when it comes to binary or octal representation of integers was to just pass them to parseInt() with the radix. In ES6, you could use the 0b and 0o prefix to represent binary and octal integer literals respectively. Similarly, to represent a hexadecimal value, use the 0x prefix.
The prefix can be written in upper or lower case. However, it is suggested to stick to the lowercase version.
Example − Binary Representation
console.log(0b001)
console.log(0b010)
console.log(0b011)
console.log(0b100)
The following output is displayed on successful execution of the above code.
1
2
3
4
Example − Octal Representation
console.log(0o010)
console.log(0o100)
The following output is displayed on successful execution of the above code.
8
64
Example − Hexadecimal Representation
console.log(0x010)
console.log(0x100)
The following output is displayed on successful execution of the above code.
255
384
Object literal Extension
ES6 introduces following syntax changes in object literals declaration.
- Object property initializer syntax
- Computed properties syntax
- Concise method syntax
Object property initializer
In object property initializer syntax, we can initialize an object directly with variables. This will create attributes which have same name as that of the variables.
<script>
   let firstName = 'Tutorials',lastName='Point'
   let company = {
      firstName,
      lastName
   }
   console.log(company)
   console.log(company.firstName)
   console.log(company.lastName)
</script>
The output of the above code will be as given below −
{firstName: "Tutorials", lastName: "Point"}
Tutorials
Point
Computed Properties
In computed properties syntax the property of object can be dynamically created from variables. In the following example, a variable by the name suffix is used to compute the company object.
<script>
   let suffix = 'Name'
   let company = {
      ['first'+suffix]:'Tutorials',
      ['last'+suffix]:'Point'
   }
   console.log(company)
   console.log(company['firstName'])
   console.log(company['lastName'])
</script>
The output of the above code will be as shown below −
{firstName: "Tutorials", lastName: "Point"}
Tutorials
Point
In Concise method syntax we can use and declare a method directly without the use of function keyword. This is a simplified syntax to include functions in object literals.
<script>
   let firstName = 'Tutorials',lastName='Point'
   let company = {
      firstName,
      lastName,
      getFullName(){
         return this.firstName+" - "+this.lastName
      }
   }
   console.log(company.getFullName())
   console.log(company)
</script>
The output of the above code will be as mentioned below −
Tutorials - Point
{firstName: "Tutorials", lastName: "Point", getFullName: ƒ}
ES6 - Boolean
The Boolean object represents two values, either "true" or "false". If the value parameter is omitted or is 0, -0, null, false, NaN, undefined, or the empty string (""), the object has an initial value of false.
Use the following syntax to create a boolean object.
var val = new Boolean(value);
Boolean Properties
Following is a list of the properties of Boolean object.
| Sr.No | Property & Description |
|---|---|
| 1 | constructor
Returns a reference to the Boolean function that created the object. |
| 2 | prototype
The prototype property allows you to add properties and methods to an object. |
Boolean Methods
Following is a list of the methods of Boolean object and their description.
| Sr.No | Method & Description |
|---|---|
| 1 |
toSource()
Returns a string containing the source of the Boolean object; you can use this string to create an equivalent object. |
| 2 |
toString()
Returns a string of either "true" or "false" depending upon the value of the object. |
| 3 |
valueOf()
Returns the primitive value of the Boolean object. |
In the following sections, we will take a look at a few examples to demonstrate the usage of the Boolean methods.
ES6 - Strings
The String object lets you work with a series of characters; it wraps JavaScript’s string primitive data type with a number of helper methods.
As JavaScript automatically converts between string primitives and String objects, you can call any of the helper methods of the String object on a string primitive.
Use the following syntax to create a String object.
var val = new String(string);
The string parameter is a series of characters that has been properly encoded. String.
String Properties
Following is a list of the properties of String object and its description.
| Sr.No | Property & Description |
|---|---|
| 1 | constructor
Returns a reference to the String function that created the object . |
| 2 | length
Returns the length of the string. |
| 3 | Prototype
The prototype property allows you to add properties and methods to an object . |
String Methods
Here is a list of the methods available in String object along with their description.
| Sr.No | Method & Description |
|---|---|
| 1 | charAt()
Returns the character at the specified index. |
| 2 | charCodeAt()
Returns a number indicating the Unicode value of the character at the given index. |
| 3 | concat()
Combines the text of two strings and returns a new string. |
| 4 | indexOf()
Returns the index within the calling String object of the first occurrence of the specified value, or -1 if not found. |
| 5 | lastIndexOf()
Returns the index within the calling String object of the last occurrence of the specified value, or -1 if not found. |
| 6 | localeCompare()
Returns a number indicating whether a reference string comes before or after or is the same as the given string in a sorted order. |
| 7 | match()
Used to match a regular expression against a string. |
| 8 | replace()
Used to find a match between a regular expression and a string, and to replace the matched substring with a new substring. |
| 9 | search()
Executes the search for a match between a regular expression and a specified string. |
| 10 | slice()
Extracts a section of a string and returns a new string. |
| 11 | split()
Splits a String object into an array of strings by separating the string into substrings. |
| 12 | substr()
Returns the characters in a string beginning at the specified location through the specified number of characters. |
| 13 | substring()
Returns the characters in a string between two indexes into the string. |
| 14 | toLocaleLowerCase()
The characters within a string are converted to lower case while respecting the current locale. |
| 15 | toLocaleupperCase()
The characters within a string are converted to uppercase while respecting the current locale. |
| 16 | toLowerCase()
Returns the calling string value converted to lowercase. |
| 17 | toString()
Returns a string representing the specified object. |
| 18 | toUpperCase()
Returns the calling string value converted to uppercase. |
| 19 | valueOf()
Returns the primitive value of the specified object. |
ES6 - Symbol
Introduction to Symbol
ES6 introduces a new primitive type called Symbol. They are helpful to implement metaprogramming in JavaScript programs.
Syntax
const mySymbol = Symbol()
const mySymbol = Symbol(stringDescription)
A symbol is just a piece of memory in which you can store some data. Each symbol will point to a different memory location. Values returned by a Symbol() constructor are unique and immutable.
Example
Let us understand this through an example. Initially, we created two symbols without description followed by symbols with same description. In both the cases the equality operator will return false when the symbols are compared.
<script>
   const s1 = Symbol();
   const s2 = Symbol();
   console.log(typeof s1)
   console.log(s1===s2)
   const s3 = Symbol("hello");//description
   const s4 = Symbol("hello");
   console.log(s3)
   console.log(s4)
   console.log(s3==s4)
</script>
The output of the above code will be as mentioned below −
symbol
false
Symbol(hello)
Symbol(hello)
false
| Sr.No | Property & Description |
|---|---|
| 1 | Symbol.for(key)
searches for existing symbols in a symbol registry with the given key and returns it, if found. Otherwise, a new symbol gets created in the global symbol registry with this key. |
| 2 | Symbol.keyFor(sym)
Retrieves a shared symbol key from the global symbol registry for the given symbol. |
Symbol & Classes
A symbol can be used with classes to define the properties in the class. The advantage is that if property is a symbol as shown below, the property can be accessed outside the package only if the symbol name is known. So, data is much encapsulated when symbols are used as properties.
Example
<script>
   const COLOR = Symbol()
   const MODEL = Symbol()
   const MAKE = Symbol()
   class Bike {
      constructor(color ,make,model){
      this[COLOR] = color;
      this[MAKE] = make;
      this[MODEL] = model;
   }
}
let bike = new Bike('red','honda','cbr')
console.log(bike)
//property can be accessed ony if symbol name is known
console.log(bike[COLOR])
</script>
The output of the above code will be as stated below −
Bike {Symbol(): "red", Symbol(): "honda", Symbol(): "cbr"}
red
ES6 - New String Methods
Following is a list of methods with their description.
| Sr.No | Method & Description |
|---|---|
| 1 |
String.prototype.startsWith(searchString, position = 0)
Returns true if the receiver starts with searchString; the position lets you specify where the string to be checked starts. |
| 2 |
String.prototype.endsWith(searchString, endPosition = searchString.length)
Returns true if the receiver starts with searchString; the position lets you specify where the string to be checked starts. |
| 3 |
String.prototype.includes(searchString, position = 0)
Returns true if the receiver contains searchString; position lets you specify where the string to be searched starts. |
| 4 |
String.prototype.repeat(count)
Returns the receiver, concatenated count times. |
Template Literals
Template literals are string literals that allow embedded expressions. Templatestrings use back-ticks (``) rather than the single or double quotes. A template string could thus be written as −
var greeting = `Hello World!`;
String Interpolation and Template literals
Template strings can use placeholders for string substitution using the ${ } syntax, as demonstrated.
Example 1
var name = "Brendan";
console.log('Hello, ${name}!');
The following output is displayed on successful execution of the above code.
Hello, Brendan!
Example 2: Template literals and expressions
var a = 10;
var b = 10;
console.log(`The sum of ${a} and ${b} is  ${a+b} `);
The following output is displayed on successful execution of the above code.
The sum of 10 and 10 is 20
Example 3: Template literals and function expression
function fn() { return "Hello World"; }
console.log(`Message: ${fn()} !!`);
The following output is displayed on successful execution of the above code.
Message: Hello World !!
Multiline Strings and Template Literals
Template strings can contain multiple lines.
Example
var multiLine = `
   This is
   a string
   with multiple
   lines`;
console.log(multiLine)
The following output is displayed on successful execution of the above code.
This is
a string
with multiple
line
String.raw()
ES6 includes the tag function String.raw for raw strings, where backslashes have no special meaning. String.raw enables us to write the backslash as we would in a regular expression literal. Consider the following example.
var text =`Hello \n World`
console.log(text)

var raw_text = String.raw`Hello \n World `
console.log(raw_text)
The following output is displayed on successful execution of the above code.
Hello
World
Hello \n World
Tagged Templates
A tag is a function which can interpret and process a template literal. A tag appears in front of the template literal. Syntax is shown below.
Syntax
let output_fromTag = tagFunction `Template literal with ${variable1} , ${variable2}`
The tag function implementation syntax is as given below −
function tagFunction(literals,...variable_values){
   //process
   return "some result"
}
Example
Following Example defines a tag function myTagFn(). It displays the parameters passed to it. After displaying it returns Done to the caller.
<script>
   function myTagFn(literals,...values){
      console.log("literal values are");
      for(let c of literals){
         console.log(c)
      }

      console.log("variable values are ");
      for(let c of values){
         console.log(c)
      }

      return "Done"
   }
   let company = `TutorialsPoint`
   let company_location = `Mumbai`
   let result = myTagFn `Hello this is ${company} from ${company_location}`

   console.log(result)

</script>
The output of the above code will be as stated below −
//literal
literal values are
Hello this is
from
//values
variable values are
TutorialsPoint
Mumbai
Done
Example
The below tag function takes a template literal and converts it to upper case as shown below −
<script>
   function convertToUpperTagFn(literals, ...values) {
      let result = "";
      for (let i = 0; i < literals.length; i++) {
         result += literals[i];
         if (i < values.length) {
            result += values[i];
         }
      }
      return result.toUpperCase();
   }
   let company = `TutorialsPoint`
   let company_location = `Mumbai`
   let result = convertToUpperTagFn `Hello this is ${company} from ${company_location}`

   console.log(result)

</script>
The output of the above code will be as mentioned below −
HELLO THIS IS TUTORIALSPOINT FROM MUMBAI
String.fromCodePoint()
The static String.fromCodePoint() method returns a string created by using the specified sequence of unicode code points. The function throws a RangeError if an invalid code point is passed.
console.log(String.fromCodePoint(42))
console.log(String.fromCodePoint(65, 90))
The following output is displayed on successful execution of the above code.
*
AZ
ES6 - Arrays
The use of variables to store values poses the following limitations −
Variables are scalar in nature. In other words, a variable declaration can only contain a single at a time. This means that to store n values in a program, n variable declarations will be needed. Hence, the use of variables is not feasible when one needs to store a larger collection of values.
Variables in a program are allocated memory in random order, thereby making it difficult to retrieve/read the values in the order of their declaration.
JavaScript introduces the concept of arrays to tackle the same.
An array is a homogenous collection of values. To simplify, an array is a collection of values of the same data type. It is a user-defined type.
Features of an Array
An array declaration allocates sequential memory blocks.
Arrays are static. This means that an array once initialized cannot be resized.
Each memory block represents an array element.
Array elements are identified by a unique integer called as the subscript/index of the element.
Arrays too, like variables, should be declared before they are used.
Array initialization refers to populating the array elements.
Array element values can be updated or modified but cannot be deleted.
Declaring and Initializing Arrays
To declare and initialize an array in JavaScript use the following syntax −
var array_name; //declaration
array_name = [val1,val2,valn..]   //initialization
OR
var array_name = [val1,val2…valn]
Note − The pair of [] is called the dimension of the array.
For example, a declaration like: var numlist = [2,4,6,8] will create an array as shown in the following figure.
Accessing Array Elements
The array name followed by the subscript is used to refer to an array element.
Following is the syntax for the same.
array_name[subscript]
Example: Simple Array
var alphas;
alphas = ["1","2","3","4"]
console.log(alphas[0]);
console.log(alphas[1]);
The following output is displayed on successful execution of the above code.
1
2
Example: Single Statement Declaration and Initialization
var nums = [1,2,3,3]
console.log(nums[0]);
console.log(nums[1]);
console.log(nums[2]);
console.log(nums[3]);
The following output is displayed on successful execution of the above code.
1
2
3
3
Array Object
An array can also be created using the Array object. The Array constructor can be passed as −
A numeric value that represents the size of the array or.
A list of comma separated values.
The following Examples create an array using this method.
Example
var arr_names = new Array(4)
for(var i = 0;i<arr_names.length;i++) {
   arr_names[i] = i * 2
   console.log(arr_names[i])
}
The following output is displayed on successful execution of the above code.
0
2
4
6
Example: Array Constructor Accepts Comma-separated Values
var names = new Array("Mary","Tom","Jack","Jill")
for(var i = 0;i<names.length;i++) {
   console.log(names[i])
}
The following output is displayed on successful execution of the above code.
Mary
Tom
Jack
Jill
Array Methods
Following is the list of the methods of the Array object along with their description.
| Sr.No | Method & Description |
|---|---|
| 1 |
concat()
Returns a new array comprised of this array joined with other array(s) and/or value(s) |
| 2 |
every()
Returns true if every element in this array satisfies the provided testing function. |
| 3 |
filter()
Creates a new array with all of the elements of this array for which the provided filtering function returns true. |
| 4 |
forEach()
Calls a function for each element in the array. |
| 5 |
indexOf()
Returns the first (least) index of an element within the array equal to the specified value, or -1 if none is found. |
| 6 |
join()
Joins all elements of an array into a string. |
| 7 |
lastIndexOf()
Returns the last (greatest) index of an element within the array equal to the specified value, or -1 if none is found. |
| 8 |
map()
Creates a new array with the results of calling a provided function on every element in this array. |
| 9 |
pop()
Removes the last element from an array and returns that element. |
| 10 |
push()
Adds one or more elements to the end of an array and returns the new length of the array. |
| 11 |
reduce()
Applies a function simultaneously against two values of the array (from left-to-right) as to reduce it to a single value. |
| 12 |
reduceRight()
Applies a function simultaneously against two values of the array (from right-to-left) as to reduce it to a single value. |
| 13 |
reverse()
Reverses the order of the elements of an array -- the first becomes the last, and the last becomes the first. |
| 14 |
shift()
Removes the first element from an array and returns that element slice. |
| 15 |
slice()
Extracts a section of an array and returns a new array. |
| 16 |
some()
Returns true if at least one element in this array satisfies the provided testing function. |
| 17 |
toSource() Represents the source code of an object. |
| 18 |
sort()
Sorts the elements of an array. |
| 19 |
splice()
Adds and/or removes elements from an array. |
| 20 |
toString()
Returns a string representing the array and its elements. |
| 21 |
unshift()
Adds one or more elements to the front of an array and returns the new length of the array. |
ES6 − Array Methods
Following are some new array methods introduced in ES6.
Array.prototype.find
find lets you iterate through an array and get the first element back that causes the given callback function to return true. Once an element has been found, the function immediately returns. It’s an efficient way to get at just the first item that matches a given condition.
Example
var numbers = [1, 2, 3];
var oddNumber = numbers.find((x) => x % 2 == 1);
console.log(oddNumber); // 1
The following output is displayed on successful execution of the above code.
1
Note − The ES5 filter() and the ES6 find() are not synonymous. Filter always returns an array of matches (and will return multiple matches), find always returns the actual element.
Array.prototype.findIndex
findIndex behaves similar to find, but instead of returning the element that matched, it returns the index of that element.
var numbers = [1, 2, 3];
var oddNumber = numbers.findIndex((x) => x % 2 == 1);
console.log(oddNumber); // 0
The above example will return the index of the value 1 (0) as output.
Array.prototype.entries
entries is a function that returns an Array Iterator that can be used to loop through the array’s keys and values. Entries will return an array of arrays, where each child array is an array of [index, value].
var numbers = [1, 2, 3];
var val = numbers.entries();
console.log(val.next().value);
console.log(val.next().value);
console.log(val.next().value);
The following output is displayed on successful execution of the above code.
[0,1]
[1.2]
[2,3]
Alternatively, we can also use the spread operator to get back an array of the entries in one go.
var numbers = [1, 2, 3];
var val= numbers.entries();
console.log([...val]);
The following output is displayed on successful execution of the above code.
[[0,1],[1,2],[2,3]]
Array.from
Array.from() enables the creation of a new array from an array like object. The basic functionality of Array.from() is to convert two kinds of values to Arrays −
Array-like values.
Iterable values like Set and Map.
Example
"use strict"
for (let i of Array.from('hello')) {
   console.log(i)
}
The following output is displayed on successful execution of the above code.
h
e
l
l
o
Array.prototype.keys()
This function returns the array indexes.
Example
console.log(Array.from(['a', 'b'].keys()))
The following output is displayed on successful execution of the above code.
[ 0, 1 ]
Array Traversal using for…in loop
One can use the for… in loop to traverse through an array.
"use strict"
var nums = [1001,1002,1003,1004]
for(let j in nums) {
   console.log(nums[j])
}
The loop performs an index-based array traversal. The following output is displayed on successful execution of the above code.
1001
1002
1003
1004
Arrays in JavaScript
JavaScript supports the following concepts about Arrays −
| Sr.No | Concept & Description |
|---|---|
| 1 |
Multi-dimensional arrays
JavaScript supports multidimensional arrays. The simplest form of the multidimensional array is the two-dimensional array |
| 2 |
Passing arrays to functions
You can pass to the function a pointer to an array by specifying the array's name without an index. |
| 3 |
Return array from functions
Allows a function to return an array. |
Array De-structuring
Destructuring refers to extracting individual values from an array or an object into distinct variables. Consider a scenario where the values of an array need to be assigned to individual variables. The traditional way of doing this is given below −
var a= array1[0]
var b= array1[1]
var c= array1[2]
Destructuring helps to achieve the same in a concise way.
Syntax
//destructuring an array
let [variable1,variable2]=[item1,item2]
//destructuring an object
let {property1,property2} = {property1:value1,property2:value2}
Example
<script>
   let names = ['Mohtashim','Kannan','Kiran']
   let [n1,n2,n3] = names;
   console.log(n1)
   console.log(n2)
   console.log(n3);
   //rest operator with array destructuring
   let locations=['Mumbai','Hyderabad','Chennai']
   let [l1,...otherValues] =locations
   console.log(l1)
   console.log(otherValues)
   //variables already declared
   let name1,name2;
   [name1,name2] =names
   console.log(name1)
   console.log(name2)
   //swapping
   let first=10,second=20;
   [second,first] = [first,second]
   console.log("second is ",second) //10
   console.log("first is ",first) //20
</script>
The output of the above code will be as shown below −
Mohtashim
Kannan
Kiran
Mumbai
["Hyderabad", "Chennai"]
Mohtashim
Kannan
second is 10
first is 20
ES6 - Date
The Date object is a datatype built into the JavaScript language. Date objects are created with the new Date () as shown in the following syntax.
Once a Date object is created, a number of methods allow you to operate on it. Most methods simply allow you to get and set the year, month, day, hour, minute, second, and millisecond fields of the object, using either local time or UTC (universal, or GMT) time.
The ECMAScript standard requires the Date object to be able to represent any date and time, to millisecond precision, within 100 million days before or after 1/1/1970. This is a range of plus or minus 273,785 years, so JavaScript can represent date and time till the year 275755.
You can use any of the following syntax to create a Date object using Date () constructor.
new Date( )
new Date(milliseconds)
new Date(datestring)
new Date(year,month,date[,hour,minute,second,millisecond ])
Note − Parameters in the brackets are always optional.
Date Properties
Here is a list of the properties of the Date object along with their description.
| Sr.No | Property & Description |
|---|---|
| 1 |
constructor
Specifies the function that creates an object's prototype |
| 2 |
prototype
The prototype property allows you to add properties and methods to an object |
Date Methods
Following is a list of different date methods along with the description.
| Sr.No | Method & Description |
|---|---|
| 1 |
Date()
Returns today's date and time |
| 2 |
getDate()
Returns the day of the month for the specified date according to the local time |
| 3 |
getDay()
Returns the day of the week for the specified date according to the local time |
| 4 |
getFullYear()
Returns the year of the specified date according to the local time |
| 5 |
getHours()
Returns the hour in the specified date according to the local time |
| 6 |
getMilliseconds()
Returns the milliseconds in the specified date according to the local time |
| 7 |
getMinutes()
Returns the minutes in the specified date according to the local time |
| 8 |
getMonth()
Returns the month in the specified date according to the local time |
| 9 |
getSeconds()
Returns the seconds in the specified date according to the local time |
| 10 |
getTime()
Returns the numeric value of the specified date as the number of milliseconds since January 1, 1970, 00:00:00 UTC |
| 11 |
getTimezoneOffset()
Returns the time-zone offset in minutes for the current locale |
| 12 |
getUTCDate()
Returns the day (date) of the month in the specified date according to the universal time |
| 13 |
getUTCDay()
Returns the day of the week in the specified date according to the universal time |
| 14 |
getUTCFullYear()
Returns the year in the specified date according to the universal time |
| 15 |
getutcHours()
Returns the hours in the specified date according to the universal time |
| 16 |
getUTCMilliseconds()
Returns the milliseconds in the specified date according to the universal time |
| 17 |
getUTCMinutes()
Returns the minutes in the specified date according to the universal time |
| 18 |
getUTCMonth()
Returns the month in the specified date according to the universal time |
| 19 |
getUTCSeconds()
Returns the seconds in the specified date according to the universal time |
| 20 |
setDate()
Sets the day of the month for a specified date according to the local time |
| 21 |
setFullYear()
Sets the full year for a specified date according to the local time |
| 22 |
setHours()
Sets the hours for a specified date according to the local time |
| 23 |
setMilliseconds()
Sets the milliseconds for a specified date according to the local time |
| 24 |
setMinutes()
Sets the minutes for a specified date according to the local time |
| 25 |
setMonth()
Sets the month for a specified date according to the local time |
| 26 |
setSeconds()
Sets the seconds for a specified date according to the local time |
| 27 |
setTime()
Sets the Date object to the time represented by a number of milliseconds since January 1, 1970, 00:00:00 UTC |
| 28 |
setUTCDate()
Sets the Date object to the time represented by a number of milliseconds since January 1, 1970, 00:00:00 UTC |
| 29 |
setUTCFullYear()
Sets the full year for a specified date according to the universal time |
| 30 |
setUTCHours()
Sets the hour for a specified date according to the universal time |
| 31 |
setUTCMilliseconds()
Sets the milliseconds for a specified date according to the universal time |
| 32 |
setUTCMinutes()
Sets the minutes for a specified date according to the universal time |
| 33 |
setUTCMonth()
Sets the month for a specified date according to the universal time |
| 34 |
setUTCSeconds()
Sets the seconds for a specified date according to the universal time |
| 35 |
todatestring()
Returns the "date" portion of the Date as a human-readable string |
| 36 |
toLocaleDateString()
Returns the "date" portion of the Date as a string, using the current locale's conventions |
| 37 |
toLocaleString()
Converts a date to a string, using the current locale's conventions |
| 38 |
toLocaleTimeString()
Returns the "time" portion of the Date as a string, using the current locale's conventions |
| 39 |
toString()
Returns a string representing the specified Date object |
| 40 |
toTimeString()
Returns the "time" portion of the Date as a human-readable string |
| 41 |
toUTCString()
Converts a date to a string, using the universal time convention |
| 42 |
valueOf()
Returns the primitive value of a Date object |
ES6 - Math
The math object provides you properties and methods for mathematical constants and functions. Unlike other global objects, Math is not a constructor. All the properties and methods of Math are static and can be called by using Math as an object without creating it.
Math Properties
Following is a list of all Math properties and its description.
| Sr.No | Property & Description |
|---|---|
| 1 | E
Euler's constant and the base of natural logarithms, approximately 2.718 |
| 2 | LN2
Natural logarithm of 2, approximately 0.693 |
| 3 | LN10
Natural logarithm of 10, approximately 2.302 |
| 4 |
LOG2E
Base 2 logarithm of E, approximately 1.442 |
| 5 |
LOG10E
Base 10 logarithm of E, approximately 0.434 |
| 6 |
PI
Ratio of the circumference of a circle to its diameter, approximately 3.14159 |
| 7 |
SQRT1_2
Square root of 1/2; equivalently, 1 over the square root of 2, approximately 0.707 |
| 8 |
SQRT2
Square root of 2, approximately 1.414 |
Exponential Functions
The basic exponential function is Math.pow(), and there are convenience functions for square root, cube root, and powers of e, as shown in the following table.
| Sr.No | Function & Description |
|---|---|
| 1 |
Math.pow(x, y)
Returns x raised to the power y |
| 2 |
Math.sqrt(x)
Returns the square root of the number x |
| 3 |
Math.cbrt(x)
This method returns the cube root of a number x |
| 4 |
Math.exp(x)
Equivalent to Math.pow(Math.E, x) |
| 5 |
Math.expm1(x)
Equivalent to Math.exp(x) – 1 |
| 6 |
Math.hypot(x1, x2,...)
Returns the square root of the sum of arguments |
Logarithmic Functions
The basic natural logarithm function is Math.log (). In JavaScript, “log” means “natural logarithm.” ES6 introduced Math.log10 for convenience.
| Sr.No | Function & Description |
|---|---|
| 1 |
Math.log(x)
Natural logarithm of x |
| 2 |
Math.log10(x)
Base 10 logarithm of x |
| 3 |
Math.log2(x)
Base 2 logarithm of x |
| 4 |
Math.log1p(x)
Natural logarithm of 1 + x |
Miscellaneous Algebraic Functions
Following is a list of miscellaneous algebraic functions with their description.
| Sr.No | Function & Description |
|---|---|
| 1 |
Math.abs(x)
Absolute value of x |
| 2 |
Math.sign(x)
The sign of x: if x is negative,–1; if x is positive, 1; and if x is 0, 0 |
| 3 |
Math.ceil(x)
The ceiling of x: the smallest integer greater than or equal to x |
| 4 |
Math.floor(x)
The floor of x: the largest integer less than or equal to x |
| 5 |
Math.trunc(x)
The integral part of x (all fractional digits are removed) |
| 6 |
Math.round(x)
x rounded to the nearest integer |
| 7 |
Math.min(x1, x2,...)
Returns the minimum argument |
| 8 |
Math.max((x1, x2,...)
Returns the minimum argument |
Trigonometric Functions
All trigonometric functions in the Math library operate on radians, not degrees.
| Sr.No | Function & Description |
|---|---|
| 1 |
Math.sin(x)
Sine of x radians |
| 2 |
Math.cos(x)
Cosine of x radians |
| 3 |
Math.tan(x)
Tangent of x radians |
| 4 |
Math.asin(x)
Inverse sine (arcsin) of x (result in radians) |
| 5 |
Math.acos(x)
Inverse cosine (arccos) of x (result in radians) |
| 6 |
Math.atan(x)
Inverse tangent (arctan) of x (result in radians) |
| 7 |
Math.atan2(y, x0)
Counterclockwise angle (in radians) from the x-axis to the point (x, y) |
Math.random()
The Math.random() function returns a pseudorandom number between 0 (inclusive) and 1 (exclusive).
Example: Pseudorandom Number Generation (PRNG)
var value1 = Math.random();
console.log("First Test Value : " + value1 );

var value2 = Math.random();
console.log("Second Test Value : " + value2 );

var value3 = Math.random();
console.log("Third Test Value : " + value3 );

var value4 = Math.random();
console.log("Fourth Test Value : " + value4 );
Output
First Test Value : 0.5782922627404332
Second Test Value : 0.5624510529451072
Third Test Value : 0.9336334094405174
Fourth Test Value : 0.4002739654388279
ES6 - RegExp
A regular expression is an object that describes a pattern of characters. Regular expressions are often abbreviated “regex” or “regexp”.
The JavaScript RegExp class represents regular expressions, and both String and RegExp define methods that use regular expressions to perform powerful pattern-matching and search-and-replace functions on the text.
A regular expression can be defined as −
var pattern = new RegExp(pattern, attributes);
OR
var pattern = /pattern/attributes;
The attribute can have any combination of the following values.
| Sr.No | Attribute & Description |
|---|---|
| 1 |
G Global Match |
| 2 |
I Ignore case |
| 3 |
M Multiline; treat the beginning and end characters (^ and $) as working over multiple lines (i.e., match the beginning or the end of each line (delimited by \n or \r), not only the very beginning or end of the whole input string) |
| 4 |
U Unicode; treat the pattern as a sequence of unicode code points |
| 5 |
Y Sticky; matches only from the index indicated by the lastIndex property of this regular expression in the target string (and does not attempt to match from any later indexes) |
Constructing Regular Expressions
Brackets
Brackets ([]) have a special meaning when used in the context of regular expressions. They are used to find a range of characters.
| Sr.No | Expression & Description |
|---|---|
| 1 |
[...] Any one character between the brackets |
| 2 |
[^...] Any one character not between the brackets |
| 3 |
[0-9] It matches any decimal digit from 0 through 9 |
| 4 |
[a-z] It matches any character from lowercase a through lowercase z |
| 5 |
[A-Z] It matches any character from uppercase A through uppercase Z |
| 6 |
[a-Z] It matches any character from lowercase a through uppercase Z |
The ranges shown above are general; you could also use the range [0-3] to match any decimal digit ranging from 0 through 3, or the range [b-v] to match any lowercase character ranging from b through v.
Quantifiers
The frequency or position of the bracketed character sequences and the single characters can be denoted by a special character. Each special character has a specific connotation. The +, *, ?, and $ flags all follow a character sequence.
| Sr.No | Expression & Description |
|---|---|
| 1 |
p+ It matches any string containing at least one p. |
| 2 |
p* It matches any string containing zero or more p's |
| 3 |
p? It matches any string containing one or more p's |
| 4 |
p{N} It matches any string containing a sequence of N p's |
| 5 |
p{2,3} It matches any string containing a sequence of two or three p's |
| 6 |
p{2, } It matches any string containing a sequence of at least two p's |
| 7 |
p$ It matches any string with p at the end of it |
| 8 |
^p It matches any string with p at the beginning of it |
| 9 |
[^a-zA-Z] It matches any string not containing any of the characters ranging from a through z and A through Z |
| 10 |
p.p It matches any string containing p, followed by any character, in turn followed by another p |
| 11 |
^.{2}$ It matches any string containing exactly two characters |
| 12 |
<b>(.*)</b> It matches any string enclosed within <b> and </b> |
| 13 |
p(hp)* It matches any string containing a p followed by zero or more instances of the sequence hp |
Literal Characters
| Sr.No | Character & Description |
|---|---|
| 1 |
Alphanumeric Itself |
| 2 |
\0 The NULL character (\u0000) |
| 3 |
\t Tab (\u0009) |
| 4 |
\n Newline (\u000A) |
| 5 |
\v Vertical tab (\u000B) |
| 6 |
\f Form feed (\u000C) |
| 7 |
\r Carriage return (\u000D) |
| 8 |
\xnn The Latin character specified by the hexadecimal number nn; for example, \x0A is the same as \n |
| 9 |
\uxxxx The Unicode character specified by the hexadecimal number xxxx; for example, \u0009 is the same as \t |
| 10 |
\cX The control character ^X; for example, \cJ is equivalent to the newline character \n |
Meta-characters
A meta-character is simply an alphabetical character preceded by a backslash that acts to give the combination a special meaning.
For instance, you can search for a large sum of money using the '\d' meta-character: /([\d]+)000/. Here, \d will search for any string of the numerical character.
The following table lists a set of meta-characters which can be used in PERL Style Regular Expressions.
| Sr.No | Character & Description |
|---|---|
| 1 |
. A single character |
| 2 |
\s A whitespace character (space, tab, newline) |
| 3 |
\S Non-whitespace character |
| 4 |
\d A digit (0-9) |
| 5 |
\D A non-digit |
| 6 |
\w A word character (a-z, A-Z, 0-9, _) |
| 7 |
\W A non-word character |
| 8 |
[\b] A literal backspace (special case) |
| 9 |
[aeiou] Matches a single character in the given set |
| 10 |
[^aeiou] Matches a single character outside the given set |
| 11 |
(foo|bar|baz) Matches any of the alternatives specified |
RegExp Properties
| Sr.No | Properties & Description |
|---|---|
| 1 |
RegExp.prototype.flags
A string that contains the flags of the RegExp object |
| 2 |
RegExp.prototype.global
Whether to test the regular expression against all possible matches in a string, or only against the first |
| 3 |
RegExp.prototype.ignoreCase
Whether to ignore case while attempting a match in a string |
| 4 |
RegExp.prototype.lastIndex
Whether read/write property of RegExp objects. |
| 5 |
RegExp.prototype.multiline
Whether or not to search in strings across multiple lines |
| 6 |
RegExp.prototype.source
The text of the pattern |
RegExp Methods
| Sr.No | Method & Description |
|---|---|
| 1 |
RegExp.prototype.exec()
Executes a search for a match in its string parameter |
| 2 |
RegExp.prototype.test()
Tests for a match in its string parameter |
| 3 |
RegExp.prototype.match()
Performs a match to the given string and returns the match result |
| 4 |
RegExp.prototype.replace()
Replaces matches in the given string with a new substring |
| 5 |
RegExp.prototype.search()
Searches the match in the given string and returns the index the pattern found in the string |
| 6 |
RegExp.prototype.split()
Splits the given string into an array by separating the string into substring |
| 7 |
RegExp.prototype.toString()
Returns a string representing the specified object. Overrides theObject.prototype.toString() method |
ES6 - HTML DOM
Every web page resides inside a browser window, which can be considered as an object.
A document object represents the HTML document that is displayed in that window. The document object has various properties that refer to other objects which allow access to and modification of the document content.
The way a document content is accessed and modified is called the Document Object Model, or DOM. The objects are organized in a hierarchy. This hierarchical structure applies to the organization of objects in a web document.
Following is a simple hierarchy of a few important objects −
There are several DOMs in existence. The following sections explain each of these DOMs in detail and describe how you can use them to access and modify the document content.
The Legacy DOM − This is the model which was introduced in early versions of JavaScript language. It is well supported by all browsers, but allows access only to certain key portions of documents, such as forms, form elements, and images.
The W3C DOM − This document object model allows access and modification of all document content and is standardized by the World Wide Web Consortium (W3C). This model is supported by almost all the modern browsers.
The IE4 DOM − This document object model was introduced in Version 4 of Microsoft's Internet Explorer browser. IE 5 and later versions include support for most basic W3C DOM features.
The Legacy DOM
This is the model which was introduced in the early versions of JavaScript language. It is well supported by all browsers, but allows access only to certain key portions of the documents, such as forms, form elements, and images.
This model provides several read-only properties, such as title, URL, and lastModified provide information about the document as a whole. Apart from that, there are various methods provided by this model which can be used to set and get the document property values.
Document Properties in Legacy DOM
Following is a list of the document properties which can be accessed using Legacy DOM.
| Sr.No | Property & Description |
|---|---|
| 1 |
alinkColor Deprecated − A string that specifies the color of activated links. Example : document.alinkColor |
| 2 |
anchors[ ] An array of anchor objects, one for each anchor that appears in the document. Example : document.anchors[0], document.anchors[1] and so on |
| 3 |
applets[ ] An array of applet objects, one for each applet that appears in the document. Example : document.applets[0], document.applets[1] and so on |
| 4 |
bgColor Deprecated − A string that specifies the background color of the document. Example : document.bgColor |
| 5 |
Cookie A string valued property with special behavior that allows the cookies associated with this document to be queried and set. Example : document.cookie |
| 6 |
Domain A string that specifies the Internet domain the document is from. Used for security purposes. Example : document.domain |
| 7 |
embeds[ ] An array of objects that represent data embedded in the document with the <embed> tag. A synonym for plugins []. Some plugins and ActiveX controls can be controlled with JavaScript code. Example : document.embeds[0], document.embeds[1] and so on |
| 8 |
fgColor A string that specifies the default text color for the document. Example : document.fgColor |
| 9 |
forms[ ] An array of form objects, one for each HTML form that appears in the document. Example : document.forms[0], document.forms[1] and so on |
| 10 |
images[ ] An array of form objects, one for each HTML form that appears in the document with the HTML <img> tag. Example : document.forms[0], document.forms[1] and so on |
| 11 |
lastModified A read-only string that specifies the date of the most recent change to the document. Example : document.lastModified |
| 12 |
linkColor Deprecated − A string that specifies the color of unvisited links. Example : document.linkColor |
| 13 |
links[ ] It is a document link array. Example : document.links[0], document.links[1] and so on |
| 14 |
Location The URL of the document. Deprecated in favor of the URL property. Example : document.location |
| 15 |
plugins[ ] A synonym for the embeds[ ] Example : document.plugins[0], document.plugins[1] and so on |
| 16 |
Referrer A read-only string that contains the URL of the document, if any, from which the current document was linked. Example : document.referrer |
| 17 |
Title The text contents of the <title> tag. Example : document.title |
| 18 |
URL A read-only string that specifies the URL of the document. Example : document.URL |
| 19 |
vlinkColor Deprecated − A string that specifies the color of the visited links. Example : document.vlinkColor |
Document Methods in Legacy DOM
Following is a list of methods supported by Legacy DOM.
| Sr.No | Property & Description |
|---|---|
| 1 |
clear( ) Deprecated − Erases the contents of the document and returns nothing. Example : document.clear( ) |
| 2 |
close( ) Closes a document stream opened with the open( ) method and returns nothing. |
| 3 |
open( ) Deletes the existing document content and opens a stream to which the new document contents may be written. Returns nothing. Example : document.open( ) |
| 4 |
write( value, ...) Inserts the specified string or strings into the document currently being parsed or appends to the document opened with open( ). Returns nothing. Example : document.write( value, ...) |
| 5 |
writeln( value, ...) Identical to write( ), except that it appends a newline character to the output. Returns nothing. Example : document.writeln( value, ...) |
We can locate any HTML element within any HTML document using HTML DOM. For instance, if a web document contains a form element, then using JavaScript, we can refer to it as document.forms[0]. If your Web document includes two form elements, the first form is referred to as document.forms[0] and the second as document.forms[1].
Using the hierarchy and properties given above, we can access the first form element using document.forms[0].elements[0] and so on.
Example
Following is an example to access document properties using Legacy DOM method.
<html>
   <head>
      <title> Document Title </title>

      <script type = "text/javascript">
         <!--
            function myFunc() {
               var ret = document.title;
               alert("Document Title : " + ret );
               var ret = document.URL;
               alert("Document URL : " + ret );
               var ret = document.forms[0];
               alert("Document First Form : " + ret );
               var ret = document.forms[0].elements[1];
               alert("Second element : " + ret );
            } //
         -->
      </script>
   </head>

   <body>
      <h1 id = "title">This is main title</h1>
      <p>Click the following to see the result:</p>

      <form name = "FirstForm">
         <input type = "button" value = "Click Me" onclick = "myFunc();" />
         <input type = "button" value = "Cancel">
      </form>

      <form name = "SecondForm">
         <input type = "button" value = "Don't ClickMe"/>
      </form>
   </body>

</html>
Output
The following output is displayed on successful execution of the above code.

Note − This example returns the objects for forms and elements. We would have to access their values by using those object properties which are not discussed in this tutorial.
ES6 - Iterator
Introduction to Iterator
Iterator is an object which allows us to access a collection of objects one at a time.
The following built-in types are by default iterable −
- String
- Array
- Map
- Set
An object is considered iterable, if the object implements a function whose key is [Symbol.iterator] and returns an iterator. A for...of loop can be used to iterate a collection.
Example
The following example declares an array, marks, and iterates through it by using a for..of loop.
<script>
   let marks = [10,20,30]
   //check iterable using for..of
   for(let m of marks){
      console.log(m);
   }
</script>
The output of the above code will be as given below −
10
20
30
Example
The following example declares an array, marks and retrieves an iterator object. The [Symbol.iterator]() can be used to retrieve an iterator object. The next() method of the iterator returns an object with 'value' and 'done' properties . 'done' is Boolean and returns true after reading all items in the collection.
<script>
   let marks = [10,20,30]
   let iter = marks[Symbol.iterator]();
   console.log(iter.next())
   console.log(iter.next())
   console.log(iter.next())
   console.log(iter.next())
</script>
The output of the above code will be as shown below −
{value: 10, done: false}
{value: 20, done: false}
{value: 30, done: false}
{value: undefined, done: true}
Custom Iterable
Certain types in JavaScript are iterable (E.g. Array, Map etc.) while others are not (E.g. Class). JavaScript types which are not iterable by default can be iterated by using the iterable protocol.
The following example defines a class named CustomerList which stores multiple customer objects as an array. Each customer object has firstName and lastName properties.
To make this class iterable, the class must implement [Symbol.iterator]() function. This function returns an iterator object. The iterator object has a function next which returns an object {value:'customer',done:true/false}.
<script>
   //user defined iterable
   class CustomerList {
      constructor(customers){
         //adding customer objects to an array
         this.customers = [].concat(customers)
      }
      //implement iterator function
      [Symbol.iterator](){
         let count=0;
         let customers = this.customers
         return {
            next:function(){
            //retrieving a customer object from the array
               let customerVal = customers[count];
               count+=1;
               if(count<=customers.length){
                  return {
                     value:customerVal,
                     done:false
                  }
               }
               //return true if all customer objects are iterated
               return {done:true}
            }
         }
      }
   }
   //create customer objects
   let c1={
      firstName:'Sachin',
      lastName:'Tendulkar'
   }
   let c2={
      firstName:'Rahul',
      lastName:'Dravid'
   }
   //define a customer array and initialize it let customers=[c1,c2]
   //pass customers to the class' constructor
   let customersObj = new CustomerList(customers);
   //iterating using for..of
   for(let c of customersObj){
      console.log(c)
   }
   //iterating using the next() method
   let iter = customersObj[Symbol.iterator]();
   console.log(iter.next())
   console.log(iter.next())
   console.log(iter.next())
</script>
The output of the above code will be as follows −
{firstName: "Sachin", lastName: "Tendulkar"}
{firstName: "Rahul", lastName: "Dravid"}
{
   done: false
   value: {
      firstName: "Sachin",
      lastName: "Tendulkar"
   }
}
{
   done: false
   value: {
      firstName: "Rahul",
      lastName: "Dravid"
   }
}
{done: true}
Generator
Prior to ES6, functions in JavaScript followed a run-to completion model. ES6 introduces functions known as Generator which can stop midway and then continue from where it stopped.
A generator prefixes the function name with an asterisk * character and contains one or more yield statements. The yield keyword returns an iterator object.
Syntax
function * generator_name() {
   yield value1
   ...
   yield valueN
}
Example
The example defines a generator function getMarks with three yield statements. Unlike normal functions, the generator function getMarks(),when invoked, doesn’t execute the function but returns an iterator object that helps you to execute code inside the generator function.
On the first call to markIter.next() operations in the beginning would run and the yield statement pauses the execution of the generator. Subsequent calls to the markIter.next() will resume the generator function until the next yield expression.
<script>
   //define generator function
   function * getMarks(){
      console.log("Step 1")
      yield 10
      console.log("Step 2")
      yield 20
      console.log("Step 3")
      yield 30
      console.log("End of function")
   }
   //return an iterator object
      let markIter = getMarks()
   //invoke statements until first yield
      console.log(markIter.next())
   //resume execution after the last yield until second yield expression
      console.log(markIter.next())
   //resume execution after last yield until third yield expression
      console.log(markIter.next())
      console.log(markIter.next()) // iteration is completed;no value is returned
</script>
The output of the above code will be as mentioned below −
Step 1
{value: 10, done: false}
Step 2
{value: 20, done: false}
Step 3
{value: 30, done: false}
End of function
{value: undefined, done: true}
Example
The following example creates an infinite sequence of even numbers through
* evenNumberGenerator generator function.
We can iterate through all even numbers by using next() or using for of loop as shown below
<script>
   function * evenNumberGenerator(){
      let num = 0;
      while(true){
         num+=2
         yield num
      }
   }
   // display first two elements
   let iter = evenNumberGenerator();
   console.log(iter.next())
   console.log(iter.next())
   //using for of to iterate till 12
   for(let n of evenNumberGenerator()){
      if(n==12)break;
      console.log(n);
   }
</script>
The output of the above code will be as follows −
{value: 2, done: false}
{value: 4, done: false}
2
4
6
8
10
ES6 - Collections
ES6 introduces two new data structures: Maps and Sets.
Maps − This data structure enables mapping a key to a value.
Sets − Sets are similar to arrays. However, sets do not encourage duplicates.
Maps
The Map object is a simple key/value pair. Keys and values in a map may be primitive or objects.
Following is the syntax for the same.
new Map([iterable])
The parameter iterable represents any iterable object whose elements comprise of a key/value pair. Maps are ordered, i.e. they traverse the elements in the order of their insertion.
Map Properties
| Sr.No | Property & Description |
|---|---|
| 1 |
Map.prototype.size
This property returns the number of key/value pairs in the Map object. |
Understanding basic Map operations
The set() function sets the value for the key in the Map object. The set() function takes two parameters namely, the key and its value. This function returns the Map object.
The has() function returns a boolean value indicating whether the specified key is found in the Map object. This function takes a key as parameter.
var map = new Map();
map.set('name','Tutorial Point');
map.get('name'); // Tutorial point
The above example creates a map object. The map has only one element. The element key is denoted by name. The key is mapped to a value Tutorial point.
Note − Maps distinguish between similar values but bear different data types. In other words, an integer key 1 is considered different from a string key “1”. Consider the following example to better understand this concept
var map = new Map();
map.set(1,true);
console.log(map.has("1")); //false
map.set("1",true);
console.log(map.has("1")); //true
Output
false true
The set() method is also chainable. Consider the following example.
var roles = new Map();
roles.set('r1', 'User')
.set('r2', 'Guest')
.set('r3', 'Admin');
console.log(roles.has('r1'))
Output
True
The above example, defines a map object. The example chains the set() function to define the key/value pair.
The get() function is used to retrieve the value corresponding to the specified key.
The Map constructor can also be passed an array. Moreover, map also supports the use of spread operator to represent an array.
Example
var roles = new Map([
['r1', 'User'],
['r2', 'Guest'],
['r3', 'Admin'],
]);
console.log(roles.get('r2'))
The following output is displayed on successful execution of the above code.
Guest
Note − The get() function returns undefined if the key specified doesn’t exist in the map.
The set() replaces the value for the key, if it already exists in the map. Consider the following example.
var roles = new Map([
['r1', 'User'],
['r2', 'Guest'],
['r3', 'Admin'],
]);
console.log(`value of key r1 before set(): ${roles.get('r1')}`)
roles.set('r1','superUser')
console.log(`value of key r1 after set(): ${roles.get('r1')}`)
The following output is displayed on successful execution of the above code.
value of key r1 before set(): User value of key r1 after set(): superUser
Map Methods
| Sr.No | Method & Description |
|---|---|
| 1 |
Map.prototype.clear()
Removes all key/value pairs from the Map object. |
| 2 |
Map.prototype.delete(key)
Removes any value associated to the key and returns the value that Map.prototype.has(key) would have previously returned. Map.prototype.has(key) will return false afterwards. |
| 3 |
Map.prototype.entries()
Returns a new Iterator object that contains an array of [key, value] for each element in the Map object in insertion order. |
| 4 |
Map.prototype.forEach(callbackFn[, thisArg])
Calls callbackFn once for each key-value pair present in the Map object, in insertion order. If a thisArg parameter is provided to forEach, it will be used as the ‘this’ value for each callback . |
| 5 |
Map.prototype.keys()
Returns a new Iterator object that contains the keys for each element in the Map object in insertion order. |
| 6 |
Map.prototype.values()
Returns a new Iterator object that contains an array of [key, value] for each element in the Map object in insertion order. |
The for…of Loop
The following example illustrates traversing a map using the for…of loop.
'use strict'
var roles = new Map([
['r1', 'User'],
['r2', 'Guest'],
['r3', 'Admin'],
]);
for(let r of roles.entries())
console.log(`${r[0]}: ${r[1]}`);
The following output is displayed on successful execution of the above code.
r1: User r2: Guest r3: Admin
Weak Maps
A weak map is identical to a map with the following exceptions −
Its keys must be objects.
Keys in a weak map can be Garbage collected. Garbage collection is a process of clearing the memory occupied by unreferenced objects in a program.
A weak map cannot be iterated or cleared.
Example : Weak Map
'use strict'
let weakMap = new WeakMap();
let obj = {};
console.log(weakMap.set(obj,"hello"));
console.log(weakMap.has(obj));// true
The following output is displayed on successful execution of the above code.
WeakMap {}
true
Sets
A set is an ES6 data structure. It is similar to an array with an exception that it cannot contain duplicates. In other words, it lets you store unique values. Sets support both primitive values and object references.
Just like maps, sets are also ordered, i.e. elements are iterated in their insertion order. A set can be initialized using the following syntax.
Set Properties
| Sr.No | Property & Description |
|---|---|
| 1 |
Set.prototype.size
Returns the number of values in the Set object. |
Set Methods
| Sr.No | Method & Description |
|---|---|
| 1 |
Set.prototype.add(value)
Appends a new element with the given value to the Set object. Returns the Set object. |
| 2 |
Set.prototype.clear()
Removes all the elements from the Set object. |
| 3 |
Set.prototype.delete(value)
Removes the element associated to the value. |
| 4 |
Set.prototype.entries()
Returns a new Iterator object that contains an array of [value, value] for each element in the Set object, in insertion order. This is kept similar to the Map object, so that each entry has the same value for its key and value here. |
| 5 |
Set.prototype.forEach(callbackFn[, thisArg])
Calls callbackFn once for each value present in the Set object, in insertion order. If athisArg parameter is provided to forEach, it will be used as the ‘this’ value for each callback. |
| 6 |
Set.prototype.has(value)
Returns a boolean asserting whether an element is present with the given value in the Set object or not. |
| 7 |
Set.prototype.values()
Returns a new Iterator object that contains the values for each element in the Set object in insertion order. |
Weak Set
Weak sets can only contain objects, and the objects they contain may be garbage collected. Like weak maps, weak sets cannot be iterated.
Example: Using a Weak Set
'use strict'
let weakSet = new WeakSet();
let obj = {msg:"hello"};
weakSet.add(obj);
console.log(weakSet.has(obj));
weakSet.delete(obj);
console.log(weakSet.has(obj));
The following output is displayed on successful execution of the above code.
true false
Iterator
Iterator is an object which allows to access a collection of objects one at a time. Both set and map have methods which returns an iterator.
Iterators are objects with next() method. When next() method is invoked, it returns an object with 'value' and 'done' properties . 'done' is boolean, this will return true after reading all items in the collection
Example 1: Set and Iterator
var set = new Set(['a','b','c','d','e']); var iterator = set.entries(); console.log(iterator.next())
The following output is displayed on successful execution of the above code.
{ value: [ 'a', 'a' ], done: false }
Since, the set does not store key/value, the value array contains similar key and value. done will be false as there are more elements to be read.
Example 2: Set and Iterator
var set = new Set(['a','b','c','d','e']); var iterator = set.values(); console.log(iterator.next());
The following output is displayed on successful execution of the above code.
{ value: 'a', done: false }
Example 3: Set and Iterator
var set = new Set(['a','b','c','d','e']); var iterator = set.keys(); console.log(iterator.next());
The following output is displayed on successful execution of the above code.
{ value: 'a', done: false }
Example 4: Map and Iterator
var map = new Map([[1,'one'],[2,'two'],[3,'three']]); var iterator = map.entries(); console.log(iterator.next());
The following output is displayed on successful execution of the above code.
{ value: [ 1, 'one' ], done: false }
Example 5: Map and Iterator
var map = new Map([[1,'one'],[2,'two'],[3,'three']]); var iterator = map.values(); console.log(iterator.next());
The following output is displayed on successful execution of the above code.
{value: "one", done: false}
Example 6: Map and Iterator
var map = new Map([[1,'one'],[2,'two'],[3,'three']]); var iterator = map.keys(); console.log(iterator.next());
The following output is displayed on successful execution of the above code.
{value: 1, done: false}
ES6 - Classes
Object Orientation is a software development paradigm that follows real-world modelling. Object Orientation, considers a program as a collection of objects that communicates with each other via mechanism called methods. ES6 supports these object-oriented components too.
Object-Oriented Programming Concepts
To begin with, let us understand
Object − An object is a real-time representation of any entity. According to Grady Brooch, every object is said to have 3 features −
State − Described by the attributes of an object.
Behavior − Describes how the object will act.
Identity − A unique value that distinguishes an object from a set of similar such objects.
Class − A class in terms of OOP is a blueprint for creating objects. A class encapsulates data for the object.
Method − Methods facilitate communication between objects.
Let us translate these Object-Oriented concepts to the ones in the real world. For example: A car is an object that has data (make, model, number of doors, Vehicle Number, etc.) and functionality (accelerate, shift, open doors, turn on headlights, etc.)
Prior to ES6, creating a class was a fussy affair. Classes can be created using the class keyword in ES6.
Classes can be included in the code either by declaring them or by using class expressions.
Syntax: Declaring a Class
class Class_name {
}
Syntax: Class Expressions
var var_name = new Class_name {
}
The class keyword is followed by the class name. The rules for identifiers (already discussed) must be considered while naming a class.
A class definition can include the following −
Constructors − Responsible for allocating memory for the objects of the class.
Functions − Functions represent actions an object can take. They are also at times referred to as methods.
These components put together are termed as the data members of the class.
Note − A class body can only contain methods, but not data properties.
Example: Declaring a class
class Polygon {
constructor(height, width) {
this.height = height;
this.width = width;
}
}
Example: Class Expression
var Polygon = class {
constructor(height, width) {
this.height = height;
this.width = width;
}
}
The above code snippet represents an unnamed class expression. A named class expression can be written as.
var Polygon = class Polygon {
constructor(height, width) {
this.height = height;
this.width = width;
}
}
Note − Unlike variables and functions, classes cannot be hoisted.
Creating Objects
To create an instance of the class, use the new keyword followed by the class name. Following is the syntax for the same.
var object_name= new class_name([ arguments ])
Where,
The new keyword is responsible for instantiation.
The right hand side of the expression invokes the constructor. The constructor should be passed values if it is parameterized.
Example: Instantiating a class
var obj = new Polygon(10,12)
Accessing Functions
A class’s attributes and functions can be accessed through the object. Use the ‘.’ dot notation (called as the period) to access the data members of a class.
//accessing a function obj.function_name()
Example: Putting them together
'use strict'
class Polygon {
constructor(height, width) {
this.h = height;
this.w = width;
}
test() {
console.log("The height of the polygon: ", this.h)
console.log("The width of the polygon: ",this. w)
}
}
//creating an instance
var polyObj = new Polygon(10,20);
polyObj.test();
The Example given above declares a class ‘Polygon’. The class’s constructor takes two arguments - height and width respectively. The ‘this’ keyword refers to the current instance of the class. In other words, the constructor above initializes two variables h and w with the parameter values passed to the constructor. The test () function in the class, prints the values of the height and width.
To make the script functional, an object of the class Polygon is created. The object is referred to by the polyObj variable. The function is then called via this object.
The following output is displayed on successful execution of the above code.
The height of the polygon: 10 The width of the polygon: 20
Setters and Getters
Setters
A setter function is invoked when there is an attempt to set the value of a property. The set keyword is used to define a setter function. The syntax for defining a setter function is given below −
{set prop(val) { . . . }}
{set [expression](val) { . . . }}
prop is the name of the property to bind to the given function. val is an alias for the variable that holds the value attempted to be assigned to property. expression with ES6, can be used as a property name to bind to the given function.
Example
<script>
class Student {
constructor(rno,fname,lname){
this.rno = rno
this.fname = fname
this.lname = lname
console.log('inside constructor')
}
set rollno(newRollno){
console.log("inside setter")
this.rno = newRollno
}
}
let s1 = new Student(101,'Sachin','Tendulkar')
console.log(s1)
//setter is called
s1.rollno = 201
console.log(s1)
</script>
The above example defines a class Student with three properties namely rno, fname and lname. A setter function rollno() is used to set the value for the rno property.
The output of the above code will be as shown below −
inside constructor
Student {rno: 101, fname: "Sachin", lname: "Tendulkar"}
inside setter
Student {rno: 201, fname: "Sachin", lname: "Tendulkar"}
Example
The following example shows how to use an expression as a property name with a setter function.
<script>
let expr = 'name';
let obj = {
fname: 'Sachin',
set [expr](v) { this.fname = v; }
};
console.log(obj.fname);
obj.name = 'John';
console.log(obj.fname);
</script>
The output of the above code will be as mentioned below −
Sachin John
Getters
A getter function is invoked when there is an attempt to fetch the value of a property. The get keyword is used to define a getter function. The syntax for defining a getter function is given below −
{get prop() { ... } }
{get [expression]() { ... } }
prop is the name of the property to bind to the given function.
expression − Starting with ES6, you can also use expressions as a property name to bind to the given function.
Example
<script>
class Student {
constructor(rno,fname,lname){
this.rno = rno
this.fname = fname
this.lname = lname
console.log('inside constructor')
}
get fullName(){
console.log('inside getter')
return this.fname + " - "+this.lname
}
}
let s1 = new Student(101,'Sachin','Tendulkar')
console.log(s1)
//getter is called
console.log(s1.fullName)
</script>
The above example defines a class Student with three properties namely rno, fname and lname. The getter function fullName() concatenates the fname and lname and returns a new string.
The output of the above code will be as given below −
inside constructor
Student {rno: 101, fname: "Sachin", lname: "Tendulkar"}
inside getter
Sachin - Tendulkar
Example
The following example shows how to use an expression as a property name with a getter function −
<script>
let expr = 'name';
let obj = {
get [expr]() { return 'Sachin'; }
};
console.log(obj.name);
</script>
The output of the above code will be as mentioned below −
Sachin
The Static Keyword
The static keyword can be applied to functions in a class. Static members are referenced by the class name.
Example
'use strict'
class StaticMem {
static disp() {
console.log("Static Function called")
}
}
StaticMem.disp() //invoke the static metho
Note − It is not mandatory to include a constructor definition. Every class by default has a constructor by default.
The following output is displayed on successful execution of the above code.
Static Function called
The instanceof operator
The instanceof operator returns true if the object belongs to the specified type.
Example
'use strict'
class Person{ }
var obj = new Person()
var isPerson = obj instanceof Person;
console.log(" obj is an instance of Person " + isPerson);
The following output is displayed on successful execution of the above code.
obj is an instance of Person True
Class Inheritance
ES6 supports the concept of Inheritance. Inheritance is the ability of a program to create new entities from an existing entity - here a class. The class that is extended to create newer classes is called the parent class/super class. The newly created classes are called the child/sub classes.
A class inherits from another class using the ‘extends’ keyword. Child classes inherit all properties and methods except constructors from the parent class.
Following is the syntax for the same.
class child_class_name extends parent_class_name
Example: Class Inheritance
'use strict'
class Shape {
constructor(a) {
this.Area = a
}
}
class Circle extends Shape {
disp() {
console.log("Area of the circle: "+this.Area)
}
}
var obj = new Circle(223);
obj.disp()
The above example declares a class Shape. The class is extended by the Circle class. Since, there is an inheritance relationship between the classes, the child class i.e., the class Circle gets an implicit access to its parent class attribute i.e., area.
The following output is displayed on successful execution of the above code.
Area of Circle: 223
Inheritance can be classified as −
Single − Every class can at the most extend from one parent class.
Multiple − A class can inherit from multiple classes. ES6 doesn’t support multiple inheritance.
Multi-level − Consider the following example.
'use strict'
class Root {
test() {
console.log("call from parent class")
}
}
class Child extends Root {}
class Leaf extends Child
//indirectly inherits from Root by virtue of inheritance {}
var obj = new Leaf();
obj.test()
The class Leaf derives the attributes from the Root and the Child classes by virtue of multilevel inheritance.
The following output is displayed on successful execution of the above code.
call from parent class
Class Inheritance and Method Overriding
Method Overriding is a mechanism by which the child class redefines the superclass method. The following example illustrates the same −
'use strict' ;
class PrinterClass {
doPrint() {
console.log("doPrint() from Parent called… ");
}
}
class StringPrinter extends PrinterClass {
doPrint() {
console.log("doPrint() is printing a string…");
}
}
var obj = new StringPrinter();
obj.doPrint();
In the above Example, the child class has changed the superclass function’s implementation.
The following output is displayed on successful execution of the above code.
doPrint() is printing a string…
The Super Keyword
ES6 enables a child class to invoke its parent class data member. This is achieved by using the super keyword. The super keyword is used to refer to the immediate parent of a class.
Consider the following example −
'use strict'
class PrinterClass {
doPrint() {
console.log("doPrint() from Parent called…")
}
}
class StringPrinter extends PrinterClass {
doPrint() {
super.doPrint()
console.log("doPrint() is printing a string…")
}
}
var obj = new StringPrinter()
obj.doPrint()
The doPrint() redefinition in the class StringWriter, issues a call to its parent class version. In other words, the super keyword is used to invoke the doPrint() function definition in the parent class - PrinterClass.
The following output is displayed on successful execution of the above code.
doPrint() from Parent called. doPrint() is printing a string.
ES6 - Maps and Sets
ES6 introduces two new data structures − maps and sets. Let us learn about them in detail.
Maps
A map is an ordered collection of key-value pairs. Maps are similar to objects. However, there are some differences between maps and objects. These are listed below −
| Sr.No | Object | Map |
|---|---|---|
| 1 | Keys cannot be Object type | Keys can be any type |
| 2 | Keys are not ordered | Keys are ordered |
| 3 | not iterable | iterable |
Syntax
The syntax for Map is given below −
let map = new Map([iterable]) let map = new Map()
Example
The following example creates a map using an iterable constructor −
<script>
let andy = {ename:"Andrel"},
varun = {ename:"Varun"},
prijin = {ename:"Prijin"}
let empJobs = new Map([
[andy,'Software Architect'],
[varun,'Developer']]
);
console.log(empJobs)
</script>
The output of the above code is as shown below −
{{…} => "Software Architect", {…} => "Developer"}
Checking size of the map
The size property can be used to determine the number of values stored in the map.
Syntax
The syntax for checking the size of the map is given below −
map_name.size
Example
<script>
let daysMap = new Map();
daysMap.set('1', 'Monday');
daysMap.set('2', 'Tuesday');
daysMap.set('3', 'Wednesday');
console.log(daysMap.size);
</script>
The output of the above code is as shown below −
3
Following are some common methods that can be used to manipulate maps −
| Sr.No | Object & Map |
|---|---|
| 1 |
set(key,value)
Adds key and value to map |
| 2 |
get(key)
Returns value if key is matched |
| 3 |
has(key)
Returns true if an element with the specified key exists; else returns false |
| 4 |
keys()
Returns an iterator that contains the keys for each element in the map object |
| 5 |
values()
Returns an iterator that contains the values for each element in the map object |
| 6 |
entries()
Returns an iterator that contains the key-value pairs for each element in the Map |
| 7 |
delete(key)
Removes the specified element from a Map object |
WeakMap
WeakMap is a small subset of map. Keys are weakly referenced, so it can be non-primitive only. If there are no reference to the object keys, it will be subject to garbage collection.
- not iterable
- every key is object type
The WeakMap will allow garbage collection if the key has no reference.
Syntax
The syntax for WeakMap is stated below −
new WeakMap([iterable])
Example 1
<script> let emp = new WeakMap(); emp.set(10,'Sachin');// TypeError as keys should be object </script>
Example 2
<script>
let empMap = new WeakMap();
// emp.set(10,'Sachin');// Error as keys should be object
let e1= {ename:'Kiran'},
e2 = {ename:'Kannan'},
e3 = {ename:'Mohtashim'}
empMap.set(e1,1001);
empMap.set(e2,1002);
empMap.set(e3,1003);
console.log(empMap)
console.log(empMap.get(e2))
console.log(empMap.has(e2))
empMap.delete(e1)
console.log(empMap)
</script>
The output of the above code is as mentioned below −
{{…} => 1002, {…} => 1003, {…} => 1001}
1002
true
{{…} => 1002, {…} => 1003}
Set
A set is an unordered collection of unique values. This data structure can contain values of primitive and object types.
Syntax
The syntax for Set is given below −
new Set([iterable]) new Set()
Example
<script> let names = new Set(['A','B','C','D']); console.log(names) </script>
The output of the above code is as given below −
{"A", "B", "C", "D"}
Checking the size of a set
The size property of the Set object can be used to query the number of elements in the Set.
Syntax
The syntax for checking the size of a set is mentioned below −
set.size
Example
<script> let names = new Set(['A','B','C','D']); console.log(names.size) </script>
The output of the above code is as given below −
4
Iterating a Set
We can use the forEach and for..of loops to iterate through a Set. This is shown in the example below −
Example
<script>
let names= new Set(['A','B','C','D']);
//iterate using forEach
console.log('forEach')
names.forEach(n=>console.log(n))
console.log('for of..')
//iterate using for..of
for(let n of names){
console.log(n)
}
</script>
The output of the above code is as mentioned below −
forEach A B C D for of.. A B C D
The following methods can be used to manipulate a set −
| Sr.No | Object & Map |
|---|---|
| 1 |
add(element)
Adds an element to the Set |
| 2 |
has(element)
Returns true if element found; else returns false |
| 3 |
delete(element)
Delete specific element from the Set |
| 4 |
clear()
Clears all elements from the Set |
WeakSet
A Weakset holds objects weakly, that means object stored in a WeakSet are subject to garbage collection, if they are not referenced. WeakSets are not iterable and do not have the get method.
<script>
let e1 = {ename:'A'}
let e2 ={ename:'B'}
let e3 ={ename:'C'}
let emps = new WeakSet();
emps.add(e1);
emps.add(e2)
.add(e3);
console.log(emps)
console.log(emps.has(e1))
emps.delete(e1);
console.log(emps)
</script>
The output of the above code will be as mentioned below −
WeakSet {{…}, {…}, {…}}
true
WeakSet {{…}, {…}}
ES6 - Promises
Promise Syntax
The Syntax related to promise is mentioned below where, p is the promise object, resolve is the function that should be called when the promise executes successfully and reject is the function that should be called when the promise encounters an error.
let p = new Promise(function(resolve,reject){
let workDone = true; // some time consuming work
if(workDone){
//invoke resolve function passed
resolve('success promise completed')
}
else{
reject('ERROR , work could not be completed')
}
})
Example
The example given below shows a function add_positivenos_async() which adds two numbers asynchronously. The promise is resolved if positive values are passed. The promise is rejected if negative values are passed.
<script>
function add_positivenos_async(n1, n2) {
let p = new Promise(function (resolve, reject) {
if (n1 >= 0 && n2 >= 0) {
//do some complex time consuming work
resolve(n1 + n2)
}
else
reject('NOT_Postive_Number_Passed')
})
return p;
}
add_positivenos_async(10, 20)
.then(successHandler) // if promise resolved
.catch(errorHandler);// if promise rejected
add_positivenos_async(-10, -20)
.then(successHandler) // if promise resolved
.catch(errorHandler);// if promise rejected
function errorHandler(err) {
console.log('Handling error', err)
}
function successHandler(result) {
console.log('Handling success', result)
}
console.log('end')
</script>
The output of the above code will be as mentioned below −
end Handling success 30 Handling error NOT_Postive_Number_Passed
Promises Chaining
Promises chaining can be used when we have a sequence of asynchronous tasks to be done one after another. Promises are chained when a promise depends on the result of another promise. This is shown in the example below
Example
In the below example, add_positivenos_async() function adds two numbers asynchronously and rejects if negative values are passed. The result from the current asynchronous function call is passed as parameter to the subsequent function calls. Note each then() method has a return statement.
<script>
function add_positivenos_async(n1, n2) {
let p = new Promise(function (resolve, reject) {
if (n1 >= 0 && n2 >= 0) {
//do some complex time consuming work
resolve(n1 + n2)
}
else
reject('NOT_Postive_Number_Passed')
})
return p;
}
add_positivenos_async(10,20)
.then(function(result){
console.log("first result",result)
return add_positivenos_async(result,result)
}).then(function(result){
console.log("second result",result)
return add_positivenos_async(result,result)
}).then(function(result){
console.log("third result",result)
})
console.log('end')
</script>
The output of the above code will be as stated below −
end first result 30 second result 60 third result 120
Some common used methods of the promise object are discussed below in detail −
promise.all()
This method can be useful for aggregating the results of multiple promises.
Syntax
The syntax for the promise.all() method is mentioned below, where, iterable is an iterable object. E.g. Array.
Promise.all(iterable);
Example
The example given below executes an array of asynchronous operations [add_positivenos_async(10,20),add_positivenos_async(30,40),add_positivenos_async(50,60)]. When all the operations are completed, the promise is fully resolved.
<script>
function add_positivenos_async(n1, n2) {
let p = new Promise(function (resolve, reject) {
if (n1 >= 0 && n2 >= 0) {
//do some complex time consuming work
resolve(n1 + n2)
}
else
reject('NOT_Postive_Number_Passed')
})
return p;
}
//Promise.all(iterable)
Promise.all([add_positivenos_async(10,20),add_positivenos_async(30,40),add_positivenos_async(50,60)])
.then(function(resolveValue){
console.log(resolveValue[0])
console.log(resolveValue[1])
console.log(resolveValue[2])
console.log('all add operations done')
})
.catch(function(err){
console.log('Error',err)
})
console.log('end')
</script>
The output of the above code will be as follows −
end 30 70 110 all add operations done
promise.race()
This function takes an array of promises and returns the first promise that is settled.
Syntax
The syntax for the promise.race() function is mentioned below, where, iterable is an iterable object. E.g. Array.
Promise.race(iterable)
Example
The example given below takes an array [add_positivenos_async(10,20),add_positivenos_async(30,40)] of asynchronous operations.
The promise is resolved whenever any one of the add operation completes. The promise will not wait for other asynchronous operations to complete.
<script>
function add_positivenos_async(n1, n2) {
let p = new Promise(function (resolve, reject) {
if (n1 >= 0 && n2 >= 0) {
//do some complex time consuming work
resolve(n1 + n2)
} else
reject('NOT_Postive_Number_Passed')
})
return p;
}
//Promise.race(iterable)
Promise.race([add_positivenos_async(10,20),add_positivenos_async(30,40)])
.then(function(resolveValue){
console.log('one of them is done')
console.log(resolveValue)
}).catch(function(err){
console.log("Error",err)
})
console.log('end')
</script>
The output of the above code will be as follows −
end one of them is done 30
Promises are a clean way to implement async programming in JavaScript (ES6 new feature). Prior to promises, Callbacks were used to implement async programming. Let’s begin by understanding what async programming is and its implementation, using Callbacks.
Understanding Callback
A function may be passed as a parameter to another function. This mechanism is termed as a Callback. A Callback would be helpful in events.
The following example will help us better understand this concept.
<script>
function notifyAll(fnSms, fnEmail) {
console.log('starting notification process');
fnSms();
fnEmail();
}
notifyAll(function() {
console.log("Sms send ..");
},
function() {
console.log("email send ..");
});
console.log("End of script");
//executes last or blocked by other methods
</script>
In the notifyAll() method shown above, the notification happens by sending SMS and by sending an e-mail. Hence, the invoker of the notifyAll method has to pass two functions as parameters. Each function takes up a single responsibility like sending SMS and sending an e-mail.
The following output is displayed on successful execution of the above code.
starting notification process Sms send .. Email send .. End of script
In the code mentioned above, the function calls are synchronous. It means the UI thread would be waiting to complete the entire notification process. Synchronous calls become blocking calls. Let's understand non-blocking or async calls now.
Understanding AsyncCallback
Consider the above example.
To enable the script, execute an asynchronous or a non-blocking call to notifyAll() method. We shall use the setTimeout() method of JavaScript. This method is async by default.
The setTimeout() method takes two parameters −
A callback function.
The number of seconds after which the method will be called.
In this case, the notification process has been wrapped with timeout. Hence, it will take a two seconds delay, set by the code. The notifyAll() will be invoked and the main thread goes ahead like executing other methods. Hence, the notification process will not block the main JavaScript thread.
<script>
function notifyAll(fnSms, fnEmail) {
setTimeout(function() {
console.log('starting notification process');
fnSms();
fnEmail();
}, 2000);
}
notifyAll(function() {
console.log("Sms send ..");
},
function() {
console.log("email send ..");
});
console.log("End of script"); //executes first or not blocked by others
</script>
The following output is displayed on successful execution of the above code.
End of script starting notification process Sms send .. Email send ..
In case of multiple callbacks, the code will look scary.
<script>
setTimeout(function() {
console.log("one");
setTimeout(function() {
console.log("two");
setTimeout(function() {
console.log("three");
}, 1000);
}, 1000);
}, 1000);
</script>
ES6 comes to your rescue by introducing the concept of promises. Promises are "Continuation events" and they help you execute the multiple async operations together in a much cleaner code style.
Example
Let's understand this with an example. Following is the syntax for the same.
var promise = new Promise(function(resolve , reject) {
// do a thing, possibly async , then..
if(/*everthing turned out fine */) resolve("stuff worked");
else
reject(Error("It broke"));
});
return promise;
// Give this to someone
The first step towards implementing the promises is to create a method which will use the promise. Let’s say in this example, the getSum() method is asynchronous i.e., its operation should not block other methods’ execution. As soon as this operation completes, it will later notify the caller.
The following example (Step 1) declares a Promise object ‘var promise’. The Promise Constructor takes to the functions first for the successful completion of the work and another in case an error happens.
The promise returns the result of the calculation by using the resolve callback and passing in the result, i.e., n1+n2
Step 1 − resolve(n1 + n2);
If the getSum() encounters an error or an unexpected condition, it will invoke the reject callback method in the Promise and pass the error information to the caller.
Step 2 − reject(Error("Negatives not supported"));
The method implementation is given in the following code (STEP 1).
function getSum(n1, n2) {
varisAnyNegative = function() {
return n1 < 0 || n2 < 0;
}
var promise = new Promise(function(resolve, reject) {
if (isAnyNegative()) {
reject(Error("Negatives not supported"));
}
resolve(n1 + n2)
});
return promise;
}
The second step details the implementation of the caller (STEP 2).
The caller should use the ‘then’ method, which takes two callback methods - first for success and second for failure. Each method takes one parameter, as shown in the following code.
getSum(5, 6)
.then(function (result) {
console.log(result);
},
function (error) {
console.log(error);
});
The following output is displayed on successful execution of the above code.
11
Since the return type of the getSum() is a Promise, we can actually have multiple ‘then’ statements. The first 'then' will have a return statement.
getSum(5, 6)
.then(function(result) {
console.log(result);
returngetSum(10, 20);
// this returns another promise
},
function(error) {
console.log(error);
})
.then(function(result) {
console.log(result);
},
function(error) {
console.log(error);
});
The following output is displayed on successful execution of the above code.
11 30
The following example issues three then() calls with getSum() method.
<script>
function getSum(n1, n2) {
varisAnyNegative = function() {
return n1 < 0 || n2 < 0;
}
var promise = new Promise(function(resolve, reject) {
if (isAnyNegative()) {
reject(Error("Negatives not supported"));
}
resolve(n1 + n2);
});
return promise;
}
getSum(5, 6)
.then(function(result) {
console.log(result);
returngetSum(10, 20);
//this returns another Promise
},
function(error) {
console.log(error);
})
.then(function(result) {
console.log(result);
returngetSum(30, 40);
//this returns another Promise
},
function(error) {
console.log(error);
})
.then(function(result) {
console.log(result);
},
function(error) {
console.log(error);
});
console.log("End of script ");
</script>
The following output is displayed on successful execution of the above code.
The program displays ‘end of script’ first and then results from calling getSum() method, one by one.
End of script 11 30 70
This shows getSum() is called in async style or non-blocking style. Promise gives a nice and clean way to deal with the Callbacks.
ES6 - Modules
Introduction
Consider a scenario where parts of JavaScript code need to be reused. ES6 comes to your rescue with the concept of Modules.
A module organizes a related set of JavaScript code. A module can contain variables and functions. A module is nothing more than a chunk of JavaScript code written in a file. By default, variables and functions of a module are not available for use. Variables and functions within a module should be exported so that they can be accessed from within other files. Modules in ES6 work only in strict mode. This means variables or functions declared in a module will not be accessible globally.
Exporting a Module
The export keyword can be used to export components in a module. Exports in a module can be classified as follows −
- Named Exports
- Default Exports
Named Exports
Named exports are distinguished by their names. There can be several named exports in a module. A module can export selected components using the syntax given below −
Syntax 1
//using multiple export keyword export component1 export component2 ... ... export componentN
Syntax 2
Alternatively, components in a module can also be exported using a single export keyword with {} binding syntax as shown below −
//using single export keyword
export {component1,component2,....,componentN}
Default Exports
Modules that need to export only a single value can use default exports. There can be only one default export per module.
Syntax
export default component_name
However, a module can have a default export and multiple named exports at the same time.
Importing a Module
To be able to consume a module, use the import keyword. A module can have multiple import statements.
Importing Named Exports
While importing named exports, the names of the corresponding components must match.
Syntax
import {component1,component2..componentN} from module_name
However, while importing named exports, they can be renamed using the as keyword. Use the syntax given below −
import {original_component_name as new_component_name }
All named exports can be imported onto an object by using the asterisk * operator.
import * as variable_name from module_name
Importing Default Exports
Unlike named exports, a default export can be imported with any name.
Syntax
import any_variable_name from module_name
Example: Named Exports
Step 1 − Create a file company1.js and add the following code −
let company = "TutorialsPoint"
let getCompany = function(){
return company.toUpperCase()
}
let setCompany = function(newValue){
company = newValue
}
export {company,getCompany,setCompany}
Step 2 − Create a file company2.js. This file consumes components defined in the company1.js file. Use any of the following approaches to import the module.
Approach 1
import {company,getCompany} from './company1.js'
console.log(company)
console.log(getCompany())
Approach 2
import {company as x, getCompany as y} from './company1.js'
console.log(x)
console.log(y())
Approach 3
import * as myCompany from './company1.js' console.log(myCompany.getCompany()) console.log(myCompany.company)
Step 3 − Execute the modules using an HTML file
To execute both the modules we need to make a html file as shown below and run this in live server. Note that we should use the attribute type="module" in the script tag.
<!DOCTYPE html> <html lang="en"> <head> <meta charset="UTF-8"> <meta name="viewport" content="width=device-width, initial-scale=1.0"> <meta http-equiv="X-UA-Compatible" content="ie=edge"> <title>Document</title> </head> <body> <script src="./company2.js" type="module"></script> </body> </html>
The output of the above code will be as stated below −
TutorialsPoint TUTORIALSPOINT
Default Export
Step 1 − Create a file company1.js and add the following code −
let name = 'TutorialsPoint'
let company = {
getName:function(){
return name
},
setName:function(newName){
name = newName
}
}
export default company
Step 2 − Create a file company2.js. This file consumes the components defined in the company1.js file.
import c from './company1.js'
console.log(c.getName())
c.setName('Google Inc')
console.log(c.getName())
Step 3 − Execute the modules using an HTML file
To execute both the modules we need to make an html file as shown below and run this in live server. Note that we should use the attribute type="module" in the script tag.
<!DOCTYPE html> <html lang="en"> <head> <meta charset="UTF-8"> <meta name="viewport" content="width=device-width, initial-scale=1.0"> <meta http-equiv="X-UA-Compatible" content="ie=edge"> <title>Document</title> </head> <body> <script src="./company2.js" type="module"></script> </body> </html>
The output of the above code will be as mentioned below −
TutorialsPoint Google Inc
Example: Combining Default and Named Exports
Step 1 − Create a file company1.js and add the following code −
//named export
export let name = 'TutorialsPoint'
let company = {
getName:function(){
return name
},
setName:function(newName){
name =newName
}
}
//default export
export default company
Step 2 − Create a file company2.js. This file consumes the components defined in the company1.js file. Import the default export first, followed by the named exports.
import c, {name} from './company1.js'
console.log(name)
console.log(c.getName())
c.setName("Mohtashim")
console.log(c.getName())
Step 3 − Execute the modules using an HTML file
<!DOCTYPE html>
<html lang="en">
<head>
<meta charset="UTF-8">
<meta name="viewport" content="width=device-width, initial-scale=1.0">
<meta http-equiv="X-UA-Compatible" content="ie=edge">
<title>Document</title>
</head>
<body>
<script src="company2.js" type="module"></script>
</body>
</html>
The output of the above code will be as shown below −
TutorialsPoint TutorialsPoint Mohtashim
ES6 - Error Handling
There are three types of errors in programming: Syntax Errors, Runtime Errors, and Logical Errors.
Syntax Errors
Syntax errors, also called parsing errors, occur at compile time in traditional programming languages and at interpret time in JavaScript. When a syntax error occurs in JavaScript, only the code contained within the same thread as the syntax error is affected and the rest of the code in other threads get executed assuming nothing in them depends on the code containing the error.
Runtime Errors
Runtime errors, also called exceptions, occur during execution (after compilation/interpretation). Exceptions also affect the thread in which they occur, allowing other JavaScript threads to continue normal execution.
Logical Errors
Logic errors can be the most difficult type of errors to track down. These errors are not the result of a syntax or runtime error. Instead, they occur when you make a mistake in the logic that drives your script and you do not get the result as expected.
You cannot catch those errors, because it depends on your business requirement, what type of logic you want to put in your program.
JavaScript throws instances of the Error object when runtime errors occur. The following table lists predefined types of the Error object.
| Sr.No | Error Object & Description |
|---|---|
| 1 |
EvalError Creates an instance representing an error that occurs regarding the global function eval(). |
| 2 |
RangeError Creates an instance representing an error that occurs when a numeric variable or parameter is outside of its valid range. |
| 3 |
ReferenceError Creates an instance representing an error that occurs when dereferencing an invalid reference. |
| 4 |
SyntaxError Creates an instance representing a syntax error that occurs while parsing the code. |
| 5 |
TypeError Creates an instance representing an error that occurs when a variable or parameter is not of a valid type. |
| 6 |
URIError Creates an instance representing an error that occurs when encodeURI() or decodeURI() are passed invalid parameters. |
Throwing Exceptions
An error (predefined or user defined) can be raised using the throw statement. Later these exceptions can be captured and you can take an appropriate action. Following is the syntax for the same.
Syntax: Throwing a generic exception
throw new Error([message]) OR throw([message])
Syntax: Throwing a specific exception
throw new Error_name([message])
Exception Handling
Exception handling is accomplished with a try...catch statement. When the program encounters an exception, the program will terminate in an unfriendly fashion. To safeguard against this unanticipated error, we can wrap our code in a try...catch statement.
The try block must be followed by either exactly one catch block or one finally block (or one of both). When an exception occurs in the try block, the exception is placed in e and the catch block is executed. The optional finally block executes unconditionally after try/catch
Following is the syntax for the same.
try {
// Code to run
[break;]
} catch ( e ) {
// Code to run if an exception occurs
[break;]
}[ finally {
// Code that is always executed regardless of
// an exception occurring
}]
Example
var a = 100;
var b = 0;
try {
if (b == 0 ) {
throw(“Divide by zero error.”);
} else {
var c = a / b;
}
}
catch( e ) {
console.log("Error: " + e );
}
Output
The following output is displayed on successful execution of the above code.
Error: Divide by zero error
Note − Note: You can raise an exception in one function and then you can capture that exception either in the same function or in the caller function using a try...catch block.
The onerror( ) Method
The onerror event handler was the first feature to facilitate error handling in JavaScript. The error event is fired on the window object whenever an exception occurs on the page.
Example
<html>
<head>
<script type = "text/javascript">
window.onerror = function () {
document.write ("An error occurred.");
}
</script>
</head>
<body>
<p>Click the following to see the result:</p>
<form>
<input type = "button" value = "Click Me" onclick = "myFunc();" />
</form>
</body>
</html>
Output
The following output is displayed on successful execution of the above code.

The onerror event handler provides three pieces of information to identify the exact nature of the error −
Error message − The same message that the browser would display for the given error.
URL − The file in which the error occurred.
Line number − The line number in the given URL that caused the error.
The following example shows how to extract this information.
Example
<html>
<head>
<script type = "text/javascript">
window.onerror = function (msg, url, line) {
document.write ("Message : " + msg );
document.write ("url : " + url );
document.write ("Line number : " + line );
}
</script>
</head>
<body>
<p>Click the following to see the result:</p>
<form>
<input type = "button" value = "Click Me" onclick = "myFunc();" />
</form>
</body>
</html>
Custom Errors
JavaScript supports the concept of custom errors. The following example explains the same.
Example 1: Custom Error with default message
function MyError(message) {
this.name = 'CustomError';
this.message = message || 'Error raised with default message';
}
try {
throw new MyError();
} catch (e) {
console.log(e.name);
console.log(e.message); // 'Default Message'
}
The following output is displayed on successful execution of the above code.
CustomError Error raised with default message
Example 2: Custom Error with user-defined error message
function MyError(message) {
this.name = 'CustomError';
this.message = message || 'Default Error Message';
} try {
throw new MyError('Printing Custom Error message');
}
catch (e) {
console.log(e.name);
console.log(e.message);
}
The following output is displayed on successful execution of the above code.
CustomError Printing Custom Error message
ES6 - Object Extensions
String extension
Some popular methods added to the String object in ES6 are −
| Sr.No | Method & Description |
|---|---|
| 1 |
str.startsWith(searchString[, position])
determines whether a string begins with the characters of a specified string. Returns true or false |
| 2 |
str.endsWith(searchString[, length])
determines whether a string ends with the characters of a specified string. Returns true/false |
| 3 |
str.includes(searchString[, position])
determines whether one string may be found within another string |
| 4 |
str.repeat(count)
constructs and returns a new string which contains the specified number of copies of the string on which it was called, concatenated together |
Regex extensions
In a regular expression, for example, /[A-Z]/g, the beginning and ending / are called delimiters. Anything after the closing delimiter is called a modifier. ES6 adds a new modifier /g where g stands for global. This match all instances of the pattern in a string, not just one.
Example
The following example searches and returns all upper-case characters in the string.
<script> let str = 'JJavascript is Fun to Work , very Fun ' let regex = /[A-Z]/g // g stands for global matches let result = str.match(regex); console.log(result) </script>
The output of the above code will be as given below −
["J", "J", "F", "W", "F"]
Regular expression searches are case-sensitive. To turn-off case-sensitivity, use the /i modifier.
Example
The following example performs a case insensitive global match. The example replaces fun with enjoyable.
<script> // /gi global match ignore case let str = 'Javascript is fun to Work , very Fun ' let regex = /Fun/gi; console.log(str.replace(regex,'enjoyable')); console.log(str) console.log(str.search(regex)) </script>
The output of the above code will be as shown below −
Javascript is enjoyable to Work , very enjoyable Javascript is fun to Work , very Fun 15
Number
Some popular methods added to the Number object in ES6 are −
| Sr.No | Method & Description |
|---|---|
| 1 |
Number.isFinite(value)
method determines whether the passed value is a finite number. Returns true/false. |
| 2 |
Number.isNaN(value)
returns true if the given value is NaN and its type is Number; otherwise, false. |
| 3 |
Number.parseFloat(string)
A floating-point number parsed from the given value. If the value cannot be converted to a number, NaN is returned. |
| 4 |
Number.parseInt(string,[ radix])
method parses a string argument and returns an integer of the specified radix or base. |
Math
Some popular methods added to the Math object in ES6 are −
| Sr.No | Method & Description |
|---|---|
| 1 |
Math.sign()
function returns the sign of a number, indicating whether the number is positive, negative or zero. |
| 2 |
Math.trunc()
function returns the integer part of a number by removing any fractional digits. |
Methods of Array in ES6
The table given below highlights the different array methods in ES6 along with the description.
| Sr.No | Method & Description |
|---|---|
| 1 |
copyWithin()
shallow copies part of an array to another location in the same array and returns it without modifying its length. |
| 2 |
entries()
method returns a new Array Iterator object that contains the key/value pairs for each index in the array. |
| 3 |
find()
method returns the value of the first element in the array that satisfies the provided testing function. Otherwise undefined is returned.. |
| 4 |
fill()
method fills all the elements of an array from a start index to an end index with a static value. It returns the modified array. |
| 5 |
Array.of()
method creates a new Array instance from a variable number of arguments, regardless of number or type of the arguments. |
| 6 |
Array.from()
method creates a shallow copy from an array like or iterable object. |
Object
Methods related to Object function are mentioned below in the table along with the respective description.
| Sr.No | Method & Description |
|---|---|
| 1 |
Object.is()
method determines whether two values are the same value |
| 2 |
Object.setPrototypeOf()
method sets the prototype of a specified object to another object or null. |
| 3 |
Object.assign()
method is used to copy the values of all enumerable own properties from one or more source objects to a target object. It will return the target object. |
ES6 - Reflect API
ES6 introduces new features around meta-programming which involves inspecting or modifying the structure of the program, or changing the way things work in the language itself.
Following are the three forms of meta programming −
Introspection − Introspection means a program gathering information about itself. Some examples of JavaScript operators that are used for introspection are typeof, instanceof etc.
Self-modification − Self-modification refers to modifying the structure of a program at runtime. It involves accessing or creating new properties at runtime. In other words, self-modification is when some code modifies itself.
Intercession − refers to code modifying the default behavior of a programming language. Intercession involves modifying semantics of the programming language or adding new constructs to the program at runtime.
ES6 introduces Reflect Application Programming Interface (Reflect API) and Proxy API that supports meta programming.
Meta Programming with Reflect API
Reflect API in ES6 allows us to inspect, or modify classes, objects, properties, and methods of a program at runtime. The Reflect API provides global Reflect object which has static methods that can be used for introspection. These methods are used to discover low level information about the code. The Reflect API can be used to build automation testing frameworks that examine and introspect program at runtime.
Some commonly used methods of the Reflect object are given below −
| Sr.No | Method & Description |
|---|---|
| 1 |
Reflect.apply()
Calls a target function with arguments as specified by the args parameter |
| 2 |
Reflect.construct()
Equivalent to calling new target(...args) objects of a class |
| 3 |
Reflect.get()
A function that returns the value of properties. |
| 4 |
Reflect.set()
A function that assigns values to properties. Returns a Boolean that is true if the update was successful. |
| 5 |
Reflect.has()
The in operator as function. Returns a Boolean indicating whether an own or inherited property exists. |
ES6 - Proxy API
ES6 implements intercession form of meta programming using Proxies. Similar to ReflectAPI, the Proxy API is another way of implementing meta programming in ES6. The Proxy object is used to define custom behavior for fundamental operations. A proxy object performs some operations on behalf of the real object.
The various terminologies related to ES6 proxies are given below
| Sr.No | Method & Description |
|---|---|
| 1 | handler Placeholder object which contains traps |
| 2 | traps The methods that provide property access. This is analogous to the concept of traps in operating systems |
| 1 | target Object which the proxy virtualizes. It is often used as storage backend for the proxy. |
Syntax
The syntax stated below is for the Proxy API, where, target can be any sort of object like array, function or another proxy and handler is an object whose properties are functions. This defines the behavior of the proxy.
const proxy = new Proxy(target,handler)
Handler Methods
The handler object contains traps for Proxy. All traps are optional. If a trap has not been defined, the default behavior is to forward the operation to the target. Some common handler methods are as follows −
| Sr.No | Method & Description |
|---|---|
| 1 |
handler.apply()
A trap for a function call. |
| 2 |
handler.construct()
A trap for the new operator. |
| 3 |
handler.get()
A trap for getting property values. |
| 4 |
handler.set()
A trap for setting property values. |
| 5 |
handler.has()
TA trap for the in operator. |
ES6 - Validations
Form validation normally used to occur at the server, after the client had entered all the necessary data and then pressed the Submit button. If the data entered by the client was incorrect or was simply missing, the server would have to send all the data back to the client and request that the form be resubmitted with the correct information. This was really a lengthy process which used to put a lot of burden on the server.
JavaScript provides a way to validate the form's data on the client's computer before sending it to the web server. Form validation generally performs two functions.
Basic Validation − First of all, the form must be checked to make sure all the mandatory fields are filled in. It would require just a loop through each field in the form and check for data.
Data Format Validation − Secondly, the data that is entered must be checked for correct form and value. Your code must include appropriate logic to test the correctness of data.
Example
We will take an example to understand the process of validation. Here is a simple form in html format.
<html>
<head>
<title>Form Validation</title>
<script type = "text/javascript">
<!--
// Form validation code will come here.
//
-->
</script>
</head>
<body>
<form action = "/cgi-bin/test.cgi" name = "myForm" onsubmit = "return(validate());">
<table cellspacing = "2" cellpadding = "2" border = "1">
<tr>
<td align = "right">Name</td>
<td><input type = "text" name = "Name" /></td>
</tr>
<tr>
<td align = "right">EMail</td>
<td><input type = "text" name = "EMail" /></td>
</tr>
<tr>
<td align = "right">Zip Code</td>
<td><input type = "text" name = "Zip" /></td>
</tr>
<tr>
<td align = "right">Country</td>
<td>
<select name = "Country">
<option value = "-1" selected>[choose yours]</option>
<option value = "1">USA</option>
<option value = "2">UK</option>
<option value = "3">INDIA</option>
</select>
</td>
</tr>
<tr>
<td align = "right"></td>
<td><input type = "submit" value = "Submit" /></td>
</tr>
</table>
</form>
</body>
</html>
Output
The following output is displayed on successful execution of the above code.
Basic Form Validation
First let us see how to do a basic form validation. In the above form, we are calling validate() to validate data when onsubmit event is occurring. The following code shows the implementation of this validate() function.
<script type = "text/javascript">
<!--
// Form validation code will come here. function validate() {
if( document.myForm.Name.value == "" ) {
alert( "Please provide your name!" );
document.myForm.Name.focus() ;
return false;
}
if( document.myForm.EMail.value == "" ) {
alert( "Please provide your Email!" );
document.myForm.EMail.focus() ;
return false;
}
if( document.myForm.Zip.value == "" ||
isNaN( document.myForm.Zip.value ) ||
document.myForm.Zip.value.length != 5 ) {
alert( "Please provide a zip in the format #####." );
document.myForm.Zip.focus() ;
return false;
}
if( document.myForm.Country.value == "-1" ) {
alert( "Please provide your country!" );
return false;
}
return( true );
}
//
-->
</script>
Data Format Validation
Now we will see how we can validate our entered form data before submitting it to the web server.
The following example shows how to validate an entered email address. An email address must contain at least a ‘@’ sign and a dot (.). Also, the ‘@’ must not be the first character of the email address, and the last dot must at least be one character after the ‘@’ sign
Example
Try the following code for email validation.
<script type = "text/javascript">
<!--
function validateEmail() {
var emailID = document.myForm.EMail.value;
atpos = emailID.indexOf("@");
dotpos = emailID.lastIndexOf(".");
if (atpos < 1 || ( dotpos - atpos < 2 )) {
alert("Please enter correct email ID")
document.myForm.EMail.focus() ;
return false;
}
return( true );
}
//
--<
</script>
ES6 - Animation
You can use JavaScript to create a complex animation having, but not limited to, the following elements −
- Fireworks
- Fade effect
- Roll-in or Roll-out
- Page-in or Page-out
- Object movements
In this chapter, we will see how to use JavaScript to create an animation.
JavaScript can be used to move a number of DOM elements (<img />, <div>, or any other HTML element) around the page according to some sort of pattern determined by a logical equation or function.
JavaScript provides the following functions to be frequently used in animation programs.
setTimeout(function, duration) − This function calls the function after duration milliseconds from now.
setInterval(function, duration) − This function calls the function after every duration milliseconds.
clearTimeout(setTimeout_variable) − This function clears any timer set by the setTimeout() function.
JavaScript can also set a number of attributes of a DOM object including its position on the screen. You can set the top and the left attribute of an object to position it anywhere on the screen. Following is the syntax for the same.
// Set distance from left edge of the screen. object.style.left = distance in pixels or points; or // Set distance from top edge of the screen. object.style.top = distance in pixels or points;
Manual Animation
So let's implement one simple animation using DOM object properties and JavaScript functions as follows. The following list contains different DOM methods.
We are using the JavaScript function getElementById() to get a DOM object and then assigning it to a global variable imgObj.
We have defined an initialization function init() to initialize imgObj where we have set its position and left attributes.
We are calling initialization function at the time of window load.
We are calling moveRight() function to increase the left distance by 10 pixels. You could also set it to a negative value to move it to the left side.
Example
Try the following example
<html>
<head>
<title>JavaScript Animation</title>
<script type = "text/javascript">
<!--
var imgObj = null; function init(){
imgObj = document.getElementById('myImage');
imgObj.style.position = 'relative';
imgObj.style.left = '0px';
}
function moveRight(){
imgObj.style.left = parseInt(
imgObj.style.left) + 10 + 'px';
}
window.onload = init;
//
-->
</script>
</head>
<body>
<form>
<img id = "myImage" src = "/images/html.gif" />
<p>Click button below to move the image to right</p>
<input type = "button" value = "Click Me" onclick = "moveRight();" />
</form>
</body>
</html>
Automated Animation
In the above example, we saw how an image moves to the right with every click. We can automate this process by using the JavaScript function setTimeout() as follows.
Here we have added more methods. So, let's see what is new here.
The moveRight() function is calling setTimeout() function to set the position of imgObj.
We have added a new function stop() to clear the timer set by setTimeout() function and to set the object at its initial position.
Example
Try the following example code.
<html>
<head>
<title>JavaScript Animation</title>
<script type = "text/javascript">
<!--
var imgObj = null; var animate ; function init(){
imgObj = document.getElementById('myImage');
imgObj.style.position = 'relative';
imgObj.style.left = '0px';
}
function moveRight(){
imgObj.style.left = parseInt(imgObj.style.left) + 10 + 'px';
animate = setTimeout(moveRight,20);
// call moveRight in 20msec
}
function stop() {
clearTimeout(animate);
imgObj.style.left = '0px';
}
window.onload = init;
//
-->
</script>
</head>
<body>
<form>
<img id = "myImage" src = "/images/html.gif" />
<p>Click the buttons below to handle animation</p>
<input type="button" value="Start" onclick = "moveRight();" />
<input type = "button" value="Stop" onclick = "stop();" />
</form>
</body>
</html>
Rollover with a Mouse Event
Here is a simple example showing the image rollover with a mouse event.
Let's see what we are using in the following example −
At the time of loading this page, the ‘if’ statement checks for the existence of the image object. If the image object is unavailable, this block will not be executed.
The Image() constructor creates and preloads a new image object called image1.
The src property is assigned the name of the external image file called /images/html.gif.
Similarly, we have created image2 object and assigned /images/http.gif in this object.
The # (hash mark) disables the link so that the browser does not try to go to a URL when clicked. This link is an image.
The onMouseOver event handler is triggered when the user's mouse moves onto the link, and the onMouseOut event handler is triggered when the user's mouse moves away from the link (image).
When the mouse moves over the image, the HTTP image changes from the first image to the second one. When the mouse is moved away from the image, the original image is displayed.
When the mouse is moved away from the link, the initial image html.gif will reappear on the screen.
<html>
<head>
<title>Rollover with a Mouse Events</title>
<script type = "text/javascript">
<!--
if(document.images) {
var image1 = new Image();
// Preload an image image1.src = "/images/html.gif";
var image2 = new Image();
// Preload second image image2.src = "/images/http.gif";
}
//
-->
</script>
</head>
<body>
<p>Move your mouse over the image to see the result</p>
<a href = "#" onMouseOver = "document.myImage.src = image2.src;"
onMouseOut = "document.myImage.src = image1.src;">
<img name = "myImage" src = "/images/html.gif" />
</a>
</body>
</html>
ES6 - Multimedia
The JavaScript navigator object includes a child object called plugins. This object is an array, with one entry for each plug-in installed on the browser. The navigator.plugins object is supported only by Netscape, Firefox, and Mozilla.
Example
The following example shows how to list down all the plug-ins installed in your browser.
<html>
<head>
<title>List of Plug-Ins</title>
</head>
<body>
<table border = "1">
<tr>
<th>Plug-in Name</th>
<th>Filename</th>
<th>Description</th>
</tr>
<script LANGUAGE = "JavaScript" type = "text/javascript">
for (i = 0; i<navigator.plugins.length; i++) {
document.write("<tr><td>");
document.write(navigator.plugins[i].name);
document.write("</td><td>");
document.write(navigator.plugins[i].filename);
document.write("</td><td>");
document.write(navigator.plugins[i].description);
document.write("</td></tr>");
}
</script>
</table>
</body>
</html>
Output
The following output is displayed on successful execution of the above code.

Checking for Plugins
Each plug-in has an entry in the array. Each entry has the following properties −
name − The name of the plug-in.
filename − The executable file that was loaded to install the plug-in.
description − A description of the plug-in, supplied by the developer.
mimeTypes − An array with one entry for each MIME type supported by the plugin.
You can use these properties in a script to find out the installed plug-ins, and then using JavaScript, you can play the appropriate multimedia file. Take a look at the following code.
<html>
<head>
<title>Using Plug-Ins</title>
</head>
<body>
<script language = "JavaScript" type = "text/javascript">
media = navigator.mimeTypes["video/quicktime"]; if (media) {
document.write("<embed src = 'quick.mov' height = 100 width = 100>");
} else {
document.write("<img src = 'quick.gif' height = 100 width = 100>");
}
</script>
</body>
</html>
Note − Here we are using HTML <embed> tag to embed a multimedia file.
Controlling Multimedia
Let us take a real example which works in almost all the browsers.
<html>
<head>
<title>Using Embeded Object</title>
<script type = "text/javascript">
<!--
function play() {
if (!document.demo.IsPlaying()) {
document.demo.Play();
}
}
function stop() {
if (document.demo.IsPlaying()){
document.demo.StopPlay();
}
}
function rewind() {
if (document.demo.IsPlaying()){
document.demo.StopPlay();
}
document.demo.Rewind();
}
//
-->
</script>
</head>
<body>
<embed id = "demo" name = "demo"
src = "http://www.amrood.com/games/kumite.swf"
width = "318" height = "300" play = "false" loop = "false"
pluginspage = "http://www.macromedia.com/go/getflashplayer"
swliveconnect = "true">
</embed>
<form name = "form" id = "form" action = "#" method = "get">
<input type = "button" value = "Start" onclick = "play();" />
<input type = "button" value = "Stop" onclick = "stop();" />
<input type = "button" value = "Rewind" onclick = "rewind();" />
</form>
</body>
</html>
ES6 - Debugging
Every now and then, developers commit mistakes while coding. A mistake in a program or a script is referred to as a bug.
The process of finding and fixing bugs is called debugging and is a normal part of the development process. This chapter covers the tools and techniques that can help you with debugging tasks.
Error Messages in IE
The most basic way to track down errors is by turning on the error information in your browser. By default, the Internet Explorer shows an error icon in the status bar when an error occurs on the page.
Double-clicking this icon takes you to a dialog box showing information about the specific error that has occurred.
Since this icon is easy to overlook, Internet Explorer gives you the option to automatically show the Error dialog box whenever an error occurs.
To enable this option, select Tools → Internet Options → Advanced tab and then finally check the “Display a NotificationaboutEvery Script Error” box option as shown in the following screenshot.
Error Messages in Firefox or Mozilla
Other browsers like Firefox, Netscape, and Mozilla send error messages to a special window called the JavaScript Console or Error Console. To view the console, select Tools → Error Console or Web Development.
Unfortunately, since these browsers give no visual indication when an error occurs, you must keep the Console open and watch for errors as your script executes.

Error Notifications
Error notifications that show up on the Console or through Internet Explorer dialog boxes are the result of both syntax and runtime errors. These error notifications include the line number at which the error occurred.
If you are using Firefox, then you can click on the error available in the error console to go to the exact line in the script having the error.
Debugging a Script
There are various ways to debug your JavaScript. Following are some of the methods.
Use a JavaScript Validator
One way to check your JavaScript code for strange bugs is to run it through a program that checks it to make sure it is valid and that it follows the official syntax rules of the language. These programs are called validating parsers or just validators for short, and often come with commercial HTML and JavaScript editors.
The most convenient validator for JavaScript is Douglas Crockford's JavaScript Lint, which is available for free at Douglas Crockford's JavaScript Lint.
Simply visit the web page, paste your JavaScript (Only JavaScript) code into the text area provided, and click the jslint button. This program will parse through your JavaScript code, ensuring that all the variable and function definitions follow the correct syntax. It will also check JavaScript statements, such as if and while, to ensure they too follow the correct format.
Add Debugging Code to Your Program
You can use the alert() or document.write() methods in your program to debug your code. For example, you might write something as follows −
var debugging = true; var whichImage = "widget"; if( debugging ) alert( "Calls swapImage() with argument: " + whichImage ); var swapStatus = swapImage( whichImage ); if( debugging ) alert( "Exits swapImage() with swapStatus=" + swapStatus );
By examining the content and order of the alert() as they appear, you can examine the health of your program very easily.
Use a JavaScript Debugger
A debugger is an application that places all aspects of script execution under the control of the programmer. Debuggers provide fine-grained control over the state of the script through an interface that allows you to examine and set values as well as control the flow of execution.
Once a script has been loaded into a debugger, it can be run one line at a time or instructed to halt at certain breakpoints. Once the execution is halted, the programmer can examine the state of the script and its variables in order to determine if something is amiss. You can also watch variables for changes in their values.
The latest version of the Mozilla JavaScript Debugger (code-named Venkman) for both Mozilla and Netscape browsers can be downloaded from − www.hacksrus.com/~ginda/venkman.
Useful Tips for Developers
You can keep the following tips in mind to reduce the number of errors in your scripts and simplify the debugging process −
Use plenty of comments. Comments enable you to explain why you wrote the script the way you did and to explain particularly the difficult sections of the code.
Always use indentation to make your code easy to read. Indenting statements also makes it easier for you to match up the beginning and ending tags, curly braces, and other HTML and script elements.
Write modular code. Whenever possible, group your statements into functions. Functions let you group related statements, and test as well as reuse portions of the code with minimal effort.
Be consistent in the way you name your variables and functions. Try using names that are long enough to be meaningful and that describe the contents of the variable or the purpose of the function.
Use consistent syntax when naming variables and functions. In other words, keep them all lowercase or all uppercase; if you prefer Camel-Back notation, use it consistently.
Test long scripts in a modular fashion. In other words, do not try to write the entire script before testing any portion of it. Write a piece and get it to work before adding the next portion of the code.
Use descriptive variable and function names and avoid using single character names.
Watch your quotation marks. Remember that quotation marks are used in pairs around strings and that both quotation marks must be of the same style (either single or double).
Watch your equal signs. You should not use a single = for comparison purpose.
Declare variables explicitly using the var keyword.
Debugging with Node.js
Node.js includes a full-featured debugging utility. To use it, start Node.js with the debug argument followed by the path to the script to debug.
node debug test.js
A prompt indicating that the debugger has started successfully will be launched.
To apply a breakpoint at a specified location, call the debugger in the source code as shown in the following code.
// myscript.js
x = 5;
setTimeout(() => {
debugger;
console.log('world');
}, 1000);
console.log('hello');
Following is a set of stepping commands that one can use with Node.
| Sr.No | Stepping Commands & Description |
|---|---|
| 1 | cont,c Continue |
| 2 | next,n Next |
| 3 | step,s Step in |
| 4 | out,o Step out |
| 5 | pause Pause the code. Similar to pause in the developer tools |
A complete list of Node’s debugging commands can be found here − https://nodejs.org/api/debugger.html.
Visual Studio Code and Debugging
One of the key features of Visual Studio Code is its great in-built debugging support for Node.js Runtime. For debugging code in other languages, it provides debugger extensions.
The debugger provides a plethora of features that allow us to launch configuration files, apply/remove/disable and enable breakpoints, variable, or enable data inspection, etc.
A detailed guide on debugging using VS Code can be found here − https://code.visualstudio.com/docs/editor/debugging
ES6 - Image Map
You can use JavaScript to create a client-side image map. Client-side image maps are enabled by the usemap attribute for the <img /> tag and defined by special <map> and <area> extension tags.
The image that is going to form the map is inserted into the page using the <img /> element as normal, except that it carries an extra attribute called usemap. The value of the usemap attribute is the value of the name attribute on the <map> element, which you are about to meet, preceded by a pound or a hash sign.
The <map> element actually creates the map for the image and usually follows directly after the <img /> element. It acts as a container for the <area /> elements that actually define the clickable hotspots. The <map> element carries only one attribute, the name attribute, which is the name that identifies the map. This is how the <img /> element knows which <map> element to use.
The <area> element specifies the shape and the coordinates that define the boundaries of each clickable hotspot.
The following code combines imagemaps and JavaScript to produce a message in a text box when the mouse is moved over different parts of an image.
<html>
<head>
<title>Using JavaScript Image Map</title>
<script type="text/javascript">
<!--
function showTutorial(name) {
document.myform.stage.value = name
}
//
-->
</script>
</head>
<body>
<form name = "myform">
<input type = "text" name = "stage" size = "20" />
</form>
<!-- Create Mappings -->
<img src = "//images/usemap.gif" alt = "HTML Map"
border = "0" usemap = "#tutorials"/>
<map name = "tutorials">
<area shape = "poly"
coords = "74,0,113,29,98,72,52,72,38,27"
href = "/perl/index.htm" alt = "Perl Tutorial"
target = "_self"
onMouseOver = "showTutorial('perl')"
onMouseOut = "showTutorial('')"/>
<area shape = "rect"
coords = "22,83,126,125"
href = "/html/index.htm" alt = "HTML Tutorial" target = "_self"
onMouseOver = "showTutorial('html')"
onMouseOut = "showTutorial('')"/>
<area shape = "circle" coords = "73,168,32"
href = "/php/index.htm" alt = "PHP Tutorial" target = "_self"
onMouseOver = "showTutorial('php')"
onMouseOut = "showTutorial('')"/>
</map>
</body>
</html>
The following output is displayed on successful execution of the above code. You can feel the map concept by placing the mouse cursor on the image object.
ES6 - Browsers
It is important to understand the differences between different browsers in order to handle each in the way it is expected. So it is important to know which browser your web page is running in. To get information about the browser your webpage is currently running in, use the built-in navigator object.
Navigator Properties
There are several Navigator related properties that you can use in your webpage. The following is a list of the names and its description.
| Sr.No | Property & Description |
|---|---|
| 1 |
appCodeName This property is a string that contains the code name of the browser, Netscape for Netscape and Microsoft Internet Explorer for Internet Explorer. |
| 2 |
appVersion This property is a string that contains the version of the browser as well as other useful information such as its language and compatibility. |
| 3 |
language This property contains the two-letter abbreviation for the language that is used by the browser. Netscape only. |
| 4 |
mimTypes[] This property is an array that contains all MIME types supported by the client. Netscape only. |
| 5 |
platform[] This property is a string that contains the platform for which the browser was compiled. "Win32" for 32-bit Windows operating systems. |
| 6 |
plugins[] This property is an array containing all the plug-ins that have been installed on the client. Netscape only. |
| 7 |
userAgent[] This property is a string that contains the code name and version of the browser. This value is sent to the originating server to identify the client. |
Navigator Methods
There are several Navigator-specific methods. Here is a list of their names and descriptions.
| Sr.No | Methods & Description |
|---|---|
| 1 |
javaEnabled() This method determines if JavaScript is enabled in the client. If JavaScript is enabled, this method returns true; otherwise, it returns false. |
| 2 |
plugings.refresh This method makes newly installed plug-ins available and populates the plugins array with all new plug-in names. Netscape only |
| 3 |
preference(name,value) This method allows a signed script to get and set some Netscape preferences. If the second parameter is omitted, this method will return the value of the specified preference; otherwise, it sets the value. Netscape only |
| 4 |
taintEnabled() This method returns true if data tainting is enabled; false otherwise |
Browser Detection
The following JavaScript code can be used to find out the name of a browser and then accordingly an HTML page can be served to the user.
<html>
<head>
<title>Browser Detection Example</title>
</head>
<body>
<script type = "text/javascript">
<!--
var userAgent = navigator.userAgent;
var opera = (userAgent.indexOf('Opera')
! = -1); var ie = (userAgent.indexOf('MSIE')
!= -1); var gecko = (userAgent.indexOf('Gecko')
! = -1); var netscape = (userAgent.indexOf('Mozilla')
! = -1); var version = navigator.appVersion;
if (opera) {
document.write("Opera based browser");
// Keep your opera specific URL here.
} else if (gecko) {
document.write("Mozilla based browser");
// Keep your gecko specific URL here.
} else if (ie) {
document.write("IE based browser");
// Keep your IE specific URL here.
} else if (netscape) {
document.write("Netscape based browser");
// Keep your Netscape specific URL here.
} else {
document.write("Unknown browser");
}
// You can include version to along with any above condition.
document.write("<br /> Browser version info : " + version );
//
-->
</script>
</body>
</html>
The following output is displayed on successful execution of the above code.
Mozilla based browser Browser version info : 5.0
(Windows NT 6.3; WOW64) AppleWebKit/537.36 (KHTML, like Gecko) Chrome/41.0.2272.101 Safari/537.36
ES7 - New Features
This chapter provides knowledge about the new features in ES7.
Exponentiation Operator
ES7 introduces a new mathematical operator called exponentiation operator. This operator is similar to using Math.pow() method. Exponentiation operator is represented by a double asterisk **. The operator can be used only with numeric values. The syntax for using the exponentiation operator is given below −
Syntax
The syntax for the exponentiation operator is mentioned below −
base_value ** exponent_value
Example
The following example calculates the exponent of a number using the Math.pow() method and the exponentiation operator.
<script>
let base = 2
let exponent = 3
console.log('using Math.pow()',Math.pow(base,exponent))
console.log('using exponentiation operator',base**exponent)
</script>
The output of the above snippet is as given below −
using Math.pow() 8 using exponentiation operator 8
Array Includes
The Array.includes() method introduced in ES7 helps to check if an element is available in an array. Prior to ES7, the indexof() method of the Array class could be used to verify if a value exists in an array . The indexof() returns the index of the first occurrence of element in the array if the data is found ,else returns -1 if the data doesn't exist.
The Array.includes() method accepts a parameter, checks if the value passed as parameter exists in the array. This method returns true if the value is found, else returns false if the value doesn't exist. The syntax for using the Array.includes() method is given below −
Syntax
Array.includes(value)
OR
Array.includes(value,start_index)
The second syntax checks if the value exists from the index specified.
Example
The following example declares an array marks and uses the Array.includes() method to verify if a value is present in the array.
<script>
let marks = [50,60,70,80]
//check if 50 is included in array
if(marks.includes(50)){
console.log('found element in array')
}else{
console.log('could not find element')
}
// check if 50 is found from index 1
if(marks.includes(50,1)){ //search from index 1
console.log('found element in array')
}else{
console.log('could not find element')
}
//check Not a Number(NaN) in an array
console.log([NaN].includes(NaN))
//create an object array
let user1 = {name:'kannan'},
user2 = {name:'varun'},
user3={name:'prijin'}
let users = [user1,user2]
//check object is available in array
console.log(users.includes(user1))
console.log(users.includes(user3))
</script>
The output of the above code will be as stated below −
found element in array could not find element true true false
ES8 - New Features
This chapter focuses on the new features in ES8.
Padding a String
ES8 introduces two string handling functions for padding a string. These functions can be used to add space or any desired set of characters to the beginning and end of a string value.
String. padStart()
This function pads the current string with a given input string repeatedly from the start, till the current string reaches the given length. The syntax of the padStart() function is given below −
Syntax
string_value.padStart(targetLength [, padString])
The padStart() function accepts two parameters which are as follows −
targetLength − A numeric value that represents the target length of the string after padding. If the value of this parameter is lesser than or equal to the existing length of the string, the string value is returned as it is.
padString − This is an optional parameter. This parameter specifies the characters that should be used to pad the string. The string value is padded with spaces if no value is passed to this parameter.
Example
The following example declares a string variable, product_cost. The variable will be padded with zeros from left until the total length of the string is seven. The example also illustrates behaviour of the padStart() function, if no value is passed to the second parameter.
<script> //pad the String with 0 let product_cost = '1699'.padStart(7,0) console.log(product_cost) console.log(product_cost.length) //pad the String with blank spaces let product_cost1 = '1699'.padStart(7) console.log(product_cost1) console.log(product_cost1.length) </script>
The output of the above code will be as stated below −
0001699 7 1699 7
String.padEnd()
This function pads the current string with a given input string repeatedly from the end, till the current string reaches the specified length.
The syntax of the padEnd() function is given below −
Syntax
string_value.padEnd(targetLength [, padString])
The padEnd() function accepts two parameters −
targetLength − A numeric value that represents the target length of the string after padding. If the value of this parameter is lesser than or equal to the existing length of the string, the string value is returned as it is.
padString − This is an optional parameter. This parameter specifies the characters that should be used to pad the string. The string value is padded with spaces if no value is passed to this parameter.
Example
The following example declares a string variable, product_cost. The variable will be padded with zeros from right until the total length of the string is seven. The example also illustrates behaviour of the padStart() function, if no value is passed to the second parameter.
<script> //pad the string with x let product_cost = '1699'.padEnd(7,'x') console.log(product_cost) console.log(product_cost.length) //pad the string with spaces let product_cost1 = '1699'.padEnd(7) console.log(product_cost1) console.log(product_cost1.length) </script>
The output of the above code will be as mentioned below −
1699xxx 7 1699 7
Trailing Commas
A trailing comma is simply a comma after the last item in a list. Trailing commas are also known as final commas.
Trailing Commas and Array
Trailing commas in arrays are skipped while using Array.prototype.forEach loop.
Example
The following example iterating an array with trailing commas using foreach loop.
<script>
let marks = [100,90,80,,]
console.log(marks.length)
console.log(marks)
marks.forEach(function(e){ //ignores empty value in array
console.log(e)
})
</script>
The output of the above code will be as shown below −
4 [100, 90, 80, empty] 100 90 80
Trailing commas and function call
Trailing commas, passed as arguments, when defining or invoking a function are ignored by JavaScript runtime engine. However, there are two exceptions −
Function definitions or invocation that contains only a comma will result in SyntaxError. For example, the following snippet will throw an error −
function test(,){} // SyntaxError: missing formal parameter
(,)=>{}; //SyntaxError: expected expression, got ','
test(,) //SyntaxError: expected expression, got ','
Trailing commas cannot be used with rest parameters.
function test(...arg1,){} // SyntaxError: parameter after rest parameter
(...arg1,)=>{} // SyntaxError: expected closing parenthesis, got ','
Example
The following example declares a function with trailing commas in the argument list.
<script>
function sumOfMarks(marks,){ // trailing commas are ignored
let sum=0;
marks.forEach(function(e){
sum+=e;
})
return sum;
}
console.log(sumOfMarks([10,20,30]))
console.log(sumOfMarks([1,2,3],))// trailing comma is ignored
</script>
The output of the above code is as follows −
60 6
Object:entries() and values()
ES8 introduces the following new methods to the built-in Object type −
Object.entries − The Object.entries() method can be used to access all the properties of an object.
Object.values() − The Object.values() method can be used to access values of all properties of an object.
Object.getOwnPropertyDescriptors() − This method returns an object containing all own property descriptors of an object. An empty object may be returned if the object doesn't have any properties.
Example
<script>
const student ={
firstName:'Kannan',
lastName:'Sudhakaran'
}
console.log(Object.entries(student))
console.log(Object.values(student))
</script>
The output of the above code will be as follows −
[ ["firstName", "Kannan"], ["lastName", "Sudhakaran"], ] ["Kannan", "Sudhakaran"]
Example
<script> const marks = [10,20,30,40] console.log(Object.entries(marks)) console.log(Object.values(marks)) </script>
The output of the above code will be as given below −
["0", 10], ["1", 20], ["2", 30], ["3", 40] ] [10, 20, 30, 40]
Example
<script>
const student = {
firstName : 'Mohtashim',
lastName: 'Mohammad',
get fullName(){
return this.firstName + ':'+ this.lastName
}
}
console.log(Object.getOwnPropertyDescriptors(student))
</script>
The output of the above code will be as mentioned below −
{firstName: {value: "Mohtashim", writable: true, enumerable: true, configurable: true}
fullName: {get: ƒ, set: undefined, enumerable: true, configurable: true}
lastName: {value: "Mohammad", writable: true, enumerable: true, configurable: true}
}
Async and Await
Async/Await is a very important feature in ES8.It is a syntactic sugar for Promises in JavaScript. The await keyword is used with promises. This keyword can be used to pause the execution of a function till a promise is settled. The await keyword returns value of the promise if the promise is resolved while it throws an error if the promise is rejected. The await function can only be used inside functions marked as async. A function that is declared using the async keyword always returns a promise.
Syntax
The syntax of async function with await is given below −
async function function_name(){
let result_of_functionCall = await longRunningMethod();
}
//invoking async function
function_name().then(()=>{})
.catch(()=>{})
Consider an example that has an asynchronous function that takes two seconds to execute and returns a string value. The function can be invoked in two ways as shown below
- Using promise.then()
- Using aync/await.
The below code shows invoking the asynchronous function using the traditional ES6 syntax - promise.then()
<script>
function fnTimeConsumingWork(){
return new Promise((resolve,reject)=>{
setTimeout(() => {
resolve('response is:2 seconds have passed')
}, 2000);
})
}
fnTimeConsumingWork().then(resp=>{
console.log(resp)
})
console.log('end of script')
</script>
The output of the above code will be as follows −
end of script response is:2 seconds have passed
The below code shows a cleaner way of invoking the asynchronous function using ES8 syntax - async/await
<script>
function fnTimeConsumingWork(){
return new Promise((resolve,reject)=>{
setTimeout(() => {
resolve('response is:2 seconds have passed')
}, 2000);
})
}
async function my_AsyncFunc(){
console.log('inside my_AsyncFunc')
const response = await fnTimeConsumingWork();// clean and readable
console.log(response)
}
my_AsyncFunc();
console.log("end of script")
</script>
The output of the above code will be as mentioned below −
inside my_AsyncFunc end of script response is:2 seconds have passed
Promise chaining with Async/await
The following example implements promise chaining using the async/await syntax.
In this example, add_positivenos_async() function adds two numbers asynchronously and rejects if negative values are passed. The result from the current asynchronous function call is passed as parameter to the subsequent function calls.
<script>
function add_positivenos_async(n1, n2) {
let p = new Promise(function (resolve, reject) {
if (n1 >= 0 && n2 >= 0) {
//do some complex time consuming work
resolve(n1 + n2)
} else
reject('NOT_Postive_Number_Passed')
})
return p;
}
async function addInSequence() {
let r1 = await add_positivenos_async(10, 20)
console.log("first result", r1);
let r2 = await add_positivenos_async(r1, r1);
console.log("second result", r2)
let r3 = await add_positivenos_async(r2, r2);
console.log("third result", r3)
return "Done Sequence"
}
addInSequence().then((r)=>console.log("Async :",r));
console.log('end')
</script>
The output of the above code will be as given below−
end first result 30 second result 60 third result 120 Async : Done Sequence
ES9 - New Features
Here, we will learn about the new features in ES9. Let us begin by understanding about the asynchronous generators.
Asynchronous Generators and Iteration
Asynchronous generators can be made asynchronous by using the async keyword. The syntax for defining an async generator is given below −
async function* generator_name() {
//statements
}
Example
Following example shows an async generator which returns Promise on each call to the next() method of generator.
<script>
async function* load(){
yield await Promise.resolve(1);
yield await Promise.resolve(2);
yield await Promise.resolve(3);
}
let l = load();
l.next().then(r=>console.log(r))
l.next().then(r=>console.log(r))
l.next().then(r=>console.log(r))
l.next().then(r=>console.log(r))
</script>
The output of the above code will be as follows −
{value: 1, done: false}
{value: 2, done: false}
{value: 3, done: false}
{value: undefined, done: true}
for await of loop
Asynchronous iterables cannot be iterated using the traditional for..of loop syntax as they return promises. ES9 introduces the for await of loop to support asynchronous iteration.
The syntax for using the for await of loop is given below, where,
On each iteration a value of a different property is assigned to variable and a variable may be declared with const, let, or var.
- iterable − Object whose iterable properties are to be iterated over.
for await (variable of iterable) {
statement
}
Example
The following example shows the use of for await of loop to iterate an async generator.
<script>
async function* load(){
yield await Promise.resolve(1);
yield await Promise.resolve(2);
yield await Promise.resolve(3);
}
async function test(){
for await (const val of load()){
console.log(val)
}
}
test();
console.log('end of script')
</script>
The output of the above code will be as shown below −
end of script 1 2 3
Example
The following example iterates an array using the for await of loop.
<script>
async function fntest(){
for await (const val of [10,20,30,40]){
console.log(val)
}
}
fntest();
console.log('end of script')
</script>
The output of the above code will be as follows −
end of script 10 20 30 40
Rest/Spread Properties
ES9 supports the use of Rest and Spread operators with Objects.
Example: Object and Rest Operator
The following example shows the use of rest operator with an object. The value of age property of student is copied into the age variable while the values of the remaining properties are copied into the other variable using the rest syntax `...`.
<script>
const student = {
age:10,
height:5,
weight:50
}
const {age,...other} = student;
console.log(age)
console.log(other)
</script>
The output of the above code will be as given below −
10
{height: 5, weight: 50}
Example: Object and Spread operator
The spread operator can be used to combine multiple objects or cloning objects. This is shown in the following example −
<script>
//spread operator
const obj1 = {a:10,b:20}
const obj2={c:30}
//clone obj1
const clone_obj={...obj1}
//combine obj1 and obj2
const obj3 = {...obj1,...obj2}
console.log(clone_obj)
console.log(obj3)
</script>
The output of the above code will be as stated below −
{a: 10, b: 20}
{a: 10, b: 20, c: 30}
Promise: finally()
The finally() is executed whenever a promise is settled, regardless of its outcome. This function returns a promise. It can be used to avoid code duplication in both the promise's then() and catch() handlers.
Syntax
The below mentioned syntax is for the function finally().
promise.finally(function() {
});
promise.finally(()=> {
});
Example
The following example declares a async function that returns the square of a positive number after a delay of 3 seconds. The function throws an error if a negative number is passed. The statements in the finally block is executed in either case, whether the promise is rejected or resolved.
<script>
let asyncSquareFn = function(n1){
return new Promise((resolve,reject)=>{
setTimeout(()=>{
if(n1>=0){
resolve(n1*n1)
}
else reject('NOT_POSITIVE_NO')
},3000)
})
}
console.log('Start')
asyncSquareFn(10)//modify to add -10
.then(result=>{
console.log("result is",result)
}).catch(error=>console.log(error))
.finally(() =>{
console.log("inside finally")
console.log("executes all the time")
})
console.log("End");
</script>
The output of the above code will be as shown below
Start End //after 3 seconds result is 100 inside finally executes all the time
Template Literal revision
As of ES7, tagged templates conform to the rules of the following escape sequences −
Unicode escape sequences are represented using "\u", for example \u2764\uFE0F
Unicode code point escape sequences are represented using "\u{}", for example \u{2F}
Hexadecimal escape sequences are represented using "\x", for example \xA8
Octal literal escape sequences are represented using "" and followed by one or more digits, for example \125
In ES2016 and earlier, if invalid escape sequences are used with tagged functions a Syntax Error will be thrown as shown below −
//tagged function with an invalid unicode sequence myTagFn`\unicode1` // SyntaxError: malformed Unicode character escape sequence
However, unlike the earlier versions, ES9 parses the invalid unicode sequence to undefined and does not throw an error. This is shown in the following example −
<script>
function myTagFn(str) {
return { "parsed": str[0] }
}
let result1 =myTagFn`\unicode1` //invalid unicode character
console.log(result1)
let result2 =myTagFn`\u2764\uFE0F`//valid unicode
console.log(result2)
</script>
The output of the above code will be as shown below −
{parsed: undefined}
{parsed: "❤️"}
Raw Strings
ES9 introduces a special property raw, available on the first argument to the tag function. This property allows you to access the raw strings as they were entered, without processing the escape sequences.
Example
<script>
function myTagFn(str) {
return { "Parsed": str[0], "Raw": str.raw[0] }
}
let result1 =myTagFn`\unicode`
console.log(result1)
let result2 =myTagFn`\u2764\uFE0F`
console.log(result2)
</script>
The output of the above code will be as follows −
{Parsed: undefined, Raw: "\unicode"}
{Parsed: "❤️", Raw: "\u2764\uFE0F"}
Regular Expression feature
In regular expressions, the dot operator or a period is use to match a single character. The . dot operator skips line break characters like \n, \r as shown in the below example −
console.log(/Tutorials.Point/.test('Tutorials_Point')); //true
console.log(/Tutorials.Point/.test('Tutorials\nPoint')); //false
console.log(/Tutorials.Point/.test('Tutorials\rPoint')); //false
A regular expression pattern is represented as the / regular_expression /. The test() method takes a string parameter and searches for the regex pattern. In the above example, the test() method searches for pattern starting with Tutorials, followed by any single character and ending with Point. If we use the \n or \r in the input string between Tutorials and Point the test() method will return false.
true false false
ES9 introduces a new flag - DotAllFlag (\s) that can be used with Regex to match line terminators and emojis. This is shown in the following example −
console.log(/Tutorials.Point/s.test('Tutorials\nPoint'));
console.log(/Tutorials.Point/s.test('Tutorials\rPoint'));
The output of the above code will be as mentioned below −
true true
Named Capture Groups
Prior to ES9, capture groups were accessed by indexes. ES9 allows us to assign names to capture groups. The syntax for the same is given below −
(?<Name1>pattern1)
Example
const birthDatePattern = /(?<myYear>[0-9]{4})-(?<myMonth>[0-9]{2})/;
const birthDate = birthDatePattern.exec('1999-04');
console.log(birthDate.groups.myYear);
console.log(birthDate.groups.myMonth);
The output of the above code is as shown below −
1999 04