- TestRail - Home
- TestRail - Introduction
- TestRail - Features
- TestRail - Free Trial Access
- TestRail - Login
- TestRail - Dashboard
- TestRail - Invite Users
- TestRail - Add A Project
- TestRail - TestCases - Section
- TestRail - TestCases - Case
- TestRail - Import TestCases - CSV
- TestRail - Import TestCases - XML
- TestRail - Export TestCases
- TestRail - Test Runs
- TestRail - Rerun
- TestRail - Customize Table
- TestRail - Copy/Move Test Cases
- TestRail - Milestones
- TestRail - Test Plans & Configuration
- TestRail - To Do & Notifications
- TestRail - Reports
- Tracking Progress & Activity
- TestRail - Add Multiple Test Results
- TestRail - Advanced Search Option
- TestRail - Optimized Printing
- TestRail - Shortcuts & Hotkeys
- TestRail Useful Resources
- TestRail - Quick Guide
- TestRail - Useful Resources
- TestRail - Discussion
TestRail - Quick Guide
TestRail - Introduction
TestRail is a web-based test management tool used by testers, developers and other stake holders to manage, track and organize software testing efforts. It follows a centralized test management concept that helps in easy communication and enables rapid development of task across QA team and other stakeholders .
Points to Note
TestRail is a test management tool.
It is developed by Gurock software.
TestRail is a web-based tool and supports all browsers, including Chrome, Firefox, IE.
It supports different windows OS like Windows XP , Vista, 7 etc
TestRail provides 30days trial period for Business email id as well as personal email.
TestRail can be integrated with many other tools JIRA, Bugzilla, Fogbugz, Version One, TFS, GitHub etc.
License and Free Trial
TestRail is commercial tool and available as Trial version for limited time of 30 days.
To utilize TestRail services, a license is required.
TestRail provides free license for 30 days for cloud based access as well as local server set up.
TestRail Uses
Use in tracking all QA activities from the 1st phase of software testing lifecycle.
TestRail is useful in Test Management, Test Data Management and integration with other tools to customize the use as per need.
In addition of above, TestRail also supports Requirement Management, Resource Management.
It supports all macro level activities performed by QA.
TestRail is very useful in performing QA tasks like Test Cases writing, execution, reports etc.
TestRail Specifications
Let us discuss the specifications of Testrail before learning how to install it. This is a nutshell of some important specifications based on its functioning and scope of operations
| S.No. | Specification & Description |
|---|---|
| 1 | Application copyright
|
| 2 | Tool scope
|
| 3 | Testing Methods
|
| 4 | Tool Objectives
|
| 5 | Management Features
|
| 6 | Hardware Requirements for Server
|
| 7 | Error Handling
|
| 8 | User interface Available
|
TestRail - Features
TestRail has a wide range of features to attract QAs and other stakeholders for test management. Following are some core features of TestRail
TestRail Core Features
This is a list of Testrail features that make it so popular among users, most notably the centralizing and organizing feature
| S.No. | Core Features & Description |
|---|---|
| 1 | Testing Supports and Methodologies
|
| 2 | Centralize & organize
|
| 3 | Manage & Track Execution
|
| 4 | Notification
|
| 5 | Power Search
|
| 6 | Reports
|
| 7 | Scale with Team Growth
|
| 8 | Integration
|
| 9 | Common Features
|
| 10 | Recover Data
|
TestRail - Free Trial Access
TestRail provides a free trial period of 30 days for new users and registered users with basic features. TestRail has other plans as well with different advanced features and add-ins. Cost depends on number of users. By visiting user can see different available plans for trying purpose.

Set up for free trials
Visit to http//www.gurock.com/testrail/ and click on Try TestRail at top right as shown in below screenshot
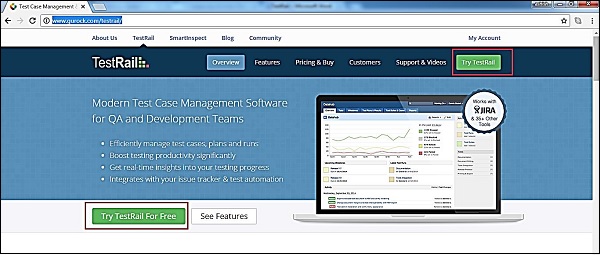
Now select TestRail cloud (default selection).
It opens a basic form to create a TestRail account.
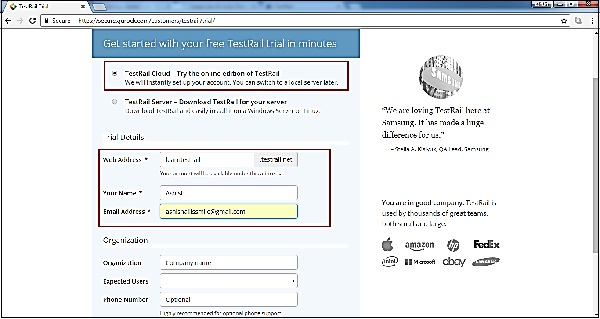
Enter the details at following fields as shown in following screenshots
Web addess − It should be unique and this URL will be used to access qTest application.
Name − The one who wants to try the free-version copy.
Email − Please note, it accepts gmail,yahoo,outlook. It can be business email as well.
The same email can be used as username to access TestRail.
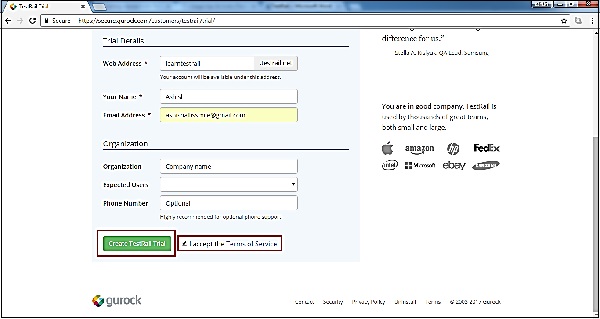
After entering all details, check the checkbox for Term & Services and c lick on Create TestRail TRIAL as shown in below screenshot.
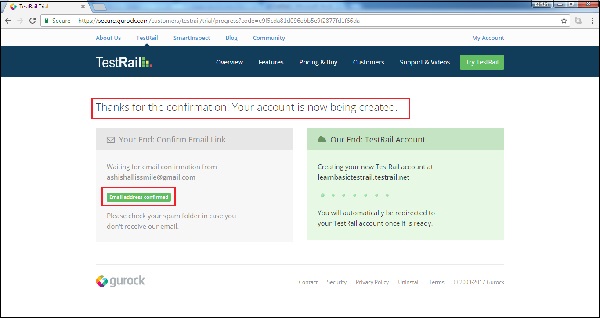
It will display Confirmation page. User should visit the email and click on confirmation link to activate the account.
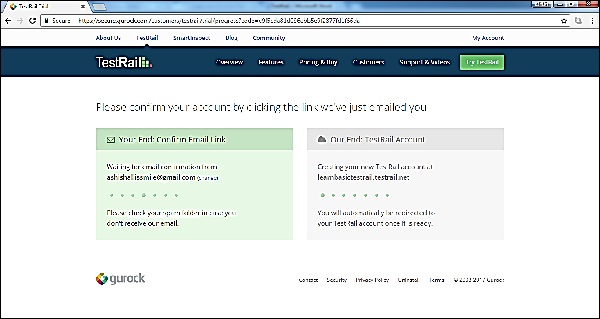
Once email gets confirmed, Thank you message displays and account is being created.
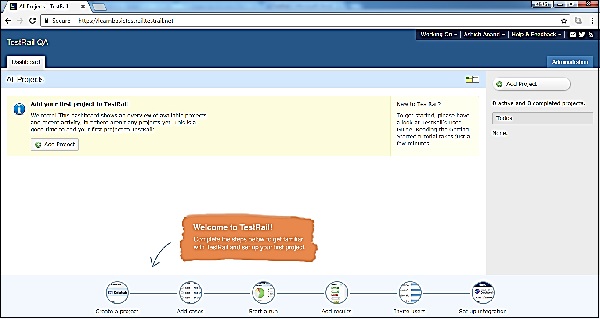
Dashboard of TestRail account displays as below
TestRail - Login
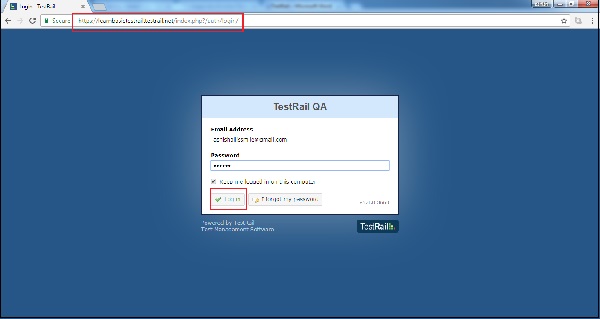
To login into TestRail, go to your sample website, selected while creating the free trial. It will open a login page;
Enter your registered email address as username and Password (One-time password is sent to the registered email).
Click on LOGIN button.
Following screenshot shows how to login into TestRail using credentials
On error
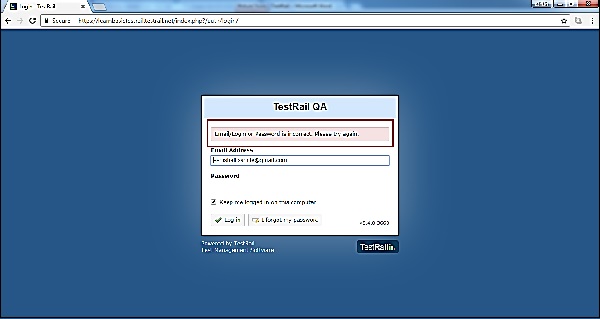
Due to unsuccessful login, following error page displays
Error may occur due to wrong combination of email id or password.
Following screenshot shows the error message user receives if credentials are not correct
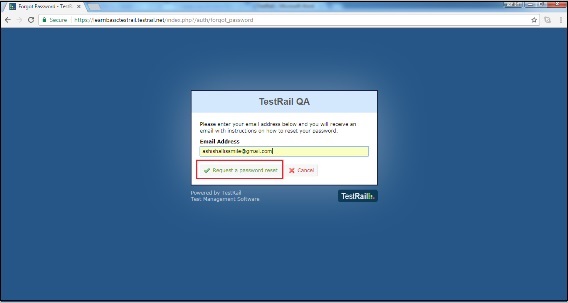
If you forgot the password, to recover it
- Click on I forgot my password? beside Login button.
- Enter the Login Email
- Click on Request a password reset
Following screenshot shows how to recover the password if you forgot
User will get an email with details of username or link to reset the password.
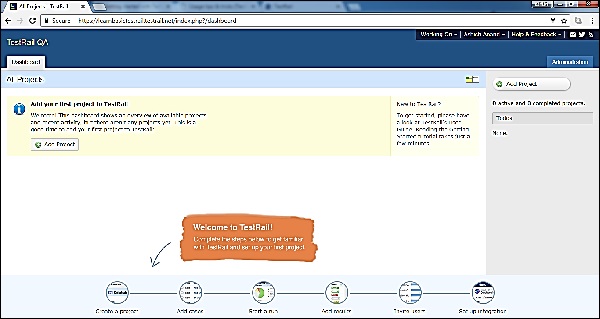
On Successful login
On successful login, system dashboard will display if account is associated with any project by admin or user can create a sample project. Following screenshot displays the welcome page/dashboard of TestRail on successful login
TestRail - Dashboard
Dashboard is the first page that a user can see after logging into TestRail,. Dashboard is customized by the Admin. Based on roles, admin can set the access of TestRail. The Admin even has right to change colors and logo of TestRail account.
Points to Note
There are 2 parts of Dashboard − the first one is generic dashboard where all projects are listed and another one is project specific dashboard.
The Navigation Bar present at the bottom of TestRail page, will be same across all pages/screen of TestRail − Create a project, Add cases, Start a Run, Add Results, Invite Users and Set up Integration
Dashboard has different links at top right and those are same across all pages − Working on, <User Name> for settings and Logout, Help & Feedback, Email, Twitter and Blog section.
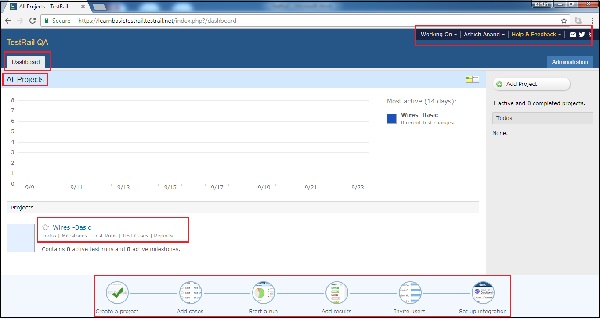
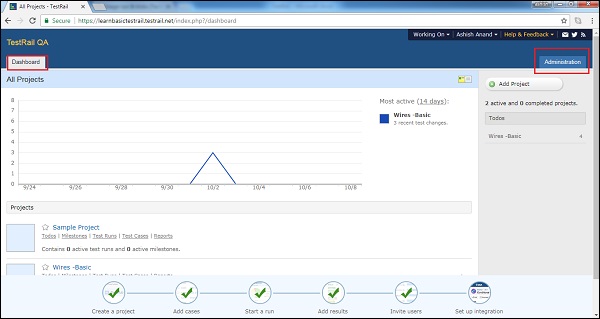
In the first half of section, dashboard displays an activity graph of all projects on daily basis. In the next half, it displays all listed projects name. user can navigate to any of project by clicking on name.
Following screenshot displays Dashboard of TestRail
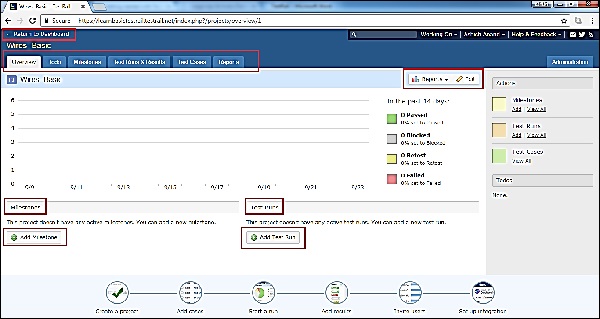
Once user clicks on Project Name (Wires −Basic in above screenshot), it displays Dashboard of Project. The project dashboard is same as main dashboard of TestRail as explained above.
The only additional part is navigation bar that provides different functionalities − Overview, to do, Milestones, Test Runs & Results, Test Cases, Reports
At the top left, Return to Dashboard link is present. By clicking there, user can navigate to main dashboard section where all project is listed.
In the first half of overview section, user can see a graph of daily activities performed in the project.
User can go to different Reports section and Edit the project details by clicking on Reports and Edit button.
In the next half, user can see test runs and milestones list along with shortcut button to add test runs and milestones for the project.
Following screenshot shows the Dashboard page of the project
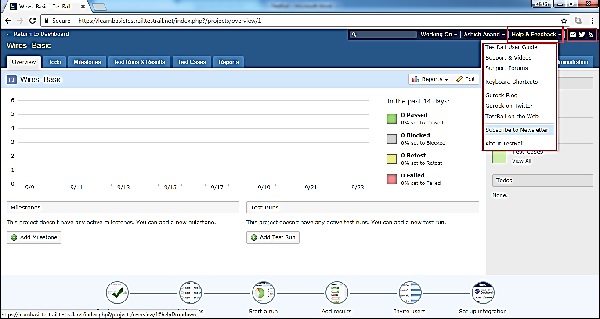
Help & Feedback
TestRail provides many useful ways to interact with users. it has User Guide, Videos, Support Forums, Keyboard Shortcuts etc. User can access blogs, follow on Twitter and can subscribe for Newsletter of Gurock.
These features can be accessed by clicking on Help & Feedback link at Dashboard. Beside the link, there are 3 more icons − Subscribe to Newsletter, follow on Twitter and Learn about TestRail.
Following screenshot displays features of Help & Feedback
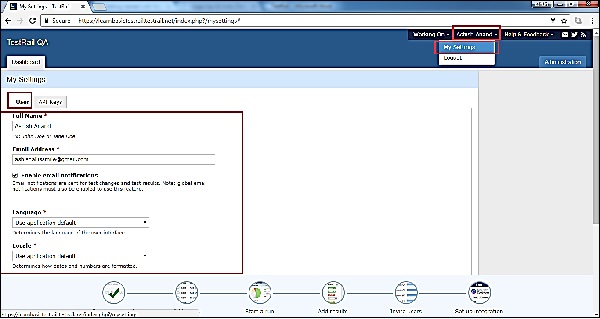
User Profile
By clicking on the profile name → My settings, user can view his personal profile in edit mode. User can modify following fields
Full Name, Email Addresses, Languages, Locale, Password. After making changes , click on Save Settings to apply all changes.
By clicking on Logout, user will get back to login page and wont able to access project details without logging back in.
TestRail - Invite Users
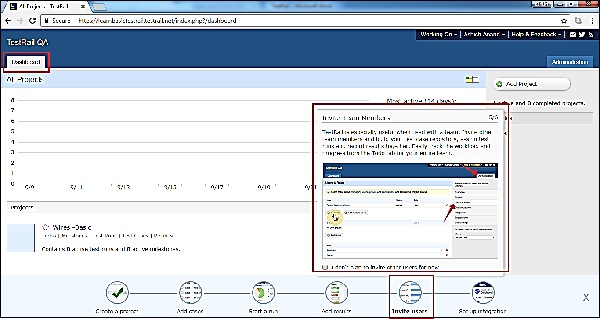
To invite new users into your TestRail domain, you need to first navigate to the Main Dashboard or Project Overview and hover over on Invite Users icon present at down of the page as shown in below screenshot
When user brings the cursor on Invite Users, it displays generic information about Invite Team Member features and how to invite a user process.
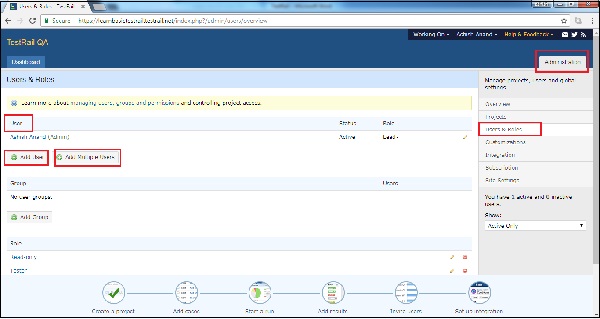
Login as Administrator and click on Administration link present at right side.
Now select the users and Roles option at right side list.
Add Users and Add Multiple Users options are present at right side. Following screenshot displays Add Users option
Add a user
To add a single user, click on Add User option.
It will open a form where enter full name, email address, notification, Language, Locale, Time zone etc as shown in below screenshot
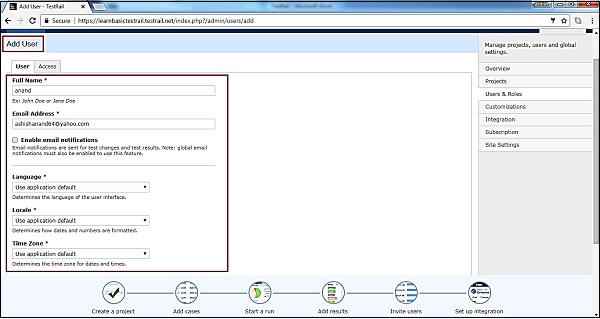
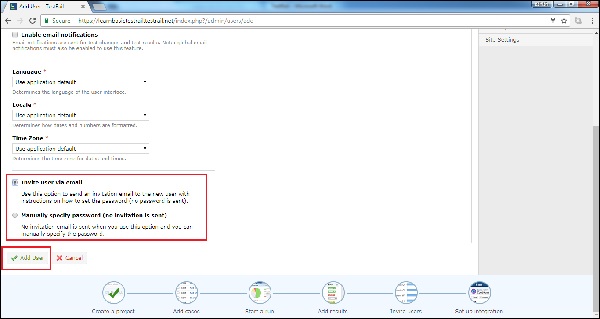
Now select the option of invitation as Via Email or manually by setting username and password.
After that click on Add User button to complete the invitation process as shown in below screenshot
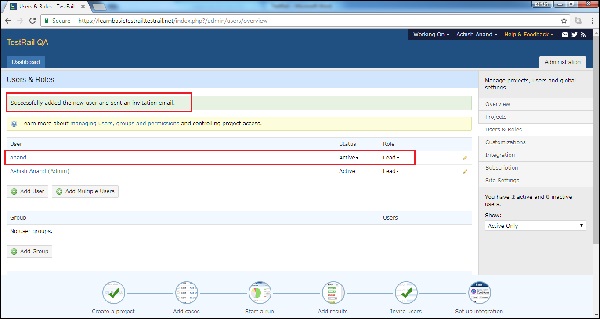
Once invited, they will receive a welcome email with an activation link. In the screen,a successful message will display along with the name of newly added user as shown in following screenshot
Add Multiple Users
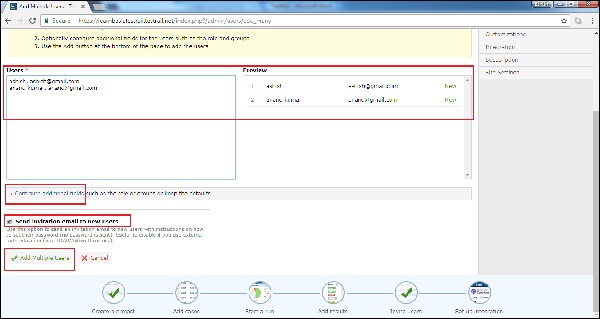
To add multiple users, click on Add Multiple Users option. It will open a form where details should enter as following
Enter each user in a separate line in the text box with the format as
<full name>, <email address>
tutorialspoint, contact@tutorialspoint.com
Optionally, configure additional field for the users such as role and groups.
In the preview, user can see added details are valid or not.
By default, send invitation email to new users will be checked.
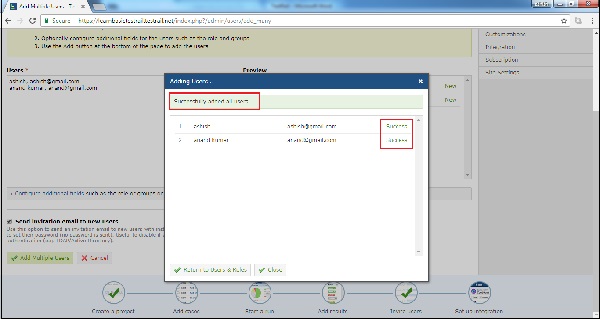
After that click on Add Multiple Users button.
Following screenshot displays how to add multiple users
As user click on Add Multiple Users, a pop − up opens stating that users are added successfully as shown in below screenshot
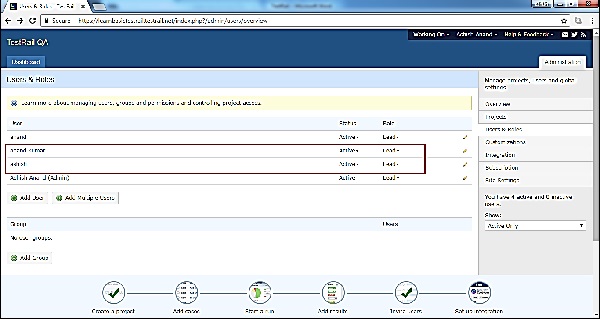
By clicking on Return to Users & Roles, user will navigate to main page where all users will be listed as shown in below screenshot
TestRail - Add A Project
To add a project, a user must have an Admin role. In the bottom, Create Project icon displays the procedure how to add a project when user brings the cursor there.
Create a Project
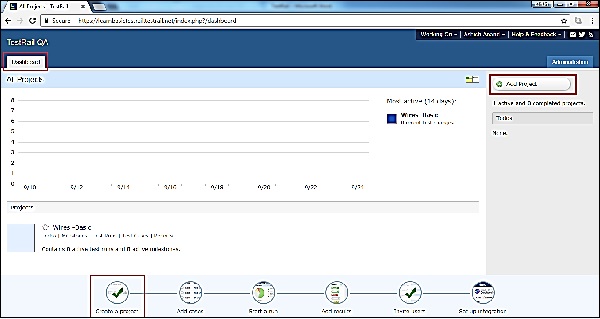
While adding a project into TestRail, the first step is to login as Administrator and Go to the main Dashboard page where all projects are listed. The 1st screen after logging into TestRail.
Click on Add Project button present at right side as displayed in below screenshot
It opens add project form where user needs to enter details in following fields
Name − Project Name
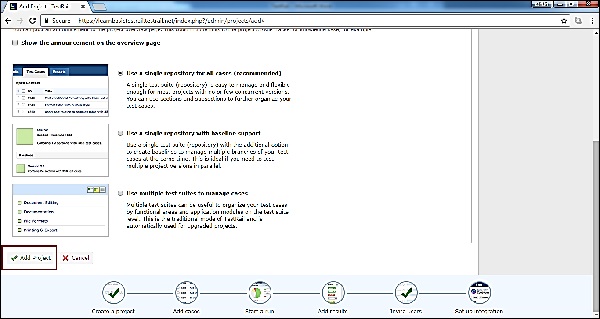
Announcement − If any announcement for the project like release date, start date etc
User can click the checkbox to display announcement at Project Overview page. Select the type of repository based on project and manage cases.

Now click on Add Project as shown below
Optionally, user can add details about access to the project as well. To add access details go to next tab and select Default Access as shown in below screenshot
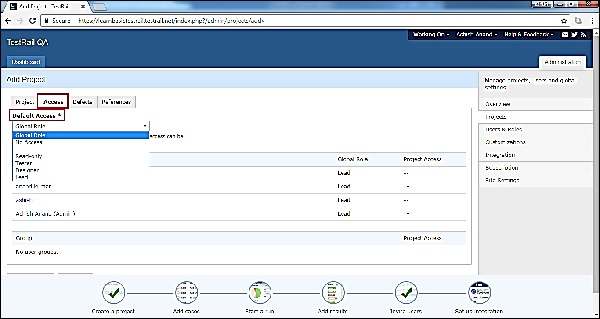
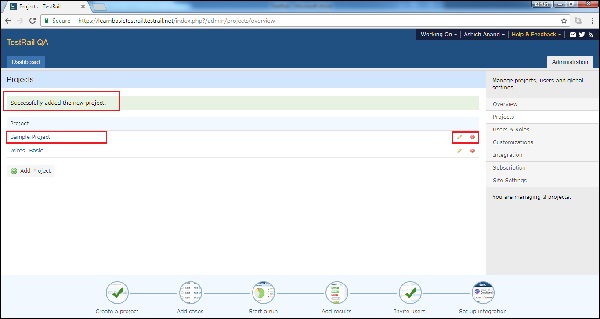
Similarly, user can add details into Defects and References tab. After clicking on Add Project, successful message displays and project gets listed as shown in below screenshot There is Edit and Delete button as well to edit project details and delisted to the project.
TestRail - TestCases - Section
TestRail supports further organized of test suites. Test cases of a test suite can be grouped into different sections. Sections are used to organize test cases into groups to make it easily to identify related test cases at high to low level design.
Points to Note
TestRail supports flexible, lightweight test management.
Test cases are organized into test suite
A test suite is created at Project modules or functionality.
Maintenance of test cases depends on size of the project.
Ideally a test suite consists of about 100 test cases.
its recommended to break down test suites at functionality level rather than module level, in case of many test cases for a project module.
Add Section
To add section, user should perform following steps
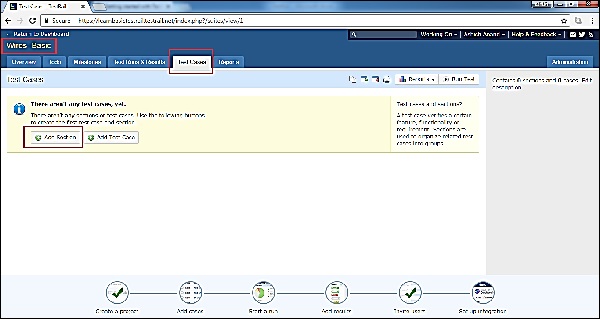
Select a project from dashboard and go to Test Cases tab.
Click on Add Sections button as shown in below screenshot
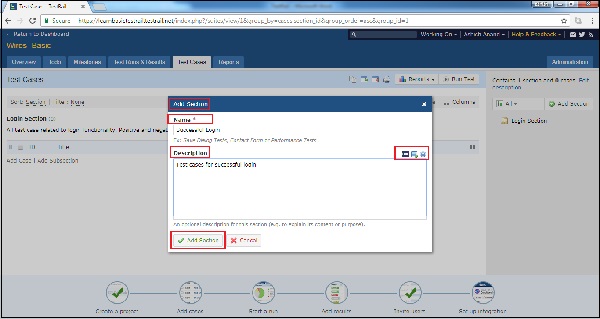
It will open Add Section pop up where user enters Name of section and Description (optionally).
In the description field user has option to insert table or images. The symbol is present at right side as shown in below screenshot
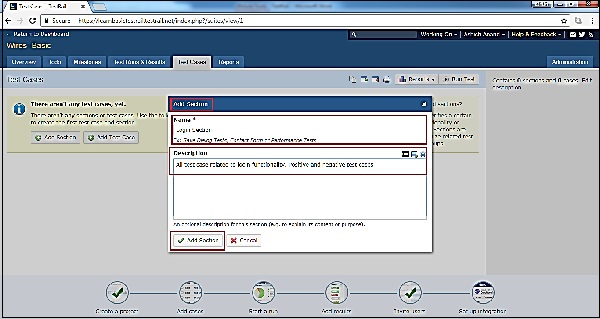
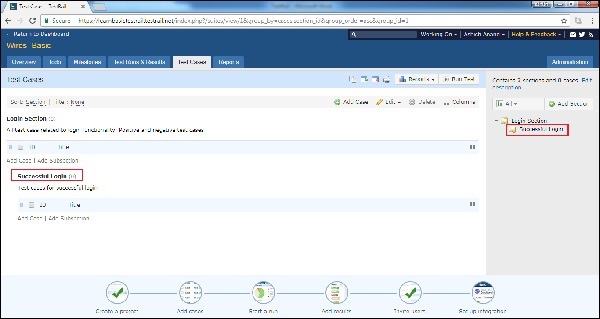
Now click on Add Section button as displayed above. Section gets added and folder structure can be viewed at right side.
In the left side, user can see section name, description and no. of test cases associated within section.
There is another option to add sub−section to organize test cases at macro level as shown in below screenshot
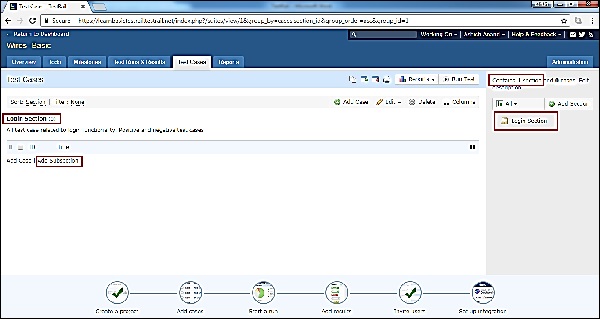
Add Subsection
User can add different subsection under a section to organize test cases at macro level. Following steps should follow while adding a subsection
Select a Section to add subsection, and click on add subsection button as shown in previous screenshot.
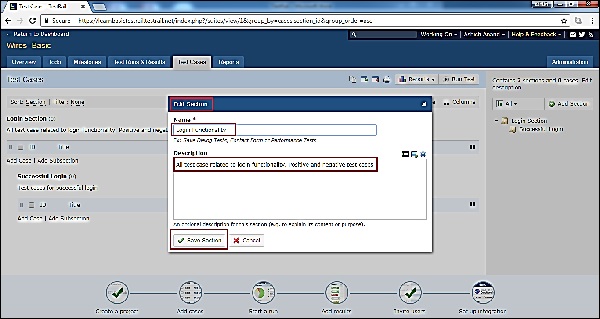
It will open Add Section pop up where user has to enter Name of section and Description (optionally).
In the description field user has option to insert table or images. The symbol is present at right side as shown in below screenshot
After that click on Add Section button present at bottom to add the subsection.
Section gets added and folder structure can be viewed at right side. In the left side, user can see section name, description and no. of test cases associated within section.
Edit a Section
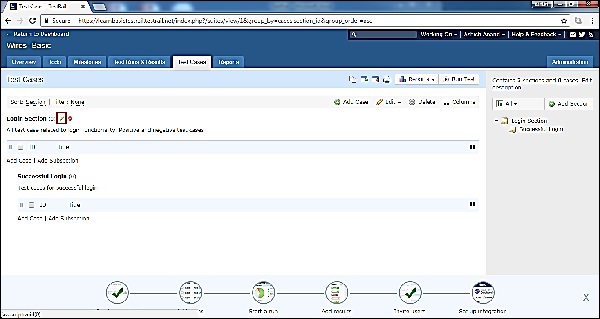
This functionality allows editing existing section or subsection. Following steps should perform to edit a section
Bring the cursor on name of section it displays 2 different icons.
The pencil icon is used as edit. Click on edit symbol as shown below screenshot
It opens Edit Section pop up where user can edit section name and Description. After that click on Save Changes button as shown in below screenshot The name and description of the section would be changed.
Delete a Section
This functionality allows deleting a section. While deleting a section, it will delete all contents inside a section like sub-sections, tests etc. To delete a section, user should perform following steps
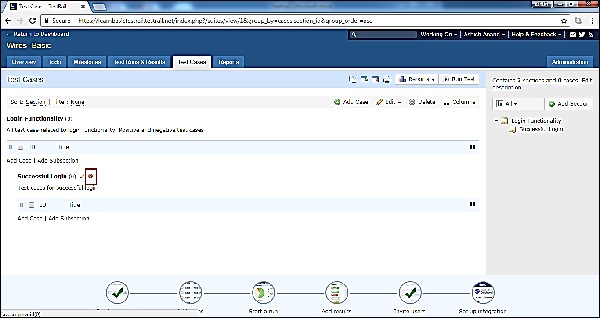
Bring the cursor on name of section, it displays 2 different icons.
The 2nd icon is used as delete. Click on delete symbol as shown in below screenshot
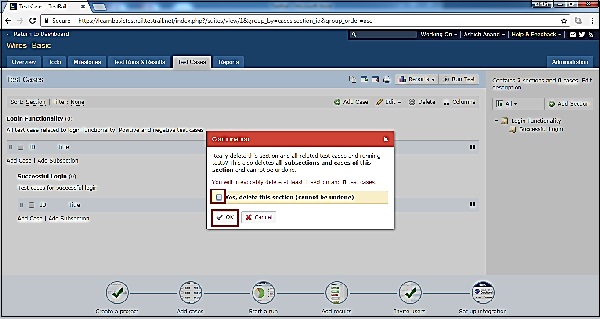
A confirmation pop-up will display for confi rmation to delete, check the checkbox of YES, delete this section and click on OK button as shown in below screenshot Note OK button wont b e enabled until checkbox is checked. P age will be refreshed and section will be deleted.
TestRail - TestCases Case
A test case consists of a description, the test's prerequisites, list of test steps and the expected result. The test case confirms a specific functionality, documents a task, verifies a project artifact, and can be verified by a tester.
In the test cases tab, test cases are organized under different section and sub sections to maintenance effectively. After adding the section (discussed in previous chapter), now need to add test cases- the main objective of this tab.
Add Test Cases
Following steps should perform to add cases
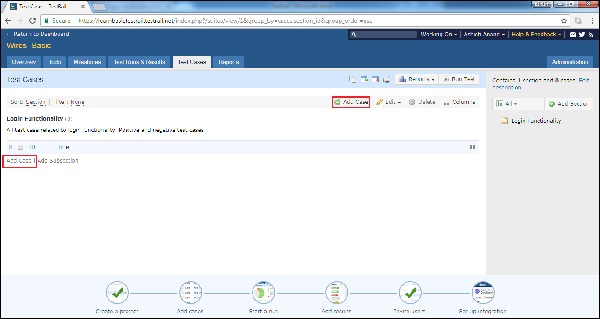
Go to Test Cases tab and click on Add Case link present at two places as shown in below screenshot
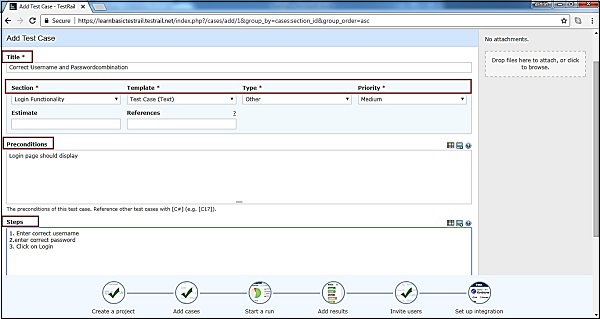
It opens Add Test case form where user enters Title.
Section, Type, Template and Priority are mandatory field and by default selected.
User can change based on the requirement and location to add test cases.
User enters pre-conditions, steps and expected result as shown in below screenshot
Enter the expected result and click on Add Test Case button as shown in below screenshot
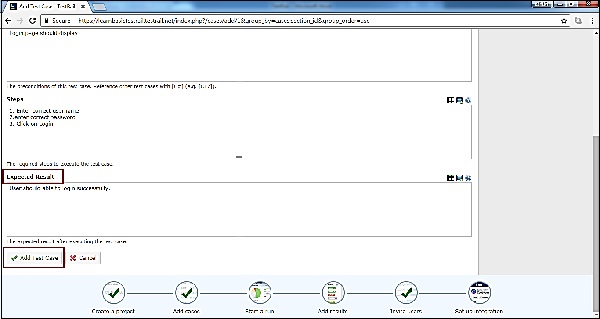
Successful message displays for addition of test case along with Add Another link.
When user click on add another link, it opens Add Test case form.
Following screenshot displays message of success addition of test case
Editing Test Case
Following steps should follow while editing a test case
Click on test case name to open the details.
Click on edit button present at right top as shown in below screenshot
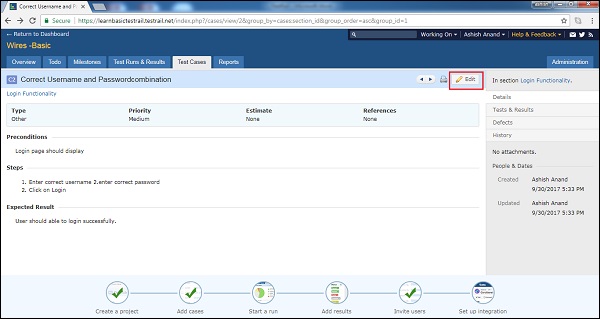
User can click pencil icon as edit when bring the cursor on test case name. It will open the test case details in edit format as shown below
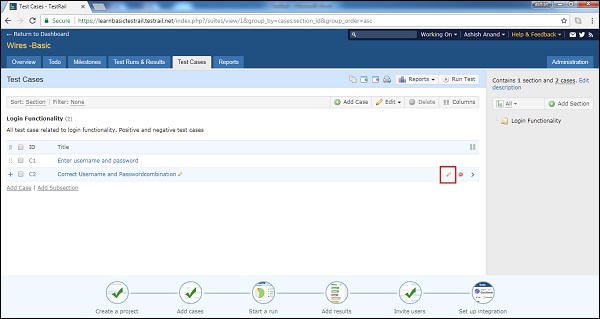
After editing, click on Save Changes button.
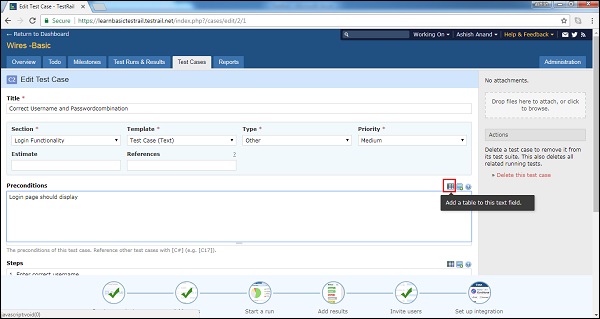
Add Table
TestRail supports adding tables content into text box like steps, pre-conditions, steps and expected result.
To add a table into text box, click on Table icon present a top right of text box as shown in below screenshot
It will open Add Table pop-up where user can design table template. The right + button will add a next column while down + symbol will add a new row.
Click on Add Table button to add the template into text box as shown below
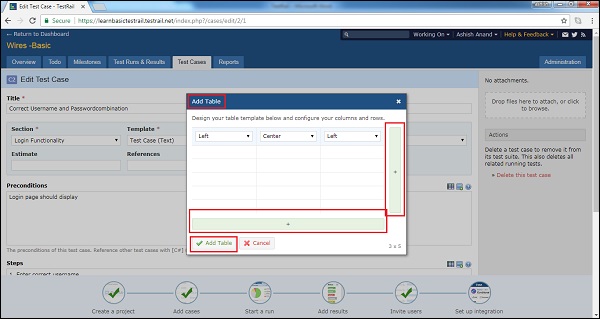
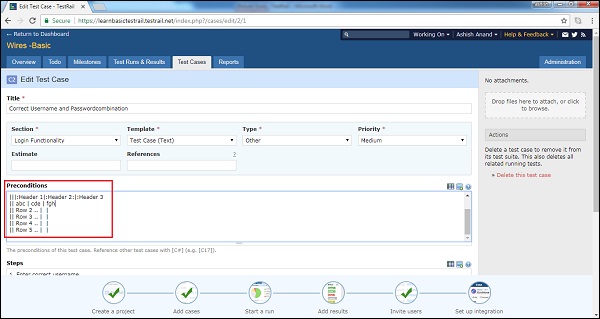
Table template gets added to the text box and use can change the data as shown in below screenshot
Add Image
TestRail supports adding tables content into text box like steps, pre-conditions, steps and expected result. This is very useful to display additional details as part of a test step or expected result
To add a table into text box, click on Table icon present a top right of text box as shown in below screenshot

A pop-up will display where user can use ALT+PrntScr to take screenshot and then press CTRL + V to paste it directly. User doesnt need to use any word or paint document. These steps can be done directly in the pop−up.
By clicking Remove link, image will be removed.
By clicking Add Images button, image will get added into text box.
Following screenshot displays how to add images

User can see the path of attachment as below
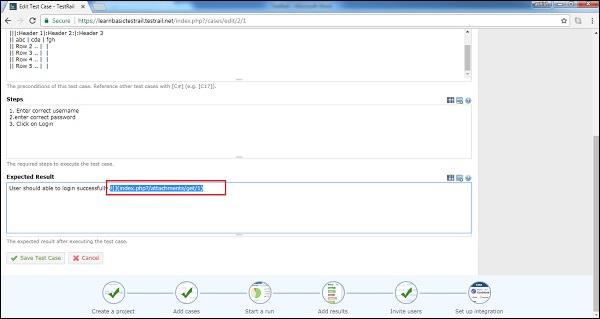
Click on Save Changes.
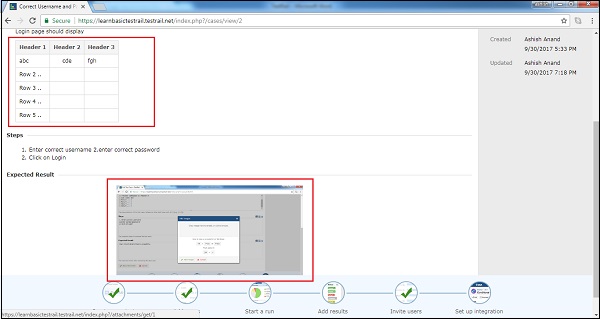
When user goes to the detail of the test cases, added table and image can be viewed.
Following screenshot displays added table and images into test case
TestRail - Import TestCases CSV
User can create multiple test-cases at a time using CSV or XML file. CSV files are comma separated text files. There are 2 steps processes require to import the data from excel.
- Rules for CSV file
- Import the file into system
Rules for CSV file
While creating CSV file following point must be considered
CSV file should have data in the first sheet only.
1st row should have headers name in different columns and next onwards data should represent each column.
Please note, 1st row will be mapped with different fields of Test Case Forms while importing.
1 column in excel file can be mapped with only 1 field in test case form.
Required fields must be mapped with column of CSV sheet and it shouldnt be blank. Otherwise, system will generate error message of unsuccessful import.
Non-Required fields can be left without mapping or data can be blank. While importing either these fields will be blank or default values as defined in projects settings.
Import CSV file
Go to Test Cases tab.
Click at import test cases icon at right side and select Import from CSV option. Following screenshot shows Import test cases icon and CSV selection
Import from CSV Wizard opens. It has 4 steps process.
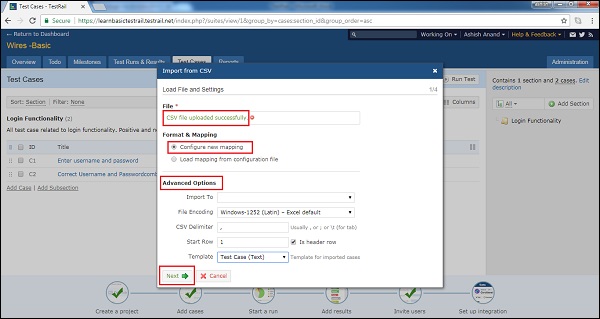
In the 1st step, browse the CSV file and upload. After successful upload, filename displays in wizard.
In the Format & Mapping section, select Configure new mapping for the 1st file. User can use the same configuration from next time after downloading configuration file. To use this option select Load mapping from configuration file.
Following selection should be made in Advanced Option section
Import − to Select the section where test cases should be imported
File Encoding − It is used t select the encoding rules of file so that TestRail can decode file properly. The file encoding of the CSV file, Excel/Windows uses Windows-1252 (Latin) for CSV files whereas most other tools (including Google Spreadsheets) prefer the Unicode-compatible UTF-8 encoding.
CSV Delimiter − User can define , or ; or \t to separate fields.
Start Row − User can separate header row and data row from where starts. And, IS header row or not can be decided using checkbox.
Template − User can choose whether it is complete test case or steps or exploratory session.
After these selection, click on Next button. Following screenshot shows 1st step of import test cases process
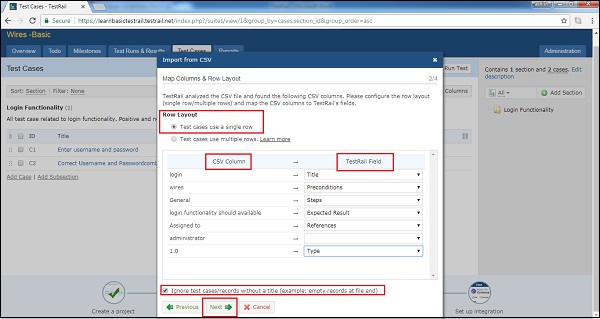
User can simply map CSV columns to TestRails test case fields. TestRail also supports importing separate test steps and expected results if user uses multiple rows for a single test case. This is called as column mapping and can be configured on step 2 of the CSV import wizard.
TestRail differentiates single and multi-row case layouts for CSV files. In a single-row layout, every test case is represented by a single row or record in the CSV file. This is the standard layout for most CSV files.
TestRail supports multi-row layout. User selects the column which detects the start of a new test case in this case (for example, an ID or Name/Title column which is unique per test case). This layout is commonly used for test cases with multiple steps and expected results.
At the last there is a checkbox whether TestRail should ignore CSV rows/records without a valid, non-empty title column. It is recommended to check the checkbox to filter empty rows at the beginning/between test cases/end of the CSV file.
Now, click on Next button. Following screenshot displays 2nd step of Import test case process
This step is to map the CSV values to TestRail. For example, if user has a priority value of Medium in CSV file, this step allows to map this to a priority of Low or Normal in TestRail. In this step, user can check the checkbox to avoid any HTML tags as imported data.
After that click on Next button. Following screenshot displays 3rd step of Import test cases process

In the 4th step, user can review the test cases that TestRail found in the CSV file. User can review the file options as well as column & value mappings those are configured on the previous steps. User can go back and forth with the Previous and Next buttons to make changes to the file options, column or value mappings. Once user is satisfied with the preview, click the Import button.
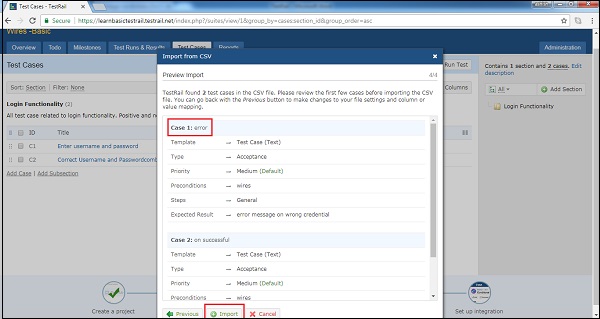
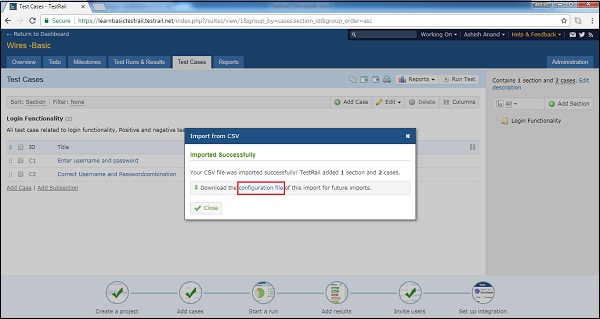
The last wizard step shows number of imported sections & test cases. It allows to download a configuration file. This file can be loaded on the first wizard step and automatically pre-configures all wizard steps and import options. This is useful when multiple CSV files would be imported with a same layout. User can share this configuration file with other team members as well.
TestRail - Import TestCases XML
User can create multiple test cases and sections at a time using XML file. There are 2 steps processes require to import the data from XML.
- Rules for XML file
- Import the file into system
Rules for XML file
While creating XML file following point must be considered
XML format should be in tree structure. It should start with Sections, test cases and Sub-section.
The XML format would be look like as following
<section>
   <name>Login Functionality<name>
   <description>All test case related to login functionality. Positive and negative test cases</description>
   <case>
      <id>C2</id>
      <title>Correct Username and Passwordcombination</title>
      <template>Test Case (Text)<template>
      <type>Other<type>
      <priority>Medium<priority>
      <estimate/>
      <references/>
      <custom>
         <preconds>Login page should display</preconds>
         <steps>1. Enter correct username 2.enter correct password</steps>
         <expected>Usershould able to login successfully.</expected>
      </custom>
   </case>
</section>
The <case> tag supports all properties of a test case in TestRail such as the title, estimate, priority, text fields, pre-conditions, steps, expected result etc
Custom fields are grouped under <custom> tag.
The following table lists the import formats for the various custom field types
| Type | Sample Value | Description |
|---|---|---|
| Checkbox | TRUE | "true" or "false" (without the quotes) |
| Date | 01-07-2010 | A valid XML date string in yyyy-mm-dd format |
| Dropdown | <id>5</id> | The ID of the value (as configured in the custom field options in the administration area) in an <id> tag |
| Integer | 1022 | A simple integer number |
| Milestone | <id>2</id> | The ID of the milestone in an <id> tag |
| Multi−select |
<item> <id>1</id> </item> <item> <id>2</id> </item> |
A list of <item> records, each with its own ID (so, like a list of Dropdown values) |
| Steps |
<step>
   <index>1</index>
   <content>Step 1</content>
   <expected>Result 1</expected>
</step>
<step>
    <index>2</index><content>Step 2</content>
</step>
|
A list of <step> records, each with its own index, content and optionally expected result |
| String/Text | Foobar | A simple string |
| URL (Link) | http//google.com/ | A simple URL as string |
| User | <id>3</id> | The ID of the user in an <id> tag |
Import CSV file
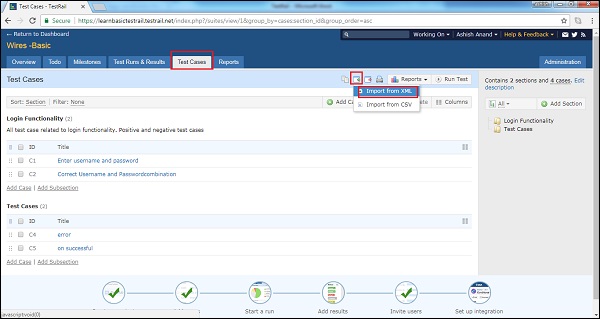
Go to Test Cases tab.
Click at import test cases icon at right side and select Import from XML option.
Following screenshot shows Import test cases icon and XML selection
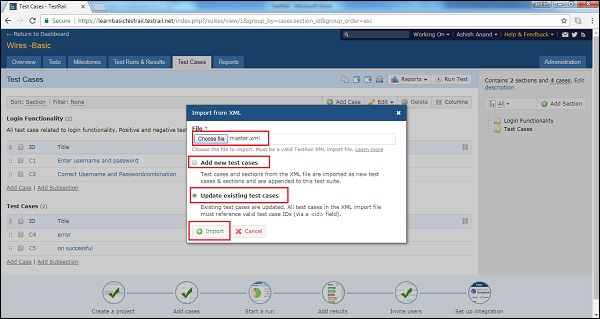
It opens Import from XML wizard. Browse and upload an XML file.
User can add new test cases as well as update existing test cases.
After selection, click on Import button.
Following screenshot shows how to export XML file
TestRail - Export TestCases
TestRail supports export functionality where user can export all sections and test cases into different files.
User can export the data into CSV, Excel or XML file.
Following steps should perform while exporting test cases details
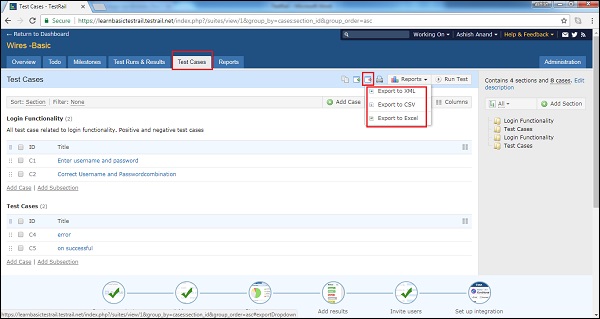
Go to Test Cases tab.
Click at export test cases icon at right side and select Export from <file name> option as shown in below screenshot
Export to XML
To export all details into XML, select Export to XML. It will directly download an XML files having all details of test cases and section.
An XML file would have section tag and inside section cases and properties of cases.
Following screenshot displays snapshot of XML file

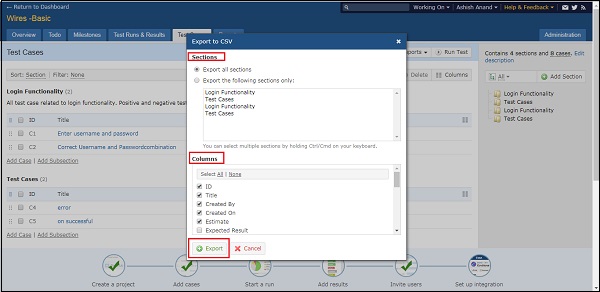
Export to CSV
To export the sections and test cases details into CSV file, select export to CSV option.
It opens Export to CSV wizard.
Here, user can select what contents needs to be exported. User can select all sections or single/multiple sections to export.
User can select specific columns as well to export details.
After selection, click on Export. This screenshot displays Export to CSV wizard
After clicking on export, it will download a csv file containing all selected details.
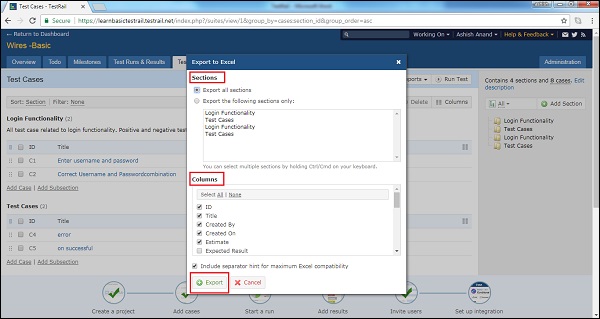
Export to Excel
To export the sections and test cases details into excel file, select export to Excel option.
It opens Export to Excel wizard.
Here, user can select what contents needs to be exported. User can select all sections or single/multiple sections to export.
User can select specific columns as well to export details.
After selection, click on Export button.
Following screenshot displays Export to Excel wizard
TestRail - Test Runs
TestRail provides 2 step procedure of test execution. First add the test run and then execute test run. Add Test Run is simply pulling the existing test cases, as test run where user can execute those based on priority.
Add Test Run
To add test run in Test Runs & Results tab, following steps should perform
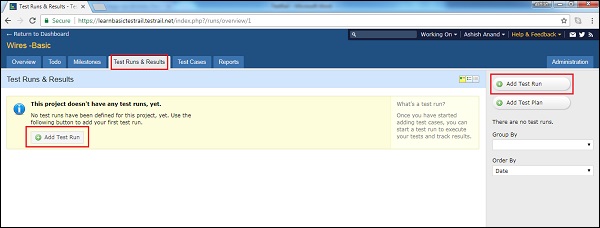
Go to Test Runs & Results tab
Click on Add Test Run button present at various places as shown in below screenshot
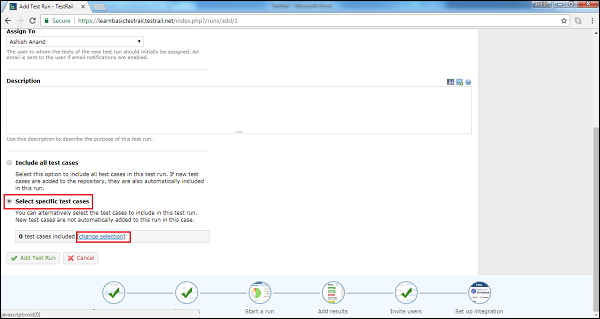
It opens Add Test Run page where user should enter Name, Milestone, Assigned To, Description as shown in below screenshot
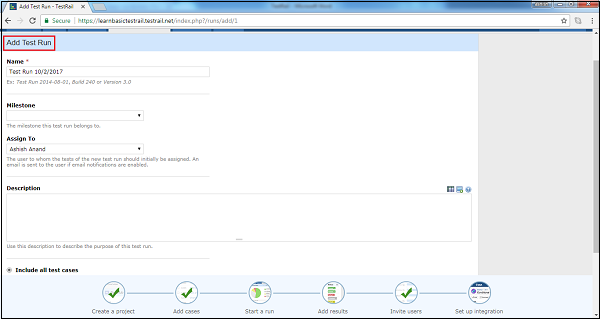
Now select test cases- there are 2 options
Include all test cases − Select this option to include all test cases in this test run. If new test cases are added to the repository, they are also automatically included in this run.
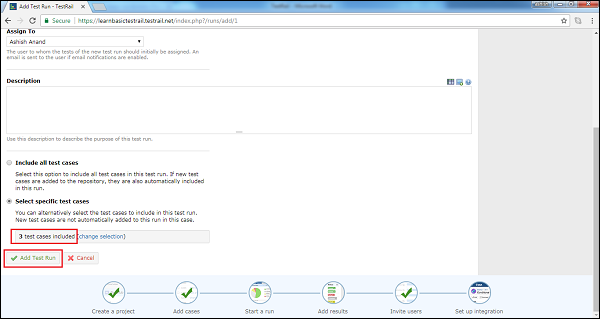
Select specific test cases − User can alternatively select the test cases to include in this test run. New test cases are not automatically added to this run in this case.
When user selects 2nd option, following additional steps to perform
Click on change selection as shown in below screenshot
It opens select cases wizard with all available test cases. User can select entire section or specific test cases from each section as shown in below screenshot and click on OK to make selection.
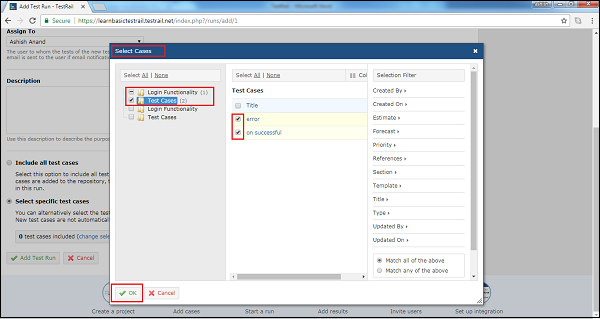
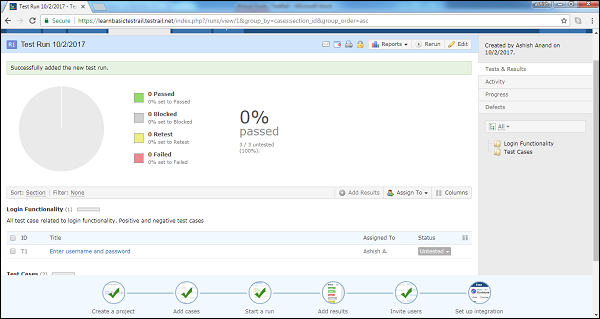
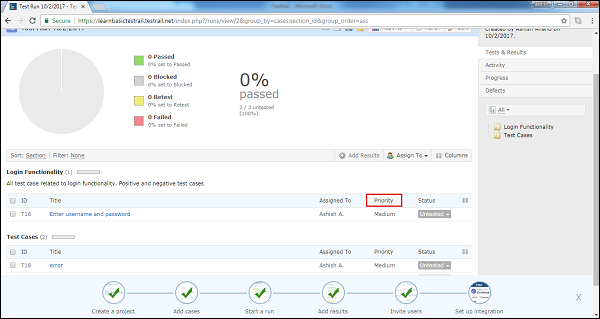
User can see number of test cases included and click on Add Run button as following screenshot

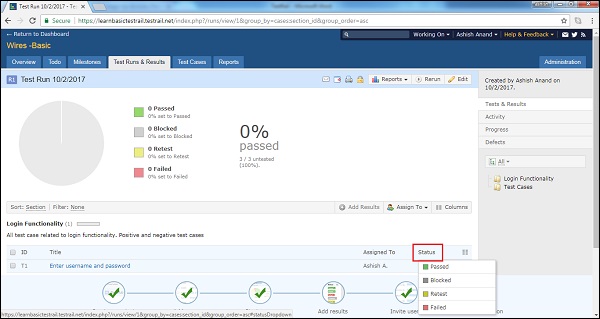
Now user can see pie-chart and test cases into Test Runs & Results tab as following

Test Run
TestRail supports following 5 statuses of test cases
Untested − By default, new tests have the status Untested. Once a test result has been added to a test, it can never change to the Untested status again.
Passed − A test case is marked as Passed when test steps are verified as per the expected results.
Failed − A test case is marked as Failed if one of the specified test steps is resulted in an error or if the expected result differs from the actual test result.
Retest − If a test should be tested again, marks the test as Retest. E.g., if a test originally failed and the developer fixed the problem, the developer can mark it to be retested.
Blocked − The Blocked status is used to specify that a test cannot be executed currently because of some external dependency (such as a bug that needs to be fixed before being able to complete to test).
Once test run is completed for a test case, status of test case is changes as one of the above. Screenshot displays how to change the status of a test case after run
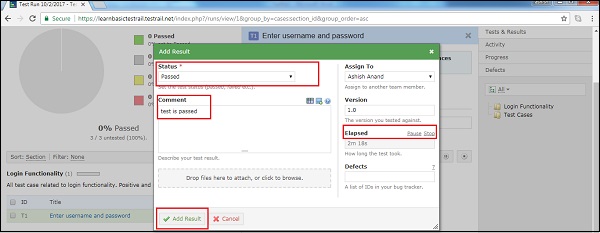
Now Add Result wizard opens where Add Results and comments as artifacts. User can record the elapsed time as well by clicking on Start link present at Elapsed field.
After that click on Add Result. It completes the test run of a test case.
TestRail - Rerun
There are many cases where rerunning of an existing test run may be useful. TestRail includes a quick link for this in the test run toolbar. Following steps should follow while rerunning the test case
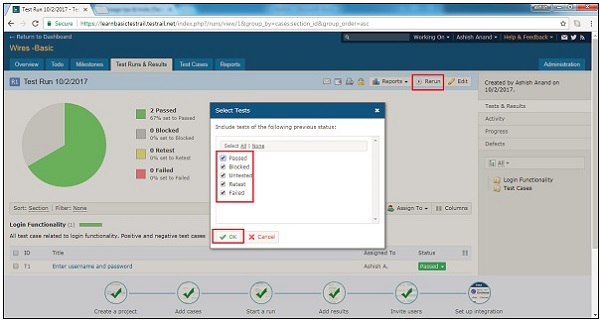
Click on Rerun button present at toolbar.
It opens select tests wizard where user can select the test cases based on status of previous result.
After selection, click on OK button.
Following screenshot displays how to rerun test cases
It opens Add Test Run page where user should enter Name, Milestone, Assigned To, Description as shown in below screenshot.

By default 2nd option is selected.
User can see number of test cases included and click on Add Run button as following screenshot
Now user can see pie-chart and test cases into Test Runs & Results tab as following
TestRail - Customize Table
User can customize the test tables in TestRail by adding or hiding columns, changing column widths or changing the grouping or sorting. It is very convenient to display important fields directly on the test run pages.
Following steps should perform while customizing the table
Go to Test Cases or Test Run & Results tab.
Click on column icon, it opens Select Columns wizard.
By clicking up and down arrows, user can change the location of the field. The top most field will present at 1st field in the left side.
User can change the width of each field by providing numeric value into width text field.
There is a delete icon, by clicking there user can delete any field.

There is a link to add additional field name as Add Column.
When click on Add Column, it opens a wizard where user can select the column name from available list.
After that click on Add Column, it will add a new column into Select Columns wizard.
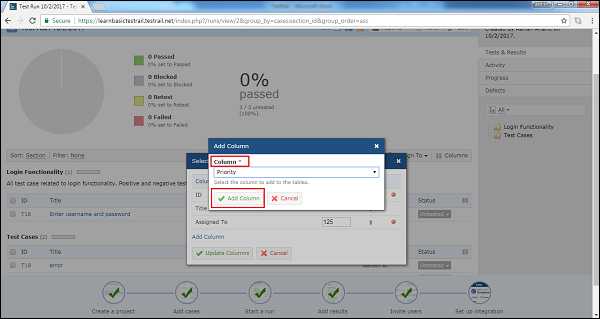
Now click on the Update Columns button present at Select Columns wizard.
Now user can see new column appears in table at test run page as shown in below screenshot
TestRail - Copy/Move Test Cases
In order to rearrange and organize test cases and suits, moving and copying test cases and entire sections is very useful. It also helps to duplicate the test suites and test cases.
There are two ways to copy and move test cases within TestRail.
- Copy/Move within same test suite
- Copy/Move from another test suite
Copy/Move within test suite
To move test case or entire section from one position to another, use drag and drop.
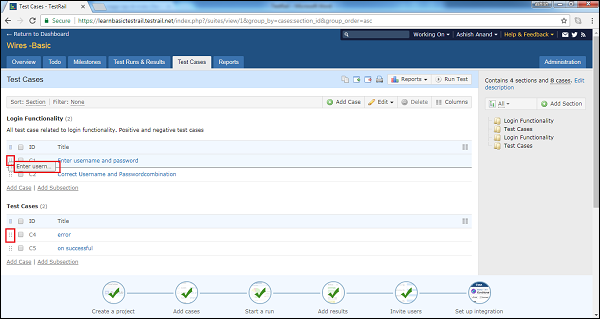
When the cursor moves at the extreme left side of the test case, icon changes as a drag and drop.
User can hold and click left mouse button and drag the test case into desired location as shown below
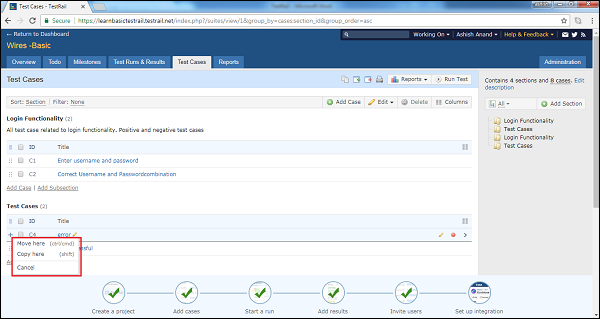
Release the mouse click at desired location, it will ask which action need to perform- Move here, Copy here or Cancel.
User can choose between Move and Copy as per requirement.
Following screenshot shows how to move/copy
To move or copy the section, user can use right side folder structure of sections and perform the same action as above.

Copy/Move from another test suite
User can use this feature to duplicate entire test suite or test cases or sections.
Following steps should perform to move/copy test suite or section from another test suite
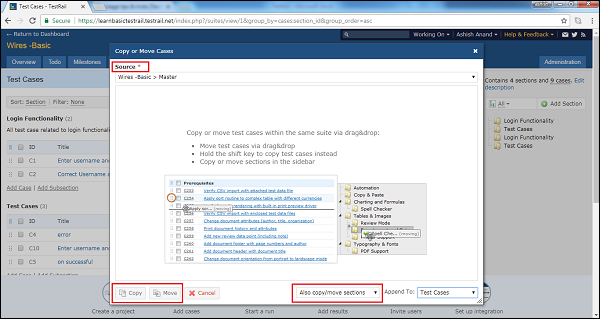
Go to Test Cases tab and click on Copy/Move test cases icon present at tool bar.

It will open the wizard where user can select Source Project.
User can also select whether all section needs to move/copy or only test cases.
After selection click on Copy or Move button. Following screenshot displays the move/copy wizard
TestRail - Milestones
Milestones are associated with project and one of the best ways to track the progress and timeline. It is similar to the small targets in a project. A milestone can be an important target such as a planned public software release, an internal test version, a new beta release for an important customer etc.
Once stakeholders add milestones to TestRail, users can assign test runs to specific milestones. It helps to track the milestones test results and progress separately. Especially if multiple milestones are in progress in parallel or if users have many test runs active at the same time.
Add Milestones
To add a milestone, user should have to perform following steps
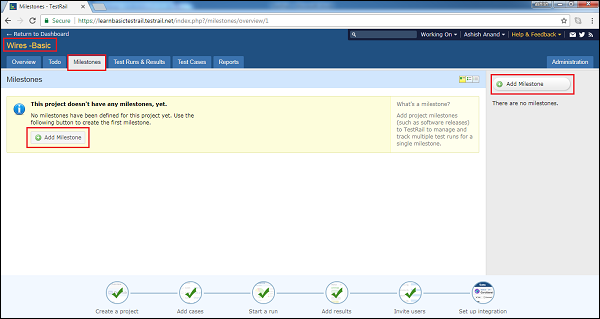
Go to the Project from a Dashboard and click to the Milestones tab.
Click on Add Milestone button present as shown in below screenshot
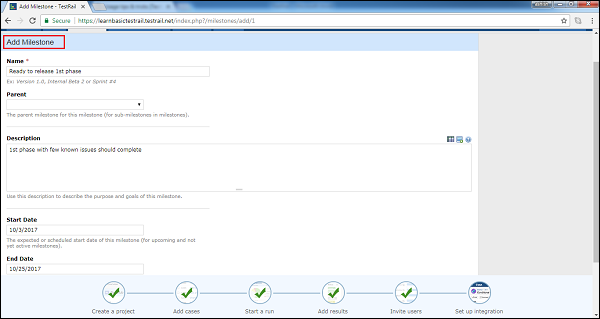
It will open Add Milestone page where user has to fill following fields
Name Milestone title
Parent If a sub-milestone is getting added, choose the parent Milestone
Description Details about milestone
Start Date When the work will start for this milestone
End Date Target achieve date
Milestone completed checkbox If milestone is completed, test cases or test run can not assign.
Following screenshot displays the different fields in Add Milestone page
Now, click on Add Milestone button present at down of the page as shown in below screenshot

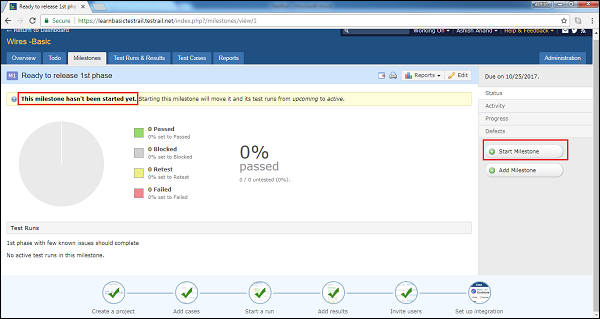
It adds the milestone but it remains as upcoming milestone. It doesnt as in progress even if the start date is past dates. User needs to start the milestone.
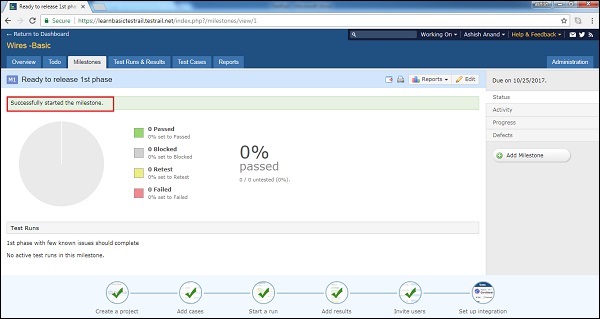
Click on Milestone name. It will open details and progress chart of milestone. Click on Start Milestone button as shown in below screenshot
It opens the start milestone pop-up with start and end dates. Click on Start Milestone again as shown below
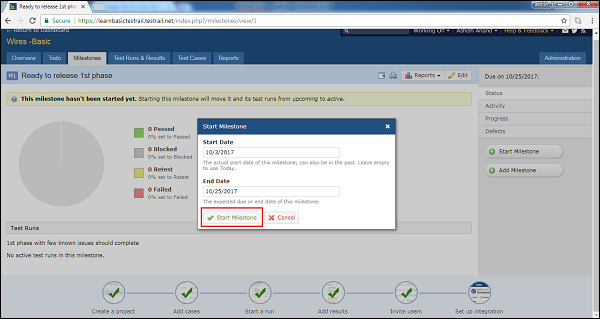
User can see the successfully started the milestone message and Start milestone button is disappeared.
TestRail - Test Plans & Configuration
TestRail support the feature of Test Plan. It is very useful when user needs to manage multiple test runs and configuration for a project. Test plan allows to execute multiple test runs either many test suites or validation test against multiple configurations. When a user tests the project against different operating systems or web browsers are called as configuration.
Add Test Plan
To create a Test Plan, user should perform following steps
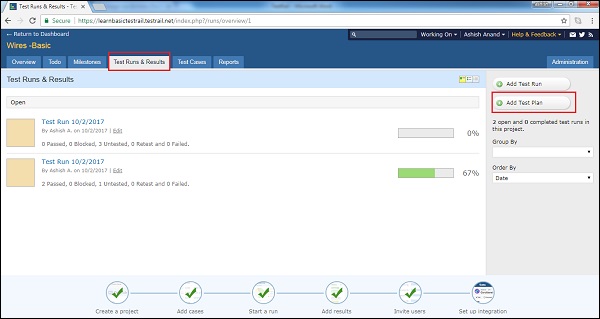
Go to Test Runs & Result tab and click on the Add Test Plan button present at right side as shown below
It opens Test Plan page where user should enter Name, Milestone and Description.
User should add Test Run as well. The advisory message displays to Add Test Run from the side bar as shown below
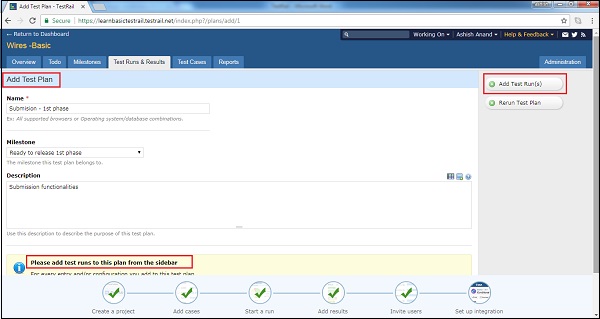
Click on Add Test Runs button present at side bar.
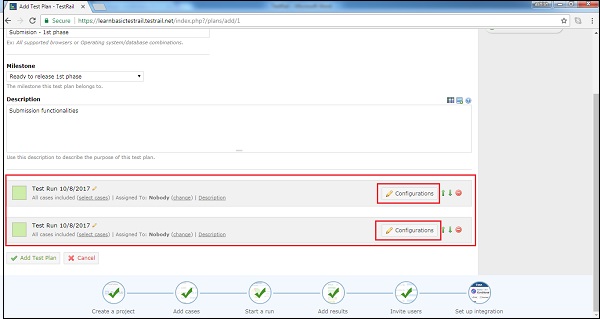
It will add available test runs.
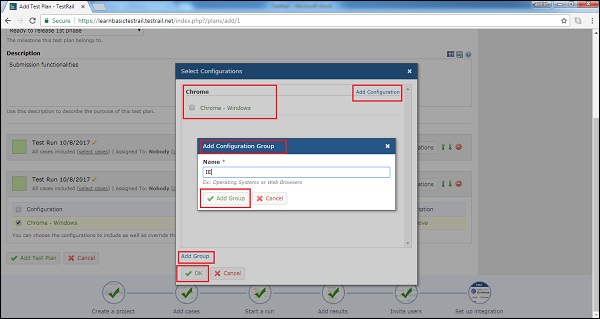
Click on Configurations to configure test runs as shown in below screenshot
It opens select configuration pop-up along with details of available configuration.
If required configuration is not present, user can add new configuration by clicking on Add Group or Add Configuration link present at the pop up.
Enter the name and click on Add Group/Configuration and after that click on OK as shown in below screenshot
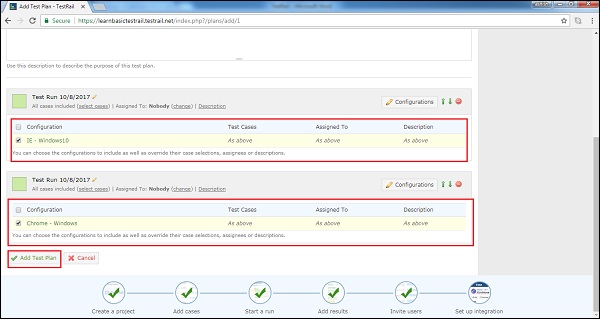
User can see the selected Configuration against each Test Run. Now click on Add Test Plan button as displayed in below screenshot.
TestRail - To Do & Notifications
Once a test case or test run is assigned to a user, it appears on the users to-do list. Every user has its own to-do list for each project he is assigned. Dashboard provides a quick view of user's to-do task for all projects. Todo section can be used to view the to-do list of other team members or the entire team as well. It provides an easy way to see the workloads and progress of individual team member.
Following screenshot displays the overview of Todo page
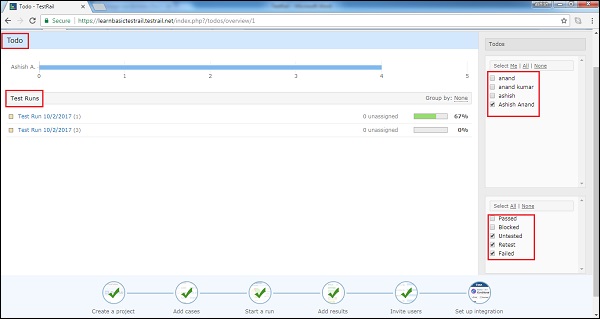
In the right side menu, user can select users name as well as status of Test cases to filter out individual to do list and progress of different team members.
Notification
Email notification is one of the attractive features of TestRail. It notifies to assigned user about test changes or test results made by other users. For example, if a test has been assigned to a user and another user adds a comment or result to the test, the assigned user is notified by email.
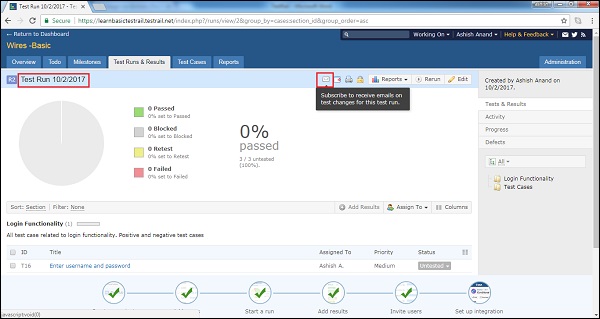
It is also possible to subscribe to tests of other users or even entire runs by clicking the small email icons on the relevant pages.
Following screenshot shows how to subscribe email notification those are assigned to other users
Enable Notification
To enable email notification, user should have Administration Permission.
Following steps should follow while enabling the notification
Go to the main Dashboard and click on the Administration present at right side as shown in below screenshot
Navigate to Users & Roles section and click on one of users name whose email notification need to enable.

In the user tab, email notification checkbox is present. By checking the checkbox enables the notification while unchecking it will disable the notification
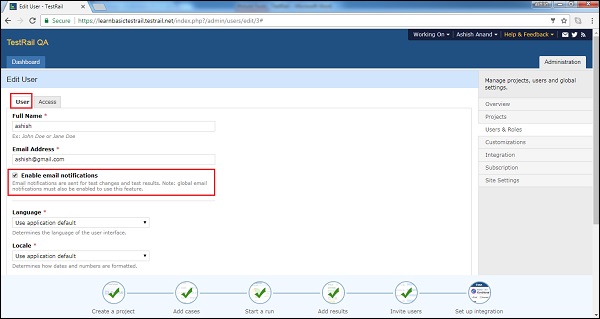
After that click on Save User button present at down of the page.
TestRail - Reports
In Reports, users can create, view and export reports supported by TestRail. TestRail supports wide range of reports to track out the progress. These reports contain various filters to fetch most important information to prepare any of the metrics.
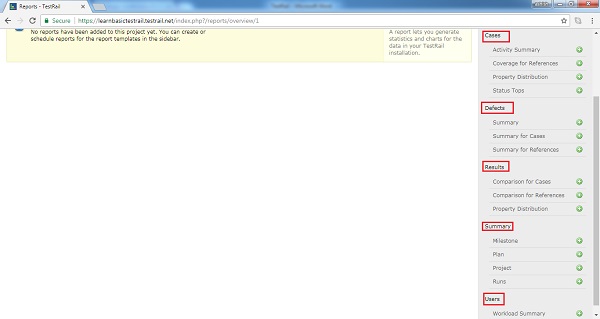
When user navigates to Reports section, it displays list of available reports for different activities at right panel as shown in below screenshots
Type of Reports
TestRail supports number of reports in different groups as explained below
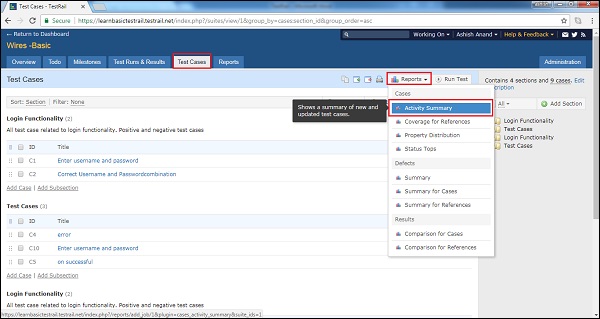
Cases These reports are related to test cases design.
Activity Summary It shows a summary of new and updated test cases.
Coverage for Reference It shows the test case coverage for references in coverage matrix.
Property Distribution It shows a summary of test cases, grouped by attributes as Priority, Created By, Template, Type etc
Status Tops It shows the test cases with the highest amount of results for the selected statuses, grouped by status.
Defects These reports are related to defects found.
Summary It shows a summary of found defects for a milestone, test plans or test runs.
Summary for Cases It shows the summary of found defects for test cases in coverage matrix.
Summary for References It shows a summary of found defects for references and their test cases in a coverage matrix.
Results These reports are related to test run results.
Comparison for Cases It shows the results for test cases in a coverage & comparison matrix.
Comparison for References It shows the result for test cases in a coverage & comparison matrix.
Property Distribution It shows a summary of tests, grouped by a selected attribute, for a given project, milestone or specific test run.
Summary These reports provide summary of progress at milestone, plan or cases level.
Milestone It shows the summary and overview of a milestone.
Plan It shows the summary and overview of a test plan.
Project It shows the summary and overview for the project.
Runs It shows the summary and overview for one or multiple test runs.
Users
Workload Summary It shows the current workload for the users of entire project, a specific milestone or test runs.
Create a Report
All of reports follow the same steps for adding and configuring a report. Following steps should perform while adding a report
Go to the report tab and click one of the listed reports at right side as displayed in following screenshot

OR, user can navigate to Overview, Test Runs & Results or Test Cases tab and click on Report icon. It will display list of available reports. Select one of among those.
It displays Add Report − Activity Summary page.
User should fill following fields
- Name
- Description
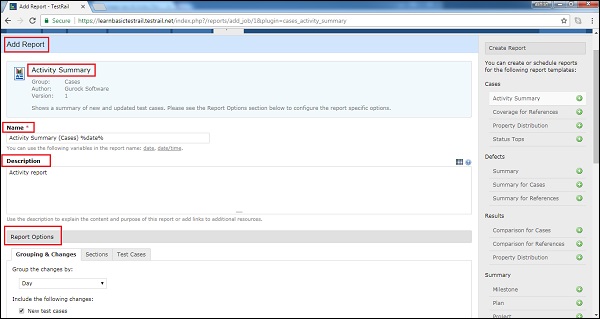
Report Option User will select the characteristic of Report. Grouping & Changes Day, Month, Cases are available list to select. These list changes based on type of reports.
Sections User can select either all section or specific section. Test Cases User can select or add what all columns and details should display in report.
Following screenshots display how to select Report option
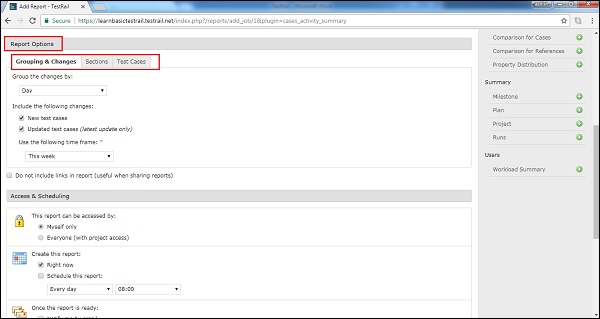
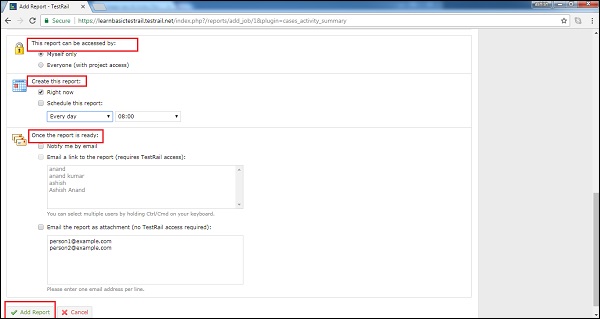
Access & Scheduling In this section, user defines privacy and schedule the generation time of the report repeatedly.
This Report can be accessed by Select the option either Myself or Everyone
Create this report check the checkbox for Right Now and/or Schedule this report and select occurrence and time.
Once the report is ready Select option either as Notify by email or email a link to the report.
Once all these selections are completed, click on Add Report button.
It will add the report into Report tab. Once user click on the added report link, it displays the report as following −
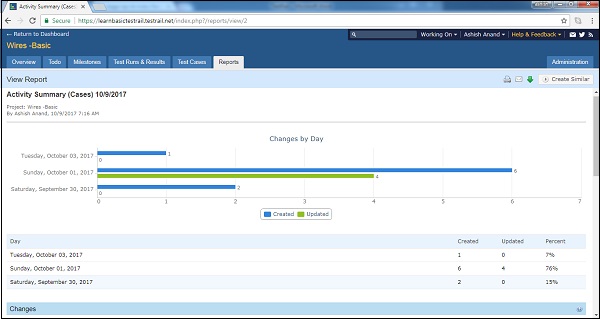
User can see the chart as well as tabular data as Day Vs changes/updated in details about report.
TestRail - Tracking Progress & Activity
TestRail supports the view of the test results and testing activities of runs, milestones and entire projects on the individual resource pages along with available reports.
When user navigates to Test Run & Result tab and select one of test run, it displays overview activity, summary and progress of particular test run as shown in below screenshot

User can see how much percentages are passed, how many test cases are remaining, what all test cases status is individual basis.
Activity
In the right side menu, Activity option is displayed.
Once user clicks on Activity option, it displays the all activities performed for Test Run.
It is not limited to only Test Run. This feature supports all section such as Milestone, Todo, Test Cases and Overview.
Following screenshot displays how the activity page displays
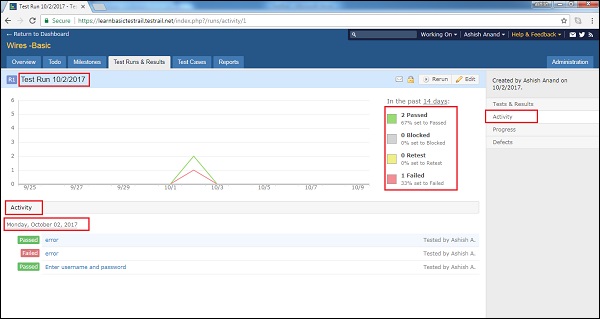
In this page, user can see graphical representation and summary of test run.
User can see day wise activity as well along with status of test cases.
Progress
In the right side menu, Progress option is displayed.
Once user clicks on Progress option, it displays the overall progress of Test Run from start date.
It is not limited to only Test Run. This feature supports all section such as Milestone, Todo, Test Cases and Overview.
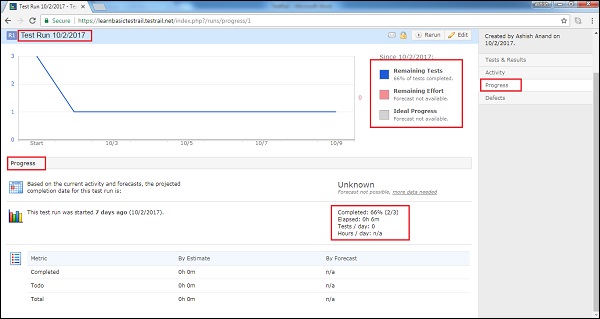
In this page, user can see graphical representation and summary of test run.
User can see day wise progress as well completion of test cases.
TestRail - Add Multiple Test Results
TestRail supports the feature to add multiple test results at a time for many test cases. This feature saves the time if the same result file is applicable for more than one test case
Following steps should perform to use this functionality
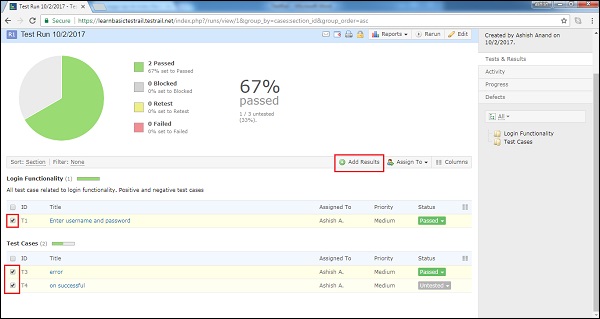
Navigate to Test Runs & Results tab. Check the checkbox (mass-action button) for each test case where test results file should be added.
After selection of test cases, click on Add Result button as shown in below screenshot
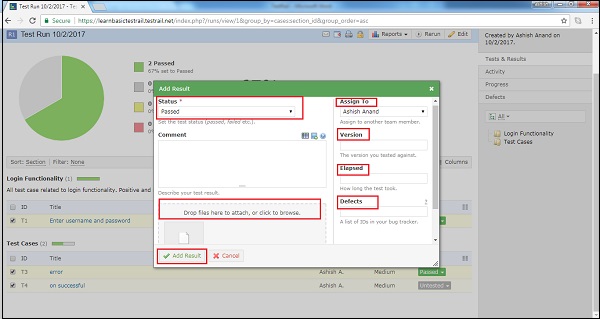
It will open Add Result pop-up. User can select Assigned To, Version, Elapsed Time and Status etc
After that, user can upload one to many result files by clicking drg and drop.
Now, click on Add Result button to add results to all selected test cases.
Following screenshot shows Add Result pop-up
It updates the status and Result section of test cases.
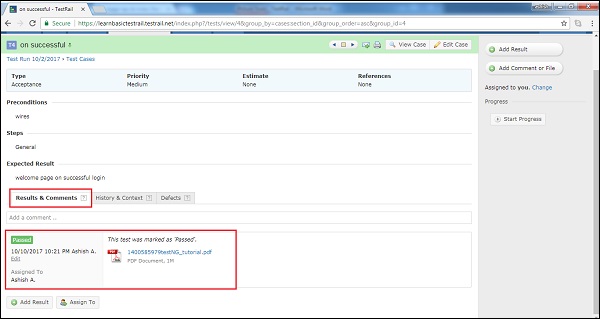
To re−verify it, user can click on test case name and go to Results & Comment section. User can see Status and attached result file as shown in below screenshot. Similarly, all selected test cases can be re−verified.
TestRail - Advanced Search Option
TestRail supports search functionality. Text entered into search box (present at upper right corner of the user interface) is treated as Query and after execution of query it displays all searched items as result. TestRail searches through all project entities, such as test cases, runs and suites. TestRail also searches through custom field that have been added to test case and test results. The search test box is present all of the pages.
Following screenshot shows the search functionality
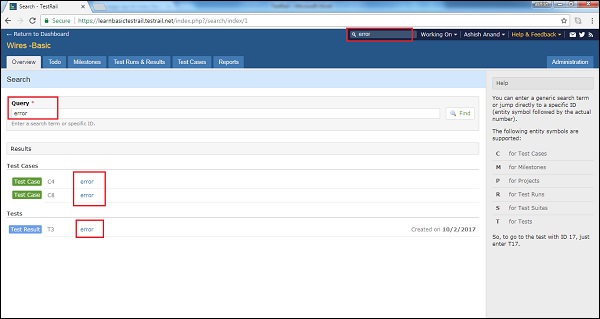
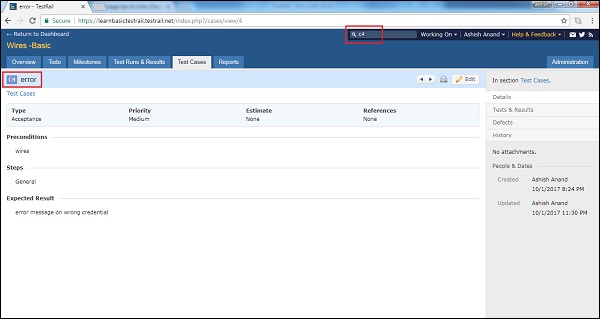
TestRail supports advanced search functionality as well. User can also just enter the ID of any entity to directly find the specific result. The advance functionality narrows down the search results and provides more specific result. For example, if user wants to view test case#8, user can directly search it by entering C15 into the search box. Similarly, to go to the test suite #1, simply enter S1.
Following screenshot shows advance search functionality of TestRail
The following entity symbols are supported by TestRail
- C TestCases
- M Milestones
- P Projects
- R Test Runs
- S Test Suites
- T Tests into Test Run
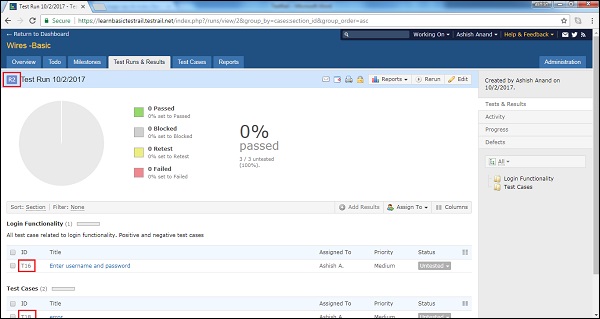
Each entity uses a different symbol in front of the ID and user can see the entities in the user interface on the left side. User can find the ID of an entity before to its title on most pages.
Following screenshot displays how to find entity and ID
TestRail - Optimized Printing
TestRail supports the feature to print different reports those are related to test runs, suits and other sections. To print in an optimized way, user needs to adjust the print options in web browser. For example, Internet Explorer and Firefox disable background colors by default to save printing costs. But TestRail print reports are already optimized for this, so user can safely enable background colors. These settings can be changed from, from Page Setup in the web browser's menu.
Print − Test Cases/Runs
All of pages like Test Runs, Suits, Reports, and Milestones etc. have a Print option. And, they all follow the similar steps to print a page as following
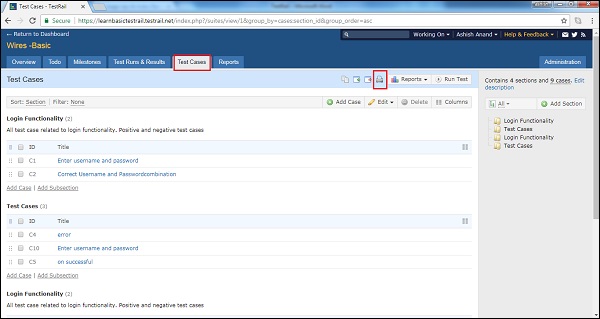
Navigate to the Test Cases or Test Runs & Results tab and select group of test entities those need to print.
The respective page opens with all details.
Click on the Print Icon present at top of the toolbar as shown in below screenshot
It opens the preview of the page in a new window.
User can select 2 different views to print the page Detail and Outline
In Detail selection, all details of a test case get printed as shown in below screenshot
In outline view, summary of each test case is printed as shown below
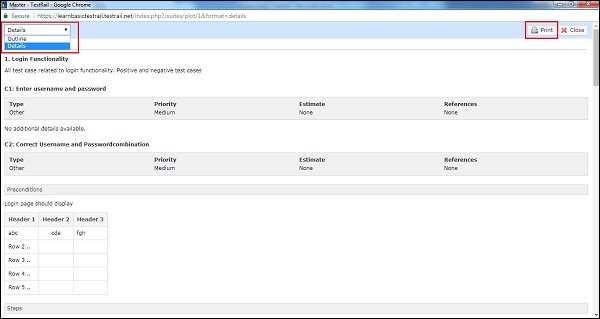
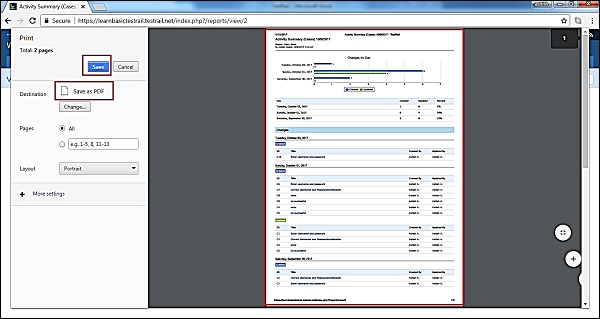
Now click on Print button at preview page.
It will open browser specific Print page. User can either print the page or save as PDF into computer.
Following screenshot shows browser specific print page

Print−Reports
Navigate to the Reports and select a report that needs to print.
The respective report opens with all details.
Click on the Print Icon present at top of the toolbar as shown in below screenshot
It will open browser specific Print page. User can either print the page or save as PDF into computer.
Following screenshot shows the browser specific print page for Reports
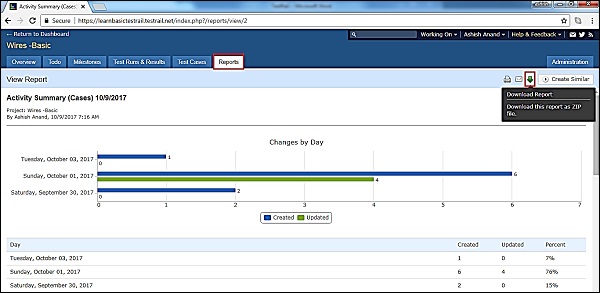
Download − Reports
TestRail supports additional feature of Download Reports.
It downloads the report into Zip file directly instead of printing.
To download a report, go to Report section and select reports to download.
Click on Download button present at top toolbar.
The following screenshot displays how to download a report.
After clicking in Download, it downloads the report into .Zip file.
TestRail - Shortcuts and Hotkeys
Starting with TestRail 4.2, TestRail will begin providing keyboard shortcuts for important and frequently used actions such as editing or saving objects, adding results and comments & attachments, and navigating between cases or tests. Shortcuts will be grouped based on tabs.
The Modifier Key
For few actions, 2 keys are required to press at a same time one is modifier key and other is actual one. Modifier key usually depends on Platform and web browser is used by user. It is generally either Command or Control key. For example, to submit a test case, user requires to press <mod> + S. So, it could be Ctrl + S or Command + S <mod> = Ctrl or Command
Common Shortcut
The following shortcut keys apply in general to TestRail
Enter Submits a dialog box (unless a text box is currently focused). Applies to all dialogs box in TestRail.
Shortcut Reference
The following keys are additional supported shortcuts in TestRail. The shortcuts in the following Cases section apply to all case-related pages.
| e | Opens the form to edit the test case |
| j | Navigates to the next case in the test suite/case repository |
| k | Navigates to the previous case in the test suite/case repository |
| <mod>+ | Moves the current step up (with separated steps) |
| <mod>+ | Moves the current step down (with separated steps) |
| <mod>+. | Adds a new step after the current step (with separated steps) |
| alt+. | Adds a new step after the last step (with separated steps) |
Dashboard
| p | Opens the form to add a new project |
Milestone
| e | Opens the form to edit the milestone |
Plans
| e | Opens the form to edit the test plan |
Projects
| e | On the project overview page, opens the form to edit the project |
Runs
| a | Opens the Assign To dialog (for the currently selected tests, if any) |
| e | Opens the form to edit the test run |
| r | Opens the Add Result dialog (for the currently selected tests, if any) |
Following shortcuts for Test Runs are available from TestRail 5.1
| j | With active three-pane view, navigates to the next test in the run |
| k | With active three-pane view, navigates to the previous test in the run |
| p | With active three-pane view, passes the currently selected test |
| q | Toggles the three-pane view (if previously active) |
| alt+m | With active three-pane view, activates the comment field for the currently selected test (<mod>+enter submits the comment) |
| alt+r | With active three-pane view, opens the Add Result dialog for the currently selected test |
Suits
| c | Opens the forms to add a new test case to the suite |
| <mod>+. | Activates the inline-add feature to add a new test case to the current section (subgroups and selected view modes only) |
| e | Opens the form to edit the test suite (or opens the Edit Description dialog if using the single-suite project mode) |
| r | Opens the forms to add a new test run for the suite |
| s | Opens the dialog to add a new section to the end of the suite |
| <mod>+s | Opens the dialog to add a new subsection to the current section (subgroups and selected view modes only) |
Following shortcuts for Test Suits are available from TestRail 5.1
| j | With active three-pane view, navigates to the next case in the test suite/case repository |
| k | With active three-pane view, navigates to the previous case in the test suite/case repository |
| q | Toggles the three-pane view (if previously active) |
Tests
| a | Opens the Assign To dialog to assign the test |
| c | Navigates to the test case of the test |
| e | Opens the form to edit the test case of the test |
| j | Navigates to the next test in the test run |
| k | Navigates to the previous test in the test run |
| m | Opens the Add Comment dialog to add a comment |
| r | Opens the Add Test Result dialog to add a test result |
