- SAP BPC - Home
- SAP BPC - Overview
- SAP BPC - Terminologies
- SAP BPC - Applications
- SAP BPC - Model Design
- SAP BPC - Data Loading
- SAP BPC - Reporting
- SAP BPC - Planning
- SAP BPC - Business Logic
- SAP BPC - Business Functions
- SAP BPC - Process Flow Management
- SAP BPC - Word Integration
- SAP BPC - PowerPoint Integration
- SAP BPC - Essential Tools
- SAP BPC - Business Process Flows
- SAP BPC - Custom Menu
- SAP BPC - Consolidation
- SAP BPC - Preparing Elimination
- SAP BPC - Configuring Elimination
- SAP BPC - Embedded Environment
- SAP BPC - Security
- SAP BPC - Hot Analysis
- SAP BPC - Park N Go
SAP BPC - Quick Guide
SAP BPC - Overview
SAP Business Planning and Consolidation (BPC) tool is used to support all operational and financial activities in an organization. SAP BPC helps in automating and streamlining business forecast, planning, and consolidation activities in your organization.
SAP BPC supports two types of migration - SAP NetWeaver and Microsoft Excel. BPC with Microsoft version enables you to perform modeling, application maintenance, importing data and applying transformations, creating scripts, etc. It leverages the power of MS Excel and provides the user with an Enterprise Power Management (EPM) solution, collaborative tool with robust, readily accepted environment.
SAP BPC provides support for existing Microsoft functionality and various enhancement features like drag and drop report builder, etc.
Following are the key benefits provided by SAP BPC −
It allows the user to make better business decisions by supporting What-If analysis and allows you to perform scenario-based planning.
It allows you to collaborate data and thus increase accuracy in business planning and accountability.
It helps in aligning your plans with strategic goals and hence decrease the cycle time.
You have an option to choose the version of SAP NetWeaver or Microsoft Platform.
Following are the key benefits that can be achieved by using BPC −
- Business Forecasting
- Analytical Reporting and Analysis
- Budget Planning
- Predictive Analysis and Recommendations
- Improve Compliance
- Consolidation
- Business Process Flows and Smooth Collaboration
What is EPM?
SAP Enterprise Performance Management (EPM) allows your organization to improve its financial and operational performance management. SAP EPM supports various functionalities with SAP Business Planning and Consolidation - BPC-NW or BPC-MS, like financial consolidation, financial information management, supply chain performance management, strategy management and many more areas.
SAP BPC NetWeaver vs BPC MS
SAP Business Planning and Consolidation NW version is based on the functionality of NetWeaver platform. This is built on NetWeaver HTML5 and supports various user environment capabilities. It also provides various prebuilt components to reuse in different applications.
SAP BPC NW version supports RESTful connection to ABAP backend component and provides regular access to user interface. It also supports client-side logging capabilities.
The following table illustrates the name of the platform and the supported components −
| Client | Microsoft Windows Vista 32 bit and 64 bit, MS windows 7 32 bit and 64 bit Window Server 2003, 2008 and 2008 R2 terminal server 32 bit and 64 bit | Microsoft Office 2007, 2010 and 2013 Internet Explorer 9.0 and 10.0 Mozilla Firefox 17 and higher Apple Safari for iPad IOS7 and upper versions |
| NetWeaver Application Server | Any OS supported by NetWeaver | SAP NetWeaver 7.4. Refer PAM for supported database |
SAP BPC for NetWeaver provides various advantages since it is integrated with BW system and allows you to store data in InfoCubes.
Some key advantages of using SAP BPC with NW system are −
Star Schema for Exceptional Reporting − SAP BPC uses NW InfoCubes to store the data. The dimension model used is extended star schema so it makes BPC with NW system and exceptional system for reporting.
No Database Dependence Version − BPC NW version is not dependent on database version and can run common databases like DB2, Oracle, SQL Server, etc.
BW Accelerator Support − SAP NetWeaver BW accelerator tool is an additional feature that can be used to enhance the performance of reporting in the system, even if you are using large datasets. It indirectly helps in saving the cost for a company as less number of performance issues are reported.
BAdI Development and ABAP Support − SAP BPC with NetWeaver allows you to use ABAP programming to develop K2 script logic. It enables to create business add-in BAdi interface in the back-end system, which can be called later from script logic developed in BPC system.
It helps in solving the complex business requirements and to reduce the development time for an organization.
Some key advantages of using SAP BPC MS are −
Apart from common features provided in BPC like currency translation, allocations, validation and account transformations, automatic adjustments and carry forward of opening balance, the following features can be achieved in BPC MS version −
Dimension Logic − This can be configured in BPC system using simple mathematical formulas.
Business Rules − This allows you to create rules in BPC system to perform specific functions.
K2 Script Logic − This is used to perform some specific functions which cant be achieved using out-of-box functionality to meet business requirements. You can create K2 script logics to perform certain functions, which can be performed in a standard system.
Many organizations use MS Excel to manage business planning and consolidation but it has some disadvantages. Following are the disadvantages of using BPC MS over NetWeaver −
Tough to Manage Excel Spreadsheets − As business planning and consolidation data is stored in the form of spreadsheets, it creates a security issue and an option to control access is by keeping the files on the shared network drive. In SAP BPC, you can save the data in database and this provides security of data.
Version Control − To create a new version of data, SAP BPC with NW allows you to maintain the version of data in the system and you can maintain the current data too. While using Excel spreadsheets for data store, you need to name the file with new name every time.
Integrity of Spreadsheets − Using spreadsheets make it tough to manage the integrity of the sheets as the same file is accessed by multiple users and its tough to find out the latest version of spreadsheet. However, SAP system has a central repository to maintain financial and business planning data.
Collaboration − SAP BPC allows you to collaborate data from different users and you can put comments on critical information and Excel doesnt support collaboration feature.
SAP BPC with NetWeaver Architecture
Requirement − SAP NetWeaver ABAP 7.3 or 7.31
Database − Any of the above version of SAP NetWeaver support.
Operating System − Any supported version of SAP NetWeaver system and database engine.
The following figure shows SAP BPC 10.0 architecture.
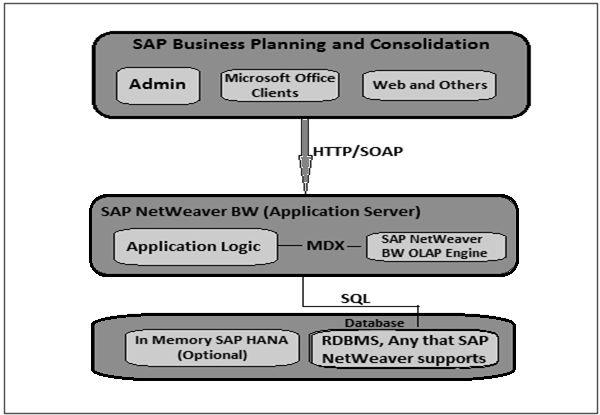
SAP NetWeaver BW Objects
Difference between SAP BPC v7.5 and v10 is Web Server component. SAP BPC 7.5 NetWeaver uses Microsoft ISS, while BPC 10.0 NW and BPC 10 on HANA use the web server that is part of SAP NetWeaver.
SAP NW 10 is more scalable than SAP NW 7.5 (IIS in 32bit mode) and it simplifies the system topology as no separate Web Server and Network Load Balancing components are required as these were part of BPC 7.5 implementations.
Another difference between the two is version of SAP NetWeaver. SAP BPC 7.5 NW supports SAP NetWeaver 7.01 and 7.02. However, SAP BPC 10 NetWeaver and BPC 10 HANA doesnt support NW 7.01, 7.02 versions. Also note that NW 7.01 and 7.02 requirements are quite different from SAP NetWeaver 7.3.
It means SAP BPC 7.5 NW systems in many organizations are running on older versions of Operating Systems and RDBMS is not supported by SAP NetWeaver 7.3.
Following are the key NetWeaver BW Objects −
- InfoObject
- InfoProvider
SAP BPC Objects
As per the above architecture, following are the key objects in BPC 10.0 −
Client Interface − At the top, you have client interface which is a web-based tool used for configuration and reporting for business planning. It consists of MS Office client, Excel based admin clients, and web-based tool for reporting.
Microsoft-based admin tool is used for configuration of application and Microsoft Office tools such as Word and PowerPoint are used for reporting data.
Web Server and .NET Application Server − This tool uses web services to connect to .NET Application Server. It receives the request from client interface and directs all the requests to ABAP server, which is a part of SAP NetWeaver BW system.
This server is used for data conversion between client tools and SAP NetWeaver BW system.
SAP NetWeaver Application Server − This server is used to process all the requests from client tool. The request from .NET Application server is processed in this server as Remote Function Call RFC. This is used to process requests to create reports or to update the database.
When a request is processed by the Application Server, it gets the data and passes to .NET Application Server, and then sends it back to client interface.
Database Server − This layer is responsible to store all the data in the database. SAP NW back-end system is responsible to create objects and data is stored for BPC system. The NetWeaver supports most of the databases like SQL Server, DB2, Oracle and many more.
Release Strategy
Following are the release notes from SAP for SAP BPC 10.0 −
- Product Version 10.0, SAP NetWeaver
- Area CPM-BPC
BPC now supports the following platforms −
Server Support − Any operating system that is supported by SAP NetWeaver. VMware support as per SAP standard. Virtualization, VMware, Microsoft, Windows, Hyper-V, XEN, vSphere, IBM, INxHY, KVM, zBX. SAP NetWeaver Support for NW 7.3. No support for older versions.
Database Support − BPC supports all database that are supported by SAP NetWeaver system.
Client Support − Microsoft Windows, WIN XP (32 bit), Windows Vista (32 bit and 64 bit), and Windows 7 (32 bit and 64 bit).
Microsoft .Net Framework − .Net Framework 3.5 is required.
Web Browser Support − BPC supports the web browsers - IE 8.0 and IE 9.0.
Microsoft Office Support − Microsoft Office 2007 (32 bit and 64 bit) and Microsoft Office 2010 (32 bit and 64 bit). .NET server is no longer required in latest BPC versions.
SAP BPC - Terminologies
On comparing BPC 7.5 and BPC 10.0, following are the key terminology differences between the two.
| BPC 7.5 | BPC 10.0 |
|---|---|
| AppSet | Environment |
| Dimensions | Dimensions |
| Applications | Models |
| Business Rules | Business Rules |
| Validation Rules | Control Settings |
| Script Logic | Logic Script |
| Work Status Settings | Work Status Settings |
| Journal Templates | Journal Templates |
| System Report Settings | Audit Report Settings |
Environment − It is defined as the starting point for creating any application or model. It was called Application sets or AppSet in older versions of BPC.
Dimensions − You can mark a dimension as secure. You need to grant read and write access to the users who use the model so they can access data.
Properties − This is used to provide additional information to the dimension.
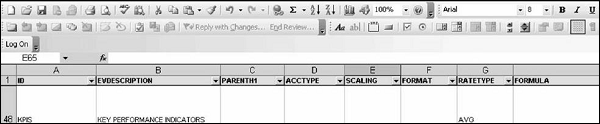
Dimension Members − Each dimension member record shows master, text and hierarchy data associated with the keys of dimension.
Model − To meet the Business Planning and Consolidation requirement of an organization, you need to build a model in an environment which is defined as collection of several dimensions.
Data Manager Package − To execute common tasks in BPC, you need data manager package.
Business Rules − To manage operations in different countries, different set of business rules are required. BPC includes rule-based table to meet some requirements for business planning and consolidation. Various rules can be set related to business planning and consolidation like - currency translation, balance carry forward, intercompany elimination, and data validation, etc.
Logic Scripts − This is defined as a set of SQL or MDX programming structure to perform some customize functions for flexibility and manage data models. When some specific requirements are not achieved using business rules that can be met by the use of Logic Scripts.
User − A user is defined as an individual who uses the application in Appset.
Team − A team is defined as a group of users based on user roles.
Task − All the activities that are performed in SAP BPC system are called tasks.
SAP BPC - Applications
An Application in BPC system is defined as multidimensional data model used in EPM. Few examples of Applications are - Operation, Legal or Finance team.
There are two types of applications in BPC system - Reporting and Non-Reporting. Reporting applications are used for analysis purpose and you can pass inputs from the users. Non-Reporting applications are used to contain reference data like currency rates, carry forward balances, etc.
An Appset consists of one or multiple applications in system. Each application consists of the master data for an application, which is used to control data in the application set. An application can also share one or multiple dimensions with other applications.
Application Architecture
Each Reporting application consists of a dimension, properties to hold the additional information, and dimension members.
Consider a Consolidation Rate application, which consists of Rate app to store currency exchange rates and an Owner application, which stores the relationship between Owner company and its subsidiary companies.
| Consolidation | Ownership | Rate |
|---|---|---|
| Account (A) | O_Account (A) | R_Account (A) |
| Category (C) | Category (C) | Category (C) |
| Entity (E) | Entity (E) | R_Entity (E) |
| Groups (R) | Groups (R) | InputCurrency (R) |
| Time (T) | Time (T) | Time (T) |
| Intercompany (I) | Intercompany (I) | |
| DataSource (D) | ||
| Flow (S) |
Creating Applications and Applying Dimensions
To add an application to the Application set, you can use an existing application by selecting reference applications and any set of business rules. You can also add dimensions in new application and these can be defined as secure or non-secure. When you define dimensions as secure it ensures the read and write access is controlled through user profiles.
You can add an application through an admin console − Application → Add a New Application
To copy an application − Application → Copy an Application
To create a Consolidation application, you need to define AppSet for consolidation and dimension set for consolidation.
You should set the following parameters after creating the application set.
- ALLOW_FILE_SIZE
- UPLOADTEMP
- TEMPLATEVERSION
- JREPORTZOOM
- LOGLEVEL
- SYSTEM
- MESSAGE
- STATUS
In SAP BPC NetWeaver version, all these parameters are maintained in ABAP DDIC table.
Once the application set is created, the next step is to set up the parameters for Dimension set.
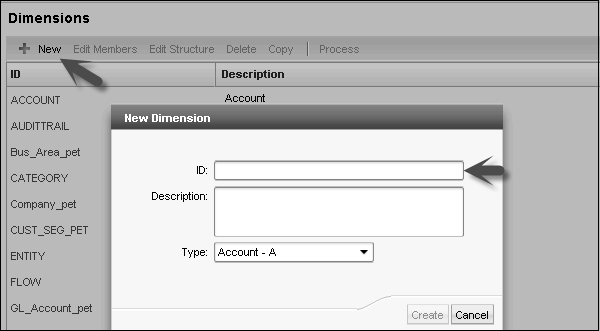
You can add a new dimension or copy an existing dimension. In the Administration Console, go to Dimension and Model.

Go to Dimensions and Models → Dimension.
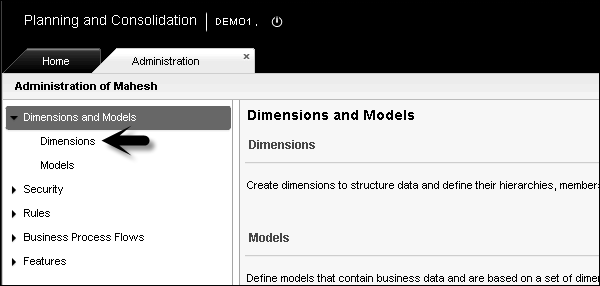
Click on +New → Enter ID, Description, Type → Create
To create a rate application which contains the exchange rate, following dimension types are needed −
C_Acct (A) − For maintaining Charts of Account.
C_Category (C) − To define Category.
Groups (R) − Like GROUP A (USD), GROUP B (EUR), and GROUP C (RMB).
Entity (E) − It contains the business unit used to derive process.
C_Datasrc (D) − Data Source Dimension.
IntCo (I) − It determines the level of entity hierarchy at which level the elimination needs to be performed.
Time (T) − Time in all dimensions.
Flow (S) − To keep track of movements in Consolidation.
To create a rate application which contains the exchange rate, following dimension types are needed −
R_Acct (A) − For maintaining different types of Rate.
InputCurrency(R) − Currency Type Dimension.
C_Category (C) − To define Category.
R_Entity (E) − Rate application.
Time (T) − Time in all dimensions.
To create an ownership, Consolidation application contains the ownership information. The following dimension types are needed −
O_Acct (A) − for Ownership
C_Category (C) − To define Category
Entity (E) − It contains the business unit used to derive process.
IntCo (I) − It determines level of the entity hierarchy at which level the elimination needs to be performed.
Groups (R) − Used to implement separate group type.
Time (T) − Time in all dimensions.
To set up a consolidation application, three applications are required - Rate, Ownership, and Consolidation.
SAP BPC - Model Design
With the release of BPC 10.1 with NetWeaver, there are two models that can be used to fulfill the business requirements. BPC models are often referred to as BPC applications and BPC environment is normally called Application.
Building Models in BPC
The following types of model can be built in BPC −
Standard Model
This model provides an option within host BWs protected namespace /CPMB/. When you separate the BPC transaction data and master data inside the namespace (/CPMB/), all the sub-processes that are associated with standard model are closely secured, and only closely managed by the department running the app.
This model is designed by SAP to provide a protected area for customers who to plan and consolidate in their own department without wanting to share or coordinate the resources with other Business Warehouse community users.
As the code set of Standard model has been coordinated with version BPC 10.0 so all the changes to BPC 10.0 are shown in BPC 10.1 Standard model and changes to the version BPC 10.1 Standard model are shown in version BPC 10.0.
This allows a code compatibility between BPC 10.0 and BPC 10.1, and clients can easily perform migrations while upgrading BPC version from 10.0 to 10.1 Standard Model.
In short, you can say in Standard model, BPC environment contains the BPC applications or models and each model generates a BW InfoCube which is hidden.
Embedded Model
This model is different from Standard model and includes data access to all community users. For Embedded design model, initial versions used were SAP BW Integrated Planning and Planning Application Kit i.e. BW-IP and PAK.
This model provides a different level of data access where master and transactional data from host EDW environment is accessible by the application. In Embedded model, it allows easy access to transactional and master data within the host BW, and this data is shared with many other users and controlled by the administrator group.
In Embedded model, migration from older versions of Business Warehouse IP, BW-IP to this data model is relatively easy and migration from earlier versions like (BPC 10.0 and earlier) is considered as a new implementation.
In short, you can say that in embedded model, any number of InfoProviders can be assigned to a single BPC model/application.
Environment Management
An application in BPC is also known as a model, like an environment is called an AppSet. You can create an application by going to Admin console in Enterprise Performance Management (EPM) System. BPC environment or AppSet has the group of applications or models. All these applications share the planning dimensions and are linked with each other.
As mentioned earlier, applications are called multidimensional data models in EPM. You can add a new application or also copy an existing application.
Environment management includes setting up work status for applications and adding the business rules to the applications.
Work Status Determination in Environment
Work status determines who can make changes to data or who can change the work state on the data set.
In Environment management, you can also carry out applications optimization. When a new application is created, it contains only a small amount of data. As time passes, data in application increases and it is always recommended to perform application performance optimization in BPC environment.
Deleting an Application in Environment Management
It is also possible to delete any application in BPC environment when required by going to admin console. You need to be an administrator to perform this function.
Dimension Management
Dimension management in BPC includes creating new dimensions, defining members in dimensions, and assigning properties. Dimension contains member and there is a hierarchy between members that is defined like parent, child and sibling.
You can create a new dimension by going to Admin Console → Dimension → New Dimension.
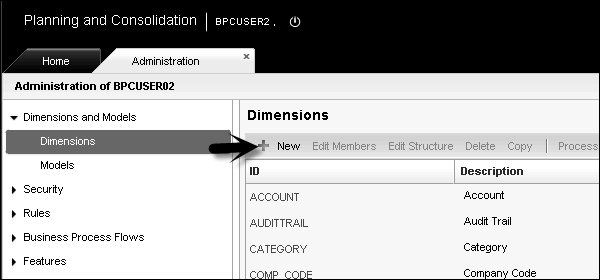
Dimension name is not case sensitive and it should be unique.
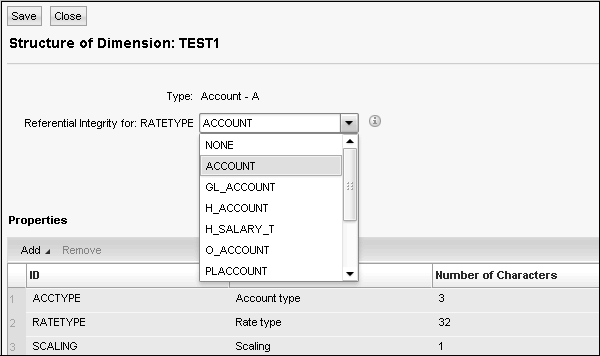
When adding a new dimension, you have to enter reference type. Planning and Consolidation checks the value of reference type while processing the dimension.
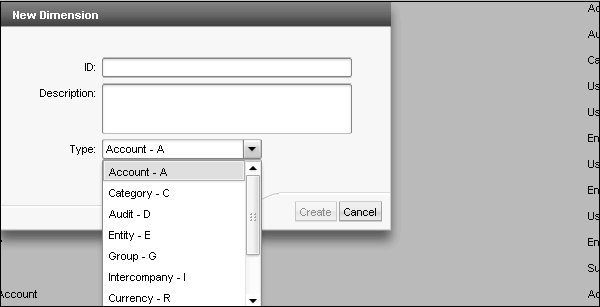
Click Create button in the above window. You have to enter referential integrity for Rate type in the new window. Click Save icon.
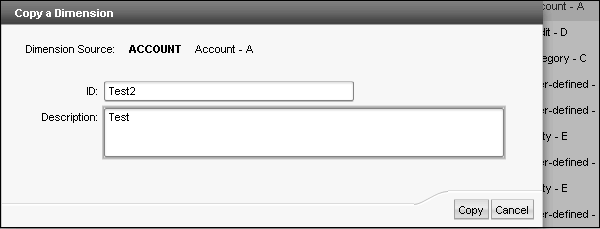
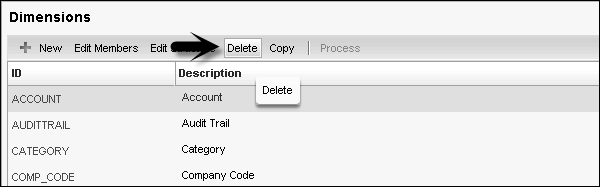
You can also edit structure, edit members, delete or copy an existing dimension. To copy a dimension, select an existing dimension and go to Copy.
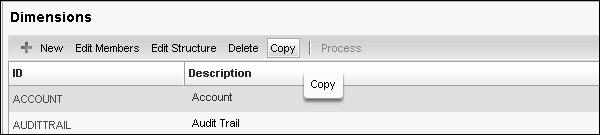
Enter the name of dimension and description. Click Copy button.
Naming Conventions in Dimensions − You shouldnt use special characters while naming a dimension, member, and application in BW table.
You can create dimension name up to 16 characters and it shouldnt contain comma, double comma, back slashes, ampersands. However, you can use underscore.
You shouldnt use the following names - App, AppAccess, AvlObject, CategoryAccess, CollabDoc, CollabIcons, CollabRecipient, CollabSupport, CollabType, DBVERSION, Defaults, DesktopStyleDef, Dimension, DrillDef, DTIParam, Function, Formula, Group, InvestParam, MemberAccess, MessageLog, Packages, PageDef, Permission, PublishedBooks, Rate, ReportParam, SectionDef, Status, StatusCode, TaskAccess, User, UserGroup, UserPackages, UserPovDef, WebContents, SOURCE, SIGNEDDATA.
Description of dimension shouldnt be more than 50 characters.
You can delete a dimension by selecting it and clicking the Delete button.
Designing Security Model
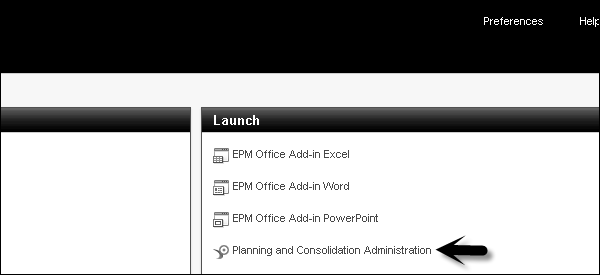
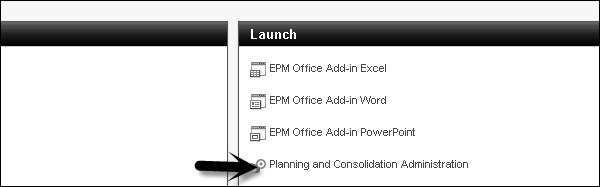
BPC security is managed in Administration console. You have to login to BPC portal and go to Planning and Consolidation Administration.

There are four key components in BPC security −
- Users
- Teams
- Task Profiles
- Data Access Profiles

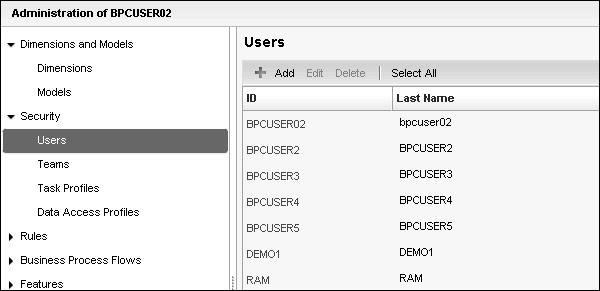
Users − This is used to add users to environment and manage their access rights.
Teams − This is not so important and you can define a team of users with the same access rights.
Task Profiles − This allows setting up profiles for tasks to be performed and assign them to users and teams.
Data Access Profiles − This is used to set up profiles that allow access to data in models and assign them to users and teams.
Click Team tab under Security, select Admin team and double-click.

You will see the details of Team name ADMIN, which users are part of this team, task profiles, and data access profiles.
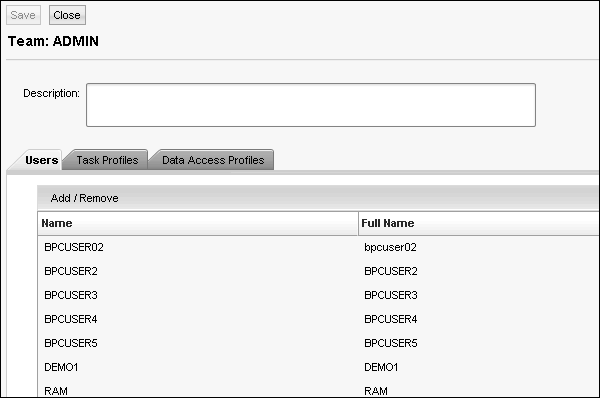
You can edit the team details and click Save icon to apply changes.
Going to the user tab, you can add new users, edit existing users, and delete any user.
SAP BPC - Data Loading
Data loading in BPC is done with the help of Data Manager that allows you to move data in Planning and Consolidation system, copy and move data and export data from an application. Data Manager moves the data in form of packages, which allows scheduled sequences to run in the background and some can initiate other processes.
Loading Data from Source System to Cube in SAP NetWeaver BW
We can pull the data from different source system like SAP ECC system, SAP CRM, SRM using extractors. You can also load data from non-SAP sources to InfoCube in SAP BW system.
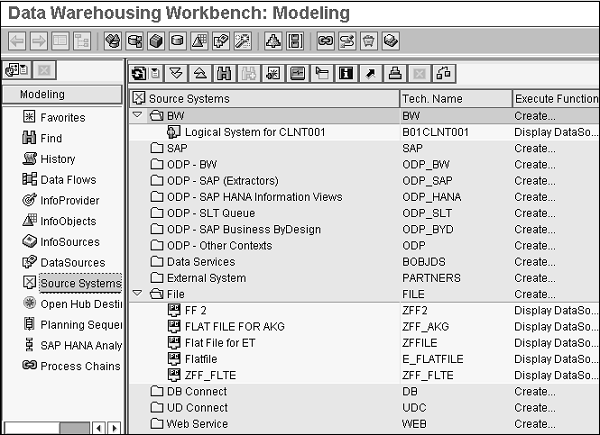
To load the data into InfoCube, go to workbench in BW system.
Transaction Code: RSA1

Data warehousing workbench will open, go to Source Systems on the left side.
Data acquisition in BW system can be done using the following methods −
- Service API
- Transfer of Flat Files
- DB Connect
- Universal Data Integration
- XML Based Data Integration
- Third party ETL tools
- Application Specific Data Acquisition
Creating a Source System
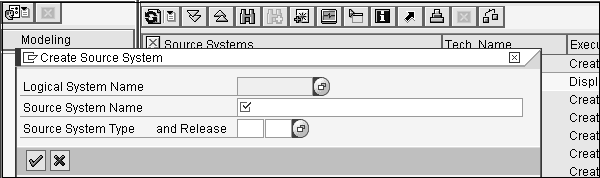
Double-click on File and enter logical system name, source system name, Type and Release.
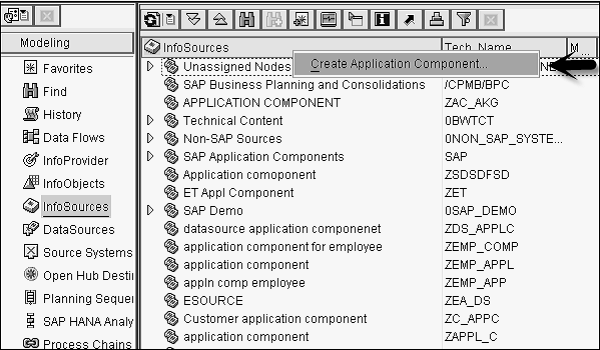
Next is to create an InfoSource for characteristics data. Right-click on InfoSource right pane → Create Application Component.
Once you create the InfoSource, right-click on it and assign data source.
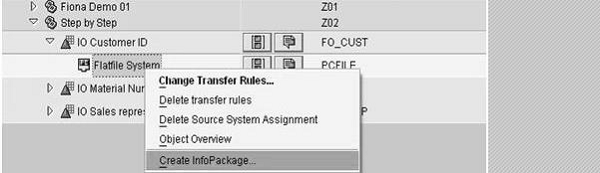
Then, right-click on Source system → InfoPackage, select master data and save.
Define Load characteristics.
Finally, create an InfoSource for transaction data. Create Updating rules and an Info Package to load transaction data.
Loading Data from SAP NetWeaver BW to SAP BPC
You can load data to BPC system from SAP BW InfoCube. With BPC Data Manager, you can use BPC code packages. You can copy or move data in different applications, and can export the data from applications. BPC packages are based on BW process chains and come with BPC installation.
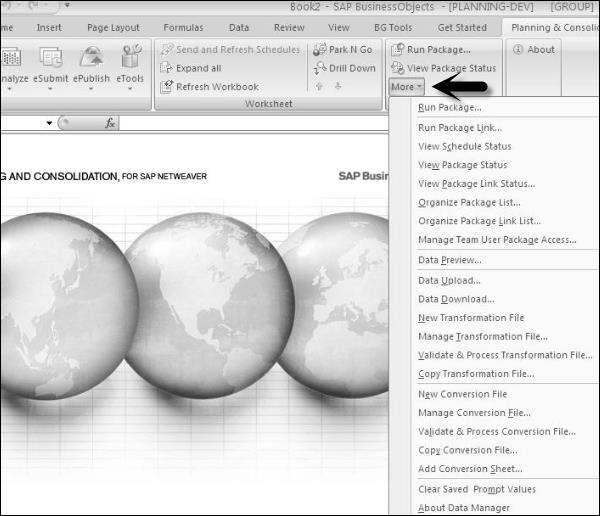
Data Manager Tool is integrated with Excel. To start BPC, go to Planning and Consolidation → eTools → Data Manager.
In Data Manager Package, there are different data transfer modes −
- Aggregate Overwrite
- Append
While loading data from Info Provider, you have the following options −
- Merge
- Replace
BPC also supports Delta load as there are many records getting generated for each load. Delta initialization is possible with higher enhancement package and you can perform Delta load in Organize option under Data Manager Tab.
In BW system, full load is supported for Standard InfoCubes, Virtual InfoCubes, Standard and Optimized Data Store Objects DSOs.
You can Delta load using Data Manager for Standard InfoCubes and Standard, Optimized DSO.
Next is to create a Package which contains conversion file and transformation file with variables, which is responsible to trigger a BW process chain. You can combine different packages for separate tasks in package links.
Creating Transformation File
Transformation file provides the mapping of fields from BW to BPC and is an excel file in BPC. It contains transaction data from Info Objects in BW with BPC dimensions defined in administration console.
There are three sections defined for mapping file −
Options − Contains the general settings.
Mapping − Used to assign dimension in BPC system with a source column in BW InfoObject.
Conversion − Contains the link of other Excel sheets to apply the conversion routine.
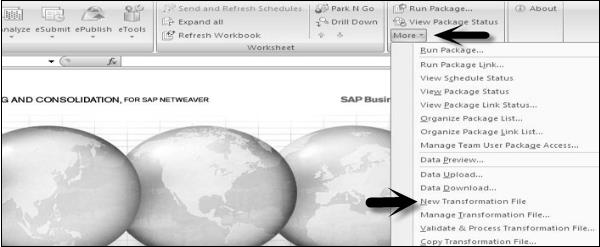
To create a Transformation File − Go to BPC Excel client. Next is to choose App set and Application where these Transformation file will be used.

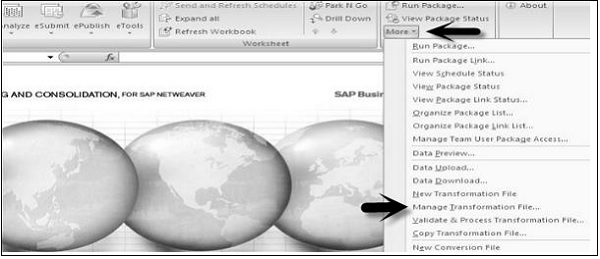
Now go to Data Manager in Business Planning and Consolidation → More → New Transformation File.

You will see an excel sheet with three sections - Option, Mapping and Conversion. You dont require to make any changes to Option, Conversion.
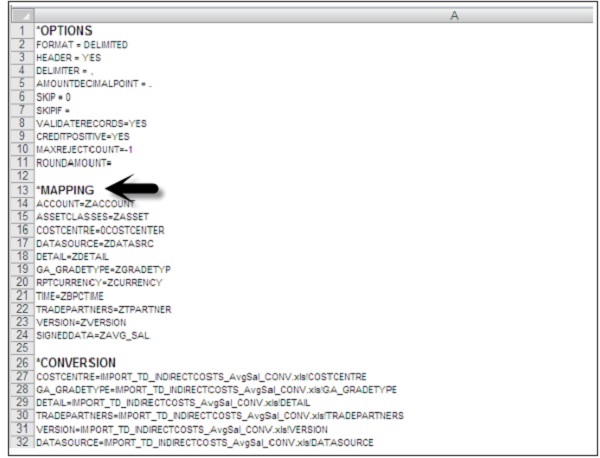
Go to Mapping and define Transactional data mapping from InfoObject in BW to BPC Dimension.
Example
ACCOUNT = ZACCOUNT
TIME = ZBPCTIME
SIGNEDDATA = ZAMOUNT
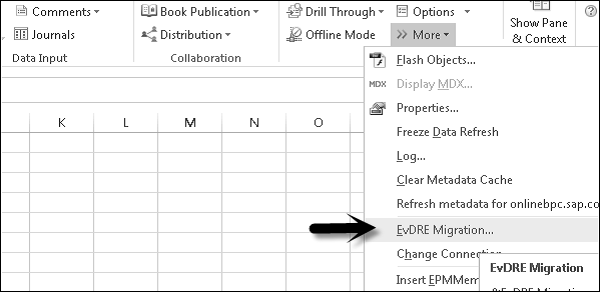
Note that you can also copy an existing transformation file or update an existing transformation file by going to More tab under Business Planning and Consolidation ribbon as shown in the following screenshot.
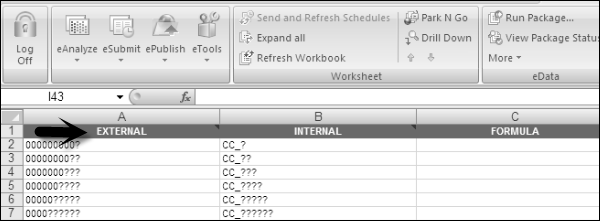
Creating a Conversion File
A Conversion file is used to apply the conversion rules for BPC dimension and is an Excel file. It contains three sections −
External − Contains the value from external source.
Internal − Contains the value it should be having for BPC dimension.
Formula − Defines the conversion formula applied to each record.
To create a Conversion File − Go to BPC Excel client. Choose AppSet and Application where these transformation files will be used.

Go to Business Planning and Consolidation Ribbon → More → New conversion File
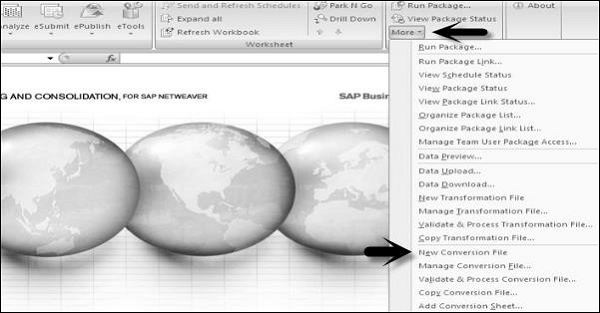
You can also use other functions like - Manage conversion file, copy conversion file, etc.
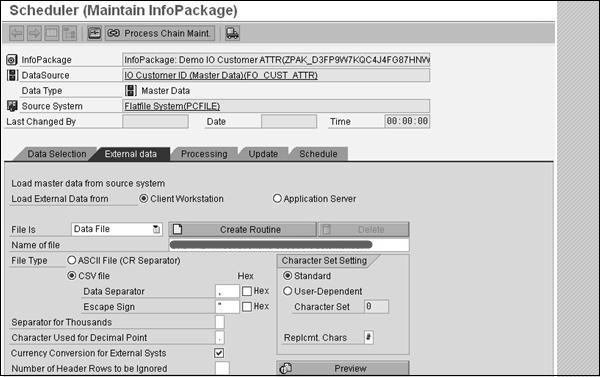
Loading Master Data from Flat File into a Dimension
You can load the data in BPC dimension from source flat file like CSV, XLS. You have to first create the dimension using administration console and a connection should be established.
Go to BPC Excel → EPM tab and click on the log on the left side panel. Select the connection name, user name and password.
Go to Data Manager tab → EPM → Upload data.

Enter the name and click Save.
Create a Transformation file as mentioned above. If the number of fields are the same for source and destination, no need to use mapping.
You will only have values under Options section and rest of the fields would be blank in this Transformation file.
If you have source and target with different number of data columns, you have to define it under mapping like for description in the above screenshot.
Once Transformation file is created, next is to validate and process transformation. Select data type → Master data from flat file and click Save icon.
Go to DM tab at the top in BPC Excel → Run Package.
Click Data Management and select import master data attribute from flat file.
Click Run at the bottom and enter the path for data file and Transformation file as created above.
Select the dimension in which you want to upload this data and click Run. Once it is completed successfully, you can go to web portal check the data under Dimension.
SAP BPC - Reporting
SAP BPC 10.0 allows you to get data from source systems in to an Excel interface. It allows you to analyze the multidimensional data and BPC 10.0 provides number of inbuilt templates that can be used for analyzing and you can also add different formulas to design reports.
SAP BPC 10.0 provides various exceptional capabilities including integration with SAP HANA over BPC 7.x to handle big data environment for reporting purpose.
SAP BPC also provides use of input schedules that allow you to send the data from report to database. Input schedules provide you with all the functionalities as that are available in BPC reports. The difference between Report and Input Schedules is that reports are used for analyzing data and input schedules are used to write data to database.
You can opt from the following methods to create reports and input schedules in Business Planning and consolidation tool.
- Using Default Templates
- EvDRE Builder
- Drag and Drop Interface
- Blank Workbook
SAP EPM Add-In Interface for Excel
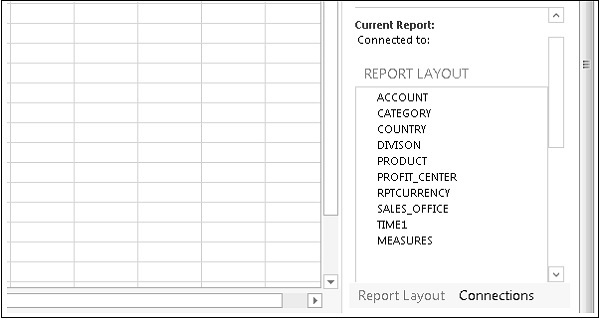
You can also create reports in Business Planning and Consolidation EPM Add-in for Excel. Excel Interface in BPC is broadly divided into the following sections −
- EPM Add-In Ribbon
- Connection and Dimension
- EPM Context Menu
- Report Area
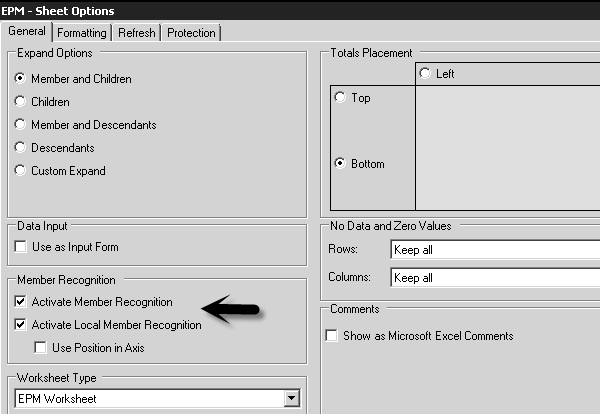
To create reports in EPM Add-In Interface for Excel, you have to enable the following option. Go to EPM → Options → Sheet Options → Check the box Activate Member Recognition.
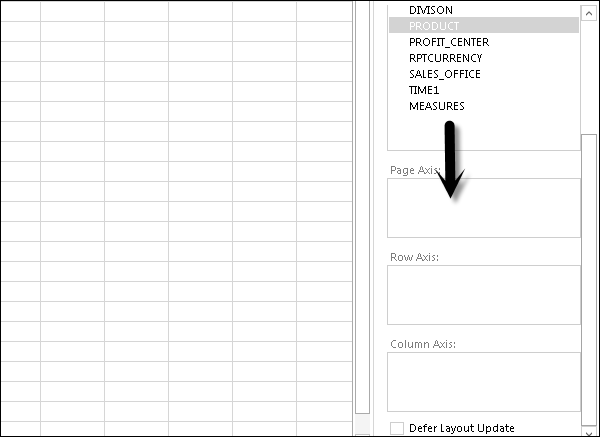
You can simply drag the dimensions and drop it to excel sheets. It is the easiest method and displays the report based on dimension selected from the list of available dimensions.

Other option to create report using Excel Add-in is by adding dimensions to Row axis and Column axis. Once you add the dimensions click Update.
You can also create reports by simply typing dimension member in the report area. BPC Excel add-in identifies the member and display result.

EPM Add-in Versions
Following are the two versions of EPM Add-ins −
EPM Add-in .net 3.5
It supports MS Office 32 bits.
It degrades the performance if you are querying using ODBO connection.
It runs on .net 3.5 framework.
It supports .msp file.
It doesnt support big volume BV mode.
EPM Add-in .net 4.0
It supports MS Office both 32 and 64 bits.
It supports BV mode on BW data sources.
It provides performance optimization if you are querying using ODBO connection.
It also support *.msp file (have to uninstall/re-install).
It supports BW connections for embedded model.
Developing Reports Using Dynamic Templates
There are various templates in sample app set and you can select any of these and customize them to meet the report requirement.
Using this feature, it allows you to save report locally or on the server. When you modify an existing report you can also save it as template for future use. BPC administrator can only have rights to save customized report as template on the server but you can save them locally.
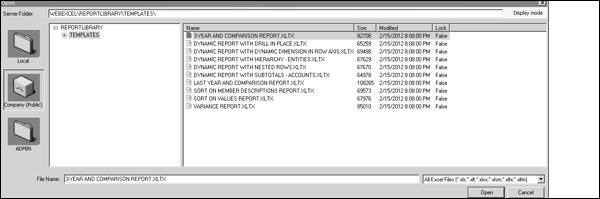
Following are the default templates in BPC −
| Subtotals by Account | This custom report contains Account dimension with subtotals in rows and any dimension across in columns. |
| Variance | This custom report contains any dimension in rows and categories comparison in columns. It also features variances calculation (both amount and percentage). With both YTD and Periodic boxes. |
| Consolidating | This custom report contains any dimension in rows and Entity type members across in columns with hierarchy. |
| Comparative X | This custom report contains any dimension in rows and categories comparison in columns and also retrieves the last year same period data. With both YTD and Periodic boxes. |
| Comparison with 3 -year | Year over Year comparison. |
| Drill in Place | This template performs drill in place. |
| Nested | This allows any two dimensions to be nested in a row and a third dimension in column. |
| Sort on value | This template performs the sort on total value. |
| Drill Dimension | This allows to use drill in one dimension to other. |
Launch EPM Office Excel Add-in, to use a template. These templates are available in Company folder and they are created using BPC add-in not like BPC 7.x where templates are created using EvDRE.

Developing Reports Using EPM Functions
There are three ways to create a report in BPC. You can create simple reports using EPM action pane by dragging dimensions and dropping it to the report area.
You can add dimensions to direct axis as shown in the following screenshot.
Similarly, you can create ad-hoc reports using the action pane.

Migration of EvDRE Reports
All reports that have been created in BPC 7.5 Excel can be migrated to BPC 10.0 using EPM Excel Add-in. EvDRE migration feature in Add-in is used to migrate as many features as possible to new version but the customized reports and templates can only be partially migrated and requires some manual effort for full migration.
Migrating EvDRE Reports to BPC 10.0
Open the reports created in EvDRE.
Update the report to have correct Dimensions migrated. Next go to EPM Ribbon → More → EvDRE Migration.
Developing Reports Using SAP BPC Web Client
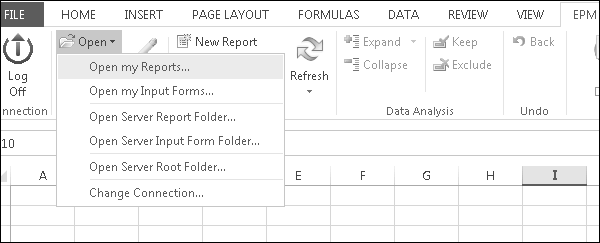
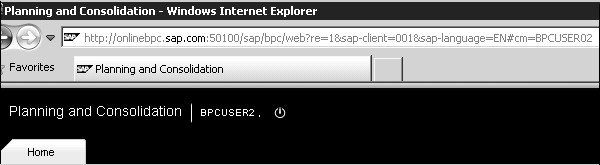
To access Business Planning and Consolidation, you can login to web client. To launch web client, open the web browser and use the URL - http://server.domain:port/sap/bpc/web/
When you login to BPC web client, first screen that opens is start page and home tab.
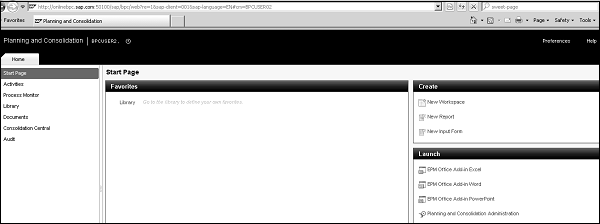
If you want to create reports using Web Client, you can go to create area which has the following options −
- New Workspace
- New Report
- New Input Form

Go to New Report and the following screen will open.
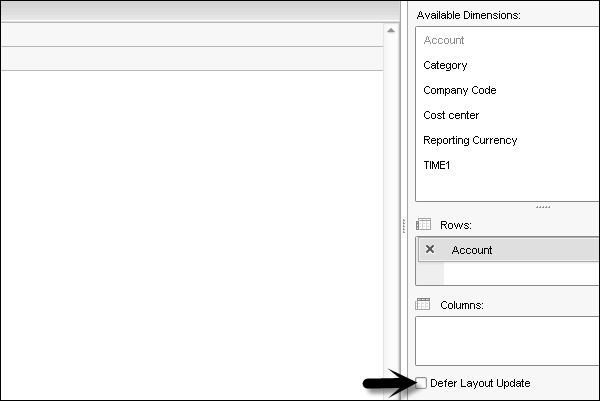
From the dropdown menu, select a new report, input form. On the right side, you have the list of available dimensions. You can add dimension to Row and Columns as per requirement.
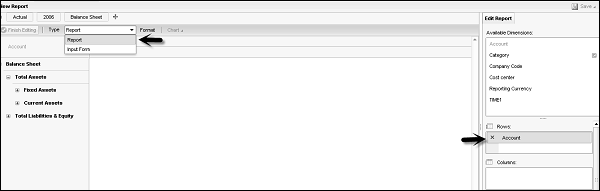
You can also edit the existing reports. There is an option to defer report layout. If you select this option it wont change the report layout.
SAP BPC - Planning
SAP BPC provides you with an end-to-end planning process and perform activities like planning, forecasting, budgeting, reporting, etc. It allows you to follow top-down or bottom-up planning with an application and user interface.
Planning Process
In Business Planning and Consolidation, the planning process is supported by automation and workflows. It allows you to create reports and input forms that can write to database.
With reporting interface, you can get data from database to excel spreadsheets and input forms allow you to send data directly to the database.
Input forms contain the same functionality and formatting as reports, only difference is that reports are used for analysis and input forms are used for sending data to database.
Planning Models
Different modeling options are possible with input forms to meet the planning needs while sending data to database.
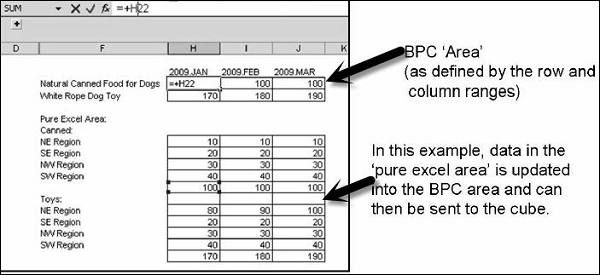
Spread − Spread modeling option allows you to send a value to specific destination cells. This value can be spread equally or weighted by the range of values.
Trend − Trend modeling method allows you to spread a value or a percentage and spread it by a growing factor in destination cells. You place the source value in first destination cell and rest of the cells are field with increased value by some amount or percentage.
Weighted − It allows you to allocate a set of values by weighted factor in the excel sheets. In this you select some values, grow them and then allocate the new amount based on weights of selected cells.
So input forms provide you with special modeling feature to assist you in your planning needs.
Input Forms/ Input Schedules
Note that input forms is the terminology used in BPC 10 whereas input schedules were used in BPC 7.x. However, eventually they both represent the same thing.
Input forms allow you to spread data from excel sheets directly to database and contains all the functions that are present with reports in BPC. The difference is that input forms write data to database and reports are used for analysis purpose.
Input forms support the following features −
Data Submission − If you have enough authorize access, using input forms you can send data to database. If data validation is allowed by the system administrator, you can also validate the data and ensure that there is no work lock and validity issues on members.
Modelling Options − Various modeling options can be used with input forms −
- Spread
- Trend
- Weighted
Work Status − After sending the data to database, you can change the work status locks to apply data locks.
Distribution and Collection Option − You can send the input schedules to different members using distribution option and then get back the input schedules using collection option.
Using Special formalities − You can also apply special formatting to read-only cells.
Input Schedule Templates
There are various templates provided in the system that you can use and apply the customizations as per your needs.
Following is the list of dynamic schedule templates that are available in the system.
| Account Trend or Entity Trend | This schedule contains Account type members in rows and time periods in columns, using EvDRE functions. |
| Entity Trend | This schedule contains Entity type members in rows and Entity type members in columns, using EvDRE based functions. |
| Consolidating | This schedule contains Account type members in rows and Entity type members in column, using EvDRE based functions. |
| Nested Row | This schedule provides the ability to choose the dimensions and members on the row, column and page. Two-row dimension can be selected and they will be nested. It also uses EvDRE functions. |
| Comparative | This schedule contains Account type members in rows and Category type members in columns with a variance column, using EvDRE based functions. |
Developing an Input Form
Input schedules can be developed using the following methods.
- Dynamic Templates
- Using EvDRE
- Using Drag and Drop
To create an input form/schedule using drag and drop, login to web client.

In the type select the input form. You can also add dimensions by clicking on + sign.
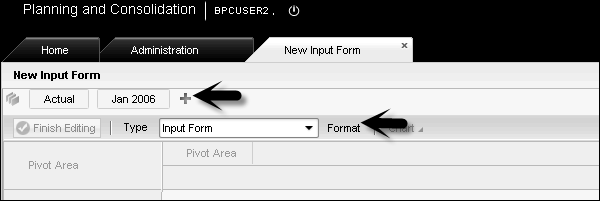
You can drag the dimension to rows and columns from the list of available dimensions and once you are done, click Save.
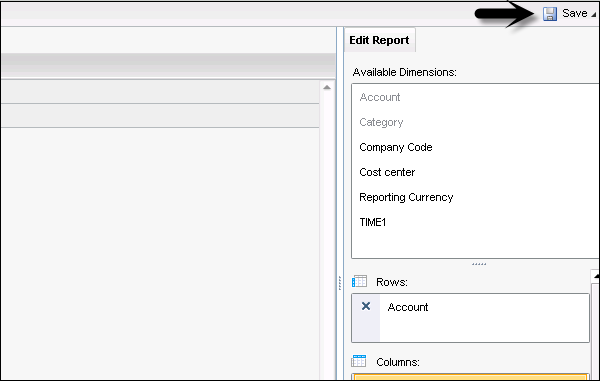
Enter the name of input form and description and click Save.
Integration with SAP BO Dashboard
You can also view the real-time data from BusinessObjects Planning and Consolidation via Dashboard designer. To create Dashboard with BPC, you need to install Dashboard designer and add EPM Connector Add-on to the Dashboard designer and connect to the EPM data using EPM Connector.
Once connector is installed, you can use BPC real time-data to create dashboard.
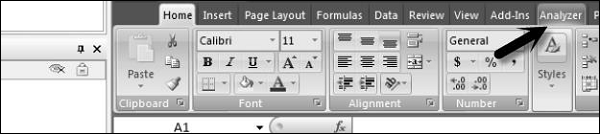
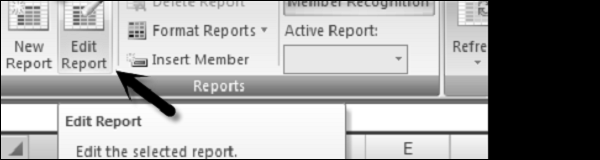
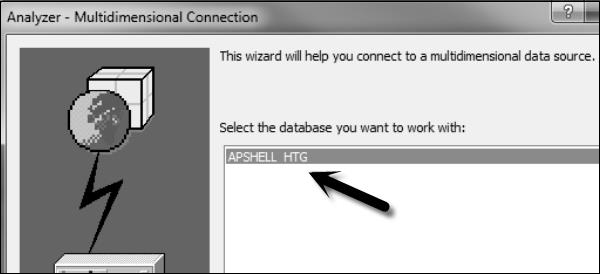
Go to Analyzer tab in Dashboard Designer.
Then go to Edit Report.
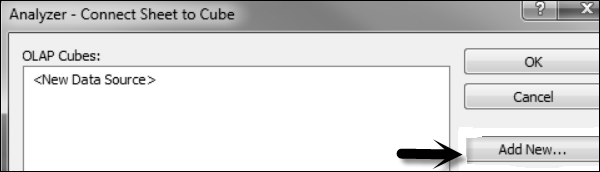
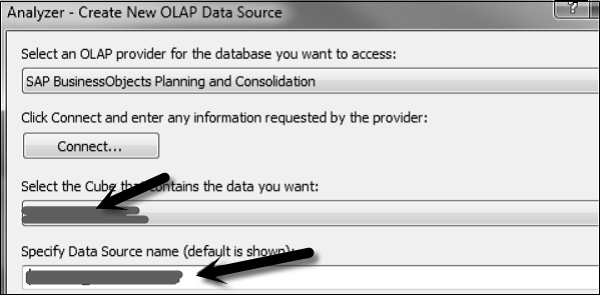
It will prompt you to add a new connection. Click on Add new button. Select SAP BusinessObjects Planning and Consolidation data source from the dropdown list and click Connect.
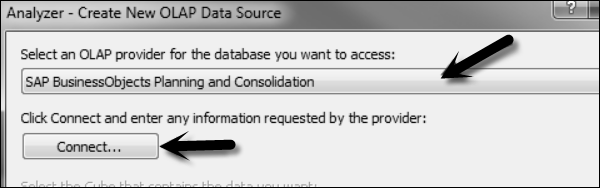
It will open a new window promoting for BPC Server name, User name and password. You have to enter the same credentials that you use to login BPC Excel client. Once you enter the details, click Next. Select the AppSet and Finish the wizard.
Select the cube from the dropdown list that contains the data you have to use and select the data source name.
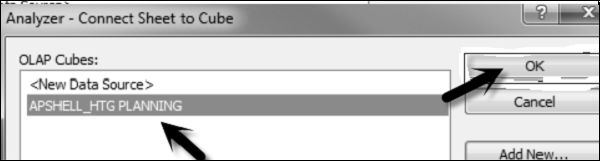
Next select the newly created connection and click OK. Once you click ok, it will open the Report Manager output, which can be used to design the report output.
These are the steps that can be used to integrate Dashboard Designer with SAP BusinessObjects Planning and Consolidation BPC tool. There are various features in the Dashboard designer that can be used to create interactive dashboard, which can be used by decision makers.
SAP BPC - Business Logic
You can perform business logic and script logic on the data in BPC. There are various calculations that can be performed.
Business Rules − These are monetary functions which are used to post common accounting tasks in Business Planning and Consolidation model.
Script Logic − This includes the formulas which are used to perform different calculations on the members, dimensions, and data in BPC system.
Dimension Logic
Dimension logic is used to apply calculations and formulas on the dimensions. Calculations are performed as per the dimension formula at retrieval time. It is important to use the dimension formulas correctly as they can affect the system performance if used incorrectly.
Key points to remember while applying Dimension logic −
Dimension formula affects the system performance so they should be applied correctly.
Dimension formulas should be applied only on the members for which calculations are required after the aggregation.
Dimension formulas should be used only for those ratios which has to be calculated at both the levels - Base and Parent Level.
Common Dimension member formulas are used to perform calculations - costs per unit, growth rates, etc.
How to Define Dimension Logic?
You should be familiar with Multi Dimension Expression language to create complex Dimension formulas. The list of supported MDX functions is available from functional module BAPI_MDPROVIDER_GET_FUNCTIONS.
Prerequisites − To use a formula in dimension, you should add a property called Formula to member sheets using manage dimension task option.
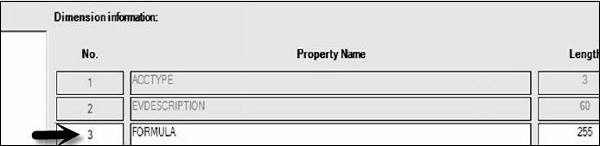
You should also define the length of field and it should be more than 60 characters. Higher field lengths are preferred as any length greater than 60 is stored as string in SAP NetWeaver.
If you want to use Dimension formula in AppSet then you should maintain a special dimension member of type R. This member is called as Local Currency (LC).
App set → Select Maintain Dimension Members.
The formula can be manually created or taken from a library dimension formula. To define member dimension formula, you have to put a Square bracket around the dimension and there is a dot between the two.
[PRODUCT].[PRODUCT1] [PRODUCT].[PRODUCT2]
[SALES].[SALES1] / [SALES].[SALES2]
Standard Arithmetic functions has to be used in dimension formula - addition (+), subtraction (−), multiplication (*), Division (/) - these are used in SAP NetWeaver.
Once you save the dimension formulas, next is to validate the syntax.

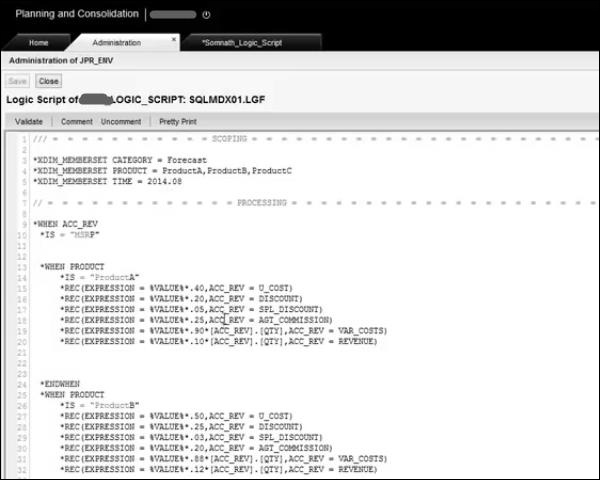
Logic Scripts
Logic scripts allow you to automate the calculations in BPC for the financial statements.
Business Rules
Business rules are used to customize the data manipulation task like bulk data imports with currency translations, input data to database, etc. Business rules can be modified using table-based logic or scripts-based filters. Table-based logic provides the features available in UCON accelerator and Script-based files can be customized using MDX or SQL syntax.
You can define business rules for the following activities −
Carry forward rules − Includes initializing balances when a new fiscal year starts.
Validation rules − Validates the input data.
Currency conversion rules − Converts the local currencies into the currency used in BPC reporting.
Intercompany booking rules − Matches intercompany transactions.
Automatic Adjustments and Other Calculations.
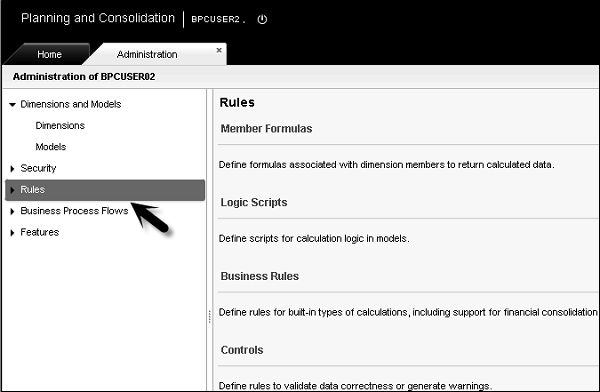
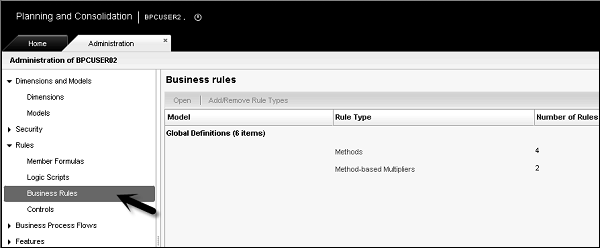
To manage business rules in BPC system − Go to Administration as shown in the following screenshot. Go to Rules → Expand → Business Rules.
Script Logic
With help of script logic, you can write your own logic in SQL or MDX language. There are various MDX functions that can be used in dimension formulas. Some of the common MDX functions are −
Avg − Returns average value of a numeric expression.
Count − Returns the number of tuples in one set and also includes null cells.
Max − Returns the maximum value of a numeric expression.
Min − Returns the minimum value of a numeric expression.
Sum − Returns the sum of numeric expression.
There are other MDX functions that can be used in dimension formulas.
Examples of simple rule formulas
[PRODUCT].[PRODUCT1] [PRODUCT].[PRODUCT2]
[SALES].[SALES1] / [SALES].[SALES2]
Standard Arithmetic functions have to be used in dimension formula - addition (+), subtraction (−), multiplication (*), Division (/) - these are used in SAP NetWeaver.
Once you save the dimension formulas, next is to validate the syntax.

Examples of Advance Rule Formulas
This includes movement of calculation dimension formulas from one time period to another.
[AccRec] Accounts Receivable
[AccPay] Accounts Payable
| Mvmt Acc Rec | Movement in Accounts Receivable | (if([Time].CurrentMember.Children.Count = 0,[Account].[AccRec]-([Account].[AccRec],[Time].PrevMember) SUM(Descendants[Time].CurrentMember,[Time].[Month],LEAVES))) |
| Mvmt inventory | Movement in Inventory | (if([Time].CurrentMember.Children.Count = 0,[Account].[Inventory]-([Account].[Inventory],[Time].PrevMember) SUM(Descendants[Time].CurrentMember,[Time].[Month],LEAVES))) |
Syntax for creating script logic in dimension formulas are already covered.
Exceptions in MDX Syntax
Following are the exceptions to MDX syntax with BPC −
- Replace the keyword AS with an = (equal) sign.
- Not to use single quotes around expressions.
Example
[ACCOUNT].[#GROSSSALES] = -[ACCOUNT].[UNITS]*[ACCOUNT].[INPUTPRICE]
[ACCOUNT].[#COST] = -[ACCOUNT].[#GROSSSALES]*80/100
Worksheet Logic
All the calculations performed in Excel worksheet is known as Worksheet logic. Worksheet logic includes all the functions that are available in an Excel spreadsheet and functions provided in BPC.
SAP BPC - Business Functions
Business Planning and Consolidation performs various business functions such as audit, business process flows, finance statements and reporting, and work status.
Various inbuilt functions are provided to perform these functions.
Currency Conversion
Currency conversion is required if your monetary figures are present in more than one currency in your application set. If app set contains monetary figures in single currency, in that case you dont need a rate application, currency time dimensions, etc.
If most of your data is entered in one currency and you have only few figures in other currency, this can be handled by creating duplicate members in entity dimension. In this case, you can duplicate few entities present in foreign operations to separate local currency from translated amounts.
Example − The US corporate mostly deals in the US but also has few subsidiaries functioning in other countries like Canada and Mexico.
Simple Conversion Requirements
There should be rate application where you store the exchange rates. You should have an account dimension, which includes RATETYPE. Then Entity dimension should include a property CURRENCY. FXTRANS logic should be available and DEFAULT logic should include a call to FXTRANS logic. Entity dimension should include the property TRANSALATE_TO.
Complex Currency Conversions
There should be rate application where you store the exchange rates. Application should contain a CURRENCY type dimension. There should be property REPORTING for the CURRENCY dimension. Entity dimension must include the property CURRENCY. Account dimension must include property RATETYPE. FXTRANS logic should be available. DEFAULT logic should include a call to FXTRANS logic.
Selecting Correct Rate
All valid rate types corresponds to an account of RATE application and belongs to GROUP FX Rate. If there is any account which is not part of this group, it will be multiplied by a factor 1. You can also define a special case NOTRANS, which results in an account being ignored during the translation.
Cross-rate translation includes multiplying the amount in local currency by ratio between the rate of destination currency and the rate of source currency. Using this, application can use only one table of rates for translating any source currency to destination currency.
You can also define the following default translations using business rules −
Using different tables of rate by reporting currency.
Identifying the difference between multiply currencies and divide currencies.
Intercompany Eliminations
To perform currency conversion and intercompany eliminations, you need a dimension type - Intercompany dimension (I). To execute intercompany elimination, an application should have the following −
- Dimension Type I for intercompany elimination.
- Dimension I should include a property ENTITY.
- Account dimension should include the property ELIMACC.
- Entity dimension should include the property ELIM.
- You should set the appropriate business tables.
- There should be DPT package to execute intercompany logic.
| Dimension | Property | Length | Content |
|---|---|---|---|
| Account | ELIMACC | 20 | Valid account |
| Entity | ELIM | 1 char | It contains Y or blank |
| Intercompany | Entity | 20 | Entity Id w.r.t Intercompany member |
| Currency | Reporting | 1 | Y or blank |
Default elimination logic performs the following functions −
- Checks all base level entities where ELIM<>Y.
- Restricts currency dimension to all reporting currencies only.
- Removes all accounts to be eliminated into desired plug account.
- Elimination is performed below first common parent in elimination entity.
SAP BPC - Process Flow Management
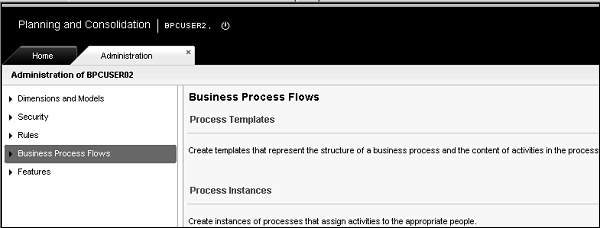
This is used to manage processes created by users and to create and manage business process flow templates. To manage business process flows, you need to have manage processes task profile.
Process template is defined as business process, which contains all the tasks that is spread across multiple modules of BPC system. It includes step-by-step process flow, user performed activities link, process context and timing when process takes place, all the participants and their roles.
Example
An area manager entering monthly budget data, which includes each manager creating a process and entering the data for each department.
To create a new Business Process Template, login to Web portal → Planning and Consolidation Administration.
On the left side, you can see the option of Business Process Flows.
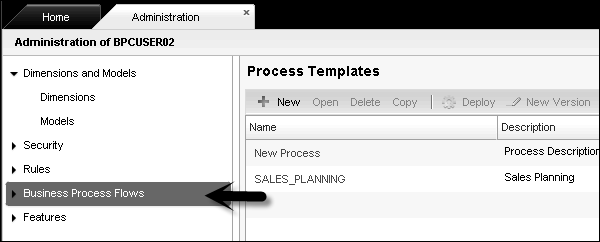
Expand this tab and you will see Process Templates and Process Instances.
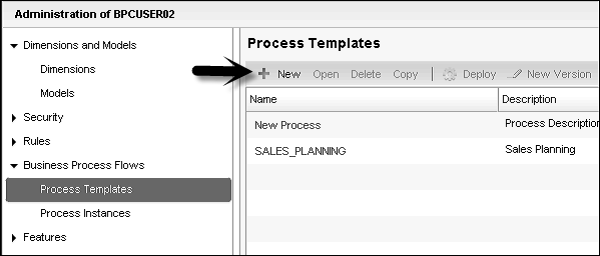
To create a new Business Process template, go to tab Process Templates. Click +New.
BPC admins are responsible to create and manage process templates. Once process templates are created, the business user can use the templates to create processes.
Work Status
Work status is used to lock a region of data in a model. This is used to override users member access privilege to write to a particular region.
There are multiple dimensions defined for a region with one property called as OWNER. While defining the work status, following are defined −
Work Status − It belongs to physical state of data.
Security − You can set different level of security on changing data in the system All or Locked. You can set who can change the work state - Manager or Owner.
Data Update − This defines how data will be updated by the customer.
Push − This option is used to push same work state for all the children of a member.
Once work status is defined, they can be used by the users to lock the data for review and approval, etc. To implement e-mail notification of work status, you should set the parameters, APPROVALSTATUSMAIL, APPROVALSTATUSMSG, SMTPPASSWORD, SMTPPORT, SMTP SERVER, SMTPAUTH, etc.
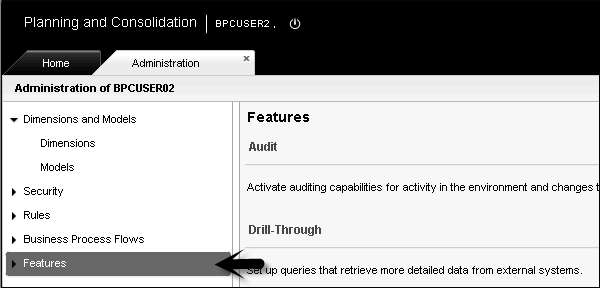
Defining the Work Status
Go to Business Planning and Administration → Features.
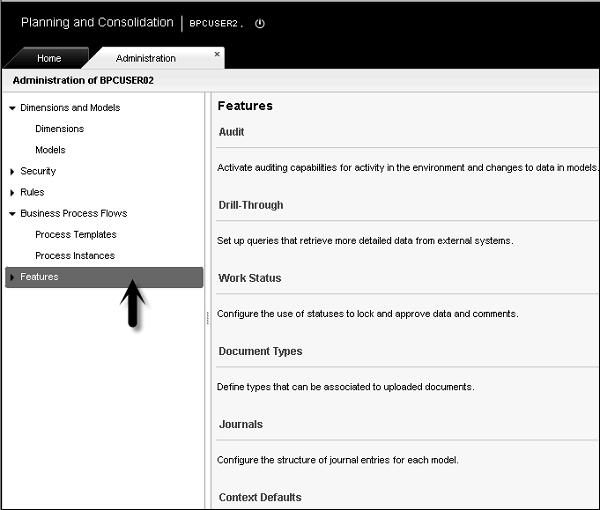
On the left side, you have Features tab. Expand this tab and you will see Work Status as the first option.
Go to Work Status and on the right side you will get options to create and manage work status.
Controlling the Work Status
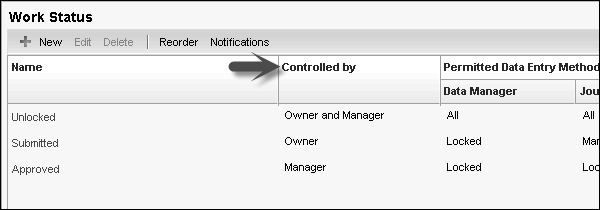
You can define in BPC system, who can change the data. This includes the following access levels −
Who can change data?
All − This allows all users with appropriate access to change the data.
Locked − This locks the change on the data. None can change the data.
Manager − Only parents of owners/manager can change the data.
Owner - Only the owner can change the data.
Who can control work status?
Both − If you select both, owner of the specific member ID and the owner of the parent to the specific member ID.
Owner − Owner of the specific member ID.
Manager − Owner of the parent to member ID.
Determining Manager or Owner in Base Hierarchies
Parent member owners act as an owner for that specific parent member ID and work as manager for direct children.
This allows parent member owner to change the work status of direct children. In case you are selecting all children, owner of a parent can update children at all levels.
Base members owners act as owner only.
Members with no parent but have children act as their own manager and owner too.
Controlled by Rule
An owner is defined by one dimension hierarchy − OWNER dimension.
You can set a work state on a single member ID, in this Manager doesnt include - All Children.
You can also set work state on multiple member IDs, manager uses Include - All Children.
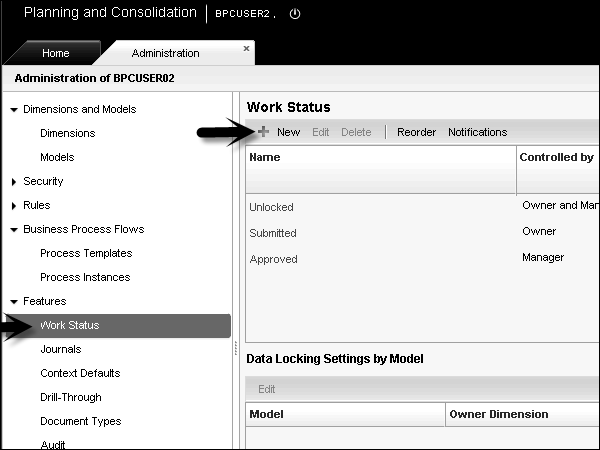
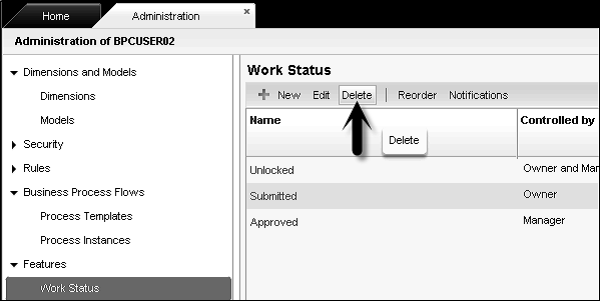
To edit a work status − Select the Work Status, click on Edit button at the top.


You can set from the above Controlled by fields.
To delete a Work Status, select the work state and click Delete.
Book Publishing
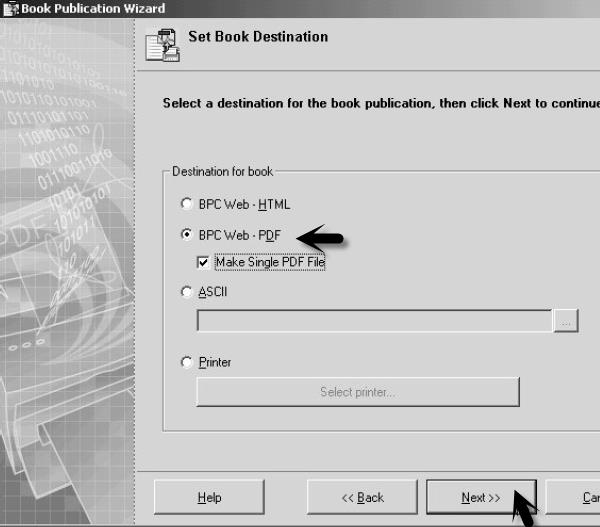
You can publish books to BPC web. Administrators and power users have an option to create books of reports by collecting series of reports. You can select an output as Printer copy or .pdf file, which can be stored on the server.
You can use Book Publishing wizard for this. Go to ePublish option and select Book Publishing wizard from there.


It will open Book Publishing Wizard → Select Publish Now as shown in the following screenshot.
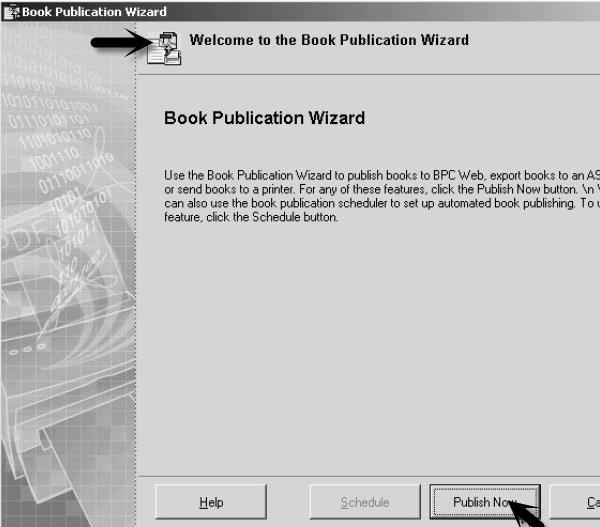
You get two options - Publish to a PDF file or print to a printer.
To delete books in BPC web, go to BPC administration.
Select Administration Configuration action pane → Manage Books.
Select the book you want to manage by using the checkbox and click Delete.
SAP BPC - Word Integration
It is easier to integrate BPC with MS Word and to create reports. BPC 10.0 has the capability to directly integrate and report using Microsoft Word and PowerPoint as well.
BPC 10.0 version of NetWeaver helps you combine the BPC features with rich functionality of Microsoft Word, Excel, and PowerPoint. Using BPC for office you can use all default features of Microsoft and worksheets, presentations can be directly linked to BPC database.
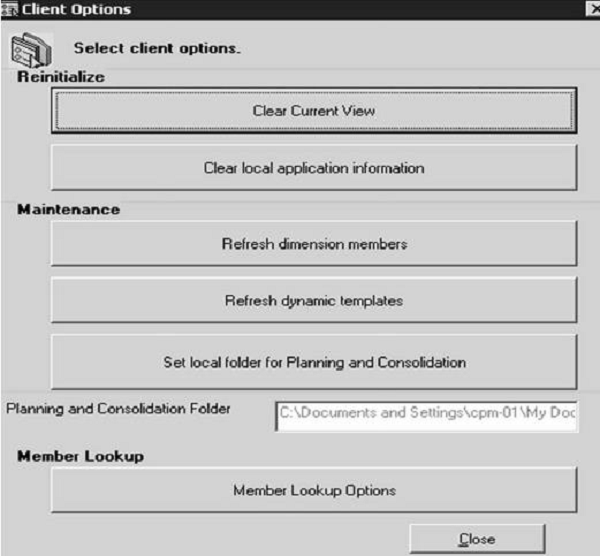
Following tasks can be performed for client maintenance.
- Reset the Current View Bar
- Clear Local Application Information
- Refresh Dimension Members
- Refresh Dynamic Templates
- Set Local folder for Planning and Consolidation for Clients
You can open these interfaces via BPC Web → List of available interfaces

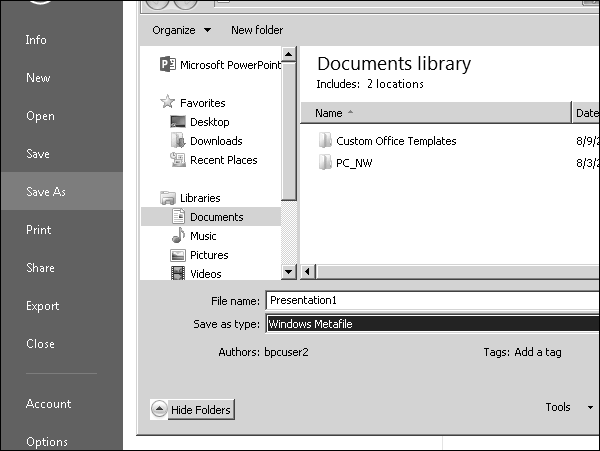
Publishing from Microsoft Word
Go to File − Save As. Select Save as Web Page as shown in the following screenshot.
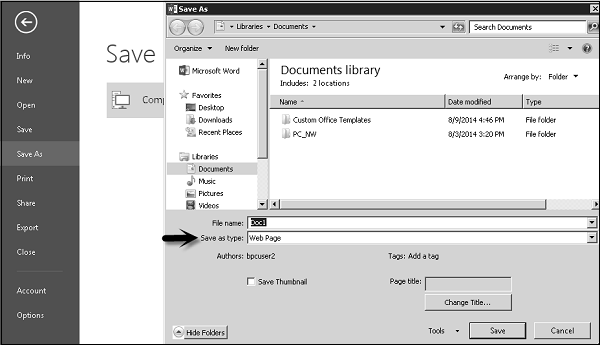
Enter the file name and select the Web folder that points to your BPC application set location.
You can select from the following directories −
- AppSetPublications − Used for publication that applies to all applications within AppSet.
- [application] − Used to publish for a specific application.
- _private − User specific.
Once you select the directory, click Save icon.
SAP BPC - PowerPoint Integration
As discussed earlier, you can integrate PowerPoint to BPC 10.0.
Publishing to PowerPoint
Go to File → Save As. Select Save as Web Page as shown in the following screenshot.
Enter the file name and select the Web folder that points to your BPC application set location.
You can select from the following directories −
AppSetPublications − Used for publication that applies to all applications within AppSet.
[application] − Used to publish for a specific application.
_site − Used to publish for a specific site.
_private − User specific
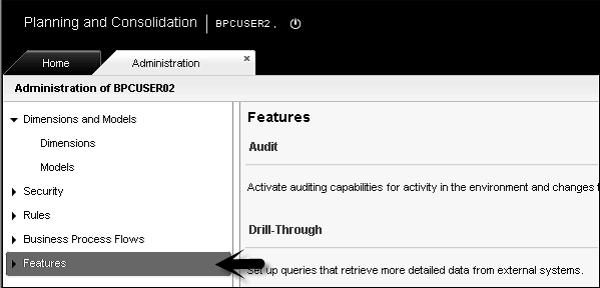
SAP BPC - Essential Tools
SAP BPC also provides essential tools Documents (repository to store files), Journals (to make adjustments to data in database), statistics, audit, etc.
Documents
This provides a central repository for storing and sharing files and web sites. There is a feature named Document View that can be used to post, share, and retrieve files or contents of a website.
Posting Files to Documents View
You can post files or URL to add to documents view. You can set the description, set access, and determine if you want to send an email notification about the document.
You can save a file to a local drive or network folder. Files with the following extension can be uploaded −
XLS, .XML, .MHT, .MHTML, .HTM, XLT, .DOC, , .HTML, .XLSX, .XLSM, .XLSB, .ZIP, .PDF, .PPTX, .PPTM, , .CDM, .TDM, .PNG, .GIF, .JPG, .CSS, .MRC, .DOT, .PPT, .POT, .POTX, .POTM, .DOCX, .DOCM, .DOTX, .DOTM
BPC Administrator can also change the environment parameters (DEFAULT_EXTENSIONS) to allow other files to be posted.
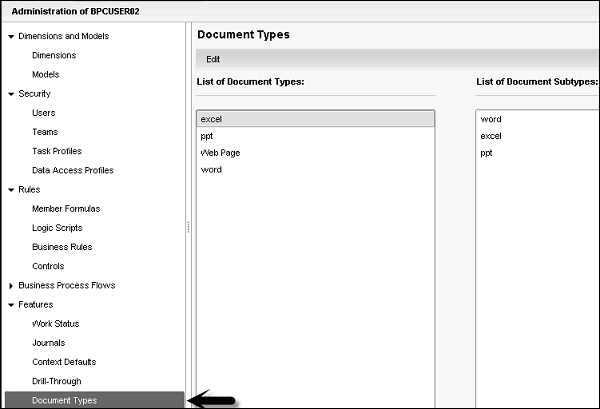
Categorization of documents, sorting, and filtering of documents is also possible based on the following elements −
- Document type and subtype
- Model context
- Access rights
- Date
To access the Document Type, go to BPC Web Portal → Administration.
On the left side of the screen, you have an option to select Features.
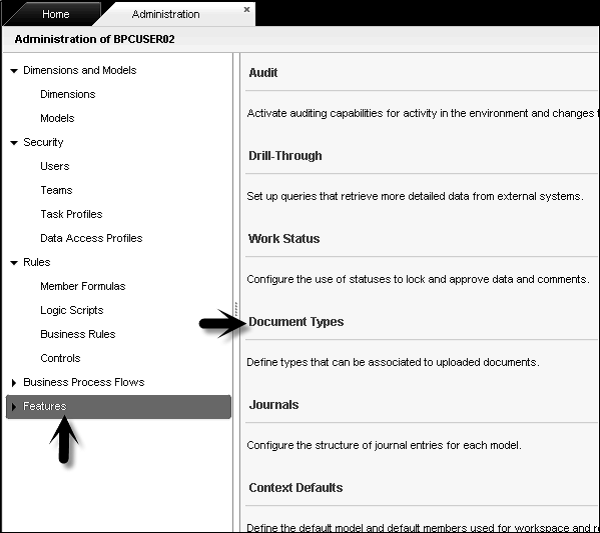
Once you expand Features, you will get an option of Document Types. You can select the document type and sub type from here and edit.
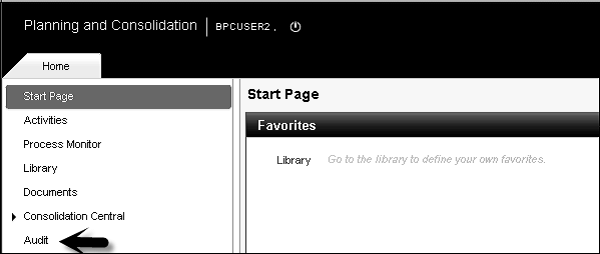
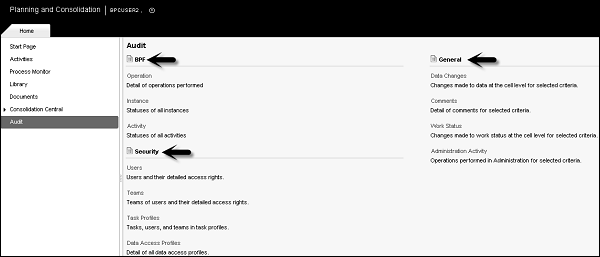
Audit
Audit function allows you to create reports that contains history of user sessions and system information. You can create Audit reports on the following topics −
Business Process Flow − You can create these reports in BPF.
- Standard
- Step
- Audit
Security − You can create these reports in Security.
- User
- Team
- Task Profiles
- Data Access Profiles
- BPF
General − You can create these reports under general.
- Work Status
- Administration Activities
- Comments
- Data Changes
Creating Audit Reports
Go to Business Planning and Consolidation Administration. On the left side of the screen, you have an option to create Audit reports.
Once you click on Audit tab, you will see all three reporting options.
To create a report, click on any of the report type.
Select the Audit level - template, instance and Duration and click on Display.

Similarly, you can create Security and General Reports.
Journals
Journals in BPC are used to update data in database. This is normally done to post quarter end or year-end data in BPC.
Example
Suppose an administrator has uploaded a general ledger information into an application for the Area manager to review using data manager. The Area Manager can make necessary changes to the data using journal entry.
Following are the tasks that can be performed from Journal manager. If you have any open journal entry, you can perform these from Journal options.
| Task | Navigation |
|---|---|
| Creating a Journal Entry | This can be done using the Action Pane |
| Modifying a Journal Entry | Save as option can be used to save journal entry with new ID |
| Copying a Journal Entry | From journal list, select a journal entry and copy to confirm |
| Searching for a Journal | Select new query from Journal Manager |
| Reopening a Journal | Select reopen journals |
There are many more Journal entry functions that can be performed using Journal Manager or from Action Pane.
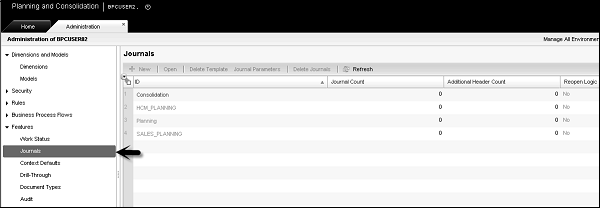
To create, edit, delete and modify Journal Parameters, go to Business Planning and Consolidation Administration → Features.
Expand the Feature tab → Select Journals.

From here, you can create new journals, delete template, journal parameters, delete journals, etc.
SAP BPC - Business Process Flows
Business Process Flows are used to guide users with predefined set of application tasks. These steps should be performed in a series and can have sub steps too.
Sub steps in process flow shouldnt be executed in a sequence and may not be required at each iteration. Also note that Business Process Flows can only be defined for end user tasks and not for administrative tasks.
Following Business Process Flow features can be used −
Personal To-do List
This list is used to display the steps and sub steps assigned to you or the completed steps that you need to review. These are called step regions.
To-do list contains the name and status of each step region. They can have the following statuses −
Action Required − Waiting for completion as new step
Review Required − Step is awaiting review and action is completed
Completed − Step is completed
Rejected − Step has failed to pass the conditions in completion status
Pending − Step is waiting for reopened step to be completed
There are various other To-do list status like reopen, waiting proper work status, waiting for reopen and unavailable.
Reopen and Reset
You can also reopen a completed step or reset a particular instance or a set of business process flow instances. To reopen a step, it should have the following criteria −
Allow reopen attribute should be included in step.
Step status should be complete.
You can only open one previous step at a time and steps can be opened in a sequence.
If a step has an attribute Enable Reviewers, users cant reopen this step directly but can send an email request to reviewer.
The user has ReopenBPFStep task security assignment.
Completed Steps
All completed steps are audited by system and displayed in the report.
Locked Dimension Precedence
All the locked dimensions that are not specified in Business Process flow current view remain locked in any open worksheet.
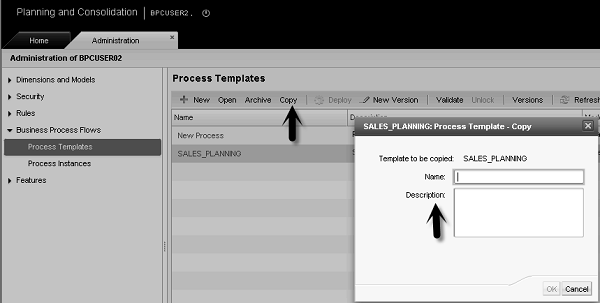
Copying a Business Process Flow − Login to Business Planning and Consolidation Administration → Business Process Flows.
List of all BPF is displayed. To copy a BPF, select BPF and click Save As. Enter the name and description of BPF and save as BPF.
Similarly, you can reset a Business Process flow, using manage option by selecting reset process flow instances.
SAP BPC - Custom Menu
Custom menu provides a summary of a business process and also provides a link to useful information used in the process. BPC administrators are responsible to create custom menus and assign access rights so that only required people see these menus. There is a possibility that you can have multiple users with different access rights on a single custom menu.
A custom menu is defined using custom menu template. EV_MENUSTYLE worksheet of custom menu template is used to define format, content, functions and parameters of custom menu.
Designing a Custom Menu
You can use custom menu template to define format, content, and functions in custom menu. You can use sample templates in ApShell or can create a custom menu by creating a new worksheet within an existing menu.
The sample template contains multiple worksheets −
EV_DEFAULT − To define content of custom menu.
EV_MENUSTYLE − To define format of custom menu.
ADMINGROUP − This is the same as EV_DEFAULT but only edited for users in admin group.
To create a custom menu template
Go to BPC Excel eTools → Custom menu manager → Open Custom menu.

You can find sample custom menu templates under EXCEL/Reports/Wizard/ProcessMenu. There are various custom menu functions that can be used to perform various common excel activities such as −
- HIGHLIGHT
- OPENLOCALFILE
- NAVIGATION
- OPENWEBFILE
- OPENLOCALFOLDER
- OPENWEBFOLDER
- MEMBERLOOKUP
- OPENMYEVEREST
- OPENURL
- CHANGEGROUP
- PUBLISHBOOK
Custom Menu Content
Custom menu content is defined by two section in custom menu template - Default section and Menu item section.
Following default parameters can be defined for EVDEFAULT.
| Parameters | Options |
|---|---|
| NORMALSCREEN |
Value is True − It opens the custom menu in Excel interface. Value is False − It opens the custom menu in Standard Excel. |
| HIDEEVTOOLBARS |
If Value is True − It will hide the Planning and Consolidation Toolbar. If Value is False − It will display the Planning and Consolidation Toolbar. |
| CVLIST |
It is used to define the dimensions that has to be displayed on the top of custom menu page. These dimensions can be changed into the report mentioned in Custom menu. |
Menu Item section includes the following parameters −
Menu Item − Text description that the user can select for menu item.
Actions − Highlight, custom menu function or Menu command.
Level − Level can be selected from section, item or sub item.
Parameters − For custom menu functions.
Normal Screen − Default is full screen. This is set true, open custom menu in Normal screen
CVOverride − This is used to change current view dimensions while switching applications.
SAP BPC - Consolidation
SAP BPC Consolidation module is used to manage and prepare consolidated data and provides a correct view of consolidated data in an organization. Consolidation module also provides an environment to perform consolidation tasks over the web.
In SAP Business Planning and Consolidation NetWeaver version, you have consolidation monitor that is used to manage consolidated data reported by groups and entity members. Consolidation monitor also controls the reported data.
Consolidation central contains journals, which are used to create and manage journal entries for updated consolidated data in database.
It contains Ownership Manager to manage ownership-based hierarchies.
Setting Up Environments and Master Data
Setting up environment includes managing master data load after you have completed the installation of BPC. Business users can set up to refresh master data on nightly or weekly basis. This can be achieved in the following different ways.
First option is you download the data from SAP BW system to a flat file and then using BPC DM Manager load the data from flat file to BPC dimensions.
Other option is to load the data directly to BPC dimension through SAP BW Transformations. The selection of option depends on your business requirement to find out which solution has to be implemented.
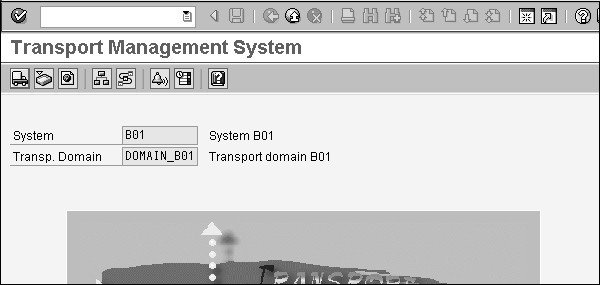
Following steps illustrate how to import a transport and create a new data manager package to process master data import.
First step is to Import Transport - Transaction Code: STMS
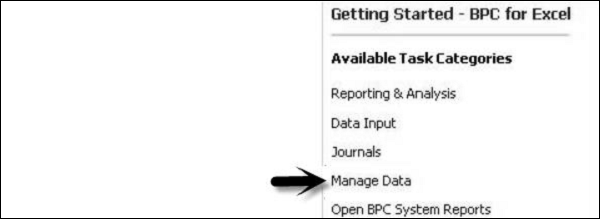
Next step is to create Data Manager Package to load from Application Server. Open BPC Excel and login. Go to Action Pane and select Manage Data.
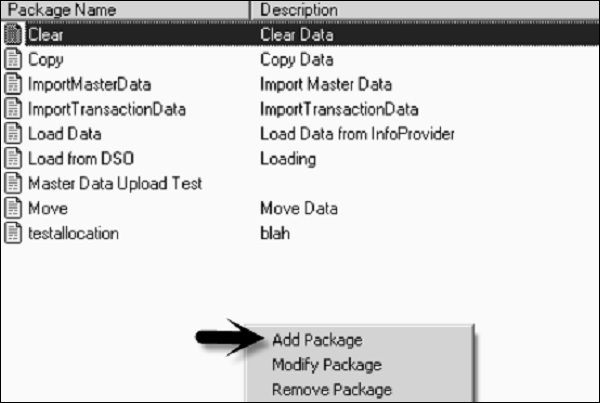
Now to create a new package, go to Maintain Data Management → Manage Packages.
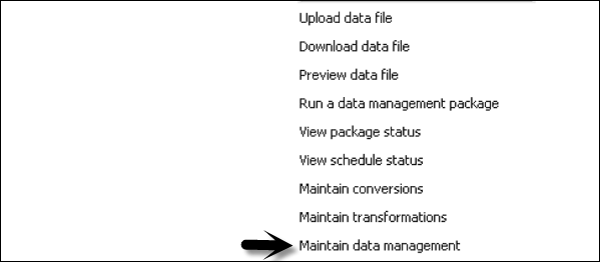
To create a new package, right-click on the blank area and select Add Package.
Click Process chain dropdown option and select Z_IMPORT_MASTER_DATA_LOAD. Click on the Select option.
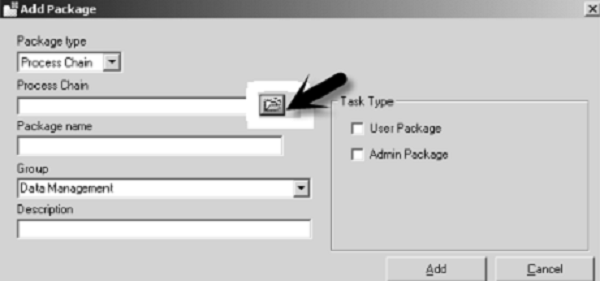
Enter the Package name and description. Click on Add and Save.
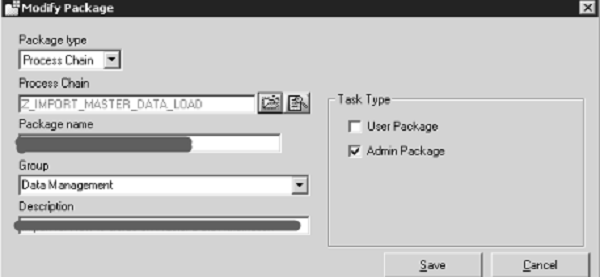
Now go to Manage Packages option under Maintain Data Management. Select the package which has been created in the previous step and click on Modify.
In next window, click on View Package and then click Advance button.
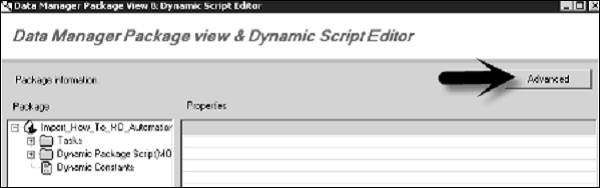
In next window of maintain dynamic script, click OK.
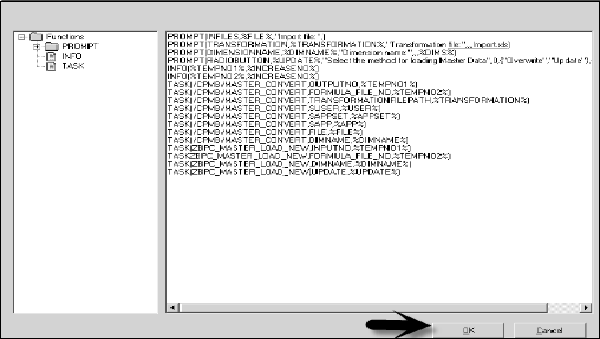
Click Save and OK and close the setup.
Creating Models for Consolidation
Models are used to hold the relationships, calculations and data in an organization. There are two types of models that can be created −
- Reporting Model
- Non Reporting Model
We use reporting models for analysis purpose. Non Reporting modules include Driver and Rates model and are used for currency rates, price, ownership data, etc.
Types of Reporting Models − Following are the types of non reporting models.
- Consolidation
- Finance
- Generic
Types of Non Reporting Models − Following are the types of non reporting models.
- Rate
- Ownership
Note that you can do reporting on non-reporting models but you cant assign work status to them.
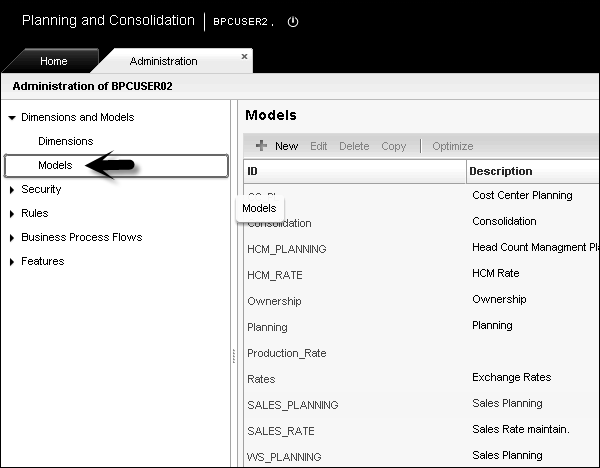
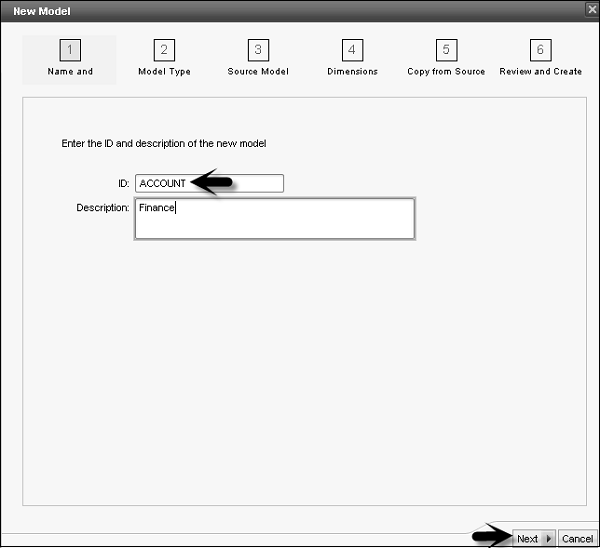
To create a model, login to Business Planning and Consolidation Administration.

Go to Dimensions and Models on the left side of the screen, click Models tab. To create a new model, click on + New sign.
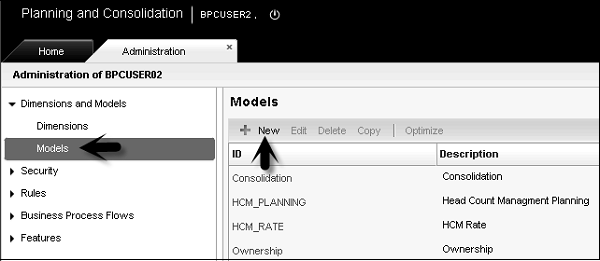
In the next window, you have to enter model Id and description and go to Next button.
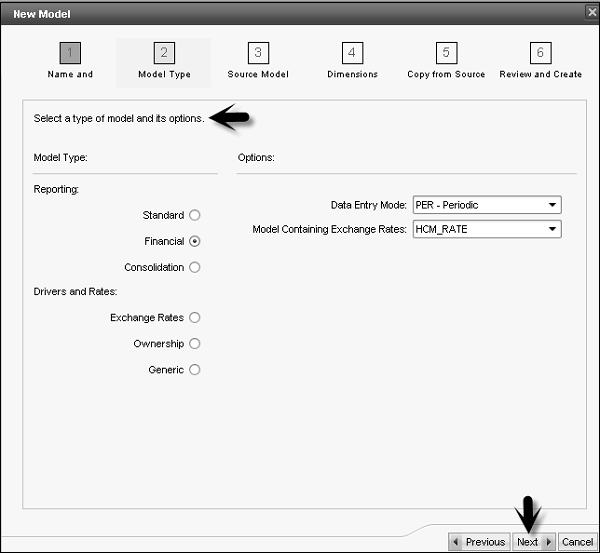
Select the Model Type - Reporting or Drivers and Rate and click Next.
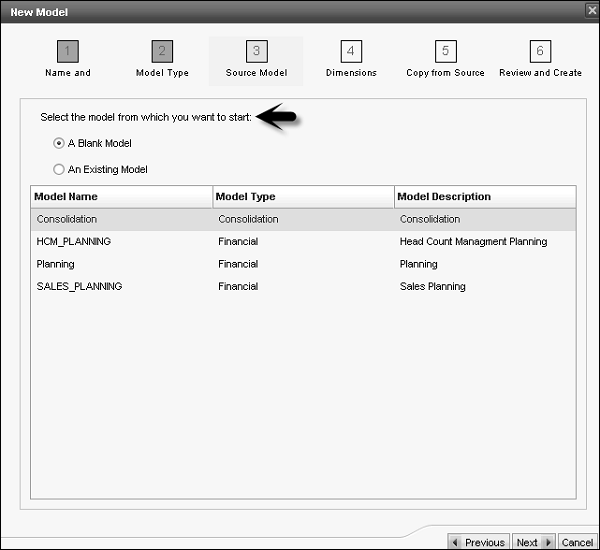
In the next screen, you have an option to select a blank model or you can copy from an existing model.
Once you select next, in the new screen you have to select dimensions to be included in the new model. You have to add specific dimensions as per model type.
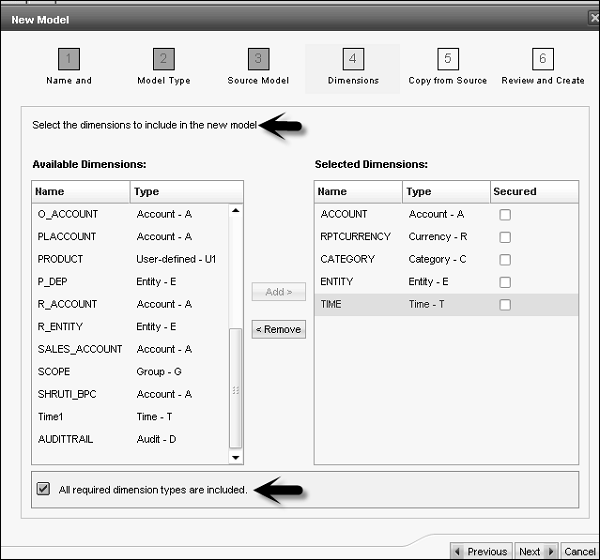
Click Next. In the last window, you will get a summary and create option. Click Create option to create a new model.
Similarly, you can copy an Existing model.
Creating Consolidation Logic
A logic is defined as calculations performed at different level. Execution of consolidation logic requires some sort of expertise and business requirement. A logic can be defined at different levels −
Within a dimension using Microsoft MDX language.
With the help of scripts.
Using business rules that are executed with predefined business requirements.
BPC Excel formulas.
A logic can be executed at different levels −
- Analysis Services
- BPC Application Server
- Excel/Live Reporting
Creating a Consolidation Logic
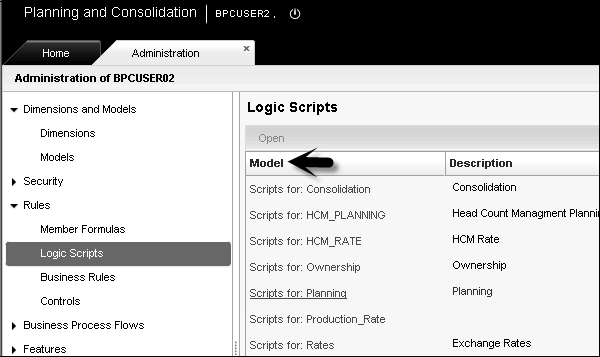
Login to Business Planning and Consolidation Administration → Rules.
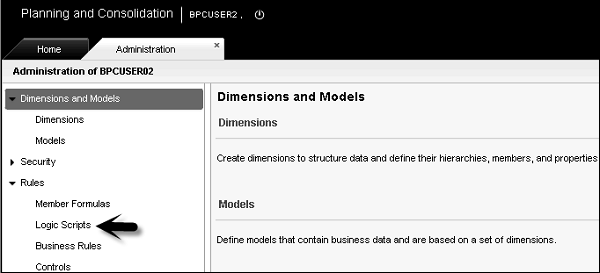
Select Logic Scripts option on the left side of the screen. Select the Model from the right side of the screen.
Click on + New sign and enter the Logic Script File Name. Go to Create button.
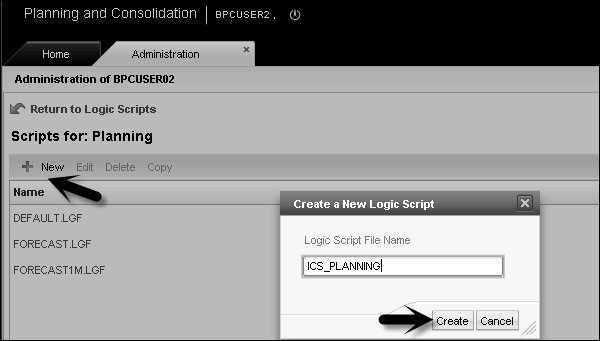
Enter the Logic script and click Validate.
Once the script is validated, click Save button.
SAP BPC - Preparing Elimination
To perform currency conversion and intercompany eliminations, you need a dimension type - Intercompany dimension (I). To execute intercompany elimination, an application should have the following −
- Dimension Type I for intercompany elimination.
- Dimension I should include a property ENTITY.
- Account dimension should include the property ELIMACC.
- Entity dimension should include the property ELIM.
- You should set the appropriate business tables.
- There should be DPT package to execute intercompany logic.
| Dimension | Property | Length | Content |
|---|---|---|---|
| Account | ELIMACC | 20 | Valid account |
| Entity | ELIM | 1 char | It contains Y or blank |
| Intercompany | Entity | 20 | Entity Id w.r.t Intercompany member |
| Currency | Reporting | 1 | Y or blank |
Default elimination logic performs the following functions −
- Checks all base level entities where ELIM<>Y.
- Restricts currency dimension to all reporting currencies only.
- It removes all accounts to be eliminated into desired plug account.
- Elimination is performed below first common parent in elimination entity.
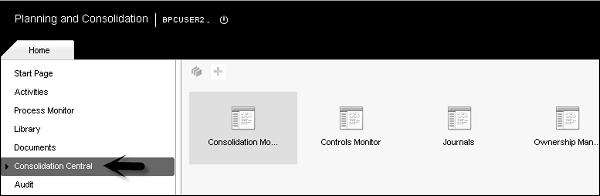
Consolidation Central
SAP BPC Consolidation central is used to manage and prepare consolidated data and provides a correct view of consolidated data in an organization. Consolidation module also provides an environment to perform consolidation tasks over the web.
Following are the key features in Consolidation Central −
Consolidation Monitor
In SAP Business Planning and Consolidation NetWeaver version, you have consolidation monitor that is used to manage consolidated data reported by groups and entity members. Consolidation monitor also controls the reported data.
It is one of the key components while executing incremental consolidation as it communicates with consolidation engine to perform currency translation execution. Consolidation monitor also displays the group-entity hierarchy that is defined in Ownership manager. Using the consolidation monitor, you can execute full consolidation that contains group-entity hierarchy. You can also perform incremental consolidation with only updated entities.
Journals
Consolidation central contain journals which are used to create and manage journal entries for updated consolidated data in database.
Ownership Manager
It contains Ownership Manager to manage ownership-based hierarchies.
Controls Monitor
It is used to manage controls which is used to validate reported data.
Setting Up Journals
Journals in BPC are used to update data in the database. This is normally done to post quarter end or year-end data in BPC.
Example − Suppose the administrator has uploaded general ledger information into an application for Area Manager to review using data manager. The Area Manager can make necessary changes to the data using journal entry.
Following are the tasks that can be performed by Journal manager. If you have any open journal entry, you can perform these from Journal options.
| Task | Navigation |
|---|---|
| Creating a Journal Entry | This can be done from the Action Pane. |
| Modifying a Journal Entry | Save as option can be used to save journal entry with new ID. |
| Copying Journal Entry | From Journal list, select a Journal Entry and copy to confirm. |
| Searching for a Journal | Select New Query from Journal Manager. |
| Reopening a Journal | Select Reopen Journals. |
There are other Journal entry functions that can be performed using the Journal Manager or from the Action Pane.
To create, edit, delete and modify Journal Parameters, go to Business Planning and Consolidation Administration → Features.
Expand the Feature tab → Select Journals.
Using this, you can create new journals, delete template, journal parameters, delete journals, etc.
Translating Local Currency
Translating local currency means converting the amount in source currency to a target currency. You can perform currency translation at any group/entity level.
Translating local currency is performed in consolidation central of Business Planning and Consolidation system. To run the currency translation on a specific entity, your BPC administrator should grant you write access on that entity.
Following are the main facts in performing local currency translation −
Category − This includes categorization of reported data to which you linked the translated amount.
Time − It displays the data entry period in which the amount to be translated was entered.
Reporting Currency − This tells you to select the currency in which you want to run the translation.
Group/Entity − This defines the fields on which translation is performed.
Translation Execution Mode − You can perform a full translation of local currency or you can select an incremental translation.
Rate Entry − This contains the exchange rates to select while performing currency translation.
Performing Currency Translation
Go to BPC web portal → Select Consolidation Central.
Go to Consolidation Monitor after expanding Consolidation Central.
Select the entity/group row for which you want to perform currency translation.
In the next dialog box, select the Execution mode - full translation or Incremental Translation. Click Ok after selecting the fields.
SAP BPC - Configuring Elimination
In BPC, it is necessary to configure intercompany eliminations between subsidiaries or parents to avoid double counting. Intercompany eliminations is performed with help of script logic.
If you have transactions between subsidiaries Co. XP02, XP03, these transactions should be eliminated. These transactions are for intercompany account payable and account receivables, and intercompany sales and cost.
Configuring Intercompany Eliminations
Before performing intercompany elimination, you should have the following prerequisites −
- A consolidation environment
- You should perform currency conversion before elimination.
To start with, first create a dimension for IC elimination. Application where you have to perform IC elimination must have dimension of type I and R for account and rate. Account dimension must have an elimination account property to post IC transfer balances.
| ID | EV Description | Account Dimension Property |
|---|---|---|
| ICCost | IC Cost of Sales | ICDiff |
| ICSales | IC Sales | ICDiff |
| ICAccRec | IC Accounts Receivables | ICBal |
| ICAccPay | IC Accounts Payable | ICBal |
Next is to have an Entity dimension with a property ELIM (Y/N) to post elimination entity results. This property is set to Y for elimination entity.

Account Dimension I should have an ENTITY property and should be maintained −
- XP01_Input
- XP02
- XP03
- XP04
- XP05
Your currency dimension R should have a property Reporting and should be maintained −
IC Elimination is managed by inbuilt procedures - INITIALIZE_ELIM and ELIMINATE_ORG. Both of these procedures are maintained in ICELIMWITHCURR.LGL file.
The following logic should be entered in application ICELIM logic file and should be validated and saved.
//Logic for Intercompany Elimination
//========================================================
*INCLUDE SYSTEM_CONSTANTS.LGL
*SYSLIB ICELIMWITHCURR.LGL
//========================================================
//Elimination logic
for organizations in the hierarchy H1
//========================================================
*INITIALIZE_ELIM()
*ELIMINATE_ORG(H1)
*COMMIT
To validate this logic, go to Action pane and select Validate and save option.
Once the above configuration is in place, you have to create an input schedule or import package to load the data to be eliminated.
To run the import package for IC elimination, login to BPC Excel. Click on Manage Data and go to Run a Data Management Package.
Go to Company folder of application, click on Financial Processes → Select Package IC Eliminations and click Run.
Once this package is executed successfully, you can check the values of the following components in Profit and Loss statement and balance sheets.
| ICCost | IC Cost of Sales | ICDiff |
| ICSales | IC Sales | ICDiff |
| ICAccRec | IC Accounts Receivables | ICBal |
| ICAccPay | IC Accounts Payable | ICBal |
Reviewing Ownership Terms and Concepts
Ownership terms is managed by the Ownership Manager. The Ownership Manager is used to manage ownership-based hierarchies. These hierarchies combine groups and entities and these entities can be connected or disconnected from groups as per the category and time.
Ownership-based hierarchies are used to meet the reporting requirements which cant be managed using fixed hierarchies.
To display the Ownership manager, login to BPC web portal home page. Go to consolidation Central on the left side of the screen → Ownership Manager.
To create an Ownership-based hierarchy − Go to Ownership manager as mentioned above. Click on Edit option provided in the Ownership Manager.
In the next window, you will get an option to add members to hierarchy. Click Add button and you will have an option to select members.
Once hierarchy members are added, click Save option on the top right corner of the screen.
Purchase Method
Purchase method is sometimes also called the Global method. Business Planning and Consolidation supports the following consolidation methods −
- Global (Purchase) method
- Proportional method
- Equity method
Global/Purchase Method
In this method of consolidation, balance sheet accounts and Profit and Loss accounts are fully included and minority interests are calculated if necessary.
Proportional Method
In this method, you include balance sheet and P&L accounts at the percentage of ownership.
Example − Including P&L statement and balance sheet are included 50% at the percentage of ownership.
Equity Method
In this method, you dont include balance sheet and P&L accounts. However, Net Value and Result of the Period are included.
SAP BPC - Embedded Environment
BPC Embedded model is based on Business Warehouse-Integrated Planning (BW-IP) in which it uses BW objects directly. This model is different from Standard model and includes data access to all community users. For Embedded design model, initial versions used were SAP BW Integrated Planning and Planning Application Kit i.e. BW-IP and PAK.
This model provides a different level of data access where master and transactional data from host EDW environment is accessible by the application. In Embedded model, it allows an easy access to transactional and master data within the host BW, and this data is shared with many other users and controlled by the administrator group.
In Embedded model, migration from older versions of BW-IP to this data model is relatively easy and migration from earlier versions like (BPC 10.0 and earlier) is considered as a new implementation.
In short you can say that in embedded model, any number of InfoProviders can be assigned to a single BPC model /application.
Following are the key features and functions offered in BPC 10.1 Embedded model −
It uses exception real-time SAP HANA functionalities and hence safeguards SAP HANA performance through the Planning Application Kit. Using SAP HANA allows to perform certain planning functions like copy, distribute, etc.
BPC-Integration planning supports the use of real-time InfoProviders and aggregations levels.
Embedded model supports SAP BW Queries that you can execute directly in the SAP EPM add-in for Microsoft Office.
Embedded model provides audit functions to allow creating various audit reports and use of the business process flows.
SAP BW Integrated Planning
SAP BW Integrated Planning provides BPC experts with an infrastructure to create and operate planning scenarios. This includes planning from common data entry processes to complex planning situations.
SAP BW-IP Planning Model
Planning model in BW-IP includes −
Data stored in InfoProviders for Planning.
Structured view of data includes aggregation levels, multi provider, and characteristic relationships.
Changing data includes planning functions, planning sequences, manual planning in the form of input-ready queries, and process chains.
Utilities, i.e. filters that can be used in queries and planning functions.
Data protecting centrally.
Tools in BW Modeling
Following tools can be used for model planning scenarios −
BW modeling tools in Eclipse and the Data Warehousing Workbench to create data models in BW.
Planning Modeler to model planning-specific metadata objects.
BW modeling tools in Eclipse and also BEx Query Designer to enter plan data manually.
BEx Web Application Designer or BEx Analyzer (Excel applications) to create applications for planning.
Applications to execute either on the Web or in BEx Analyzer to enter data manually.
Creating Data Model in SAP BW
Transaction Code: RSA1
A data model is defined as an Info Cube in SAP BW, which consists of fact table and dimension tables.
To create an InfoCube − First create an Info Area, which is a building block for an InfoCube.
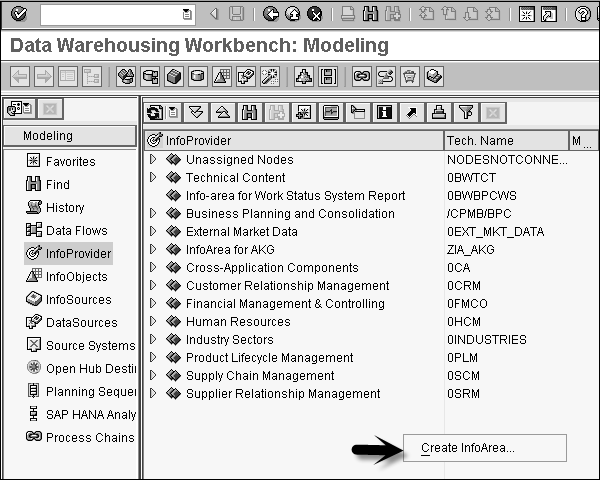
Enter the name and description of Info Area and click Ok.

Next create InfoObject Catalog which is used to define characteristics and key figures for different type of objects. Go to InfoObjects on the left side of the screen. Select the Info Area created above → Create InfoObject Catalog.
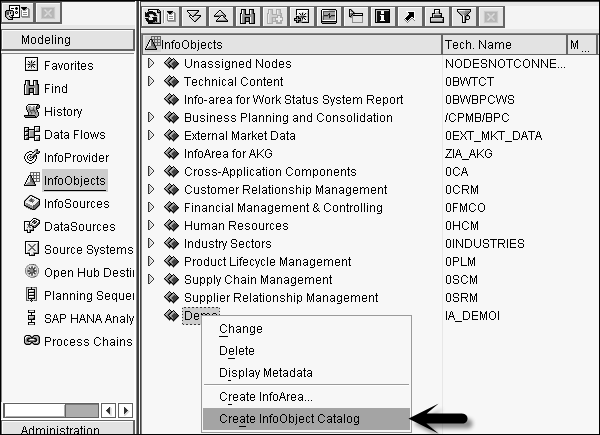
Enter the name and description of InfoObject Catalog, InfoObject Type and click Create (F5).
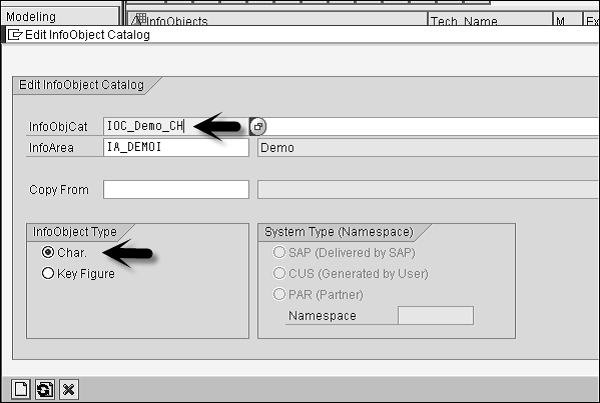
Now validate and activate IOC_Demo_CH to check InfoObject Catalog.
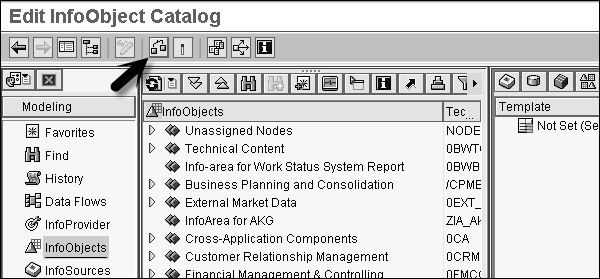
To activate InfoObject Catalog, go to activate icon.
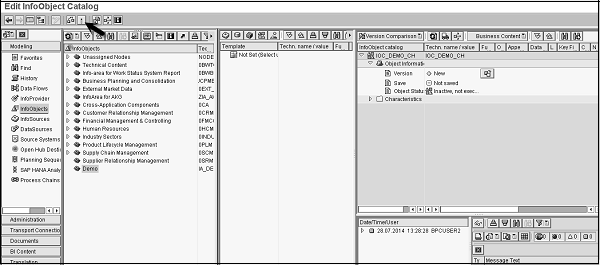

Similarly, you can create InfoObject Catalog to hold key figures.
Let us create InfoObject. Right-click on InfoObject Catalog IOC_demo_CH and select create InfoObject. Enter the name and description of InfoObject.
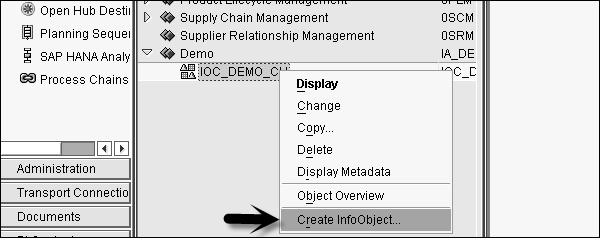
Click Continue.
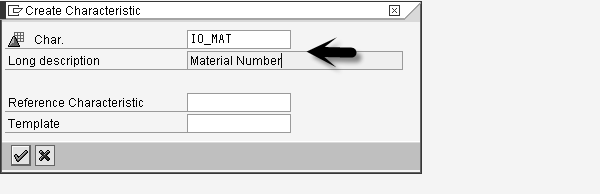
Select Data Type with Character and Length as 15. Then click Attribute tab.

Enter the Attribute name and click Create.
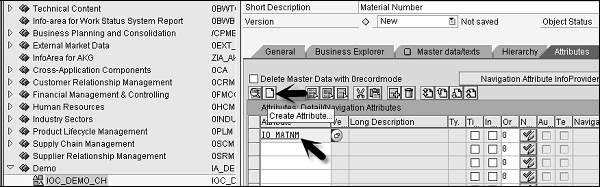
Select Create Attribute as Characteristics and click Create icon.
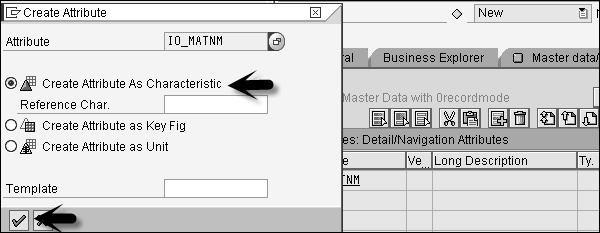
Select Character as data type and Length 30. Note that Attribute only option is automatically checked. Click the green tick at the bottom.
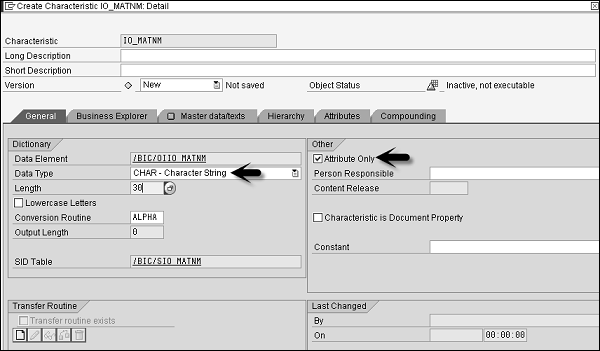
Click Check and Activate option to validate and activate the characteristics.
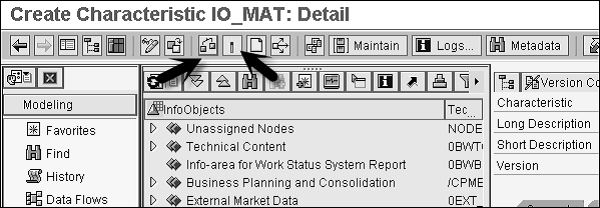
Similarly, you can create InfoObjects for key figures.
Once you define InfoObjects for characteristics and key figures, create an InfoCube.
Right-click on Info Provider Demo → Create InfoCube.

Enter the name of InfoCube, select standard for the description of InfoCube and click Create.

Select characteristics from template table and move them to structure table using arrows. Click the Dimensions tab to assign these characteristics to dimension.
Click Create and add a description of dimension. Once you assign all the characteristics and key figures, validate and activate the InfoCube.
SAP BPC - Security
Security in SAP BPC system is defined using two components − Authentication and Authorization. Authentication defines who can access system and data, while authorization tells the level of access for each authenticated user.
SAP BPC security is based on access profiles and task profiles. When you dont assign task profiles to users or teams, no access to BPC tasks will be provided. Thus you have to assign access to members of a secured dimension.
BPC Security provides the following key functions −
- Add Users
- Add Teams
- Add Task Profiles
- Add Member access profiles
To manage the above functions, login to BPC Administration and go to Security.
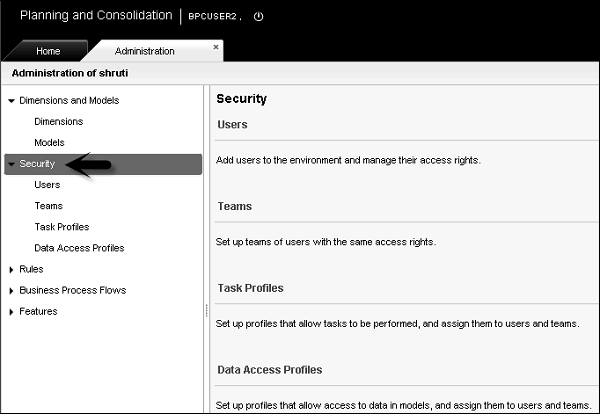
There are four tabs under Security −
Users − This is used to add users to the environment and manage access rights.
Teams − You can add users with the same access rights to the same team.
Task Profiles − This is used to set up profiles that allow tasks to be performed and assign them to users and teams.
Data Access Profiles − This is used to set up profiles that allow access to data in models and assign them to users and teams.
To Add/Edit/Delete any of the objects under Security, select the object as shown in the following screenshot.
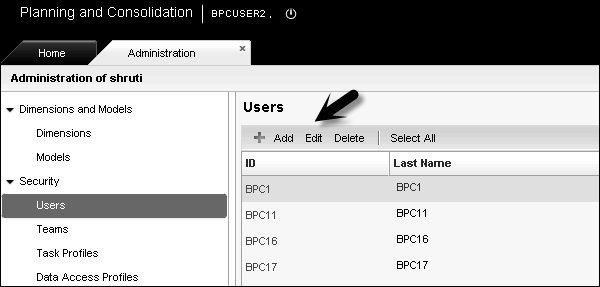
SAP BPC - Hot Analysis
Hot Analysis is used to set up hot link to another report or cell in another report. EvHOT functions are used by BPC Application Set and AP Shell to provide a sample report called Hot Analysis. Hot links are used by the users for ad hoc reporting and also used in the process selector reporting.
This is used to switch between reports that are in different applications.
EvHOT Function Syntax
EvHOT(AppName,ReportName,DisplayName,Member1,Member2,Member3,Member4, ., Member N)
You have to pass the following parameters in EvHOT function.
AppName − This is the name of application. Note that in BPC system there is a setting in Workbook Option, which allows the system to remember the current view. By default, this setting is disabled. In this case, if you switch to a new application using EvHOT, it changes the application in the current view of workbook and other reports that you access in this session tries to get data from that application.
If this option is enabled, current view will revert to the workbook's application setting when switching focus to it.
ReportName − This is the name of the report. The root directory for BPC reports is the Wizard directory for the given application.
When you create a report - use eTools → Save Template Library option.
DisplayName − The text the user clicks to go to the specified report location.
Member1-Member N − This represents the CurrentView member. Here you can mention as many number of members you want.
Example of EvHOT Syntax
EvHot("Finance","Report2","2010 Quarter 2","2010.Q2")
Note − This report should be stored in \Reports\Wizard folder. Exact path is Report Wizard folder −
..\Data\Webfolders\ApShellCopy\PLANNING\eExcel\Reports\Wizard
In case of a new report, you will also have to increase the template version in the BPC administration client.
SAP BPC - Park N Go
Using Park N Go feature, you can lock down a BPC report and save it locally on your system as well as send the report through email to someone who doesnt have access to BPC system.
If you dont save the report with correct setting or sequence, you get an error in the report that makes the report unusable. You can use Park n Go feature to work it correctly.
Following are the steps you should follow to use Park n Go −
Login to BPC Excel and open the report that you want to Park. Go to Save → Save my Reports.
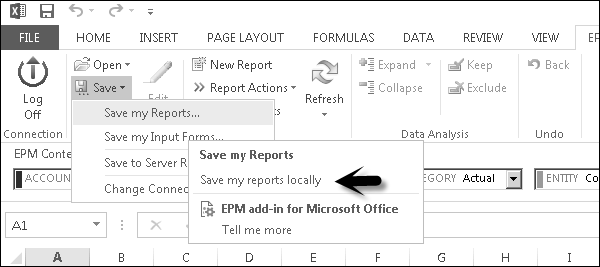
You will get a dialog box asking if you want to lock the report before saving it. Select Yes.

In the next window, you will get a message - Select a Park n Go state for active workbook with four options.
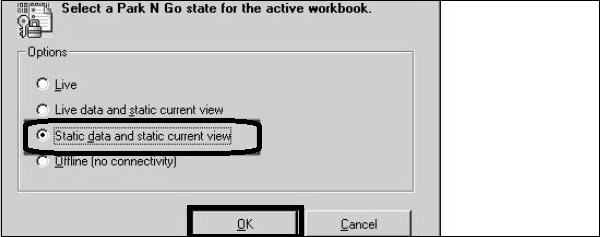
Once you click Ok, a report will flash and you will get an option Save As. You can save the Excel of report to the location where you want to save.
This option allows you to open the report in Excel and all the data will appear correctly in the report.
