- Python Forensics - Home
- Python Forensics - Introduction
- Python Forensics - Installation of Python
- Python Forensics - Overview of Python
- Python Forensics - Basic Forensic Application
- Python Forensics - Hash Function
- Python Forensics - Cracking an Encryption
- Python Forensics - Virtualization
- Python Forensics - Network Forensics
- Python Forensics - Python Modules
- Python Forensics - Dshell and Scapy
- Python Forensics - Searching
- Python Forensics - Indexing
- Python Forensics - Python Imaging Library
- Python Forensics - Mobile Forensics
- Python Forensics - Network Time Protocol
- Python Forensics - Multiprocessing Support
- Python Forensics - Memory & Forensics
- Python Forensics - Forensics in Linux
- Python Forensics - Indicators of Compromise
- Python Forensics - Implementation of Cloud
- Python Forensic Resources
- Python Forensics - Quick Guide
- Python Forensics - Useful Resources
- Python Forensics - Discussion
Python Forensic - Quick Guide
Python Forensic - Introduction
Python is a general-purpose programming language with easy, readable code that can be easily understood by both professional developers as well as novice programmers. Python comprises of many useful libraries that can be used with any stack framework. Many laboratories rely on Python to build basic models for predictions and to run experiments. It also helps to control critical operational systems.
Python has built-in capabilities to support digital investigation and protect the integrity of evidence during an investigation. In this tutorial, we will explain the fundamental concepts of applying Python in digital or computation forensics.
What is Computational Forensics?
Computational Forensics is an emerging research domain. It deals with solving forensic problems using digital methods. It uses computational science to study digital evidence.
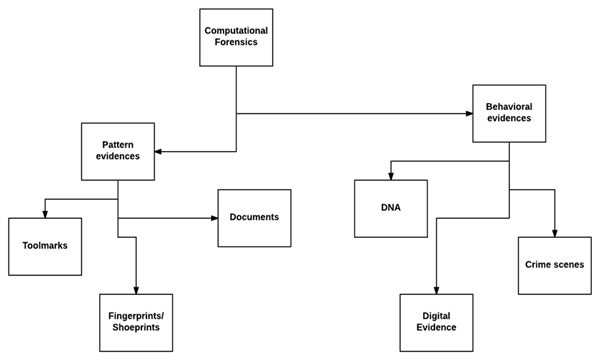
Computation Forensics includes a broad range of subjects which has objects, substances, and processes investigated, mainly based on pattern evidence, such as toolmarks, fingerprints, shoeprints, documents etc., and also includes physiological and behavioral patterns, DNA, and digital evidence at crime scenes.
The following diagram shows the broad range of subjects covered under Computational Forensics.
Computational forensics is implemented with the help of some algorithms. These algorithms are used for signal and image processing, computer vision and graphics. It also includes data mining, machine learning, and robotics.
Computational forensics involves diverse digital methods. The best solution to ease all digital methods in forensics is to use a general-purpose programming language like Python.
Python Forensic - Installation
To successfully create and run the example code in this tutorial we will need an environment set up which will have both general-purpose python as well as the special packages required for Data science. We will first look as installing the general-purpose python which can be python 2 or python 3. But we will prefer python 2 for this tutorial mainly because of its maturity and wider support of external packages.
Getting Python
The most up-to-date and current source code, binaries, documentation, news, etc., is available on the official website of Python https://www.python.org/
You can download Python documentation from https://www.python.org/doc/. The documentation is available in HTML, PDF, and PostScript formats.
Installing Python
Python distribution is available for a wide variety of platforms. You need to download only the binary code applicable for your platform and install Python.
If the binary code for your platform is not available, you need a C compiler to compile the source code manually. Compiling the source code offers more flexibility in terms of choice of features that you require in your installation.
Here is a quick overview of installing Python on various platforms −
Unix and Linux Installation
Here are the simple steps to install Python on Unix/Linux machine.
Open a Web browser and go to https://www.python.org/downloads/.
Follow the link to download zipped source code available for Unix/Linux.
Download and extract files.
Editing the Modules/Setup file if you want to customize some options.
run ./configure script
make
make install
This installs Python at standard location /usr/local/bin and its libraries at /usr/local/lib/pythonXX where XX is the version of Python.
Windows Installation
Here are the steps to install Python on Windows machine.
Open a Web browser and go to https://www.python.org/downloads/.
Follow the link for the Windows installer python-XYZ.msi file where XYZ is the version you need to install.
To use this installer python-XYZ.msi, the Windows system must support Microsoft Installer 2.0. Save the installer file to your local machine and then run it to find out if your machine supports MSI.
Run the downloaded file. This brings up the Python install wizard, which is really easy to use. Just accept the default settings, wait until the install is finished, and you are done.
Macintosh Installation
Recent Macs come with Python installed, but it may be several years out of date. See http://www.python.org/download/mac/ for instructions on getting the current version along with extra tools to support development on the Mac. For older Mac OS's before Mac OS X 10.3 (released in 2003), MacPython is available.
Jack Jansen maintains it and you can have full access to the entire documentation at his website − https://homepages.cwi.nl/~jack/macpython/index.html. You can find complete installation details for Mac OS installation.
Setting up PATH
Programs and other executable files can be in many directories, so operating systems provide a search path that lists the directories that the OS searches for executables.
The path is stored in an environment variable, which is a named string maintained by the operating system. This variable contains information available to the command shell and other programs.
The path variable is named as PATH in Unix or Path in Windows (Unix is case sensitive; Windows is not).
In Mac OS, the installer handles the path details. To invoke the Python interpreter from any particular directory, you must add the Python directory to your path.
Setting path at Unix/Linux
To add the Python directory to the path for a particular session in Unix −
In the csh shell − type setenv PATH "$PATH:/usr/local/bin/python" and press Enter.
In the bash shell (Linux) − type export ATH="$PATH:/usr/local/bin/python" and press Enter.
In the sh or ksh shell − type PATH="$PATH:/usr/local/bin/python" and press Enter.
Note − /usr/local/bin/python is the path of the Python directory
Setting path at Windows
To add the Python directory to the path for a particular session in Windows −
At the command prompt − type path %path%;C:\Python and press Enter.
Note − C:\Python is the path of the Python directory
Python Environment Variables
Here are important environment variables, which can be recognized by Python −
| Sr.No. | Variable & Description |
|---|---|
| 1 | PYTHONPATH It has a role similar to PATH. This variable tells the Python interpreter where to locate the module files imported into a program. It should include the Python source library directory and the directories containing Python source code. PYTHONPATH is sometimes preset by the Python installer. |
| 2 | PYTHONSTARTUP It contains the path of an initialization file containing Python source code. It is executed every time you start the interpreter. It is named as .pythonrc.py in Unix and it contains commands that load utilities or modify PYTHONPATH. |
| 3 | PYTHONCASEOK It is used in Windows to instruct Python to find the first case-insensitive match in an import statement. Set this variable to any value to activate it. |
| 4 | PYTHONHOME It is an alternative module search path. It is usually embedded in the PYTHONSTARTUP or PYTHONPATH directories to make switching module libraries easy. |
Running Python
There are three different ways to start Python −
Interactive Interpreter
You can start Python from Unix, DOS, or any other system that provides you a command-line interpreter or shell window.
Enter python the command line.
Start coding right away in the interactive interpreter.
$py # Unix/Linux
or
py% # Unix/Linux
or
C:> py # Windows/DOS
Here is the list of all the available command line options −
| Sr.No. | Option & Description |
|---|---|
| 1 | -d It provides debug output. |
| 2 | -O It generates optimized bytecode (resulting in .pyo files). |
| 3 | -S Do not run import site to look for Python paths on startup. |
| 4 | -v verbose output (detailed trace on import statements). |
| 5 | -X disable class-based built-in exceptions (just use strings); obsolete starting with version 1.6. |
| 6 | -c cmd run Python script sent in as cmd string |
| 7 | file run Python script from given file |
Script from the Command-line
A Python script can be executed at command line by invoking the interpreter on your application, as in the following −
$py script.py # Unix/Linux

or

py% script.py # Unix/Linux

or

C: >py script.py # Windows/DOS
Note − Be sure the file permission mode allows execution.
Integrated Development Environment
You can run Python from a Graphical User Interface (GUI) environment as well, if you have a GUI application on your system that supports Python.
Unix − IDLE is the very first Unix IDE for Python.
Windows − PythonWin is the first Windows interface for Python and is an IDE with a GUI.
Macintosh − The Macintosh version of Python along with the IDLE IDE is available from the main website, downloadable as either MacBinary or BinHex'd files.
The addition of other libraries will be discussed in each chapter as and when we need for their use in the python program.
Python Forensic - Overview
The codes written in Python look quite similar to the codes written in other conventional programming languages such as C or Pascal. It is also said that the syntax of Python is heavily borrowed from C. This includes many of the Python keywords which are similar to C language.
Python includes conditional and looping statements, which can be used to extract the data accurately for forensics. For flow control, it provides if/else, while, and a high-level for statement that loops over any "iterable" object.
if a < b:
   max = b
else:
   max = a
The major area where Python differs from other programming languages is in its use of dynamic typing. It uses variable names that refer to objects. These variables need not be declared.
Data Types
Python includes a set of built-in data types such as strings, Boolean, numbers, etc. There are also immutable types, which means the values which cannot be changed during the execution.
Python also has compound built-in data types that includes tuples which are immutable arrays, lists, and dictionaries which are hash tables. All of them are used in digital forensics to store values while gathering evidence.
Third-party Modules and Packages
Python supports groups of modules and/or packages which are also called third-party modules (related code grouped together in a single source file) used for organizing programs.
Python includes an extensive standard library, which is one of the main reasons for its popularity in computational forensics.
Life Cycle of Python Code
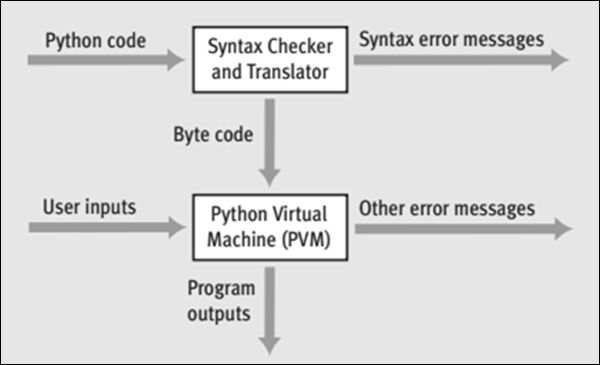
At first, when you execute a Python code, the interpreter checks the code for syntax errors. If the interpreter discovers any syntax errors, then they are displayed immediately as error messages.
If there are no syntax errors, then the code is compiled to produce a bytecode and sent to PVM (Python Virtual Machine).
The PVM checks the bytecode for any runtime or logical errors. In case the PVM finds any runtime errors, then they are reported immediately as error messages.
If the bytecode is error-free, then the code gets processed and you get its output.
The following illustration shows in a graphical manner how the Python code is first interpreted to produce a bytecode and how the bytecode gets processed by the PVM to produce the output.
Python Forensic - Basic Application
For creating an application as per the Forensic guidelines, it is important to understand and follow its naming conventions and patterns.
Naming Conventions
During the development of Python forensics applications, the rules and conventions to be followed are described in the following table.
| Constants | Uppercase with underscore separation | HIGH_TEMPERATURE |
| Local variable name | Lowercase with bumpy caps (underscores are optional) | currentTemperature |
| Global variable name | Prefix gl lowercase with bumpy caps (underscores are optional) | gl_maximumRecordedTemperature |
| Functions name | Uppercase with bumpy caps (underscores optional) with active voice | ConvertFarenheitToCentigrade(...) |
| Object name | Prefix ob_ lowercase with bumpy caps | ob_myTempRecorder |
| Module | An underscore followed by lowercase with bumpy caps | _tempRecorder |
| Class names | Prefix class_ then bumpy caps and keep brief | class_TempSystem |
Let us take a scenario to understand the importance of naming conventions in Computational Forensics. Suppose we have a hashing algorithm that is normally used for encrypting data. The one-way hashing algorithm takes input as a stream of binary data; this could be a password, a file, binary data, or any digital data. The hashing algorithm then produces a message digest (md) with respect to the data received in the input.
It is practically impossible to create a new binary input that will generate a given message digest. Even a single bit of the binary input data, if changed, will generate a unique message, which is different than the previous one.
Example - Creating a Message Digest
Take a look at the following sample program which follows the above-mentioned conventions.
main.py
import string, hashlib   # necessary libraries
data = b"Data to encode."
md5_object = hashlib.md5()
md5_object.update(data)
print(md5_object.hexdigest())   # Prints the output as per the hashing algorithm i.e. md5
Output
The above program produces the following output.
e15053688c28a9e3017bfe8adc906102
In this program, the Python script accepts the input (your full name) and converts it as per the md5 hashing algorithm. It encrypts the data and secures the information, if required. As per forensic guidelines, the name of evidences or any other proofs can be secured in this pattern.
Python Forensic - Hash Function
A hash function is defined as the function that maps on a large amount of data to a fixed value with a specified length. This function ensures that the same input results in the same output, which is actually defined as a hash sum. Hash sum includes a characteristic with specific information.
This function is practically impossible to revert. Thus, any third party attack like brute force attack is practically impossible. Also, this kind of algorithm is called one-way cryptographic algorithm.
An ideal cryptographic hash function has four main properties −
- It must be easy to compute the hash value for any given input.
- It must be infeasible to generate the original input from its hash.
- It must be infeasible to modify the input without changing the hash.
- It must be infeasible to find two different inputs with the same hash.
Flowchart
We have explained the logic of this program with the help of the following flowchart −
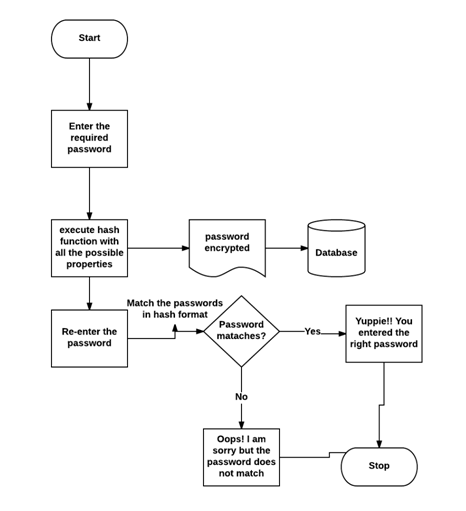
Example - Hashing and Matching Hashed Password
Consider the following example which helps in matching passwords using characters in hexadecimal format.
main.py
import uuid
import hashlib

def hash_password(password):
   # userid is used to generate a random number
   salt = uuid.uuid4().hex #salt is stored in hexadecimal value
   return hashlib.sha256(salt.encode() + password.encode()).hexdigest() + ':' + salt

def check_password(hashed_password, user_password):
   # hexdigest is used as an algorithm for storing passwords
   password, salt = hashed_password.split(':')
   return password == hashlib.sha256(salt.encode()
      + user_password.encode()).hexdigest()

new_pass = "password"
hashed_password = hash_password(new_pass)
print('The string to store in the db is: ' + hashed_password)
old_pass = "password"

if check_password(hashed_password, old_pass):
   print('Yuppie!! You entered the right password')
else:
   print('Oops! I am sorry but the password does not match')
Output
Our code will produce the following output −
The string to store in the db is:
ec12a7a80a11df221258c8c85650d6c45bc3f478fd34e5e067e50ab28a4b92da:dc1e5f7c95a14aa580c9204a1c3e7f8c
Yuppie!! You entered the right password
The password entered twice matches with the hash function. This ensures that the password entered twice is accurate, which helps in gathering useful data and save them in an encrypted format.
Python Forensic - Cracking an Encryption
In this chapter, we will learn about cracking a text data fetched during analysis and evidence.
A plain text in cryptography is some normal readable text, such as a message. A cipher text, on the other hand, is the output of an encryption algorithm fetched after you enter plain text.
Simple algorithm of how we turn a plain text message into a cipher text is the Caesar cipher, invented by Julius Caesar to keep the plain text secret from his enemies. This cipher involves shifting every letter in the message "forward" by three places in the alphabet.
Following is a demo illustration.
a → D
b → E
c → F
....
w → Z
x → A
y → B
z → C
Example - Getting all Possibilities of Characters
A message entered when you run a Python script gives all the possibilities of characters, which is used for pattern evidence.
The types of pattern evidences used are as follows −
- Tire Tracks and Marks
- Impressions
- Fingerprints
Every biometric data comprises of vector data, which we need to crack to gather full-proof evidence.
The following Python code shows how you can produce a cipher text from plain text −
def decrypt(k,cipher):
   plaintext = ''

   for each in cipher:
      p = (ord(each)-k) % 126

      if p < 32:
         p+=95
         plaintext += chr(p)
         print(plaintext)

def main():
   cipher = 'Sample'
   for i in range(1,95,1):
      decrypt(i,cipher)

if __name__ == "__main__":
   main()
Output
Now, check the output of this code. When we enter a simple text "Radhika", the program will produce the following cipher text.
~
}
|
{
z
...
Python Forensic - Virtualization
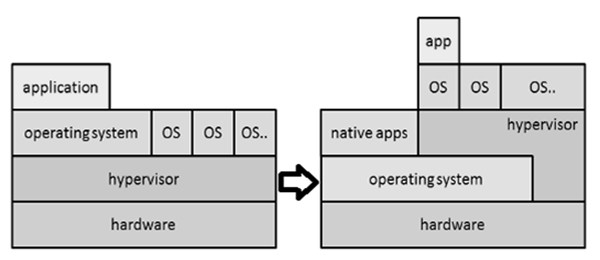
Virtualization is the process of emulating IT systems such as servers, workstations, networks, and storage. It is nothing but the creation of a virtual rather than actual version of any operating system, a server, a storage device or network processes.
The main component which helps in emulation of virtual hardware is defined as a hyper-visor.
The following figure explains the two main types of system virtualization used.
Virtualization has been used in computational forensics in a number of ways. It helps the analyst in such a way that the workstation can be used in a validated state for each investigation. Data recovery is possible by attaching the dd image of a drive as a secondary drive on a virtual machine particularly. The same machine can be used as a recovery software to gather the evidences.
The following example helps in understanding the creation of a virtual machine with the help of Python programming language.
Step 1 − Let the virtual machine be named 'dummy1'.
Every virtual machine must have 512 MB of memory in minimum capacity, expressed in bytes.
vm_memory = 512 * 1024 * 1024
Step 2 − The virtual machine must be attached to the default cluster, which has been calculated.
vm_cluster = api.clusters.get(name = "Default")
Step 3 − The virtual machine must boot from the virtual hard disk drive.
vm_os = params.OperatingSystem(boot = [params.Boot(dev = "hd")])
All the options are combined into a virtual machine parameter object, before using the add method of the vms collection to the virtual machine.
Example - Creating a Virtual Machine
Following is the complete Python script for adding a virtual machine.
main.py
from ovirtsdk.api import API #importing API library
from ovirtsdk.xml import params
try: #Api credentials is required for virtual machine
api = API(url = "https://HOST",
username = "Radhika",
password = "a@123",
ca_file = "ca.crt")
vm_name = "dummy1"
vm_memory = 512 * 1024 * 1024 #calculating the memory in bytes
vm_cluster = api.clusters.get(name = "Default")
vm_template = api.templates.get(name = "Blank")
#assigning the parameters to operating system
vm_os = params.OperatingSystem(boot = [params.Boot(dev = "hd")])
vm_params = params.VM(name = vm_name,
memory = vm_memory,
cluster = vm_cluster,
template = vm_template,
os = vm_os)
try:
api.vms.add(vm = vm_params)
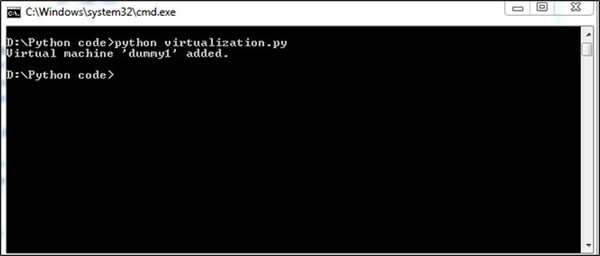
print("Virtual machine '%s' added." % vm_name) #output if it is successful.
except Exception as ex:
print("Adding virtual machine '%s' failed: %s" % (vm_name, ex))
api.disconnect()
except Exception as ex:
print("Unexpected error: %s" % ex)
Output
Our code will produce the following output −
Python Forensic - Network Forensics
The scenario of modern network environments is such that investigating can be fraught due to a number of difficulties. This can happen whether you are responding to a breach support, investigating insider activities, performing assessments related to vulnerability, or validating a regulatory compliance.
Concept of Network Programming
The following definitions are used in network programming.
Client − Client is a part of client-server architecture of network programming which runs on a personal computer and workstation.
Server − The server is a part of client-server architecture that provides services to other computer programs in the same or other computers.
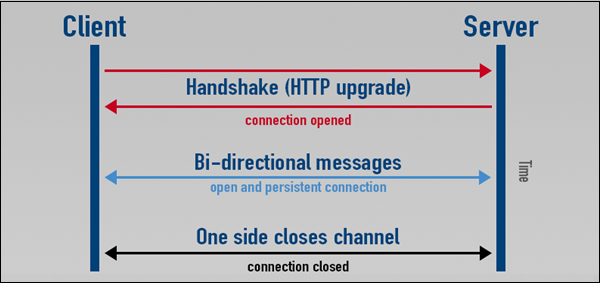
WebSockets − WebSockets provide a protocol between the client and the server, which runs over a persistent TCP connection. Through this, bi-directional messages can be sent between the TCP socket connection (simultaneously).
WebSockets come after many other technologies that allow the servers to send information to the client. Other than handshaking the Upgrade Header, WebSockets is independent from HTTP.
These protocols are used to validate the information which is sent or received by the third party users. As encryption is one of the methods used for securing messages, it is also important to secure the channel through which the messages have been transferred.
Consider the following Python program, which the client uses for handshaking.
Example - Creating a Server
The server accepting the request for communication channel will include the following script.
server.py
import socket
import time

# create a socket object
serversocket = socket.socket(socket.AF_INET, socket.SOCK_STREAM)

# get local machine name
host = socket.gethostname()
port = 8080

# bind to the port
serversocket.bind((host, port))

# queue up to 5 requests
serversocket.listen(5)

while True:
   # establish a connection
   clientsocket,addr = serversocket.accept()
   print("Got a connection from %s" % str(addr))
   currentTime = time.ctime(time.time()) + "\r\n"
   clientsocket.send(currentTime.encode('ascii'))
   clientsocket.close()
Output
Once you run the server, it will wait for client to connect and show log once a connection is requested.
(myenv) D:\Projects\python\myenv>py server.py
Got a connection from ('192.168.28.173', 57951)
client.py
import socket

# create a socket object
s = socket.socket(socket.AF_INET, socket.SOCK_STREAM)

# get local machine name
host = socket.gethostname()
port = 8080

# connection to hostname on the port.
s.connect((host, port))

# Receive no more than 1024 bytes
tm = s.recv(1024)
print("The client is waiting for connection")
s.close()
Output
It will produce the following output −
(myenv) D:\Projects\python\myenv>py client.py
The client is waiting for connection
The client and server created with the help of Python programming listen to the host number. Initially, the client sends a request to the server with respect to data sent in the host number and the server accepts the request and sends a response immediately. This way, we can have a secure channel of communication.
Python Forensic - Python Modules
Modules in Python programs help in organizing the code. They help in grouping related code into a single module, which makes it easier to understand and use. It includes arbitrarily named values, which can be used for binding and reference. In simple words, a module is a file consisting of Python code which includes functions, classes, and variables.
The Python code for a module (file) is saved with .py extension which is compiled as and when needed.
Example
support.py
def print_hello_func( par ):
   print "Hello : ", par
   return
Import Statement
The Python source file can be used as a module by executing an import statement which imports other packages or third-party libraries. The syntax used is as follows −
import module1[, module2[,... moduleN]
When the Python interpreter encounters the import statement, it imports the module specified which is present in the search path.
Example
Consider the following example.
main.py
#!/usr/bin/python
# Import module support
import support
# Now you can call defined function that module as follows
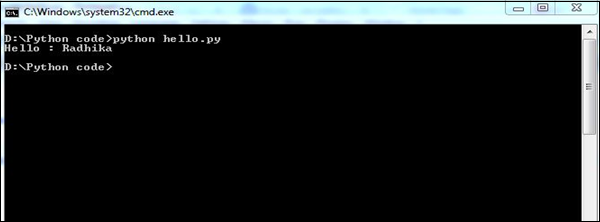
support.print_func("Radhika")
Output
It will produce the following output −
A module is loaded only once, regardless of the number of times it has been imported by Python code.
From...import statement
From attribute helps to import specific attributes from a module into a current namespace. Here is its syntax.
from modname import name1[, name2[, ... nameN]]
Example
To import the function fibonacci from the module fib, use the following statement.
from fib import fibonacci
Locating Modules
When the module is being imported, the Python interpreter searches for the following sequences −
The current directory.
If the module does not exist, Python then searches each directory in the shell variable PYTHONPATH.
If the shell variable location fails, Python checks the default path.
Computational forensics use Python modules and third-party modules to get the information and extract evidence with better ease. Further chapters focus on the implementation of modules to get the necessary output.
Python Forensic - Dshell and Scapy
DShell
Dshell is a Python-based network forensic analysis toolkit. This toolkit was developed by the US Army Research Laboratory. The release of this open source toolkit was in the year 2014. The major focus of this toolkit is to make forensic investigations with ease.
The toolkit consists of large number of decoders which are listed in the following table.
| Sr.No. | Decoder Name & Description |
|---|---|
| 1 | dns This is used to extract DNS related queries |
| 2 | reservedips Identifies the solutions for DNS problems |
| 3 | large-flows Listing of the netflows |
| 4 | rip-http It is used extract the files from the HTTP traffic |
| 5 | Protocols Used for identification of non-standard protocols |
The US Army Laboratory has maintained the clone repository in GitHub in the following link −
https://github.com/USArmyResearchLab/Dshell
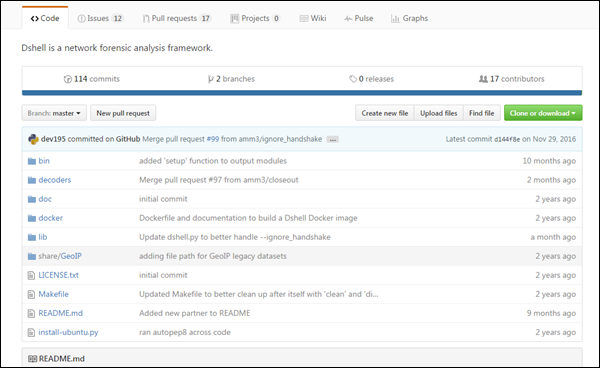
The clone consists of a script install-ubuntu.py () used for installation of this toolkit.
Once the installation is successful, it will automatically build the executables and dependencies that will be used later.
The dependencies are as follows −
dependencies = {
   "Crypto": "crypto",
   "dpkt": "dpkt",
   "IPy": "ipy",
   "pcap": "pypcap"
}
This toolkit can be used against the pcap (packet capture) files, which is usually recorded during the incidents or during the alert. These pcap files is either created by libpcap on Linux platform or WinPcap on Windows platform.
Scapy
Scapy is a Python-based tool used to analyze and manipulate the network traffic. Following is the link for Scapy toolkit −
This toolkit is used to analyze packet manipulation. It is very capable to decode packets of a wide number of protocols and capture them. Scapy differs from the Dshell toolkit by providing a detailed description to the investigator about network traffic. These descriptions have been recorded in real time.
Scapy has the ability to plot using third-party tools or OS fingerprinting.
Example - Usage of Scapy
Consider the following example.
main.py
import scapy, GeoIP #Imports scapy and GeoIP toolkit
from scapy import *
geoIp = GeoIP.new(GeoIP.GEOIP_MEMORY_CACHE) #locates the Geo IP address
def locatePackage(pkg):
src = pkg.getlayer(IP).src #gets source IP address
dst = pkg.getlayer(IP).dst #gets destination IP address
srcCountry = geoIp.country_code_by_addr(src) #gets Country details of source
dstCountry = geoIp.country_code_by_addr(dst) #gets country details of destination
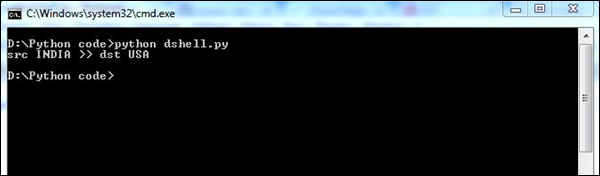
print src+"("+srcCountry+") >> "+dst+"("+dstCountry+")\n"
Output
This script gives the detailed description of the country details in the network packet, who are communicating with each other.
The above script will produce the following output.
Python Forensic - Searching
Searching is certainly one of the pillars of forensic investigation. Nowadays, search is only as good as the investigator who is running the evidence.
Searching a keyword from the message plays a vital role in forensics, when we search for an evidence with the help of a keyword. The knowledge of what is to be searched in a particular file along with the ones in deleted files requires both experience and knowledge.
Python has various built-in mechanisms with standard library modules to support search operation. Fundamentally, investigators use the search operation to find answers to questions such as "who", "what", "where", "when", etc.
Example - Usage of Find Function
In the following example, we have declared two strings and then, we have used the find function to check whether the first string contains the second string or not.
main.py
# Searching a particular word from a message
str1 = "This is a string example for Computational forensics of gathering evidence!";
str2 = "string";

print(str1.find(str2))
print(str1.find(str2, 10))
print(str1.find(str2, 40))
Output
The above script will produce the following output.
10
10
-1
find function in Python helps in searching a keyword in a message or a paragraph. This is critical in collecting appropriate evidence.
Python Forensic - Indexing
Indexing actually provides the investigator have a complete look at a file and gather potential evidence from it. The evidence could be contained within a file, a disk image, a memory snapshot, or a network trace.
Indexing helps in reducing time for time-consuming tasks such as keyword searching. Forensic investigation also involves interactive searching phase, where the index is used to rapidly locate keywords.
Indexing also helps in listing the keywords in a sorted list.
Example - Usage of Indexing
The following example shows how you can use indexing in Python.
main.py
aList = [123, 'sample', 'zara', 'indexing'];

print("Index for sample : ", aList.index('sample'))
print("Index for indexing : ", aList.index('indexing'))

str1 = "This is sample message for forensic investigation indexing";
str2 = "sample";

print("Index of the character keyword found is ")
print(str1.index(str2))
Output
The above script will produce the following output.
Index for sample :  1
Index for indexing :  3
Index of the character keyword found is
8
Python Forensic - Imaging Library
Extracting valuable information from the resources available is a vital part of digital forensics. Getting access to all the information available is essential for an investigation process as it helps in retrieving appropriate evidence.
Resources that contain data can be either simple data structures such as databases or complex data structures such as a JPEG image. Simple data structures can be easily accessed using simple desktop tools, while extracting information from complex data structures require sophisticated programming tools.
Python Imaging Library
The Python Imaging Library (PIL) adds image processing capabilities to your Python interpreter. This library supports many file formats, and provides powerful image processing and graphics capabilities. You can download the source files of PIL from − https://pillow.readthedocs.io/en/stable/
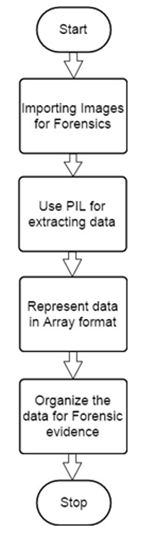
The following illustration shows the complete flow diagram of extracting data from images (complex data structures) in PIL.
Example - Loading Image data
Now, lets have a programming example to understand how it actually works.
Step 1 − Suppose we have the following image from where we need to extract information.

Step 2 − When we open this image using PIL, it will first note the necessary points required for extracting evidence, which includes various pixel values. Here is the code to open the image and record its pixel values −
main.py
from PIL import Image
im = Image.open('Capture.jpeg', 'r')
pix_val = list(im.getdata())
pix_val_flat = [x for sets in pix_val for x in sets]
print(pix_val_flat)
Output
Step 3 − Our code will produce the following output, after extracting the pixel values of the image.
[255, 255, 255 ...]
The output delivered represents the pixel values of RGB combination, which gives a better picture of what data is needed for evidence. The data fetched is represented in the form of an array.
Python Forensics - Mobile Forensics
Forensic investigation and analysis of standard computer hardware such as hard disks have developed into a stable discipline and is followed with the help of techniques to analyze non-standard hardware or transient evidence.
Although smartphones are increasingly being used in digital investigations, they are still considered as non-standard.
Forensic Analysis
Forensic investigations search for data such as received calls or dialed numbers from the smartphone. It can include text messages, photos, or any other incriminating evidence. Most smartphones have screen-locking features using passwords or alphanumeric characters.
Here, we will take an example to show how Python can help crack the screen-locking password to retrieve data from a smartphone.
Manual Examination
Android supports password lock with PIN number or alphanumeric password. The limit of both passphrases are required to be between 4 and 16 digits or characters. The password of a smartphone is stored in the Android system in a special file called password.key in /data/system.
Android stores a salted SHA1-hashsum and MD5-hashsum of the password. These passwords can be processed in the following code.
public byte[] passwordToHash(String password) {

   if (password == null) {
      return null;
   }

   String algo = null;
   byte[] hashed = null;

   try {
      byte[] saltedPassword = (password + getSalt()).getBytes();
      byte[] sha1 = MessageDigest.getInstance(algo = "SHA-1").digest(saltedPassword);
      byte[] md5 = MessageDigest.getInstance(algo = "MD5").digest(saltedPassword);
      hashed = (toHex(sha1) + toHex(md5)).getBytes();
   } catch (NoSuchAlgorithmException e) {
      Log.w(TAG, "Failed to encode string because of missing algorithm: " + algo);
   }

   return hashed;
}
It is not feasible to crack the password with the help of dictionary attack as the hashed password is stored in a salt file. This salt is a string of hexadecimal representation of a random integer of 64 bit. It is easy to access the salt by using Rooted Smartphone or JTAG Adapter.
Rooted Smartphone
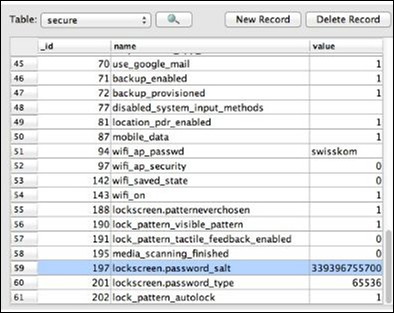
The dump of the file /data/system/password.key is stored in SQLite database under the lockscreen.password_salt key. Under settings.db, the password is stored and the value is clearly visible in the following screenshot.
JTAG Adapter
A special hardware known as JTAG (Joint Test Action Group) adapter can be used to access the salt. Similarly, a Riff-Box or a JIG-Adapter can also be used for the same functionality.
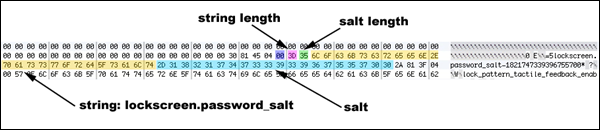
Using the information obtained from Riff-box, we can find the position of the encrypted data, i.e., the salt. Following are the rules −
Search for the associated string "lockscreen.password_salt."
The byte represents the actual width of the salt, which is its length.
This is the length which is actually searched for to get the stored password/pin of the smartphones.
These set of rules help in getting the appropriate salt data.
Python Forensic - Network Time Protocol
The most widely used protocol for synchronizing time and which has been widely accepted as a practice is done through Network Time Protocol (NTP).
NTP uses the User Datagram Protocol (UDP) which uses minimum time to communicate the packets between the server and the client who wish to synchronize with the given time source.
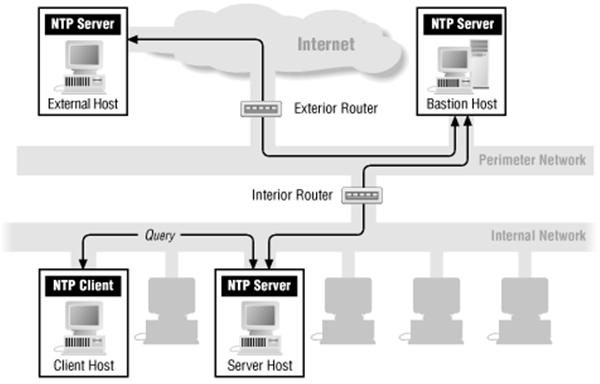
Features of Network Time Protocol are as follows −
The default server port is 123.
This protocol consists of many accessible time servers synchronized to national laboratories.
The NTP protocol standard is governed by the IETF and the Proposed Standard is RFC 5905, titled Network Time Protocol Version 4: Protocol and Algorithms Specification [NTP RFC]
Operating systems, programs, and applications use NTP to synchronize time in a proper way.
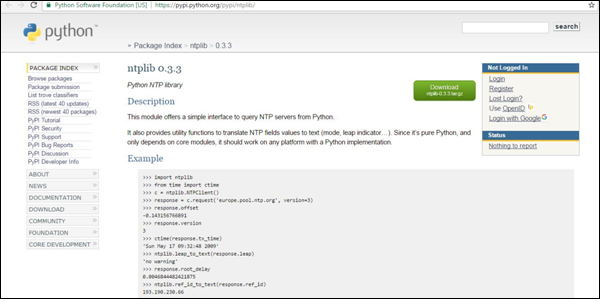
In this chapter, we will focus on the usage of NTP with Python, which is feasible from third-party Python Library ntplib. This library efficiently handles the heavy lifting, which compares the results to my local system clock.
Installing the NTP Library
The ntplib is available for download at https://pypi.python.org/pypi/ntplib/ as shown in the following figure.
The library provides a simple interface to NTP servers with the help of methods that can translate NTP protocol fields. This helps access other key values such as leap seconds.
Example - Using NTP
The following Python program helps in understanding the usage of NTP.
main.py
import ntplib
import time

NIST = 'nist1-macon.macon.ga.us'
ntp = ntplib.NTPClient()
ntpResponse = ntp.request(NIST)

if (ntpResponse):
   now = time.time()
   diff = now-ntpResponse.tx_time
   print diff;
Output
The above program will produce the following output.
2.01850914955
The difference in time is calculated in the above program. These calculations help in forensic investigations. The network data obtained is fundamentally different than the analysis of data found on the hard drive.
The difference in time zones or getting accurate time zones can help in gathering evidence for capturing the messages through this protocol.
Python Forensic - Multiprocessing Support
Forensic specialists normally find it difficult to apply digital solutions to analyze the mountains of digital evidence in common crimes. Most digital investigation tools are single threaded and they can execute only one command at a time.
In this chapter, we will focus on the multiprocessing capabilities of Python, which can relate to the common forensic challenges.
Multiprocessing
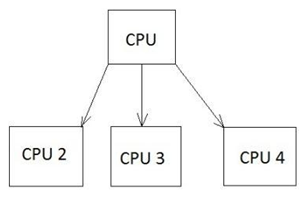
Multiprocessing is defined as the computer system's ability to support more than one process. The operating systems that support multiprocessing enable several programs to run concurrently.
There are various types of multiprocessing such as symmetric and asymmetric processing. The following diagram refers to a symmetric multiprocessing system which is usually followed in forensic investigation.
Example - Multiprocessing
The following code shows how different processes are listed internally in Python programming.
main.py
import random
import multiprocessing

def list_append(count, id, out_list):
   #appends the count of number of processes which takes place at a time
   for i in range(count):
      out_list.append(random.random())

if __name__ == "__main__":
   size = 999
   procs = 2
   # Create a list of jobs and then iterate through
   # the number of processes appending each process to
   # the job list
   jobs = []

   for i in range(0, procs):
      out_list = list() #list of processes
      process1 = multiprocessing.Process(
         target = list_append, args = (size, i, out_list))

   # appends the list of processes
   jobs.append(process1)

   # Calculate the random number of processes
   for j in jobs:
      j.start()  #initiate the process

   # After the processes have finished execution
   for j in jobs:
      j.join()
      print("List processing complete.")
Here, the function list_append() helps in listing the set of processes in the system.
Output
Our code will produce the following output −
List processing complete.
Python Forensic - Memory and Python Forensics
In this chapter, we will focus on investigating the volatile memory with the help of Volatility, a Python-based forensics framework applicable on the following platforms: Android and Linux.
Volatile Memory
Volatile memory is a type of storage where the contents get erased when the system's power is turned off or interrupted. RAM is the best example of a volatile memory. It means, if you were working on a document that has not been saved to a non-volatile memory, such as a hard drive, and the computer lost power, then all the data will be lost.
In general, volatile memory forensics follow the same pattern as other forensic investigations −
- Selecting the target of the investigation
- Acquiring forensic data
- Forensic analysis
The basic volatility plugins which are used for Android gathers RAM dump for analysis. Once the RAM dump is gathered for analysis, it is important to start hunting for malware in RAM.
YARA Rules
YARA is a popular tool which provides a robust language, is compatible with Perl-based Regular Expressions, and is used to examine the suspected files/directories and match strings.
In this section, we will use YARA based on the pattern matching implementation and combine them with utility power. The complete process will be beneficial for forensic analysis.
Example - Implementing YARA Rules
Consider the following code. This code helps in extracting the code.
main.py
import operator
import os
import sys

sys.path.insert(0, os.getcwd())
import plyara.interp as interp

# Plyara is a script that lexes and parses a file consisting of one more Yara
# rules into a python dictionary representation.
if __name__ == '__main__':
   file_to_analyze = sys.argv[1]
   rulesDict = interp.parseString(open(file_to_analyze).read())
   authors = {}
   imps = {}
   meta_keys = {}
   max_strings = []
   max_string_len = 0
   tags = {}
   rule_count = 0

   for rule in rulesDict:
      rule_count += 1

   # Imports
   if 'imports' in rule:
      for imp in rule['imports']:
         imp = imp.replace('"','')

         if imp in imps:
            imps[imp] += 1
         else:
            imps[imp] = 1
   # Tags
   if 'tags' in rule:
      for tag in rule['tags']:
         if tag in tags:
            tags[tag] += 1
         else:
            tags[tag] = 1

   # Metadata
   if 'metadata' in rule:
      for key in rule['metadata']:
         if key in meta_keys:
            meta_keys[key] += 1
         else:
            meta_keys[key] = 1

         if key in ['Author', 'author']:
            if rule['metadata'][key] in authors:
               authors[rule['metadata'][key]] += 1
            else:
               authors[rule['metadata'][key]] = 1

   #Strings
   if 'strings' in rule:
      for strr in rule['strings']:
         if len(strr['value']) > max_string_len:
            max_string_len = len(strr['value'])
            max_strings = [(rule['rule_name'], strr['name'], strr['value'])]
         elif len(strr['value']) == max_string_len:
            max_strings.append((rule['rule_name'], strr['key'], strr['value']))

   print("\nThe number of rules implemented" + str(rule_count))
   ordered_meta_keys = sorted(meta_keys.items(), key = operator.itemgetter(1),
      reverse = True)
   ordered_authors = sorted(authors.items(), key = operator.itemgetter(1),
      reverse = True)
   ordered_imps = sorted(imps.items(), key = operator.itemgetter(1), reverse = True)
   ordered_tags = sorted(tags.items(), key = operator.itemgetter(1), reverse = True)
Output
The above code will produce the following output.

The number of YARA rules implemented helps in giving a better picture of the suspected files. Indirectly, the list of suspected files help in gathering appropriate information for forensics.
Following is the source code in github: https://github.com/radhikascs/Python_yara
Python Forensic - Forensics in Linux
The major concern of digital investigations is to secure important evidences or data with encryption or any other format. The basic example is storing the passwords. It is therefore necessary to understand the usage of Linux operating system for digital forensic implementation to secure these valuable data.
Information for all the local users are mostly stored in the following two files −
- /etc/passwd
- etc/shadow
The first one is mandatory, which stores all the passwords. The second file is optional and it stores information about the local users including the hashed passwords.
Issues arise regarding the security issue of storing the password information in a file, which is readable by every user. Therefore, hashed passwords are stored in /etc/passwd, where the content is replaced by a special value "x".
The corresponding hashes have to be looked up in /etc/shadow. The settings in /etc/passwd may override the details in /etc/shadow.
Both the text files in Linux include one entry per line and the entry consists of multiple fields, separated by colons.
The format of /etc/passwd is as follows −
| Sr.No. | Field Name & Description |
|---|---|
| 1 | Username This field consists of the attributes of human-readable format |
| 2 | Password hash It consists of the password in an encoded form according to the Posix crypt function |
If the hash password is saved as empty, then the corresponding user will not require any password to log into the system. If this field contains a value that cannot be generated by the hash algorithm, such as an exclamation mark, then the user cannot log on using a password.
A user with a locked password can still log on using other authentication mechanisms, for example, SSH keys. As mentioned earlier, the special value "x" means that the password hash has to be found in the shadow file.
The password hash includes the following −
Encrypted salt − The encrypted salt helps maintain the screen locks, pins, and passwords.
Numerical user ID − This field denotes the ID of the user. The Linux kernel assigns this user ID to the system.
Numerical group ID − This field refers to the primary group of the user.
Home directory − The new processes are started with a reference of this directory.
Command shell − This optional field denotes the default shell that is to be started after a successful login to the system.
Digital forensics include collecting the information which is relevant to tracking an evidence. Hence, the user ids are useful in maintaining the records.
Using Python, all of this information can be automatically analyzed for the Indicators of Analysis, reconstructing the recent system activity. Tracking is simple and easy with the implementation of Linux Shell.
Example - Python Programming with Linux
main.py
import sys
import hashlib
import getpass

def main(argv):
   print('\nUser & Password Storage Program in Linux for forensic detection v.01\n')

   if input('The file ' + sys.argv[1] + ' will be erased or overwrite if
         it exists .\nDo you wish to continue (Y/n): ') not in ('Y','y') :
   sys.exit('\nChanges were not recorded\n')

   user_name = input('Please Enter a User Name: ')
   password = hashlib.sha224(getpass.getpass('Please Enter a Password:')).hexdigest()

   # Passwords which are hashed
   try:
      file_conn = open(sys.argv[1],'w')
      file_conn.write(user_name + '\n')
      file_conn.write(password + '\n')
      file_conn.close()
   except:
      sys.exit('There was a problem writing the passwords to file!')

if __name__ == "__main__":
   main(sys.argv[1:])
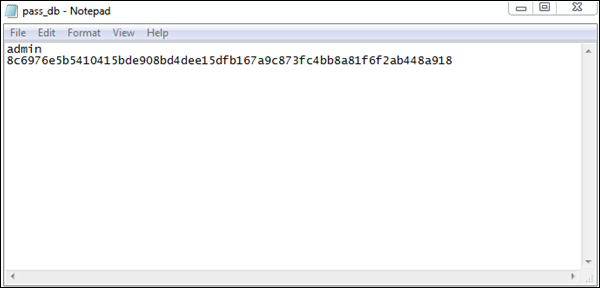
Output
The password is stored in a hexadecimal format in pass_db.txt as shown in the following screenshot. The text files are saved for further use in computational forensics.
Python Forensics - Indicators of Compromise
Indicators of Compromise (IOC) is defined as "pieces of forensic data, which includes data found in system log entries or files, that identify potentially malicious activity on a system or network."
By monitoring for IOC, organizations can detect attacks and act quickly to prevent such breaches from occurring or limit damages by stopping attacks in earlier stages.
There are some use-cases, which allow querying the forensic artifacts such as −
- Looking for a specific file by MD5
- Searching for a specific entity, which is actually stored in the memory
- Specific entry or set of entries, which is stored in Windows registry
The combination of all the above provides better results in searching artifacts. As mentioned above, Windows registry gives a perfect platform in generating and maintaining IOC, which directly helps in computational forensics.
Methodology
Look for the locations in the file system and specifically for now into Windows registry.
Search for the set of artifacts, which have been designed by forensic tools.
Look for the signs of any adverse activities.
Investigative Life Cycle
Investigative Life Cycle follows IOC and it searches for specific entries in a registry.
Stage 1: Initial Evidence − Evidence of the compromise is detected either on a host or on the network. The responders will investigate and identify the exact solution, which is a concrete forensic indicator.
Stage 2: Create IOCs for Host & Network − Following the data collected, the IOC is created, which is easily possible with Windows registry. The flexibility of OpenIOC gives limitless number of permutations on how an Indicator can be crafted.
Stage 3: Deploy IOCs in the Enterprise − Once the specified IOC has been created, the investigator will deploy these technologies with the help of API in Windows registers.
Stage 4: Identification of Suspects − The deployment of IOC helps in the identification of suspects in a normal way. Even additional systems will be identified.
Stage 5: Collect and Analyze Evidence − Evidences against the suspects are gathered and analyzed accordingly.
Stage 6: Refine & Create New IOCs − The investigative team can create new IOCs based of their evidences and data found in the enterprise and additional intelligence, and continue to refine their cycle.
The following illustration shows the phases of Investigative Life Cycle −

Python Forensic - Implementation of Cloud
Cloud computing can be defined as a collection of hosted services provided to users over the Internet. It enables organizations to consume or even compute the resource, which includes Virtual Machines (VMs), storage, or an application as a utility.
One of the most important advantages of building applications in Python programming language is that it includes the ability to deploy applications virtually on any platform, which includes cloud as well. It implies that Python can be executed on cloud servers and can also be launched on handy devices such as desktop, tablet, or smartphone.
One of the interesting perspectives is creating a cloud base with the generation of Rainbow tables. It helps in integrating single and multiprocessing versions of the application, which requires some considerations.
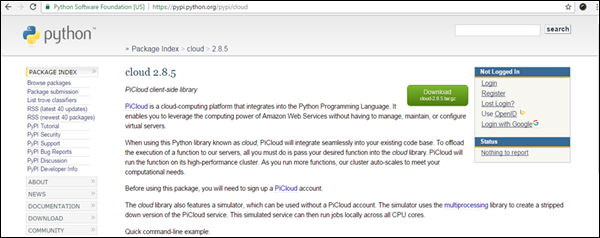
Pi Cloud
Pi Cloud is the cloud computing platform, which integrates Python programming language with the computing power of Amazon Web Services.
Lets take a look at an example of implementing Pi clouds with rainbow tables.
Rainbow Tables
A rainbow table is defined as a listing of all possible plain text permutations of encrypted passwords specific to a given hash algorithm.
Rainbow tables follow a standard pattern, which creates a list of hashed passwords.
A text file is used to generate passwords, which include characters or plain text of passwords to be encrypted.
The file is used by Pi cloud, which calls the main function to be stored.
The output of hashed passwords is stored in the text file as well.
This algorithm can be used to save passwords in the database as well and have a backup storage in the cloud system.
The following in-built program creates a list of encrypted passwords in a text file.
Example - Implementation of Cloud
main.py
import os
import random
import hashlib
import string
import enchant    #Rainbow tables with enchant
import cloud      #importing pi-cloud

def randomword(length):
   return ''.join(random.choice(string.lowercase) for i in range(length))

print('Author- Radhika Subramanian')

def mainroutine():
   engdict = enchant.Dict("en_US")
   fileb = open("password.txt","a+")

   # Capture the values from the text file named password
   while True:
      randomword0 = randomword(6)
      if engdict.check(randomword0) == True:
         randomkey0 = randomword0+str(random.randint(0,99))
      elif engdict.check(randomword0) == False:
         englist = engdict.suggest(randomword0)
         if len(englist) > 0:
            randomkey0 = englist[0]+str(random.randint(0,99))
         else:
            randomkey0 = randomword0+str(random.randint(0,99))

      randomword3 = randomword(5)
      if engdict.check(randomword3) == True:
         randomkey3 = randomword3+str(random.randint(0,99))
      elif engdict.check(randomword3) == False:
         englist = engdict.suggest(randomword3)
         if len(englist) > 0:
            randomkey3 = englist[0]+str(random.randint(0,99))
         else:
            randomkey3 = randomword3+str(random.randint(0,99))

      if 'randomkey0' and 'randomkey3' and 'randomkey1' in locals():
         whasher0 = hashlib.new("md5")
         whasher0.update(randomkey0)
         whasher3 = hashlib.new("md5")
         whasher3.update(randomkey3)
         whasher1 = hashlib.new("md5")
         whasher1.update(randomkey1)
         print(randomkey0+" + "+str(whasher0.hexdigest())+"\n")
         print(randomkey3+" + "+str(whasher3.hexdigest())+"\n")
         print(randomkey1+" + "+str(whasher1.hexdigest())+"\n")
         fileb.write(randomkey0+" + "+str(whasher0.hexdigest())+"\n")
         fileb.write(randomkey3+" + "+str(whasher3.hexdigest())+"\n")
         fileb.write(randomkey1+" + "+str(whasher1.hexdigest())+"\n")

jid = cloud.call(randomword)  #square(3) evaluated on PiCloud
cloud.result(jid)
print('Value added to cloud')
print('Password added')
mainroutine()
Output
This code will produce the following output −
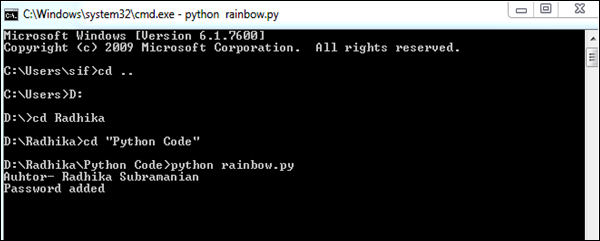
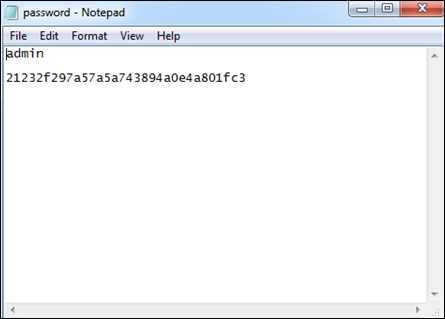
The passwords are stored in the text files, which is visible, as shown in the following screenshot.
Python Forensic - Implementation of Cloud
Cloud computing can be defined as a collection of hosted services provided to users over the Internet. It enables organizations to consume or even compute the resource, which includes Virtual Machines (VMs), storage, or an application as a utility.
One of the most important advantages of building applications in Python programming language is that it includes the ability to deploy applications virtually on any platform, which includes cloud as well. It implies that Python can be executed on cloud servers and can also be launched on handy devices such as desktop, tablet, or smartphone.
One of the interesting perspectives is creating a cloud base with the generation of Rainbow tables. It helps in integrating single and multiprocessing versions of the application, which requires some considerations.
Pi Cloud
Pi Cloud is the cloud computing platform, which integrates Python programming language with the computing power of Amazon Web Services.
Lets take a look at an example of implementing Pi clouds with rainbow tables.
Rainbow Tables
A rainbow table is defined as a listing of all possible plain text permutations of encrypted passwords specific to a given hash algorithm.
Rainbow tables follow a standard pattern, which creates a list of hashed passwords.
A text file is used to generate passwords, which include characters or plain text of passwords to be encrypted.
The file is used by Pi cloud, which calls the main function to be stored.
The output of hashed passwords is stored in the text file as well.
This algorithm can be used to save passwords in the database as well and have a backup storage in the cloud system.
The following in-built program creates a list of encrypted passwords in a text file.
Example - Implementation of Cloud
main.py
import os
import random
import hashlib
import string
import enchant    #Rainbow tables with enchant
import cloud      #importing pi-cloud

def randomword(length):
   return ''.join(random.choice(string.lowercase) for i in range(length))

print('Author- Radhika Subramanian')

def mainroutine():
   engdict = enchant.Dict("en_US")
   fileb = open("password.txt","a+")

   # Capture the values from the text file named password
   while True:
      randomword0 = randomword(6)
      if engdict.check(randomword0) == True:
         randomkey0 = randomword0+str(random.randint(0,99))
      elif engdict.check(randomword0) == False:
         englist = engdict.suggest(randomword0)
         if len(englist) > 0:
            randomkey0 = englist[0]+str(random.randint(0,99))
         else:
            randomkey0 = randomword0+str(random.randint(0,99))

      randomword3 = randomword(5)
      if engdict.check(randomword3) == True:
         randomkey3 = randomword3+str(random.randint(0,99))
      elif engdict.check(randomword3) == False:
         englist = engdict.suggest(randomword3)
         if len(englist) > 0:
            randomkey3 = englist[0]+str(random.randint(0,99))
         else:
            randomkey3 = randomword3+str(random.randint(0,99))

      if 'randomkey0' and 'randomkey3' and 'randomkey1' in locals():
         whasher0 = hashlib.new("md5")
         whasher0.update(randomkey0)
         whasher3 = hashlib.new("md5")
         whasher3.update(randomkey3)
         whasher1 = hashlib.new("md5")
         whasher1.update(randomkey1)
         print(randomkey0+" + "+str(whasher0.hexdigest())+"\n")
         print(randomkey3+" + "+str(whasher3.hexdigest())+"\n")
         print(randomkey1+" + "+str(whasher1.hexdigest())+"\n")
         fileb.write(randomkey0+" + "+str(whasher0.hexdigest())+"\n")
         fileb.write(randomkey3+" + "+str(whasher3.hexdigest())+"\n")
         fileb.write(randomkey1+" + "+str(whasher1.hexdigest())+"\n")

jid = cloud.call(randomword)  #square(3) evaluated on PiCloud
cloud.result(jid)
print('Value added to cloud')
print('Password added')
mainroutine()
Output
This code will produce the following output −
The passwords are stored in the text files, which is visible, as shown in the following screenshot.
