- Python - Home
- Python - Overview
- Python - History
- Python - Features
- Python vs C++
- Python - Hello World Program
- Python - Application Areas
- Python - Interpreter
- Python - Environment Setup
- Python - Virtual Environment
- Python - Basic Syntax
- Python - Variables
- Python - Private Variables
- Python - Data Types
- Python - Type Casting
- Python - Unicode System
- Python - Literals
- Python - Operators
- Python - Arithmetic Operators
- Python - Comparison Operators
- Python - Assignment Operators
- Python - Logical Operators
- Python - Bitwise Operators
- Python - Membership Operators
- Python - Identity Operators
- Python - Walrus Operator
- Python - Operator Precedence
- Python - Comments
- Python - User Input
- Python - Numbers
- Python - Booleans
- Python - Floating Points
- Python - Control Flow
- Python - Decision Making
- Python - If Statement
- Python - If else
- Python - Nested If
- Python - Conditional User Inputs
- Python - Match-Case Statement
- Python - Loops
- Python - for Loops
- Python - for-else Loops
- Python - While Loops
- Python - break Statement
- Python - continue Statement
- Python - pass Statement
- Python - Nested Loops
- Python Functions & Modules
- Python - Functions
- Python - Default Arguments
- Python - Keyword Arguments
- Python - Keyword-Only Arguments
- Python - Positional Arguments
- Python - Positional-Only Arguments
- Python - Arbitrary Arguments
- Python - Variables Scope
- Python - Function Annotations
- Python - Modules
- Python - Packing and Unpacking
- Python - Built in Functions
- Python Strings
- Python - Strings
- Python - Slicing Strings
- Python - Modify Strings
- Python - String Concatenation
- Python - String Formatting
- Python - Escape Characters
- Python - String Methods
- Python - String Exercises
- Python Lists
- Python - Lists
- Python - Access List Items
- Python - Change List Items
- Python - Add List Items
- Python - Remove List Items
- Python - Loop Lists
- Python - List Comprehension
- Python - Sort Lists
- Python - Copy Lists
- Python - Join Lists
- Python - List Methods
- Python - List Exercises
- Python Tuples
- Python - Tuples
- Python - Access Tuple Items
- Python - Update Tuples
- Python - Unpack Tuples
- Python - Loop Tuples
- Python - Join Tuples
- Python - Tuple Methods
- Python - Namedtuple
- Python - Tuple Exercises
- Python Sets
- Python - Sets
- Python - Access Set Items
- Python - Add Set Items
- Python - Remove Set Items
- Python - Loop Sets
- Python - Join Sets
- Python - Copy Sets
- Python - Set Operators
- Python - Set Methods
- Python - Set Exercises
- Python Dictionaries
- Python - Dictionaries
- Python - Access Dictionary Items
- Python - Change Dictionary Items
- Python - Add Dictionary Items
- Python - Remove Dictionary Items
- Python - Dictionary View Objects
- Python - Loop Dictionaries
- Python - Copy Dictionaries
- Python - Nested Dictionaries
- Python - Dictionary Methods
- Python - Dictionary Exercises
- Python Arrays
- Python - Arrays
- Python - Access Array Items
- Python - Add Array Items
- Python - Remove Array Items
- Python - Loop Arrays
- Python - Copy Arrays
- Python - Reverse Arrays
- Python - Sort Arrays
- Python - Join Arrays
- Python - Array Methods
- Python - Array Exercises
- Python File Handling
- Python - File Handling
- Python - Write to File
- Python - Read Files
- Python - Renaming and Deleting Files
- Python - Directories
- Python - File Methods
- Python - OS File/Directory Methods
- Python - OS Path Methods
- Object Oriented Programming
- Python - OOPs Concepts
- Python - Classes & Objects
- Python - Class Attributes
- Python - Class Methods
- Python - Static Methods
- Python - Constructors
- Python - Access Modifiers
- Python - Inheritance
- Python - Multiple Inheritance
- Python - Multilevel Inheritance
- Python - Polymorphism
- Python - Method Overriding
- Python - Method Overloading
- Python - Dynamic Binding
- Python - Dynamic Typing
- Python - Abstraction
- Python - Encapsulation
- Python - Interfaces
- Python - Packages
- Python - Inner Classes
- Python - Anonymous Class and Objects
- Python - Singleton Class
- Python - Wrapper Classes
- Python - Enums
- Python - Reflection
- Python - Data Classes
- Python Errors & Exceptions
- Python - Syntax Errors
- Python - Exceptions
- Python - try-except Block
- Python - try-finally Block
- Python - Raising Exceptions
- Python - Exception Chaining
- Python - Nested try Block
- Python - User-defined Exception
- Python - Logging
- Python - Assertions
- Python - Warnings
- Python - Built-in Exceptions
- Python - Debugger (PDB)
- Python Multithreading
- Python - Multithreading
- Python - Thread Life Cycle
- Python - Creating a Thread
- Python - Starting a Thread
- Python - Joining Threads
- Python - Naming Thread
- Python - Thread Scheduling
- Python - Thread Pools
- Python - Main Thread
- Python - Thread Priority
- Python - Daemon Threads
- Python - Synchronizing Threads
- Python Synchronization
- Python - Inter-thread Communication
- Python - Thread Deadlock
- Python - Interrupting a Thread
- Python Networking
- Python - Networking
- Python - Socket Programming
- Python - URL Processing
- Python - Generics
- Python Libraries
- NumPy Tutorial
- Pandas Tutorial
- SciPy Tutorial
- Matplotlib Tutorial
- Django Tutorial
- OpenCV Tutorial
- Python Miscellenous
- Python - Date & Time
- Python - Maths
- Python - Iterators
- Python - Generators
- Python - Generator Expressions
- Python - Lambda Expressions
- Python - Closures
- Python - Decorators
- Python - Recursion
- Python - Reg Expressions
- Python - PIP
- Python - Database Access
- Python - Weak References
- Python - Serialization
- Python - Templating
- Python - Output Formatting
- Python - Performance Measurement
- Python - Data Compression
- Python - CGI Programming
- Python - XML Processing
- Python - GUI Programming
- Python - Command-Line Arguments
- Python - Docstrings
- Python - JSON
- Python - Sending Email
- Python - Further Extensions
- Python - Tools/Utilities
- Python - Odds and Ends
- Python - GUIs
- Python Advanced Concepts
- Python - Abstract Base Classes
- Python - Custom Exceptions
- Python - Higher Order Functions
- Python - Object Internals
- Python - Memory Management
- Python - Metaclasses
- Python - Metaprogramming with Metaclasses
- Python - Mocking and Stubbing
- Python - Monkey Patching
- Python - Signal Handling
- Python - Type Hints
- Python - Automation Tutorial
- Python - Humanize Package
- Python - Context Managers
- Python - Coroutines
- Python - Descriptors
- Python - Diagnosing and Fixing Memory Leaks
- Python - Immutable Data Structures
- Python - Domain Specific Language (DSL)
- Python - Data Model
- Python Useful Resources
- Python - Questions & Answers
- Python - Interview Questions & Answers
- Python - Online Quiz
- Python - Quick Guide
- Python - Reference
- Python - Cheatsheet
- Python - Projects
- Python - Useful Resources
- Python - Discussion
- Python Compiler
- NumPy Compiler
- Matplotlib Compiler
- SciPy Compiler
Python - Virtual Environment
Python Virtual Environment
Python virtual environments create a virtual installation of Python inside a project directory. Users can then install and manage Python packages for each project. This allows users to be able to install packages and modify their Python environment without fear of breaking packages installed in other environments.
What is Virtual Environment in Python?
A Python virtual environment is:
- Considered as disposable.
- Used to contain a specific Python interpreter and software libraries and binaries which are needed to support a project.
- Contained in a directory, conventionally either named venv or .venv in the project directory.
- Not considered as movable or copyable.
When you install Python software on your computer, it is available for use from anywhere in the filesystem. This is a system-wide installation.
While developing an application in Python, one or more libraries may be required to be installed using the pip utility (e.g., pip3 install somelib). Moreover, an application (let us say App1) may require a particular version of the library − say somelib 1.0. At the same time another Python application (for example App2) may require newer version of same library say somelib 2.0. Hence by installing a new version, the functionality of App1 may be compromised because of conflict between two different versions of same library.
This conflict can be avoided by providing two isolated environments of Python in the same machine. These are called virtual environment. A virtual environment is a separate directory structure containing isolated installation having a local copy of Python interpreter, standard library and other modules.
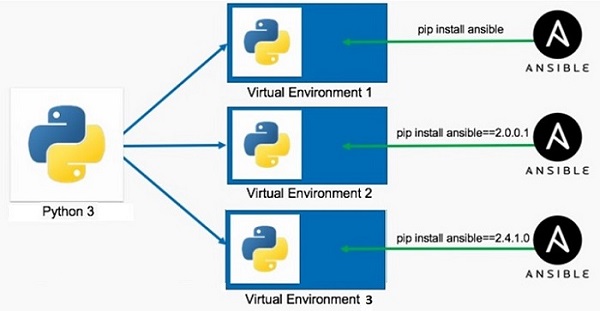
The following figure shows the purpose of advantage of using virtual environment. Using the global Python installation, more than one virtual environments are created, each having different version of the same library, so that conflict is avoided.
Creation of Virtual Environments in Python using venv
This functionality is supported by venv module in standard Python distribution. Use following commands to create a new virtual environment.
C:\Users\Acer>md\pythonapp
C:\Users\Acer>cd\pythonapp
C:\pythonapp>python -m venv myvenv
Here, myvenv is the folder in which a new Python virtual environment will be created showing following directory structure −
Directory of C:\pythonapp\myvenv
22-02-2023 09:53 <DIR> .
22-02-2023 09:53 <DIR> ..
22-02-2023 09:53 <DIR> Include
22-02-2023 09:53 <DIR> Lib
22-02-2023 09:53 77 pyvenv.cfg
22-02-2023 09:53 <DIR> Scripts
The utilities for activating and deactivating the virtual environment as well as the local copy of Python interpreter will be placed in the scripts folder.
Directory of C:\pythonapp\myvenv\scripts
22-02-2023 09:53 <DIR> .
22-02-2023 09:53 <DIR> ..
22-02-2023 09:53 2,063 activate
22-02-2023 09:53 992 activate.bat
22-02-2023 09:53 19,611 Activate.ps1
22-02-2023 09:53 393 deactivate.bat
22-02-2023 09:53 106,349 pip.exe
22-02-2023 09:53 106,349 pip3.10.exe
22-02-2023 09:53 106,349 pip3.exe
22-02-2023 09:53 242,408 python.exe
22-02-2023 09:53 232,688 pythonw.exe
Activating Virtual Environment
To enable this new virtual environment, execute activate.bat in Scripts folder.
C:\pythonapp>myvenv\scripts\activate
(myvenv) C:\pythonapp>
Note the name of the virtual environment in the parentheses. The Scripts folder contains a local copy of Python interpreter. You can start a Python session in this virtual environment.
Checking If Python is Running Inside a Virtual Environment?
To confirm whether this Python session is in virtual environment check the sys.path.
(myvenv) C:\pythonapp>python
Python 3.10.1 (tags/v3.10.1:2cd268a, Dec 6 2021, 19:10:37) [MSC v.1929
64 bit (AMD64)] on win32
Type "help", "copyright", "credits" or "license" for more information.
>>> import sys
>>> sys.path
['', 'C:\\Python310\\python310.zip', 'C:\\Python310\\DLLs',
'C:\\Python310\\lib', 'C:\\Python310', 'C:\\pythonapp\\myvenv',
'C:\\pythonapp\\myvenv\\lib\\site-packages']
>>>
The scripts folder of this virtual environment also contains pip utilities. If you install a package from PyPI, that package will be active only in current virtual environment.
Deactivating Virtual Environment
To deactivate this environment, run deactivate.bat.
