- Mobile Testing - Home
- Mobile Testing - Overview
- Mobile Testing - Platforms
- Mobile Testing - Device Types
- Native Vs Hybrid Vs Mobileweb
- Mobile Testing - Device Vs Application
- Emulator Vs Simulator
- Mobile Testing - Application
- Mobile Testing - UI
- Mobile Testing - Planning & Tools
- Hardware Perspective
- Mobile Device Testing - Types
- Mobile Testing - Framework Overview
- Mobile Testing - Android Frameworks
- Mobile Testing - IOS Frameworks
- Robotium Framework
- Selendroid Framework
- Mobile Testing - Appium Framework
- Mobile Testing - Zucchini Framework
Mobile Testing - Quick Guide
Mobile Testing - Overview
Before we start the actual tutorial, lets have some fun. Take a look at the following list. You can easily relate to these essential chores that we invariably have to face in todays busy and hectic lifestyle −
I want to pay my electricity bill.
I need to communicate with my manager and submit my reports urgently.
I want to buy new clothes for my kid, but I don't have the time to go to a store.
Oh...it's 10 PM; I am running late for my flight. Where is my cab?
I have been in this city for the first time; which hotel should I book?
Now answer yourself. What do you need to perform these activities in a fraction of second? The answer would be −
- A smartphone,
- Internet connectivity, and
- A mobile app to do the job.
This makes us realize the importance of a mobile app in todays era. Everything is being done in a smart way through your smart phone. Each day, we get to know about a new app or tool being launched to ease our life.
There is one well-known incidence about Gowalla. Millions of people enjoyed this location-based social network that started in 2007 and shuttered down five years later. Multiple problems blocked Gowalla from reaching mass appeal. One of the prime reasons that surfaced was Checking in was not that user friendly.
To have a successful mobile app, we need to understand that developing a nice mobile app is not the only requirement. A mobile app needs to be tested thoroughly in order to get the likability of users. After all, it is the user experience makes any software successful.
Mobile Testing - Platforms
Before jumping on to mobile testing, it's advisable to understand the basics of mobile platforms. It mainly includes the operating system of the mobile, type of the device, and type of the mobile app. Having sufficient knowledge about each of these will help us conduct robust test planning in the long run.
Mobile Operating Systems
The following table gives an overview of some of the popular mobile operating systems available in market −
| Operating System | Developed by | Popularity (Low, Medium, High) | Latest available version |
|---|---|---|---|
| Android | Google Inc | High | Lollipop, Android 5.0-5.1 |
| iOS | Apple Inc | High | iOS 8.X |
| Blackberry | Blackberry Ltd | Low | Blackberry 10.2.1 |
| Windows | Microsoft Inc | Medium | Windows 10 Mobile |
| Symbian | Symbian Foundation | Low | Discontinued |
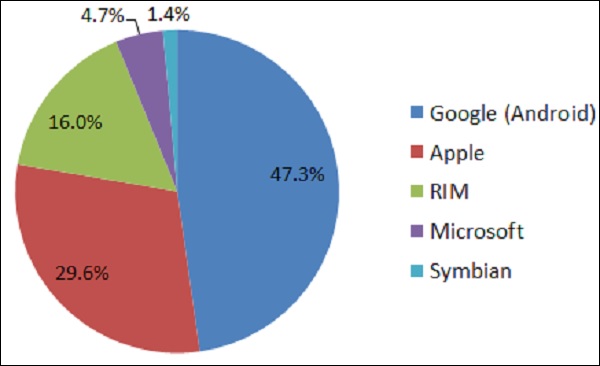
Based on some generic survey, the usage of different operating systems in the market can be depicted as shown below.
Mobile Testing - Device Types
Mobile devices are typically handheld computers. They have many variants based on their characteristics such as physical dimension, hardware and software capability, what are they meant for, etc.
Take a look at the following table. It differentiates tablets, e-book readers, and smartphones based on their characteristics.
| Device | Tablets | E-book Readers | Smartphones |
|---|---|---|---|
| What it is | Tablets are portable computer devices. Unlike traditional computers, they dont have keyboards or mouse, however the entire screen is touch sensitive. | E-book readersalso called e-readersare similar to tablet computers, except they are mainly designed for reading e-books (digital, downloadable books). | A smartphone is a powerful mobile phone that is designed to run a variety of applications in addition to providing phone service. |
| Used for | Almost all the jobs which we can do with traditional computers or desktops. | Reading e-books | Web browsing, watching videos, reading e-books, and playing games |
| Example | Samsung Tablets | Amazon Kindle, Barnes & Noble Nook. | Sony smartphones, Samsung smartphones, Apple iPhone. |
Native Vs Hybrid Vs Mobileweb
A critical factor that you have to consider while doing test planning is checking the Mobile Application type. You will mainly come across three types of mobile applications: Mobile Web, Native App, and Hybrid App. The classification is based on the development efforts and App redistribution strategy. Let's understand each of them in detail.
Mobile Web
Web apps are not real applications; they are actually websites that open in your smartphone with the help of a web browser. Mobile websites have the broadest audience of all the primary types of applications.
Example − Tutorials Point
Benefits −
Easy access.
Easy Development − Developing responsive design and restructuring the content to be properly displayed on a smaller screen/hardware will make any desktop website mobile friendly.
Easy update − Just update in one location and all the users automatically have access to the latest version of the site.
No installation required, as compared to native or hybrid app.
Downside −
Mobile websites cannot use some of the features. For example, access to the file system and local resources isnt available in websites.
Many existing websites dont support offline capabilities.
Users wont have the apps icon on their home screen as a constant reminder. The website needs to be opened in a web browser only.
While native and hybrid apps appear on the App Store and Google Play, web apps wont. So redistribution is not that sensible.
Native App
A native app is developed specifically for one platform. It can be installed through an application store (such as Google Play Store or Apples App Store).
Example − Whatsapp, Facebook.
Benefits −
Native Apps live on the device and are accessed through icons on the device home screen.
They can take full advantage of all the device features − they can use the camera, the GPS, the accelerometer, the compass, the list of contacts, and so on. They can also incorporate gestures (either standard operating-system gestures or new, and app-defined gestures).
Native apps can use the devices notification system and can work offline.
Publishers can make use of push-notifications, alerting users every time a new piece of content is published or when their attention is required.
Native Apps maintain UI design of each operating system, thus they offer the best user experience. For example, a Native App can have a left-aligned header in Android and a center-aligned header in iOS.
Redistribution is easy, as it is found in app store.
Downside −
High cost for building the app : Native apps developed for one platform will not run on another platform. An App built for Android will not run on iOS. We need to build a different App altogether for iOS. Because of this reason, we need to maintain multiple versions of the App.
Even though you might publish native Apps, youll want to keep the mobile website well maintained, as mobile brings more traffic. So maintenance is higher.
Hybrid App
Hybrid Apps are a way to expose content from existing websites in App format. They can be well described as a mixture of Web App and Native App.
Example − Instagram, Wikipedia.
Benefits −
Developing a Hybrid App is cheaper than developing a Native App. It can be built for cross-platforms, i.e., reduced cost for App development.
Maintenance is simple, as there are not many versions to be maintained.
It can take advantage of a few features available in the device.
It can be found in the App Store, which makes the distribution easy.
It has a browser embedded within the app only.
Downside −
Graphics are less accustomed with the operating system as compared to Native Apps.
Hybrid Apps are slower than Native Apps.
Mobile Testing - Device Vs Application
Device Testing
This type of testing is generally being done to ensure the quality of a mobile device. Testing includes hardware and software testing for a mobile. We will discuss here the different types of testing which are generally being carried out on a mobile devices.
Unit Testing
Unit testing is a test phase when portions of a mobile device development are tested, usually by the developer. It may contain hardware testing, software testing, and mechanical testing.
Factory Testing
Factory testing is a kind of sanity check on mobile devices. It is conducted automatically to verify that there are no defects brought by the manufacturing or assembling. It mainly includes the following testing −
- Mobile application testing
- Hardware testing
- Battery (charging) testing
- Signal receiving
- Network testing
- Protocol testing
- Mobile games testing
- Mobile software compatibility testing
Certification Testing
Certification testing is the check before a mobile device goes to the market.
Application Testing
Mobile application testing is a process by which application a software developed for handheld mobile devices is tested for its functionality, usability, and consistency. There are different types of testing which can be performed on a mobile device. For example,
- Functional Testing
- Laboratory Testing
- Performance Testing
- Memory Leakage Testing
- Interrupt Testing
- Usability testing
- Installation testing
- Certification Testing
- Security Testing
Key Points
Device testing is generally being carried out to check the mobile device itself, whereas Mobile application testing involves testing of an application which will be running on the chosen device.
When we call it device testing, hardware testing becomes a part of it. In case of mobile application testing, it depends, i.e., if the application under test requires hardware integration, then hardware testing will be involved.
Automation is possible for Mobile Device testing as well as for Mobile application testing.
Mobile Testing - Emulator Vs Simulator
One thing is self-explanatory in case of mobile testing. To perform mobile testing, you need a mobile device. This is to access that how our product will work and look like on a given mobile set.
Suppose we are developing an application for flight ticket booking system. Once the product is entirely developed, as a part of mobile testing, we need to check if the application is working as expected with all the majorly used devices like Android phones, iOS, Blackberry phones, and other different types of tablets and iPads.
To do this kind of check, we need to acquire each such device and then we can check if the application behaves as per expectation. Yes you thought right, as a product owner one will defiantly find this very expensive to procure such a large number of mobile devices and carry out testing. So is there any smart alternate available?
The solution to this problem is to use Mobile Simulators and Mobile Emulators. These are primarily software programs designed to provide simulation for important features of a smartphone. They are very similar in nature, so sometimes, they are used interchangeably.
Lets compare how testing on an Emulator/Simulator is different from testing on a real device −
| Real Device | Emulator / Simulator | |
|---|---|---|
| Price | Getting real devices will cost you a lot. | It is almost free, we just need to download and install them |
| Processing Speed | It has faster processing; however network latency may be normal. | It is slower as compared to actual devices. It has observed less latency than real devices connected to the local network or in the cloud. |
| Debugging | Debugging is not that easy. | It provides step-by-step debugging of an application. Also, it provides an efficient way for capturing screenshots. |
| Web-app Testing | Web applications can be tested in a normal way. | Testing a web application is much easier. |
| Reliability | Testing on a real device has a major advantage that it always gives accurate results. | It cannot simulate all types of user interactions; hence it may lead to false results sometimes. So it scores low when it comes to reliability. |
A simulator/emulator cannot mimic the following features −
- Mobile device battery
- Mobile devices camera
- Difficult to mimic interruptions like incoming calls and SMS.
- Not so much realistic simulation for mobile device memory usage.
Let us now understand more about mobile simulators and mobile emulators. There are specific differences between the two. The following table lists the major difference between a simulator and an emulator.
| Emulator | Simulator | |
|---|---|---|
| What it mimics |
Mobile device software Mobile device hardware Mobile operating system |
Internal behavior of the device. It does not mimic hardware. |
| How to get it | It is generally provided by the device manufacturer. | It is generally provided by the device manufacturer or some other company. |
| Internal structure | It is written in machine-level assembly language. | It is written in high-level language. |
| Debugging | It is more suitable for debugging. | It is not suitable for debugging purpose. |
| Performance | Emulators are really slow. Emulating the actual hardware usually makes the software run slower than it would natively. | Faster than emulators. |
| Example | Googles Android SDK | Apples iOS Simulator |
So, what is the best choice for mobile testing? Best practice indicates that, while actual development is in progress, we should use an emulator or a simulator. Before finalizing the product, there should be a sanity check with chosen real devices. For example, there is a huge number of Android smartphone users, so the smart choice is to have a sanity check for the latest Android device and regression can be conducted over simulators.
Mobile Testing - Application
A simple definition of mobile application testing would go like this Mobile application testing is a process by which an application software developed for handheld mobile devices is tested for its functionality, usability, and consistency. Mobile application testing can be automated or manual type of testing.
Note − For better understanding, we shall assume that we are testing a mobile application for online flight ticket booking system.
Functional Testing
Functional testing is the most basic test for any application to ensure that it is working as per the defined requirements. Similar to other user-interface based applications, mobile applications require a number of human interactions in user scenarios.
Example test scenarios −
Verify that flight availability is displayed for a chosen source destination on a selected date only.
Verify that past dates are not included in the search results.
Compatibility Testing
Compatibility testing has got the highest stack when it comes to mobile application testing. The purpose of a mobile app compatibility test, in general, is to ensure an apps key functions behave as expected on a specific device. The compatibility itself should only take a few minutes, and can be planned well in advance.
It is not going to be an easy task, deciding on which mobile devices compatibility tests should be performed (as testing with all available devices is merely impossible). So prepare a test matrix with every possible combination and get it prioritized by the client.
Example test scenarios −
- Verify that flight search is performed successfully with Android device.
- Verify that flight search is performed successfully for Apple iPad.
Localization Testing
Nowadays, most of the apps are designed for global use and it is very important to care about regional trails like languages, time zones, etc. Its important to validate the apps functionality when someone changes the time zone. It has to be taken into consideration that sometimes western designs may not work with the audience from eastern countries or vice-versa.
Example test scenarios −
Verify that there is no UI or data truncation issue when we use the mobile app with different languages (or say, non-English language).
Verify that time zone changes are handled gracefully for your mobile application.
Laboratory Testing
Laboratory testing, usually carried out by network carriers, is done by simulating the complete wireless network. This test is performed to find out any glitches when a mobile application uses voice and/or data connection to perform some functions.
Example test scenarios −
Verify that there is no glitch while a customer is having voice chat with the support staff.
Performance Testing
Mobile performance test covers client application performance, server performance, and network performance. It is important to make sure that the performance test scenarios cover all those areas. With the help of performance testing tools, it is not difficult to identify the existing networks, servers, and server-side application bottlenecks, given the predefined loads and transaction mix.
Example test scenarios −
Verify that flight available check takes only a reasonable amount of time.
Verify that while flight availability is being checked, the mobile operates normally and does not hang.
Stress Testing
Stress testing is a must to find exceptions, hangs, and deadlocks that may go unnoticed during functional and user interface testing. Here is a list of some of the criteria for stress testing −
Load your application with as much data as possible to try to reach its breaking point.
Perform the same operations over and over again.
Perform the repeated operations at varying speeds very quickly or very slowly.
Leave your application running for a long period of time, both interacting with the device and just letting it sit idle, or performing some automatic task that takes a long time, for example, a slideshow.
Randomly send screen taps and keystrokes to your application.
Have multiple applications running on your device so that you can switch between your application and other device applications often.
Example test scenarios −
- Check 1000 users are accessing the mobile app to search for domestic flights.
- Check 1000 users are accessing the mobile app to search for domestic flights.
Security Testing
Vulnerabilities to hacking, authentication, and authorization policies, data security, session management and other security standards should be verified as a part of mobile app security testing. Applications should encrypt user name and passwords when authenticating the user over a network.
One way to test security related scenarios is to route your mobiles data through a proxy server like OWASP Zed Attack Proxy and look for vulnerabilities.
Example test scenarios −
Verify that the application does not get operated with same user credentials on two different mobile devices.
Verify that a session automatically gets expired if it remains inactive for more than 15 minutes.
Memory Leakage Testing
Mobile devices have very limited memory as compared to other computers, and mobile operating systems have a default behavior to terminate applications that are using excessive memory and causing a poor user experience.
Memory testing is exceptionally important for mobile applications to ensure that each application maintains optimized memory usage throughout the user journey. It is recommended that we conduct memory testing on the actual target device, since the system architecture is different from an emulator to an actual device.
Example test scenarios −
Do flight availability checks ten times and note down increasing memory usage for each check.
Keep the application running for ten minutes and observe if memory usage remains stable.
Power Consumption Testing
There are several types of batteries used in different mobile devices (i.e. nickel cadmium/ lithium ion/ Nickel metal hybrid). While we focus on power consumption testing, we are required to measure the state of the battery at each activity level. It will give us a better understanding of power consumption by an individual application.
Power Consumption test can be done manually; also there are some free tools available in the market such as Trepn Profiler, Power Tutor, and Nokia Energy Profiler. These are applications which can display the real-time power consumption on a smartphone or tablet.
Example test scenarios −
Use the mobile app to search for flight availability, and check the power consumption remains minimal.
Keep the mobile app in ideal condition; verify that there is no power consumption when there is no activity happening for the app.
Interrupt Testing
An application, while functioning, may face several interruptions like incoming calls or network coverage outage and recovery. This can again be distinguished for −
- Incoming and Outgoing SMS and MMS
- Incoming and Outgoing calls
- Incoming Notifications
- Battery Removal
- Cable Insertion and Removal for data transfer
Example test scenarios −
Verify that flight availability check gets paused and resumed back after receiving an incoming call.
Verify that the user can reject a call while using the App and again resume the same App thereafter.
Usability Testing
Usability testing evaluates the application based on the following three criteria for the target audience −
Efficiency − The accuracy and completeness with which specified users can achieve specified goals in a particular environment.
Effectiveness − The resources expended in relation to the accuracy and completeness of goals achieved.
Satisfaction − The comfort and acceptability of the work system to its users and other people affected by its use.
It is very important to get usability testing in place from the early stage of the application design, and it should not be done only when the application is completed. Usability testing requires heavy involvement of users, and the output might affect the application design, which is very difficult to change in the later stages of the project.
Example test scenarios −
- Flight availability check should be on the home page.
- Sponsored advertisement should not be displayed in the middle of the content.
Installation Testing
Installation testing verifies that the installation process goes smoothly without the user having to face any difficulty.
Example test scenarios −
- Verify that the installation process is smooth and does not take long.
- Verify that the installation is successful through enterprise app store.
Uninstallation Testing
The basics of uninstallation testing can be summarized in one line as Uninstallation should sweep out data related to the App in just one go.
Example test scenarios −
Verify that all the application related files are removed successfully after uninstallation.
If it is an App which stores media files (like Whatsapp or Facebook), retain the files even after the uninstallation of the App.
Updates Testing
We need to be very much cautious about mobile app updates. People frequently complain about applications not working satisfactorily after an update. So it is very important that under the update testing, we qualify that the App will work as it was working previously. In a nutshell, it should not break anything. Mobile application updates can take place in two ways − Automatic update and Manual update.
Example test scenarios −
- Verify that the application works successfully after automatic update.
- Verify that the update progress is displayed properly.
Certification Testing
To get a certificate of compliance, each mobile device needs to be tested against the guidelines set by different mobile platforms.
Example test scenarios −
Verify that the application adheres to the policy of iOS phones when installed on iPhone.
Verify that the application adheres to the policy of Android phones when installed on Android.
Mobile Testing - UI
Suppose we are using a mobile application, and interestingly, you experience the following situation −
- Button alignment is missing.
- Text is getting trimmed.
- Calendar control is getting cut.
Indeed this is an unpleasant experience for any of the users. To make sure that we provide excellent experience to our users, Mobile UI Testing is highly recommended.
The first area to explore in your test plan is the user interface. It is your job as the tester to confirm that your application meets certain expectations, such as −
- Overall color scheme/theme of the device
- Style and color of icons
- Progress indicators when pages are loading
- Menus and how they are invoked and the typical items they contain
- Overall responsiveness of applications on this device
Lets discuss more on the basics of Mobile UI Testing.
Screen Orientation / Resolution
Web content needs to look and feel great across a wide variety of devices and network conditions. It's generally a good idea to test your webpage under the commonly used screen resolutions so that you can be sure that your page is usable.
If you have a multi-column layout, you may also want to check that your columns align correctly and are still viewable when your visitor has a lower resolution. It is also important to know the standard screen resolutions −
- 640 480
- 800 600
- 1024 768
- 1280 800
- 1366 768
- 1400 900
- 1680 1050
Available Tools
There are quite a few tools available in the market to make mobile UI testing smoother and simpler. For example −
- Google chrome extension
- Screenfly
- Browser Stack
Lets understand a little more about these tools and their usefulness.
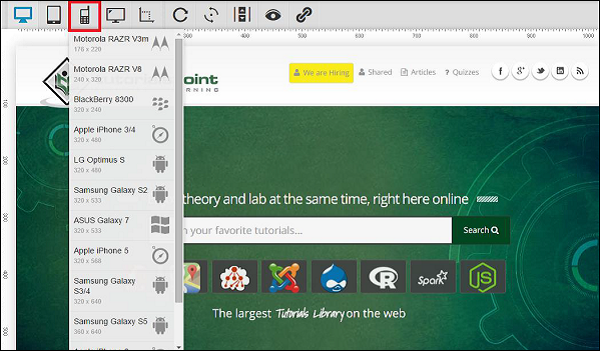
Google chrome extension
Its a free feature available with Google chrome web browser. We have given here a step-by-step explanation of how to test mobile web with Google Chrome Extension −
Step 1 − Open the website under testing in Google Chrome Web browser.
Step 2 − Press F12. It will open the Developer tool window, as shown in the following screenshot.
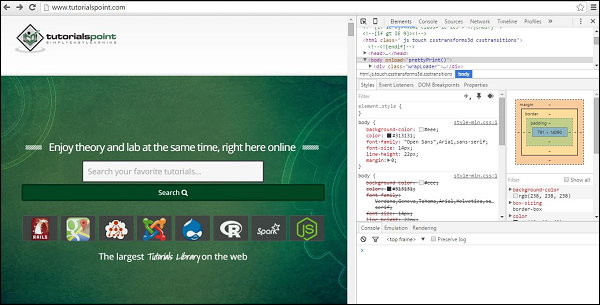
Step 3 − Click the mobile device like icon. Refer the following screenshot.
Step 4 − Select the mobile device with which you want to test the website. You can choose the different available devices in order to do the UI verification.

Screenfly
Screenfly is a free and easy-to-use tool. To use this, you just need to type in Quirktools in your web browser. You will see the following screen.
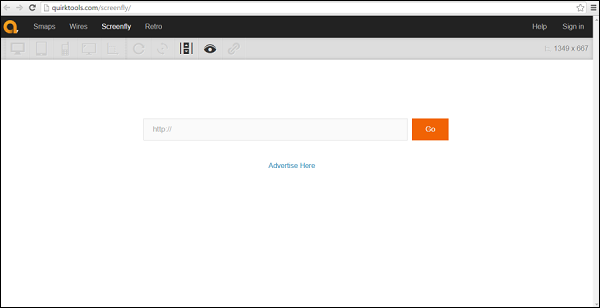
Enter the website under test and click Go. Select the mobile device in which you want to view the website.
BrowserStack
Its another great tool for performing mobile UI testing. It provides wonderful results. Although it is a paid tool, you can avail a free trail by registering on BrowserStack with a valid email address.
Touch Screens
Multi-Touch vs. Single Touch Screens
If your device and application support multi-touch features, like the pinch-to-zoom effect on iPhone, then make sure to include lots of test cases involving touching the screen in more than one place simultaneously, especially while typing on the soft keyboard.
Long Touch vs. Short Touch
While there is no concept of a double-click on touch screen devices (although there could be, if specifically implemented in your application), some devices, like Android smartphones, distinguish between long touches and short touches. Pressing and holding an item will bring up a context menu in the middle of the screen, while short-clicking the same item will automatically perform the first action in that context menu.
Button Size and Position
Ensure that buttons and icons are large enough and far enough from the edges of the screen to be easily clicked by a large fingertip.
Soft & Hard Keys
Soft Keyboards
Often, there are various special cases and corner cases that are important to the end-users.
Does the soft keyboard automatically appear if the user's main action is to enter some text?
Does the first layer of the soft keyboard include shortcut "@" and ".com" keys if the highlighted field is for entering email addresses?
Can the soft keyboard be dismissed and re-displayed easily?
Can the soft and hard keyboards be used interchangeably (if the device has both)?
Hard Keys
Make sure to include a lot of testing around the use of the device's available hard keys such as Start, Home, Menu, and Back. These should all interact with your application similarly to how they interact with the device's native applications.
Trackballs, Track wheels & Touchpads
If your device doesn't have a touch screen, it is even more important to verify that the screen navigation is as painless as possible for the user. In these cases, the user may rely on a trackball, track wheel, or touchpad to move from object to object.
Mobile Testing - Planning & Tools
Testing mobile devices such as phones, tablets, and eReaders requires special equipment and methodology. Since traditional desktop screen-capture software cannot adequately capture touch interactions, usability practitioners have been using strategically placed cameras to record usability test interactions on these mobile devices.
Preparing to Perform Mobile Device Testing
The methodologies and devices to facilitate usability testing on phones, tablets, and eReaders continue to develop. When planning mobile device testing, you should keep in mind the following points −
Your timeframe and budget. Having a good understanding of the timeframe and the budget will help you determine which processes and equipment will work best based your needs.
The physical setup of the space and how you will capture the test. This may range from a lower-fidelity arrangement to using a specialized platform and camera device and/or maybe using an eye-tracking software.
Your target audience and devices. Use web analytics to check how many mobile users visit the site, which device they use, and their operating system. Understanding this information will help you to know which devices to test.
Another important aspect to cover after test planning is test device management. In a large organization, handling mobile device testing needs a smart way to secure organizations confidential data. To do this, you will need a security software. In the following section, we will understand more on device management tools.
Device Management Tools
Mobile device management (MDM) is a type of security software used in IT to monitor, manage, and secure employees' mobile devices that are deployed across multiple mobile service providers and across multiple mobile operating systems being used in the organization.
MDM is often combined with additional security services and tools such as Mobile Application Management to create a complete mobile device and security Enterprise Mobility Management solution.
There are many tools available in market to do this job. The following table provides an overview of some of the popular tools and their features.
| Products | BlackBerry MDM | Citrix MDM | Dell MDM | IBM MDM | MobileIron MDM | SOTI MDM |
|---|---|---|---|---|---|---|
| Android | 2.3+ | Yes | Yes | Yes | 2.3 through current | Yes |
| iOS | 5.0+ | Yes | Yes | Yes | 4.0 through current | Yes |
| Windows Phone | No for BES10 (WP 8+ for BES12) | Yes | Yes | Yes | 7 through current | Yes |
| BlackBerry | Yes, BBOS, BlackBerry 10 | Yes | No | Yes | 10 (through ActiveSync) | No |
| Symbian | No | Yes | No | Yes | No | No |
| Windows OS | No | Yes | Yes | Yes | 8.1 RT/Pro | No |
| Mac OSX | No | Coming soon | Yes | Yes | Lion, Mountain Lion | Yes |
| Other | No | Windows Mobile | None | Office 365, Gmail, Lotus | None | Windows Mobile, CE, Embedded |
| Configure/disable WiFi | Yes | Yes | Yes | Yes | Yes | Yes |
| Device Encryption | Yes | Yes | Yes, device type dependent | Yes | Yes | Yes |
| Email Encryption | Yes | Yes | Yes, device type dependent | Yes | Yes | Yes |
| Multifactor authentication | Yes | Yes | No | Yes | Yes | Yes |
| Malware detection | No | No | No | Yes | Yes with partner integration | Yes |
| Firewall | Yes | No | No | Yes | Yes with partner integration | Yes |
| Separate User Data from Corporate Data | Yes | Yes | Yes | Yes | Yes | Yes |
Mobile Testing - Hardware Perspective
Before we move ahead with actual mobile device testing, it is very important to have an insight into the mobile device hardware architecture. This will help us in better test planning when we actually jump into mobile device/mobile device application testing. Lets take a look at the different characteristics of mobile device hardware.
Hardware Components
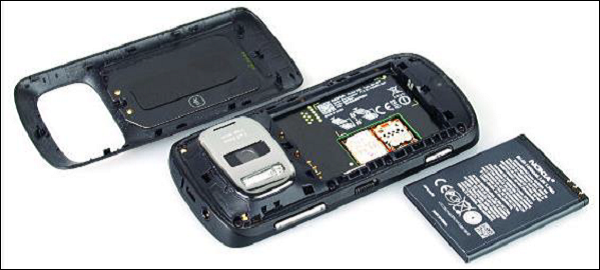
If you take any cellphone, mostly it will comprise of the following parts.
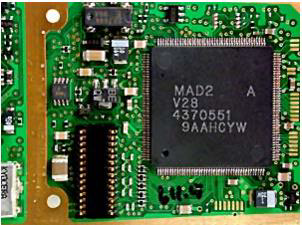
Circuit Board
It can be regarded as the brain of the phone that controls all its activities.
Touch screen display
Touchscreens are a vital component of smartphones. Touchscreens recognize where on the screen you have placed your finger or stylus and communicates the co-ordinates to the phone CPU accordingly.
There are two popular types of touchscreens −
Resistive Touchscreen − It has two layers (separated by a miniscule gap) which form an overlay over the screen. When a finger is placed on any point on the screen, the two form a contact and the co-ordinates are obtained. These are relatively inexpensive and are rightly found on most budget phones. The downside is that a certain amount of pressure is required to register a touch. As time goes by, some degree of damage does occur to the screen.
Capacitive Touchscreen − It has the entire screen coated with a capacitive substance which holds a certain amount of electrical charge. When a conducting object like a finger is placed on the screen, there is a change in capacitance on that point and thus the coordinates are obtained. Capacitive touchscreens dont respond well in cold climates where the human finger doesnt cause a change in capacitance, thus a stylus is recommended for such scenarios. Then there are multi-touch touchscreens wherein almost all fingers can be pinpointed accurately. This has led to an increase in the number of gestures that one can perform on a touchscreen.
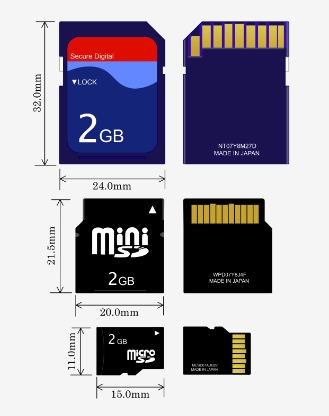
Memory Card
Memory cards come in different sizes and capacities. They are used widely as a data storage device to store digital information.
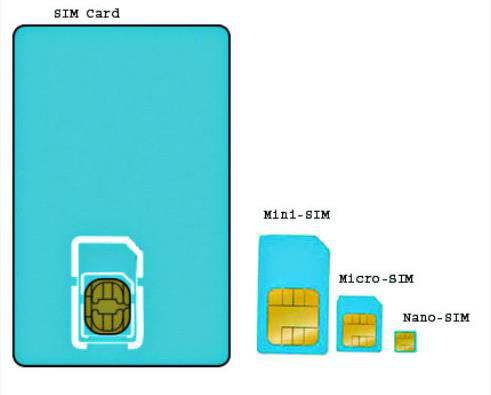
SIM Card
A SIM card provides personal mobility so that the user can have access to all subscribed services irrespective of both the location of the terminal and the use of a specific terminal. You need to insert the SIM card into another GSM cellular phone to receive calls at that phone, make calls from that phone, or receive other subscribed services.
Battery
Smartphones run on a variety of different batteries depending on the phones manufacturer, its dimensions and features. For those who depend heavily on their smartphones, it is important that the batteries are as long lasting as possible. This eliminates the need to recharge them frequently, and makes it less likely that they will run out of charge when they are most needed.
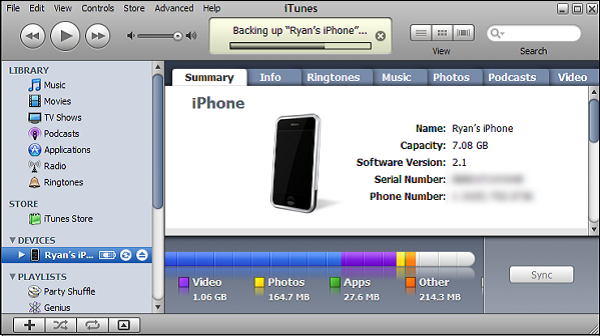
UDID for iOS
Each iPhone or iPod Touch has a Unique Device Identifier (UDID), which is a sequence of 40 letters and numbers that is specific to your device. It's like a serial number but much harder to guess. It will look something like this − 2b6f0cc904d137be2e1730235f5664094b831186.
How to find you UUID?
- Connect your iOS device to your computer.
- Open iTunes.
- In iTunes, click on the devices name under Devices in the column on the left.
- Click once on the serial number of the device in the windows main section.
- The serial number should then change to the devices UDID.
Provision Profile for iOS
A provisioning profile is a collection of digital entities that uniquely ties developers and devices to an authorized iPhone Development Team and enables a device to be used for testing. A Development Provisioning Profile must be installed on each device on which you wish to run your application code.
How to create a provision profile for iOS?
Run Google Chrome, Mozilla Firefox or Safari.
In the iOS Dev. Center, click Certificates, Identifiers & Profiles.
In the iOS Apps panel, click Provisioning Profiles.
Click +.
Select iOS App Development and click Continue.
Select an App ID to associate with the provisioning profile and click Continue.
To be able to use one development provisioning profile across multiple apps, select a wildcard App ID, if available.
Select one or more certificates for development to include in the provisioning profile and click Continue.
Only certificates for development are listed.
Select one or more devices to include in the provisioning profile and click Continue.
Enter a name for the profile and click Generate.
(Optional) Click Download to download the provisioning profile.
How to add your provisioning profile in AppBuilder?
Click the cogwheel icon and select Options.
Select iOS → Provisioning Profiles.
Click Import.
Browse to the location where the mobile provision file for your provisioning profile is stored, select it and confirm the import.
Device Options & Preferences
You can specify a device preference (Mobile or All) for any text, dynamic search, image, or display ad.
If an ad group has both mobile-preferred and regular ads, only mobile-preferred ads serve on mobile devices, and only regular ads serve on computers and tablets.
In the type list, select Ads and Extensions and choose the type of ad youd like to update. Select one or more ads. Under "Device preference" on the edit panel, select Mobile or All.
Mobile Device Testing - Types
Lets look into the details of different types of testing that we can perform on the mobile devices.
Network Connections
The following table provides a checklist of network connection tests that can be performed for a mobile device.
| Sr.No. | Description |
|---|---|
| 1 | Does the app behave according to specification if connected to the internet through Wi-Fi? |
| 2 | Does the app behave according to specification if connected to the internet through 3G? |
| 3 | Does the app behave according to specification if connected to the internet through 2G? |
| 4 | Does the app behave according to specification of the app is out of network reach? |
| 5 | Does the app resume working when it gets back into the network reach from outside reach of the network? |
| 6 | Update transactions are processed correctly after re-establishing connection. |
| 7 | Does the app still work correctly when tethering or otherwise connected to another device? |
| 8 | What happens if the app switches between networks (Wi-Fi, 3G, 2G)? |
| 9 | Does the app use standard network ports (Mail: 25, 143, 465, 993 or 995 HTTP: 80 or 443 SFTP: 22) to connect to remote services, as some providers block certain ports. |
SD Card Interactions
The following table provides a checklist of checking premiere functions of the SD card interaction with a mobile phone.
| Sr.No. | Description |
|---|---|
| 1 | Can the app be installed on the device? |
| 2 | Does the app behave as designed/desired if there is an incoming call? |
| 3 | Does the app behave as designed/desired if there is an incoming SMS? |
| 4 | Does the app behave as designed/desired if the charger is connected? |
| 5 | Does the app behave as designed/desired if the charger is disconnected? |
| 6 | Does the app behave as designed/desired if the device goes to sleeping mode |
| 7 | Does the app behave as designed/desired if the device resumes from sleeping mode |
| 8 | Does the app behave as designed/desired if the device resumes from lock screen? |
| 9 | Does the app behave as designed/desired if the device is tilted? |
| 10 | Does the app behave as designed/desired if the device is shaken? |
| 11 | Does the app behave as designed/desired if a local message is coming from another app (think of: calendar reminders, to-do task etc.)? |
| 12 | Does the app behave as designed/desired if a push message is coming from another app (think of: twitter mentions, Whatsapp message, wordfeud invitation, etc.). |
| 13 | Does the app interact with the GPS sensor correctly (switch on/off, retrieve GPS data)? |
| 14 | Is the functionality of all the buttons or keys on the device defined for this app? |
| 15 | Verify that buttons or keys which have no defined function have no unexpected behaviour on the app when activating. |
| 16 | In case theres a true back button available on the device does the back button take the user to the previous screen? |
| 17 | In case theres a true menu button available on the device, does the menu button show the apps menu? |
| 18 | In case theres a true home button available on the device, does the home button get the user back to the home screen of the device? |
| 19 | In case theres a true search button available on the device, does this get the user to some form of search within the app? |
| 20 | Does the app behave as designed/desired if the Battery low message is pushed |
| 21 | Does the app behave as designed/desired if the sound on the device is turned off? |
| 22 | Does the app behave as designed/desired if the device is in airplane mode? |
| 23 | Can the app be de-installed from the device? |
| 24 | Does the application function as expected after re-installation? |
| 25 | Can the app be found in the app store? (Check after go-live) |
| 26 | Can the app switch to different apps on the device through multitasking as designed/desired? |
| 27 | Are all touch screen positions (buttons) working when a screen protector is used. |
Bluetooth Testing
Bluetooth devices can communicate only within the radius of the 10 meters. Such devices can be keyboards, the mouse, wireless headphones, etc. The following table provides a checklist of Bluetooth tests that can be performed −
| Sr.No. | Description |
|---|---|
| 1 | User can able to search all available devices on the range. |
| 2 | Both data and voice transmissions can be sent through the use of short range networks. |
| 3 | Both data and voice transmissions can be received through the use of short range networks. |
| 4 | User can able to disconnect any time. |
| 5 | While closing Bluetooth ask to disconnect the present connections. |
| 6 | Bluetooth maximum range is 10 meters. |
| 7 | Through mobile phone, you can send pictures, videos, exchange business cards and also transfer files to your PC. |
| 8 | (Device paired) this is a message used to confirm that a user has successfully paired two Bluetooth devices. |
| 9 | Non-discoverable mode, a device that will not respond to discovery requests. |
| 10 | Non-discoverable mode, a device that will not respond to discovery requests. |
| 11 | Non-pairable mode, a device that will not accept pairing is said to be in non-pairable mode. |
| 12 | Passkey, a passkey is a user-defined password needed to connect to a device from any other device. It is strongly advised to use passkeys wherever possible to avoid unauthorized access to your Bluetooth devices. |
| 13 | Authentication − The process of verifying the identity of the other end of a communications link. In Bluetooth technology this is achieved by the authentication process based on passkeys and pairing. |
| 14 | Devices not found, this is an error message which may appear if a search for other devices in range does not find anything. |
| 15 | Idle Mode, a device is in idle mode when it has no established links with other devices. In this mode a device may discover other devices. |
| 16 | Known Device testing, a device which is already known about by another device. Either the devices have been paired in the past or some information of the known devices is stored. |
Wi-Fi Testing
Testing your mobile phone WiFi connection is a great way to make sure your Internet is operating at the speed promised by your service provider, but you arent limited to running those tests on your desktop computer. Mobile phone WiFi testing is a perfect way to test the power of your WiFi signal at various places in your home or office. Given below is the Wifi testing checklist for a mobile device.
| Sr.No. | Description |
|---|---|
| 1 | Does the app behave according to specification if connected to the internet through Wi-Fi? |
| 2 | Does the app behave according to specification of the app is out of network reach? |
| 3 | Does the app resume working when it gets back into network reach from outside reach of the network? |
| 4 | What happens if the app switches between networks (Wi-Fi, 3G, 2G) |
| 5 | Does the app use standard network ports (Mail: 25, 143, 465, 993 or 995 HTTP: 80 or 443 SFTP: 22) to connect to remote services, as some providers block certain ports. |
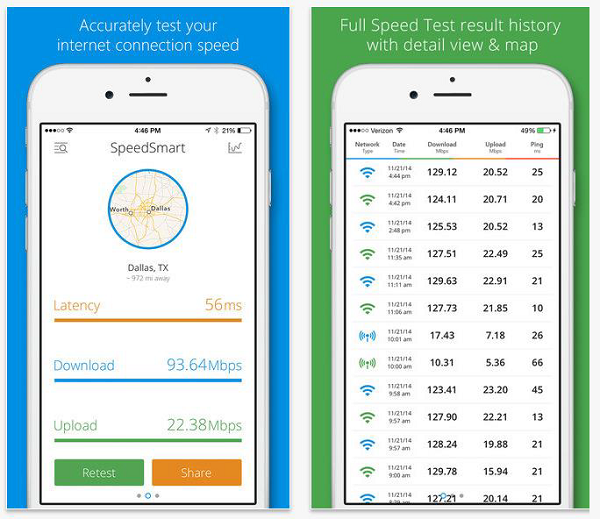
How to Run a Mobile Phone WiFi Speed Test on your Smartphone
Running a WiFi speed test on your smartphone is a simple task. Most convenient are the speed tests that run in your smartphones mobile web browser. Just follow the simple on-screen prompts to begin the test. If the online test doesnt save your results, take a screenshot after the finished test to provide a history.
Some tests are available as apps for both the iOS and Android platforms. To use these, download the app you want. Then follow the instructions to run the test and save your result.
Tools to Perform Speed Test
Speed Test SpeedSmart WiFi & Mobile Network Speedtest − It is compatible with Apple iPhone and iPad. It is a paid application. SpeedSmart is the ultimate iOS speed test utility for evaluating your cellular (3G, 4G, and LTE) and Wi-Fi connection on all your iOS devices. A global server network and a smart speed test method ensure accurate results.
WiFi Speed Test − It is compatible with Android phones. It is a paid tool. With this tool, you can test the speed of your local (LAN) network. Testing can be done on wireless (WiFi) or wired network.
Localization & Globalization
Please see the checklist below to have an idea about localization and globalization testing for a mobile device.
| Sr.No. | Description |
|---|---|
| 1 | Text is translated. |
| 2 | Translations meet the standards of native speakers with respect to grammar and accuracy of terminology. |
| 3 | Dialog boxes are properly resized and dialog text is hyphenated according to the rules of the user interface language. |
| 4 | Translated dialog boxes, status bars, toolbars, and menus fit on the screen at different resolutions. They do not wrap and are not cut off. |
| 5 | Menu and dialog accelerators are unique. |
| 6 | Visual layout is consistent with the native edition's layout. For example, dialog elements are in the proper tab order. |
Database Testing
There are different ways you can store data in Mobile Apps. In case of Android, you may choose to store your data over server, shared Preferences or SQLite.
SQLite is a lightweight database which is commonly used in Android and other operating systems as well. In order to view data in SQLite, you may need to root the device or you can use emulators for testing. There are some tools in Android Playstore which would help you extract data from this database.
The following types of tests should form a part of your mobile database testing −
- Database validation testing.
- Database integration testing.
- Database performance testing.
- Procedure and function testing.
- Trigger testing.
- CRUD (Create/Read/Update/Delete) operations testing to make sure they will work on the database.
- Testing that the database changes are shown correctly on the UI of the app.
- Search and indexing function testing.
Recovery Testing
Recovery testing is used to ensure that operations can be continued after a disaster. Recovery testing not only verifies the recovery process, but also the effectiveness of the component parts of that process.
Recovery testing is the activity of testing how well an application is able to recover from crashes, hardware failures, and other similar problems. Given below is the checklist for Recoverability testing.
| Sr.No | Description |
|---|---|
| 1 | Adequate backup data is preserved. |
| 2 | Backup data is stored in a secure location. |
| 3 | Recovery procedures are documented. |
| 4 | All media file has been recovered from the restore point |
| 5 | All contacts have been recovered |
| 6 | All the applications has been restored successfully |
Concurrency Testing
We generally take the help of concurrent testing to make sure that multiple users can concurrently access a program at the same time. While applying concurrency testing for a mobile device, as such there will be only single user. So it eliminates the need of concurrency testing for a mobile device.
Usability Testing
Generally you get a rig where mobile phone and a web cam can be adjusted to record the usability assessment session.

There are tools available like Applause. They provide a targeted group of survey participants who are handpicked to test your app. What separates Applause from other such services is that you can have a consultation with an expert at Applause, who then chooses the ideal participants based on the consultation.
Given below is the general checklist for GUI testing.
| Sr.No. | Description |
|---|---|
| 1 | Can the app be installed on the device? |
| 2 | Does the app behave as designed/desired if there is an incoming call? |
| 3 | Does the app behave as designed/desired if there is an incoming SMS? |
| 4 | Does the app behave as designed/desired if the charger is connected? |
| 5 | Does the app behave as designed/desired if the charger is disconnected? |
| 6 | Does the app behave as designed/desired if the device goes to sleeping mode. |
| 7 | Does the app behave as designed/desired if the device resumes from sleeping mode. |
| 8 | Does the app behave as designed/desired if the device resumes from lock screen? |
| 9 | Does the app behave as designed/desired if the device is tilted? |
| 10 | Does the app behave as designed/desired if the device is shaken? |
| 11 | Does the app behave as designed/desired if a local message is coming from another app (think of: calendar reminders, to-do task etc.). |
| 12 | Does the app behave as designed/desired if a push message is coming from another app (think of: twitter mentions, Whatsapp message, etc.). |
| 13 | Does the app interact with the GPS sensor correctly (switch on/off, retrieve GPS data)? |
| 14 | Is the functionality of all the buttons or keys on the device defined for this app? |
| 15 | Verify that buttons or keys which have no defined function have no unexpected behaviour on the app when activating. |
| 16 | In case theres a true back button available on the device does the back button take the user to the previous screen? |
| 17 | In case theres a true menu button available on the device, does the menu button show the apps menu? |
| 18 | In case theres a true home button available on the device, does the home button get the user back to the home screen of the device? |
| 19 | In case theres a true search button available on the device, does this get the user to some form of search within the app? |
| 20 | Does the app behave as designed/desired if the Battery low message is pushed |
| 21 | Does the app behave as designed/desired if the sound on the device is turned off? |
| 22 | Does the app behave as designed/desired if the device is in airplane mode? |
| 23 | Can the app be de-installed from the device? |
| 24 | Does the application function as expected after re-installation? |
| 25 | Can the app be found in the app store? (Check after go-live) |
| 26 | Can the app switch to different apps on the device through multitasking as designed/desired? |
| 27 | Are all touch screen positions (buttons) working when a screen protector is used. |
Mobile Testing - Frameworks Overview
A testing framework or more specifically a testing automation framework is an execution environment to perform automated tests. It is the overall system in which the tests will be automated. It is defined as the set of assumptions, concepts, and practices that constitute a work platform or support for automated testing.
A testing framework is responsible for −
- Defining the format in which to express expectations
- Creating a mechanism to hook into or drive the application under test
- Executing the tests and reporting the results
Framework Architecture
The general architecture of a testing framework is as follows −
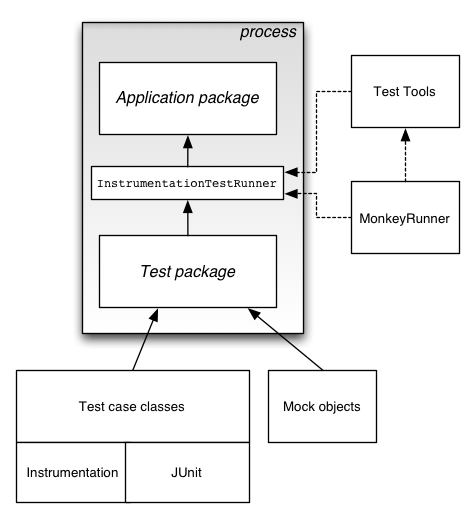
For mobile testing automation, we need a good mobile automation testing framework. On the top of that framework, we can build our test cases. Mobile automation testing frameworks can be segregated by the operating system of the mobile device. In the following chapters, we will discuss two types of mobile testing frameworks: Android testing frameworks and iOS testing frameworks.
Mobile Testing - Android Frameworks
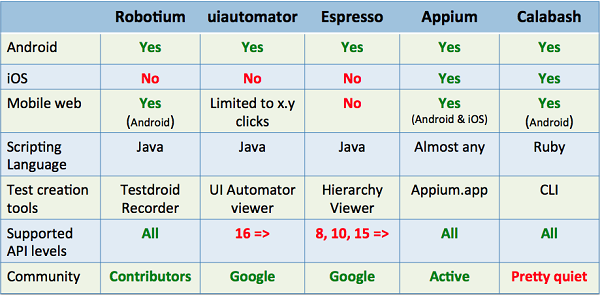
There are many Android testing frameworks available in the market. Lets take a look at the top 5 on the stack.
Robotium − Robotium is an open-source test framework for developing functional, system and acceptance test scenarios. It is very similar to Selenium.
UIAutomator − UIAutomator is a test framework by Google that provides advance UI testing of native Android apps and games. It has a Java library containing API to create functional UI tests and also an execution engine to run the tests.
Appium − Appium is an open-source test automation framework to test native and hybrid apps and mobile web apps. Appium library functions inside the framework make calls to the Appium server running in the background which operates the connected device.
Calabash − Calabash is a functional testing framework that can be used for both iOS and Android functional testing. On paper, it must be one of the easiest frameworks to use and even non-developers should be able to create functional tests using it.
Selendroid − Selendroid is a relatively new kid on the block and can be used to functionally test your Android applications. Apparently, if you are used to Selenium, Selendroid should be an easy way to use your knowledge to create your functional tests for Android.
Mobile Testing - IOS Frameworks
Like Android testing frameworks, there are many iOS testing frameworks available in the market. Here we will talk about a few popular ones.
Appium − Appium is an open-source test automation framework to test native and hybrid apps and mobile web apps. Appium library functions inside the framework make calls to the Appium server running in background which operates the connected device.
Calabash − Calabash is a functional testing framework that can be used for both iOS and Android functional testing. On paper, it must be one of the easiest frameworks to use and even non-developers should be able to create functional tests using it.
Zucchini − Zucchini is an open-source visual functional testing framework for iOS applications based on Apple UIAutomation.
UI Automation − For your more typical functional tests (or black-box tests), in which youre going to write code that simulates an end-user navigating your app, there is UI Automation. UI Automation is provided by Apple and is the Apple-sanctioned way of performing iOS functional testing.
FRANK BDD for iOS − If you want to do end-to-end testing in iOS and wish you could use BDD and Cucumber, no worries theres a tool called Frank that will allow you to create acceptance tests and requirements using Cucumber.
Comparison between different testing frameworks
Mobile Testing - Robotium Framework
Robotium is an open-source test framework for writing automatic gray-box testing cases for Android applications. With the support of Robotium, test case developers can write function, system and acceptance test scenarios, spanning multiple Android activities.
Robotium can be used both for testing applications where the source code is available and applications where only the APK file is available.
Benefits of Robotium
Easy to write, shorter code. Minimal time needed to write solid test cases.
You can develop powerful test cases, with minimal knowledge of the application under test.
The framework handles multiple Android activities automatically. Readability of test cases is greatly improved, compared to standard instrumentation tests.
Automatic timing and delays.
Automatically follows current Activity.
Automatically finds Views.
Automatically makes its own decisions (ex: When to scroll, etc.)
No modification to Android platform.
Test execution is fast.
Test cases are more robust due to the run-time binding to GUI components.
Integrates smoothly with Maven or Ant.
Drawbacks of Robotium
Robotium cannot handle Flash or Web components.
It handles only one application at a time.
It cannot simulate clicking on soft keyboard using Robotium (need to use enterText() to enter text into an EditText field)
Robotium cannot interact with Status Bar Notifications − that is, pull down the Notification area and click on a specified Notification.
Can be a bit slow, especially running on older devices.
How to Use Robotium
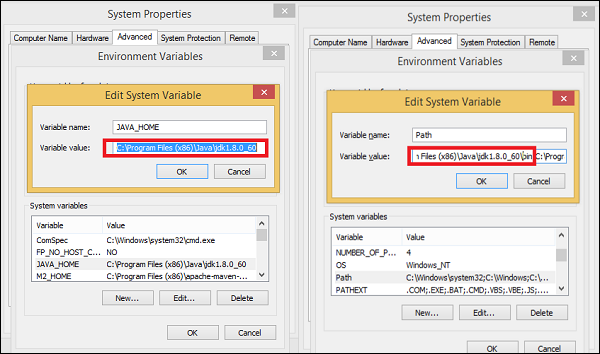
Step 1 − The prerequisites to use Robotium is Java SDK (minimum 1.6). If you dont have Java installed on your system, then follow the steps given below.
Download JDK and JRE from Oracle Technology Network
Accept license agreement.
Install JDK and JRE.
Set environment variable as shown in the screenshot below.
Step 2 − Download Android Studio from Android Studio
- Double click the exe and run the installer.
- Continue with all default options.
- Set the ANDROID_HOME.
Step 3 − Install Android images and tools.
- Click on SDK Manager −
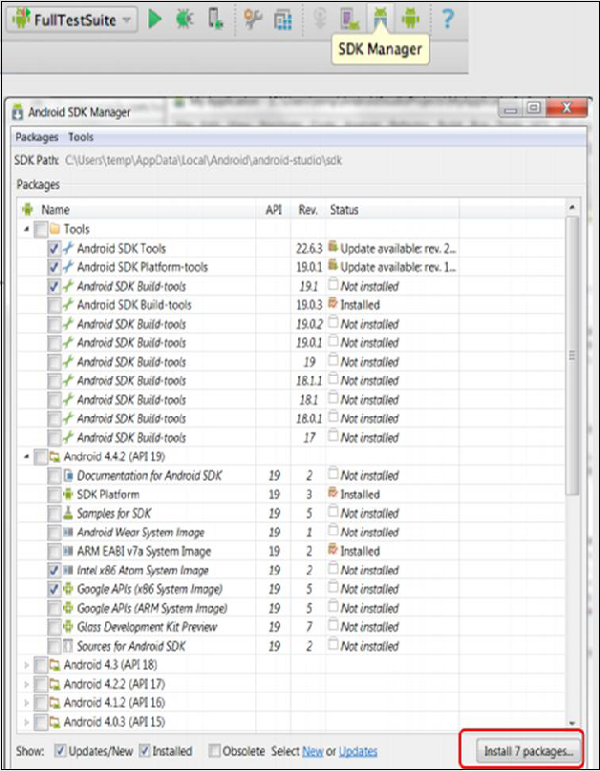
Select the necessary package. For example, if we are building an App for Android 4.4.2, then make sure the following packages are checked under the Tools section −
- Android SDK Tools rev 22.6.3
- Android Platform-tools rev 19.0.1
- Android SDK Build-tools rev 19.1
Step 4 − Create Android Virtual Devices.
- Open Android Studio and click AVD Manager in the toolbar. AVDs allow us to test and run our Android apps.
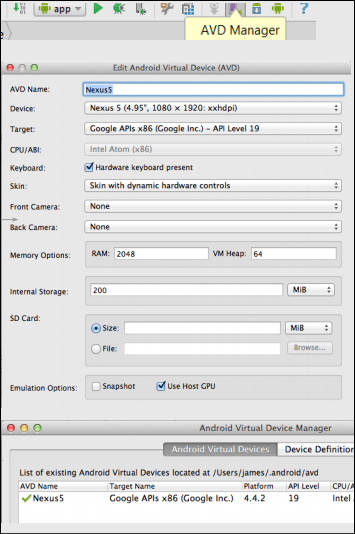
Use the following settings for a Nexus5 AVD −
- Device − Nexus 5 (4.95, 1080 x 1920; xxhdpi)
- Target − Google APIs x86 (Google Inc.) - API Level 19
- (Make sure you select the target with Google APIs in the name.)
- CPU − Intel Atom (x86)
- Check the box for Use Host GPU
- Click OK
You should now see the AVD you created in the AVD Manager, where you can start it, delete it, or create another one!
Step 5 − Robotium Jar file Download Robotium Jar file from RobotiumTech
Test an App with Robotium
To test an App with Robotium, follow the steps given below −
Step 1 − Create a test Project in the Android Studio named as RobotiumTest.
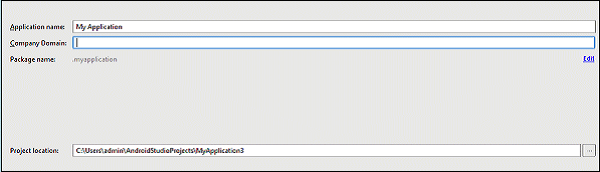
Choose all the default options until you reach to the main page.
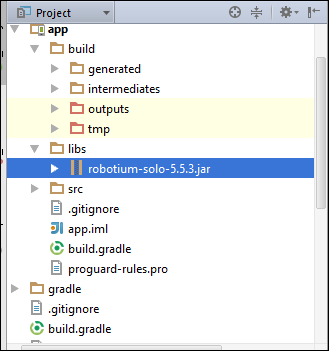
Step 2 − Copy the Robotium jar file into the Lib folder of the project.
Step 3 − Add the dependency in build.gradle file under src folder.
androidTestCompile 'com.jayway.android.robotium:robotium-solo-5.5.3'
Step 4 − Sync the Gradle.

Step 5 − Create the Test class as follows −
package com.example;

import com.robotium.solo.Solo;
import android.test.ActivityInstrumentationTestCase2;
import android.widget.EditText;
import android.widget.TextView;

public class MyTestClass extends ActivityInstrumentationTestCase2<TestActivity>{

   private Solo solo;

   public MyTestClass() {
      super(TestActivity.class);
   }

   public void setUp() throws Exception {
      solo = new Solo(getInstrumentation(), getActivity());
   }

   public void testCase() throws Exception {
      String vResult="TestExample";
      EditText vEditText = (EditText) solo.getView(R.id.edit1);
      solo.clearEditText(vEditText);
      solo.enterText(vEditText,"TestExample");
      solo.clickOnButton("Submit");
      assertTrue(solo.searchText(vResult));
      TextView textField = (TextView) solo.getView(R.id.txt1);
      //Assert to verify result with visible value
      assertEquals(vResult, textField.getText().toString());
   }

   @Override
   public void tearDown() throws Exception {
      solo.finishOpenedActivities();
   }
}
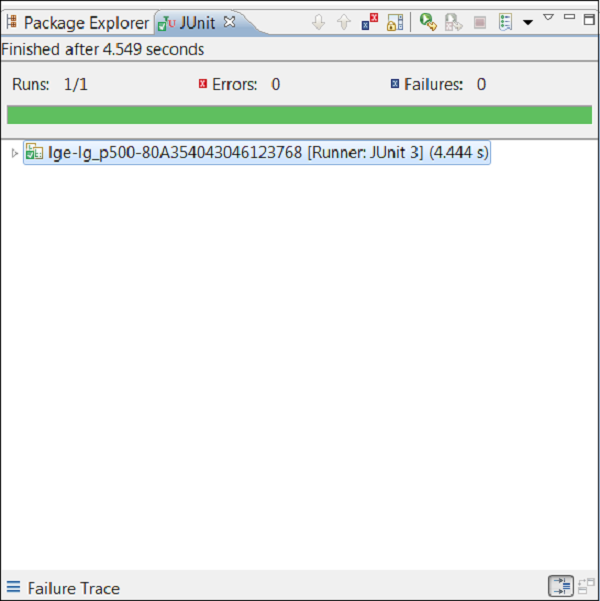
Step 6 − Save all changes. Make sure no errors are present.
Step 7 − Now, run the test case. If the test case is successful, you should see the following output!
Mobile Testing - Selendroid Framework
Selendroid is a test automation framework for testing Android native and hybrid applications. Selendroid tests are written using the Selenium Webdriver client API.
Benefits of Selendroid
Fully compatible with JSON Wire Protocol/Selenium 3 Ready.
No modification of app under test required in order to automate it.
Testing the mobile web using built in Android driver webview app.
Same concept for automating native or hybrid apps.
UI elements can be found by different locator types.
Gestures are supported: Advanced User Interactions API.
Existing Emulators are started automatically.
Selendroid supports hot plugging of hardware devices.
Full integration as a node into Selenium Grid for scaling and parallel testing.
Multiple Android target API support (10 to 19).
Built in Inspector to simplify test case development.
Selendroid can be extended at runtime with your own extensions.
Selendroid can interact with multiple Android devices (emulators or hardware devices) at the same time.
Drawbacks of Selendroid
The drawback of this tool is that it is quite slow and on some machines with less than 4GB RAM, it is unusable.
How to Use Selendroid
Step 1 − The prerequisites to use Robotium is Java SDK (minimum 1.6). If you dont have Java installed on your system, then follow the steps given below.
Download JDK and JRE from Oracle JavaSE
Accept license agreement.
Install JDK and JRE.
Set environment variable as shown in the screenshot below.
Step 2 − Download Android Studio from SDK Android (It will take time because of the size of the file).
- Double click the exe and run the installer.
- Continue with all default options.
- Set the ANDROID_HOME.
Step 3 − Download Selenium jar files and test application from Selendroid
- Download selenium jar file and test app.
- Place it into any folder i.e. D:\SelendroidJars.
Step 4 − Physical device with USB cable.
Make sure that the device is attached to the workstation with USB cable.
Make sure the USB debugging mode (under setttings → Developer options) is enabled.
Test an App with Selendroid
To test an App using Selendroid, follow the steps given below −
Step 1 − Install Eclipse.
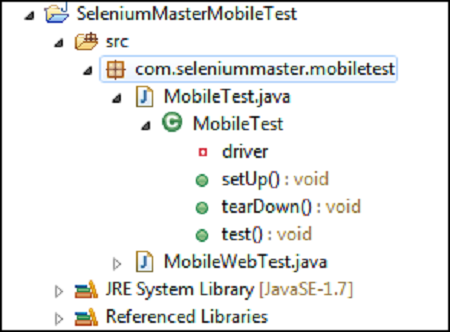
Step 2 − Create a Java project.
Step 3 − Add the downloaded Selendroid jar file to the newly created project.
Step 4 − Add the downloaded Selenium jar files to the newly created project.
Step 5 − Configure testNG in the Eclipse.
Step 6 − Connect the mobile devices with the system using USB cable. Set the USB debugging mode from the developers options under settings.
Step 7 − Run the Selendroid server. Open command prompt and write the following code and hit Enter −
java -jar selendroid-standalone-0.17.0-with-dependencies.jar -app selendroid-test-app-0.17.0.apk
Selendroid-standalone will start an http server on port 4444 and will scan all Android virtual devices (avd) that the user has created (~/.android/avd/).
Open the web browser and navigate to: http://localhost:4444/wd/hub/status.
Step 8 − Create a Java Project; add Selendroid Standalone libraries, Selenium jars, and JUnit libraries in the build path.
Step 9 − Create package under the Java project.
Step 10 − Create a class under the package and write the following code.
package selTest;

import io.selendroid.SelendroidDriver;
import io.selendroid.common.SelendroidCapabilities;
import io.selendroid.standalone.SelendroidConfiguration;
import io.selendroid.standalone.SelendroidLauncher;

import org.openqa.selenium.By;
import org.openqa.selenium.WebDriver;
import org.openqa.selenium.WebElement;

import org.testng.Assert;
import org.testng.annotations.AfterSuite;
import org.testng.annotations.BeforeSuite;
import org.testng.annotations.Test;

public class SelendroidTest {

   private WebDriver driver ;

   @BeforeSuite
   public void setUp() throws Exception {
      SelendroidConfiguration config = new SelendroidConfiguration();
      config.addSupportedApp("selendroid-test-app-0.9.0.apk");
      SelendroidLauncher selendroidServer = new SelendroidLauncher(config);
      selendroidServer.launchSelendroid();

      SelendroidCapabilities caps = new
         SelendroidCapabilities("io.selendroid.testapp:0.9.0");
      driver = new SelendroidDriver(caps);
   }

   @Test
   public void selendroidTest() throws Exception {
      WebElement inputField = driver.findElement(By.id("my_text_field"));
      Assert.assertEquals("true", inputField.getAttribute("enabled"));
      inputField.sendKeys("Selendroid");

      Assert.assertEquals("Selendroid", inputField.getText());

      WebElement button = driver.findElement(By.id("buttonTest"));
      button.click();

      button = driver.findElement(By.id("button2"));
      button.click();

      Thread.sleep(5000);

      button = driver.findElement(By.id("startUserRegistration"));
      button.click();

      Thread.sleep(10000);

      WebElement element = driver.findElement(By.id("label_username"));

      String text = element.getText();
      System.out.println(text);
      element = driver.findElement(By.id("inputUsername"));
      element.sendKeys("bob");

      element = driver.findElement(By.id("inputEmail"));
      element.sendKeys("test@gmail.com");

      element = driver.findElement(By.id("inputPassword"));
      element.clear();
      element.sendKeys("test1233");

      element = driver.findElement(By.id("inputName"));
      element.clear();
      element.sendKeys("My Name ");

      element = driver.findElement(By.id("input_preferedProgrammingLanguage"));
      element.click();

      element = driver.findElement(By.id("text1"));
      element.click();

      element = driver.findElement(By.id("input_adds"));
      element.click();

      element = driver.findElement(By.id("btnRegisterUser"));
      element.click();

      element = driver.findElement(By.id("buttonRegisterUser"));
      element.click();
   }

   @AfterSuite
   public void tearDown(){
      driver.quit();
   }
}
Step 11 − Run the class with testNG run configuration.
Mobile Testing - Appium Framework
Appium is an open-source test automation framework for testing native and hybrid apps and mobile web apps. It drives iOS and Android apps using the WebDriver protocol.
Advantages of Appium
Its free and (mostly) open source.
It has a very well supported and active Google group.
Its in the Selenium 3 spec so should be future proof.
It supports both Android and iOS.
It does not require anything to be installed on the device no server or code changes required.
Drawbacks of Appium
- No support for intelligent waits.
- On iOS, you can only execute one test at a time per Mac.
- Limited support for gestures.
- Limited support for Android < 4.1
How to Use Appium
Step 1 − The prerequisites to use Appium is Java SDK (minimum 1.6). If you dont have Java installed on your system, then follow the steps given below.
Download JDK and JRE from Oracle JavaSE
Accept license agreement.
Install JDK and JRE.
Set environment variable as shown in the screenshot below.
Step 2 − Download Android Studio from SDK (It will take time because of the size of the file).
- Double click the exe and run the installer.
- Continue with all default options.
- Set the ANDROID_HOME.
Step 3 − Install Android images and tools.
- Click on SDK Manager −
Select the necessary package. For example, if we are building an App for Android 4.4.2, then make sure the following packages are checked under the Tools section −
- Android SDK Tools rev 22.6.3
- Android Platform-tools rev 19.0.1
- Android SDK Build-tools rev 19.1
Step 4 − Create Android Virtual Devices −
Open Android Studio and click AVD Manager in the toolbar. AVDs allow us to test and run our Android apps.
Use the following settings for a Nexus5 AVD −
Device: Nexus 5 (4.95, 1080 x 1920; xxhdpi)
Target: Google APIs x86 (Google Inc.) - API Level 19
Make sure you select the target with Google APIs in the name.
CPU: Intel Atom (x86)
Check the box for Use Host GPU
Click OK.
You should now see the AVD you created in the AVD Manager, where you can start it, delete it, or create another one!
Step 5 − Download Appium jar files from Appium
Test an App with Appium
To test an App with Appium, follow the steps given below −
Step 1 − Create a test Project in the Android Studio named as RobotiumTest.
Choose all the default options until you reach to the main page.
Step 2 − Add the Appium jars into your project. Click Project → App → copy all the jars in lib. Select the copied jars except Selenium, Java client and Junit Jar, then right-click on it and click on "Add as Library".
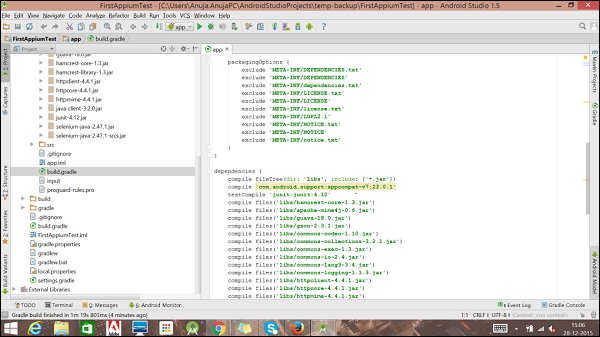
Step 3 − Click on build.gradle in the App. You will see all the libraries added, as shown in the following screenshot.
Step 4 − Now create a Java class as shown below −
AppiumDriver driver;
@Before
public void testCaseSetup()throws Exception {
   //service.start();
   //reader.readFile();

   DesiredCapabilities cap = new DesiredCapabilities();

   cap.setCapability(MobileCapabilityType.PLATFORM_NAME,"Android");
   cap.setCapability(MobileCapabilityType.DEVICE_NAME, "Android device");
   cap.setCapability(MobileCapabilityType.NEW_COMMAND_TIMEOUT, "4000");
   cap.setCapability(MobileCapabilityType.APP, "c://apk//sample.apk");

   driver = new AndroidDriver<MobileElement>("http://127.0.0.1:4444/wd/hub",cap);
}

@Test
public void testcase1()throws Exception {
   driver.findElementByID("Example").click();
   Asser.assertTrue(driver.findElementByID("Example").isDisplayed));
}

@After
public void testCaseTearDown() {
   driver.quit();
}
Step 5 − Running the Test case.
- Click on build variant and select Unit Testing.
- Start the Appium server with the specific port "4444".
- Download the Appium for Windows from here.
- Double click on the .exe and install Appium.
- Click on the icon to up the UI.
- Change the port if required, as shown below.
- Click the Play button to start the server.

- Connect the device with USB debugging on or start an emulator.
- Right-click the test class and click on "Run".
Mobile Testing - Zucchini Framework
Zucchini is a new testing framework that uses a BDD-style domain-specific language (DSL). One of its focus areas is simplifying the acceptance tests written with Selenium.
It is not a replacement for JBehave or the Robot Framework, as you will see later on. Here, we will give you a glimpse of Zucchinis concepts by describing an example step by step.
How to install Zucchini
The prerequisites to install Zucchini is XCode 4.2. In addition, a few command line tools are required such as brew update && brew install imagemagick && brew install coffee-script.
How to Use Zucchini
gem install zucchini-ios
Start by creating a project scaffold
Create a feature scaffold for your first feature
Start hacking by modifying features/my_feature/feature.zucchini and features/support/screens/welcome.coffee.
Zucchini doesn't involve making any modifications to your application code. You might as well keep your Zucchini tests in a separate project.
zucchini generate --project /path/to/my_project
zucchini generate --feature /path/to/my_project/features/my_feature
Alternatively, check out the zucchini-demo project featuring an easy to explore Zucchini setup around Apple's CoreDataBooks sample.
Running on the device
Add your device to features/support/config.yml.
Running on the iOS Simulator. We strongly encourage you to run your Zucchini features on real hardware. However, you can run them on the iOS Simulator, if you must.
First off, modify your features/support/config.yml to include a full path to your compiled app. For example,
app:/Users/vaskas/Library/Developer/Xcode/DerivedData/CoreDataBooks-ebeqiuqksrwwoscupvxuzjzrdfjz/Build/Products/Debug-iphonesimulator/CoreDataBooks.app
Secondly, add an 'iOS Simulator' entry to the devices section (no UDID needed) and make sure you provide the actual value for 'screen' based on your iOS Simulator settings −
Run it like −
ZUCCHINI_DEVICE="iOS Simulator" zucchini run /path/to/my_feature
The udidetect utility comes in handy if you plan to add devices from time to time − udidetect -z.
ZUCCHINI_DEVICE="My Device" zucchini run /path/to/my_feature
Result Display