- JFreeChart - Home
- JFreeChart - Overview
- JFreeChart - Installation
- JFreeChart - Architecture
- JFreeChart - Referenced APIs
- JFreeChart - Pie Chart
- JFreeChart - Bar Chart
- JFreeChart - Line Chart
- JFreeChart - XY Chart
- JFreeChart - 3D Chart/Bar Chart
- JFreeChart- Bubble Chart
- JFreeChart - TimeSeries Chart
- JFreeChart - File Interface
- JFreeChart - Database Interface
JFreeChart - Installation
JFreeChart is popular for its efficient chart creation and user-friendly installation setup. This chapter describes the process of setting up JFreeChart on Windows and Linux. User administration is needed while installing JFreeChart.
System Requirements
| JDK | 1.5 or above |
| Memory | 2GB RAM |
| Disk Space | No minimum requirement |
| Operating System Version | Linux or Windows |
Installing JFreeChart
To install JFreeChart, there are three following steps viz

Step 1: Verifying Java Installation
To verify Java installation, open the console and execute the following java command −
| Os | Task | Command |
|---|---|---|
| Windows | Open command console | C:>java -version |
| Linux | Open command terminal | $java -version |
Once Java installation is done properly, then you should get the following output for both the operating systems −
| S.No | OS & Description |
|---|---|
| 1 | Windows Java version "1.7.0_60" Java (TM) SE Run Time Environment (build 1.7.0_60-b19) Java HotSpot(TM) 64-bit Server VM (build 24.60-b09,mixed mode) |
| 2 | Linux java version "1.7.0_25" OpenJDK Runtime Environment (rhel2.3.10.4.el6_4-x86_64) OpenJDK 64-Bit Server VM (build 23.7-b01, mixed mode) |
If you do not have Java installed, then install the Java Software Development Kit (SDK) from the link −
https://www.oracle.com/technetwork/java/javase/downloads/index.html
We assume that you have installed Java 1.7.0_60 version before proceeding for this tutorial.
Step 2: Setting JAVA Environment
Set the JAVA_HOME environment variable to point to the base directory location where Java is installed on your machine. For example,
| S.No | Os & Description |
|---|---|
| 1 | Windows Set Environmental variable JAVA_HOME to C:\ProgramFiles\java\jdk1.7.0_60 |
| 2 | Linux export JAVA_HOME=/usr/local/java-current |
Append Java compiler location to System Path.
| S.No | OS & Description |
|---|---|
| 1 | Windows Append the String; C:\Program Files\Java\jdk1.7.0_60\bin to the end of the system variable PATH. |
| 2 | Linux export PATH=$PATH:$JAVA_HOME/bin/ |
Verify the command java -version from the command prompted as explained above.
Step 3: Installing JFreeChart
Download the latest version of JFreeChart.zip from the link http://www.jfree.org/jfreechart/download/ Unzip the downloaded file at any location from where required libraries can be linked into your Java program. The following image shows the structure of the directories and files −
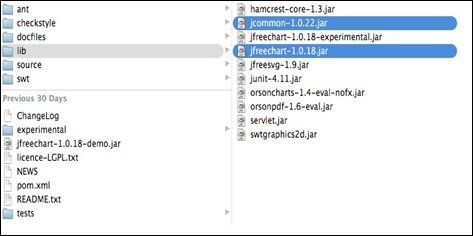
Add complete path of jfreechart-1.0.18.jar and jcommon-1.0.22.jar files to the CLASSPATH as shown below −
| S.No | OS & Description |
|---|---|
| 1 | Windows Append the Strings C:\ jfreechart-1.0.18\lib\ jfreechart-1.0.18.jar and C:\ jfreechart-1.0.18\lib\ jcommon-1.0.22.jar to the end of the user variable CLASSPATH |
| 2 | Linux Export CLASSPATH=$CLASSPATH: /usr/share/jfreechart1.0.18/lib/jfreechart-1.0.18.jar: /usr/share/jfreechart-1.0.18/lib/jcommon1.0.22.jar |
Note − Inorder to communicate with MySql database you need to set the classpath to mysql-connector-java-5.0.8-bin.jar too.
