- Home
- Introduction
- Python Frameworks
- Django Framework
- Flask Framework
- Web2py Framework
- Pyramid Framework
- Dash Framework
- Choosing a Better Framework
Dash Framework
In this chapter, we will discuss about the Dash framework in detail.
Dash is an open-source Python framework used for building analytical web applications. It is a powerful library that simplifies the development of data-driven applications. Its especially useful for Python data scientists who arent very familiar with web development. Users can create amazing dashboards in their browser using dash.
Built on top of Plotly.js, React, and Flask, Dash ties modern UI elements like dropdowns, sliders and graphs directly to your analytical python code.
Dash apps consist of a Flask server that communicates with front-end React components using JSON packets over HTTP requests.
Dash applications are written purely in python, so NO HTML or JavaScript is necessary.
Dash Setup
If Dash is not already installed in your terminal, then install the below mentioned Dash libraries. As these libraries are under active development, install and upgrade then frequently. Python 2 and 3 are also supported.
- pip install dash==0.23.1 # The core dash backend
- pip install dash-renderer==0.13.0 # The dash front-end
- pip install dash-html-components==0.11.0 # HTML components
- pip install dash-core-components==0.26.0 # Supercharged components
- pip install plotly==3.1.0 # Plotly graphing library
In order to make sure everything is working properly, here, we created a simple dashApp.py file.
Dash or App Layout
Dash apps are composed of two parts. The first part is the layout of the app which basically describes how the application looks like. The second part describes the interactivity of the application.
Core Components
We can build the layout with the dash_html_components and the dash_core_components library. Dash provides python classes for all the visual components of the application. We can also customize our own components with JavaScript and React.js.
import dash_core_components as dcc
import dash_html_components as html
The dash_html_components is for all HTML tags where the dash_core_components is for interactivity built with React.js.
Using above two libraries, let us write a code as given below −
app = dash.Dash()
app.layout = html.Div(children=[
   html.H1(children='Hello Dash'),
   html.Div(children='''Dash Framework: A web application framework for Python.''')
And the equivalent HTML code would look like this −
<div>
   <h1> Hello Dash </h1>
   <div> Dash Framework: A web application framework for Python. </div>
</div>
Writing Simple Dash app
We will learn how to write a simple example on dash using above mentioned library in a file dashApp.py.
# -*- coding: utf-8 -*-
import dash
import dash_core_components as dcc
import dash_html_components as html

app = dash.Dash()
app.layout = html.Div(children=[
   html.H1(children='Hello Dash'),
   html.Div(children='''Dash Framework: A web application framework for Python.'''),

   dcc.Graph(
      id='example-graph',
      figure={
         'data': [
            {'x': [1, 2, 3], 'y': [4, 1, 2], 'type': 'bar', 'name': 'Delhi'},
            {'x': [1, 2, 3], 'y': [2, 4, 5], 'type': 'bar', 'name': u'Mumbai'},
         ],
         'layout': {
            'title': 'Dash Data Visualization'
         }
      }
   )
])

if __name__ == '__main__':
   app.run_server(debug=True)
Running the Dash app
Note the following points while running the Dash app.
(MyDjangoEnv) C:\Users\rajesh\Desktop\MyDjango\dash>python dashApp1.py
Serving Flask app "dashApp1" (lazy loading)
Environment: production
WARNING: Do not use the development server in a production environment.
Use a production WSGI server instead.
Debug mode: on
Restarting with stat
Debugger is active!
Debugger PIN: 130-303-947
Running on http://127.0.0.1:8050/ (Press CTRL+C to quit)
127.0.0.1 - - [12/Aug/2018 09:32:39] "GET / HTTP/1.1" 200 -
127.0.0.1 - - [12/Aug/2018 09:32:42] "GET /_dash-layout HTTP/1.1" 200 -
127.0.0.1 - - [12/Aug/2018 09:32:42] "GET /_dash-dependencies HTTP/1.1" 200 -
127.0.0.1 - - [12/Aug/2018 09:32:42] "GET /favicon.ico HTTP/1.1" 200 -
127.0.0.1 - - [12/Aug/2018 09:39:52] "GET /favicon.ico HTTP/1.1" 200 -
Visit http:127.0.0.1:8050/ in your web browser. You should see an app that looks like this.
In above program, few important points to be noted are as follows −
The app layout is composed of a tree of components like html.Div and dcc.Graph.
The dash_html_components library has a component for every HTML tag. The html.H1 (children = Hello Dash) component generates a <h1> Hello Dash </h1> HTML element in your application.
Not all components are pure HTML. The dash_core_components describe higher-level components that are interactive and are generated with JavaScript, HTML, and CSS through the React.js library.
Each component is described entirely through keyword attributes. Dash is declarative: you will primarily describe your application through these attributes.
The children property is special. By convention, its always the first attribute which means that you can omit it.
Html.H1 (children=Hello Dash) is the same as html.H1 (Hello Dash).
The fonts in your application will look a little bit different than what is displayed here. This application is using a custom CSS stylesheet to modify the default styles of the elements. Custom font style is permissible, but as of now, we can add the below URL or any URL of your choice −
app.css.append_css ({external_url:https://codepen.io/chriddyp/pen/bwLwgP.css}) to get your file to get the same look and feel of these examples.
More about HTML
The dash_html_components library contains a component class for every HTML tag as well as keyword arguments for all of the HTML arguments.
Let us add the inline style of the components in our previous app text −
# -*- coding: utf-8 -*-
import dash
import dash_core_components as dcc
import dash_html_components as html

app = dash.Dash()
colors = {
   'background': '#87D653',
   'text': '#ff0033'
}

app.layout = html.Div(style={'backgroundColor': colors['background']}, children=[
   html.H1(
      children='Hello Dash',
      style={
         'textAlign': 'center',
         'color': colors['text']
      }
   ),

   html.Div(children='Dash: A web application framework for Python.', style={
      'textAlign': 'center',
      'color': colors['text']
   }),

   dcc.Graph(
      id='example-graph-2',

      figure={
         'data': [
            {'x': [1, 2, 3], 'y': [4, 1, 2], 'type': 'bar', 'name': 'Delhi'},
            {'x': [1, 2, 3], 'y': [2, 4, 5], 'type': 'bar', 'name': u'Mumbai'},
         ],
         'layout': {
            'plot_bgcolor': colors['background'],
            'paper_bgcolor': colors['background'],
            'font': {
               'color': colors['text']
            }
         }
      }
   )
])

if __name__ == '__main__':
   app.run_server(debug=True)
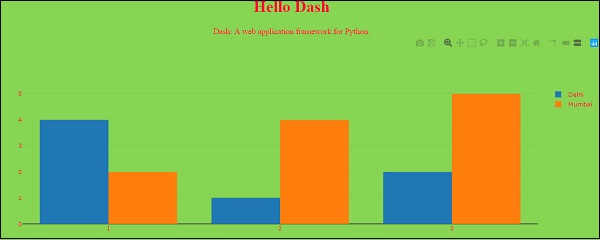
In the above example, we modified the inline styles of the html.Div and html.H1 components with the style property.

It is rendered in the Dash application as follows −

There are couple of key distinctions between dash_html_components and HTML attributes −
For style property in Dash, you can just supply a dictionary, whereas in HTML, it is semicolon-separated string.
Style dictionary keys are camelCased, so text-align changes to textalign.
ClassName in Dash is similar to HTML class attribute.
The first argument is the children of the HTML tag which is specified through the children keyword argument.
Reusable Components
By writing our markup in Python, we can create complex reusable components like tables without switching contexts or languages −
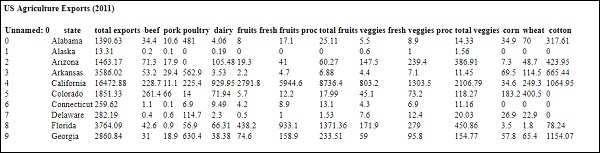
Below is a quick example that generates a Table from pandas dataframe.
import dash
import dash_core_components as dcc
import dash_html_components as html
import pandas as pd

df = pd.read_csv(
   'https://gist.githubusercontent.com/chriddyp/'
   'c78bf172206ce24f77d6363a2d754b59/raw/'
   'c353e8ef842413cae56ae3920b8fd78468aa4cb2/'
   'usa-agricultural-exports-2011.csv')

def generate_table(dataframe, max_rows=10):
   return html.Table(
      # Header
      [html.Tr([html.Th(col) for col in dataframe.columns])] +
      # Body
      [html.Tr([
         html.Td(dataframe.iloc[i][col]) for col in dataframe.columns
      ]) for i in range(min(len(dataframe), max_rows))]
   )

app = dash.Dash()
app.layout = html.Div(children=[
   html.H4(children='US Agriculture Exports (2011)'),
   generate_table(df)
])

if __name__ == '__main__':
   app.run_server(debug=True)
Our output will be something like −
More about Visualization
The dash_core_components library includes a component called Graph.
Graph renders interactive data visualizations using the open source plotly.js JavaScript graphing library. Plotly.js support around 35 chart types and renders charts in both vector-quality SVG and high-performance WebGL.
Below is an example that creates a scatter plot from a Pandas dataframe −
import dash
import dash_core_components as dcc
import dash_html_components as html
import pandas as pd
import plotly.graph_objs as go

app = dash.Dash()

df = pd.read_csv(
   'https://gist.githubusercontent.com/chriddyp/' +
   '5d1ea79569ed194d432e56108a04d188/raw/' +
   'a9f9e8076b837d541398e999dcbac2b2826a81f8/'+
   'gdp-life-exp-2007.csv')

app.layout = html.Div([
   dcc.Graph(
      id='life-exp-vs-gdp',
      figure={
         'data': [
            go.Scatter(
               x=df[df['continent'] == i]['gdp per capita'],
               y=df[df['continent'] == i]['life expectancy'],
               text=df[df['continent'] == i]['country'],
               mode='markers',
               opacity=0.7,
               marker={
                  'size': 15,
                  'line': {'width': 0.5, 'color': 'white'}
               },
               name=i
            ) for i in df.continent.unique()
         ],
         'layout': go.Layout(
            xaxis={'type': 'log', 'title': 'GDP Per Capita'},
            yaxis={'title': 'Life Expectancy'},
            margin={'l': 40, 'b': 40, 't': 10, 'r': 10},
            legend={'x': 0, 'y': 1},
            hovermode='closest'
         )
      }
   )
])

if __name__ == '__main__':
   app.run_server()
The output of the above code is as follows −

These graphs are interactive and responsive. You can hover over points to see their values, click on legend items to toggle traces, click and drag to zoom, hold down shift, and click and drag to pan.
Markdown
While dash exposes HTML flavours through the dash_html_components library, it can be tedious to write your copy in HTML. For writing blocks of texts, you can use the Markdown component in the dash_core_components library.
Core Components
The dash_core_components includes a set of higher-level components like dropdowns, graphs, markdown, blocks and many more.
Like all other Dash components, they are described entirely declaratively. Every option that is configurable is available as a keyword argument of the component.
Below is the example, using some of the available components −
# -*- coding: utf-8 -*-
import dash
import dash_core_components as dcc
import dash_html_components as html

app = dash.Dash()

app.layout = html.Div([
   html.Label('Dropdown'),
   dcc.Dropdown(
      options=[
         {'label': 'New York City', 'value': 'NYC'},
         {'label': u'Montral', 'value': 'MTL'},
         {'label': 'San Francisco', 'value': 'SF'}
      ],
      value='MTL'
   ),

   html.Label('Multi-Select Dropdown'),
   dcc.Dropdown(
      options=[
         {'label': 'New York City', 'value': 'NYC'},
         {'label': u'Montral', 'value': 'MTL'},
         {'label': 'San Francisco', 'value': 'SF'}
      ],
      value=['MTL', 'SF'],
      multi=True
   ),

   html.Label('Radio Items'),
   dcc.RadioItems(
      options=[
         {'label': 'New York City', 'value': 'NYC'},
         {'label': u'Montral', 'value': 'MTL'},
         {'label': 'San Francisco', 'value': 'SF'}
      ],
      value='MTL'
   ),

   html.Label('Checkboxes'),
   dcc.Checklist(
      options=[
         {'label': 'New York City', 'value': 'NYC'},
         {'label': u'Montral', 'value': 'MTL'},
         {'label': 'San Francisco', 'value': 'SF'}
      ],
      values=['MTL', 'SF']
   ),

   html.Label('Text Input'),
   dcc.Input(value='MTL', type='text'),

   html.Label('Slider'),
   dcc.Slider(
      min=0,
      max=9,
      marks={i: 'Label {}'.format(i) if i == 1 else str(i) for i in range(1, 6)},
      value=5,
   ),
], style={'columnCount': 2})

if __name__ == '__main__':
   app.run_server(debug=True)
Output from the above program is as follows −

Calling Help
Dash components are declarative. Every configurable aspect of these components is set during installation as a keyword argument. You can call help in your python console on any of the components to learn more about a component and its available arguments. Some of them are given below −
>>> help(dcc.Dropdown)
Help on class Dropdown in module builtins:
class Dropdown(dash.development.base_component.Component)
| A Dropdown component.
| Dropdown is an interactive dropdown element for selecting one or more

| items.
| The values and labels of the dropdown items are specified in the `options`
| property and the selected item(s) are specified with the `value` property.
|
| Use a dropdown when you have many options (more than 5) or when you are
| constrained for space. Otherwise, you can use RadioItems or a Checklist,
| which have the benefit of showing the users all of the items at once.
|
| Keyword arguments:
| - id (string; optional)
| - options (list; optional): An array of options
| - value (string | list; optional): The value of the input. If `multi` is false (the default)
-- More --
To summarize, the layout of a Dash app describes what the app looks like. The layout is a hierarchical tree of components. The dash_html_components library provides classes for all the HTML tags and the keyword arguments, and describes the HTML attributes like style, className, and id. The dash_core_components library generates higher-level components like controls and graphs.