
Article Categories
- All Categories
-
 Data Structure
-
 Networking
-
 RDBMS
RDBMS
-
 Operating System
-
 Java
Java
-
 MS Excel
-
 iOS
iOS
-
 HTML
HTML
-
 CSS
CSS
-
 Android
-
 Python
-
 C Programming
-
 C++
C++
-
 C#
C#
-
 MongoDB
-
 MySQL
MySQL
-
 Javascript
-
 PHP
PHP
-
 Economics & Finance
How to Setup Own Fileserver using Pydio on Ubuntu
In this article we will learn, how to host a file sharing server using Pydio which can run well without a powerful hardware. We will install community edition but if we go for enterprise license, it is free for teams smaller than 10 persons.
Pydio is a utility which looks like Dropbox and allows files sharing. Pydio has a good feature as other file syncing services, a web interface, native client for Mac, Windows and Linux, Mobile client for IOS and Andriod. It has an ability to share files with other Pydio user who are in the public.
Prerequisites
- User with no root permissions
- Apache installed with LAMP, and https setup for accessing
- An FQDN if we expose to public.
- Postfix installed.
Installing Pydio
We will install all the dependencies and Pydio using the below command, before that we needed to update the machine. Download the Pydio and extract it and move the code to default folder in apache.
$ sudo apt-get update
$ sudo apt-get install php5 libapache2-mod-php5
sudo apt-get install php5 libapache2-mod-php5
Reading package lists... Done
Building dependency tree
Reading state information... Done
libapache2-mod-php5 is already the newest version.
php5 is already the newest version.
The following packages were automatically installed and are no longer required:
libntdb1 python-ntdb
Use 'apt-get autoremove' to remove them.
0 upgraded, 0 newly installed, 0 to remove and 3 not upgraded.
root@ubuntu:~# sudo apt-get remove php5 libapache2-mod-php5
Reading package lists... Done
Building dependency tree
Reading state information... Done
The following packages were automatically installed and are no longer required:
libntdb1 python-ntdb
Use 'apt-get autoremove' to remove them.
The following extra packages will be installed:
libapache2-mod-php5filter
Suggested packages:
php-pear
The following packages will be REMOVED:
libapache2-mod-php5 php5
The following NEW packages will be installed:
libapache2-mod-php5filter
0 upgraded, 1 newly installed, 2 to remove and 3 not upgraded.
Need to get 2,205 kB of archives.
After this operation, 33.8 kB disk space will be freed.
Do you want to continue? [Y/n] y
Get:1 http://us.archive.ubuntu.com/ubuntu/ trusty-updates/universe libapache2-mod-php5filter amd64 5.5.9+dfsg-1ubuntu4.17 [2,205 kB]
Fetched 2,205 kB in 5s (370 kB/s)
(Reading database ... 201552 files and directories currently installed.)
Removing php5 (5.5.9+dfsg-1ubuntu4.17) ...
dpkg: libapache2-mod-php5: dependency problems, but removing anyway as you requested:
phpmyadmin depends on libapache2-mod-php5 | libapache2-mod-php5filter | php5-cgi | php5-fpm | php5; however:
Package libapache2-mod-php5 is to be removed.
Package libapache2-mod-php5filter is not installed.
Package php5-cgi is not installed.
Package php5-fpm is not installed.
Package php5 is not installed.
apache2_invoke prerm: Disable module php5
* Restarting web server apache2 AH00558: apache2: Could not reliably determine the server's fully qualified domain name, using 127.0.1.1. Set the 'ServerName' directive globally to suppress this message
[ OK ]
Selecting previously unselected package libapache2-mod-php5filter.
(Reading database ... 201540 files and directories currently installed.)
Preparing to unpack .../libapache2-mod-php5filter_5.5.9+dfsg-1ubuntu4.17_amd64.deb ...
Unpacking libapache2-mod-php5filter (5.5.9+dfsg-1ubuntu4.17) ...
Setting up libapache2-mod-php5filter (5.5.9+dfsg-1ubuntu4.17) ...
..
..
Creating config file /etc/php5/apache2filter/php.ini with new version
..
..
* Restarting web server apache2 AH00558: apache2: Could not reliably determine the server's fully qualified domain name, using 127.0.1.1. Set the 'ServerName' directive globally to suppress this message
[ OK ]
root@ubuntu:~# sudo apt-get install php5 libapache2-mod-php5
Reading package lists... Done
Building dependency tree
Reading state information... Done
The following packages were automatically installed and are no longer required:
libntdb1 python-ntdb
Use 'apt-get autoremove' to remove them.
Suggested packages:
php-pear
The following packages will be REMOVED:
libapache2-mod-php5filter
The following NEW packages will be installed:
libapache2-mod-php5 php5
0 upgraded, 2 newly installed, 1 to remove and 3 not upgraded.
Need to get 0 B/2,213 kB of archives.
After this operation, 33.8 kB of additional disk space will be used.
Do you want to continue? [Y/n] y
Selecting previously unselected package php5.
(Reading database ... 201551 files and directories currently installed.)
Preparing to unpack .../php5_5.5.9+dfsg-1ubuntu4.17_all.deb ...
Unpacking php5 (5.5.9+dfsg-1ubuntu4.17) ...
dpkg: libapache2-mod-php5filter: dependency problems, but removing anyway as you requested:
phpmyadmin depends on libapache2-mod-php5 | libapache2-mod-php5filter | php5-cgi | php5-fpm | php5; however:
Package libapache2-mod-php5 is not installed.
Package libapache2-mod-php5filter is to be removed.
Package php5-cgi is not installed.
Package php5-fpm is not installed.
Package php5 is not configured yet.
apache2_invoke prerm: Disable module php5filter
* Restarting web server apache2 AH00558: apache2: Could not reliably determine the server's fully qualified domain name, using 127.0.1.1. Set the 'ServerName' directive globally to suppress this message
[ OK ]
Selecting previously unselected package libapache2-mod-php5.
(Reading database ... 201548 files and directories currently installed.)
Preparing to unpack .../libapache2-mod-php5_5.5.9+dfsg-1ubuntu4.17_amd64.deb ...
Unpacking libapache2-mod-php5 (5.5.9+dfsg-1ubuntu4.17) ...
Setting up libapache2-mod-php5 (5.5.9+dfsg-1ubuntu4.17) ...
* Restarting web server apache2 AH00558: apache2: Could not reliably determine the server's fully qualified domain name, using 127.0.1.1. Set the 'ServerName' directive globally to suppress this message
[ OK ]
Setting up php5 (5.5.9+dfsg-1ubuntu4.17) ...
$ wget https://download.pydio.com/641qt8npdernapoevdm/pydio-enterprise-6.4.1.tar.gz
wget -P ~/ http://vorboss.dl.sourceforge.net/project/ajaxplorer/pydio/stable-channel/6.2.2/pydio-core-6.2.2.tar.gz
--2016-06-02 09:17:35-- http://vorboss.dl.sourceforge.net/project/ajaxplorer/pydio/stable-channel/6.2.2/pydio-core-6.2.2.tar.gz
Resolving vorboss.dl.sourceforge.net (vorboss.dl.sourceforge.net)... 5.10.152.194
Connecting to vorboss.dl.sourceforge.net (vorboss.dl.sourceforge.net)|5.10.152.194|:80... connected.
HTTP request sent, awaiting response... 200 OK
Length: 15735734 (15M) [application/x-gzip]
Saving to: ‘/root/pydio-core-6.2.2.tar.gz.1’
100%[======================================>] 1,57,35,734 917KB/s in 28s
2016-06-02 09:18:03 (549 KB/s) - ‘/root/pydio-core-6.2.2.tar.gz.1’ saved [15735734/15735734]
$ tar -xvzf ~/pydio-enterprise-6.4.1.tar.gz
$ sudo mv ~/pydio-core-6.4.1 /var/www/pydio
Change the folder permission to Apache so that we can store the data and update the configuration files
$ sudo chown -R www-data:www-data /var/www/pydio
Setting PHP Modules to run Pydio
Install some PHP modules to work
$ sudo apt-get install php5-mcrypt php5-gd php5-sqlite
By default mcrypt is not enabled to enable it using phpenmod
$ sudo php5enmod mcrypt
To sync client to work we needed to enable and install a2enmod
$ sudo a2enmod rewrite
We needed to modify the php.ini file and we needed to update these lines
$ sudo vi /etc/php5/apache2/php.ini
Fine the line with output_buffering = 4096 and changes to off
; Default Value: Off
; Development Value: 4096
; Production Value: 4096
; http://php.net/output-buffering
output_buffering = Off
We also needed to modify upload_max_filesize = 2M and change the 2M to any large no like 1G
; Maximum allowed size for uploaded files.
; http://php.net/upload-max-filesize
upload_max_filesize = 1G
Also, we needed to change post_max_size also
; Maximum size of POST data that PHP will accept.
; Its value may be 0 to disable the limit. It is ignored if POST data reading
; is disabled through enable_post_data_reading.
; http://php.net/post-max-size
post_max_size = 1G
Save the files and restart.
Config Apache for Pydio
Create a new file pydio.conf in /etc/apache2/sites-available
$ sudo nano /etc/apache2/sites-available/pydio.conf
<VirtualHost *:80>
   ServerAdmin pydio@localhost.localdomain.com
   ServerName 192.168.100.111
   DocumentRoot /var/www/pydio
   ErrorLog ${APACHE_LOG_DIR}/pydio-error.log
   CustomLog ${APACHE_LOG_DIR}/pydio-access.log combined
   <Directory /var/www/pydio/>
      AllowOverride All
   </Directory>
</VirtualHost>
We will disable the default Apache Configuration.
$ sudo a2dissite 000-default
We needed to enable two config files
$ sudo a2ensite pydio
Restart the apache services
$ sudo service apache2 restart
Customize the PHP Mailer to support Pydio.
We needed to edit the Postfix config files /etc/postfix/main.cf
$ sudo nano /etc/postfix/main.cf
Search for inet_interfaces, and update the all with your locathost
mailbox_size_limit = 0
recipient_delimiter = +
inet_interfaces = all
inet_protocols = all
Restart the Postifx Services
$ sudo service postfix restart
Finalizing Pydio Setup
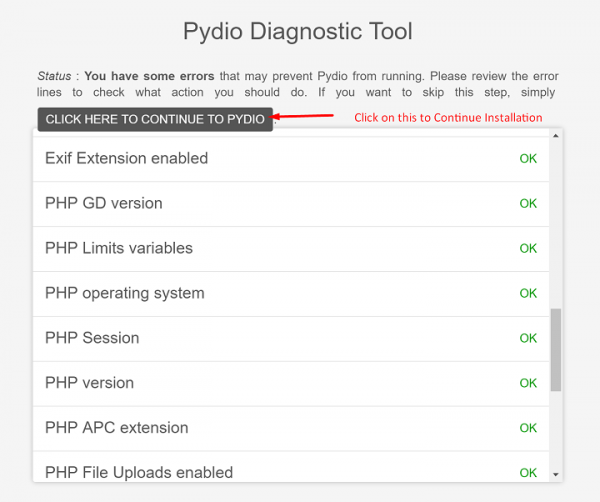
As we just finished the Pydio setup we will access this from the web using https://IP-Address-of-the-server-system in the browser. The 1st page will do the Diagnostics of the machine using diagnostic tools and Click on CLICK HERE TO CONTINUE TO PYDIO
It will start the Pydio Welcome screen
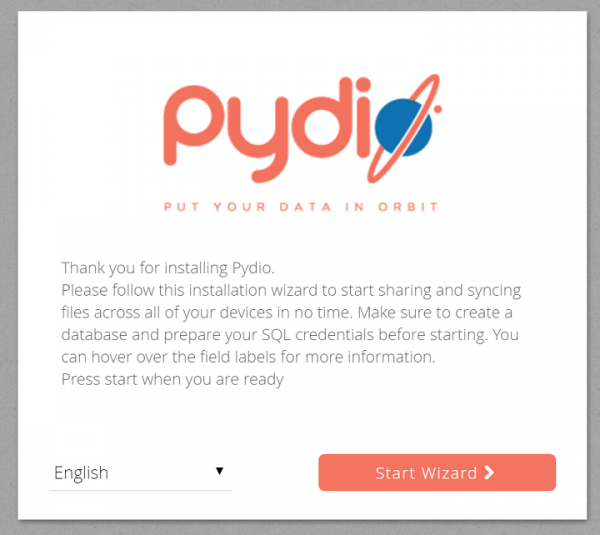
Click on Start Wizard Button and provide the information in the fields
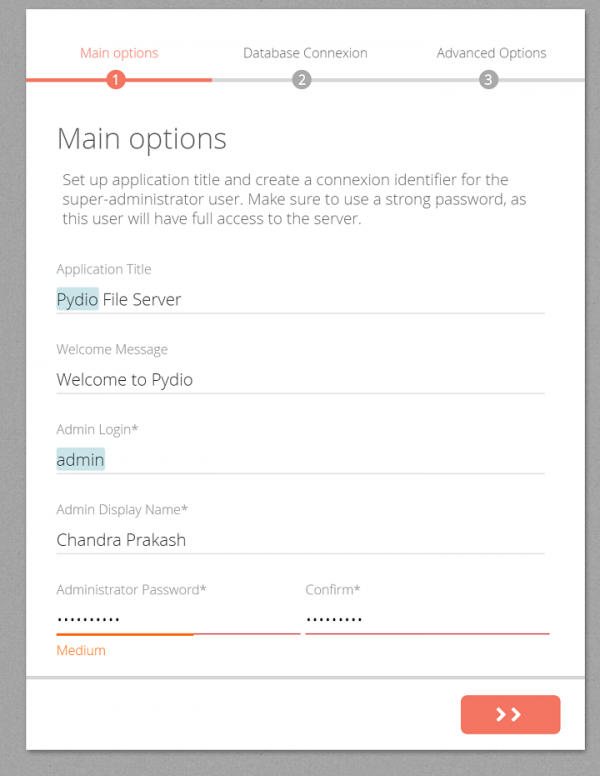
Application Title, which will appear on the browser’s Title Bar
Welcome message, appears on the login screen.
Administrator Login, the admin’s login user name.
Admin Display Name, which will be the display name for the administrator.
Administrator Password, provides the administrator password.
Click on the ‘>>’ button on the bottom of the screen to proceed.
Before we go to Database connection, we needed to create a database and users in MySql for Pydio
$ sudo mysql -uroot -p
mysql> create database pydio;
Query OK, 1 row affected (0.00 sec)
mysql> CREATE user 'pydio'@'localhost' IDENTIFIED BY 'pydio1234';
Query OK, 0 rows affected (0.00 sec)
mysql> GRANT ALL privileges ON pydio.* TO 'pydio'@'localhost';
Query OK, 0 rows affected (0.01 sec)
mysql> \q
The next page will find Database connection setup, choose Sqlite 3 from database pull down menu. Click on the test connection button to test that everything is working fine.
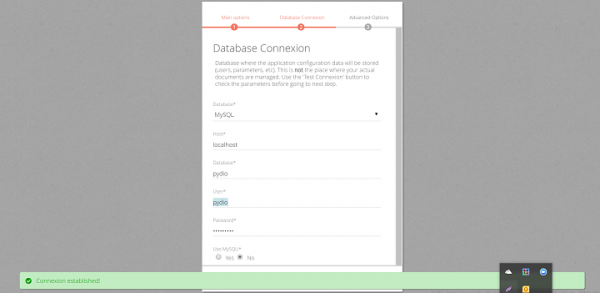
Then Click on ‘>’ button to continue.
In advance options on the page, we needed to enable email support.
For enable emails we select Yes from the menu.
For use PHP mailer select Mail.
Provide the email address for the Administrators emails.
We can check sending emails with configured data button to make sure that the configuration is working, click on ‘Try sending an email with the configured data’
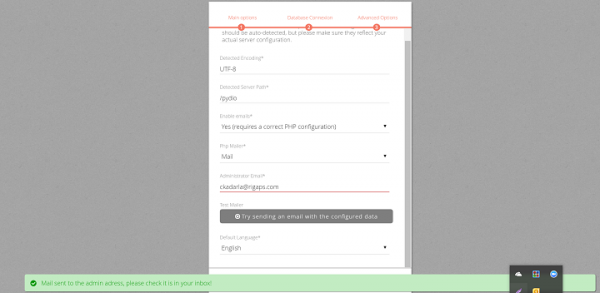
Finally, click on Install Pydio button.
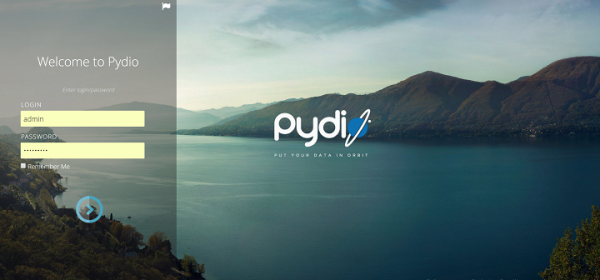
Accessing the Pydio
We can access the Pydio using http://IP-address from the browser.
We can use the following links to download clients.
Desktop: https://pydio.com
IOS Client: https://itunes.apple.com/fr/app/pydio/id709275884
Android Client: https://play.google.com/store/apps/details?id=com.pydio.android.Client
When we install the client Pydio, it lets you choose and sync each work space individually. When we run the client setup for the first time, we can choose what to sync with local folders. Once the synchronization is set we can add the workplaces later.
After this setup and configuration we can have our own File-server like Dropbox, or any other online storage, etc., use the Pydio to take control of your data with native clients and major desktops the data can be accessible whenever we need it as well.

254 Views
