
Article Categories
- All Categories
-
 Data Structure
-
 Networking
-
 RDBMS
RDBMS
-
 Operating System
-
 Java
Java
-
 MS Excel
-
 iOS
iOS
-
 HTML
HTML
-
 CSS
CSS
-
 Android
-
 Python
-
 C Programming
-
 C++
C++
-
 C#
C#
-
 MongoDB
-
 MySQL
MySQL
-
 Javascript
-
 PHP
PHP
-
 Economics & Finance
How to configure and setup postfix mail transfer agent on ubuntu
In this article, we will learn how to configure and install the most popular open source MTA (Mail Transfer Agent) Postfix, which can be used to route email delivery of the Linux Systems. Based on industry usage and estimates, most of the public mail servers are currently running on Postfix.
Installing the Software on Linux
Since, Postfix is a default package in the Ubuntu repositories, we can install it easily by using the ‘apt-get’ command. Before we install the packages, we need to update the system. We can do this by using the below command.
Here is a sample demo, I used hanuman.com as a domain.
$ sudo apt-get update
$ sudo apt-get install postfix
sudo apt-get install postfix
Reading package lists... Done
Building dependency tree
Reading state information... Done
The following packages were automatically installed and are no longer required:
libntdb1 python-ntdb
Use 'apt-get autoremove' to remove them.
Suggested packages:
procmail postfix-mysql postfix-pgsql postfix-ldap postfix-pcre sasl2-bin
dovecot-common postfix-cdb postfix-doc
The following NEW packages will be installed:
postfix0 upgraded, 1 newly installed, 0 to remove and 41 not upgraded.
Need to get 1,084 kB of archives.
After this operation, 3,609 kB of additional disk space will be used.
Get:1 http://us.archive.ubuntu.com/ubuntu/ trusty-updates/main postfix amd64 2.11.0-1ubuntu1 [1,084 kB]
Fetched 1,084 kB in 5s (196 kB/s)
Preconfiguring packages ...
Selecting previously unselected package postfix.
(Reading database ... 201768 files and directories currently installed.)
Preparing to unpack .../postfix_2.11.0-1ubuntu1_amd64.deb ...
Unpacking postfix (2.11.0-1ubuntu1) ...
Processing triggers for ufw (0.34~rc-0ubuntu2) ...
Processing triggers for ureadahead (0.100.0-16) ...
ureadahead will be reprofiled on next reboot
Processing triggers for man-db (2.6.7.1-1ubuntu1) ...
Setting up postfix (2.11.0-1ubuntu1) ...
Adding group `postfix' (GID 126) ...
Done.
Adding system user `postfix' (UID 118) ...
Adding new user `postfix' (UID 118) with group `postfix' ...
Not creating home directory `/var/spool/postfix'.
Creating /etc/postfix/dynamicmaps.cf
Adding tcp map entry to /etc/postfix/dynamicmaps.cf
Adding sqlite map entry to /etc/postfix/dynamicmaps.cf
Adding group `postdrop' (GID 127) ...
Done.
Here it will ask you to enter the type of the mail configuration which we want to configure on our server. In this demo, we are going to choose “internet site” which suits the environment.
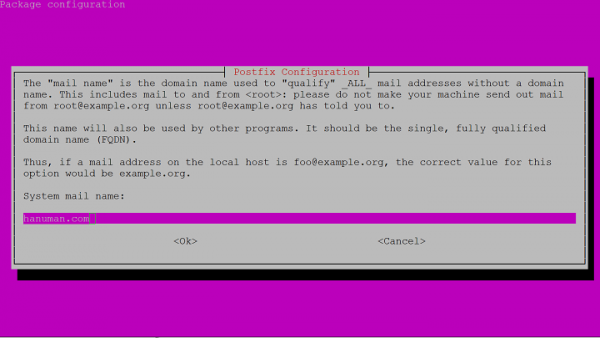
Next, we will provide the FQDN (Fully Qualified Domain Name). In this example, we used ‘hanuman.com’ as the server FQDN name but actually we will use it as domain.com generally. We needed to end the FQDN with a dot, but in Postfix we can exclude.

setting myhostname: hanuman.com
setting alias maps
setting alias database
mailname is not a fully qualified domain name. Not changing /etc/mailname.
setting destinations: mailserver, hanuman.com, localhost.localdomain, localhost
setting relayhost:
setting mynetworks: 127.0.0.0/8 [::ffff:127.0.0.0]/104 [::1]/128
setting mailbox_size_limit: 0
setting recipient_delimiter: +
setting inet_interfaces: all
setting inet_protocols: all
/etc/aliases does not exist, creating it.
WARNING: /etc/aliases exists, but does not have a root alias.
Postfix is now set up with a default configuration. If you need to make changes, edit
/etc/postfix/main.cf (and others) as needed. To view Postfix configuration values, see postconf(1).
After modifying main.cf, be sure to run '/etc/init.d/postfix reload'.
Running newaliases
* Stopping Postfix Mail Transport Agent postfix [ OK ]
* Starting Postfix Mail Transport Agent postfix [ OK ]
Processing triggers for ufw (0.34~rc-0ubuntu2) ...
Processing triggers for ureadahead (0.100.0-16) ...
Processing triggers for libc-bin (2.19-0ubuntu6.8) ...
Configuring Postfix
Now, we needed to change some basic settings in the Postifx main configuration file.
$ sudo nano /etc/postfix/main.cf
Search for the string ‘myhostname’ in the file. By default the ‘myhostname’ is set to localhost, which we needed to add to the FQDN name.
Myhostname = hanuman.com
If we want to configure a specific email which needs to be forwarded to another domain or we wish to deliver to an address(s) that we don’t map 1-to-1 with the system accounts, then we can remove the alias_maps and replace it with virtual_alias_maps.
Virtual_alias_maps = has:/etc/postfix/virtual
As we discussed in above the ‘mydestination’ parameters has been modified with the FQDN which we entered during the installation process. This holds any domains that the installation of Postfix is responsible.
We need to specify the ‘mynetworks’ parameter, which defines the computers which are able to use this mail server. In general, we set to local only(127.0.0.0/8), We can modify this by allowing the other hosts to use and send but this may be a vulnerability.
mynetworks = 127.0.0.0/8 [::ffff:127.0.0.0]/104 [::1]/128
We can also specify emails that we wish to create and on the left side the username to deliver the emails to on the right side, you can see this in the below example.
info@hanuman.com admin
info@hanuman.com is the email id to be used and admin is the username which allows you to send the emails on this server.
To check the emails and for the demo, we are creating an email address and route them to the same account for testing purpose. We can set this address to forward multiple user accounts using a comma-separated list.
info@hanuman.com adminuser
support@hanuman.com adminuser
root@hanuman.com root
contact@hanuman.com adminuser,root
Save the file and implement our mapping by using the below command –
$ sudo postmap /etc/postfix/virtual
Testing the Postfix Configuration
We can test the server that can receive and route the emails. We can test this by sending email to one of the email address which we mentioned in the virtual accounts.
We will get mail delivered to a file that matches the username in the /var/mail folder.
By default the mail program is not installed on the Ubuntu we can install this using the below command
$ sudo apt-get install mailutils
We can check the email using ‘mail’ command from the command prompt
$ echo "Test email " | mail -s "Test email " info@hanuman.com
By using the above configuration and setup, we will have a basic email functionality on our Ubuntu server. It is also very important to secure the server and make sure that Postfix is not configured as an open relay email server is the most targeted by the attackers.

787 Views
