
Article Categories
- All Categories
-
 Data Structure
-
 Networking
-
 RDBMS
RDBMS
-
 Operating System
-
 Java
Java
-
 MS Excel
-
 iOS
iOS
-
 HTML
HTML
-
 CSS
CSS
-
 Android
-
 Python
-
 C Programming
-
 C++
C++
-
 C#
C#
-
 MongoDB
-
 MySQL
MySQL
-
 Javascript
-
 PHP
PHP
-
 Economics & Finance
How to Quickly Install WordPress On Ubuntu/Linux Mint
WordPress is a free and open source website and blogging tool and it is the most popular CMS (content management system) on the internet. It allows you to easily set up flexible blogs and websites on top of a MySQL backend with PHP processing. This article describes “How to install WordPress on Linux with bash script”. Bash script automatically downloads and installs the latest version of WordPress in any place of your choice.
Installing LAMP
To install and run WordPress on your system, pre-installation on your web server is required.
Use the following command to install LAMP web server.
$ sudo apt-get install lamp-server^
The sample output should be like this –
Reading package lists... Done
Building dependency tree
Reading state information... Done
Note, selecting 'mysql-server-core-5.5' for task 'lamp-server'
Note, selecting 'mysql-server-5.5' for task 'lamp-server'
Note, selecting 'libaio1' for task 'lamp-server'
Note, selecting 'mysql-client-core-5.5' for task 'lamp-server'
Note, selecting 'apache2-mpm-prefork' for task 'lamp-server'
Note, selecting 'libaprutil1' for task 'lamp-server'
Note, selecting 'libapache2-mod-php5' for task 'lamp-server'
Note, selecting 'php5-mysql' for task 'lamp-server'
Note, selecting 'php5-common' for task 'lamp-server'
Note, selecting 'libaprutil1-dbd-sqlite3' for task 'lamp-server'
Note, selecting 'php5-readline' for task 'lamp-server'
Note, selecting 'ssl-cert' for task 'lamp-server'
Note, selecting 'mysql-client-5.5' for task 'lamp-server'
Note, selecting 'libhtml-template-perl' for task 'lamp-server'
Note, selecting 'libterm-readkey-perl' for task 'lamp-server'
Note, selecting 'libaprutil1-ldap' for task 'lamp-server'
Note, selecting 'mysql-common' for task 'lamp-server'
Note, selecting 'php5-cli' for task 'lamp-server'
Note, selecting 'libmysqlclient18' for task 'lamp-server'
Note, selecting 'apache2-data' for task 'lamp-server'
Note, selecting 'php5-json' for task 'lamp-server'
Note, selecting 'libapr1' for task 'lamp-server'
Note, selecting 'apache2' for task 'lamp-server'
................................................
To restart Apache2, use the following command –
$ sudo service apache2 restart
To restart mySQL, use the following command –
$ sudo service mysql restart
Now open localhost directory,use the following command to open localhost directory-
$ cd /var/www/html
Now use wget command to aceess the wp-install.sh, use the following command –
$ sudo wget https://goo.gl/MndEJc --no-check-certificate -O wp-install.sh
The sample output should be like this –
--2016-03-16 12:13:06-- https://goo.gl/MndEJc
Resolving goo.gl (goo.gl)... 216.58.196.110, 2404:6800:4007:806::200e
Connecting to goo.gl (goo.gl)|216.58.196.110|:443... connected.
HTTP request sent, awaiting response... 301 Moved Permanently
Location: https://raw.githubusercontent.com/WebPraktikos/wp-install/master/wp-install.sh [following]
--2016-03-16 12:13:06-- https://raw.githubusercontent.com/WebPraktikos/wp-install/master/wp-install.sh
Resolving raw.githubusercontent.com (raw.githubusercontent.com)... 103.245.222.133
Connecting to raw.githubusercontent.com (raw.githubusercontent.com)|103.245.222.133|:443... connected.
HTTP request sent, awaiting response... 200 OK
Length: 4410 (4.3K) [text/plain]
Saving to: ‘wp-install.sh’

100%[======================================>] 4,410 --.-K/s in 0s

2016-03-16 12:13:07 (1003 MB/s) - ‘wp-install.sh’ saved [4410/4410]
To install wp-install.sh, use the following command –
$ sudo bash wp-install.sh
The sample output should be like this –
creating: w3-total-cache/lib/EDD/
inflating: w3-total-cache/lib/EDD/integration.php
inflating: w3-total-cache/lib/EDD/EDD_SL_Plugin_Updater.php
creating: w3-total-cache/lib/SNS/
creating: w3-total-cache/lib/SNS/lib/
creating: w3-total-cache/lib/SNS/lib/requestcore/
inflating: w3-total-cache/lib/SNS/lib/requestcore/requestcore.class.php
inflating: w3-total-cache/lib/SNS/lib/requestcore/cacert.pem
inflating: w3-total-cache/lib/SNS/lib/requestcore/README.md
inflating: w3-total-cache/lib/SNS/lib/requestcore/LICENSE
creating: w3-total-cache/lib/SNS/utilities/
inflating: w3-total-cache/lib/SNS/utilities/utilities.class.php
inflating: w3-total-cache/lib/SNS/utilities/request.class.php
inflating: w3-total-cache/lib/SNS/utilities/response.class.php
inflating: w3-total-cache/lib/SNS/utilities/simplexml.class.php
inflating: w3-total-cache/lib/SNS/README.md
inflating: w3-total-cache/lib/SNS/sdk.class.php
creating: w3-total-cache/lib/SNS/services/
creating: w3-total-cache/lib/SNS/services/MessageValidator/
inflating: w3-total-cache/lib/SNS/services/MessageValidator/MessageValidator.php
inflating: w3-total-cache/lib/SNS/services/MessageValidator/sns-exceptions.php
inflating: w3-total-cache/lib/SNS/services/MessageValidator/Message.php
inflating: w3-total-cache/lib/SNS/services/sns.class.php
creating: w3-total-cache/lib/Microsoft/
..........................................................
While installing WordPress, it will ask Database name and password. Make sure to give proper information to set up WordPress. Type the following URL in your favorite web browser-
http://localhost/wp-admin/install.php
The sample output should be like this –
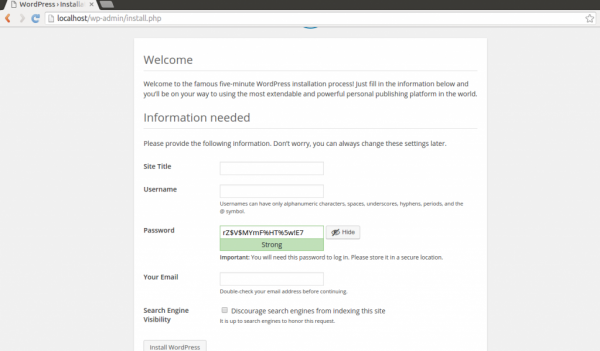
Fill the details as your needed and press install WordPress button.After done all successful steps, you will get screen as shown below –
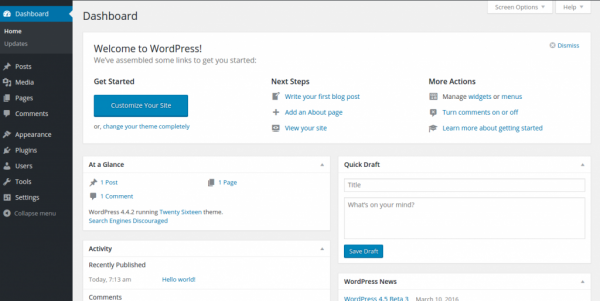
Congratulations! Now, you know “How to Quickly Install WordPress On Ubuntu/Linux Mint”. We’ll learn more about these types of commands in our next Linux post. Keep reading!

2K+ Views
