
Article Categories
- All Categories
-
 Data Structure
-
 Networking
-
 RDBMS
RDBMS
-
 Operating System
-
 Java
Java
-
 MS Excel
-
 iOS
iOS
-
 HTML
HTML
-
 CSS
CSS
-
 Android
-
 Python
-
 C Programming
-
 C++
C++
-
 C#
C#
-
 MongoDB
-
 MySQL
MySQL
-
 Javascript
-
 PHP
PHP
-
 Economics & Finance
How to install and configure own wordpress instance on linux centos 7
In this article, we will learn about how to install WordPress in an open source website and blogging tools which works with PHP and MySQL. WordPress is the most popular Content management system (CRM) used on the Internet and it has more plugins to extend the functionality of the WordPress.
Prerequisites
Before we set up, the we need to have the below –
We need a non-root user with Sudo privileges
We need to setup LAMP (Linux, Apache, MySQL and PHP) which needs to be installed on the Centos 7 Server.
Creating MySQL Database and User for the WordPress
Assuming that we have already had LAMP setup on the machine and the WordPress will use RDBMS to manage information for the site and the users. We have MySQL installed in the system and we needed to setup user for the WordPress to work with MySQL.
Log into the MySQL server with root user with the below command
# mysql –uroot –p
We need to create a database for WordPress. Below is the command to create the database in MySQL.
# mysql> create database wordpress;
Now we will create a new user to the users list with the WordPress Database which we created in the about command. Below is the command to create the user WordPress admin.
# mysql> CREATE USER wordpressadmin@localhost IDENTIFIED by ‘password’;
Here, for demo purpose, I am creating a user ‘wordpressadmin’ which you can define for yourself and assigned the password for the user as “password” (you can setup accordingly) which will help setting- up the WordPress in further steps.
We need to provide the user ‘wordpressadmin’ for accessing the database. Below is the command to link the database and user together by granting the database access.
# mysql> GRANT ALL PRIVILEGES ON wordpress.* TO wordpressadmin@localhost IDENTIFIED BY ‘password’
We need to flush the privileges of the database access, so that MySQL will know about the recent privilege changes which we made in the previous step.
# flush privilegs;
# exit
Installing the WordPress
Before we install and setup the WordPress, we need to install the PHP module that we needed to continue the installation and ensure that WordPress works fine.
‘php-gd’ is the module which is responsible for WordPress to resize the images, and to create the thumbnails, We can install the package directly from CentOS’s default using the yum repository.
# yum install php-gd
Now, we will restart the Apache server so that the PHP-modules will be loaded.
# service httpd restart
The next step would be to download and install the WordPress from the project’s repository. The WordPress team will allows and maintain very recent stable versions with the same URL. Below is the command to get the latest stable version of the WordPress from their repository.
# cd ~
# wget http://wordpress.org/latest.tar.gz
Then, we will uncompress the archive file which contains the WordPress files which we needed to set up the environment. We can use the below command to extract the file
# tar –xvf latest.tar.gz
The output will be that we will have one directory called WordPress in the home directory, now we needed to finish the moving the files to Apache’s document root directory, and create an upload folder in the WordPress folders so that we can upload the images and contents from WordPress
# mv wordpress/ /var/www/html
# mkdir /var/www/html/wp-content/uploads
We needed to change the folder ownership and permission of the WordPress files and folders to Apache which will increase the security, we can use the below command to change the ownership of the folder and files
# chown –R apache:apache /var/www/html/wordpress
Configure WordPress application
Most of the configuration will be done on the GUI interface, but we needed to copy some database configuration files from the samples and edit it with the database name and credentials.
# cd /var/www/html/wordpress
# cp wp-config-samples.php wp-config.php
# nano wp-config.php
We need to modify some parameters that holds the database information. We needed to font eh MySQL settings section on the file and change the DB_NAME DB_USER and DB_PASSWORD values.
Below is the sample file of MySQL settings section for your clarification
* * MySQL settings
* * Secret keys
* * Database table prefix
* * ABSPATH
*
* @link https://codex.wordpress.org/Editing_wp-config.php
*
* @package WordPress
*/
// ** MySQL settings - You can get this info from your web host ** //
/** The name of the database for WordPress */
define('DB_NAME', 'database_name_here');
/** MySQL database username */
define('DB_USER', 'username_here');
/** MySQL database password */
define('DB_PASSWORD', 'password_here');
/** MySQL hostname */
define('DB_HOST', 'localhost');
/** Database Charset to use in creating database tables. */
define('DB_CHARSET', 'utf8');
Configuring the Installation on the GUI interface or Web interface
We needed to complete the installation on the GUI or web interface to create an admin user for the WordPress and to complete the WordPress installation.
http://IP-Address/wordpress
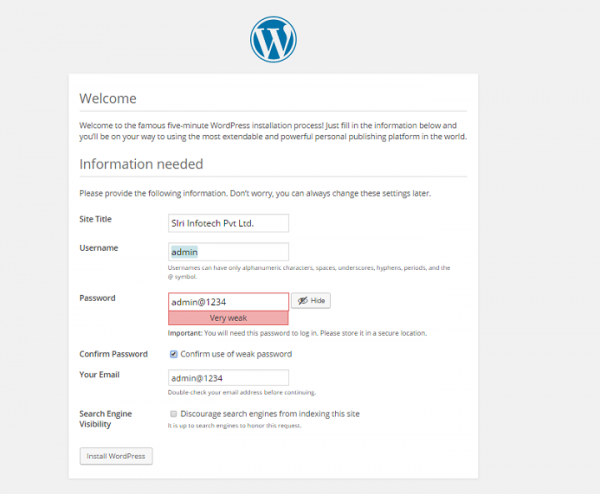
Provide the Site tile for which organization we want to use and provide the admin username and password and provide the admin user’s email address
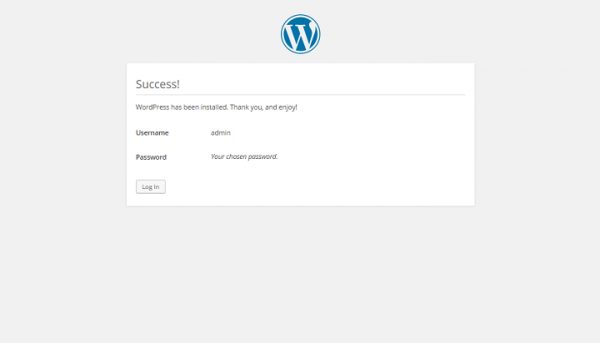
When we click on Install WordPress the admin user will be created and the environment is setup for you, the WordPress wizard will confirm the installation.
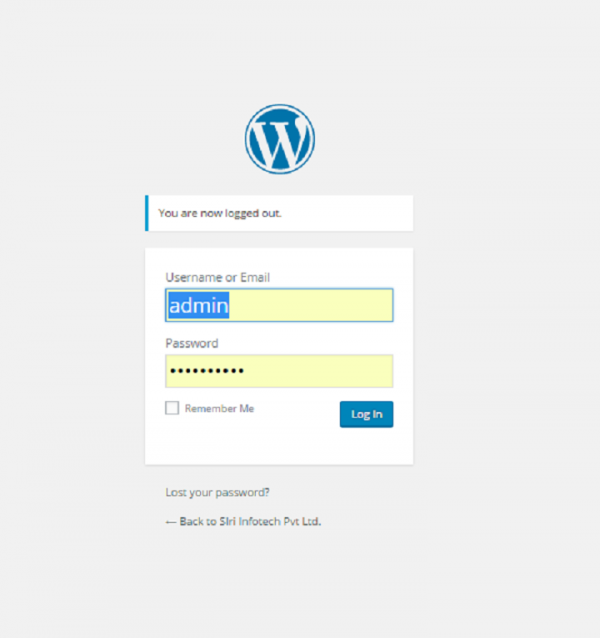
Click on the Log in button and fill the administrator account information which we have given at the time of setup to log in
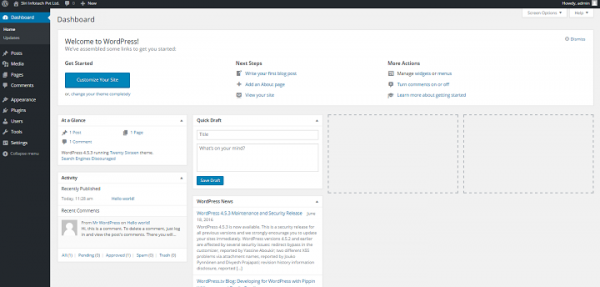
Once we Log in the WordPress dashboard will look like this
After the setup and configuration, you should be now have a own WordPress instance up and running successfully on a CentOS 7 server. In future we will come more options and know more about WordPress.

436 Views
