
Article Categories
- All Categories
-
 Data Structure
-
 Networking
-
 RDBMS
RDBMS
-
 Operating System
-
 Java
Java
-
 MS Excel
-
 iOS
iOS
-
 HTML
HTML
-
 CSS
CSS
-
 Android
-
 Python
-
 C Programming
-
 C++
C++
-
 C#
C#
-
 MongoDB
-
 MySQL
MySQL
-
 Javascript
-
 PHP
PHP
-
 Economics & Finance
How to install Angry IP Scanner from PPA in Ubuntu/Linux Mint
Angry IP Scanner is an open-source and cross-platform network scanner designed for fast and simple IP address and port scanning. This lightweight tool allows users to scan IP addresses within any specified range through an intuitive graphical interface. When Angry IP Scanner detects an active IP address, it resolves the MAC address, hostname, and available ports. The collected data can be exported in multiple formats including TXT, CSV, XML, or IP-Port list files.
Prerequisites
Before installing Angry IP Scanner, ensure your system is running Ubuntu or Linux Mint with administrator privileges. The installation requires adding a third-party PPA repository and installing Java dependencies.
Adding the PPA Repository
First, add the Angry IP Scanner PPA repository to your system using the following command:
sudo add-apt-repository ppa:upubuntu-com/network
The system will display repository information and prompt for confirmation:
More info: https://launchpad.net/~upubuntu-com/+archive/ubuntu/network
Press [ENTER] to continue or ctrl-c to cancel adding it

gpg: keyring `/tmp/tmpaj4fxqym/secring.gpg' created
gpg: keyring `/tmp/tmpaj4fxqym/pubring.gpg' created
gpg: requesting key E06E6293 from hkp server keyserver.ubuntu.com
gpg: key E06E6293: public key "Launchpad PPA for upubuntu.com" imported
OK
Installing Angry IP Scanner
Update the package index to refresh the repository information:
sudo apt-get update
Install Angry IP Scanner using the package name ipscan:
sudo apt-get install ipscan
The installation will include Java Runtime Environment (JRE) and other required dependencies:
Reading package lists... Done
Building dependency tree
Reading state information... Done
The following extra packages will be installed:
  ca-certificates-java fonts-dejavu-extra java-common libatk-wrapper-java
  libatk-wrapper-java-jni libgconf2-4 libsctp1 lksctp-tools openjdk-7-jre
  openjdk-7-jre-headless tzdata-java
The following NEW packages will be installed:
  ca-certificates-java fonts-dejavu-extra ipscan java-common
Launching the Application
Start Angry IP Scanner from the terminal:
ipscan
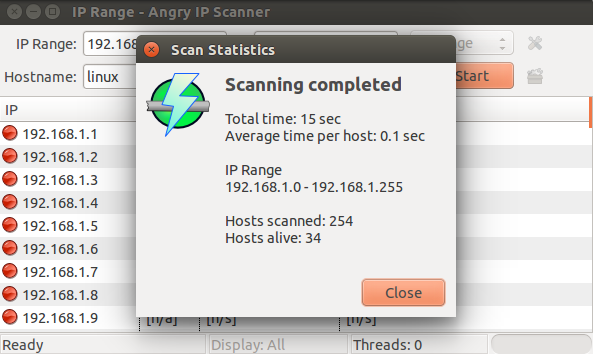
The application will open with a graphical interface showing options for IP range scanning, ping settings, and export formats.
Removing Angry IP Scanner
To uninstall Angry IP Scanner, use the following command:
sudo apt-get remove ipscan
Remove the PPA repository to clean up your system:
sudo add-apt-repository --remove ppa:upubuntu-com/network
Update the package index after removing the PPA:
sudo apt-get update
Key Features
-
Fast scanning − Multi-threaded scanning capability for quick network discovery
-
Port detection − Identifies open ports on discovered hosts
-
Export options − Save results in TXT, CSV, XML, or IP-Port list formats
-
Cross-platform − Available for Linux, Windows, and macOS
Conclusion
Angry IP Scanner provides a simple yet powerful solution for network scanning in Ubuntu and Linux Mint. The PPA installation method ensures easy updates and dependency management, making it an excellent choice for network administrators and security professionals.

8K+ Views
