
Article Categories
- All Categories
-
 Data Structure
-
 Networking
-
 RDBMS
RDBMS
-
 Operating System
-
 Java
Java
-
 MS Excel
-
 iOS
iOS
-
 HTML
HTML
-
 CSS
CSS
-
 Android
-
 Python
-
 C Programming
-
 C++
C++
-
 C#
C#
-
 MongoDB
-
 MySQL
MySQL
-
 Javascript
-
 PHP
PHP
-
 Economics & Finance
How to prevent number increments when using AutoFill by dragging in Excel?
What is the Number Increment?
Microsoft Excel has a numbering system that allows you to generate a sequence of incremented numerals automatically. In cell A1, insert any beginning value. To create a pattern, put the following value in cell A2. Drag the bottom filling slider down the column to produce a sequence of incremental numbers by selecting those two cells. Putting 1 and 2 in cells A1 and A2 would, for instance, yield a series of 1, 2, 3, 4, and 5 when carried down to cell A5.
How to Prevent Number Increment
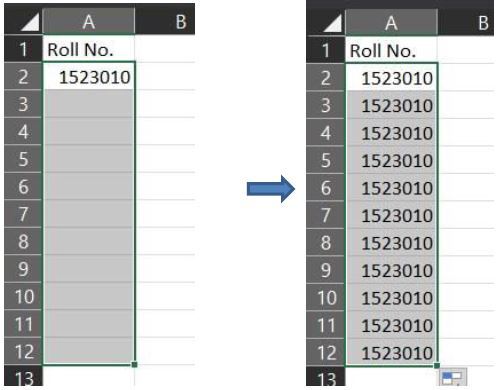
For instance, if cell A2 has been filled with 1523010, you must fill every cell below using the same value. The number increases automatically when we move Cell A2's AutoFill slider down. Is there an option to stop the number from incrementing while using AutoFill in Excel? The strategy outlined below will assist you in completing the task.

Prevent Number Increment When Using AutoFill by Hotkey
The number will not rise automatically when we hold down the Ctrl key while sliding the AutoFill slider in Excel. In our scenario, pick Cell A2; press down the Ctrl key to turn the mouse cursor to a double-cross; then drag the AutoFill handles across the cells as needed.

Prevent Number Increment with the Fill Feature
You may also use Excel's Fill tool to fill subsequent empty spaces with the information of the first cell without the amount increasing automatically. Please perform the following
Select the cell with information and the blank cells below it, then go to Home > Fill > Down.
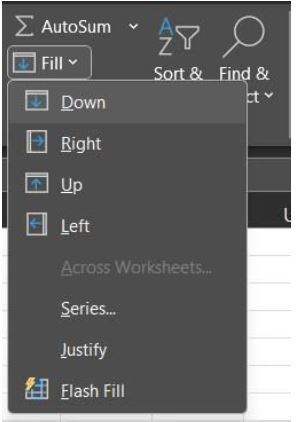
And now, the blank cells below have been filled with the first cell's information exactly, with no automated number incrementation.
Prevent Number Increment with Kutools for Excel
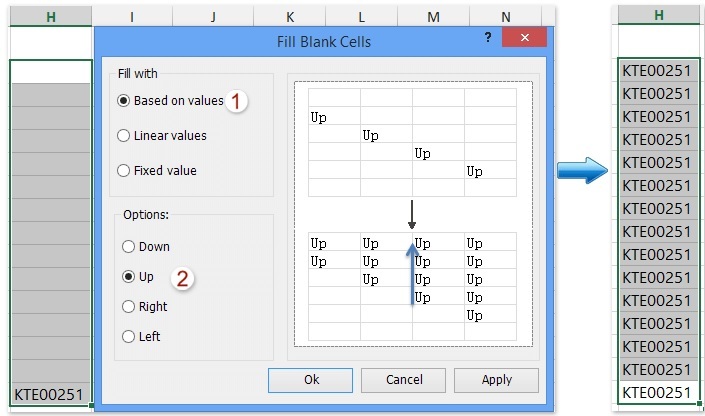
If you've got Kutools for Excel set up, you may block numbers from incrementing in Excel by using its Fill Blank Cells feature. Please perform the following
Kutools for Excel Contains over 300 useful Excel tools 30-day full-featured free trial, no debit or credit card needed.
Choose the cell with information and the empty ones below it, then go to Kutools > Insert > Fill Blank Cells.

In the Fill Blank Cells dialogue box that opens, select the Based on Numbers option within the Fill with section, the Down choice in the Choices section, and then click the Ok button.
The blank cells below have been filled with the initial cell's contents exactly, with no automated number incrementation.

Disable Data Autofill in Excel
In the Microsoft Excel Ribbon, choose the File tab and then pick "Options." Select "Advanced" from the set of preferences on the left side of the Options dialogue box.
Look for the Editing Options option on the right of the dialogue box. Uncheck the box next to "Enable AutoComplete for Cell Values" to prevent Excel from attempting to finish what you input based on previous values in cells that start with the exact same characters.
To disable the fill handle, uncheck the "Enable Fill Handle and Cell Drag-and-Drop" box. You cannot drag across the lower-right corner of a cell to fill neighbouring cells with successive or associated information if this setting is disabled.
Find the Excel Options dialogue box's Cut, Copy, and Paste area. To disable the Auto Fill Choices button that shows when you click and drag the Fill manage, uncheck the "Show Paste Options Button When Content Is Pasted" option. When you disable this feature, you will not notice the Auto Fill Options button, which typically displays in the bottom right corner of the last cell you fill. The button opens a menu where you may fine-tune the input process only to pick up the styling or information contents of the cell where you began serving.
Undo the Autofill
The keyboard shortcut Ctrl + Z is the simplest and quickest method to undo the autofill. This usually reverses the previous action, which was the automated filling of the columns using the identical formula used for the initial cell.
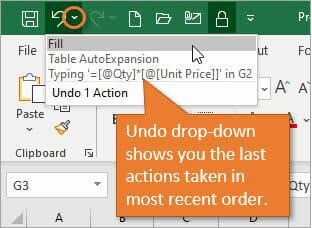
You may also achieve the same by using the Undo option in the Quick Access Toolbar.
The small drop-down button next to the Undo option reveals a menu that displays the most recent actions taken by Excel. Excel's last operation in the above picture was to fill the cells in each column with the equation. So, using the Undo button (or pressing Ctrl + Z) once will undo the fill action.
Auto Fill for the Column is Temporarily Disabled
When you undo auto-fill in a particular column, the automatic Fill for that specific row is deactivated. The column will NOT fill down if you enter another formula. Even so, under the AutoCorrect Options menu, users will find an option to overwrite every cell in this column with the given procedure. This will substitute the formula you just typed for any formulae in the column. It simply repeats the Fill step. You may also re-enable auto-fill by clearing or deleting every cell in the column and entering a new formula.
How to Use the Fill Handle Field to Auto-Populate Dates in Excel
This is how to use the handle for the fill box to fill in the dates within an Excel spreadsheet
Choose a cell to insert a date into, then enter the date in the following manner mm/dd/yyyy. For instance, the proper format is 29/05/2023.
Choose the cell where you just wrote the date once more, then left-click and hold down your mouse button in the bottom right area of the cell. A little dot at the bottom of the filled area normally activates the handle for filling and shows wherever to click.
Drag the handle for the fill box across the number of cells where you wish to input more dates.
Release the mouse button. This inserts the ordered series of dates into the specified cells immediately.

3K+ Views
