
Article Categories
- All Categories
-
 Data Structure
-
 Networking
-
 RDBMS
RDBMS
-
 Operating System
-
 Java
Java
-
 MS Excel
-
 iOS
iOS
-
 HTML
HTML
-
 CSS
CSS
-
 Android
-
 Python
-
 C Programming
-
 C++
C++
-
 C#
C#
-
 MongoDB
-
 MySQL
MySQL
-
 Javascript
-
 PHP
PHP
-
 Economics & Finance
How to merge two columns into one with alternating values in Excel?
In the article, the users are going to merge two columns into one column with alternating values in Microsoft Excel. There are numerous types of structures within the Excel sheet including home, Visual Basic Applications VBA, and Ku-tools tab to merge two columns into one with Ku-tools that will open the dialog box according to the need. The users can use the visual basic to merge the two columns into one. This method may be completed utilizing an easy way within Microsoft Excel by using the Ku-tools tab to merge the two columns in a different column.
Example 1: Merge two columns into one with alternating values by using VBA
Step 1
Deliberate the Excel worksheet. First, open the Excel sheet and create the data one by one from cells A1 to B5 in any cell according to the need as shown below.

Step 2
In the sheet, place the cursor in any cell and go to the ribbon. In the ribbon, there are many tabs included in the top corner. Place the cursor in the Developer tab and click on the tab that has many options included. On the Developer tab, place the cursor and click on the Visual Basic Applications tab in the Code group which will open the VBA. On this window, there are many tabs in the ribbon. Place the cursor and click on the Insert tab which has many options. Click on the Module tab that opens the coding window which the users have to make a program to hide all the worksheets except the active sheet as shown below.

Step 3
In this coding window, make the program that has to run the code. The program is that ?
Sub MergeCol()
Dim x1, x2 As Range
Dim k1 As Worksheet
Dim r1, r2, r3 As Long
Dim f1 As Long
On Error GoTo Err
Set x1 = Application.InputBox("Choose the  two types of columns:", "Excel", xText, , , , , 8)
If x1 Is Nothing Then
Err:
   Application.ScreenUpdating = True
   Exit Sub
End If
Set x2 = Application.InputBox("Select a cell:", "Excel", xText, , , , , 8)
If x2 Is Nothing Then
   Exit Sub
End If
Application.ScreenUpdating = False
Set k1 = x2.Worksheet
r1 = x2.Row
r2 = x2.Column
r3 = 0
   For f1 = 1 To x1.Count
      Set x2 = k1.Cells(r1 + r3, r2)
      x2.Value = x1.Item(f1).Value
      r3 = r3 + 1
   Next f1
Application.ScreenUpdating = True
End Sub
Step 4
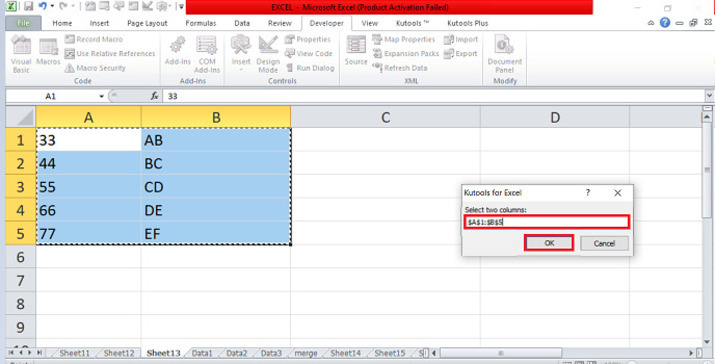
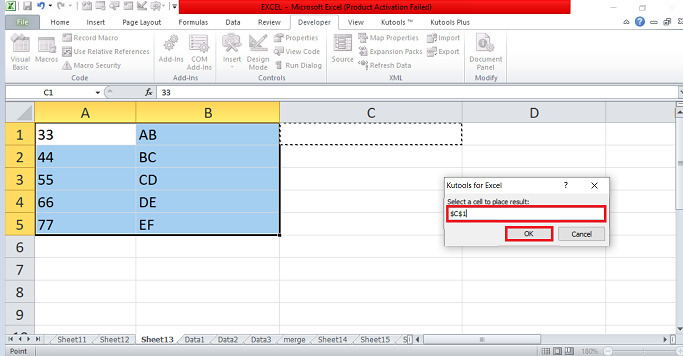
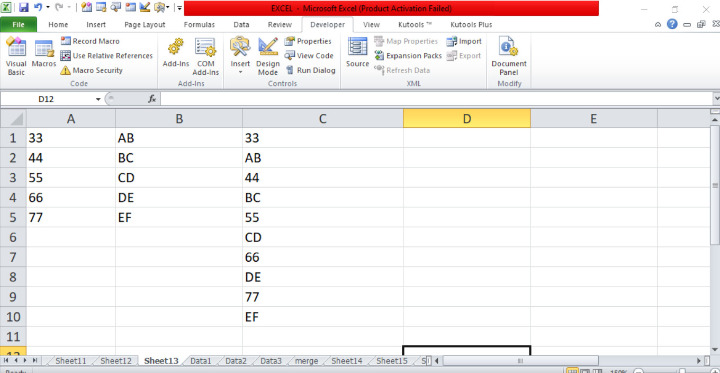
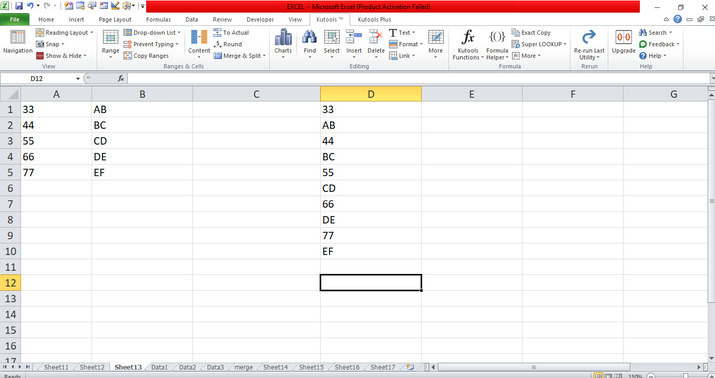
In the visual basic window, place the cursor in the ribbon and click on the Run icon to run this code that will open the dialog box in the active worksheet. Select all the cells or two columns which you want to merge the columns. Click on the Run tab then it will return to the sheet. In the sheet, it opens the pop-up window to ask to select two columns. In the pop-up window, select the range from A1 to B5 then click on the ok button that will open the pop-up window. In the window, select any cell where we have to merge the columns into one column. It will merge the two columns into one as shown below.
Example 2: Merge two columns into one with alternating values by using Ku-tools
Step 1
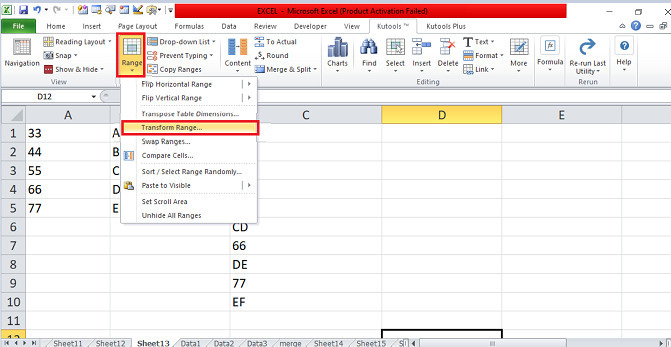
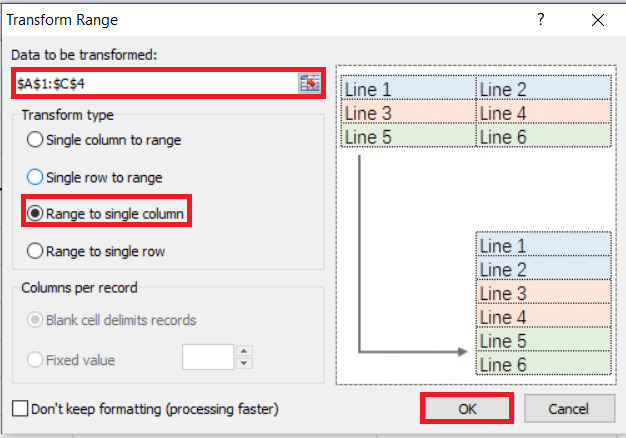
In the sheet, place the cursor in the ribbon. In the ribbon, there are many tabs included in the top corner. Place the cursor in the Ku-tools tab and click on the tab that has many options included. On the Ku-tools tab, place the cursor and click on the Range tab which has a drop-down menu on the Ranges & Cells group. Click on the menu and select the Transform Range tab as shown below ?
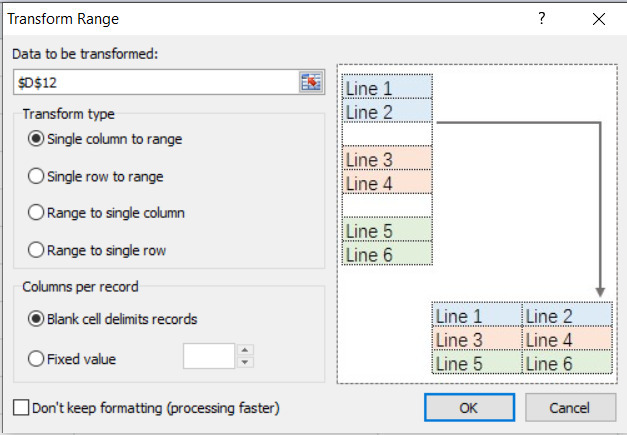
Step 2
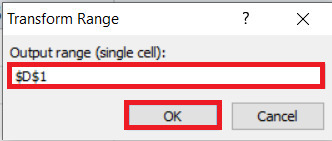
In the dialog box, select the range from A1 to C5 and enable the option Range to single column then click on the ok button. It will open the pop-up window that will ask for the output range. Select any cell select any cell where we have to merge the columns in one column then it will open the pop-up window. In this window click on the ok button that will merge the two columns into one as shown below.

The users utilized the easy instances to display how they merge two columns in different cells in only one column by using visual basic applications and the Ku-tools tab. The users used the necessary tabs which are included in the ribbon. They have to practice the essential options from the ribbon and modify the data according to the need.

1K+ Views
