
Article Categories
- All Categories
-
 Data Structure
-
 Networking
-
 RDBMS
RDBMS
-
 Operating System
-
 Java
Java
-
 MS Excel
-
 iOS
iOS
-
 HTML
HTML
-
 CSS
CSS
-
 Android
-
 Python
-
 C Programming
-
 C++
C++
-
 C#
C#
-
 MongoDB
-
 MySQL
MySQL
-
 Javascript
-
 PHP
PHP
-
 Economics & Finance
How to Insert file Name or Path into cell/header or Footer in Excel?
In this article, the user will understand the process of inserting a file name or path into the cell/header or footer. This article briefs two examples. Here, the first example allows the user to insert the file name, path, and complete details with the help of the formula in a stepwise manner, while the second example, allows the user to use the header or footer option, to perform the same task. All the guided steps are detailed and thorough. Refer to both examples to understand the working of the provided examples, and to master the process of inserting file name or path in cell or header or footer of Excel.
Example 1: To demonstrate the method, insert the current file name or path in a cell by using a valid Excel Formula.
Step 1
In this example, the user will learn the process of inserting the current file name or path within a cell by using the available formula. First, will create two columns. Here, the first column stores the file name, and the second column stores the results data. The first column will provide the possible description of the formula, that will be going to use with the B column of respective cells. For proper reference consider the below?provided snapshot of data:

Step 2
After that go to the B3 cell, and type "=LEFT(CELL("filename",A3),FIND("[",CELL("filename",A3),1)?1)". Snapshot for the same is provided below:

The explanation for formula
CELL("filename", A3): This part of the formula retrieves the full path and filename of the A3 cell. The CELL function is used to retrieve information about a cell, and the "filename" argument specifies that we want to retrieve the filename.
FIND("[", CELL("filename", A3), 1): This part of the formula allows user to determine the position of the opening square bracket "[" within the filename. Results obtained in previous steps are used here to process data.
LEFT(CELL("filename", A3), FIND("[", CELL("filename", A3), 1) ? 1): This function is used to extract a specified number of characters from the left side of a text string. For this case, the filename obtained in step 1 is used to extract the portion required string.
In summary, it is evaluated that the first argument of the LEFT function is CELL("filename", A3), which is the full filename. The second argument determines the number of characters to be extracted, subtracting 1 from the position of the "[" character found in step 2. By subtracting 1, it excludes the "[" character itself from the extracted portion.
Step 3
Press the "Enter" key. The B3 cell will display the sheet path, as depicted below. After that click on the B4 cell and type formula "=RIGHT(CELL("filename"),LEN(CELL("filename"))?FIND("]",CELL("filename"),1))".
Snapshot for formula

The Explanation for Formula
CELL("filename"): This part of the formula allows the user to retrieve the full path and filename of the current worksheet.
LEN(CELL("filename")): This part of the formula allows the user calculates the length of the filename obtained in step 1. The LEN function returns the number of characters in a text string.
FIND("]", CELL("filename"), 1): This part of the formula finds the position of the closing square bracket "]" within the filename. The FIND function is used to locate a specific character or text within a string. In this case, it looks for the "]" character within the filename obtained in step 1.
LEN(CELL("filename")) ? FIND("]", CELL("filename"), 1): This field calculates the number of characters to be extracted from the right side of the filename.
RIGHT(CELL("filename"), LEN(CELL("filename")) ? FIND("]", CELL("filename"), 1)): This is the main part of the formula. The provided function extracts some specified number of characters from the right side of a text string.
Step 4
After that press the "Enter" key to generate the required result. Here, it is observed that the provided formula will generate the active sheet name only.

Step 5
Go to the B3 cell, and type the formula,
"=MID(CELL("filename"),SEARCH("[",CELL("filename"))+1, SEARCH("]",CELL("filename"))?SEARCH("[",CELL("filename"))?1)". A snapshot of the same is provided below:

Step 6
Press the "Enter" key to display the required results. A snapshot for the same is provided below:

Example 2: To demonstrate the method, insert the file path in an Excel sheet by using the "custom header option".
Step 1
In this example, the user will understand the process of inserting the file path in the excel sheet by using the header and footer option. Consider the below provided excel sheet for reference:

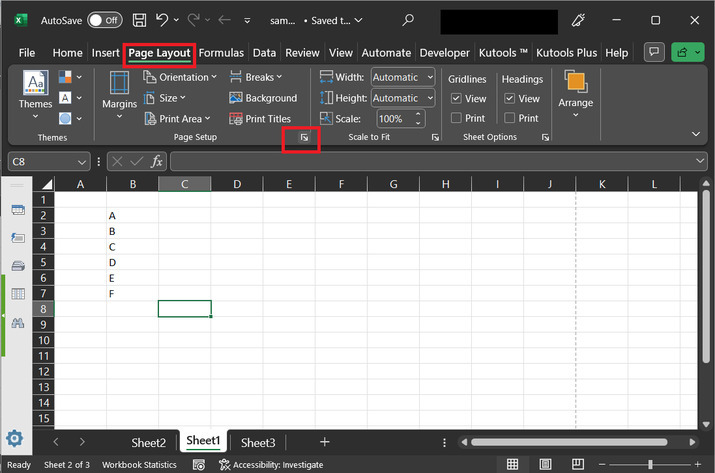
Step 2
In this step, the user needs to go to the "Page Layout" tab, and then click on the arrow, highlighted below:
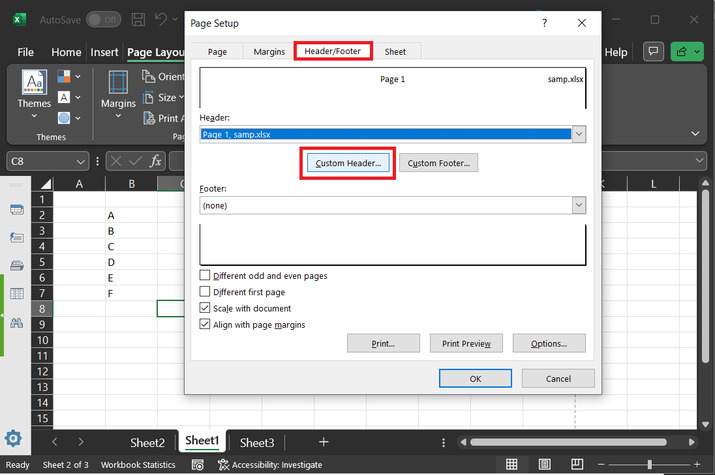
Step 3
The above step will open the "Page Setup" dialog box, along with different tabs and options. Among the provided list of options, the user needs to click on the "Header/ Footer" tab. After that user will observe two buttons, one for "Custom Header", and the second for "custom footer". A snapshot for the same is provided below:
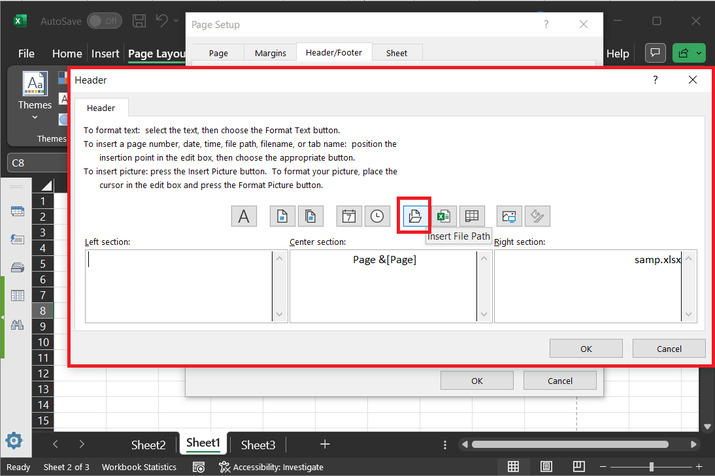
Step 4
The above?provided step will open a "Header" dialog box. This dialog box contains some button options along with three sections, such as left, center, and right. Click on the "Insert file path" button, as highlighted below:
Step 5
The above step will add a few code lines "&[Path] &[File]" to the left section, "Page &[Page]" to the center section, and the file name "samp.xlsx" to the right section. After that click on the "OK" button. snapshot for the same is provided below:

Step 6
After the successful completion of the above step, the user will observe that the file path will be observed in the header section, as shown below. Finally, click on the "OK" button.

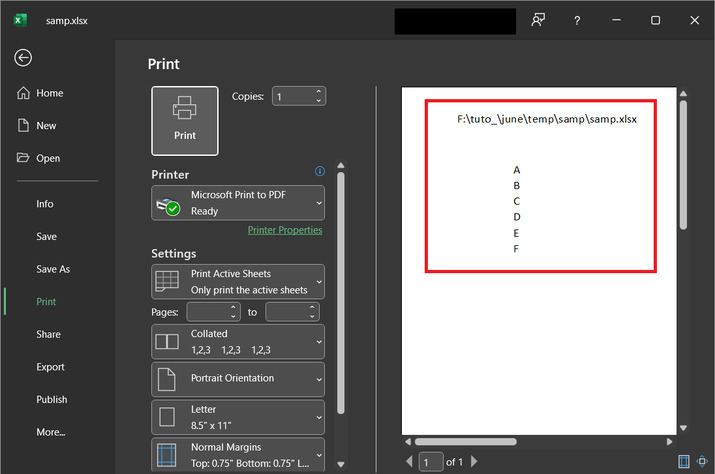
Step 7
Now, to observe the changes made to the cell sheet, use a key combination, "Ctrl+P". This step will open the print preview for the sheet, in the highlighted portion user can easily check that the file path name is shown above the Excel sheet. Consider the below?provided snapshot for proper reference:
Conclusion
This article allows the user to insert the file name or path into the cells, header, or footer. Both the illustrated examples are easy to use and contain proper valid explanation steps.

4K+ Views
