
Article Categories
- All Categories
-
 Data Structure
-
 Networking
-
 RDBMS
RDBMS
-
 Operating System
-
 Java
Java
-
 MS Excel
-
 iOS
iOS
-
 HTML
HTML
-
 CSS
CSS
-
 Android
-
 Python
-
 C Programming
-
 C++
C++
-
 C#
C#
-
 MongoDB
-
 MySQL
MySQL
-
 Javascript
-
 PHP
PHP
-
 Economics & Finance
How to Implement Preferences Settings Screen in Android?
Achieving a user-friendly Android application requires providing customizable preferences to users. To accomplish this task, integrating a preferences settings screen is essential. This screen gives users the flexibility to personalize their app experience by modifying different options and configurations as per their needs and desires.
The hub for modifying preferences encompasses a screen where app users can easily access and customize settings according to their liking. The user-friendly interface includes options such as theme selection, notification preferences, language selection, and more, all designed to enhance engagement and satisfaction. By allowing developers to tailor the application specifically to individual needs, this feature enhances user experience.
This guide delves into implementing a preferences settings screen in Android. Its objective is to ensure that users have a personalized experience without interruptions or inconve-nience. The guide aims to provide practical steps for a seamless process.
Preferences Settings Screen
The Preferences Settings Screen in Android is a component that provides users with a user interface to personalize their app experience. It acts as a central location where they can modify settings related to the behavior, appearance, and functionality of the application according to their individual preferences.
The user-friendly Preferences Settings Screen allows for convenient management of preference-s. This includes selecting a preferred language, customizing the theme, choosing notification settings, managing account details, ensuring privacy settings and much more.
Users can personalise their app experience by tailoring the application's behavior to their precise needs and preferences. Developers incorporate this feature to ensure flexibility, satisfaction and improve the user's overall experience.
Approaches
Implementing a Preferences Settings Screen in Android using Java involves several steps and methods. Here are the different methods you can use to achieve this:
Creating a Preferences XML File
Creating a Preferences Fragment
Handling Preference Changes
Creating a Preferences XML File
To implement a Preferences Settings Screen in Android, you need to define the layout and structure of the screen using an XML file. This file will contain preference categories, preference items, and their attributes. By defining the preferences in XML, you can easily customize their appearance, define dependencies between preferences, and specify default values.
Algorithm
Define the structure of the preferences screen using an XML file.
Specify preference categories and items with their respective attributes.
Customize the appearance, dependencies, and default values of preferences as needed.
Example
//res/preferences.xml
<PreferenceCategory
   android:title="General">
   <SwitchPreference
      android:key="pref_key_push_notification"
      android:title="Enable Push Notification"
      android:summary="Toggle push notification on/off"
      android:defaultValue="false" />

   <SwitchPreference
      android:key="pref_key_send_weekly_emails"
      android:title="Send Weekly Emails"
      android:summary="Toggle sending of weekly emails on/off"
      android:defaultValue="false" />
</PreferenceCategory>

<PreferenceCategory
   android:title="Account">
   <EditTextPreference
      android:key="pref_key_email"
      android:title="Email"
      android:summary="Enter your email address"
      android:defaultValue="" />

   <EditTextPreference
      android:key="pref_key_name"
      android:title="Name"
      android:summary="Enter your name"
      android:defaultValue="" />
</PreferenceCategory>

//arrays.xml
<?xml version="1.0" encoding="utf-8"?>
<resources>
   <string-array name="language_entries">
      <item>English</item>
      <item>Spanish</item>
      <item>French</item>
   </string-array>
   <string-array name="language_values">
      <item>en</item>
      <item>es</item>
      <item>fr</item>
   </string-array>
</resources>

//SettingsFragment.java
public class SettingsFragment extends PreferenceFragmentCompat {
   @Override
   public void onCreatePreferences(Bundle savedInstanceState,
String rootKey) {
      setPreferencesFromResource(R.xml.preferences, rootKey);
   }
}

//MainActivity.java
public class MainActivity extends AppCompatActivity {
   @Override
   protected void onCreate(Bundle savedInstanceState) {
      super.onCreate(savedInstanceState);
      setContentView(R.layout.activity_main);

      getSupportFragmentManager()
            .beginTransaction()
            .replace(R.id.container, new SettingsFragment())
            .commit();
   }
}

//activity_main.xml
<LinearLayout xmlns:android="http://schemas.android.com/apk/res/
android"
   android:layout_width="match_parent"
   android:layout_height="match_parent"
   android:orientation="vertical">

   <!-- Other views in your activity layout -->

   <FrameLayout
      android:id="@+id/settings_container"
      android:layout_width="match_parent"
      android:layout_height="match_parent" />

</LinearLayout>

//MainActivity.java
import android.os.Bundle;
import androidx.appcompat.app.AppCompatActivity;

public class MainActivity extends AppCompatActivity {
   @Override
   protected void onCreate(Bundle savedInstanceState) {
      super.onCreate(savedInstanceState);
      setContentView(R.layout.activity_main);

      if (savedInstanceState == null) {
         getSupportFragmentManager().beginTransaction()
            .replace(R.id.settings_container, new SettingsFragment())
            .commit();
      }
   }
}
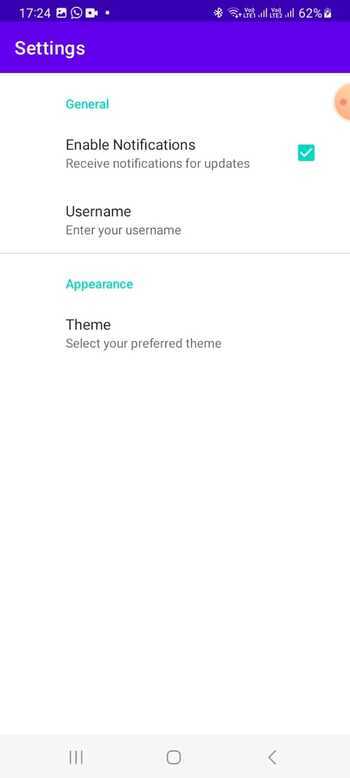
Output

Creating a Preferences Fragment
In order to display the preferences defined in the XML file, you need to create a Preferences Fragment. This fragment class extends the PreferenceFragmentCompat class and serves as the container for displaying the preferences. In the fragment's onCreateView() method, you can inflate the preferences XML using the addPreferencesFromResource() method to load and display the preferences on the screen.
Algorithm
Create a fragment class that extends PreferenceFragmentCompat.
Override the onCreateView() method to inflate the preferences XML layout.
Use addPreferencesFromResource() to load and display the preferences on the screen.
Customize the fragment by implementing additional methods or adding event listeners if necessary.
Example
// PreferenceFragmentCompat.java
import android.os.Bundle;
import androidx.preference.PreferenceFragmentCompat;

public class MyPreferencesFragment extends
PreferenceFragmentCompat {

   @Override
   public void onCreatePreferences(Bundle savedInstanceState,
   String rootKey) {
      setPreferencesFromResource(R.xml.preferences, rootKey);
   }
}

//res/preferences.xml
<PreferenceScreen xmlns:android=
"http://schemas.android.com/apk/res/android">
   <PreferenceCategory
      android:title="General Settings">

      <CheckBoxPreference
         android:key="pref_key_notification"
         android:title="Enable Notifications"
         android:summary="Receive notifications"
         android:defaultValue="true" />

      <EditTextPreference
         android:key="pref_key_username"
         android:title="Username"
         android:summary="Enter your username"
         android:dialogTitle="Enter username"
         android:defaultValue="JohnDoe" />

      <!-- Add more preferences here -->
   </PreferenceCategory>
</PreferenceScreen>

// SettingsActivity.java
import android.os.Bundle;
import androidx.appcompat.app.AppCompatActivity;

public class SettingsActivity extends AppCompatActivity {

   @Override
   protected void onCreate(Bundle savedInstanceState) {
      super.onCreate(savedInstanceState);
      getSupportFragmentManager().beginTransaction()
            .replace(android.R.id.content, new
            MyPreferencesFragment())
            .commit();
   }
}

// MainActivity.java
import android.content.Intent;
import android.os.Bundle;
import androidx.appcompat.app.AppCompatActivity;
import android.view.View;
import android.widget.Button;

public class MainActivity extends AppCompatActivity {

   private Button settingsButton;

   @Override
   protected void onCreate(Bundle savedInstanceState) {
      super.onCreate(savedInstanceState);
      setContentView(R.layout.activity_main);

      settingsButton = findViewById(R.id.settings_button);
      settingsButton.setOnClickListener(new View.OnClickListener() {
         @Override
         public void onClick(View v) {
            startActivity(new Intent(MainActivity.this,
ettingsActivity.class));
         }
      });
   }
}
Output

Handling Preference Changes
To respond to changes in the preferences made by the user, you need to implement the onSharedPreferenceChanged() method. By registering a SharedPreferences.OnSharedPreferenceChangeListener, you can listen for changes in the preferences and update the app's behavior accordingly. This method allows you to access the updated preference values and perform actions such as updating UI elements or triggering specific functionalities based on the new preferences selected by the user.
The shared preference change listener should always be registered and unregistered appropriately to ensure proper memory management and avoid any potential memory leaks.
Algorithm
Implement the onSharedPreferenceChanged() method in the Preferences Fragment.
Register a SharedPreferences.OnSharedPreferenceChangeListener.
Listen for changes in the preferences and receive updates.
Update the app's behavior based on the new preference values.
Unregister the shared preference change listener when it's no longer needed to prevent memory leaks.
Example
// preferences.xml
<?xml version="1.0" encoding="utf-8"?>
<PreferenceScreen
xmlns:android="http://schemas.android.com/apk/res/android">
   <CheckBoxPreference
      android:key="notification_preference"
      android:title="Enable Notifications"
      android:summary="Enable/disable notifications"
      android:defaultValue="true" />
   <!-- Add more preferences as needed -->
</PreferenceScreen>

// PreferencesFragment.java
import android.os.Bundle;
import androidx.preference.CheckBoxPreference;
import androidx.preference.Preference;
import androidx.preference.PreferenceFragmentCompat;

public class PreferencesFragment extends PreferenceFragmentCompat {
   @Override
   public void onCreatePreferences(Bundle savedInstanceState,
String rootKey) {
      setPreferencesFromResource(R.xml.preferences, rootKey);

      CheckBoxPreference notificationPreference =
findPreference("notification_preference");
      notificationPreference.setOnPreferenceChangeListener(new
Preference.OnPreferenceChangeListener() {
         @Override
         public boolean onPreferenceChange(Preference preference,
Object newValue) {
            boolean enableNotifications = (boolean) newValue;
            // Handle preference change, e.g., save to
SharedPreferences or trigger an action
            return true; // Return 'true' to update the preference
value
         }
      });
      // Add more preference change listeners as needed
   }
}

//activity_main.xml
<FrameLayout
   xmlns:android="http://schemas.android.com/apk/res/android"
   android:id="@+id/preferences_container"
   android:layout_width="match_parent"
   android:layout_height="match_parent" />

// MainActivity.java
import android.os.Bundle;
import androidx.appcompat.app.AppCompatActivity;

public class MainActivity extends AppCompatActivity {
   @Override
   protected void onCreate(Bundle savedInstanceState) {
      super.onCreate(savedInstanceState);
      setContentView(R.layout.activity_main);

      getSupportFragmentManager().beginTransaction()
         .replace(R.id.preferences_container, new
PreferencesFragment())
         .commit();
   }
}
Output
Conclusion
Developers can provide a personalized experience to users by implementing a Preferences Settings Screen in Android. This tutorial outlines the steps, including creating an XML file, preferences fragment, and handling preference changes. By offering users an intuitive interface to manage settings and preferences tailored to their liking, the app becomes more user-friendly and engaging. This ultimately enhances satisfaction for all parties involved in using the app.

2K+ Views
