
Article Categories
- All Categories
-
 Data Structure
-
 Networking
-
 RDBMS
RDBMS
-
 Operating System
-
 Java
Java
-
 MS Excel
-
 iOS
iOS
-
 HTML
HTML
-
 CSS
CSS
-
 Android
-
 Python
-
 C Programming
-
 C++
C++
-
 C#
C#
-
 MongoDB
-
 MySQL
MySQL
-
 Javascript
-
 PHP
PHP
-
 Economics & Finance
How to use the apply() in Android Shared preferences with example?
Before getting into shared preference apply(),we should know what is shared preferences in android. Using share preference, we can store or retrieve values as key and value pair. There are five different methods are available in share preference as shown below -
Edit()- It going to edit shared preference values
commit()- it going to commit shared preference values in xml file
apply()- It going to commit back changes from editor to shared preference.
remove(String key)- It going to remove key and vales from shared preference use key.
Put()- It going to put key and values to shared preference xml.
A sample example syntax of shared preference as shown below -
final SharedPreferences sharedPreferences=getSharedPreferences("USER",MODE_PRIVATE);
In the above syntax we have created a shared preference file as USER.xml and it is private mode means no other applications can access this shared preference.
Usage of Apply method in shared preferences -
apply() will write to the in-memory storage immediately, and schedule an asynchronous write to persistent storage
This below example demonstrate about How to use apply() in Android Shared preferences with example.
Step 1 − Create a new project in Android Studio, go to File ⇒ New Project and fill all required details to create a new project.
Step 2 − Add the following code to res/layout/activity_main.xml.
<?xml version="1.0" encoding="utf-8"?>
<android.support.constraint.ConstraintLayout xmlns:android="http://schemas.android.com/apk/res/android"
   xmlns:app="http://schemas.android.com/apk/res-auto"
   xmlns:tools="http://schemas.android.com/tools"
   android:layout_width="match_parent"
   android:layout_height="match_parent"
   android:orientation="vertical"
   tools:context=".MainActivity"
   tools:layout_editor_absoluteY="81dp">

   <EditText
      android:id="@+id/name"
      android:layout_width="match_parent"
      android:layout_height="60dp"
      android:layout_marginTop="8dp"
      android:autofillHints=""
      android:hint="NAME"
      app:layout_constraintTop_toTopOf="parent"
      tools:layout_editor_absoluteX="0dp" />

   <EditText
      android:id="@+id/address"
      android:layout_width="match_parent"
      android:layout_height="wrap_content"
      android:layout_marginTop="84dp"
      android:hint="Phone Number"
      android:importantForAutofill="no"
      android:inputType=""
      app:layout_constraintTop_toTopOf="@+id/name"
      tools:layout_editor_absoluteX="16dp"
      tools:targetApi="o" />

   <Button
      android:id="@+id/button"
      android:layout_width="108dp"
      android:layout_height="wrap_content"
      android:layout_marginStart="8dp"
      android:layout_marginLeft="8dp"
      android:layout_marginTop="120dp"
      android:layout_marginEnd="8dp"
      android:layout_marginRight="8dp"
      android:gravity="center_horizontal"
      android:text="Save"
      app:layout_constraintEnd_toEndOf="parent"
      app:layout_constraintHorizontal_bias="0.503"
      app:layout_constraintStart_toStartOf="parent"
      app:layout_constraintTop_toTopOf="@+id/address" />

   <Button
      android:id="@+id/read"
      android:layout_width="wrap_content"
      android:layout_height="wrap_content"
      android:layout_marginStart="8dp"
      android:layout_marginLeft="8dp"
      android:layout_marginTop="88dp"
      android:layout_marginEnd="8dp"
      android:layout_marginRight="8dp"
      android:gravity="center_horizontal"
      android:text="read"
      app:layout_constraintEnd_toEndOf="parent"
      app:layout_constraintStart_toStartOf="parent"
      app:layout_constraintTop_toBottomOf="@+id/button" />

   <TextView
      android:id="@+id/result"
      android:layout_width="wrap_content"
      android:layout_height="0dp"
      android:layout_marginStart="8dp"
      android:layout_marginLeft="8dp"
      android:layout_marginTop="184dp"
      android:layout_marginEnd="8dp"
      android:layout_marginRight="8dp"
      android:text="result"
      app:layout_constraintEnd_toEndOf="parent"
      app:layout_constraintStart_toStartOf="parent"
      app:layout_constraintTop_toBottomOf="@+id/button" />
</android.support.constraint.ConstraintLayout>
In the above xml it contains two edit text for name and address, when user click on save button it going to store the values in shared preferences and when user click on read button it going to read the values from shared preferences.
Step 3 − Add the following code to src/MainActivity.java
package package com.example.andy.myapplication;
import android.content.SharedPreferences;
import android.support.v7.app.AppCompatActivity;
import android.os.Bundle;
import android.view.View;
import android.widget.Button;
import android.widget.EditText;
import android.widget.TextView;
import android.widget.Toast;
public class MainActivity extends AppCompatActivity {
   @Override
   protected void onCreate(Bundle savedInstanceState) {
      super.onCreate(savedInstanceState);
      setContentView(R.layout.activity_main);
      final SharedPreferences sharedPreferences=getSharedPreferences("USER",MODE_PRIVATE);
      final EditText name=findViewById(R.id.name);
      final EditText address=findViewById(R.id.address);
      final TextView result=findViewById(R.id.result);
      Button save=findViewById(R.id.button);
      Button read=findViewById(R.id.read);
      read.setOnClickListener(new View.OnClickListener() {
         @Override
         public void onClick(View v) {
            result.setText("Name is "+sharedPreferences.getString("Name","No name")+" Address "+   sharedPreferences.getString("Address","No Address"));
         }
      });
      save.setOnClickListener(new View.OnClickListener() {
         @Override
         public void onClick(View v) {
            if(name.getText().toString().isEmpty() && address.getText().toString().isEmpty()){
               Toast.makeText(MainActivity.this,"Plz Enter all the data",Toast.LENGTH_LONG).show();
            }else{
               String nameData=name.getText().toString().trim();
               String addressData=address.getText().toString().trim();
               SharedPreferences.Editor editor=sharedPreferences.edit();
               editor.putString("Name",nameData);
               editor.putString("Address",addressData);
               editor.apply();
            }
         }
      });
   }
}
Step 4 − No need to change manifest.xml Let's try to run your application. I assume you have connected your actual Android Mobile device with your computer. To run the app from android studio, open one of your project's activity files and click Run ![]() icon from the toolbar. Select your mobile device as an option and then check your mobile device which will display your default screen −
icon from the toolbar. Select your mobile device as an option and then check your mobile device which will display your default screen −
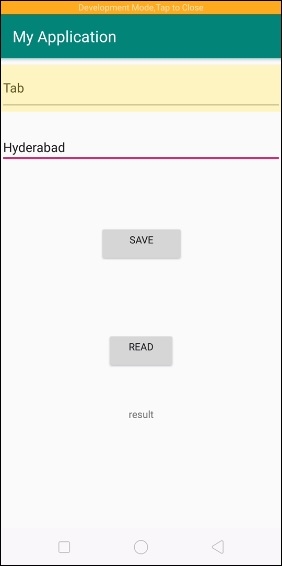
In the above example we have added name and address and clicked on save button.
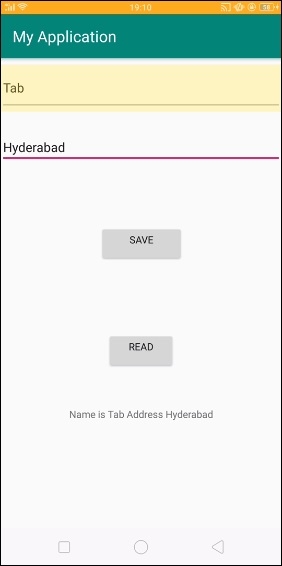
In the above example,we have clicked on read button. it will append the text to text view
Click here to download the project code

543 Views
