
Article Categories
- All Categories
-
 Data Structure
-
 Networking
-
 RDBMS
RDBMS
-
 Operating System
-
 Java
Java
-
 MS Excel
-
 iOS
iOS
-
 HTML
HTML
-
 CSS
CSS
-
 Android
-
 Python
-
 C Programming
-
 C++
C++
-
 C#
C#
-
 MongoDB
-
 MySQL
MySQL
-
 Javascript
-
 PHP
PHP
-
 Economics & Finance
How to Convert Multiple XLS Files to XLSX Files in Excel?
The default format for Excel files between Excel 97 and Excel 2003 is Xls, and the above versions have the default format of Xlsx. Both are Excel file extensions. If there are any old files in our system and we need to use the new features on them, then it is very necessary to convert them to a new extension. If there is only one file, we can use the "save as" function to complete the task, but it can be time-consuming for multiple files. We can complete the task using the VBA application in a faster way. Read this tutorial to learn how you can convert multiple XLS files to XLSX files in Excel.
Converting Multiple XLS Files to XLSX Files in Excel
Here, we will first create a module and then run it to convert the files. Let us look at a simple procedure for converting multiple Xls files to Xlsx files in Excel using the vba application.
Step 1
Let us consider a new excel sheet, then right-click on the sheet name and select view code to open the vba application, then click on insert, select module, and type the below-mentioned programme into the text box as shown in the below image.
Right click > View code > Insert > Module > Program
Program
Sub ConvertToXlsx()
'Update By Nirmal
Dim strPath As String
Dim strFile As String
Dim xWbk As Workbook
Dim xSFD, xRFD As FileDialog
Dim xSPath As String
Dim xRPath As String
Set xSFD = Application.FileDialog(msoFileDialogFolderPicker)
With xSFD
.Title = "Please select the folder contains the xls files:"
.InitialFileName = "C:"
End With
If xSFD.Show <> -1 Then Exit Sub
xSPath = xSFD.SelectedItems.Item(1)
Set xRFD = Application.FileDialog(msoFileDialogFolderPicker)
With xRFD
.Title = "Please select a folder for outputting the new files:"
.InitialFileName = "C:"
End With
If xRFD.Show <> -1 Then Exit Sub
xRPath = xRFD.SelectedItems.Item(1) & ""
strPath = xSPath & ""
strFile = Dir(strPath & "*.xls")
Application.ScreenUpdating = False
Application.DisplayAlerts = False
Do While strFile <> ""
If Right(strFile, 3) = "xls" Then
Set xWbk = Workbooks.Open(Filename:=strPath & strFile)
xWbk.SaveAs Filename:=xRPath & strFile & "x", _
FileFormat:=xlOpenXMLWorkbook
xWbk.Close SaveChanges:=False
End If
strFile = Dir
Loop
Application.DisplayAlerts = True
Application.ScreenUpdating = True
End Sub

Step 2
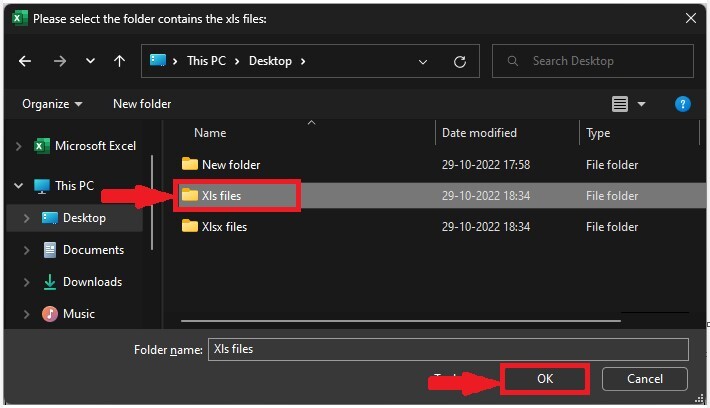
Then save the sheet as a macro-enabled workbook, click F5 to run the code, select the folder where our XLS files are present, and click OK.
Save > F5 > Folder > OK
Step 3
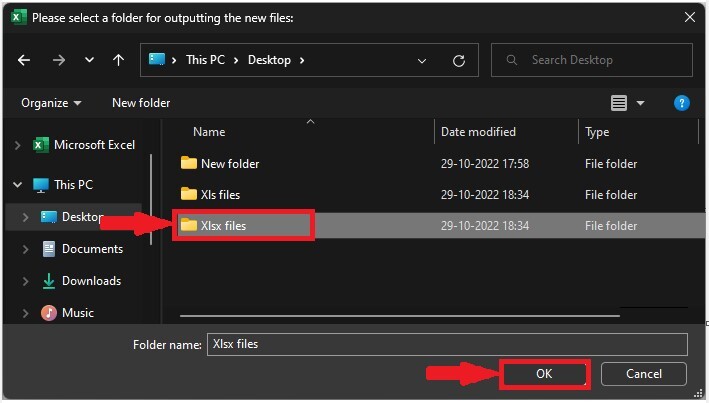
Now select the folder where you want to store the new files and click OK.
Conclusion
In this tutorial, we used a simple example to demonstrate how you can convert multiple XLS files to XLSX files.

4K+ Views
