
Article Categories
- All Categories
-
 Data Structure
-
 Networking
-
 RDBMS
RDBMS
-
 Operating System
-
 Java
Java
-
 MS Excel
-
 iOS
iOS
-
 HTML
HTML
-
 CSS
CSS
-
 Android
-
 Python
-
 C Programming
-
 C++
C++
-
 C#
C#
-
 MongoDB
-
 MySQL
MySQL
-
 Javascript
-
 PHP
PHP
-
 Economics & Finance
How to Import Multiple Text Files from a Folder into One Worksheet?
Microsoft Excel provides a wide range of functionalities to handle and manipulate data effectively. One common requirement is to import multiple text files from a folder into a single worksheet, allowing you to consolidate and analyze data efficiently. Fortunately Excel provides a straightforward solution to accomplish this task. In this article. We will carefully examine the step by step guidelines for importing multiple text files from a folder into one worksheet. This functionality allows you to optimize your data processing workflow and derive meaningful insights.
Approach 1: Using Power Query to Import File Names by using "Combine and Transform data" with "Colon" as delimiter
-
Step 1 ? Prepare Your Folder and Text Files.
Before we commence. Kindly ensure that you possess a folder encompassing the text files which you desire to import into Excel. It is imperative that these text files adhere to a uniform format and are stored within the same folder location for effortless retrieval.
-
Step 2 ? Open Excel and Create a New Workbook.
To begin, Kindly launch Microsoft Excel and proceed to create a new workbook for the purpose of importing the text files. This newly created workbook will serve as your designated destination worksheet.
-
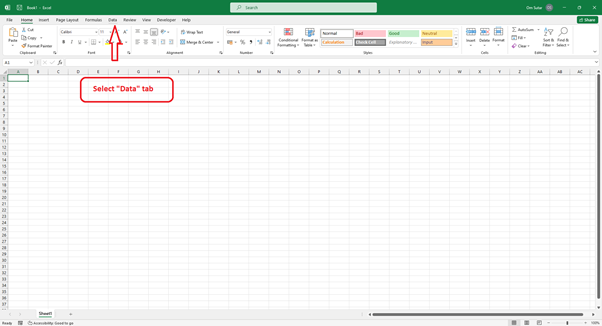
Step 3 ? Activate the Data Tab.
Please access the "Data" tab in Excel, which is located in the main ribbon at the top of your screen. This tab contains various tools and features aimed at enhancing data management efficiency.
-
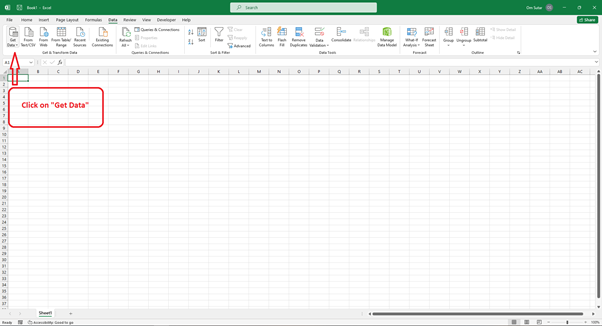
Step 4 ? Click on the "Get Data" Option.
To access the data import options. Kindly navigate to the "Data" tab. And proceed to click on the "Get Data" option. Consequently. A dropdown menu will be displayed, presenting you with various choices for importing data.

-
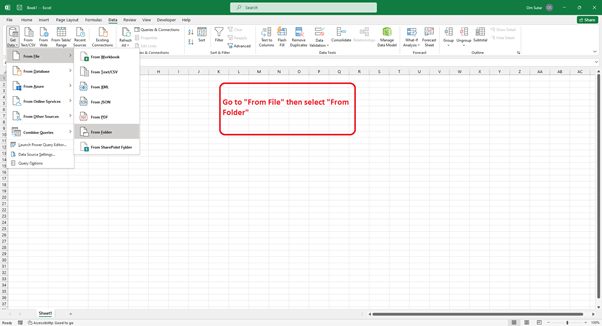
Step 5 ? Select "From File" and "From Folder".
To begin kindly access the "Get Data" menu. Once there please select the option labeled "From File." Following this navigate to the secondary dropdown menu and choose the option titled "From Folder." Upon doing so.

-
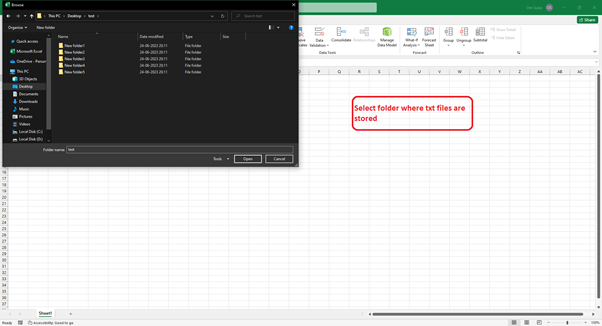
Step 6 ? Choose the Folder Containing Text Files.
An explorer window will appear for your convenience. Within this windowPlease locate and select the folder where your desired text files are stored. Once you have done this kindly confirm your selection by clicking on the "OK" button.

-
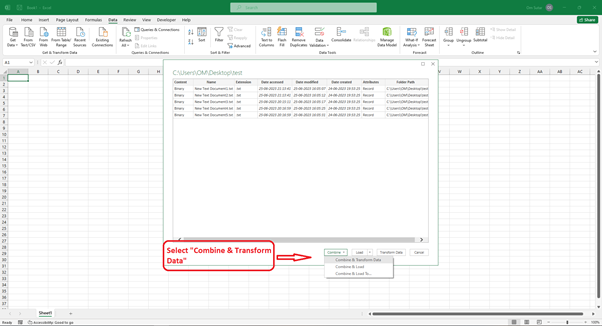
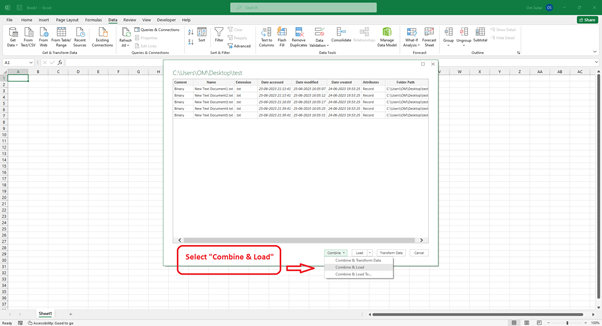
Step 7 ? Configure Import Settings.
After selecting the folder, the "Combine Files" window will appear. Here, you can configure various import settings to customize how Excel imports the text files. Select "Combine & Transform".
-
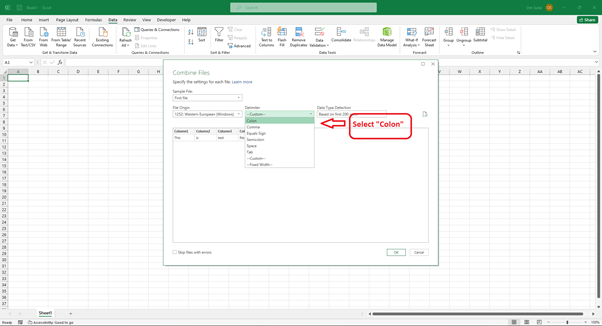
Step 8 ? Select "Colon" as Delimiter.
In the "Combine Files" window, you can preview and select the specific text files you want to import. In delimiter dropdown, select "Colon"

-
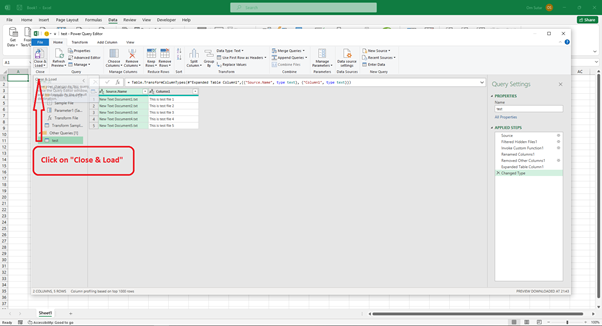
Step 9 ? Close and Load.
In the power query editor window, click on "Close & Load" to load necessary content.
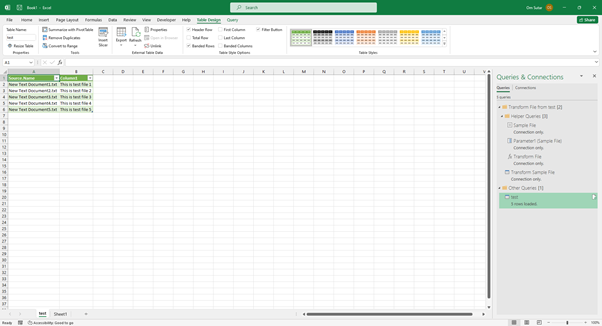
You will see columns as "File name" and "Columns 1" where Column 1 contains the content inside each text file.
Approach 2: Using Power Query to Import File Names by using "Combine and Transform data" with "Comma" as delimiter
-
Step 1 ? Prepare Your Folder and Text Files.
Please make sure that you possess a folder that consists of the text files you wish to bring into Excel. It is of utmost importance that these text files are stored in a uniform format and in the exact same folder to facilitate convenient access.
-
Step 2 ? Open Excel and Create a New Workbook.
To begin, kindly launch Microsoft Excel and open a new workbook in which you plan to import the text files. This particular workbook will act as your designated destination worksheet.
-
Step 3 ? Activate the Data Tab.
To access the data handling tools and features kindly proceed to the "Data" tab on the main ribbon located at the top of your screen within Excel.

-
Step 4 ? Click on the "Get Data" Option.
To access the desired data import options. Kindly navigate to the "Data" tab and select the "Get Data" option.
Subsequently. A dropdown menu will be presented to you. Offering various choices for importing data.

-
Step 5 ? Select "From File" and "From Folder".
To access the desired functionality please navigate to the "Get Data" menu. From there kindly select the "From File" option found within. Then proceed to choose the "From Folder" alternative from the secondary dropdown menu. By doing so. An explorer window dedicated to file selection will be prompted to appear for your convenience.

-
Step 6 ? Choose the Folder Containing Text Files.
To import the desired text files kindly open the file explorer window and locate the folder they are stored in. Once you have found it please select the folder and proceed by clicking on the "OK" button.
-
Step 7 ? Configure Import Settings.
After selecting the folder, the "Combine Files" window will appear. Here, you can configure various import settings to customize how Excel imports the text files. Select "Combine & Transform".

-
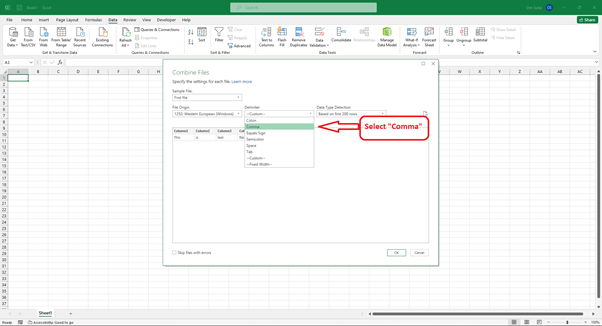
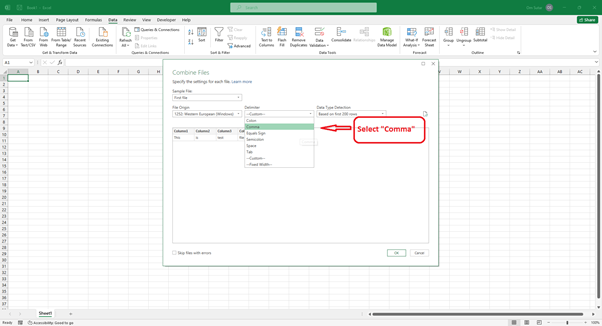
Step 8 ? Select "Comma" as Delimiter.
In the "Combine Files" window, you can preview and select the specific text files you want to import. In delimiter dropdown, select "Comma"
-
Step 9 ? Close and Load.
In the power query editor window, click on "Close & Load" to load necessary content.

You will see columns as "File name" and "Columns 1" where Column 1 contains the content inside each text file.

Approach 3: Using Power Query to Import File Names by using "Combine and Load" with "Colon" as delimiter
-
Step 1 ? Prepare Your Folder and Text Files.
Before we commence kindly ensure that you possess a folder encompassing the text files you desire to import into Excel. It is imperative that these text files are uniformly formatted and conveniently stored in the identical folder location to facilitate accessibility.
-
Step 2 ? Open Excel and Create a New Workbook.
Launch Microsoft Excel and create a new workbook where you want to import the text files. This will serve as your destination worksheet.
-
Step 3 ? Activate the Data Tab.
In Excel, navigate to the "Data" tab located in the main ribbon at the top of the screen. This tab contains various tools and features related to data handling.

-
Step 4 ? Click on the "Get Data" Option.
Under the "Data" tab, click on the "Get Data" option. This will open a dropdown menu with different data import options.
-
Step 5 ? Select "From File" and "From Folder".
To access the data kindly navigate to the "Get Data" menu. Within this menu. Please select the "From File" option and proceed by choosing the "From Folder" option from the secondary dropdown menu. By following these steps. A file explorer window will be prompted to appear. Granting you access to the desired data.

-
Step 6 ? Choose the Folder Containing Text Files.
To import the desired text files please navigate to the folder that contains them in the file explorer window. Once you have located the folder.
Kindly select it and proceed by clicking on the "OK" button.

-
Step 7 ? Configure Import Settings.
After selecting the folder, the "Combine Files" window will appear. Here, you can configure various import settings to customize how Excel imports the text files. Select "Combine & Load".

-
Step 8 ? Select "Colon" as Delimiter.
In the "Combine Files" window, you can preview and select the specific text files you want to import. In delimiter dropdown, select "Colon"
You will see columns as "File name" and "Columns 1" where Column 1 contains the content inside each text file.

Approach 4: Using Power Query to Import File Names by using "Combine and Load" with "Comma" as delimiter
-
Step 1 ? Prepare Your Folder and Text Files.
Before we commence the task at hand kindly ensure that you possess a folder comprising the pertinent text files that you intend to import into Excel. It is imperative that these text files adhere to a uniform format and are stored in a singular folder location for effortless access.
-
Step 2 ? Open Excel and Create a New Workbook.
To begin, kindly launch Microsoft Excel and proceed to create a new workbook in the desired location for importing the text files. This will serve as your destination worksheet.
-
Step 3 ? Activate the Data Tab.
To gain access to the data handling tools and features. Please proceed to the "Data" tab. This tab is conveniently located at the top of the screen in Excels main ribbon.

-
Step 4 ? Click on the "Get Data" Option.
To access the required data. Please navigate to the "Data" tab located on the interface. Subsequently. Please click on the "Get Data" option. This action will display a dropdown menu with several data import alternatives.

-
Step 5 ? Select "From File" and "From Folder".
To access the data. Please navigate to the "Get Data" menu and click on the "From File" option.
After that choose the "From Folder" selection from the secondary dropdown menu. This action will trigger a file explorer window to open up for you.
-
Step 6 ? Choose the Folder Containing Text Files.
To begin. Open the file explorer window. To begin kindly identify and choose the folder where the desired text files are stored. Once done please proceed by clicking on the "OK" button to continue with the process.

-
Step 7 ? Configure Import Settings.
After selecting the folder, the "Combine Files" window will appear. Here, you can configure various import settings to customize how Excel imports the text files. Select "Combine & Load".
-
Step 8 ? Select "Comma" as Delimiter.
In the "Combine Files" window, you can preview and select the specific text files you want to import. In delimiter dropdown, select "Comma"
You will see columns as "File name" and "Columns 1" where Column 1 contains the content inside each text file.

Conclusion
You can significantly improve your data processing capabilities in Excel by importing multiple text files from a folder into a single worksheet. This article will guide you through the steps to seamlessly consolidate data from multiple text files making it easier to analyze and gain insights. With Excel's data import features. You can efficiently manage large volumes of data and make informed decisions based on comprehensive data sets. Incorporate these techniques into your data workflow to unlock the full potential of Microsoft Excel.

7K+ Views
