
Article Categories
- All Categories
-
 Data Structure
-
 Networking
-
 RDBMS
RDBMS
-
 Operating System
-
 Java
Java
-
 MS Excel
-
 iOS
iOS
-
 HTML
HTML
-
 CSS
CSS
-
 Android
-
 Python
-
 C Programming
-
 C++
C++
-
 C#
C#
-
 MongoDB
-
 MySQL
MySQL
-
 Javascript
-
 PHP
PHP
-
 Economics & Finance
How to create a multilevel listView using Kotlin?
This example demonstrates how to create a multilevel listView using Kotlin Android.
Step 1 − Create a new project in Android Studio, go to File ? New Project and fill all required details to create a new project.
Step 2 − Add the following code to res/layout/activity_main.xml.
Step 3 − Add the following code to src/MainActivity.kt
package app.com.kotlinapp
import android.os.Bundle
import androidx.appcompat.app.AppCompatActivity
import kotlinx.android.synthetic.main.activity_main.*
class MainActivity : AppCompatActivity() {
private val header: MutableList = ArrayList()
private val body: MutableList> = ArrayList()
override fun onCreate(savedInstanceState: Bundle?) {
super.onCreate(savedInstanceState)
setContentView(R.layout.activity_main)
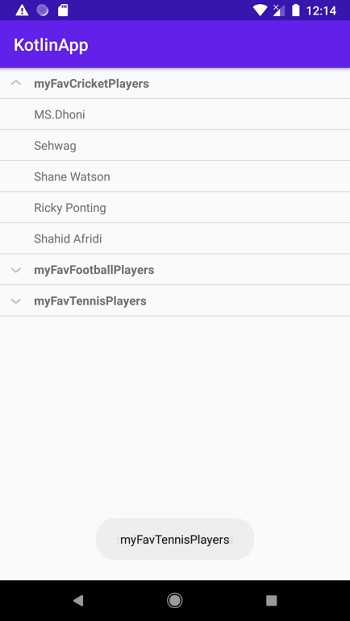
val myFavCricketPlayers: MutableList = ArrayList()
myFavCricketPlayers.add("MS.Dhoni");
myFavCricketPlayers.add("Sehwag");
myFavCricketPlayers.add("Shane Watson");
myFavCricketPlayers.add("Ricky Ponting");
myFavCricketPlayers.add("Shahid Afridi");
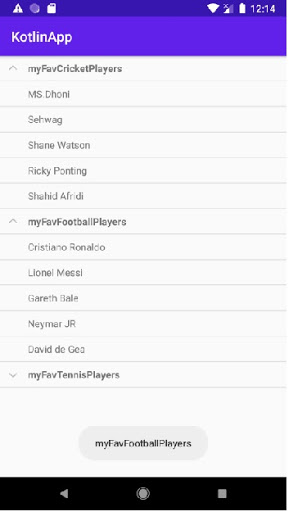
val myFavFootballPlayers: MutableList = ArrayList()
myFavFootballPlayers.add("Cristiano Ronaldo")
myFavFootballPlayers.add("Lionel Messi")
myFavFootballPlayers.add("Gareth Bale")
myFavFootballPlayers.add("Neymar JR")
myFavFootballPlayers.add("David de Gea")
val myFavTennisPlayers: MutableList = ArrayList()
myFavTennisPlayers.add("Roger Federer")
myFavTennisPlayers.add("Rafael Nadal")
myFavTennisPlayers.add("Andy Murray")
myFavTennisPlayers.add("Novak Jokovic")
myFavTennisPlayers.add("Sania Mirza")
header.add("myFavCricketPlayers")
header.add("myFavFootballPlayers")
header.add("myFavTennisPlayers")
body.add(myFavCricketPlayers)
body.add(myFavFootballPlayers)
body.add(myFavTennisPlayers)
expandableListView.setAdapter(CustomListAdapter(this, expandableListView, header, body))
}
}
Step 4 − Create a new Kotlin class and add the following code to src/CustomListAdapter.kt
package app.com.kotlinapp import android.content.Context import android.view.LayoutInflater import android.view.View import android.view.ViewGroup import android.widget.BaseExpandableListAdapter import android.widget.ExpandableListView import android.widget.TextView import android.widget.Toast class CustomListAdapter( var context: Context, var expandableListView: ExpandableListView, var header: MutableList, var body: MutableList > ) : BaseExpandableListAdapter() { override fun getGroup(groupPosition: Int): String { return header[groupPosition] } override fun isChildSelectable(groupPosition: Int, childPosition: Int): Boolean { return true } override fun hasStableIds(): Boolean { return false } override fun getGroupView( groupPosition: Int, isExpanded: Boolean, convertView: View?, parent: ViewGroup? ): View? { var convertView = convertView if (convertView == null) { val inflater = context.getSystemService(Context.LAYOUT_INFLATER_SERVICE) as LayoutInflater convertView = inflater.inflate(R.layout.list_header, null) } val title = convertView?.findViewById (R.id.textView) title?.text = getGroup(groupPosition) title?.setOnClickListener { if (expandableListView.isGroupExpanded(groupPosition)) expandableListView.collapseGroup(groupPosition) else expandableListView.expandGroup(groupPosition) Toast.makeText(context, getGroup(groupPosition), Toast.LENGTH_SHORT).show() } return convertView } override fun getChildrenCount(groupPosition: Int): Int { return body[groupPosition].size } override fun getChild(groupPosition: Int, childPosition: Int): String { return body[groupPosition][childPosition] } override fun getGroupId(groupPosition: Int): Long { return groupPosition.toLong() } override fun getChildView( groupPosition: Int, childPosition: Int, isLastChild: Boolean, convertView: View?, parent: ViewGroup? ): View? { var convertView = convertView if (convertView == null) { val inflater = context.getSystemService(Context.LAYOUT_INFLATER_SERVICE) as LayoutInflater convertView = inflater.inflate(R.layout.list_body, null) } val title = convertView?.findViewById (R.id.textView) title?.text = getChild(groupPosition, childPosition) return convertView } override fun getChildId(groupPosition: Int, childPosition: Int): Long { return childPosition.toLong() } override fun getGroupCount(): Int { return header.size } }
Step 5 − Create a Layout resource file (list_header.xml) and add the following code −
Step 6 − Create a Layout resource file (list_body.xml) and add the following code−
Step 7 − Add the following code to androidManifest.xml
Let's try to run your application. I assume you have connected your actual Android Mobile device with your computer. To run the app from android studio, open one of your project's activity files and click the Run  icon from the toolbar. Select your mobile device as an option and then check your mobile device which will display your default screen –
Click here to download the project code.

424 Views
