- ES - Home
- ES - Overview
- ES - Processors
- ES - Architectures
- ES - Tools and Peripherals
- ES - 8051 Microcontroller
- ES - I/O Programming
- ES - Terms
- ES - Assembly Language
- ES - Registers
- ES - Registers Bank/Stack
- ES - Instructions
- ES - Addressing Modes
- ES - Special Function Registers
- ES - Timer/Counter
- ES - Interrupts
Embedded Systems - Quick Guide
Embedded Systems - Overview
System
A system is an arrangement in which all its unit assemble work together according to a set of rules. It can also be defined as a way of working, organizing or doing one or many tasks according to a fixed plan. For example, a watch is a time displaying system. Its components follow a set of rules to show time. If one of its parts fails, the watch will stop working. So we can say, in a system, all its subcomponents depend on each other.
Embedded System
As its name suggests, Embedded means something that is attached to another thing. An embedded system can be thought of as a computer hardware system having software embedded in it. An embedded system can be an independent system or it can be a part of a large system. An embedded system is a microcontroller or microprocessor based system which is designed to perform a specific task. For example, a fire alarm is an embedded system; it will sense only smoke.
An embedded system has three components −
It has hardware.
It has application software.
It has Real Time Operating system (RTOS) that supervises the application software and provide mechanism to let the processor run a process as per scheduling by following a plan to control the latencies. RTOS defines the way the system works. It sets the rules during the execution of application program. A small scale embedded system may not have RTOS.
So we can define an embedded system as a Microcontroller based, software driven, reliable, real-time control system.
Characteristics of an Embedded System
Single-functioned − An embedded system usually performs a specialized operation and does the same repeatedly. For example: A pager always functions as a pager.
Tightly constrained − All computing systems have constraints on design metrics, but those on an embedded system can be especially tight. Design metrics is a measure of an implementation's features such as its cost, size, power, and performance. It must be of a size to fit on a single chip, must perform fast enough to process data in real time and consume minimum power to extend battery life.
Reactive and Real time − Many embedded systems must continually react to changes in the system's environment and must compute certain results in real time without any delay. Consider an example of a car cruise controller; it continually monitors and reacts to speed and brake sensors. It must compute acceleration or de-accelerations repeatedly within a limited time; a delayed computation can result in failure to control of the car.
Microprocessors based − It must be microprocessor or microcontroller based.
Memory − It must have a memory, as its software usually embeds in ROM. It does not need any secondary memories in the computer.
Connected − It must have connected peripherals to connect input and output devices.
HW-SW systems − Software is used for more features and flexibility. Hardware is used for performance and security.
Advantages
- Easily Customizable
- Low power consumption
- Low cost
- Enhanced performance
Disadvantages
- High development effort
- Larger time to market
Basic Structure of an Embedded System
The following illustration shows the basic structure of an embedded system −
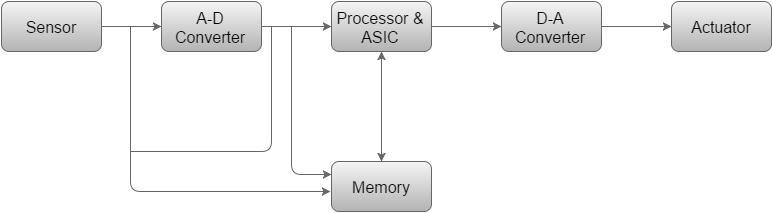
Sensor − It measures the physical quantity and converts it to an electrical signal which can be read by an observer or by any electronic instrument like an A2D converter. A sensor stores the measured quantity to the memory.
A-D Converter − An analog-to-digital converter converts the analog signal sent by the sensor into a digital signal.
Processor & ASICs − Processors process the data to measure the output and store it to the memory.
D-A Converter − A digital-to-analog converter converts the digital data fed by the processor to analog data
Actuator − An actuator compares the output given by the D-A Converter to the actual (expected) output stored in it and stores the approved output.
Embedded Systems - Processors
Processor is the heart of an embedded system. It is the basic unit that takes inputs and produces an output after processing the data. For an embedded system designer, it is necessary to have the knowledge of both microprocessors and microcontrollers.
Processors in a System
A processor has two essential units −
- Program Flow Control Unit (CU)
- Execution Unit (EU)
The CU includes a fetch unit for fetching instructions from the memory. The EU has circuits that implement the instructions pertaining to data transfer operation and data conversion from one form to another.
The EU includes the Arithmetic and Logical Unit (ALU) and also the circuits that execute instructions for a program control task such as interrupt, or jump to another set of instructions.
A processor runs the cycles of fetch and executes the instructions in the same sequence as they are fetched from memory.
Types of Processors
Processors can be of the following categories −
General Purpose Processor (GPP)
- Microprocessor
- Microcontroller
- Embedded Processor
- Digital Signal Processor
- Media Processor
Application Specific System Processor (ASSP)
Application Specific Instruction Processors (ASIPs)
GPP core(s) or ASIP core(s) on either an Application Specific Integrated Circuit (ASIC) or a Very Large Scale Integration (VLSI) circuit.
Microprocessor
A microprocessor is a single VLSI chip having a CPU. In addition, it may also have other units such as coaches, floating point processing arithmetic unit, and pipelining units that help in faster processing of instructions.
Earlier generation microprocessors fetch-and-execute cycle was guided by a clock frequency of order of ~1 MHz. Processors now operate at a clock frequency of 2GHz

Microcontroller
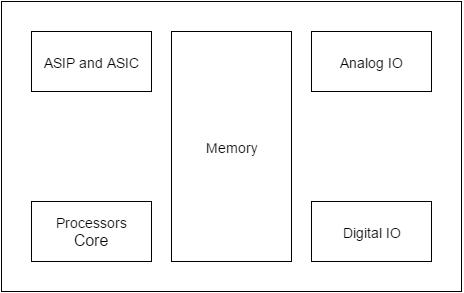
A microcontroller is a single-chip VLSI unit (also called microcomputer) which, although having limited computational capabilities, possesses enhanced input/output capability and a number of on-chip functional units.
| CPU | RAM | ROM |
| I/O Port | Timer | Serial COM Port |
Microcontrollers are particularly used in embedded systems for real-time control applications with on-chip program memory and devices.
Microprocessor vs Microcontroller
Let us now take a look at the most notable differences between a microprocessor and a microcontroller.
| Microprocessor | Microcontroller |
|---|---|
| Microprocessors are multitasking in nature. Can perform multiple tasks at a time. For example, on computer we can play music while writing text in text editor. | Single task oriented. For example, a washing machine is designed for washing clothes only. |
| RAM, ROM, I/O Ports, and Timers can be added externally and can vary in numbers. | RAM, ROM, I/O Ports, and Timers cannot be added externally. These components are to be embedded together on a chip and are fixed in numbers. |
| Designers can decide the number of memory or I/O ports needed. | Fixed number for memory or I/O makes a microcontroller ideal for a limited but specific task. |
| External support of external memory and I/O ports makes a microprocessor-based system heavier and costlier. | Microcontrollers are lightweight and cheaper than a microprocessor. |
| External devices require more space and their power consumption is higher. | A microcontroller-based system consumes less power and takes less space. |
Embedded Systems - Architecture Types
The 8051 microcontrollers work with 8-bit data bus. So they can support external data memory up to 64K and external program memory of 64k at best. Collectively, 8051 microcontrollers can address 128k of external memory.
When data and code lie in different memory blocks, then the architecture is referred as Harvard architecture. In case data and code lie in the same memory block, then the architecture is referred as Von Neumann architecture.
Von Neumann Architecture
The Von Neumann architecture was first proposed by a computer scientist John von Neumann. In this architecture, one data path or bus exists for both instruction and data. As a result, the CPU does one operation at a time. It either fetches an instruction from memory, or performs read/write operation on data. So an instruction fetch and a data operation cannot occur simultaneously, sharing a common bus.
Von-Neumann architecture supports simple hardware. It allows the use of a single, sequential memory. Today's processing speeds vastly outpace memory access times, and we employ a very fast but small amount of memory (cache) local to the processor.
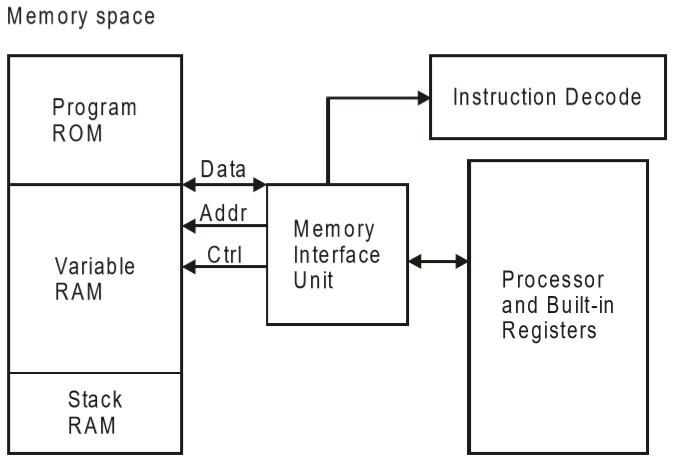
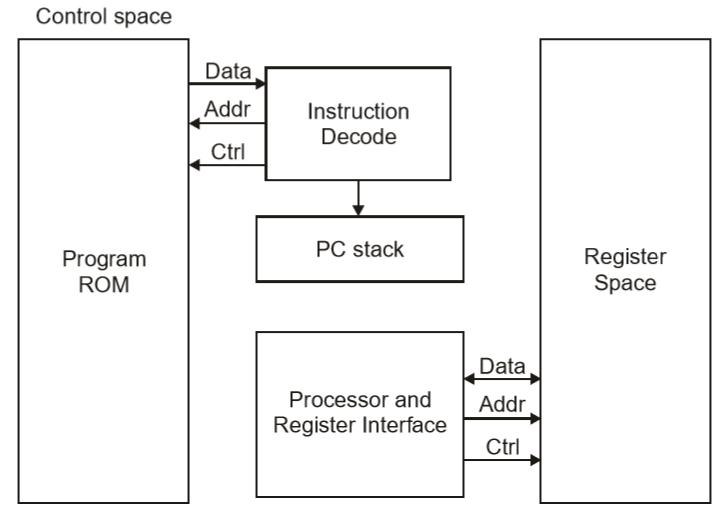
Harvard Architecture
The Harvard architecture offers separate storage and signal buses for instructions and data. This architecture has data storage entirely contained within the CPU, and there is no access to the instruction storage as data. Computers have separate memory areas for program instructions and data using internal data buses, allowing simultaneous access to both instructions and data.
Programs needed to be loaded by an operator; the processor could not boot itself. In a Harvard architecture, there is no need to make the two memories share properties.
Von-Neumann Architecture vs Harvard Architecture
The following points distinguish the Von Neumann Architecture from the Harvard Architecture.
| Von-Neumann Architecture | Harvard Architecture |
|---|---|
| Single memory to be shared by both code and data. | Separate memories for code and data. |
| Processor needs to fetch code in a separate clock cycle and data in another clock cycle. So it requires two clock cycles. | Single clock cycle is sufficient, as separate buses are used to access code and data. |
| Higher speed, thus less time consuming. | Slower in speed, thus more time-consuming. |
| Simple in design. | Complex in design. |
CISC and RISC
CISC is a Complex Instruction Set Computer. It is a computer that can address a large number of instructions.
In the early 1980s, computer designers recommended that computers should use fewer instructions with simple constructs so that they can be executed much faster within the CPU without having to use memory. Such computers are classified as Reduced Instruction Set Computer or RISC.
CISC vs RISC
The following points differentiate a CISC from a RISC −
| CISC | RISC |
|---|---|
| Larger set of instructions. Easy to program | Smaller set of Instructions. Difficult to program. |
| Simpler design of compiler, considering larger set of instructions. | Complex design of compiler. |
| Many addressing modes causing complex instruction formats. | Few addressing modes, fix instruction format. |
| Instruction length is variable. | Instruction length varies. |
| Higher clock cycles per second. | Low clock cycle per second. |
| Emphasis is on hardware. | Emphasis is on software. |
| Control unit implements large instruction set using micro-program unit. | Each instruction is to be executed by hardware. |
| Slower execution, as instructions are to be read from memory and decoded by the decoder unit. | Faster execution, as each instruction is to be executed by hardware. |
| Pipelining is not possible. | Pipelining of instructions is possible, considering single clock cycle. |
Embedded Systems - Tools & Peripherals
Compilers and Assemblers
Compiler
A compiler is a computer program (or a set of programs) that transforms the source code written in a programming language (the source language) into another computer language (normally binary format). The most common reason for conversion is to create an executable program. The name "compiler" is primarily used for programs that translate the source code from a highlevel programming language to a low-level language (e.g., assembly language or machine code).
Cross-Compiler
If the compiled program can run on a computer having different CPU or operating system than the computer on which the compiler compiled the program, then that compiler is known as a cross-compiler.
Decompiler
A program that can translate a program from a low-level language to a high-level language is called a decompiler.
Language Converter
A program that translates programs written in different high-level languages is normally called a language translator, source to source translator, or language converter.
A compiler is likely to perform the following operations −
- Preprocessing
- Parsing
- Semantic Analysis (Syntax-directed translation)
- Code generation
- Code optimization
Assemblers
An assembler is a program that takes basic computer instructions (called as assembly language) and converts them into a pattern of bits that the computer's processor can use to perform its basic operations. An assembler creates object code by translating assembly instruction mnemonics into opcodes, resolving symbolic names to memory locations. Assembly language uses a mnemonic to represent each low-level machine operation (opcode).
Debugging Tools in an Embedded System
Debugging is a methodical process to find and reduce the number of bugs in a computer program or a piece of electronic hardware, so that it works as expected. Debugging is difficult when subsystems are tightly coupled, because a small change in one subsystem can create bugs in another. The debugging tools used in embedded systems differ greatly in terms of their development time and debugging features. We will discuss here the following debugging tools −
- Simulators
- Microcontroller starter kits
- Emulator
Simulators
Code is tested for the MCU / system by simulating it on the host computer used for code development. Simulators try to model the behavior of the complete microcontroller in software.
Functions of Simulators
A simulator performs the following functions −
Defines the processor or processing device family as well as its various versions for the target system.
Monitors the detailed information of a source code part with labels and symbolic arguments as the execution goes on for each single step.
Provides the status of RAM and simulated ports of the target system for each single step execution.
Monitors system response and determines throughput.
Provides trace of the output of contents of program counter versus the processor registers.
Provides the detailed meaning of the present command.
Monitors the detailed information of the simulator commands as these are entered from the keyboard or selected from the menu.
Supports the conditions (up to 8 or 16 or 32 conditions) and unconditional breakpoints.
Provides breakpoints and the trace which are together the important testing and debugging tool.
Facilitates synchronizing the internal peripherals and delays.
Microcontroller Starter Kit
A microcontroller starter kit consists of −
- Hardware board (Evaluation board)
- In-system programmer
- Some software tools like compiler, assembler, linker, etc.
- Sometimes, an IDE and code size limited evaluation version of a compiler.
A big advantage of these kits over simulators is that they work in real-time and thus allow for easy input/output functionality verification. Starter kits, however, are completely sufficient and the cheapest option to develop simple microcontroller projects.
Emulators
An emulator is a hardware kit or a software program or can be both which emulates the functions of one computer system (the guest) in another computer system (the host), different from the first one, so that the emulated behavior closely resembles the behavior of the real system (the guest).
Emulation refers to the ability of a computer program in an electronic device to emulate (imitate) another program or device. Emulation focuses on recreating an original computer environment. Emulators have the ability to maintain a closer connection to the authenticity of the digital object. An emulator helps the user to work on any kind of application or operating system on a platform in a similar way as the software runs as in its original environment.
Peripheral Devices in Embedded Systems
Embedded systems communicate with the outside world via their peripherals, such as following &mins;
- Serial Communication Interfaces (SCI) like RS-232, RS-422, RS-485, etc.
- Synchronous Serial Communication Interface like I2C, SPI, SSC, and ESSI
- Universal Serial Bus (USB)
- Multi Media Cards (SD Cards, Compact Flash, etc.)
- Networks like Ethernet, LonWorks, etc.
- Fieldbuses like CAN-Bus, LIN-Bus, PROFIBUS, etc.
- imers like PLL(s), Capture/Compare and Time Processing Units.
- Discrete IO aka General Purpose Input/Output (GPIO)
- Analog to Digital/Digital to Analog (ADC/DAC)
- Debugging like JTAG, ISP, ICSP, BDM Port, BITP, and DP9 ports
Criteria for Choosing Microcontroller
While choosing a microcontroller, make sure it meets the task at hand and that it is cost effective. We must see whether an 8-bit, 16-bit or 32-bit microcontroller can best handle the computing needs of a task. In addition, the following points should be kept in mind while choosing a microcontroller −
Speed − What is the highest speed the microcontroller can support?
Packaging − Is it 40-pin DIP (Dual-inline-package) or QFP (Quad flat package)? This is important in terms of space, assembling, and prototyping the end-product.
Power Consumption − This is an important criteria for battery-powered products.
Amount of RAM and ROM on the chip.
Count of I/O pins and Timers on the chip.
Cost per Unit − This is important in terms of final cost of the product in which the microcontroller is to be used.
Further, make sure you have tools such as compilers, debuggers, and assemblers, available with the microcontroller. The most important of all, you should purchase a microcontroller from a reliable source.
Embedded Systems - 8051 Microcontroller
Brief History of 8051
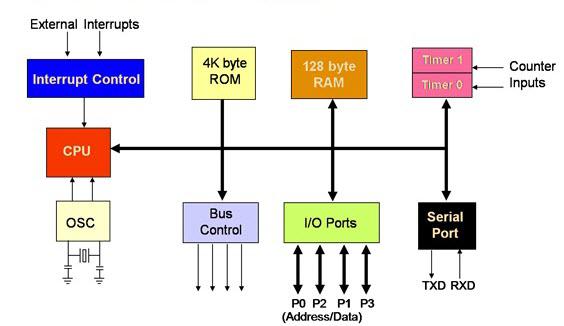
The first microprocessor 4004 was invented by Intel Corporation. 8085 and 8086 microprocessors were also invented by Intel. In 1981, Intel introduced an 8-bit microcontroller called the 8051. It was referred as system on a chip because it had 128 bytes of RAM, 4K byte of on-chip ROM, two timers, one serial port, and 4 ports (8-bit wide), all on a single chip. When it became widely popular, Intel allowed other manufacturers to make and market different flavors of 8051 with its code compatible with 8051. It means that if you write your program for one flavor of 8051, it will run on other flavors too, regardless of the manufacturer. This has led to several versions with different speeds and amounts of on-chip RAM.
8051 Flavors / Members
8052 microcontroller − 8052 has all the standard features of the 8051 microcontroller as well as an extra 128 bytes of RAM and an extra timer. It also has 8K bytes of on-chip program ROM instead of 4K bytes.
8031 microcontroller − It is another member of the 8051 family. This chip is often referred to as a ROM-less 8051, since it has 0K byte of on-chip ROM. You must add external ROM to it in order to use it, which contains the program to be fetched and executed. This program can be as large as 64K bytes. But in the process of adding external ROM to the 8031, it lost 2 ports out of 4 ports. To solve this problem, we can add an external I/O to the 8031
Comparison between 8051 Family Members
The following table compares the features available in 8051, 8052, and 8031.
| Feature | 8051 | 8052 | 8031 |
|---|---|---|---|
| ROM(bytes) | 4K | 8K | 0K |
| RAM(bytes) | 128 | 256 | 128 |
| Timers | 2 | 3 | 2 |
| I/O pins | 32 | 32 | 32 |
| Serial port | 1 | 1 | 1 |
| Interrupt sources | 6 | 8 | 6 |
Features of 8051 Microcontroller
An 8051 microcontroller comes bundled with the following features −
- 4KB bytes on-chip program memory (ROM)
- 128 bytes on-chip data memory (RAM)
- Four register banks
- 128 user defined software flags
- 8-bit bidirectional data bus
- 16-bit unidirectional address bus
- 32 general purpose registers each of 8-bit
- 16 bit Timers (usually 2, but may have more or less)
- Three internal and two external Interrupts
- Four 8-bit ports,(short model have two 8-bit ports)
- 16-bit program counter and data pointer
- 8051 may also have a number of special features such as UARTs, ADC, Op-amp, etc.
Block Diagram of 8051 Microcontroller
The following illustration shows the block diagram of an 8051 microcontroller −
Embedded System - I/O Programming
In 8051, I/O operations are done using four ports and 40 pins. The following pin diagram shows the details of the 40 pins. I/O operation port reserves 32 pins where each port has 8 pins. The other 8 pins are designated as Vcc, GND, XTAL1, XTAL2, RST, EA (bar), ALE/PROG (bar), and PSEN (bar).
It is a 40 Pin PDIP (Plastic Dual Inline Package)
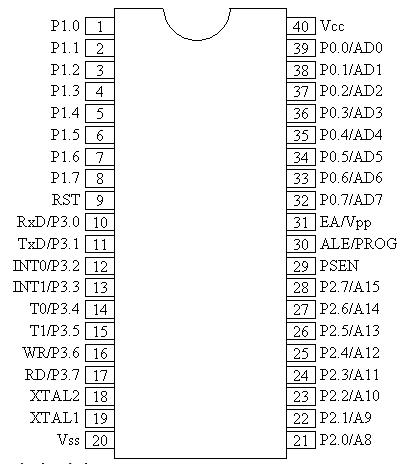
Note − In a DIP package, you can recognize the first pin and the last pin by the cut at the middle of the IC. The first pin is on the left of this cut mark and the last pin (i.e. the 40th pin in this case) is to the right of the cut mark.
I/O Ports and their Functions
The four ports P0, P1, P2, and P3, each use 8 pins, making them 8-bit ports. Upon RESET, all the ports are configured as inputs, ready to be used as input ports. When the first 0 is written to a port, it becomes an output. To reconfigure it as an input, a 1 must be sent to a port.
Port 0 (Pin No 32 Pin No 39)
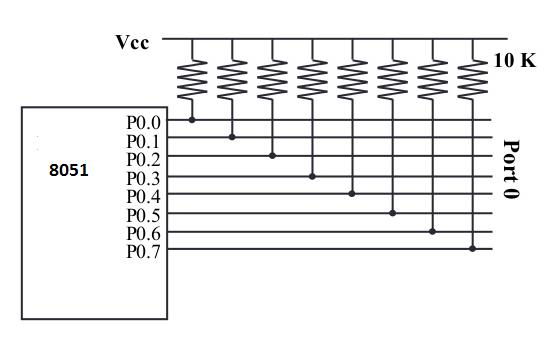
It has 8 pins (32 to 39). It can be used for input or output. Unlike P1, P2, and P3 ports, we normally connect P0 to 10K-ohm pull-up resistors to use it as an input or output port being an open drain.
It is also designated as AD0-AD7, allowing it to be used as both address and data. In case of 8031 (i.e. ROMless Chip), when we need to access the external ROM, then P0 will be used for both Address and Data Bus. ALE (Pin no 31) indicates if P0 has address or data. When ALE = 0, it provides data D0-D7, but when ALE = 1, it has address A0-A7. In case no external memory connection is available, P0 must be connected externally to a 10K-ohm pull-up resistor.
MOV A,#0FFH  ;(comments: A=FFH(Hexadecimal  i.e. A=1111 1111)

MOV P0,A     ;(Port0 have 1's on every pin so that it works as Input)
Port 1 (Pin 1 through 8)
It is an 8-bit port (pin 1 through 8) and can be used either as input or output. It doesn't require pull-up resistors because they are already connected internally. Upon reset, Port 1 is configured as an input port. The following code can be used to send alternating values of 55H and AAH to Port 1.
;Toggle all bits of continuously
MOV     A,#55
BACK:

MOV     P2,A
ACALL   DELAY
CPL     A      ;complement(invert) reg. A
SJMP    BACK
If Port 1 is configured to be used as an output port, then to use it as an input port again, program it by writing 1 to all of its bits as in the following code.
;Toggle all bits of continuously

MOV     A ,#0FFH    ;A = FF hex
MOV     P1,A        ;Make P1 an input port
MOV     A,P1        ;get data from P1
MOV     R7,A        ;save it in Reg R7
ACALL   DELAY       ;wait

MOV     A,P1        ;get another data from P1
MOV     R6,A        ;save it in R6
ACALL   DELAY       ;wait

MOV     A,P1        ;get another data from P1
MOV     R5,A        ;save it in R5
Port 2 (Pins 21 through 28)
Port 2 occupies a total of 8 pins (pins 21 through 28) and can be used for both input and output operations. Just as P1 (Port 1), P2 also doesn't require external Pull-up resistors because they are already connected internally. It must be used along with P0 to provide the 16-bit address for the external memory. So it is also designated as (A0A7), as shown in the pin diagram. When the 8051 is connected to an external memory, it provides path for upper 8-bits of 16-bits address, and it cannot be used as I/O. Upon reset, Port 2 is configured as an input port. The following code can be used to send alternating values of 55H and AAH to port 2.
;Toggle all bits of continuously
MOV     A,#55
BACK:
MOV     P2,A
ACALL   DELAY
CPL     A         ; complement(invert) reg. A
SJMP    BACK
If Port 2 is configured to be used as an output port, then to use it as an input port again, program it by writing 1 to all of its bits as in the following code.
;Get a byte from P2 and send it to P1
MOV    A,#0FFH    ;A = FF hex
MOV    P2,A       ;make P2 an input port
BACK:
MOV    A,P2       ;get data from P2
MOV    P1,A       ;send it to Port 1
SJMP   BACK       ;keep doing that
Port 3 (Pins 10 through 17)
It is also of 8 bits and can be used as Input/Output. This port provides some extremely important signals. P3.0 and P3.1 are RxD (Receiver) and TxD (Transmitter) respectively and are collectively used for Serial Communication. P3.2 and P3.3 pins are used for external interrupts. P3.4 and P3.5 are used for timers T0 and T1 respectively. P3.6 and P3.7 are Write (WR) and Read (RD) pins. These are active low pins, means they will be active when 0 is given to them and these are used to provide Read and Write operations to External ROM in 8031 based systems.
| P3 Bit | Function | Pin |
|---|---|---|
| P3.0 | RxD | 10 |
| P3.1 < | TxD | 11 |
| P3.2 < | Complement of INT0 | 12 |
| P3.3 < | INT1 | 13 |
| P3.4 < | T0 | 14 |
| P3.5 < | T1 | 15 |
| P3.6 < | WR | 16 |
| P3.7 < | Complement of RD | 17 |
Dual Role of Port 0 and Port 2
Dual role of Port 0 − Port 0 is also designated as AD0AD7, as it can be used for both data and address handling. While connecting an 8051 to external memory, Port 0 can provide both address and data. The 8051 microcontroller then multiplexes the input as address or data in order to save pins.
Dual role of Port 2 − Besides working as I/O, Port P2 is also used to provide 16-bit address bus for external memory along with Port 0. Port P2 is also designated as (A8 A15), while Port 0 provides the lower 8-bits via A0A7. In other words, we can say that when an 8051 is connected to an external memory (ROM) which can be maximum up to 64KB and this is possible by 16 bit address bus because we know 216 = 64KB. Port2 is used for the upper 8-bit of the 16 bits address, and it cannot be used for I/O and this is the way any Program code of external ROM is addressed.
Hardware Connection of Pins
Vcc − Pin 40 provides supply to the Chip and it is +5 V.
Gnd − Pin 20 provides ground for the Reference.
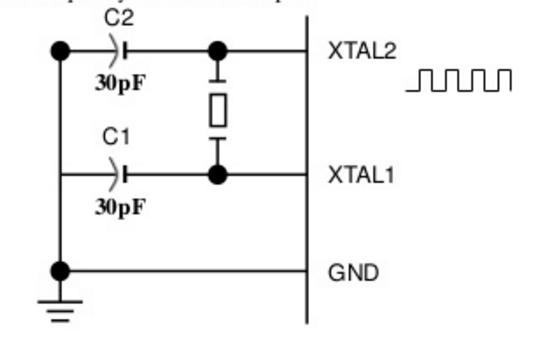
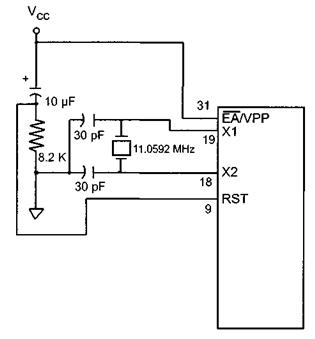
XTAL1, XTAL2 (Pin no 18 & Pin no 19) − 8051 has on-chip oscillator but requires external clock to run it. A quartz crystal is connected between the XTAL1 & XTAL2 pin of the chip. This crystal also needs two capacitors of 30pF for generating a signal of desired frequency. One side of each capacitor is connected to ground. 8051 IC is available in various speeds and it all depends on this Quartz crystal, for example, a 20 MHz microcontroller requires a crystal with a frequency no more than 20 MHz.
RST (Pin No. 9) − It is an Input pin and active High pin. Upon applying a high pulse on this pin, that is 1, the microcontroller will reset and terminate all activities. This process is known as Power-On Reset. Activating a power-on reset will cause all values in the register to be lost. It will set a program counter to all 0's. To ensure a valid input of Reset, the high pulse must be high for a minimum of two machine cycles before it is allowed to go low, which depends on the capacitor value and the rate at which it charges. (Machine Cycle is the minimum amount of frequency a single instruction requires in execution).
EA or External Access (Pin No. 31) − It is an input pin. This pin is an active low pin; upon applying a low pulse, it gets activated. In case of microcontroller (8051/52) having on-chip ROM, the EA (bar) pin is connected to Vcc. But in an 8031 microcontroller which does not have an on-chip ROM, the code is stored in an external ROM and then fetched by the microcontroller. In this case, we must connect the (pin no 31) EA to Gnd to indicate that the program code is stored externally.
PSEN or Program store Enable (Pin No 29) − This is also an active low pin, i.e., it gets activated after applying a low pulse. It is an output pin and used along with the EA pin in 8031 based (i.e. ROMLESS) Systems to allow storage of program code in external ROM.
ALE or (Address Latch Enable) − This is an Output Pin and is active high. It is especially used for 8031 IC to connect it to the external memory. It can be used while deciding whether P0 pins will be used as Address bus or Data bus. When ALE = 1, then the P0 pins work as Data bus and when ALE = 0, then the P0 pins act as Address bus.
I/O Ports and Bit Addressability
It is a most widely used feature of 8051 while writing code for 8051. Sometimes we need to access only 1 or 2 bits of the port instead of the entire 8-bits. 8051 provides the capability to access individual bits of the ports.
While accessing a port in a single-bit manner, we use the syntax "SETB X. Y" where X is the port number (0 to 3), and Y is a bit number (0 to 7) for data bits D0-D7 where D0 is the LSB and D7 is the MSB. For example, "SETB P1.5" sets high bit 5 of port 1.
The following code shows how we can toggle the bit P1.2 continuously.
AGAIN:
SETB    P1.2
ACALL   DELAY
CLR     P1.2
ACALL   DELAY
SJMP    AGAIN
Single-Bit Instructions
| Instructions | Function |
|---|---|
| SETB bit | Set the bit (bit = 1) |
| CLR bit | clear the bit (bit = 0) |
| CPL bit | complement the bit (bit = NOT bit) |
| JB bit, target | jump to target if bit = 1 (jump if bit) |
| JNB bit, target | jump to target if bit = 0 (jump if no bit) |
| JBC bit, target | jump to target if bit = 1, clear bit (jump if bit, then clear) |
Embedded Systems - Terms
Program Counter
The Program Counter is a 16- or 32-bit register which contains the address of the next instruction to be executed. The PC automatically increments to the next sequential memory location every time an instruction is fetched. Branch, jump, and interrupt operations load the Program Counter with an address other than the next sequential location.
Activating a power-on reset will cause all values in the register to be lost. It means the value of the PC (program counter) is 0 upon reset, forcing the CPU to fetch the first opcode from the ROM memory location 0000. It means we must place the first byte of upcode in ROM location 0000 because that is where the CPU expects to find the first instruction
Reset Vector
The significance of the reset vector is that it points the processor to the memory address which contains the firmware's first instruction. Without the Reset Vector, the processor would not know where to begin execution. Upon reset, the processor loads the Program Counter (PC) with the reset vector value from a predefined memory location. On CPU08 architecture, this is at location $FFFE:$FFFF.
When the reset vector is not necessary, developers normally take it for granted and dont program into the final image. As a result, the processor doesn't start up on the final product. It is a common mistake that takes place during the debug phase.
Stack Pointer
Stack is implemented in RAM and a CPU register is used to access it called SP (Stack Pointer) register. SP register is an 8-bit register and can address memory addresses of range 00h to FFh. Initially, the SP register contains value 07 to point to location 08 as the first location being used for the stack by the 8051.
When the content of a CPU register is stored in a stack, it is called a PUSH operation. When the content of a stack is stored in a CPU register, it is called a POP operation. In other words, a register is pushed onto the stack to save it and popped off the stack to retrieve it.
Infinite Loop
An infinite loop or an endless loop can be identified as a sequence of instructions in a computer program that executes endlessly in a loop, because of the following reasons −
- loop with no terminating condition.
- loop with a terminating condition that can never be met.
- loop with a terminating condition that causes the loop to start over.
Such infinite loops normally caused older operating systems to become unresponsive, as an infinite loop consumes all the available processor time. I/O operations waiting for user inputs are also called "infinite loops". One possible cause of a computer "freezing" is an infinite loop; other causes include deadlock and access violations.
Embedded systems, unlike a PC, never "exit" an application. They idle through an Infinite Loop waiting for an event to take place in the form of an interrupt, or a pre-scheduled task. In order to save power, some processors enter special sleep or wait modes instead of idling through an Infinite Loop, but they will come out of this mode upon either a timer or an External Interrupt.
Interrupts
Interrupts are mostly hardware mechanisms that instruct the program that an event has occurred. They may occur at any time, and are therefore asynchronous to the program flow. They require special handling by the processor, and are ultimately handled by a corresponding Interrupt Service Routine (ISR). Interrupts need to be handled quickly. If you take too much time servicing an interrupt, then you may miss another interrupt.
Little Endian Vs Big Endian
Although numbers are always displayed in the same way, they are not stored in the same way in memory. Big-Endian machines store the most significant byte of data in the lowest memory address. A Big-Endian machine stores 0x12345678 as −
ADD+0: 0x12
ADD+1: 0x34
ADD+2: 0x56
ADD+3: 0x78
Little-Endian machines, on the other hand, store the least significant byte of data in the lowest memory address. A Little-Endian machine stores 0x12345678 as −
ADD+0: 0x78
ADD+1: 0x56
ADD+2: 0x34
ADD+3: 0x12
Embedded Systems - Assembly Language
Assembly languages were developed to provide mnemonics or symbols for the machine level code instructions. Assembly language programs consist of mnemonics, thus they should be translated into machine code. A program that is responsible for this conversion is known as assembler. Assembly language is often termed as a low-level language because it directly works with the internal structure of the CPU. To program in assembly language, a programmer must know all the registers of the CPU.
Different programming languages such as C, C++, Java and various other languages are called high-level languages because they do not deal with the internal details of a CPU. In contrast, an assembler is used to translate an assembly language program into machine code (sometimes also called object code or opcode). Similarly, a compiler translates a high-level language into machine code. For example, to write a program in C language, one must use a C compiler to translate the program into machine language.
Structure of Assembly Language
An assembly language program is a series of statements, which are either assembly language instructions such as ADD and MOV, or statements called directives.
An instruction tells the CPU what to do, while a directive (also called pseudo-instructions) gives instruction to the assembler. For example, ADD and MOV instructions are commands which the CPU runs, while ORG and END are assembler directives. The assembler places the opcode to the memory location 0 when the ORG directive is used, while END indicates to the end of the source code. A program language instruction consists of the following four fields −
[ label: ] mnemonics [ operands ] [;comment ]
A square bracket ( [ ] ) indicates that the field is optional.
The label field allows the program to refer to a line of code by name. The label fields cannot exceed a certain number of characters.
The mnemonics and operands fields together perform the real work of the program and accomplish the tasks. Statements like ADD A , C & MOV C, #68 where ADD and MOV are the mnemonics, which produce opcodes ; "A, C" and "C, #68" are operands. These two fields could contain directives. Directives do not generate machine code and are used only by the assembler, whereas instructions are translated into machine code for the CPU to execute.
1.0000         ORG  0H            ;start (origin) at location 0
2 0000 7D25    MOV  R5,#25H       ;load 25H into R5
3.0002 7F34    MOV  R7,#34H       ;load 34H into  R7
4.0004 7400    MOV  A,#0          ;load 0 into A
5.0006 2D      ADD  A,R5          ;add contents of R5 to A
6.0007 2F      ADD  A,R7          ;add contents of R7 to A
7.0008 2412    ADD  A,#12H        ;add to A value 12 H
8.000A 80FE    HERE: SJMP HERE    ;stay in this loop
9.000C END                        ;end of asm source file
The comment field begins with a semicolon which is a comment indicator.
Notice the Label "HERE" in the program. Any label which refers to an instruction should be followed by a colon.
Assembling and Running an 8051 Program
Here we will discuss about the basic form of an assembly language. The steps to create, assemble, and run an assembly language program are as follows −
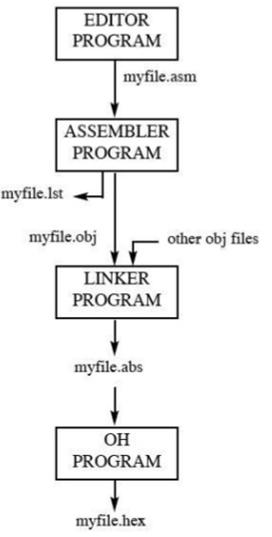
First, we use an editor to type in a program similar to the above program. Editors like MS-DOS EDIT program that comes with all Microsoft operating systems can be used to create or edit a program. The Editor must be able to produce an ASCII file. The "asm" extension for the source file is used by an assembler in the next step.
The "asm" source file contains the program code created in Step 1. It is fed to an 8051 assembler. The assembler then converts the assembly language instructions into machine code instructions and produces an .obj file (object file) and a .lst file (list file). It is also called as a source file, that's why some assemblers require that this file have the "src" extensions. The "lst" file is optional. It is very useful to the program because it lists all the opcodes and addresses as well as errors that the assemblers detected.
Assemblers require a third step called linking. The link program takes one or more object files and produces an absolute object file with the extension "abs".
Next, the "abs" file is fed to a program called "OH" (object to hex converter), which creates a file with the extension "hex" that is ready to burn in to the ROM.
Data Type
The 8051 microcontroller contains a single data type of 8-bits, and each register is also of 8-bits size. The programmer has to break down data larger than 8-bits (00 to FFH, or to 255 in decimal) so that it can be processed by the CPU.
DB (Define Byte)
The DB directive is the most widely used data directive in the assembler. It is used to define the 8-bit data. It can also be used to define decimal, binary, hex, or ASCII formats data. For decimal, the "D" after the decimal number is optional, but it is required for "B" (binary) and "Hl" (hexadecimal).
To indicate ASCII, simply place the characters in quotation marks ('like this'). The assembler generates ASCII code for the numbers/characters automatically. The DB directive is the only directive that can be used to define ASCII strings larger than two characters; therefore, it should be used for all the ASCII data definitions. Some examples of DB are given below −
        ORG  500H
DATA1:  DB   28                     ;DECIMAL (1C in hex)
DATA2:  DB   00110101B              ;BINARY  (35 in hex)
DATA3:  DB   39H                    ;HEX
        ORG  510H
DATA4:  DB   "2591"                 ;ASCII  NUMBERS
        ORG  520H
DATA6:  DA   "MY NAME IS Michael"   ;ASCII CHARACTERS
Either single or double quotes can be used around ASCII strings. DB is also used to allocate memory in byte-sized chunks.
Assembler Directives
Some of the directives of 8051 are as follows −
ORG (origin) − The origin directive is used to indicate the beginning of the address. It takes the numbers in hexa or decimal format. If H is provided after the number, the number is treated as hexa, otherwise decimal. The assembler converts the decimal number to hexa.
EQU (equate) − It is used to define a constant without occupying a memory location. EQU associates a constant value with a data label so that the label appears in the program, its constant value will be substituted for the label. While executing the instruction "MOV R3, #COUNT", the register R3 will be loaded with the value 25 (notice the # sign). The advantage of using EQU is that the programmer can change it once and the assembler will change all of its occurrences; the programmer does not have to search the entire program.
END directive − It indicates the end of the source (asm) file. The END directive is the last line of the program; anything after the END directive is ignored by the assembler.
Labels in Assembly Language
All the labels in assembly language must follow the rules given below −
Each label name must be unique. The names used for labels in assembly language programming consist of alphabetic letters in both uppercase and lowercase, number 0 through 9, and special characters such as question mark (?), period (.), at the rate @, underscore (_), and dollar($).
The first character should be in alphabetical character; it cannot be a number.
Reserved words cannot be used as a label in the program. For example, ADD and MOV words are the reserved words, since they are instruction mnemonics.
Embedded Systems - Registers
Registers are used in the CPU to store information on temporarily basis which could be data to be processed, or an address pointing to the data which is to be fetched. In 8051, there is one data type is of 8-bits, from the MSB (most significant bit) D7 to the LSB (least significant bit) D0. With 8-bit data type, any data type larger than 8-bits must be broken into 8-bit chunks before it is processed.
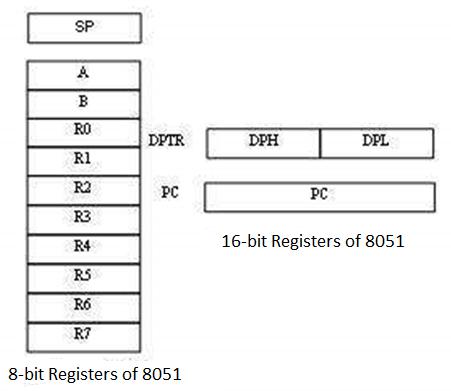
The most widely used registers of the 8051 are A (accumulator), B, R0-R7, DPTR (data pointer), and PC (program counter). All these registers are of 8-bits, except DPTR and PC.
Storage Registers in 8051
We will discuss the following types of storage registers here −
- Accumulator
- R register
- B register
- Data Pointer (DPTR)
- Program Counter (PC)
- Stack Pointer (SP)
Accumulator
The accumulator, register A, is used for all arithmetic and logic operations. If the accumulator is not present, then every result of each calculation (addition, multiplication, shift, etc.) is to be stored into the main memory. Access to main memory is slower than access to a register like the accumulator because the technology used for the large main memory is slower (but cheaper) than that used for a register.
The "R" Registers
The "R" registers are a set of eight registers, namely, R0, R1 to R7. These registers function as auxiliary or temporary storage registers in many operations. Consider an example of the sum of 10 and 20. Store a variable 10 in an accumulator and another variable 20 in, say, register R4. To process the addition operation, execute the following command −
ADD A,R4
After executing this instruction, the accumulator will contain the value 30. Thus "R" registers are very important auxiliary or helper registers. The Accumulator alone would not be very useful if it were not for these "R" registers. The "R" registers are meant for temporarily storage of values.
Let us take another example. We will add the values in R1 and R2 together and then subtract the values of R3 and R4 from the result.
MOV A,R3   ;Move the value of R3 into the accumulator
ADD A,R4   ;Add the value of R4
MOV R5,A   ;Store the resulting value temporarily in R5
MOV A,R1   ;Move the value of R1 into the accumulator
ADD A,R2   ;Add the value of R2
SUBB A,R5  ;Subtract the value of R5 (which now contains R3 + R4)
As you can see, we used R5 to temporarily hold the sum of R3 and R4. Of course, this is not the most efficient way to calculate (R1 + R2) (R3 + R4), but it does illustrate the use of the "R" registers as a way to store values temporarily.
The "B" Register
The "B" register is very similar to the Accumulator in the sense that it may hold an 8-bit (1-byte) value. The "B" register is used only by two 8051 instructions: MUL AB and DIV AB. To quickly and easily multiply or divide A by another number, you may store the other number in "B" and make use of these two instructions. Apart from using MUL and DIV instructions, the "B" register is often used as yet another temporary storage register, much like a ninth R register.
The Data Pointer
The Data Pointer (DPTR) is the 8051s only user-accessible 16-bit (2-byte) register. The Accumulator, R0R7 registers and B register are 1-byte value registers. DPTR is meant for pointing to data. It is used by the 8051 to access external memory using the address indicated by DPTR. DPTR is the only 16-bit register available and is often used to store 2-byte values.
The Program Counter
The Program Counter (PC) is a 2-byte address which tells the 8051 where the next instruction to execute can be found in the memory. PC starts at 0000h when the 8051 initializes and is incremented every time after an instruction is executed. PC is not always incremented by 1. Some instructions may require 2 or 3 bytes; in such cases, the PC will be incremented by 2 or 3.
Branch, jump, and interrupt operations load the Program Counter with an address other than the next sequential location. Activating a power-on reset will cause all values in the register to be lost. It means the value of the PC is 0 upon reset, forcing the CPU to fetch the first opcode from the ROM location 0000. It means we must place the first byte of upcode in ROM location 0000 because that is where the CPU expects to find the first instruction.
The Stack Pointer (SP)
The Stack Pointer, like all registers except DPTR and PC, may hold an 8-bit (1-byte) value. The Stack Pointer tells the location from where the next value is to be removed from the stack. When a value is pushed onto the stack, the value of SP is incremented and then the value is stored at the resulting memory location. When a value is popped off the stack, the value is returned from the memory location indicated by SP, and then the value of SP is decremented.
This order of operation is important. SP will be initialized to 07h when the 8051 is initialized. If a value is pushed onto the stack at the same time, the value will be stored in the internal RAM address 08h because the 8051 will first increment the value of SP (from 07h to 08h) and then will store the pushed value at that memory address (08h). SP is modified directly by the 8051 by six instructions: PUSH, POP, ACALL, LCALL, RET, and RETI.
ROM Space in 8051
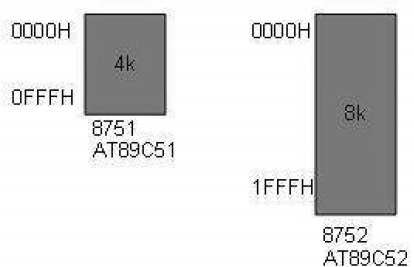
Some family members of 8051 have only 4K bytes of on-chip ROM (e.g. 8751, AT8951); some have 8K ROM like AT89C52, and there are some family members with 32K bytes and 64K bytes of on-chip ROM such as Dallas Semiconductor. The point to remember is that no member of the 8051 family can access more than 64K bytes of opcode since the program counter in 8051 is a 16-bit register (0000 to FFFF address).
The first location of the program ROM inside the 8051 has the address of 0000H, whereas the last location can be different depending on the size of the ROM on the chip. Among the 8051 family members, AT8951 has $k bytes of on-chip ROM having a memory address of 0000 (first location) to 0FFFH (last location).
8051 Flag Bits and PSW Register
The program status word (PSW) register is an 8-bit register, also known as flag register. It is of 8-bit wide but only 6-bit of it is used. The two unused bits are user-defined flags. Four of the flags are called conditional flags, which means that they indicate a condition which results after an instruction is executed. These four are CY (Carry), AC (auxiliary carry), P (parity), and OV (overflow). The bits RS0 and RS1 are used to change the bank registers. The following figure shows the program status word register.
The PSW Register contains that status bits that reflect the current status of the CPU.
| CY | CA | F0 | RS1 | RS0 | OV | - | P |
|---|
| CY | PSW.7 | Carry Flag |
| AC | PSW.6 | Auxiliary Carry Flag |
| F0 | PSW.5 | Flag 0 available to user for general purpose. |
| RS1 | PSW.4 | Register Bank selector bit 1 |
| RS0 | PSW.3 | Register Bank selector bit 0 |
| OV | PSW.2 | Overflow Flag |
| - | PSW.1 | User definable FLAG |
| P | PSW.0 | Parity FLAG. Set/ cleared by hardware during instruction cycle to indicate even/odd number of 1 bit in accumulator. |
We can select the corresponding Register Bank bit using RS0 and RS1 bits.
| RS1 | RS2 | Register Bank | Address |
|---|---|---|---|
| 0 | 0 | 0 | 00H-07H |
| 0 | 1 | 1 | 08H-0FH |
| 1 | 0 | 2 | 10H-17H |
| 1 | 1 | 3 | 18H-1FH |
CY, the carry flag − This carry flag is set (1) whenever there is a carry out from the D7 bit. It is affected after an 8-bit addition or subtraction operation. It can also be reset to 1 or 0 directly by an instruction such as "SETB C" and "CLR C" where "SETB" stands for set bit carry and "CLR" stands for clear carry.
AC, auxiliary carry flag − If there is a carry from D3 and D4 during an ADD or SUB operation, the AC bit is set; otherwise, it is cleared. It is used for the instruction to perform binary coded decimal arithmetic.
P, the parity flag − The parity flag represents the number of 1's in the accumulator register only. If the A register contains odd number of 1's, then P = 1; and for even number of 1's, P = 0.
OV, the overflow flag − This flag is set whenever the result of a signed number operation is too large causing the high-order bit to overflow into the sign bit. It is used only to detect errors in signed arithmetic operations.
Example
Show the status of CY, AC, and P flags after the addition of 9CH and 64H in the following instruction.
MOV A, #9CH
ADD A, # 64H
Solution:  9C   10011100
          +64   01100100
          100   00000000

CY = 1 since there is a carry beyond D7 bit
AC = 0 since there is a carry from D3 to D4
P  = 0 because the accumulator has even number of 1's
Embedded Systems - Registers Bank/Stack
The 8051 microcontroller has a total of 128 bytes of RAM. We will discuss about the allocation of these 128 bytes of RAM and examine their usage as stack and register.
RAM Memory Space Allocation in 8051
The 128 bytes of RAM inside the 8051 are assigned the address 00 to 7FH. They can be accessed directly as memory locations and are divided into three different groups as follows −
32 bytes from 00H to 1FH locations are set aside for register banks and the stack.
16 bytes from 20H to 2FH locations are set aside for bit-addressable read/write memory.
80 bytes from 30H to 7FH locations are used for read and write storage; it is called as scratch pad. These 80 locations RAM are widely used for the purpose of storing data and parameters by 8051 programmers.

Register Banks in 8051
A total of 32 bytes of RAM are set aside for the register banks and the stack. These 32 bytes are divided into four register banks in which each bank has 8 registers, R0R7. RAM locations from 0 to 7 are set aside for bank 0 of R0R7 where R0 is RAM location 0, R1 is RAM location 1, R2 is location 2, and so on, until the memory location 7, which belongs to R7 of bank 0.
The second bank of registers R0R7 starts at RAM location 08 and goes to locations OFH. The third bank of R0R7 starts at memory location 10H and goes to location to 17H. Finally, RAM locations 18H to 1FH are set aside for the fourth bank of R0R7.
Default Register Bank
If RAM locations 001F are set aside for the four registers banks, which register bank of R0R7 do we have access to when the 8051 is powered up? The answer is register bank 0; that is, RAM locations from 0 to 7 are accessed with the names R0 to R7 when programming the 8051. Because it is much easier to refer these RAM locations by names such as R0 to R7, rather than by their memory locations.
How to Switch Register Banks
Register bank 0 is the default when the 8051 is powered up. We can switch to the other banks using PSW register. D4 and D3 bits of the PSW are used to select the desired register bank, since they can be accessed by the bit addressable instructions SETB and CLR. For example, "SETB PSW.3" will set PSW.3 = 1 and select the bank register 1.
| RS1 | RS2 | Bank Selected |
|---|---|---|
| 0 | 0 | Bank0 |
| 0 | 1 | Bank1 |
| 1 | 0 | Bank2 |
| 1 | 1 | Bank3 |
Stack and its Operations
Stack in the 8051
The stack is a section of a RAM used by the CPU to store information such as data or memory address on temporary basis. The CPU needs this storage area considering limited number of registers.
How Stacks are Accessed
As the stack is a section of a RAM, there are registers inside the CPU to point to it. The register used to access the stack is known as the stack pointer register. The stack pointer in the 8051 is 8-bits wide, and it can take a value of 00 to FFH. When the 8051 is initialized, the SP register contains the value 07H. This means that the RAM location 08 is the first location used for the stack. The storing operation of a CPU register in the stack is known as a PUSH, and getting the contents from the stack back into a CPU register is called a POP.
Pushing into the Stack
In the 8051, the stack pointer (SP) points to the last used location of the stack. When data is pushed onto the stack, the stack pointer (SP) is incremented by 1. When PUSH is executed, the contents of the register are saved on the stack and SP is incremented by 1. To push the registers onto the stack, we must use their RAM addresses. For example, the instruction "PUSH 1" pushes register R1 onto the stack.
Popping from the Stack
Popping the contents of the stack back into a given register is the opposite to the process of pushing. With every pop operation, the top byte of the stack is copied to the register specified by the instruction and the stack pointer is decremented once.
Embedded Systems - Instructions
The flow of program proceeds in a sequential manner, from one instruction to the next instruction, unless a control transfer instruction is executed. The various types of control transfer instruction in assembly language include conditional or unconditional jumps and call instructions.
Loop and Jump Instructions
Looping in the 8051
Repeating a sequence of instructions a certain number of times is called a loop. An instruction DJNZ reg, label is used to perform a Loop operation. In this instruction, a register is decremented by 1; if it is not zero, then 8051 jumps to the target address referred to by the label.
The register is loaded with the counter for the number of repetitions prior to the start of the loop. In this instruction, both the registers decrement and the decision to jump are combined into a single instruction. The registers can be any of R0R7. The counter can also be a RAM location.
Example
Multiply 25 by 10 using the technique of repeated addition.
Solution − Multiplication can be achieved by adding the multiplicand repeatedly, as many times as the multiplier. For example,
25 * 10 = 250(FAH)
25 + 25 + 25 + 25 + 25 + 25 + 25 + 25 + 25 + 25 = 250
   MOV A,#0             ;A = 0,clean ACC
   MOV R2,#10           ; the multiplier is replaced in R2
   Add A,#25            ;add the multiplicand to the ACC

AGAIN:DJNZ R2,
AGAIN:repeat  until R2 = 0 (10 times)

   MOV R5 , A           ;save A in R5 ;R5 (FAH)
Drawback in 8051 − Looping action with the instruction DJNZ Reg label is limited to 256 iterations only. If a conditional jump is not taken, then the instruction following the jump is executed.
Looping inside a Loop
When we use a loop inside another loop, it is called a nested loop. Two registers are used to hold the count when the maximum count is limited to 256. So we use this method to repeat the action more times than 256.
Example
Write a program to −
- Load the accumulator with the value 55H.
- Complement the ACC 700 times.
Solution − Since 700 is greater than 255 (the maximum capacity of any register), two registers are used to hold the count. The following code shows how to use two registers, R2 and R3, for the count.
   MOV A,#55H            ;A = 55H

NEXT: MOV R3,#10         ;R3 the outer loop counter
AGAIN:MOV R2,#70         ;R2 the inner loop counter

   CPL A                 ;complement
Other Conditional Jumps
The following table lists the conditional jumps used in 8051 −
| Instruction | Action |
|---|---|
| JZ | Jump if A = 0 |
| JNZ | Jump if A ≠ 0 |
| DJNZ | Decrement and Jump if register ≠ 0 |
| CJNE A, data | Jump if A ≠ data |
| CJNE reg, #data | Jump if byte ≠ data |
| JC | Jump if CY = 1 |
| JNC | Jump if CY ≠ 1 |
| JB | Jump if bit = 1 |
| JNB | Jump if bit = 0 |
| JBC | Jump if bit = 1 and clear bit |
JZ (jump if A = 0) − In this instruction, the content of the accumulator is checked. If it is zero, then the 8051 jumps to the target address. JZ instruction can be used only for the accumulator, it does not apply to any other register.
JNZ (jump if A is not equal to 0) − In this instruction, the content of the accumulator is checked to be non-zero. If it is not zero, then the 8051 jumps to the target address.
JNC (Jump if no carry, jumps if CY = 0) − The Carry flag bit in the flag (or PSW) register is used to make the decision whether to jump or not "JNC label". The CPU looks at the carry flag to see if it is raised (CY = 1). If it is not raised, then the CPU starts to fetch and execute instructions from the address of the label. If CY = 1, it will not jump but will execute the next instruction below JNC.
JC (Jump if carry, jumps if CY = 1) − If CY = 1, it jumps to the target address.
JB (jump if bit is high)
JNB (jump if bit is low)
Note − It must be noted that all conditional jumps are short jumps, i.e., the address of the target must be within 128 to +127 bytes of the contents of the program counter.
Unconditional Jump Instructions
There are two unconditional jumps in 8051 −
LJMP (long jump) − LJMP is 3-byte instruction in which the first byte represents opcode, and the second and third bytes represent the 16-bit address of the target location. The 2-byte target address is to allow a jump to any memory location from 0000 to FFFFH.
SJMP (short jump) − It is a 2-byte instruction where the first byte is the opcode and the second byte is the relative address of the target location. The relative address ranges from 00H to FFH which is divided into forward and backward jumps; that is, within 128 to +127 bytes of memory relative to the address of the current PC (program counter). In case of forward jump, the target address can be within a space of 127 bytes from the current PC. In case of backward jump, the target address can be within 128 bytes from the current PC.
Calculating the Short Jump Address
All conditional jumps (JNC, JZ, and DJNZ) are short jumps because they are 2-byte instructions. In these instructions, the first byte represents opcode and the second byte represents the relative address. The target address is always relative to the value of the program counter. To calculate the target address, the second byte is added to the PC of the instruction immediately below the jump. Take a look at the program given below −
Line   PC    Op-code   Mnemonic   Operand
1      0000               ORG       0000
2      0000  7800         MOV       R0,#003
3      0002  7455         MOV       A,#55H0
4      0004  6003         JZ        NEXT
5      0006  08           INC       R0
6      0007  04   AGAIN:  INC       A
7      0008  04           INC       A
8      0009  2477 NEXT:   ADD       A, #77h
9      000B  5005         JNC       OVER
10     000D  E4           CLR       A
11     000E  F8           MOV       R0, A
12     000F  F9           MOV       R1, A
13     0010  FA          MOV       R2, A
14     0011  FB           MOV       R3, A
15     0012  2B   OVER:   ADD       A, R3
16     0013  50F2         JNC       AGAIN
17     0015  80FE HERE:   SJMP      HERE
18     0017             END
Backward Jump Target Address Calculation
In case of a forward jump, the displacement value is a positive number between 0 to 127 (00 to 7F in hex). However, for a backward jump, the displacement is a negative value of 0 to 128.
CALL Instructions
CALL is used to call a subroutine or method. Subroutines are used to perform operations or tasks that need to be performed frequently. This makes a program more structured and saves memory space. There are two instructions − LCALL and ACALL.
LCALL (Long Call)
LCALL is a 3-byte instruction where the first byte represents the opcode and the second and third bytes are used to provide the address of the target subroutine. LCALL can be used to call subroutines which are available within the 64K-byte address space of the 8051.
To make a successful return to the point after execution of the called subroutine, the CPU saves the address of the instruction immediately below the LCALL on the stack. Thus, when a subroutine is called, the control is transferred to that subroutine, and the processor saves the PC (program counter) on the stack and begins to fetch instructions from the new location. The instruction RET (return) transfers the control back to the caller after finishing execution of the subroutine. Every subroutine uses RET as the last instruction.
ACALL (Absolute Call)
ACALL is a 2-byte instruction, in contrast to LCALL which is 3 bytes. The target address of the subroutine must be within 2K bytes because only 11 bits of the 2 bytes are used for address. The difference between the ACALL and LCALL is that the target address for LCALL can be anywhere within the 64K-bytes address space of the 8051, while the target address of CALL is within a 2K-byte range.
Embedded Systems - Addressing Modes
An addressing mode refers to how you are addressing a given memory location. There are five different ways or five addressing modes to execute this instruction which are as follows −
- Immediate addressing mode
- Direct addressing mode
- Register direct addressing mode
- Register indirect addressing mode
- Indexed addressing mode
Immediate Addressing Mode
Let's begin with an example.
MOV A, #6AH
In general, we can write,
MOV A, #data
It is termed as immediate because 8-bit data is transferred immediately to the accumulator (destination operand).
The following illustration describes the above instruction and its execution. The opcode 74H is saved at 0202 address. The data 6AH is saved at 0203 address in the program memory. After reading the opcode 74H, the data at the next program memory address is transferred to accumulator A (E0H is the address of accumulator). Since the instruction is of 2-bytes and is executed in one cycle, the program counter will be incremented by 2 and will point to 0204 of the program memory.
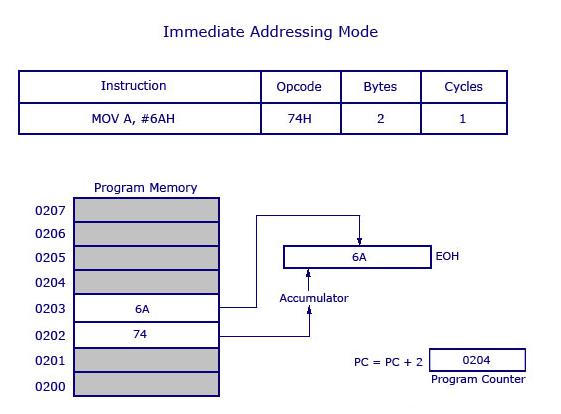
Note − The '#' symbol before 6AH indicates that the operand is a data (8 bit). In the absence of '#', the hexadecimal number would be taken as an address.
Direct Addressing Mode
This is another way of addressing an operand. Here, the address of the data (source data) is given as an operand. Lets take an example.
MOV A, 04H
The register bank#0 (4th register) has the address 04H. When the MOV instruction is executed, the data stored in register 04H is moved to the accumulator. As the register 04H holds the data 1FH, 1FH is moved to the accumulator.
Note − We have not used '#' in direct addressing mode, unlike immediate mode. If we had used '#', the data value 04H would have been transferred to the accumulator instead of 1FH.
Now, take a look at the following illustration. It shows how the instruction gets executed.
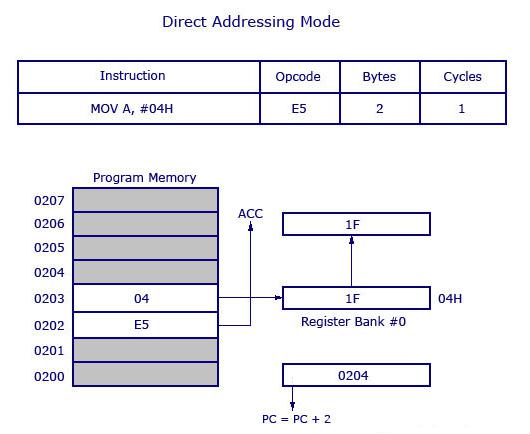
As shown in the above illustration, this is a 2-byte instruction which requires 1 cycle to complete. The PC will be incremented by 2 and will point to 0204. The opcode for the instruction MOV A, address is E5H. When the instruction at 0202 is executed (E5H), the accumulator is made active and ready to receive data. Then the PC goes to the next address as 0203 and looks up the address of the location of 04H where the source data (to be transferred to accumulator) is located. At 04H, the control finds the data 1F and transfers it to the accumulator and hence the execution is completed.
Register Direct Addressing Mode
In this addressing mode, we use the register name directly (as source operand). Let us try to understand with the help of an example.
MOV A, R4
At a time, the registers can take values from R0 to R7. There are 32 such registers. In order to use 32 registers with just 8 variables to address registers, register banks are used. There are 4 register banks named from 0 to 3. Each bank comprises of 8 registers named from R0 to R7.
At a time, a single register bank can be selected. Selection of a register bank is made possible through a Special Function Register (SFR) named Processor Status Word (PSW). PSW is an 8-bit SFR where each bit can be programmed as required. Bits are designated from PSW.0 to PSW.7. PSW.3 and PSW.4 are used to select register banks.
Now, take a look at the following illustration to get a clear understanding of how it works.
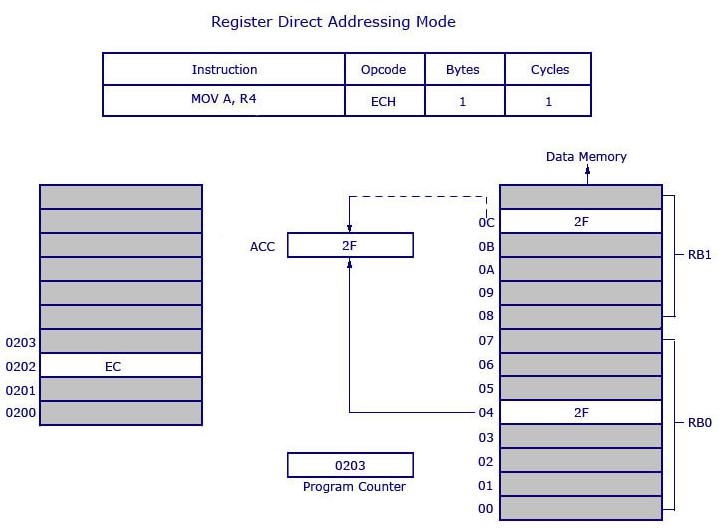
Opcode EC is used for MOV A, R4. The opcode is stored at the address 0202 and when it is executed, the control goes directly to R4 of the respected register bank (that is selected in PSW). If register bank #0 is selected, then the data from R4 of register bank #0 will be moved to the accumulator. Here 2F is stored at 04H. 04H represents the address of R4 of register bank #0.
Data (2F) movement is highlighted in bold. 2F is getting transferred to the accumulator from data memory location 0C H and is shown as dotted line. 0CH is the address location of Register 4 (R4) of register bank #1. The instruction above is 1 byte and requires 1 cycle for complete execution. What it means is, you can save program memory by using register direct addressing mode.
Register Indirect Addressing Mode
In this addressing mode, the address of the data is stored in the register as operand.
MOV A, @R0
Here the value inside R0 is considered as an address, which holds the data to be transferred to the accumulator. Example: If R0 has the value 20H, and data 2FH is stored at the address 20H, then the value 2FH will get transferred to the accumulator after executing this instruction. See the following illustration.
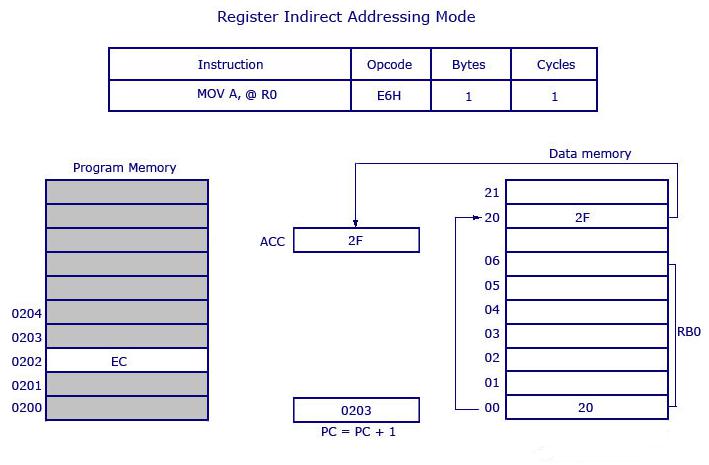
So the opcode for MOV A, @R0 is E6H. Assuming that the register bank #0 is selected, the R0 of register bank #0 holds the data 20H. Program control moves to 20H where it locates the data 2FH and it transfers 2FH to the accumulator. This is a 1-byte instruction and the program counter increments by 1 and moves to 0203 of the program memory.
Note − Only R0 and R1 are allowed to form a register indirect addressing instruction. In other words, the programmer can create an instruction either using @R0 or @R1. All register banks are allowed.
Indexed Addressing Mode
We will take two examples to understand the concept of indexed addressing mode. Take a look at the following instructions −
MOVC A, @A+DPTR
and
MOVC A, @A+PC
where DPTR is the data pointer and PC is the program counter (both are 16-bit registers). Consider the first example.
MOVC A, @A+DPTR
The source operand is @A+DPTR. It contains the source data from this location. Here we are adding the contents of DPTR with the current content of the accumulator. This addition will give a new address which is the address of the source data. The data pointed by this address is then transferred to the accumulator.
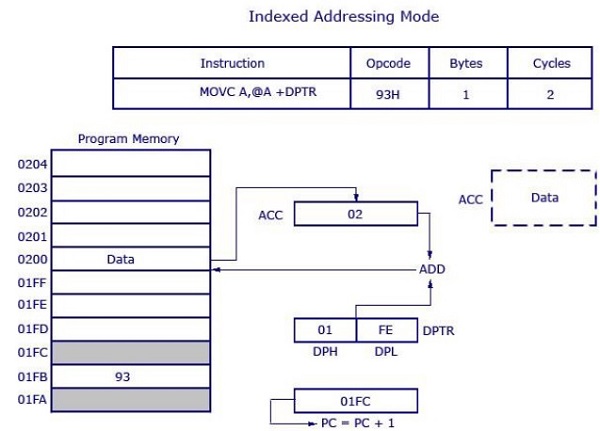
The opcode is 93H. DPTR has the value 01FE, where 01 is located in DPH (higher 8 bits) and FE is located in DPL (lower 8 bits). Accumulator has the value 02H. Then a 16-bit addition is performed and 01FE H+02H results in 0200 H. Data at the location 0200H will get transferred to the accumulator. The previous value inside the accumulator (02H) will be replaced with the new data from 0200H. The new data in the accumulator is highlighted in the illustration.
This is a 1-byte instruction with 2 cycles needed for execution and the execution time required for this instruction is high compared to previous instructions (which were all 1 cycle each).
The other example MOVC A, @A+PC works the same way as the above example. Instead of adding DPTR with the accumulator, here the data inside the program counter (PC) is added with the accumulator to obtain the target address.
Embedded Systems - SFR Registers
A Special Function Register (or Special Purpose Register, or simply Special Register) is a register within a microprocessor that controls or monitors the various functions of a microprocessor. As the special registers are closely tied to some special function or status of the processor, they might not be directly writable by normal instructions (like add, move, etc.). Instead, some special registers in some processor architectures require special instructions to modify them.
In the 8051, register A, B, DPTR, and PSW are a part of the group of registers commonly referred to as SFR (special function registers). An SFR can be accessed by its name or by its address.
The following table shows a list of SFRs and their addresses.
| Byte Address | Bit Address | ||||||||
|---|---|---|---|---|---|---|---|---|---|
| FF | |||||||||
| F0 | F7 | F6 | F5 | F4 | F3 | F2 | F1 | F0 | B |
| E0 | E7 | E6 | E5 | E4 | E3 | E2 | E1 | E0 | ACC |
| D0 | D7 | D6 | D5 | D4 | D3 | D2 | - | D0 | PSW |
| B8 | - | - | - | BC | BB | BA | B9 | B8 | IP |
| B0 | B7 | B6 | B5 | B4 | B3 | B2 | B1 | B0 | P3 |
| A2 | AF | - | - | AC | AB | AA | A9 | A8 | IE |
| A0 | A7 | A6 | A5 | A4 | A3 | A2 | A1 | A0 | P2 |
| 99 | Not bit Addressable | SBUF | |||||||
| 98 | 9F | 9E | 9D | 9C | 9B | 9A | 99 | 98 | SCON |
| 90 | 97 | 96 | 95 | 94 | 93 | 92 | 91 | 90 | P1 |
| 8D | Not bit Addressable | TH1 | |||||||
| 8C | Not bit Addressable | TH0 | |||||||
| 8B | Not bit Addressable | TL1 | |||||||
| 8A | Not bit Addressable | TL0 | |||||||
| 89 | Not bit Addressable | TMOD | |||||||
| 88 | 8F | 8E | 8D | 8C | 8B | 8A | 89 | 88 | TCON |
| 87 | Not bit Addressable | PCON | |||||||
| 83 | Not bit Addressable | DPH | |||||||
| 82 | Not bit Addressable | DPL | |||||||
| 81 | Not bit Addressable | SP | |||||||
| 80 | 87 | 87 | 85 | 84 | 83 | 82 | 81 | 80 | P0 |
Consider the following two points about the SFR addresses.
A special function register can have an address between 80H to FFH. These addresses are above 80H, as the addresses from 00 to 7FH are the addresses of RAM memory inside the 8051.
Not all the address space of 80 to FF are used by the SFR. Unused locations, 80H to FFH, are reserved and must not be used by the 8051 programmer.
| CY | PSW.7 | Carry Flag |
| AC | PSW.6 | Auxiliary Carry Flag |
| F0 | PSW.5 | Flag 0 available to user for general purpose. |
| RS1 | PSW.4 | Register Bank selector bit 1 |
| RS0 | PSW.3 | Register Bank selector bit 0 |
| OV | PSW.2 | Overflow Flag |
| - | PSW.1 | User definable FLAG |
| P | PSW.0 | Parity FLAG. Set/ cleared by hardware during instruction cycle to indicate even/odd number of 1 bit in accumulator. |
In the following example, the SFR registers names are replaced with their addresses.
| CY | AC | F0 | RS1 | RS0 | OV | - | P |
|---|
We can select the corresponding Register Bank bit using RS0 and RS1 bits.
| RS1 | RS2 | Register Bank | Address |
|---|---|---|---|
| 0 | 0 | 0 | 00H-07H |
| 0 | 1 | 1 | 08H-0FH |
| 1 | 0 | 2 | 10H-17H |
| 1 | 1 | 3 | 18H-1FH |
The Program Status Word (PSW) contains status bits to reflect the current state of the CPU. The 8051 variants provide one special function register, PSW, with this status information. The 8251 provides two additional status flags, Z and N, which are available in a second special function register called PSW1.
Embedded Systems - Timer/Counter
A timer is a specialized type of clock which is used to measure time intervals. A timer that counts from zero upwards for measuring time elapsed is often called a stopwatch. It is a device that counts down from a specified time interval and used to generate a time delay, for example, an hourglass is a timer.
A counter is a device that stores (and sometimes displays) the number of times a particular event or process occurred, with respect to a clock signal. It is used to count the events happening outside the microcontroller. In electronics, counters can be implemented quite easily using register-type circuits such as a flip-flop.
Difference between a Timer and a Counter
The points that differentiate a timer from a counter are as follows −
| Timer | Counter |
|---|---|
| The register incremented for every machine cycle. | The register is incremented considering 1 to 0 transition at its corresponding to an external input pin (T0, T1). |
| Maximum count rate is 1/12 of the oscillator frequency. | Maximum count rate is 1/24 of the oscillator frequency. |
| A timer uses the frequency of the internal clock, and generates delay. | A counter uses an external signal to count pulses. |
Timers of 8051 and their Associated Registers
The 8051 has two timers, Timer 0 and Timer 1. They can be used as timers or as event counters. Both Timer 0 and Timer 1 are 16-bit wide. Since the 8051 follows an 8-bit architecture, each 16 bit is accessed as two separate registers of low-byte and high-byte.
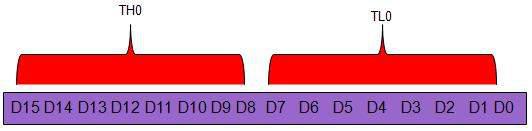
Timer 0 Register
The 16-bit register of Timer 0 is accessed as low- and high-byte. The low-byte register is called TL0 (Timer 0 low byte) and the high-byte register is called TH0 (Timer 0 high byte). These registers can be accessed like any other register. For example, the instruction MOV TL0, #4H moves the value into the low-byte of Timer #0.
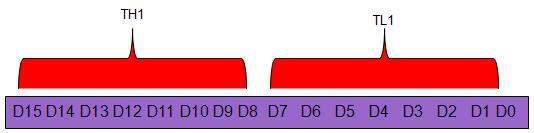
Timer 1 Register
The 16-bit register of Timer 1 is accessed as low- and high-byte. The low-byte register is called TL1 (Timer 1 low byte) and the high-byte register is called TH1 (Timer 1 high byte). These registers can be accessed like any other register. For example, the instruction MOV TL1, #4H moves the value into the low-byte of Timer 1.
TMOD (Timer Mode) Register
Both Timer 0 and Timer 1 use the same register to set the various timer operation modes. It is an 8-bit register in which the lower 4 bits are set aside for Timer 0 and the upper four bits for Timers. In each case, the lower 2 bits are used to set the timer mode in advance and the upper 2 bits are used to specify the location.
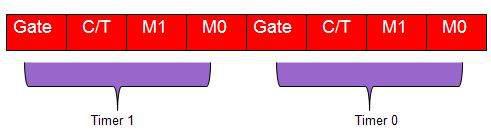
Gate − When set, the timer only runs while INT(0,1) is high.
C/T − Counter/Timer select bit.
M1 − Mode bit 1.
M0 − Mode bit 0.
GATE
Every timer has a means of starting and stopping. Some timers do this by software, some by hardware, and some have both software and hardware controls. 8051 timers have both software and hardware controls. The start and stop of a timer is controlled by software using the instruction SETB TR1 and CLR TR1 for timer 1, and SETB TR0 and CLR TR0 for timer 0.
The SETB instruction is used to start it and it is stopped by the CLR instruction. These instructions start and stop the timers as long as GATE = 0 in the TMOD register. Timers can be started and stopped by an external source by making GATE = 1 in the TMOD register.
C/T (CLOCK / TIMER)
This bit in the TMOD register is used to decide whether a timer is used as a delay generator or an event manager. If C/T = 0, it is used as a timer for timer delay generation. The clock source to create the time delay is the crystal frequency of the 8051. If C/T = 0, the crystal frequency attached to the 8051 also decides the speed at which the 8051 timer ticks at a regular interval.
Timer frequency is always 1/12th of the frequency of the crystal attached to the 8051. Although various 8051 based systems have an XTAL frequency of 10 MHz to 40 MHz, we normally work with the XTAL frequency of 11.0592 MHz. It is because the baud rate for serial communication of the 8051.XTAL = 11.0592 allows the 8051 system to communicate with the PC with no errors.
M1 / M2
| M1 | M2 | Mode |
|---|---|---|
| 0 | 0 | 13-bit timer mode. |
| 0 | 1 | 16-bit timer mode. |
| 1 | 0 | 8-bit auto reload mode. |
| 1 | 1 | Spilt mode. |
Different Modes of Timers
Mode 0 (13-Bit Timer Mode)
Both Timer 1 and Timer 0 in Mode 0 operate as 8-bit counters (with a divide-by-32 prescaler). Timer register is configured as a 13-bit register consisting of all the 8 bits of TH1 and the lower 5 bits of TL1. The upper 3 bits of TL1 are indeterminate and should be ignored. Setting the run flag (TR1) does not clear the register. The timer interrupt flag TF1 is set when the count rolls over from all 1s to all 0s. Mode 0 operation is the same for Timer 0 as it is for Timer 1.
Mode 1 (16-Bit Timer Mode)
Timer mode "1" is a 16-bit timer and is a commonly used mode. It functions in the same way as 13-bit mode except that all 16 bits are used. TLx is incremented starting from 0 to a maximum 255. Once the value 255 is reached, TLx resets to 0 and then THx is incremented by 1. As being a full 16-bit timer, the timer may contain up to 65536 distinct values and it will overflow back to 0 after 65,536 machine cycles.
Mode 2 (8 Bit Auto Reload)
Both the timer registers are configured as 8-bit counters (TL1 and TL0) with automatic reload. Overflow from TL1 (TL0) sets TF1 (TF0) and also reloads TL1 (TL0) with the contents of Th1 (TH0), which is preset by software. The reload leaves TH1 (TH0) unchanged.
The benefit of auto-reload mode is that you can have the timer to always contain a value from 200 to 255. If you use mode 0 or 1, you would have to check in the code to see the overflow and, in that case, reset the timer to 200. In this case, precious instructions check the value and/or get reloaded. In mode 2, the microcontroller takes care of this. Once you have configured a timer in mode 2, you don't have to worry about checking to see if the timer has overflowed, nor do you have to worry about resetting the value because the microcontroller hardware will do it all for you. The auto-reload mode is used for establishing a common baud rate.
Mode 3 (Split Timer Mode)
Timer mode "3" is known as split-timer mode. When Timer 0 is placed in mode 3, it becomes two separate 8-bit timers. Timer 0 is TL0 and Timer 1 is TH0. Both the timers count from 0 to 255 and in case of overflow, reset back to 0. All the bits that are of Timer 1 will now be tied to TH0.
When Timer 0 is in split mode, the real Timer 1 (i.e. TH1 and TL1) can be set in modes 0, 1 or 2, but it cannot be started/stopped as the bits that do that are now linked to TH0. The real timer 1 will be incremented with every machine cycle.
Initializing a Timer
Decide the timer mode. Consider a 16-bit timer that runs continuously, and is independent of any external pins.
Initialize the TMOD SFR. Use the lowest 4 bits of TMOD and consider Timer 0. Keep the two bits, GATE 0 and C/T 0, as 0, since we want the timer to be independent of the external pins. As 16-bit mode is timer mode 1, clear T0M1 and set T0M0. Effectively, the only bit to turn on is bit 0 of TMOD. Now execute the following instruction −
MOV TMOD,#01h
Now, Timer 0 is in 16-bit timer mode, but the timer is not running. To start the timer in running mode, set the TR0 bit by executing the following instruction −
SETB TR0
Now, Timer 0 will immediately start counting, being incremented once every machine cycle.
Reading a Timer
A 16-bit timer can be read in two ways. Either read the actual value of the timer as a 16-bit number, or you detect when the timer has overflowed.
Detecting Timer Overflow
When a timer overflows from its highest value to 0, the microcontroller automatically sets the TFx bit in the TCON register. So instead of checking the exact value of the timer, the TFx bit can be checked. If TF0 is set, then Timer 0 has overflowed; if TF1 is set, then Timer 1 has overflowed.
Embedded Systems - Interrupt
An interrupt is a signal to the processor emitted by hardware or software indicating an event that needs immediate attention. Whenever an interrupt occurs, the controller completes the execution of the current instruction and starts the execution of an Interrupt Service Routine (ISR) or Interrupt Handler. ISR tells the processor or controller what to do when the interrupt occurs. The interrupts can be either hardware interrupts or software interrupts.
Hardware Interrupt
A hardware interrupt is an electronic alerting signal sent to the processor from an external device, like a disk controller or an external peripheral. For example, when we press a key on the keyboard or move the mouse, they trigger hardware interrupts which cause the processor to read the keystroke or mouse position.
Software Interrupt
A software interrupt is caused either by an exceptional condition or a special instruction in the instruction set which causes an interrupt when it is executed by the processor. For example, if the processor's arithmetic logic unit runs a command to divide a number by zero, to cause a divide-by-zero exception, thus causing the computer to abandon the calculation or display an error message. Software interrupt instructions work similar to subroutine calls.
What is Polling?
The state of continuous monitoring is known as polling. The microcontroller keeps checking the status of other devices; and while doing so, it does no other operation and consumes all its processing time for monitoring. This problem can be addressed by using interrupts.
In the interrupt method, the controller responds only when an interruption occurs. Thus, the controller is not required to regularly monitor the status (flags, signals etc.) of interfaced and inbuilt devices.
Interrupts v/s Polling
Here is an analogy that differentiates an interrupt from polling −
| Interrupt | Polling |
|---|---|
| An interrupt is like a shopkeeper. If one needs a service or product, he goes to him and apprises him of his needs. In case of interrupts, when the flags or signals are received, they notify the controller that they need to be serviced. | The polling method is like a salesperson. The salesman goes from door to door while requesting to buy a product or service. Similarly, the controller keeps monitoring the flags or signals one by one for all devices and provides service to whichever component that needs its service. |
Interrupt Service Routine
For every interrupt, there must be an interrupt service routine (ISR), or interrupt handler. When an interrupt occurs, the microcontroller runs the interrupt service routine. For every interrupt, there is a fixed location in memory that holds the address of its interrupt service routine, ISR. The table of memory locations set aside to hold the addresses of ISRs is called as the Interrupt Vector Table.
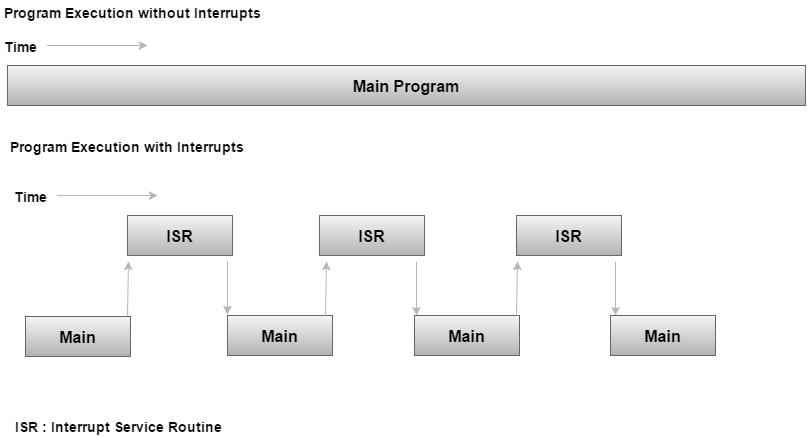
Interrupt Vector Table
There are six interrupts including RESET in 8051.
| Interrupts | ROM Location (Hex) | Pin |
|---|---|---|
| Interrupts | ROM Location (HEX) | |
| Serial COM (RI and TI) | 0023 | |
| Timer 1 interrupts(TF1) | 001B | |
| External HW interrupt 1 (INT1) | 0013 | P3.3 (13) |
| External HW interrupt 0 (INT0) | 0003 | P3.2 (12) |
| Timer 0 (TF0) | 000B | |
| Reset | 0000 | 9 |
When the reset pin is activated, the 8051 jumps to the address location 0000. This is power-up reset.
Two interrupts are set aside for the timers: one for timer 0 and one for timer 1. Memory locations are 000BH and 001BH respectively in the interrupt vector table.
Two interrupts are set aside for hardware external interrupts. Pin no. 12 and Pin no. 13 in Port 3 are for the external hardware interrupts INT0 and INT1, respectively. Memory locations are 0003H and 0013H respectively in the interrupt vector table.
Serial communication has a single interrupt that belongs to both receive and transmit. Memory location 0023H belongs to this interrupt.
Steps to Execute an Interrupt
When an interrupt gets active, the microcontroller goes through the following steps −
The microcontroller closes the currently executing instruction and saves the address of the next instruction (PC) on the stack.
It also saves the current status of all the interrupts internally (i.e., not on the stack).
It jumps to the memory location of the interrupt vector table that holds the address of the interrupts service routine.
The microcontroller gets the address of the ISR from the interrupt vector table and jumps to it. It starts to execute the interrupt service subroutine, which is RETI (return from interrupt).
Upon executing the RETI instruction, the microcontroller returns to the location where it was interrupted. First, it gets the program counter (PC) address from the stack by popping the top bytes of the stack into the PC. Then, it start to execute from that address.
Edge Triggering vs. Level Triggering
Interrupt modules are of two types − level-triggered or edge-triggered.
| Level Triggered | Edge Triggered |
|---|---|
| A level-triggered interrupt module always generates an interrupt whenever the level of the interrupt source is asserted. | An edge-triggered interrupt module generates an interrupt only when it detects an asserting edge of the interrupt source. The edge gets detected when the interrupt source level actually changes. It can also be detected by periodic sampling and detecting an asserted level when the previous sample was de-asserted. |
| If the interrupt source is still asserted when the firmware interrupt handler handles the interrupt, the interrupt module will regenerate the interrupt, causing the interrupt handler to be invoked again. | Edge-triggered interrupt modules can be acted immediately, no matter how the interrupt source behaves. |
| Level-triggered interrupts are cumbersome for firmware. | Edge-triggered interrupts keep the firmware's code complexity low, reduce the number of conditions for firmware, and provide more flexibility when interrupts are handled. |
Enabling and Disabling an Interrupt
Upon Reset, all the interrupts are disabled even if they are activated. The interrupts must be enabled using software in order for the microcontroller to respond to those interrupts.
IE (interrupt enable) register is responsible for enabling and disabling the interrupt. IE is a bitaddressable register.
Interrupt Enable Register
| EA | - | ET2 | ES | ET1 | EX1 | ET0 | EX0 |
|---|
EA − Global enable/disable.
- − Undefined.
ET2 − Enable Timer 2 interrupt.
ES − Enable Serial port interrupt.
ET1 − Enable Timer 1 interrupt.
EX1 − Enable External 1 interrupt.
ET0 − Enable Timer 0 interrupt.
EX0 − Enable External 0 interrupt.
To enable an interrupt, we take the following steps −
Bit D7 of the IE register (EA) must be high to allow the rest of register to take effect.
If EA = 1, interrupts will be enabled and will be responded to, if their corresponding bits in IE are high. If EA = 0, no interrupts will respond, even if their associated pins in the IE register are high.
Interrupt Priority in 8051
We can alter the interrupt priority by assigning the higher priority to any one of the interrupts. This is accomplished by programming a register called IP (interrupt priority).
The following figure shows the bits of IP register. Upon reset, the IP register contains all 0's. To give a higher priority to any of the interrupts, we make the corresponding bit in the IP register high.
| - | - | - | - | PT1 | PX1 | PT0 | PX0 |
|---|
| - | IP.7 | Not Implemented. |
| - | IP.6 | Not Implemented. |
| - | IP.5 | Not Implemented. |
| - | IP.4 | Not Implemented. |
| PT1 | IP.3 | Defines the Timer 1 interrupt priority level. |
| PX1 | IP.2 | Defines the External Interrupt 1 priority level. |
| PT0 | IP.1 | Defines the Timer 0 interrupt priority level. |
| PX0 | IP.0 | Defines the External Interrupt 0 priority level. |
Interrupt inside Interrupt
What happens if the 8051 is executing an ISR that belongs to an interrupt and another one gets active? In such cases, a high-priority interrupt can interrupt a low-priority interrupt. This is known as interrupt inside interrupt. In 8051, a low-priority interrupt can be interrupted by a high-priority interrupt, but not by any another low-priority interrupt.
Triggering an Interrupt by Software
There are times when we need to test an ISR by way of simulation. This can be done with the simple instructions to set the interrupt high and thereby cause the 8051 to jump to the interrupt vector table. For example, set the IE bit as 1 for timer 1. An instruction SETB TF1 will interrupt the 8051 in whatever it is doing and force it to jump to the interrupt vector table.
