- Home
- Overview
- Double Strength Encryption
- Python Overview and Installation
- Reverse Cipher
- Caesar Cipher
- ROT13 Algorithm
- Transposition Cipher
- Encryption of Transposition Cipher
- Decryption of Transposition Cipher
- Encryption of files
- Decryption of files
- Base64 Encoding & Decoding
- XOR Process
- Multiplicative Cipher
- Affine Ciphers
- Hacking Monoalphabetic Cipher
- Simple Substitution Cipher
- Testing of Simple Substitution Cipher
- Decryption of Simple Substitution Cipher
- Python Modules of Cryptography
- Understanding Vignere Cipher
- Implementing Vignere Cipher
- One Time Pad Cipher
- Implementation of One Time Pad Cipher
- Symmetric & Asymmetric Cryptography
- Understanding RSA Algorithm
- Creating RSA Keys
- RSA Cipher Encryption
- RSA Cipher Decryption
- Hacking RSA Cipher
Cryptography with Python - Resources
Cryptography with Python - Quick Guide
Cryptography with Python - Overview
Cryptography is the art of communication between two users via coded messages. The science of cryptography emerged with the basic motive of providing security to the confidential messages transferred from one party to another.
Cryptography is defined as the art and science of concealing the message to introduce privacy and secrecy as recognized in information security.
Terminologies of Cryptography
The frequently used terms in cryptography are explained here −
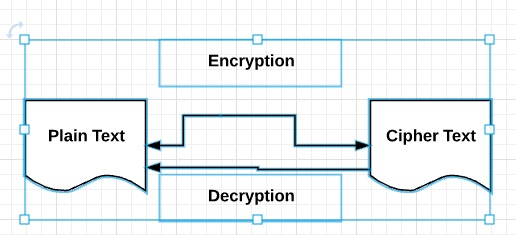
Plain Text
The plain text message is the text which is readable and can be understood by all users. The plain text is the message which undergoes cryptography.
Cipher Text
Cipher text is the message obtained after applying cryptography on plain text.
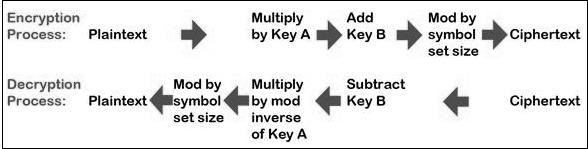
Encryption
The process of converting plain text to cipher text is called encryption. It is also called as encoding.
Decryption
The process of converting cipher text to plain text is called decryption. It is also termed as decoding.
The diagram given below shows an illustration of the complete process of cryptography −
Characteristics of Modern Cryptography
The basic characteristics of modern cryptography are as follows −
It operates on bit sequences.
It uses mathematical algorithms for securing the information.
It requires parties interested in secure communication channel to achieve privacy.
Double Strength Encryption
Double strength encryption, also called as multiple encryption, is the process of encrypting an already encrypted text one or more times, either with the same or different algorithm/pattern.
The other names for double strength encryption include cascade encryption or cascade ciphering.
Levels of Double Strength Encryption
Double strength encryption includes various levels of encryption that are explained here under −
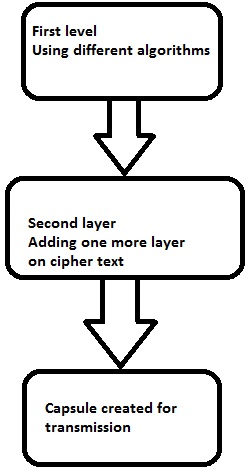
First layer of encryption
The cipher text is generated from the original readable message using hash algorithms and symmetric keys. Later symmetric keys are encrypted with the help of asymmetric keys. The best illustration for this pattern is combining the hash digest of the cipher text into a capsule. The receiver will compute the digest first and later decrypt the text in order to verify that text is not tampered in between.
Second layer of encryption
Second layer of encryption is the process of adding one more layer to cipher text with same or different algorithm. Usually, a 32-bit character long symmetric password is used for the same.
Third layer of encryption
In this process, the encrypted capsule is transmitted via SSL/TLS connection to the communication partner.
The following diagram shows double encryption process pictorially −
Hybrid Cryptography
Hybrid cryptography is the process of using multiple ciphers of different types together by including benefits of each of the cipher. There is one common approach which is usually followed to generate a random secret key for a symmetric cipher and then encrypt this key via asymmetric key cryptography.
Due to this pattern, the original message itself is encrypted using the symmetric cipher and then using secret key. The receiver after receiving the message decrypts the message using secret key first, using his/her own private key and then uses the specified key to decrypt the message.
Python Overview and Installation
Python is an open source scripting language which is high-level, interpreted, interactive and object-oriented. It is designed to be highly readable. The syntax of Python language is easy to understand and uses English keywords frequently.
Features of Python Language
Python provides the following major features −
Interpreted
Python is processed at runtime using the interpreter. There is no need to compile a program before execution. It is similar to PERL and PHP.
Object-Oriented
Python follows object-oriented style and design patterns. It includes class definition with various features like encapsulation and polymorphism.
Key Points of Python Language
The key points of Python programming language are as follows −
It includes functional and structured programming and methods as well as object oriented programming methods.
It can be used as a scripting language or as a programming language.
It includes automatic garbage collection.
It includes high-level dynamic data types and supports various dynamic type checking.
Python includes a feature of integration with C, C++ and languages like Java.
The download link for Python language is as follows − www.python.org/downloadsIt includes packages for various operating systems like Windows, MacOS and Linux distributions.

Python Strings
The basic declaration of strings is shown below −
str = 'Hello World!'
Python Lists
The lists of python can be declared as compound data types, separated by commas and enclosed within square brackets ([]).
list = [ 'abcd', 786 , 2.23, 'john', 70.2 ]
tinylist = [123, 'john']
Python Tuples
A tuple is dynamic data type of Python which consists of number of values separated by commas. Tuples are enclosed with parentheses.
tinytuple = (123, 'john')
Python Dictionary
Python dictionary is a type of hash table. A dictionary key can be almost any data type of Python, which are usually numbers or strings.
tinydict = {'name': 'omkar','code':6734, 'dept': 'sales'}
Cryptography Packages
Python includes a package called cryptography which provides cryptographic recipes and primitives. It supports Python 2.7, Python 3.4+, and PyPy 5.3+. The basic installation of cryptography package is achieved through following command −
pip3 install cryptography
There are various packages with both high level recipes and low level interfaces to common cryptographic algorithms such as symmetric ciphers, message digests and key derivation functions.
Throughout this tutorial, we will be using various packages of Python for implementation of cryptographic algorithms.
Cryptography with Python - Reverse Cipher
The previous chapter gave you an overview of installation of Python on your local computer. In this chapter you will learn in detail about reverse cipher and its coding.
Algorithm of Reverse Cipher
The algorithm of reverse cipher holds the following features −
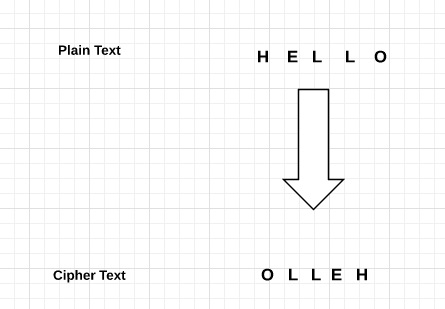
Reverse Cipher uses a pattern of reversing the string of plain text to convert as cipher text.
The process of encryption and decryption is same.
To decrypt cipher text, the user simply needs to reverse the cipher text to get the plain text.
Drawback
The major drawback of reverse cipher is that it is very weak. A hacker can easily break the cipher text to get the original message. Hence, reverse cipher is not considered as good option to maintain secure communication channel,.
Example - Usage of Reverse Cipher
Consider an example where the statement This is program to explain reverse cipher is to be implemented with reverse cipher algorithm. The following python code uses the algorithm to obtain the output.
main.py
message = 'This is program to explain reverse cipher.'
translated = '' #cipher text is stored in this variable
i = len(message) - 1

while i >= 0:
   translated = translated + message[i]
   i = i - 1
print('The cipher text is : ', translated)
Output
You can see the reversed text, that is the output as shown below −
The cipher text is : .rehpic esrever nialpxe ot margorp si sihT
Explanation
Plain text is stored in the variable message and the translated variable is used to store the cipher text created.
The length of plain text is calculated using for loop and with help of index number. The characters are stored in cipher text variable translated which is printed in the last line.
Cryptography with Python - Caesar Cipher
In the last chapter, we have dealt with reverse cipher. This chapter talks about Caesar cipher in detail.
Algorithm of Caesar Cipher
The algorithm of Caesar cipher holds the following features −
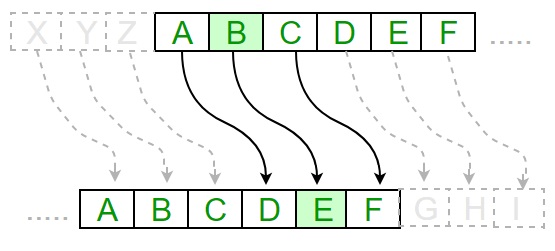
Caesar Cipher Technique is the simple and easy method of encryption technique.
It is simple type of substitution cipher.
Each letter of plain text is replaced by a letter with some fixed number of positions down with alphabet.
The following diagram depicts the working of Caesar cipher algorithm implementation −
Example - Caesar Cipher Algorithm Usage
The program implementation of Caesar cipher algorithm is as follows −
main.py
def encrypt(text,s):
   result = ""
   # transverse the plain text
   for i in range(len(text)):
      char = text[i]
      # Encrypt uppercase characters in plain text

      if (char.isupper()):
         result += chr((ord(char) + s-65) % 26 + 65)
      # Encrypt lowercase characters in plain text
      else:
         result += chr((ord(char) + s - 97) % 26 + 97)
   return result
#check the above function
text = "CEASER CIPHER DEMO"
s = 4

print ("Plain Text : ", text)
print ("Shift pattern : ", str(s))
print ("Cipher: ", encrypt(text,s))
Output
You can see the Caesar cipher, that is the output as shown in the following image −
Plain Text :  CEASER CIPHER DEMO
Shift pattern :  4
Cipher:  GIEWIVrGMTLIVrHIQS
Explanation
The plain text character is traversed one at a time.
For each character in the given plain text, transform the given character as per the rule depending on the procedure of encryption and decryption of text.
After the steps is followed, a new string is generated which is referred as cipher text.
Hacking of Caesar Cipher Algorithm
The cipher text can be hacked with various possibilities. One of such possibility is Brute Force Technique, which involves trying every possible decryption key. This technique does not demand much effort and is relatively simple for a hacker.
The program implementation for hacking Caesar cipher algorithm is as follows −
main.py
message = 'GIEWIVrGMTLIVrHIQS' #encrypted message
LETTERS = 'ABCDEFGHIJKLMNOPQRSTUVWXYZ'

for key in range(len(LETTERS)):
   translated = ''
   for symbol in message:
      if symbol in LETTERS:
         num = LETTERS.find(symbol)
         num = num - key
         if num < 0:
            num = num + len(LETTERS)
         translated = translated + LETTERS[num]
      else:
         translated = translated + symbol
   print('Hacking key #%s: %s' % (key, translated))
Output
Consider the cipher text encrypted in the previous example. Then, the output with possible hacking methods with the key and using brute force attack technique is as follows −
Hacking key #0: GIEWIVrGMTLIVrHIQS
Hacking key #1: FHDVHUrFLSKHUrGHPR
Hacking key #2: EGCUGTrEKRJGTrFGOQ
Hacking key #3: DFBTFSrDJQIFSrEFNP
Hacking key #4: CEASERrCIPHERrDEMO
Hacking key #5: BDZRDQrBHOGDQrCDLN
Hacking key #6: ACYQCPrAGNFCPrBCKM
Hacking key #7: ZBXPBOrZFMEBOrABJL
Hacking key #8: YAWOANrYELDANrZAIK
Hacking key #9: XZVNZMrXDKCZMrYZHJ
Hacking key #10: WYUMYLrWCJBYLrXYGI
Hacking key #11: VXTLXKrVBIAXKrWXFH
Hacking key #12: UWSKWJrUAHZWJrVWEG
Hacking key #13: TVRJVIrTZGYVIrUVDF
Hacking key #14: SUQIUHrSYFXUHrTUCE
Hacking key #15: RTPHTGrRXEWTGrSTBD
Hacking key #16: QSOGSFrQWDVSFrRSAC
Hacking key #17: PRNFRErPVCURErQRZB
Hacking key #18: OQMEQDrOUBTQDrPQYA
Hacking key #19: NPLDPCrNTASPCrOPXZ
Hacking key #20: MOKCOBrMSZROBrNOWY
Hacking key #21: LNJBNArLRYQNArMNVX
Hacking key #22: KMIAMZrKQXPMZrLMUW
Hacking key #23: JLHZLYrJPWOLYrKLTV
Hacking key #24: IKGYKXrIOVNKXrJKSU
Hacking key #25: HJFXJWrHNUMJWrIJRT
Cryptography with Python - ROT13 Algorithm
Till now, you have learnt about reverse cipher and Caesar cipher algorithms. Now, let us discuss the ROT13 algorithm and its implementation.
Explanation of ROT13 Algorithm
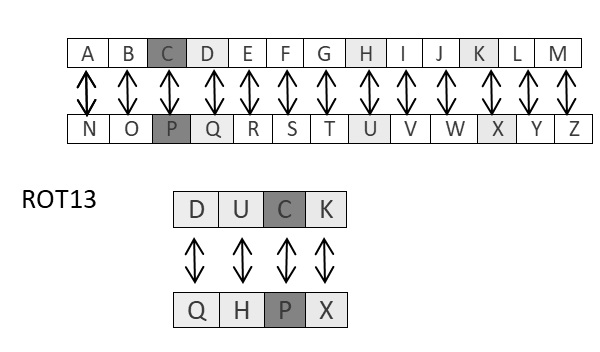
ROT13 cipher refers to the abbreviated form Rotate by 13 places. It is a special case of Caesar Cipher in which shift is always 13. Every letter is shifted by 13 places to encrypt or decrypt the message.
Example - Usage of ROT13 Algorithm
The following diagram explains the ROT13 algorithm process pictorially −
main.py
The program implementation of ROT13 algorithm is as follows −
rot13trans = str.maketrans('ABCDEFGHIJKLMNOPQRSTUVWXYZabcdefghijklmnopqrstuvwxyz',
   'NOPQRSTUVWXYZABCDEFGHIJKLMnopqrstuvwxyzabcdefghijklm')

# Function to translate plain text
def rot13(text):
   return text.translate(rot13trans)
def main():
   txt = "ROT13 Algorithm"
   print(rot13(txt))

if __name__ == "__main__":
   main()
Output
You can see the ROT13 output as shown in the following image −
EBG13 Nytbevguz
Drawback
The ROT13 algorithm uses 13 shifts. Therefore, it is very easy to shift the characters in the reverse manner to decrypt the cipher text.
Analysis of ROT13 Algorithm
ROT13 cipher algorithm is considered as special case of Caesar Cipher. It is not a very secure algorithm and can be broken easily with frequency analysis or by just trying possible 25 keys whereas ROT13 can be broken by shifting 13 places. Therefore, it does not include any practical use.
Cryptography with Python - Transposition Cipher
Transposition Cipher is a cryptographic algorithm where the order of alphabets in the plaintext is rearranged to form a cipher text. In this process, the actual plain text alphabets are not included.
Example - Usage of Transposition Cipher
A simple example for a transposition cipher is columnar transposition cipher where each character in the plain text is written horizontally with specified alphabet width. The cipher is written vertically, which creates an entirely different cipher text.
Consider the plain text hello world, and let us apply the simple columnar transposition technique as shown below
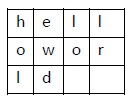
The plain text characters are placed horizontally and the cipher text is created with vertical format as : holewdlo lr. Now, the receiver has to use the same table to decrypt the cipher text to plain text.
main.py
The following program code demonstrates the basic implementation of columnar transposition technique −
def split_len(seq, length):
   return [seq[i:i + length] for i in range(0, len(seq), length)]
def encode(key, plaintext):
   order = {
      int(val): num for num, val in enumerate(key)
   }
   ciphertext = ''

   for index in sorted(order
.keys()):
for part in split_len(plaintext, len(key)):
try:ciphertext += part[order[index]]
except IndexError:
continue
return ciphertext
print(encode('3214', 'HELLO'))
Output
The program code for the basic implementation of columnar transposition technique gives the following output −
LEHOLExplanation
Using the function split_len(), we can split the plain text characters, which can be placed in columnar or row format.
encode method helps to create cipher text with key specifying the number of columns and prints the cipher text by reading characters through each column.
Note − Cryptanalysts observed a significant improvement in crypto security when transposition technique is performed. They also noted that re-encrypting the cipher text using same transposition cipher creates better security.
Encryption of Transposition Cipher
In the previous chapter, we have learnt about Transposition Cipher. In this chapter, let us discuss its encryption.
Pyperclip
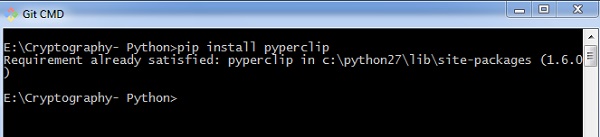
The main usage of pyperclip plugin in Python programming language is to perform cross platform module for copying and pasting text to the clipboard. You can install python pyperclip module using the command as shown
pip3 install pyperclip
If the requirement already exists in the system, you can see the following output −
Code
The python code for encrypting transposition cipher in which pyperclip is the main module is as shown below −
import pyperclip
def main():
   myMessage = 'Transposition Cipher'
   myKey = 10
   ciphertext = encryptMessage(myKey, myMessage)

   print("Cipher Text is")
   print(ciphertext + '|')
   pyperclip.copy(ciphertext)

def encryptMessage(key, message):
   ciphertext = [''] * key

   for col in range(key):
      position = col
      while position < len(message):
         ciphertext[col] += message[position]
         position += key
      return ''.join(ciphertext) #Cipher text
if __name__ == '__main__':
   main()
Output
The program code for encrypting transposition cipher in which pyperclip is the main module gives the following output −
Cipher Text is
Ti|
Explanation
The function main() calls the encryptMessage() which includes the procedure for splitting the characters using len function and iterating them in a columnar format.
The main function is initialized at the end to get the appropriate output.
Decryption of Transposition Cipher
In this chapter, you will learn the procedure for decrypting the transposition cipher.
Code
Observe the following code for a better understanding of decrypting a transposition cipher. The cipher text for message Transposition Cipher with key as 6 is fetched as Toners raiCntisippoh.
import math, pyperclip
def main():
   myMessage= 'Toners raiCntisippoh'
   myKey = 6
   plaintext = decryptMessage(myKey, myMessage)

   print("The plain text is")
   print(plaintext)

def decryptMessage(key, message):
   numOfColumns = math.ceil(len(message) / key)
   numOfRows = key
   numOfShadedBoxes = (numOfColumns * numOfRows) - len(message)
   plaintext =  ' ' * numOfColumns
   col = 0
   row = 0

   plaintextList = list(plaintext)
   for symbol in message:
      plaintextList[col] += symbol
      col += 1
      if (col == numOfColumns) or (col == numOfColumns - 1 and row >= numOfRows - numOfShadedBoxes):
         col = 0
         row += 1
         return ''.join(plaintextList)

if __name__ == '__main__':
   main()
Explanation
The cipher text and the mentioned key are the two values taken as input parameters for decoding or decrypting the cipher text in reverse technique by placing characters in a column format and reading them in a horizontal manner.
You can place letters in a column format and later combined or concatenate them together using the following piece of code −
for symbol in message:
   plaintext[col] += symbol
   col += 1

   if (col == numOfColumns) or (col == numOfColumns - 1 and row >= numOfRows - numOfShadedBoxes):
   col = 0
   row += 1
return ''.join(plaintext)
Output
The program code for decrypting transposition cipher gives the following output −
The plain text is
 T o n e
Encryption of files
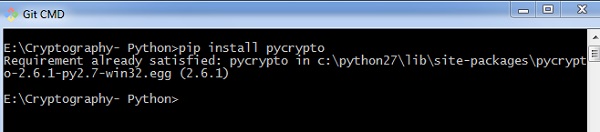
In Python, it is possible to encrypt and decrypt files before transmitting to a communication channel. For this, you will have to use the plugin PyCrypto. You can installation this plugin using the command given below.
pip install pycrypto
Example - Encrypting Files
The program code for encrypting the file with password protector is mentioned below −
main.py
# =================Other Configuration================
# Usages :
usage = "usage: %prog [options] "
# Version
Version="%prog 0.0.1"
# ====================================================
# Import Modules
import optparse, sys,os
from toolkit import processor as ps

def main():
   parser = optparse.OptionParser(usage = usage,version = Version)
   parser.add_option(
      '-i','--input',type = 'string',dest = 'inputfile',
      help = "File Input Path For Encryption", default = None)

   parser.add_option(
      '-o','--output',type = "string",dest = 'outputfile',
      help = "File Output Path For Saving Encrypter Cipher",default = ".")

   parser.add_option(
      '-p','--password',type = "string",dest = 'password',
      help = "Provide Password For Encrypting File",default = None)

   parser.add_option(
      '-p','--password',type = "string",dest = 'password',
      help = "Provide Password For Encrypting File",default = None)

   (options, args)= parser.parse_args()

   # Input Conditions Checkings
   if not options.inputfile or not os.path.isfile(options.inputfile):
      print(" [Error] Please Specify Input File Path")
      exit(0)
   if not options.outputfile or not os.path.isdir(options.outputfile):
      print(" [Error] Please Specify Output Path")
      exit(0)
   if not options.password:
      print(" [Error] No Password Input")
      exit(0)
   inputfile = options.inputfile

   outputfile = os.path.join(
      options.outputfile,os.path.basename(options.inputfile).split('.')[0]+'.ssb')
   password = options.password
   base = os.path.basename(inputfile).split('.')[1]
   work = "E"

   ps.FileCipher(inputfile,outputfile,password,work)
   return

if __name__ == '__main__':
   main()
Output
You can use the following command to execute the encryption process along with password −
python pyfilecipher-encrypt.py -i file_path_for_encryption -o output_path -p password
You can observe the following output when you execute the code given above −
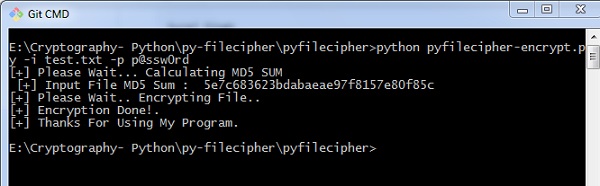
Explanation
The passwords are generated using MD5 hash algorithm and the values are stored in simply safe backup files in Windows system, which includes the values as displayed below −

Decryption of files
In this chapter, let us discuss decryption of files in cryptography using Python. Note that for decryption process, we will follow the same procedure, but instead of specifying the output path, we will focus on input path or the necessary file which is encrypted.
Example - Decryting a File
The following is a sample code for decrypting files in cryptography using Python −
main.py
#!/usr/bin/python
# ---------------- READ ME ---------------------------------------------
# This Script is Created Only For Practise And Educational Purpose Only
# This Script Is Created For http://bitforestinfo.blogspot.in
# This Script is Written By
#
#
##################################################
######## Please Don't Remove Author Name #########
############### Thanks ###########################
##################################################
#
#
# =================Other Configuration================
# Usages :
usage = "usage: %prog [options] "
# Version
Version="%prog 0.0.1"
# ====================================================
# Import Modules
import optparse, sys,os
from toolkit import processor as ps
def main():
   parser = optparse.OptionParser(usage = usage,version = Version)
   parser.add_option(
      '-i','--input',type = 'string',dest = 'inputfile',
      help = "File Input Path For Encryption", default = None)

   parser.add_option(
      '-o','--output',type = "string",dest = 'outputfile',
      help = "File Output Path For Saving Encrypter Cipher",default = ".")

   parser.add_option(
      '-p','--password',type = "string",dest = 'password',
      help = "Provide Password For Encrypting File",default = None)
      (options, args) =  parser.parse_args()
      # Input Conditions Checkings
      if not options.inputfile or not os.path.isfile(options.inputfile):
         print(" [Error] Please Specify Input File Path")
         exit(0)
      if not options.outputfile or not os.path.isdir(options.outputfile):
         print(" [Error] Please Specify Output Path")
         exit(0)
      if not options.password:
         print(" [Error] Not a valid password")
         exit(0)
      inputfile = options.inputfile
      outputfile = options.outputfile
      password = options.password
      work = "D"
      ps.FileCipher(inputfile,outputfile,password,work)
      return
if __name__ == '__main__':
   main()
Output
You can use the following command for executing the above code −
python pyfilecipher-decrypt.py -i encrypted_file_path -p password
You can observe the following code when you execute the command shown above −

Note − The output specifies the hash values before encryption and after decryption, which keeps a note that the same file is encrypted and the process was successful.
Base64 Encoding and Decoding
Base64 encoding converts the binary data into text format, which is passed through communication channel where a user can handle text safely. Base64 is also called as Privacy enhanced Electronic mail (PEM) and is primarily used in email encryption process.
Python includes a module called BASE64 which includes two primary functions as given below −
base64.decode(input, output) − It decodes the input value parameter specified and stores the decoded output as an object.
Base64.encode(input, output) − It encodes the input value parameter specified and stores the decoded output as an object.
Example - Base64 Encoding
You can use the following piece of code to perform base64 encoding −
main.py
import base64

text = "Encode this text"
text_bytes = text.encode('utf-8')

encoded_data = base64.b64encode(text_bytes)

print("Encoded text with base 64 is")
print(encoded_data.decode("utf-8"))
Output
The code for base64 encoding gives you the following output −
Encoded text with base 64 is
RW5jb2RlIHRoaXMgdGV4dA==
Example - Base64 Decoding
You can use the following piece of code to perform base64 decoding −
main.py
import base64
decoded_bytes = base64.b64decode("RW5jb2RlIHRoaXMgdGV4dA==")

text = decoded_bytes.decode("utf-8")

print("decoded text is ")
print(text)
Output
The code for base64 decoding gives you the following output −
decoded text is
Encode this text
Difference between ASCII and base64
You can observe the following differences when you work on ASCII and base64 for encoding data −
When you encode text in ASCII, you start with a text string and convert it to a sequence of bytes.
When you encode data in Base64, you start with a sequence of bytes and convert it to a text string.
Drawback
Base64 algorithm is usually used to store passwords in database. The major drawback is that each decoded word can be encoded easily through any online tool and intruders can easily get the information.
Cryptography with Python - XOR Process
In this chapter, let us understand the XOR process along with its coding in Python.
Algorithm
XOR algorithm of encryption and decryption converts the plain text in the format ASCII bytes and uses XOR procedure to convert it to a specified byte. It offers the following advantages to its users −
- Fast computation
- No difference marked in left and right side
- Easy to understand and analyze
Example - XOR Process
You can use the following piece of code to perform XOR process −
main.py
from itertools import cycle
import base64
def xor_crypt_string(data, key = 'awesomepassword', encode = False, decode = False):
if decode:
data = base64.b64decode(data)
xored = ''.join(chr(ord(x) ^ ord(y)) for (x,y) in zip(data, cycle(key)))
if encode:
return base64.b64encode(xored.encode("utf-8")).strip()
return xored.encode("utf-8")
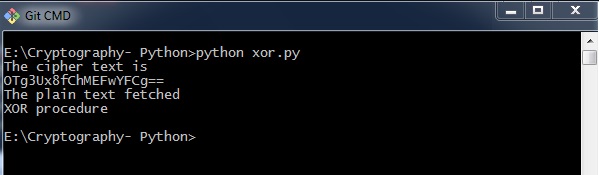
secret_data = "XOR procedure"
print("The cipher text is")
encrypted = xor_crypt_string(secret_data, encode = True).decode("utf-8")
print(encrypted)
print("The plain text fetched")
print(xor_crypt_string(encrypted, decode = True))
Output
The code for XOR process gives you the following output −
Explanation
The function xor_crypt_string() includes a parameter to specify mode of encode and decode and also the string value.
The basic functions are taken with base64 modules which follows the XOR procedure/ operation to encrypt or decrypt the plain text/ cipher text.
Note − XOR encryption is used to encrypt data and is hard to crack by brute-force method, that is by generating random encrypting keys to match with the correct cipher text.
Cryptography with Python - Multiplicative Cipher
While using Caesar cipher technique, encrypting and decrypting symbols involves converting the values into numbers with a simple basic procedure of addition or subtraction.
If multiplication is used to convert to cipher text, it is called a wrap-around situation. Consider the letters and the associated numbers to be used as shown below −
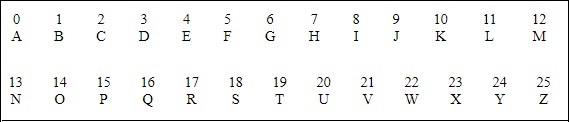
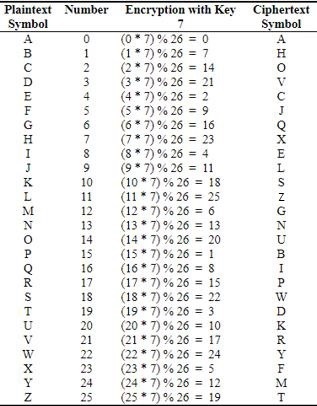
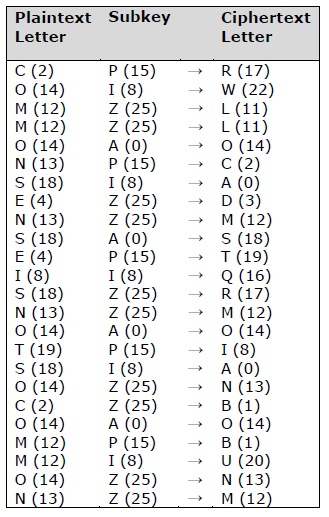
The numbers will be used for multiplication procedure and the associated key is 7. The basic formula to be used in such a scenario to generate a multiplicative cipher is as follows −
(Alphabet Number * key)mod(total number of alphabets)
The number fetched through output is mapped in the table mentioned above and the corresponding letter is taken as the encrypted letter.
The basic modulation function of a multiplicative cipher in Python is as follows −
def unshift(key, ch):
   offset = ord(ch) - ASC_A
   return chr(((key[0] * (offset + key[1])) % WIDTH) + ASC_A)
Note − The advantage with a multiplicative cipher is that it can work with very large keys like 8,953,851. It would take quite a long time for a computer to brute-force through a majority of nine million keys.
Cryptography with Python - Affine Cipher
Affine Cipher is the combination of Multiplicative Cipher and Caesar Cipher algorithm. The basic implementation of affine cipher is as shown in the image below −
In this chapter, we will implement affine cipher by creating its corresponding class that includes two basic functions for encryption and decryption.
Example - Using Affine Cipher
You can use the following code to implement an affine cipher −
main.py
class Affine(object):
   DIE = 128
   KEY = (7, 3, 55)
   def __init__(self):
      pass
   def encryptChar(self, char):
      K1, K2, kI = self.KEY
      return chr((K1 * ord(char) + K2) % self.DIE)

   def encrypt(self, string):
      return "".join(map(self.encryptChar, string))

   def decryptChar(self, char):
      K1, K2, KI = self.KEY
      return chr(KI * (ord(char) - K2) % self.DIE)

   def decrypt(self, string):
      return "".join(map(self.decryptChar, string))
affine = Affine()
print(affine.encrypt('Affine Cipher'))
print(affine.decrypt('JMMbFcXb[F!'))
Output
You can observe the following output when you implement an affine cipher −
JMMbFcXb[F!
Affie Ciher
The output displays the encrypted message for the plain text message Affine Cipher and decrypted message for the message sent as input abcdefg.
Hacking Monoalphabetic Cipher
In this chapter, you will learn about monoalphabetic cipher and its hacking using Python.
Monoalphabetic Cipher
A Monoalphabetic cipher uses a fixed substitution for encrypting the entire message. A monoalphabetic cipher using a Python dictionary with JSON objects is shown here −
monoalpha_cipher = {
   'a': 'm',
   'b': 'n',
   'c': 'b',
   'd': 'v',
   'e': 'c',
   'f': 'x',
   'g': 'z',
   'h': 'a',
   'i': 's',
   'j': 'd',
   'k': 'f',
   'l': 'g',
   'm': 'h',
   'n': 'j',
   'o': 'k',
   'p': 'l',
   'q': 'p',
   'r': 'o',
   's': 'i',
   't': 'u',
   'u': 'y',
   'v': 't',
   'w': 'r',
   'x': 'e',
   'y': 'w',
   'z': 'q',
	' ': ' ',
}
Example - Encrypting using Monoalphabetic Cipher
With help of this dictionary, we can encrypt the letters with the associated letters as values in JSON object. The following program creates a monoalphabetic program as a class representation which includes all the functions of encryption and decryption.
main.py
from string import ascii_lowercase, digits
from random import shuffle

def random_monoalpha_cipher(pool = None):
   if pool is None:
      pool = ascii_lowercase + digits
   original_pool = list(pool)
   shuffled_pool = list(pool)
   shuffle(shuffled_pool)
   return dict(zip(original_pool, shuffled_pool))

def inverse_monoalpha_cipher(monoalpha_cipher):
   inverse_monoalpha = {}
   for key, value in monoalpha_cipher.items():
      inverse_monoalpha[value] = key
   return inverse_monoalpha

def encrypt_with_monoalpha(message, monoalpha_cipher):
   encrypted_message = []
   for letter in message:
      encrypted_message.append(monoalpha_cipher.get(letter, letter))
   return ''.join(encrypted_message)

def decrypt_with_monoalpha(encrypted_message, monoalpha_cipher):
   return encrypt_with_monoalpha(
      encrypted_message,
      inverse_monoalpha_cipher(monoalpha_cipher)
   )

cipher = random_monoalpha_cipher()
encrypted = encrypt_with_monoalpha('Hello all you hackers out there!', cipher)
decrypted = decrypt_with_monoalpha(encrypted, cipher)

print(encrypted)
print(decrypted)
Output
You can observe the following output when you implement the code given above −
Hpmma 2mm 4a5 y2i0p1o a57 7yp1p!
Hello all you hackers out there!
Thus, you can hack a monoalphabetic cipher with specified key value pair which cracks the cipher text to actual plain text.
Simple Substitution Cipher
Simple substitution cipher is the most commonly used cipher and includes an algorithm of substituting every plain text character for every cipher text character. In this process, alphabets are jumbled in comparison with Caesar cipher algorithm.
Example
Keys for a simple substitution cipher usually consists of 26 letters. An example key is −
plain alphabet : abcdefghijklmnopqrstuvwxyz
cipher alphabet: phqgiumeaylnofdxjkrcvstzwb
An example encryption using the above key is−
plaintext : defend the east wall of the castle
ciphertext: giuifg cei iprc tpnn du cei qprcni
Example - Usage of Simple Substitution Cipher
The following code shows a program to implement simple substitution cipher −
main.py
import random, sys

LETTERS = 'ABCDEFGHIJKLMNOPQRSTUVWXYZ'
def main():
   message = ''
   if len(sys.argv) > 1:
      with open(sys.argv[1], 'r') as f:
         message = f.read()
   else:
      message = input("Enter your message: ")
   mode = input("E for Encrypt, D for Decrypt: ")
   key = ''

   while checkKey(key) is False:
      key = input("Enter 26 ALPHA key (leave blank for random key): ")
      if key == '':
         key = getRandomKey()
      if checkKey(key) is False:
         print('There is an error in the key or symbol set.')
   translated = translateMessage(message, key, mode)
   print('Using key: %s' % (key))

   if len(sys.argv) > 1:
      fileOut = 'enc.' + sys.argv[1]
      with open(fileOut, 'w') as f:
         f.write(translated)
      print('Success! File written to: %s' % (fileOut))
   else: print('Result: ' + translated)

# Store the key into list, sort it, convert back, compare to alphabet.
def checkKey(key):
   keyString = ''.join(sorted(list(key)))
   return keyString == LETTERS
def translateMessage(message, key, mode):
   translated = ''
   charsA = LETTERS
   charsB = key

   # If decrypt mode is detected, swap A and B
   if mode == 'D':
      charsA, charsB = charsB, charsA
   for symbol in message:
      if symbol.upper() in charsA:
         symIndex = charsA.find(symbol.upper())
         if symbol.isupper():
            translated += charsB[symIndex].upper()
         else:
            translated += charsB[symIndex].lower()
      else:
         translated += symbol
   return translated
def getRandomKey():
   randomList = list(LETTERS)
   random.shuffle(randomList)
   return ''.join(randomList)
if __name__ == '__main__':
   main()
Output
You can observe the following output when you implement the code given above −
(myenv) D:\Projects\python\myenv>py main.py
Enter your message: "HELLO"
E for Encrypt, D for Decrypt: E
Enter 26 ALPHA key (leave blank for random key): IQRYVOCPNALMHTZGKFXJSEBDWU
Using key: IQRYVOCPNALMHTZGKFXJSEBDWU
Result: "PVMMZ"
Testing of Simple Substitution Cipher
In this chapter, we will focus on testing substitution cipher using various methods, which helps to generate random strings as given below −
Example - Testing Substitution Cipher
main.py
import random, string

LETTERS = 'ABCDEFGHIJKLMNOPQRSTUVWXYZ'

def main():
   for i in range(1000):
      key = getRandomKey()
      message = random_string()
      print('Test %s: String: "%s.."' % (i + 1, message[:50]))
      print("Key: " + key)
      encrypted = translateMessage(message, key, 'E')
      decrypted = translateMessage(encrypted, key, 'D')

      if decrypted != message:
         print('ERROR: Decrypted: "%s" Key: %s' % (decrypted, key))
         sys.exit()
      print('Substutition test passed!')

def random_string(size = 5000, chars = string.ascii_letters + string.digits):
   return ''.join(random.choice(chars) for _ in range(size))

def translateMessage(message, key, mode):
   translated = ''
   charsA = LETTERS
   charsB = key

   # If decrypt mode is detected, swap A and B
   if mode == 'D':
      charsA, charsB = charsB, charsA
   for symbol in message:
      if symbol.upper() in charsA:
         symIndex = charsA.find(symbol.upper())
         if symbol.isupper():
            translated += charsB[symIndex].upper()
         else:
            translated += charsB[symIndex].lower()
      else:
         translated += symbol
   return translated

def getRandomKey():
   randomList = list(LETTERS)
   random.shuffle(randomList)
   return ''.join(randomList)

if __name__ == '__main__':
   main()
Output
You can observe the output as randomly generated strings which helps in generating random plain text messages, as shown below −
Test 1: String: "7KdDVIFW16UM8U0lNwn3vcnky4EYCKbFUbxh1hYqQdKcKnq4l9.."
Key: VKAYMQGLZHNOUJDCETFPSBWRXI
Substutition test passed!
Test 2: String: "c78WvP3zLihhCogHNTvhQJ5TsZWaCX71p71xU1UPHSOBmAgLQq.."
Key: ROUXJYHEPLGMVDWCQTIAFKZNBS
Substutition test passed!
...
After the test is successfully completed, we can observe the output message Substitution test passed!.
...
Test 998: String: "P9rpUdfVtHYwH8oCMJssNu2AYl8vVkoJB0BwcXmz1ldXPSNlyy.."
Key: SXKWFYBIJAUTVDGELZHCNOPMQR
Substutition test passed!
Test 999: String: "EWGGt9RSrlZwYo3FUNG4JCtDAytUWF0rihlcJEvQd4nZxo0Qvg.."
Key: VCIGEBQTWHNXRSYUMKOFLJADPZ
Substutition test passed!
Test 1000: String: "GYsSq3xU33VP2f3pnAajgMq1ClUzQPGe72fL9sv9xYV0Bpx04Y.."
Key: REMIUPWXVLDYGHCOJFSKQBTAZN
Substutition test passed!
Thus, you can hack a substitution cipher in the systematic manner.
Decryption of Simple Substitution Cipher
In this chapter, you can learn about simple implementation of substitution cipher which displays the encrypted and decrypted message as per the logic used in simple substitution cipher technique. This can be considered as an alternative approach of coding.
Example - Decryption Using Simple Substitution Cipher
You can use the following code to perform decryption using simple substitution cipher −
main.py
import random

chars = 'ABCDEFGHIJKLMNOPQRSTUVWXYZ' + \
   'abcdefghijklmnopqrstuvwxyz' + \
   '0123456789' + \
   ':.;,?!@#$%&()+=-*/_ []{}`~^"\'\\'

def generate_key():
   """Generate a key for our cipher"""
   shuffled = sorted(chars, key=lambda k: random.random())
   return dict(zip(chars, shuffled))

def encrypt(key, plaintext):
   """Encrypt the string and return the ciphertext"""
   return ''.join(key[l] for l in plaintext)

def decrypt(key, ciphertext):
   """Decrypt the string and return the plaintext"""
   flipped = {v: k for k, v in key.items()}
   return ''.join(flipped[l] for l in ciphertext)

def show_result(plaintext):
   """Generate a resulting cipher with elements shown"""
   key = generate_key()
   encrypted = encrypt(key, plaintext)
   decrypted = decrypt(key, encrypted)

   print('Key: ',key)
   print('Plaintext: ',plaintext)
   print('Encrypted: ',encrypted)
   print('Decrypted: ', decrypted)

show_result('Hello World. This is demo of substitution cipher')
Output
The above code gives you the output as shown here −
(myenv) D:\Projects\python\myenv>py main.py
Key:  {'A': 'Z', 'B': 'o', 'C': '#', 'D': 'r', 'E': 'V', 'F': 'W', 'G': 'K', 'H': '%', 'I': '&', 'J': 'H', 'K': 'f', 'L': 'b', 'M': '[', 'N': '8', 'O': 'F', 'P': 'O', 'Q': '/', 'R': 'a', 'S': 'c', 'T': 'J', 'U': '9', 'V': '{', 'W': 'B', 'X': 'P', 'Y': '=', 'Z': '.', 'a': 'u', 'b': "'", 'c': 's', 'd': 'q', 'e': 'y', 'f': ',', 'g': '^', 'h': '~', 'i': '2', 'j': ';', 'k': 'C', 'l': 'I', 'm': 'A', 'n': '}', 'o': '-', 'p': 'Q', 'q': '"', 'r': 'S', 's': 'n', 't': ':', 'u': 'U', 'v': '+', 'w': 'd', 'x': 'D', 'y': 'Y', 'z': '7', '0': '*', '1': ']', '2': 'k', '3': 'R', '4': ')', '5': '3', '6': 'z', '7': 'E', '8': 'X', '9': 't', ':': '1', '.': 'x', ';': '\\', ',': '@', '?': 'v', '!': 'L', '@': ' ', '#': '5', '$': '6', '%': '!', '&': ';', '(': '?', ')': '4', '+': '0', '=': 'l', '-': 'T', '*': 'M', '/': 'N', '_': 'p', ' ': 'a', '[': 'j', ']': 'w', '{': 'h', '}': 'e', '`': 'g', '~': '_', '^': 'm', '"': '(', "'": 'm', '\\': 'G'}
Plaintext:  Hello World. This is demo of substitution cipher
Encrypted:  %yII-aB-SIqxaJ~2na2naqyA-a-,anU'n:2:U:2-}as2Q~yS
Decrypted:  Hello World. This is demo of substitution cipher

(myenv) D:\Projects\python\myenv>
Python Modules of Cryptography
In this chapter, you will learn in detail about various modules of cryptography in Python.
Cryptography Module
It includes all the recipes and primitives, and provides a high level interface of coding in Python. You can install cryptography module using the following command −
pip3 install cryptography
Collecting cryptography
  Downloading cryptography-46.0.3-cp311-abi3-win_amd64.whl.metadata (5.7 kB)
Collecting cffi>=2.0.0 (from cryptography)
  Downloading cffi-2.0.0-cp314-cp314-win_amd64.whl.metadata (2.6 kB)
Collecting pycparser (from cffi>=2.0.0->cryptography)
  Downloading pycparser-2.23-py3-none-any.whl.metadata (993 bytes)
Downloading cryptography-46.0.3-cp311-abi3-win_amd64.whl (3.5 MB)
   ━━━━━━━━━━━━━━━━━━━━━━━━━━━━━━━━━━━━━━━━ 3.5/3.5 MB 6.6 MB/s  0:00:00
Downloading cffi-2.0.0-cp314-cp314-win_amd64.whl (185 kB)
Downloading pycparser-2.23-py3-none-any.whl (118 kB)
Installing collected packages: pycparser, cffi, cryptography
Successfully installed cffi-2.0.0 cryptography-46.0.3 pycparser-2.23
Example - Usage of Cryptography Module
You can use the following code to implement the cryptography module −
main.py
from cryptography.fernet import Fernet

key = Fernet.generate_key()
cipher_suite = Fernet(key)
text = "This example is used to demonstrate cryptography module";

cipher_text = cipher_suite.encrypt(text.encode())

plain_text = cipher_suite.decrypt(cipher_text)

print(plain_text.decode())
Output
The code given above produces the following output −
This example is used to demonstrate cryptography module
Example - Verifying a Password
The code given here is used to verify the password and creating its hash. It also includes logic for verifying the password for authentication purpose.
main.py
import uuid
import hashlib

def hash_password(password):
   # uuid is used to generate a random number of the specified password
   salt = uuid.uuid4().hex
   return hashlib.sha256(salt.encode() + password.encode()).hexdigest() + ':' + salt

def check_password(hashed_password, user_password):
   password, salt = hashed_password.split(':')
   return password == hashlib.sha256(salt.encode() + user_password.encode()).hexdigest()

new_pass = input('Please enter a password: ')
hashed_password = hash_password(new_pass)
print('The string to store in the db is: ' + hashed_password)
old_pass = input('Now please enter the password again to check: ')

if check_password(hashed_password, old_pass):
   print('You entered the right password')
else:
   print('Passwords do not match')
Output
Scenario 1 − If you have entered a correct password, you can find the following output −
Please enter a password: abcd
The string to store in the db is: e3b340e06393a071a1685251fe59523b21b77d5d1bf1092bb270a1875b09250c:0f2f13c9312f42fc92a68350d0139ee4
Now please enter the password again to check: abcd
You entered the right password
Scenario 2 − If we enter wrong password, you can find the following output −
Please enter a password: abcd
The string to store in the db is: e375a2bd46f0cf0c63a96fc0a5e7cd8884e0ebbccff6d7196929538a8019b909:f500e1821203492ca88c53256ee947e6
Now please enter the password again to check: abc
Passwords do not match
Explanation
Hashlib package is used for storing passwords in a database. In this program, salt is used which adds a random sequence to the password string before implementing the hash function.
Understanding Vignere Cipher
Vignere Cipher includes a twist with Caesar Cipher algorithm used for encryption and decryption. Vignere Cipher works similar to Caesar Cipher algorithm with only one major distinction: Caesar Cipher includes algorithm for one-character shift, whereas Vignere Cipher includes key with multiple alphabets shift.
Mathematical Equation
For encryption the mathematical equation is as follows −
$$E_{k}\left ( M{_{i{}}} \right ) = \left ( M_{i}+K_{i} \right )\;\;\; mod \;\; 26$$
For decryption the mathematical equation is as follows −
$$D_{k}\left ( C{_{i{}}} \right ) = \left ( C_{i}-K_{i} \right )\;\;\; mod \;\; 26$$
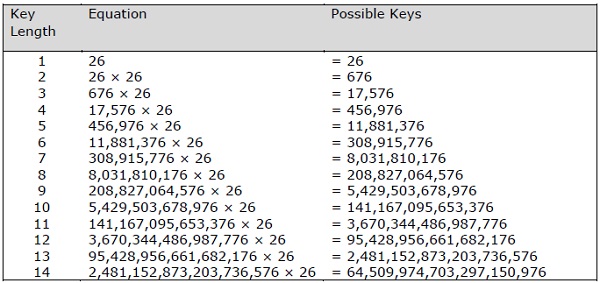
Vignere cipher uses more than one set of substitutions, and hence it is also referred as polyalphabetic cipher. Vignere Cipher will use a letter key instead of a numeric key representation: Letter A will be used for key 0, letter B for key 1 and so on. Numbers of the letters before and after encryption process is shown below −
The possible combination of number of possible keys based on Vignere key length is given as follows, which gives the result of how secure is Vignere Cipher Algorithm −
Vignere Tableau
The tableau used for Vignere cipher is as shown below −

Implementing Vignere Cipher
In this chapter, let us understand how to implement Vignere cipher. Consider the text This is basic implementation of Vignere Cipher is to be encoded and the key used is PIZZA.
Example - Usage of Vignere Cipher
You can use the following code to implement a Vignere cipher in Python −
main.py
import pyperclip

LETTERS = 'ABCDEFGHIJKLMNOPQRSTUVWXYZ'
def main():
   myMessage = "This is basic implementation of Vignere Cipher"
   myKey = 'PIZZA'
   myMode = 'encrypt'

   if myMode == 'encrypt':
      translated = encryptMessage(myKey, myMessage)
   elif myMode == 'decrypt':
      translated = decryptMessage(myKey, myMessage)

   print('%sed message:' % (myMode.title()))
   print(translated)
   print()
def encryptMessage(key, message):
   return translateMessage(key, message, 'encrypt')
def decryptMessage(key, message):
   return translateMessage(key, message, 'decrypt')

def translateMessage(key, message, mode):
   translated = [] # stores the encrypted/decrypted message string
   keyIndex = 0
   key = key.upper()

   for symbol in message:
      num = LETTERS.find(symbol.upper())
      if num != -1:
         if mode == 'encrypt':
            num += LETTERS.find(key[keyIndex])
         elif mode == 'decrypt':
            num -= LETTERS.find(key[keyIndex])

         num %= len(LETTERS)

         if symbol.isupper():
            translated.append(LETTERS[num])
         elif symbol.islower():
            translated.append(LETTERS[num].lower())

      keyIndex += 1

      if keyIndex == len(key):
         keyIndex = 0
      else:
         translated.append(symbol)
   return ''.join(translated)
if __name__ == '__main__':
   main()
Output
You can observe the following output when you implement the code given above −
Encrypted message:
ITphhirsxias abahsqibc ibmxpkldemtevnstzatxiwomn ouf UVhigcnmeqrdeRCqiopghegr
The possible combinations of hacking the Vignere cipher is next to impossible. Hence, it is considered as a secure encryption mode.
One Time Pad Cipher
One-time pad cipher is a type of Vignere cipher which includes the following features −
It is an unbreakable cipher.
The key is exactly same as the length of message which is encrypted.
The key is made up of random symbols.
As the name suggests, key is used one time only and never used again for any other message to be encrypted.
Due to this, encrypted message will be vulnerable to attack for a cryptanalyst. The key used for a one-time pad cipher is called pad, as it is printed on pads of paper.
Why is it Unbreakable?
The key is unbreakable owing to the following features −
The key is as long as the given message.
The key is truly random and specially auto-generated.
Key and plain text calculated as modulo 10/26/2.
Each key should be used once and destroyed by both sender and receiver.
There should be two copies of key: one with the sender and other with the receiver.
Encryption
To encrypt a letter, a user needs to write a key underneath the plaintext. The plaintext letter is placed on the top and the key letter on the left. The cross section achieved between two letters is the plain text. It is described in the example below −
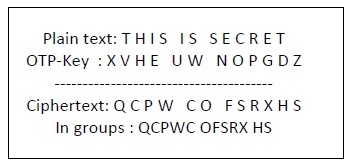
Decryption
To decrypt a letter, user takes the key letter on the left and finds cipher text letter in that row. The plain text letter is placed at the top of the column where the user can find the cipher text letter.
Implementation of One Time Pad Cipher
Python includes a hacky implementation module for one-time-pad cipher implementation. The package name is called One-Time-Pad which includes a command line encryption tool that uses encryption mechanism similar to the one-time pad cipher algorithm.
Installation
You can use the following command to install this module −
(myenv) D:\Projects\python\myenv>pip3 install onetimepad
Collecting onetimepad
  Downloading onetimepad-1.4.tar.gz (3.3 kB)
  Installing build dependencies ... done
  Getting requirements to build wheel ... done
  Preparing metadata (pyproject.toml) ... done
Building wheels for collected packages: onetimepad
  Building wheel for onetimepad (pyproject.toml) ... done
  Created wheel for onetimepad: filename=onetimepad-1.4-py3-none-any.whl size=3984 sha256=86d0c217afdd0c8acc51e7334da80255d7ebdb31476dc3bf0288f81b42150730
  Stored in directory: c:\users\mahes\appdata\local\pip\cache\wheels\c0\07\a8\67ac97824598d99846b28c5c06965b48e505ce73d609eb67f2
Successfully built onetimepad
Installing collected packages: onetimepad
Successfully installed onetimepad-1.4
If you wish to use it from the command-line, run the following command −
(myenv) D:\Projects\python\myenv>onetimepad
Message: Hello World
Key: abcdefghijk
Cipher: 29070f080a4630071b060f
Example - Generating One-Time Pad Cipher
The following code helps to generate a one-time pad cipher −
main.py
import onetimepad

cipher = onetimepad.encrypt('One Time Cipher', 'random')
print("Cipher text is ")
print(cipher)
print("Plain text is ")
msg = onetimepad.decrypt(cipher, 'random')

print(msg)
Output
You can observe the following output when you run the code given above −
Cipher text is
3d0f0b443b041f044e27061d1a041c
Plain text is
One Time Cipher
Note − The encrypted message is very easy to crack if the length of the key is less than the length of message (plain text).
In any case, the key is not necessarily random, which makes one-time pad cipher as a worth tool.
Symmetric and Asymmetric Cryptography
In this chapter, let us discuss in detail about symmetric and asymmetric cryptography.
Symmetric Cryptography
In this type, the encryption and decryption process uses the same key. It is also called as secret key cryptography. The main features of symmetric cryptography are as follows −
- It is simpler and faster.
- The two parties exchange the key in a secure way.
Drawback
The major drawback of symmetric cryptography is that if the key is leaked to the intruder, the message can be easily changed and this is considered as a risk factor.
Data Encryption Standard (DES)
The most popular symmetric key algorithm is Data Encryption Standard (DES) and Python includes a package which includes the logic behind DES algorithm.
Installation
The command for installation of DES package pyDES in Python is −
(myenv) D:\Projects\python\myenv>pip3 install pyDES
Collecting pyDES
  Downloading pyDes-2.0.1.tar.gz (9.9 kB)
  Installing build dependencies ... done
  Getting requirements to build wheel ... done
  Preparing metadata (pyproject.toml) ... done
Building wheels for collected packages: pyDES
  Building wheel for pyDES (pyproject.toml) ... done
  Created wheel for pyDES: filename=pydes-2.0.1-py2.py3-none-any.whl size=9737 sha256=cc4ac26565690404f31aa3aef42334eac97679e21fe8fb333a5e75089c4bf40e
  Stored in directory: c:\users\mahes\appdata\local\pip\cache\wheels\fa\d5\cb\f9970a46d7c9ddeb958e8dd9483e5c368923fccf23ceb0c716
Successfully built pyDES
Installing collected packages: pyDES
Successfully installed pyDES-2.0.1
Example - Usage of DES Algorithm
Simple program implementation of DES algorithm is as follows −
import pyDes

data = "DES Algorithm Implementation"
k = pyDes.des("DESCRYPT", pyDes.CBC, "\0\0\0\0\0\0\0\0", pad=None, padmode=pyDes.PAD_PKCS5)
d = k.encrypt(data)

print("Encrypted: %r" % d)
print("Decrypted: %r" % k.decrypt(d))
assert(k.decrypt(d) == data)
It calls for the variable padmode which fetches all the packages as per DES algorithm implementation and follows encryption and decryption in a specified manner.
Output
You can see the following output as a result of the code given above −
Encrypted: b'\xd6V\xf2\xffW\x16\xda\xa8r\x12\x9bi\xce\xect\x93\xef\t4\xf4!\xc2\x91\x8dA\xf3\x0b\x10\xfc\x97\xcf\xb2'
Decrypted: b'DES Algorithm Implementation'
Asymmetric Cryptography
It is also called as public key cryptography. It works in the reverse way of symmetric cryptography. This implies that it requires two keys: one for encryption and other for decryption. The public key is used for encrypting and the private key is used for decrypting.
Drawback
- Due to its key length, it contributes lower encryption speed.
- Key management is crucial.
Example - Usage of Asymmetric Cryptography using RSA Algorithm
The following program code in Python illustrates the working of asymmetric cryptography using RSA algorithm and its implementation −
main.py
from cryptography.hazmat.primitives.asymmetric import rsa
from cryptography.hazmat.primitives.asymmetric import padding
from cryptography.hazmat.primitives import serialization
from cryptography.hazmat.primitives import hashes

def generate_keys():
   privatekey = rsa.generate_private_key(public_exponent=65537, key_size=2048)
   publickey = privatekey.public_key()
   return privatekey, publickey

def encrypt_message(a_message , publickey):
   return publickey.encrypt(a_message,
      padding.OAEP(
         mgf=padding.MGF1(algorithm=hashes.SHA256()),
         algorithm=hashes.SHA256(),
         label=None
      ))

def decrypt_message(encrypted_msg, privatekey):
   return privatekey.decrypt(encrypted_msg, padding.OAEP(
        mgf=padding.MGF1(algorithm=hashes.SHA256()),
        algorithm=hashes.SHA256(),
        label=None
    ))

a_message = b"This is the illustration of RSA algorithm of asymmetric cryptography"
privatekey , publickey = generate_keys()
encrypted_msg = encrypt_message(a_message , publickey)
decrypted_msg = decrypt_message(encrypted_msg, privatekey)

print(" Original content: %s - (%d)" % (a_message, len(a_message)))
print("Encrypted message: %s - (%d)" % (encrypted_msg, len(encrypted_msg)))
print("Decrypted message: %s - (%d)" % (decrypted_msg, len(decrypted_msg)))
Output
You can find the following output when you execute the code given above −
Original content: b'This is the illustration of RSA algorithm of asymmetric cryptography' - (68)
Encrypted message: b"o\\\x851\x18\x01?S\xf0/\xe6\xb0s\xf9(BMA\x7f#Fw\xa6\x16s\xf6\x83\x00I\xc5$\xd0H@\x92\xdb~\xbc:\xe3\x914\x0c\x1b\x9c;\x98\xde|\xe5\xea\xb9Yj\xc0y\x9a5^\xe8r\xe9e\x94r\xf4\xe7\xf8\x1bP\xc7\x8e\xf6\x9e&S\xa1\xbb\x0f\xd4ArW\xfalh4^`\x96\xaa\xfe\\X\xbbO \xd8_^\xb8\xdd\x8c+\xcf\xd5\xd5viE\x85u\xeeG4\x07oD\x86\x0e5)\xc5\x1b}\x06:W^\x00\xb8\xd0\x88j\xc2\xb6D\x981\x06\xb7\xb6\x9e\xebj\xe5uE\xdb\xd8~\x03\x0c\xb0<\xbc7@\xcbq\xb8\xeac\xa8v\xd5D\xf2\xff)\xfea\x12\xff\xbc\xf4\xe8\xfa\xa3\x82Z\x13\x18\x8d'&\xdf\x17\xd1\xf1\x88\xd9C\xe8g\xf0\xee$\xc8\xe6\xe4\xa8d\\\xdbO\xcb\\\x1ek\x90d\x91b\x08f[IK\x9c7t\xb2\t\x19\x8b\xe6\xeb\xdb=\xba\x18[\xbf\xcf\x99\x16\xd7\xeb\x8d\xed\x97\xa0\x99\x866c\x08Qfy\xbb\xe2\xc9\x15\xa7" - (256)
Decrypted message: b'This is the illustration of RSA algorithm of asymmetric cryptography' - (68)
Understanding RSA Algorithm
RSA algorithm is a public key encryption technique and is considered as the most secure way of encryption. It was invented by Rivest, Shamir and Adleman in year 1978 and hence name RSA algorithm.
Algorithm
The RSA algorithm holds the following features −
RSA algorithm is a popular exponentiation in a finite field over integers including prime numbers.
The integers used by this method are sufficiently large making it difficult to solve.
There are two sets of keys in this algorithm: private key and public key.
You will have to go through the following steps to work on RSA algorithm −
Step 1: Generate the RSA modulus
The initial procedure begins with selection of two prime numbers namely p and q, and then calculating their product N, as shown −
N=p*q
Here, let N be the specified large number.
Step 2: Derived Number (e)
Consider number e as a derived number which should be greater than 1 and less than (p-1) and (q-1). The primary condition will be that there should be no common factor of (p-1) and (q-1) except 1
Step 3: Public key
The specified pair of numbers n and e forms the RSA public key and it is made public.
Step 4: Private Key
Private Key d is calculated from the numbers p, q and e. The mathematical relationship between the numbers is as follows −
ed = 1 mod (p-1) (q-1)
The above formula is the basic formula for Extended Euclidean Algorithm, which takes p and q as the input parameters.
Encryption Formula
Consider a sender who sends the plain text message to someone whose public key is (n,e). To encrypt the plain text message in the given scenario, use the following syntax −
C = Pe mod n
Decryption Formula
The decryption process is very straightforward and includes analytics for calculation in a systematic approach. Considering receiver C has the private key d, the result modulus will be calculated as −
Plaintext = Cd mod n
Creating RSA Keys
In this chapter, we will focus on step wise implementation of RSA algorithm using Python.
Generating RSA keys
The following steps are involved in generating RSA keys −
Create two large prime numbers namely p and q. The product of these numbers will be called n, where n= p*q
Generate a random number which is relatively prime with (p-1) and (q-1). Let the number be called as e.
Calculate the modular inverse of e. The calculated inverse will be called as d.
Algorithms for generating RSA keys
We need two primary algorithms for generating RSA keys using Python − Cryptomath module and Rabin Miller module.
Cryptomath Module
The source code of cryptomath module which follows all the basic implementation of RSA algorithm is as follows −
def gcd(a, b):
   while a != 0:
      a, b = b % a, a
   return b

def findModInverse(a, m):
   if gcd(a, m) != 1:
      return None
   u1, u2, u3 = 1, 0, a
   v1, v2, v3 = 0, 1, m

   while v3 != 0:
      q = u3 // v3
         v1, v2, v3, u1, u2, u3 = (u1 - q * v1), (u2 - q * v2), (u3 - q * v3), v1, v2, v3
   return u1 % m
RabinMiller Module
The source code of RabinMiller module which follows all the basic implementation of RSA algorithm is as follows −
import random
def rabinMiller(num):
   s = num - 1
   t = 0

   while s % 2 == 0:
      s = s // 2
      t += 1
   for trials in range(5):
      a = random.randrange(2, num - 1)
      v = pow(a, s, num)
      if v != 1:
         i = 0
         while v != (num - 1):
            if i == t - 1:
               return False
            else:
               i = i + 1
               v = (v ** 2) % num
      return True
def isPrime(num):
   if (num 7< 2):
      return False
   lowPrimes = [2, 3, 5, 7, 11, 13, 17, 19, 23, 29, 31, 37, 41, 43, 47, 53, 59, 61,
   67, 71, 73, 79, 83, 89, 97, 101, 103, 107, 109, 113, 127, 131, 137, 139, 149, 151,
   157, 163, 167, 173, 179, 181, 191, 193, 197, 199, 211, 223, 227, 229, 233, 239, 241,
   251, 257, 263, 269, 271, 277, 281, 283, 293, 307, 311, 313,317, 331, 337, 347, 349,
   353, 359, 367, 373, 379, 383, 389, 397, 401, 409, 419, 421, 431, 433, 439, 443, 449,
   457, 461, 463, 467, 479, 487, 491, 499, 503, 509, 521, 523, 541, 547, 557, 563, 569,
   571, 577, 587, 593, 599, 601, 607, 613, 617, 619, 631, 641, 643, 647, 653, 659, 661,
   673, 677, 683, 691, 701, 709, 719, 727, 733, 739, 743, 751, 757, 761, 769, 773, 787,
   797, 809, 811, 821, 823, 827, 829, 839, 853, 857, 859, 863, 877, 881, 883, 887, 907,
   911, 919, 929, 937, 941, 947, 953, 967, 971, 977, 983, 991, 997]

   if num in lowPrimes:
      return True
   for prime in lowPrimes:
      if (num % prime == 0):
         return False
   return rabinMiller(num)
def generateLargePrime(keysize = 1024):
   while True:
      num = random.randrange(2**(keysize-1), 2**(keysize))
      if isPrime(num):
         return num
The complete code for generating RSA keys is as follows −
main.py
import random, sys, os

def gcd(a, b):
   while a != 0:
      a, b = b % a, a
   return b

def findModInverse(a, m):
   if gcd(a, m) != 1:
      return None
   u1, u2, u3 = 1, 0, a
   v1, v2, v3 = 0, 1, m

   while v3 != 0:
      q = u3 // v3
      v1, v2, v3, u1, u2, u3 = (u1 - q * v1), (u2 - q * v2), (u3 - q * v3), v1, v2, v3
   return u1 % m

def rabinMiller(num):
   s = num - 1
   t = 0

   while s % 2 == 0:
      s = s // 2
      t += 1
   for trials in range(5):
      a = random.randrange(2, num - 1)
      v = pow(a, s, num)
      if v != 1:
         i = 0
         while v != (num - 1):
            if i == t - 1:
               return False
            else:
               i = i + 1
               v = (v ** 2) % num
      return True
def isPrime(num):
   if (num < 2):
      return False
   lowPrimes = [2, 3, 5, 7, 11, 13, 17, 19, 23, 29, 31, 37, 41, 43, 47, 53, 59, 61,
   67, 71, 73, 79, 83, 89, 97, 101, 103, 107, 109, 113, 127, 131, 137, 139, 149, 151,
   157, 163, 167, 173, 179, 181, 191, 193, 197, 199, 211, 223, 227, 229, 233, 239, 241,
   251, 257, 263, 269, 271, 277, 281, 283, 293, 307, 311, 313,317, 331, 337, 347, 349,
   353, 359, 367, 373, 379, 383, 389, 397, 401, 409, 419, 421, 431, 433, 439, 443, 449,
   457, 461, 463, 467, 479, 487, 491, 499, 503, 509, 521, 523, 541, 547, 557, 563, 569,
   571, 577, 587, 593, 599, 601, 607, 613, 617, 619, 631, 641, 643, 647, 653, 659, 661,
   673, 677, 683, 691, 701, 709, 719, 727, 733, 739, 743, 751, 757, 761, 769, 773, 787,
   797, 809, 811, 821, 823, 827, 829, 839, 853, 857, 859, 863, 877, 881, 883, 887, 907,
   911, 919, 929, 937, 941, 947, 953, 967, 971, 977, 983, 991, 997]

   if num in lowPrimes:
      return True
   for prime in lowPrimes:
      if (num % prime == 0):
         return False
   return rabinMiller(num)
def generateLargePrime(keysize = 1024):
   while True:
      num = random.randrange(2**(keysize-1), 2**(keysize))
      if isPrime(num):
         return num

def main():
   makeKeyFiles('RSA_demo', 1024)

def generateKey(keySize):
   # Step 1: Create two prime numbers, p and q. Calculate n = p * q.
   print('Generating p prime...')
   p = generateLargePrime(keySize)
   print('Generating q prime...')
   q = generateLargePrime(keySize)
   n = p * q

   # Step 2: Create a number e that is relatively prime to (p-1)*(q-1).
   print('Generating e that is relatively prime to (p-1)*(q-1)...')
   while True:
      e = random.randrange(2 ** (keySize - 1), 2 ** (keySize))
      if gcd(e, (p - 1) * (q - 1)) == 1:
         break

   # Step 3: Calculate d, the mod inverse of e.
   print('Calculating d that is mod inverse of e...')
   d = findModInverse(e, (p - 1) * (q - 1))
   publicKey = (n, e)
   privateKey = (n, d)
   print('Public key:', publicKey)
   print('Private key:', privateKey)
   return (publicKey, privateKey)

def makeKeyFiles(name, keySize):
   # Creates two files 'x_pubkey.txt' and 'x_privkey.txt'
   #   (where x is the value in name) with the the n,e and d,e integers written in them,
   # delimited by a comma.
   if os.path.exists('%s_pubkey.txt' % (name)) or os.path.exists('%s_privkey.txt' % (name)):
      sys.exit('WARNING: The file %s_pubkey.txt or %s_privkey.txt already exists! Use a different name or delete these files and re-run this program.' % (name, name))
   publicKey, privateKey = generateKey(keySize)
   print()
   print('The public key is a %s and a %s digit number.' % (len(str(publicKey[0])), len(str(publicKey[1]))))
   print('Writing public key to file %s_pubkey.txt...' % (name))

   fo = open('%s_pubkey.txt' % (name), 'w')
   fo.write('%s,%s,%s' % (keySize, publicKey[0], publicKey[1]))
   fo.close()
   print()
   print('The private key is a %s and a %s digit number.' % (len(str(publicKey[0])), len(str(publicKey[1]))))
   print('Writing private key to file %s_privkey.txt...' % (name))

   fo = open('%s_privkey.txt' % (name), 'w')
   fo.write('%s,%s,%s' % (keySize, privateKey[0], privateKey[1]))
   fo.close()
# If makeRsaKeys.py is run (instead of imported as a module) call
# the main() function.
if __name__ == '__main__':
   main()
Output
The public key and private keys are generated and saved in the respective files as shown in the following output.
Generating p prime...
Generating q prime...
Generating e that is relatively prime to (p-1)*(q-1)...
Calculating d that is mod inverse of e...
Public key: (20651742507739431177563405271458613946950876690935622944646644093053589369724831443574647311798293375887145080076213111718925590471652324223461159946727619590141671203390398415379682338231382794563939296134193222561614757027160916530497451379094741609876723839962143909595232102770139380718017717537559342810727645384023250657412517972958958998176266800406976441172565592879915402606602728247525612219346826374389429656765145152407616252833220682464532308766810445155804492192268885411784677003532810736501362964137899608160980063583703178515004091399071939143938352076615723075094356989782141902036333647694321625359, 143884987523548375904597000340779571714590487093201270719046606895772614156314845041587981448117503422746576832500022224806185158585295907996413160175569868252601328376235473109717827197455949595853436754723842967289003425129278867635204333820810148465824134002921622648833281281256033671910904808139684738653)
Private key: (20651742507739431177563405271458613946950876690935622944646644093053589369724831443574647311798293375887145080076213111718925590471652324223461159946727619590141671203390398415379682338231382794563939296134193222561614757027160916530497451379094741609876723839962143909595232102770139380718017717537559342810727645384023250657412517972958958998176266800406976441172565592879915402606602728247525612219346826374389429656765145152407616252833220682464532308766810445155804492192268885411784677003532810736501362964137899608160980063583703178515004091399071939143938352076615723075094356989782141902036333647694321625359, 16144287447839081729426838025672262266654769362915138877177613986159412191866377905964574560184392926529262545278012111155414215281143021928574685677641331946588947158681237947890840265533430543604387516111685829898756842185905588849983987335232480487517593046050585057962456138852177724856014686180731235784099928897284016379218516957562150537005675865850658841251776778304004382410815731196175796877276464002488397679693484255395285841320733994524380498680045823669751745100499893628303364728080310741099109917855410928470075482824220535907588838696772813919931518920282111563890956531994635909078122300727732191477)

The public key is a 617 and a 309 digit number.
Writing public key to file RSA_demo_pubkey.txt...

The private key is a 617 and a 309 digit number.
Writing private key to file RSA_demo_privkey.txt...
RSA Cipher Encryption
In this chapter, we will focus on different implementation of RSA cipher encryption and the functions involved for the same. You can refer or include this python file for implementing RSA cipher algorithm implementation.
The modules included for the encryption algorithm are as follows −
from cryptography.hazmat.primitives.asymmetric import rsa
from cryptography.hazmat.primitives.asymmetric import padding
from cryptography.hazmat.primitives import serialization
from cryptography.hazmat.primitives import hashes
def generate_keys():
   privatekey = rsa.generate_private_key(public_exponent=65537, key_size=2048)
   publickey = privatekey.public_key()
   return privatekey, publickey
For encryption, the following function is used which follows the RSA algorithm −
def encrypt_message(message , publickey):
   return publickey.encrypt(message,
      padding.OAEP(
         mgf=padding.MGF1(algorithm=hashes.SHA256()),
         algorithm=hashes.SHA256(),
         label=None
      ))
Two parameters are mandatory: message and publickey which refers to Public key. A public key is used for encryption and private key is used for decryption.
The complete program for encryption procedure is mentioned below −
from cryptography.hazmat.primitives.asymmetric import rsa
from cryptography.hazmat.primitives.asymmetric import padding
from cryptography.hazmat.primitives import serialization
from cryptography.hazmat.primitives import hashes

def generate_keys():
   privatekey = rsa.generate_private_key(public_exponent=65537, key_size=2048)
   publickey = privatekey.public_key()
   return privatekey, publickey

def encrypt_message(a_message , publickey):
   return publickey.encrypt(a_message,
      padding.OAEP(
         mgf=padding.MGF1(algorithm=hashes.SHA256()),
         algorithm=hashes.SHA256(),
         label=None
      ))
RSA Cipher Decryption
This chapter is a continuation of the previous chapter where we followed step wise implementation of encryption using RSA algorithm and discusses in detail about it.
The function used to decrypt cipher text is as follows
def decrypt_message(encrypted_msg, privatekey):
   return privatekey.decrypt(encrypted_msg, padding.OAEP(
        mgf=padding.MGF1(algorithm=hashes.SHA256()),
        algorithm=hashes.SHA256(),
        label=None
    ))
For public key cryptography or asymmetric key cryptography, it is important to maintain two important features namely Authentication and Authorization.
Authorization
Authorization is the process to confirm that the sender is the only one who have transmitted the message. The following code explains this −
def sign(message, private_key):
   return private_key.sign(
    message,
    padding.PSS(
        mgf=padding.MGF1(hashes.SHA256()),
        salt_length=padding.PSS.MAX_LENGTH
    ),
    hashes.SHA256()
)
Authentication
Authentication is possible by verification method which is explained as below −
def verify(message, signature, public_key):
   return public_key.verify(
        signature,
        message,
        padding.PSS(
            mgf=padding.MGF1(hashes.SHA256()),
            salt_length=padding.PSS.MAX_LENGTH
        ),
        hashes.SHA256()
    )
The digital signature is verified along with the details of sender and recipient. This adds more weight age for security purposes.
Example - RSA Cipher Decryption
You can use the following code for RSA cipher decryption −
main.py
from cryptography.hazmat.primitives.asymmetric import rsa
from cryptography.hazmat.primitives.asymmetric import padding
from cryptography.hazmat.primitives import serialization
from cryptography.hazmat.primitives import hashes

def generate_keys():
   privatekey = rsa.generate_private_key(public_exponent=65537, key_size=2048)
   publickey = privatekey.public_key()
   return privatekey, publickey

def encrypt_message(a_message , publickey):
   return publickey.encrypt(a_message,
      padding.OAEP(
         mgf=padding.MGF1(algorithm=hashes.SHA256()),
         algorithm=hashes.SHA256(),
         label=None
      ))

def decrypt_message(encrypted_msg, privatekey):
   return privatekey.decrypt(encrypted_msg, padding.OAEP(
        mgf=padding.MGF1(algorithm=hashes.SHA256()),
        algorithm=hashes.SHA256(),
        label=None
    ))

def sign(message, private_key):
   return private_key.sign(
    message,
    padding.PSS(
        mgf=padding.MGF1(hashes.SHA256()),
        salt_length=padding.PSS.MAX_LENGTH
    ),
    hashes.SHA256()
)

def verify(message, signature, public_key):
   return public_key.verify(
        signature,
        message,
        padding.PSS(
            mgf=padding.MGF1(hashes.SHA256()),
            salt_length=padding.PSS.MAX_LENGTH
        ),
        hashes.SHA256()
    )

message = b"Sample Message to be signed"
privatekey , publickey = generate_keys()

signature = sign(message, privatekey)

try:
   verify(message, signature, publickey)
   print("Signature validated")
except:
   print("Invalid Signature")
Output
Run the code and verify the output −
Signature validated
Hacking RSA Cipher
Hacking RSA cipher is possible with small prime numbers, but it is considered impossible if it is used with large numbers. The reasons which specify why it is difficult to hack RSA cipher are as follows −
Brute force attack would not work as there are too many possible keys to work through. Also, this consumes a lot of time.
Dictionary attack will not work in RSA algorithm as the keys are numeric and does not include any characters in it.
Frequency analysis of the characters is very difficult to follow as a single encrypted block represents various characters.
There are no specific mathematical tricks to hack RSA cipher.
The RSA decryption equation is −
M = C^d mod n
Example - Hacking RSA Cipher
With the help of small prime numbers, we can try hacking RSA cipher and the sample code for the same is mentioned below −
main.py
def p_and_q(n):
   data = []
   for i in range(2, n):
      if n % i == 0:
         data.append(i)
   return tuple(data)

def euler(p, q):
   return (p - 1) * (q - 1)

def private_index(e, euler_v):
   for i in range(2, euler_v):
      if i * e % euler_v == 1:
         return i

def decipher(d, n, c):
   return c ** d % n

def main():
   e = int(input("input e: "))
   n = int(input("input n: "))
   c = int(input("input c: "))

   # t = 123
   # private key = (103, 143)
   p_and_q_v = p_and_q(n)
   # print("[p_and_q]: ", p_and_q_v)
   euler_v = euler(p_and_q_v[0], p_and_q_v[1])

   # print("[euler]: ", euler_v)
   d = private_index(e, euler_v)
   plain = decipher(d, n, c)
   print("plain: ", plain)
if __name__ == "__main__":
   main()
Output
The above code produces the following output −
input e: 7
input n: 143
input c: 7
plain:  123
