 Data Structure
 Networking
 RDBMS
RDBMS Operating System
 Java
Java MS Excel
 iOS
iOS HTML
HTML CSS
CSS Android
 Python
 C Programming
 C++
C++ C#
C# MongoDB
 MySQL
MySQL Javascript
 PHP
PHP
- Selected Reading
- UPSC IAS Exams Notes
- Developer's Best Practices
- Questions and Answers
- Effective Resume Writing
- HR Interview Questions
- Computer Glossary
- Who is Who
Create a plot with Multiple Glyphs using Python Bokeh
Bokeh is a powerful data visualization library in Python that helps to create interactive and unique visualizations for the web. Bokeh supports various rendering techniques and provides a wide range of built-in tools for creating complex visualizations with multiple glyphs. This document will guide you through the process of creating a plot with multiple glyphs using Bokeh. This plot combines different glyphs to display multiple data series in a single plot that provides a more efficient way to understand the relationship between different variables.
What are Glyphs and what are the key advantages of these?
Glyphs are graphical representations of characters, symbols, or icons used in typography and graphic design. They are often used in the design and layout of text, and can include letters, numbers, punctuation marks, and other symbols.
Some of the key advantages of using glyphs include ?
Improved legibility ? Glyphs can be designed to be highly legible, making it easier for readers to quickly and accurately understand the text.
Enhanced aesthetics ? Glyphs can be used to add visual interest and appeal to text, making it more visually appealing and engaging.
Consistency and accuracy ? Glyphs can be designed to be consistent in size, shape, and style, ensuring that text is easy to read and visually coherent.
Flexibility ? Glyphs can be scaled and modified easily, making it possible to use them in a wide range of contexts and applications.
Internationalization ? Glyphs can be used to represent characters and symbols from a wide range of languages and writing systems, making them useful for internationalization and localization.
Overall, glyphs are a powerful tool for typography and graphic design, and can help improve the legibility, aesthetics, consistency, and flexibility of text.
Statistical Significance of these
Glyphs themselves are not subject to statistical significance tests since they are not statistical data. However, the use of glyphs in typography and graphic design may be subject to statistical significance tests if they are used in the context of an experiment or study that involves statistical analysis. For example, if a study is examining the effects of different fonts on reading speed or comprehension, statistical tests may be used to determine whether any observed differences between the fonts are statistically significant.
In general, statistical significance tests are used to determine whether observed differences or effects are likely to be due to chance or random variation, or whether they are likely to reflect a true difference or effect in the population being studied. The specific test used depends on the research question, the type of data being analyzed, and the assumptions made about the data and population.
Therefore, while glyphs themselves are not subject to statistical significance tests, they may be used in the context of experiments or studies that are subject to statistical analysis to determine whether any observed differences or effects are statistically significant.
Prerequisites
Before we dive into the task few things should is expected to be installed onto your system ?
List of recommended settings ?
pip install pandas, bokeh
It is expected that the user will have access to any standalone IDE such as VS-Code, PyCharm, Atom or Sublime text.
Even online Python compilers can also be used such as Kaggle.com, Google Cloud platform or any other will do.
Updated version of Python. At the time of writing the article I have used 3.10.9 version.
Knowledge of the use of Jupyter notebook.
Knowledge and application of virtual environment would be beneficial but not required.
It is also expected that the person will have a good understanding of statistics and mathematics.
Creating a basic plot
To create a plot, we first need to import the necessary modules, such as `Figure`, `ColumnDataSource`, and the desired glyphs. Here's an example code snippet that creates a line plot with a single glyph using Bokeh ?
Syntax
from bokeh.plotting import figure, output_file, show
output_file("line.html")
p = figure(title="Line Plot", x_axis_label="X", y_axis_label="Y")

x = [1, 2, 3, 4, 5]
y = [6, 7, 2, 4, 5]

p.line(x, y, line_width=2)

show(p)
Output

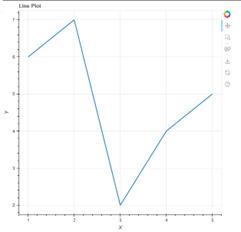
This code will create a line plot with x-axis labeled as "X", y-axis labeled as "Y", and a title "Line Plot". The line plot will display five data points with their corresponding x and y values.
Adding multiple glyphs to the plo
To add multiple glyphs to the plot, we need to use the `Figure` object's `multi_line()` function. The `multi_line()` function takes multiple sequences of x and y values and creates a line glyph for each of them. Here's an example code snippet to create a line plot with multiple glyphs ?
from bokeh.plotting import figure, output_file, show
from bokeh.models import ColumnDataSource

output_file("multi_line.html")

p = figure(title="Multiple Glyphs", x_axis_label="X", y_axis_label="Y")

x1 = [1, 2, 3, 4, 5]
y1 = [6, 7, 2, 4, 5]

x2 = [1, 2, 3, 4, 5]
y2 = [2, 4, 6, 8, 10]

source = ColumnDataSource(data=dict(x1=x1, y1=y1, x2=x2, y2=y2))
p.multi_line(xs=[source.data["x1"], source.data["x2"]],
   ys=[source.data["y1"], source.data["y2"]],
   line_color=["red", "blue"], line_width=[2, 2])
show(p)
Output

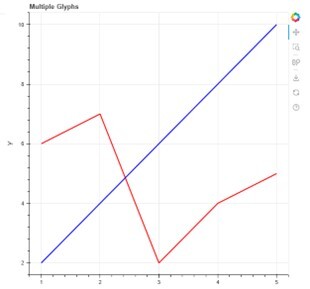
Here, we created two sets of x and y values and stored them in a `ColumnDataSource` object. We then passed the two sequences of x and y values to the `multi_line()` function, along with the colors and line widths of the two glyphs. This will create a line plot with two glyphs, one in red color and one in blue color, each with their corresponding x and y values.
Final Program, Code
# Basic plot

from bokeh.plotting import figure, output_file, show
output_file("line.html")

p = figure(title="Line Plot", x_axis_label="X", y_axis_label="Y")

x = [1, 2, 3, 4, 5]
y = [6, 7, 2, 4, 5]

p.line(x, y, line_width=2)

show(p)

# Multiple graphs

from bokeh.plotting import figure, output_file, show
from bokeh.models import ColumnDataSource

output_file("multi_line.html")

p = figure(title="Multiple Glyphs", x_axis_label="X", y_axis_label="Y")

x1 = [1, 2, 3, 4, 5]
y1 = [6, 7, 2, 4, 5]

x2 = [1, 2, 3, 4, 5]
y2 = [2, 4, 6, 8, 10]

source = ColumnDataSource(data=dict(x1=x1, y1=y1, x2=x2, y2=y2))

p.multi_line(xs=[source.data["x1"], source.data["x2"]],
   ys=[source.data["y1"], source.data["y2"]],
   line_color=["red", "blue"], line_width=[2, 2])

show(p)
Conclusion
In this document, we have seen how to create a plot with multiple glyphs using Bokeh. We started with an introduction to glyphs and then created a basic line plot with a single glyph. We then added multiple glyphs to the plot using the `multi_line()` function of the `Figure` object. With Bokeh, it is easy to create interactive visualizations that can help to understand the relationship between different data points. Bokeh allows you to create beautiful visualizations with minimal effort, allowing you to focus on analyzing the data rather than worrying about the visualization.

