- Consul - Home
- Consul - Introduction
- Consul - Architecture
- Consul - Installation
- Consul - Working with Microservices
- Consul - Bootstrapping & DNS
- Consul - Querying Nodes
- Consul - Failover Events
- Consul - Using UI
- Consul - Using Consul on AWS
Consul - Quick Guide
Consul - Introduction
Consul is a Hashicorp based tool for discovering and configuring a variety of different services in your infrastructure. It is based and built on Golang. One of the core reasons to build Consul was to maintain the services present in the distributed systems. Some of the significant features that Consul provides are as follows.
Service Discovery − Using either DNS or HTTP, applications can easily find the services they depend upon.
Health Check Status − It can provide any number of health checks. It is used by the service discovery components to route traffic away from unhealthy hosts.
Key/Value Store − It can make use of Consul's hierarchical key/value store for any number of purposes, including dynamic configuration, feature flagging, coordination, leader election, etc.
Multi Datacenter Deployment − Consul supports multiple datacenters. It is used for building additional layers of abstraction to grow to multiple regions.
Web UI − Consul provides its users a beautiful web interface using which it can be easy to use and manage all of the features in consul.
Service Discovery
Service discovery is one of the most important feature of Consul. It is defined as the detection of different services and network protocols using which a service is found. The usage of service discovery comes in as a boon for distributed systems. This is one of the main problems, which are faced by today's large-scale industries with the advancement of distributed systems in their environment.
Comparison with Etcd and Zookeeper
When we look at other service discovery tools in this domain, we have two popular options. Some major players in the software industry have been using it in the past. These tools are Etcd and Zookeeper.
Let us consider the following table for comparing different aspects of each tool. We will also understand what each one of them uses internally.
| Properties | Consul | Etcd | Zoo Keeper |
|---|---|---|---|
| User Interface | Available |  |
|
| RPC | Available | Available | |
| Health Check | HTTP API | HTTP API | TCP |
| Key Value | 3 Consistency modes | Good Consistency | Strong Consistency |
| Token System | Available | |
|
| Language | Golang | Golang | Java |
Consul - Members and Agents
Consul members can be defined as the list of different agents and server modes using which a consul cluster is deployed. Consul provides us with a command line feature using which we can easily list all the agents associated with consul.
Consul agent is the core process of Consul. The agent maintains membership information, registers services, runs checks, responds to queries, etc. Any agent can be run in one of two modes: Client or Server. These two modes can be used according to their role as decided when using consul. The consul agent helps by providing us information, which is listed below.
Node name − This is the hostname of the machine.
Datacenter − The datacenter in which the agent is configured to run. Each node must be configured to report to its datacenter.
Server − It indicates whether the agent is running in server or client mode. Server nodes participates in the consensus quorum, storing cluster state and handling queries.
Client Addr − It is the address used for client interfaces by the agent. It includes the ports for the HTTP, DNS, and RPC interfaces.
Cluster Addr − It is the address and the set of ports used for communication between Consul Agents in a cluster. This address must be reachable by all other nodes.
In the next chapter, we will understand the architecture for Consul.
Consul - Architecture
The architecture diagram for consul working in one datacenter can be best described as shown below −
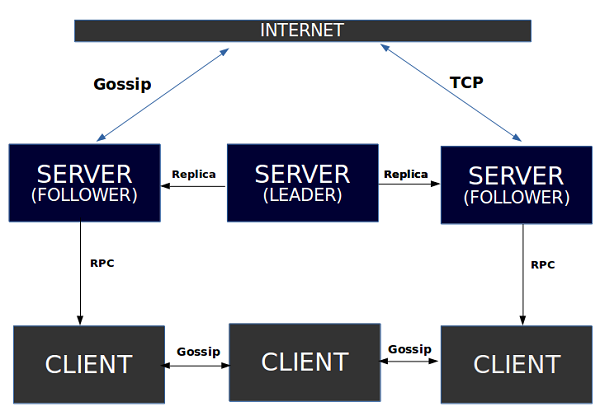
As we can observe, there are three different servers, which are managed by Consul. The working architecture works by the using raft algorithm, which helps us in electing a leader out of the three different servers. These servers are then labelled according to the tags such as Follower and Leader. As the name suggests, the follower is responsible for following the decisions of the leader. All these three servers are further connected with each other for any communication.
Each server interacts with its own client using the concept of RPC. The Communication between the Clients is possible due to Gossip Protocol as mentioned below. The Communication with the internet facility can be made available using TCP or gossip method of communication. This communication is in direct contact with any of the three servers.
Raft Algorithm
Raft is a consensus algorithm for managing a replicated log. It relies on the principle of CAP Theorem, which states that in the presence of a network partition, one has to choose between consistency and availability. Not all the three fundamentals of the CAP Theorem can be achieved at any given point of time. One has to tradeoff for any two of them at the best.
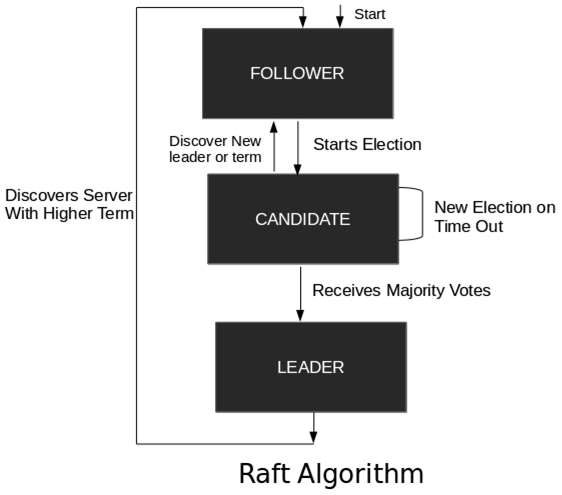
A Raft Cluster contains several servers, usually in the odd number count. For example, if we have five servers, it will allow the system to tolerate two failures. At any given time, each server is in one of the three states: Leader, Follower, or Candidate. In a normal operation, there is exactly one leader and all of the other servers are followers. These followers are in a passive state, i.e. they issue no requests on their own, but simply respond to requests from leaders and the candidate.
The following illustration describes the workflow model using which the raft algorithm works −
Key Value Data
Since the Consul's version 0.7.1, there has been an introduction of separate key value data. The KV command is used to interact with the Consul's key-value store via the command line. It exposes top-level commands for Inserting, Updating, Reading and Deleting from the store. To get the Key/Value object store, we call the KV method available for the consul client −
kv := consul.KV()
The KVPair Structure is used to represent a single key/value entry. We can view the structure of Consul KV Pair in the following program.
type KVPair struct {
   Key string
   CreateIndex uint64
   ModifyIndex uint64
   LockIndex uint64
   Flags uint64
   Value []byte
   Session string
}
Here, the various structures mentioned in the above code can be defined as follows −
Key − It is a slash URL name. For example sites/1/domain.
CreateIndex − Index number assigned when the key was first created.
ModifyIndex − Index number assigned when the key was last updated.
LockIndex − Index number created when a new lock acquired on the key/value entry
Flags − It can be used by the app to set the custom value.
Value − It is a byte array of maximum 512kb.
Session − It can be set after creating a session object.
Types of Protocol
There are two types of protocol in Consul, which are called as −
- Consensus Protocol and
- Gossip Protocol
Let us now understand them in detail.
Consensus Protocol
Consensus protocol is used by Consul to provide Consistency as described by the CAP Theorem. This protocol is based on the Raft Algorithm. When implementing Consensus protocol, the Raft Algorithm is used where raft nodes are always in any one of the three states: Follower, Candidate or Leader.
Gossip Protocol
The gossip protocol can be used to manage membership, send and receive messages across the cluster. In consul, the usage of gossip protocol occurs in two ways, WAN (Wireless Area Network) and LAN (Local Area Network). There are three known libraries, which can implement a Gossip Algorithm to discover nodes in a peer-to-peer network −
teknek-gossip − It works with UDP and is written in Java.
gossip-python − It utilizes the TCP stack and it is possible to share data via the constructed network as well.
Smudge − It is written in Go and uses UDP to exchange status information.
Gossip protocols have also been used for achieving and maintaining a distributed database consistency or with other types of data in consistent states, counting the number of nodes in a network of unknown size, spreading news robustly, organizing nodes, etc.
Remote Procedure Calls
The RPC can be denoted as the short form for Remote Procedure Calls. It is a protocol that one program uses to request a service from another program. This protocol can be located in another computer on a network without having to acknowledge the networking details.
The real beauty of using RPC in Consul is that, it helps us avoid the latency issues which most of the discovery service tools did have some time ago. Before RPC, Consul used to have only TCP and UDP based connections, which were good with most systems, but not in the case of distributed systems. RPC solves such problems by reducing the time-period of transfer of packet information from one place to another. In this area, GRPC by Google is a great tool to look forward in case one wishes to observe benchmarks and compare performance.
Consul - Installation
For demonstration purposes, we are going to use consul agent in the developer mode using the -dev mode. Just for the local machine setup, we are going to do a single system consul setup. Please do not use this single node consul cluster in your production. As Hashicorp already mentions it in the case scenario of a single node consul cluster, the data loss is inevitable.
Installing Consul
Consul can be installed via the Downloads page at www.consul.io/downloads.html
You can extract the binary package in your Downloads section of your machine.
$ cd Downloads
$ chmod +x consul
$ sudo mv consul /usr/bin/
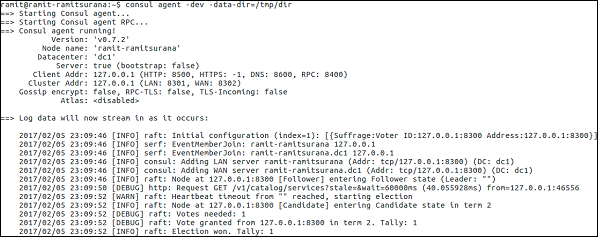
Now let us start using consul using the -dev flag.
$ consul agent -dev -data-dir=/tmp/consul
The output would be as shown in the following screenshot.
Now you can check your consul members using the following command.
$ consul members
The output would be as shown in the following screenshot.

If you want to join other nodes to this node −
$ consul join <Node 2> <Node 3>
Alternatively, you can run the following command on Node 2 & 3 −
$ consul join <Node 1>
Using the Command Line
The command line of consul consists of several different options, some of the most commonly used ones are as follows −
agent − which runs a Consul agent.
configtest − to validate a config file.
event − to start up a new event.
exec − to execute a command on Consul nodes.
force-leave − forcing a member of the cluster to leave the cluster.
info − it provides us the debugging information for operators.
join − to make a Consul agent join the cluster.
keygen − to generate a new encryption key.
keyring − to manage gossip layer encryption keys.
kv − to interact with the key-value store.
leave − to leave the Consul cluster and shut it down without force.
lock − to execute a command to hold down a lock.
maint − to control node or service maintenance mode.
members − it lists the members of a Consul cluster.
monitor − it streams logs from a Consul agent.
operator − it provides us a cluster of tools for Consul operators.
reload − it triggers the agent to reload configuration files.
rtt − it estimates network round trip time between nodes.
snapshot − it saves, restores and inspects snapshots of Consul server state.
version − to print the current Consul version.
watch − to Watch out for changes in the Consul.
Consul Template
The consul-template provides us a daemon that queries the Consul instance and updates any number of specified templates on the file system. The consul-template can optionally run arbitrary commands when the update process completes. This option helps us to setup the consul cluster without manually doing everything on our own.
The consul template is to be formed at /tmp/<name-of-file>.conf.tmpfl. The language in which the template is written according to Hashicorp Configuration Language (HCL).
You can download the consul-template from this page.

Try it out by using the following command −
$ ./consul-template -h
The output would be as shown in the following screenshot.
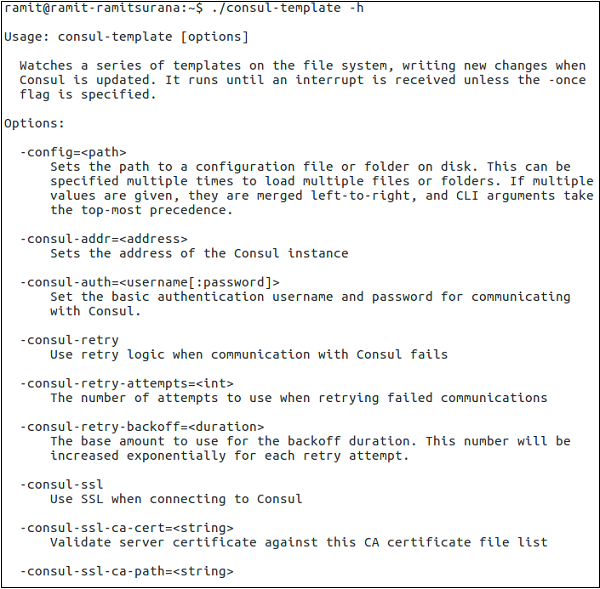
If you wish to move this binary to a more prominent space, so that it is available for the user every time. You can type in the following commands −
$ chmod +x consul-template
$ sudo mv consul-template /usr/share/bin/
For demo purposes, we are going to use a sample configuration of nginx to be used as our service. You can try out more demos at https://github.com/hashicorp/consul-template/tree/master/examples or better write down your own template.
$ vim /tmp/nginx.conf.ctmpl
The output would be as shown in the following screenshot.
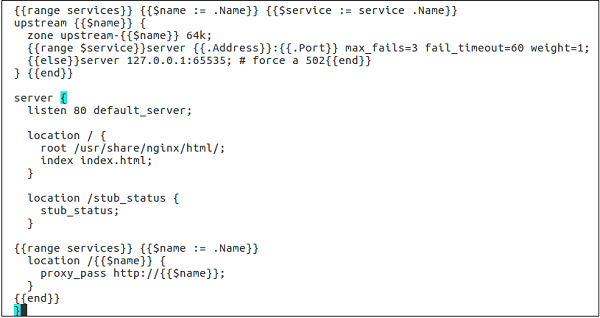
The config file may look like −
{{range services}} {{$name := .Name}} {{$service := service .Name}}

upstream {{$name}} {
   zone upstream-{{$name}} 64k;
   {{range $service}}server {{.Address}}:{{.Port}} max_fails = 3 fail_timeout = 60
   weight = 1;
   {{else}}server 127.0.0.1:65535; # force a 502{{end}}
} {{end}}

server {
   listen 80 default_server;
   location / {
      root /usr/share/nginx/html/;
      index index.html;
   }
   location /stub_status {
      stub_status;
   }
   {{range services}} {{$name := .Name}}
   location /{{$name}} {
      proxy_pass http://{{$name}};
   }
   {{end}}
}
Now using the consul template binary file, please run the following commands −
$ consul-template \
 -template = "/tmp/nginx.conf.ctmpl:/etc/nginx/conf.d/default.conf"
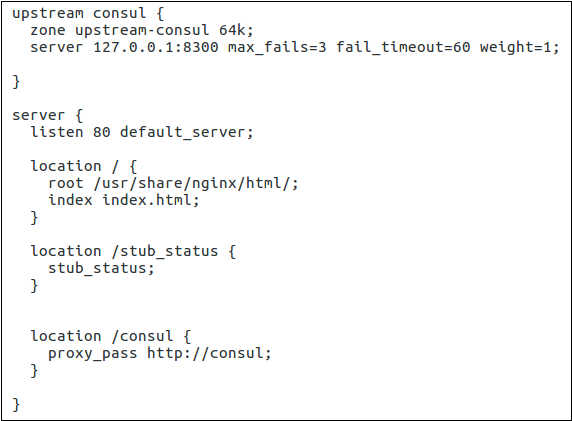
With the previous command the process has started. You can later open up another terminal and view the nginx.conf file being completely rendered using the following command.
$ cat /etc/nginx/conf.d/default.conf
The output would be as shown in the following screenshot.
Consul - Working with Microservices
In this chapter, we will understand how Microservices work with Consul. We will also learn how the following components affect Consul.
- Using docker
- Building Registrator for Service Discovery
- Using rkt and Nomad
Let us now discuss each of these in detail.
Using Docker
Before starting, please do not use this setup in production as it is used for demo purposes only. Docker is a container based service using which we can easily deploy our applications. For using Consul, we are going to use the image at the following link 0
https://hub.docker.com/r/progrium/consul/.
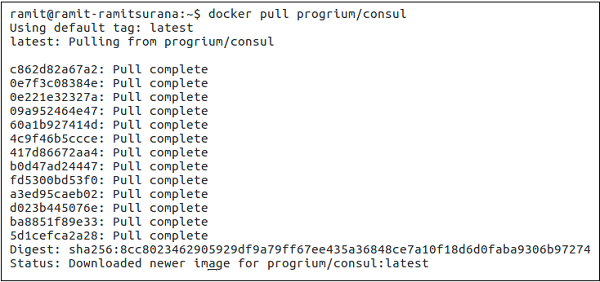
It is being assumed that your system has Docker installed and properly configured. Let us try pulling down the image from the Docker hub, by running the following command −
$ docker pull progrium/consul
The output would be as shown in the following screenshot.
We are going to publish some interfaces with their ports (using -p option on Docker) in the following manner.
- 8400 (RPC)
- 8500 (HTTP)
- 8600 (DNS)
Also as per the pull made, we are going to set the name of the hostname as node1.You can change it to anything you want by using the -h flag with some hostname of your own as shown below.
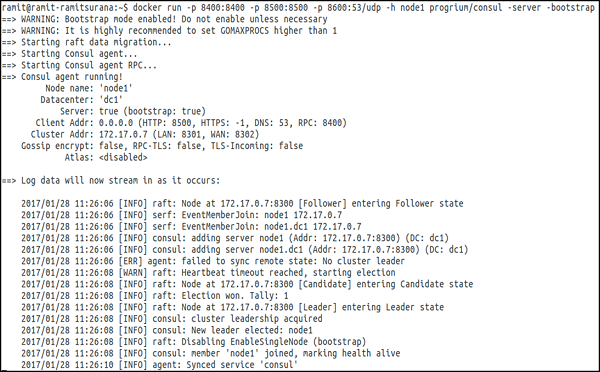
$ docker run -p 8400:8400 -p 8500:8500 -p 8600:53/udp -h node1 progrium/consul
-server -bootstrap
The output would be as shown in the following screenshot.
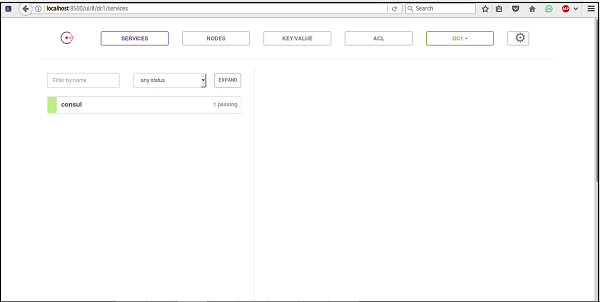
You can also enable the UI mode for the Consul using −
$ docker run -p 8400:8400 -p 8500:8500 -p 8600:53/udp -h node1 progrium/consul
-server -bootstrap -ui-dir /ui
You can check the UI based output on http://localhost:8500. The following screenshot gives you a better idea regarding the UI based output.
For using consul over various docker containers on different nodes, we can run the following commands on different nodes −
On Node1
$ docker run -d --name node1 -h node1 progrium/consul -server -bootstrap-expect 3
Where, -bootstrap-expect 3 means that the consul server will wait until there are 3 peers connected before self-bootstrapping and becoming a working cluster.
Before going any further, we need to get the container's internal IP by inspecting the container. For our use, case purpose, we are going to declare the $ JOIN_IP.
$ JOIN_IP = "$(docker inspect -f '{{.NetworkSettings.IPAddress}}' node1)"
On Node2
So, let us start Node2 and tell it to join Node1 using the variable declared in the program given above.
$docker run -d --name node2 -h node2 progrium/consul -server -join $JOIN_IP
On Node3
$ docker run -d --name node3 -h node3 progrium/consul -server -join $JOIN_IP
Building Registrator for Service Discovery
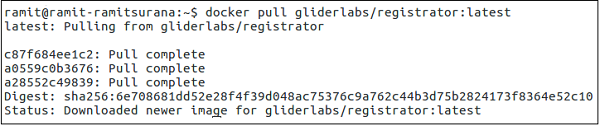
Registrator automatically registers and deregisters services for any Docker container by inspecting containers as they come online. The Registrator we are about to use currently supports pluggable service registries, which currently includes Consul, Etcd and SkyDNS2. The usage of Registrator is highly recommended when we are interacting with different services over the network.
$ docker pull gliderlabs/registrator:latest
The output would be as shown in the following screenshot.
$ docker run -d \
--name = registrator \
--net = host \
--volume = /var/run/docker.sock:/tmp/docker.sock \
gliderlabs/registrator:latest \
 consul://localhost:8500
The output would be as shown in the following screenshot.
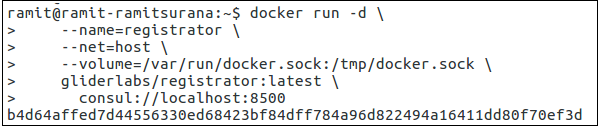
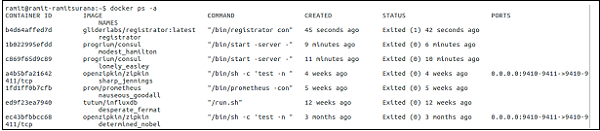
The output you have received is the ID of the Docker Container that you have just started. You can check whether the container is running or not by using the command −
$ docker ps -a
he output would be as shown in the following screenshot.
You can also view the logs of Registrator by using the following command.
$ docker logs registrator
Using rkt and Nomad
The rkt is another container-based service, which you can use in your environment. It is built by CoreOS. The main reason for building rkt was to improve the security that was one of the crisis issues for Docker back when it was still in development in 2013-14.
As for Consul, we can use the Rkt Registrator for working on service discovery with Consul. This particular Registrator project, which is covered for rkt is under development and is not recommended for production level use.
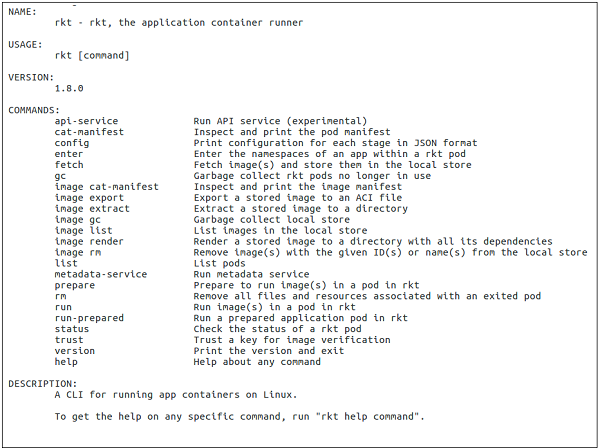
You can check if rkt is installed or not, by going to its path and running the following command.
$ ./rkt
You can check the output to check, if it is correctly installed or not as shown in the following screenshot.
For trying out rkt and Consul please check out − https://github.com/r3boot/rkt-registrator.
Nomad Tool
One of the most commonly used and a favorite option is the Nomad tool. Nomad is a tool for managing a cluster of machines and running applications on them. It is similar to Mesos or Kubernetes. By default, Nomad covers the Docker and rkt driver within itself. So, if you are looking for a large-scale deployment of containers with Consul. Nomad might be a good solution to it. Check out − https://www.nomadproject.io/docs/drivers/rkt.html for further information on Nomad.
Consul - Bootstrapping & DNS
In this chapter, we will discuss how the following components are used in Consul.
- Automatic bootstrapping
- Manual bootstrapping
- Using DNS Forwarding
- DNS Caching
Let us now discuss each of these in detail.
Automatic Bootstrapping
Bootstrapping is one of the core features of Consul. When you install consul for the first time, it is automatically configured to detect, identify and join nodes it comes across. During its cluster formation, automatic bootstrapping is a built-in feature of Consul. To gain more information on consul, the best way is to use the command below −
$ sudo consul info
The output would be as shown in the following screenshot.
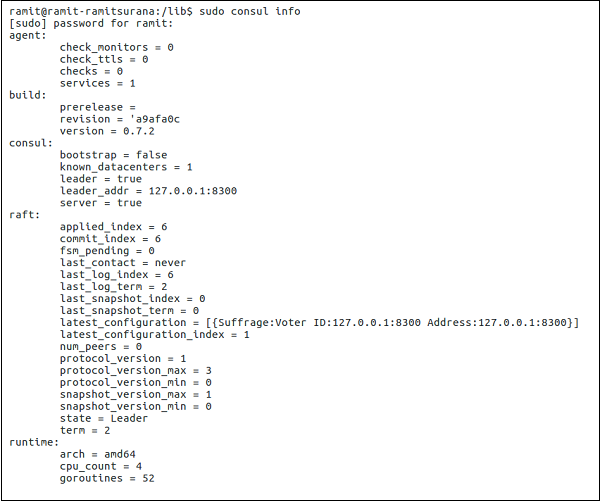
This command will show the actual working of consul in real working scenarios. It will display the Raft Algorithm working in Consul. The automatic bootstrapping command can be shown using the following command −
$ consul agent -server -data-dir = /tmp/consul -bootstrap-expect 3
Automatic bootstrapping cannot be done in -dev mode.
This option informs Consul of the expected number of server nodes and automatically bootstraps when servers are available.
Manual Bootstrapping
Manual Bootstrapping is an old and useful feature of Consul. Actually, during Consul's earlier version, bootstrapping has to be done manually when installing and using consul for the first time. Later, it was realized that it was not possible to perform this command line operation at different times. Hence, automatic bootstrapping was introduced. You can always use bootstrapping manually by using the following commands.
In this case, we will assume that a 3-node consul cluster is to be built.
There are two options to do manual bootstrapping
Running commands over 2 nodes: On Node B and Node C you can do the following −
$ consul join <Node A Address>
Running command over 1 node −
$ consul join <Node B Address> <Node C Address>
Using DNS Forwarding
DNS is served from port 53. The DNS forwarding can be done using BIND, dnsmasq and iptables. By default, the Consul agent runs a DNS server listening on port 8600. By submitting DNS requests to the Consul agents DNS server, you can get the IP address of a node running the service in which you are interested.
The Consul DNS interface makes the port information for a service available via the SRV records. Without manually adding logic in your code, you are generally limited just to the IP address info (i.e. a record) of the service you are querying.
The best option is to have multiple BIND servers each running a Consul agent locally. Any queries received by a BIND server would be forwarded to its local Consul Agent DNS Server.
Using Bind
We can use DNS Forwarding using the Bind function. It can be done by using the following command.
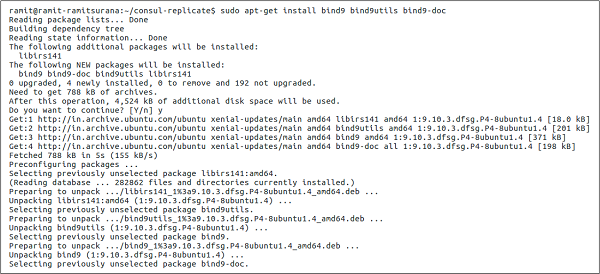
$ sudo apt-get install bind9 bind9utils bind9-doc
The output would be as shown in the following screenshot.
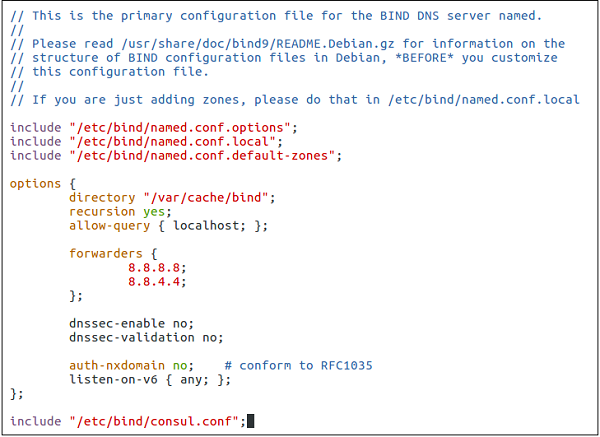
Let us edit the /etc/bind/named.conf file with the following command.
$ sudo vim /etc/bind/named.conf
In the file, please add the following lines below the last line of the code.
options {
   directory "/var/cache/bind";
   recursion yes;
   allow-query { localhost; };

   forwarders {
      8.8.8.8;
      8.8.4.4;
   };
   dnssec-enable no;
   dnssec-validation no;
   auth-nxdomain no; # conform to RFC1035
   listen-on-v6 { any; };
};
include "/etc/bind/consul.conf";
The output would be as shown in the following screenshot.
You can take the following Bind command to configure Consul.
$ sudo vim /etc/bind/consul.conf
Add the following lines when you create the file −
zone "consul" IN {
   type forward;
   forward only;
   forwarders { 127.0.0.1 port 8600; };
};
Now you can start running your consul agent by using the following command. (Remember to restart the bind9 service as well.)
$ sudo service bind9 restart
$ consul agent -server -bootstrap-expect 1 -data-dir = /tmp/consul -configdir = [Path]
The system needs to be configured to send queries to the local Consul agents DNS server. This is done by updating the resolv.conf file on the system to point to 127.0.0.1. In most cases, Consul will need to be configured to run on port 53.
You can add the following information to the /etc/resolv.conf:
nameserver 127.0.0.1
DNS Caching
Consul serves all DNS results with a 0 TTL (Time to Live) value. This prevents any caching. However, due to the TTL values, it can be set to allow DNS results to be cached with downstream of Consul. Higher TTL values reduce the number of lookups on the Consul servers and speed lookups for clients, at the cost of increasingly stale results.
For this purpose, we are going to use DNS caching using the method below −
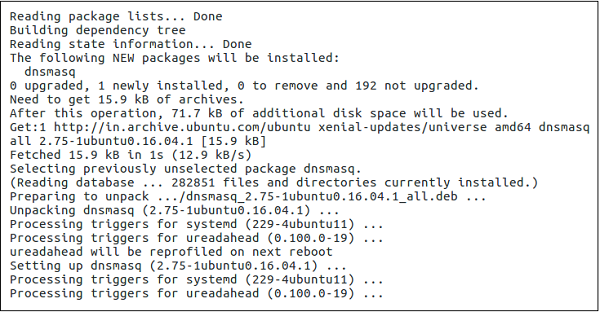
$ sudo apt-get install dnsmasq
The output would be as shown in the following screenshot.
Now, we can do a very simple configuration −
$ echo "server = /consul/127.0.0.1#8600" > /etc/dnsmasq.d/10-consul
All we are doing here is specifying that DNS requests for consul services, which are to be dealt with by the DNS server at 127.0.0.1 on port 8600. Unless you change the consul defaults, this should work.
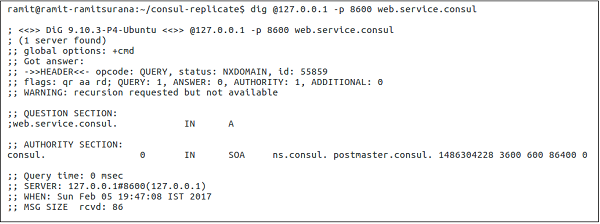
In normal cases, the following command should be used.
$ dig @127.0.0.1 -p 8600 web.service.consul
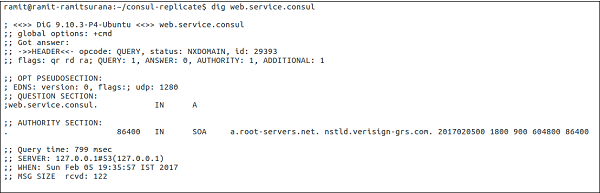
With Dnsmasq, you should use the following command.
$ dig web.service.consul
The output would be as shown in the following screenshot.
Consul - Querying Nodes
In this chapter, we will learn how to query nodes with the following functions −
- Using dig
- Using the Monitor command
- Using the Watch command
- By Registering External Services
Let us understand each of these functions in detail.
Using Dig
Consul listens on 127.0.0.1:8600 for DNS queries in the consul. The way it determines which nodes are available to provide a service is using checks that can be either −
A Script that is executed and it returns a nagios compliant code.
An HTTP check that returns an HTTP response code.
A TCP check that is checking if a port is open.
The general command for trying out dig is −
$ dig @127.0.0.1 -p <port> <service-name>.consul
Now, let us try out a sample dig command −
$ dig @127.0.0.1 -p 8600 web.service.consul
The output would be as shown in the following screenshot.
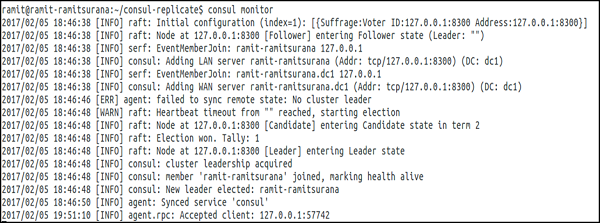
Using the Monitor Command
It is used to connect and show the logs of a running Consul agent. This command will show the recent logs. It also allows you to log the agent at a relatively high log level. It consists of various log levels, which you can follow, such as Trace, Debug, Info, Warn and Err.
Let us try out the following command −
$ consul monitor
The output would be as shown in the following screenshot.
You can also set the monitor command using the sub-commands such as -log-level and -rpc-address. By default, the address of the RPC is 127.0.0.1:8400. For more info, click here.
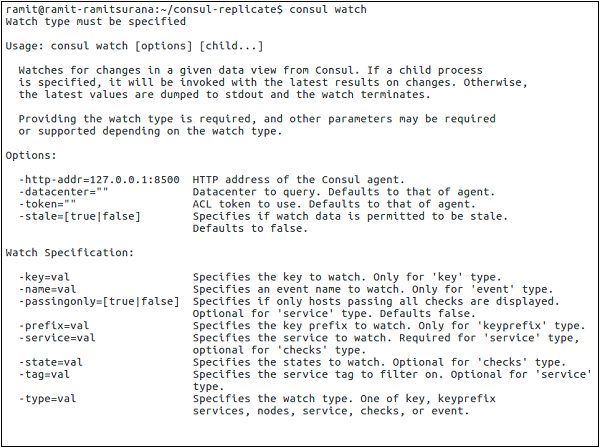
Using the Watch Command
This command provides us with a mechanism to watch for changes in the list of nodes, service members, key value, etc. It also invokes a process with the latest values of the view. If no process is specified, the current values are processed to STDOUT, which can be a useful way to inspect data in Consul. The Consul Watch Command help has a variety of different options as shown in the following screenshot −
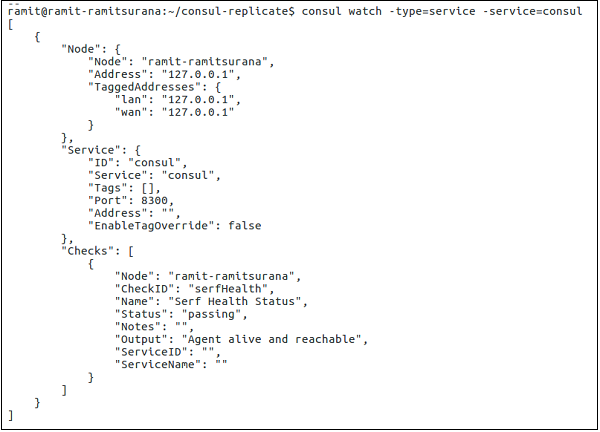
Let us try out a demo with -type = service as shown in the following command.
$ consul watch -type = service -service = consul
For more information on this topic, you can click here.
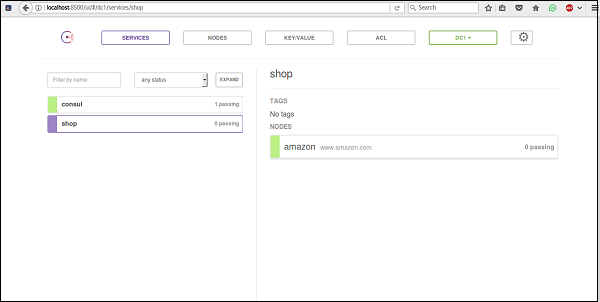
By Registering External Services
Once registered, the DNS interface will be able to return the appropriate A Records or CNAME Records for the service. Let us register an external service, such as Amazon as shown in the following code block and the screenshot as well.
$ sudo curl -X PUT -d '{"Datacenter": "dc1", "Node": "amazon",
"Address": "www.amazon.com",
"Service": {"Service": "shop", "Port": 80}}'
http://127.0.0.1:8500/v1/catalog/register

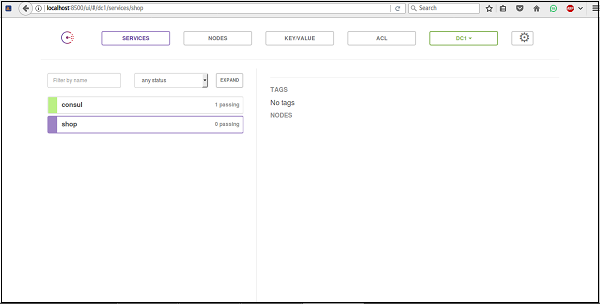
The above command specifies a service called as shop. This Node is called as amazon with its URL available at www.amazon.com on Port 80. Let us check the output on consul to make sure we have correctly installed this service. For this, please open the browser window at localhost:8500.
To remove the service, we can simply use the following command.
$ curl -X PUT -d '{"Datacenter": "dc1", "Node": "amazon"}'
http://127.0.0.1:8500/v1/catalog/deregister

Let us check the UI for it as shown in the following screenshot.
Consul - Failover Events
In this chapter, we will learn regarding the Failover Events in Consul. This will be done with the help of the following functionalities −
- Single Cluster Failure
- Jepsen Testing
- Multiple Cluster Failure
- Taking snapshots
Let us understand each of these in detail.
Single Cluster Failure
In a single cluster failure, the cluster placed in one of the datacenter starts failing. In every case scenario, it is important to make sure that in case of a failover the system cannot only prevent it, but also have a backup that it can rely on. For preventing Consul Failover events, we are going to use something called as Consul-alerts. The main project can be found at https://github.com/AcalephStorage/consul-alerts.
Consul-alerts is a highly available daemon for sending notifications and reminders based on Consul Health checks. This project runs a daemon and API at localhost:9000 and connects to the local consul agent (localhost:8500) with the default datacenter (dc1).
There are two methods to get started with the project. The first method is to install it via GO. For users, who have GO installed and configured, they can follow the steps given below −
$ go get github.com/AcalephStorage/consul-alerts
$ go install
$ consul-alerts start
The last command can be easily used to override the default ports for consul-alert, datacenter option, consul-acl token, etc. The command can also be written as given below −
$ consul-alerts start --alert-addr = localhost:9000 --consul-addr = localhost:8500
--consul-dc = dc1 --consul-acl-token = ""
The second method involves the user to use Docker. Both the methods are equally useful in different scenarios. For using Consul-alerts over Docker, let us pull the image from the Docker Hub by using the following command.
$ docker pull acaleph/consul-alerts
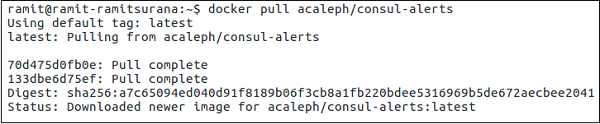
Into the Docker method, we can consider the following three options −
- Using Consul Agent that is built in the container itself.
- Using the Consul Agent running over another Docker Container.
- Using the Consul-alerts to link over a Remote Consul Instance.
Let us now discuss both of these in detail.
Using Consul Agent that is built in the container itself
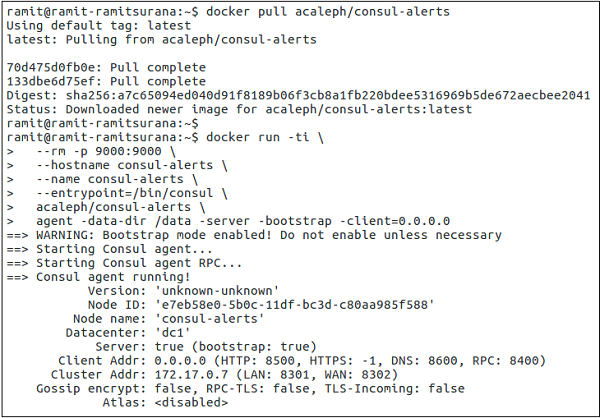
Let us start the consul agent using the following command −
$ docker run -ti \
   --rm -p 9000:9000 \
   --hostname consul-alerts \
   --name consul-alerts \
   --entrypoint = /bin/consul \
   acaleph/consul-alerts \
   agent -data-dir /data -server -bootstrap -client = 0.0.0.0
Here, we are overriding the entrypoint for Consul as mentioned by the flag --entrypoint. Along with it, we are bootstrapping the client by mentioning the port used by using -p flag, data directory /data using the flag -data-dir and client as 0.0.0.0.
On a new terminal window, let us start the consul-alerts option.
$ docker exec -ti consul-alerts /bin/consul-alerts start --alertaddr = 0.0.0.0:9000
--log-level = info --watch-events --watch-checks
Here, in the above steps, we are executing the consul-alerts to start in the interactive mode. The alert address port is mentioned as 9000. The watch checks whether the consul agents are enabled or not along with the consul checks.
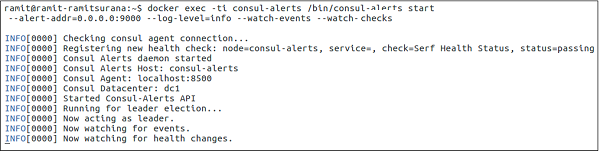
We can clearly see that the consul alerts have easily started and it has registered a new health check with addition of the consul agent. The datacenter is taken as dc1, which can be changed according to the user.
Using the Consul Agent running over another Docker Container
Here, you can use any type of a consul image to be run over the Docker Container. Using the consul-alerts image, we can easily link the consul container with the consul-alerts container. This is done using the --link flag.
Note − Before using the following command, please make sure that the consul container is already running on another terminal.
$ docker run -ti \
   -p 9000:9000 \
   --hostname consul-alerts \
   --name consul-alerts \
   --link consul:consul \
   acaleph/consul-alerts start \
   --consul-addr=consul:8500 \
   --log-level = info --watch-events --watch-checks
Using the Consul-alerts to link over a Remote Consul Instance
Here, we should use the following command to use the Consul-alerts to link over a remote consul instance.
$ docker run -ti \
   -p 9000:9000 \
   --hostname consul-alerts \
   --name consul-alerts \
   acaleph/consul-alerts start \
   --consul-addr = remote-consul-server.domain.tdl:8500 \
   --log-level = info --watch-events --watch-checks
Jepsen Testing
Jespen is a tool written to test the partial tolerance and networking in any system. It tests the system by creating some random operations on the system. Jepsen is written in Clojure. Unfortunately, for demo, Jepsen testing requires a huge level of cluster formation with database systems and hence is out of scope to be covered here.
Jepsen works by setting up the data store under test on five different hosts. It creates a client, for the data store under test, pointing each of the five nodes to send requests. It also creates a special series of client(s) called as Nemesis, which wreak havoc in the cluster like, cutting links between nodes using iptables. Then it proceeds to make requests concurrently against different nodes while alternately partitioning and healing the network.
At the end of the test run, it heals the cluster, waits for the cluster to recover and then verifies whether the intermediate and final state of the system is as expected.
For more info on Jepsen Testing, check it here.
Multiple Cluster Failure
During a Multiple Cluster Failover event, the clusters deployed in multiple datacenter fail to support the services supported to the customer. Consul enables us to ensure that when one of such condition occurs, Consul has features that help you to enable services in such type of conditions.
For this to happen, we will look through a project that helps us to enable replicating Consul from One Cluster to Multiple Clusters. The project provides us a way to replicate K/V pairs across multiple Consul Data centers using the consul-replicate daemon. You can view this Hashicorp project on − https://github.com/hashicorp/consul-replicate. Some of the prerequisites for trying out this project include −
- Golang
- Docker
- Consul
- Git
Let us get started with the following commands −
Note − Before running the following command, please make sure you have Git properly installed and configured on your machine.
$ git clone − https://github.com/hashicorp/consul-replicate.git
The output would be as shown in the following screenshot.

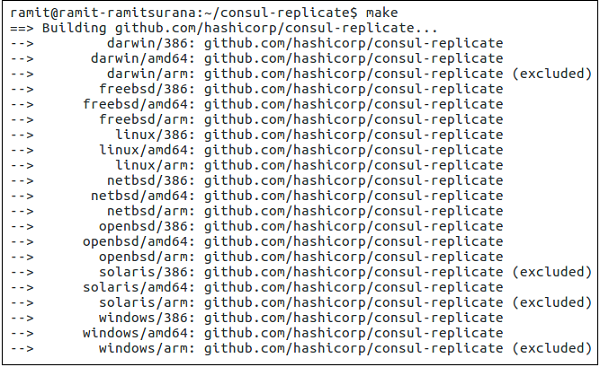
$ cd consul-replicate
$ make
The output would be as shown in the following screenshot.
If you are having some trouble building the binary, you can also try pulling the Docker images manually by using the following command −
$ docker pull library/golang:1.7.4
The above-mentioned command will create bin/consul-replicate, which can be invoked as a binary. The following table shows the full list of sub-commands that it covers −
| Option | Description |
|---|---|
| auth | The basic authentication username (and optional password), separated by a colon. There is no default value. |
| consul* | The location of the consul instance to query (may be an IP address or FQDN) with port. |
| max-stale | The maximum staleness of a query. If specified, Consule will distribute work among all servers instead of just the leader. The default value is 0 (none). |
| ssl | Use HTTPS while talking to Consul. Requires the consule server to be configured to server secure connections. The default value is false. |
| ssl-verify | Verify certificates when connecting via SSL. This requires the use of -ssl. The default value is true. |
| syslog | Send log output to syslog (in addition to stdout and stderr). The default value is false |
| syslog-facility | The facility to use when sending to syslog. This requires the use of -syslog. The default is LOCAL |
| token | The Consul API token. There is no default value. |
| prefix* | The source prefix including the, with options destination prefix, separated by a colon(:). This option is additive and may be specified multiple times for multiple prefixes to replicate. |
| exclude | A prefix to exclude during replication. This option is additive and may be specified multiple times for multiple prefixes to exclude. |
| wait | The minium(:maximum) to wait for stability before replicating, separated by a colon(:). If the optional maximum value is omitted, it is assumed to be 4x the required minimum value. There is no default value. |
| retry | The amount to time to wait if Consule returns an error when communicating with the API. The default value is 5 seconds. |
| config | The path to a configuration file or directory of configuration files on disk, relative to the current working directory. Values specified on the CLI take precedence over values specified in the configuration file. There is no default value. |
| log-level | The log level for output. This applies to the stdout/stderr logging as well as syslog logging (if eneabled). Valid values are "debug", "info", "warn, and "err". The default value is "warn". |
| once | Run Consule Replicate once and exit (as opposed to the default behavior of daemon). (CLI-only) |
| version | Output version information and quit. (CLI-only) |
Taking Snapshots
Snapshots are an essential and important part for managing the Consul cluster in case of backups. By default, Consul provides us a way to save snapshots of the consul cluster. Consul provides us four separate sub-commands using which we can use consul to create snapshots, which are −
- Consul snapshot save
- Consul snapshot agent
- Consul snapshot inspect
- Consul snapshot restore
Let us understand each of these in detail.
Consul Snapshot Save
This command is set to retrieve an atomic, point-in-time snapshot of the state of the Consul Servers, which includes Key/Value Entries, Service Catalog, Prepared Queries, Sessions and ACLs. The snapshot is saved to the file name mentioned.
$ consul snapshot save <name-of-the-file>.snap
The output would be as shown in the following screenshot.
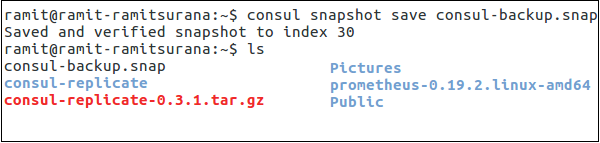
To check the presence of the file in the current directory, please check it via running it in your current directory. In the case of a non-leader node, please execute the following command −
$ consul snapshot save -stale <name-of-file>.snap
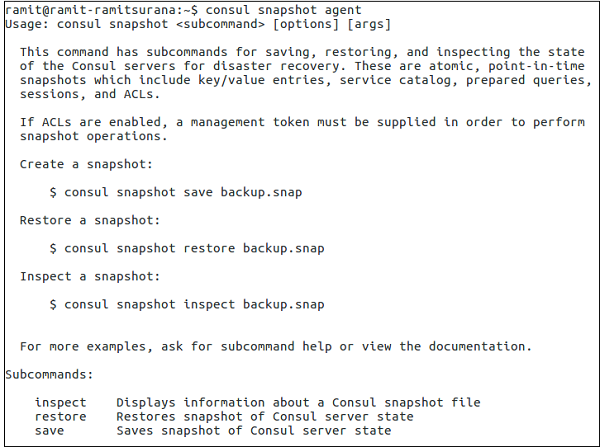
Consul Snapshot Agent
This sub-command starts a process that takes snapshots of the state of the Consul servers and saves them locally, or pushes them to an optional remote storage service.
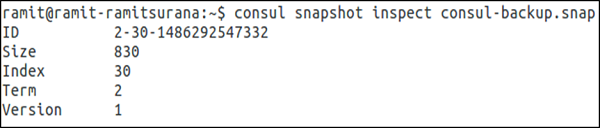
Consul Snapshot Inspect
It is used to inspect the point-in-time snapshot of the state of the Consul servers, which includes key/value entries, service catalog, prepared queries, sessions, and ACLs. The command can be executed as follows −
Note − Remember that the following command can only be run in the Directory, where the snapshot is saved.
$ consul snapshot save <name-of-the-file>.snap
The output would be as shown in the following screenshot.
Consul Snapshot Restore
The snapshot restore command is used to restore a point-in-time snapshot of the state of the Consul servers, which includes key/value entries, service catalog, prepared queries, sessions, and ACLs. The snapshot is read from the saved backup file.
Note − Remember that the following command can only be run in the directory, where the snapshot is saved.
$ consul snapshot restore <name-of-the-file>.snap
The output would be as shown in the following screenshot.

If you are working on Consul with AWS, this project might help you save some time − https://github.com/pshima/consul-snapshot.
Consul - Using UI
In this chapter, we will learn how to use the Consul UI (User Interface) and understand its important components.
Consul UISetup
Consul provides us with a useful interface using that we can manage things at ease. You can easily bring up the consul user interface on any port you desire. The Consul UI can be divided into three important parts, which are −
ACL − Set of Rules to easily lock your clusters easily
Datacenter − Enables you to easily manage datacenters and work out with your cluster.
Nodes − Quick update on the nodes that Consul cluster is using
Using Consul UI
In order to use the Consul UI, we have to install the UI package provided by the Hashicorp team on Consul's project site. So, let us try to download it from the source and start using it. Please use sudo ahead of every command in case the Permission Denied error is shown.
$ mkdir /opt/consul-ui
$ cd /opt/consul-ui
$ wget https://releases.hashicorp.com/consul/0.7.2/consul_0.7.2_web_ui.zip
$ unzip consul_0.7.2_web_ui.zip
$ rm consul_0.7.2_web_ui.zip
You can view the output of Consul UI using the following command over any agent.
$ consul agent -dev -ui -data-dir /tmp/consul
The output would be as shown in the following screenshot.
By default, you will observe the UI at http://localhost:8500/ui. The /ui part is same as the consuls HTTP API.
For using the Consul UI over a Docker, please run the following command for the Docker image (progrium/consul) −
$ docker run -p 8400:8400 -p 8500:8500 -p 8600:53/udp -h node1 progrium/consul
-server -bootstrap -ui-dir /ui
The output would be as shown in the following screenshot.

Features of Consul UI
You can start browsing Consul UI by looking at some of its features, such as −
- Nodes
- ACL
- Key/Value
- Settings
- Datacenter
- Services
Let us understand each of these in detail.
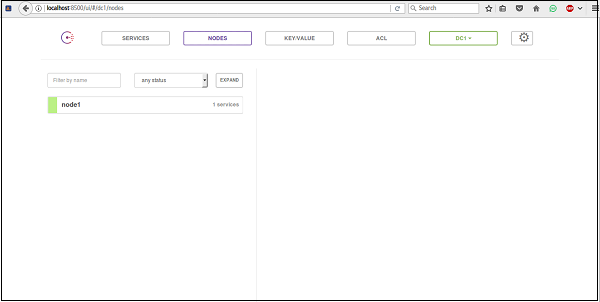
Nodes
The basic usage of Nodes on the UI Dashboard can be observed as shown in the following screenshot.
When you click on the particular node like node1 in our case, we can see that the information on the node can be easily seen as −
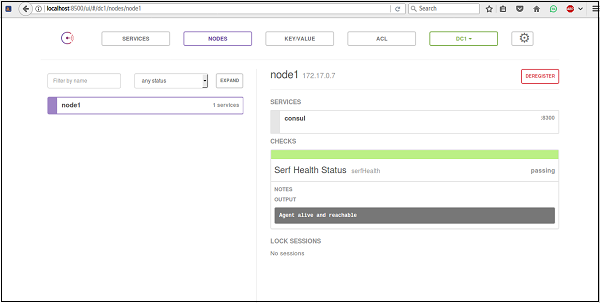
You can anytime deregister the node from Consul. It makes it easy to manage nodes from a high consul cluster point of view.
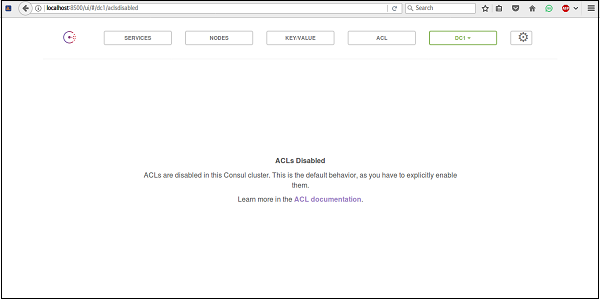
ACL (Access Control Lists)
One of the best features of Consul is the Access Control Lists. You can write your different permissions for different clusters across various datacenters. One of the easiest way to turn on the ACLs is to add a new json file in Consuls data directory. To enable and update the ACL, you can add the master ACL token in the field in settings, and refresh it using the ACL tab
For more information, please check here
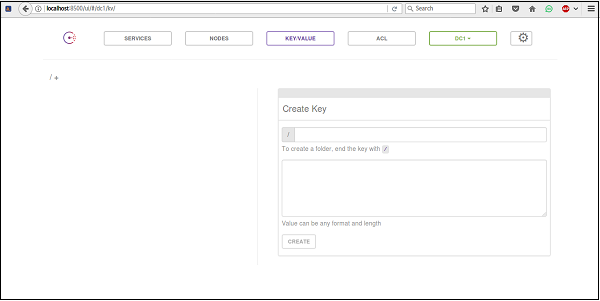
Key/Value
The Key Value option for Consul is by default present in the Consul UI. You can create your own key by using the Consul UI. It also provides an option to create a folder to store your key.
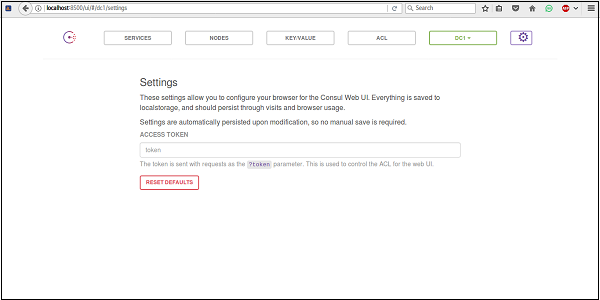
Settings
You can check the settings option of the Consul UI on the top right hand side of the screen. Upon clicking that option, you can easily see that Consul provides you an option using which you can configure its local storage settings and token system for verification.
Datacenter
The datacenter option can be easily changed and switched over by choice. The Consul UI automatically updates the detection of the number of data centers Consul is working on.
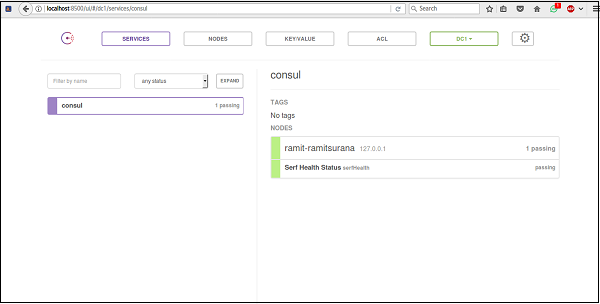
Services
The Consul UI also provides you a Services tab to configure and view services that are currently deployed using Consul. It provides us an option to configure services depending on the nodes.
Consul - Using Consul on AWS
In this chapter, we will learn how to use Consul on AWS (Amazon Web Services).
Features of AWS
Some features that are useful while using Consul in AWS are −
- Easy to maintain cluster states.
- Scalability and High Availability.
- Great User Interface for managing clusters across multiple datacenters.
- Easy to use Command Line Options.
If you are looking for a solution using which we can easily deploy Consul on AWS with Docker. Check out the following link − https://github.com/dwmkerr/terraform-consul-cluster.
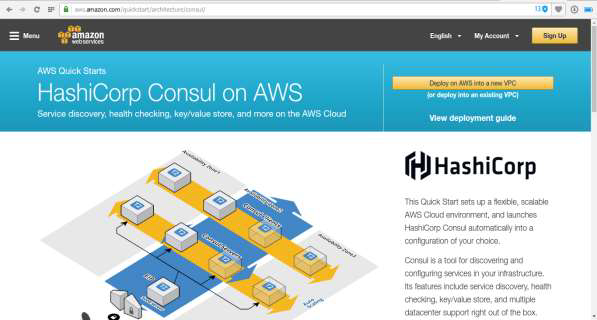
AWS Deployment
For using AWS, we can start by creating a VPC for it. For deploying consul in AWS, we will use a quick start template as provided by the AWS Service. This template can be easily found at https://aws.amazon.com/quickstart/architecture/consul/.
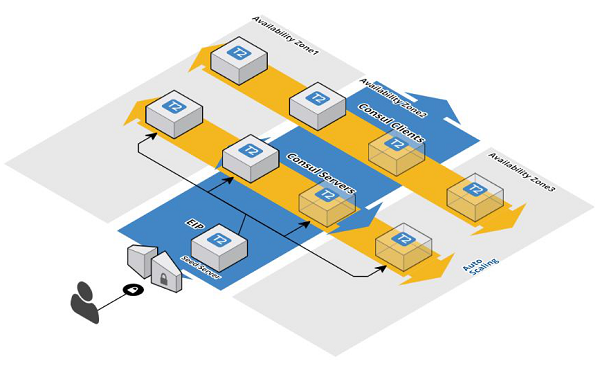
For this chapter, we assume that you already know the basics of AWS. The AWS CloudFormation template will create the following components −
A VPC with public and private subnets across three Availability Zones.
A Seed Consul server and a Seed client along with two Auto Scaling groups.
You can choose to create 3, 5, or 7 servers. The number of clients is set to three by default, but it is user-configurable.
Dnsmasq, which is installed and configured for Consul as part of the installation.
A Consul cluster using bootstrap_expect option.
Take a look at the following illustration to understand how the different components are interconnected.
Using the AWS
Please make sure you have already signed into your AWS infrastructure using the web console. Now, please put the following URL into the browser window. Once you type in the URL and press enter, the AWS website will open.
For this demo, we will choose to deploy it into a new VPC (Virtual Private Cloud). You can always check your VPC Management of AWS on the following link https://<awsregion>.console.aws.amazon.com/vpc/home. For the first time users, the by-default region is West Oregon in the USA. So, you can directly visit the URL at https://us-west- 2.console.aws.amazon.com/vpc/home.

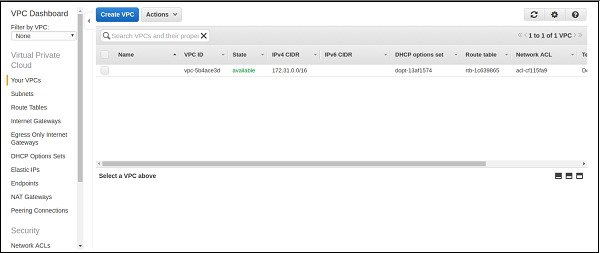
As you can see the VPC service of the AWS is operational and you have no VPC, i.e. already running/configured on your AWS account. Now please click on the Deploy option on AWS into a new VPC or Deploy into an existing VPC according to your choice. You can view the option on the website as shown in the following screenshot.

On clicking the above-described option, you can see that it opens up another window, which is similar to the one shown below.
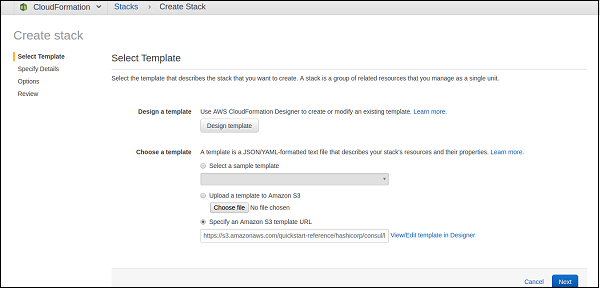
As you can see in the template, the URL is already chosen on your behalf by AWS. It also gives you the freedom to customize the cloud formation template as you like. You can customize it if you want and click on the Next Button to proceed.
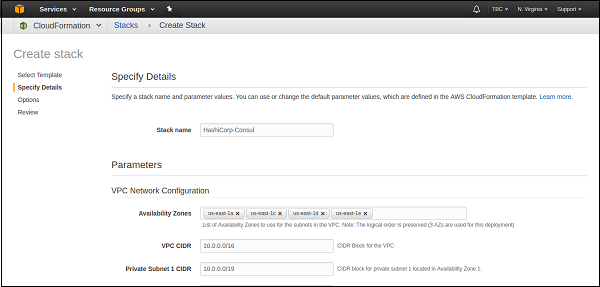
As you can see that, there are various different values and options that you can configure here. For some changes, you can rename it as per your choice in replacement of the name HashiCorp-Consul. Please feel free to change the other options according to your convenience.
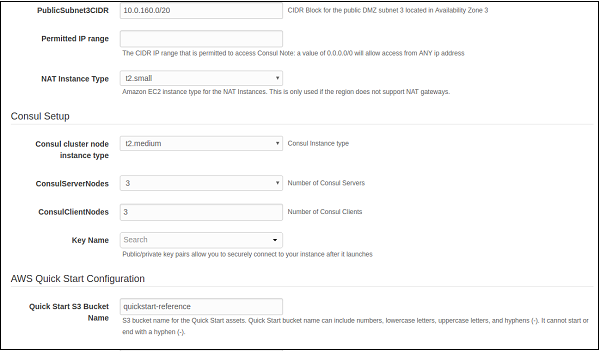
As you can see above, several options can be customized according to your choice. As you can see in the Consul Setup section, the default Consul Cluster instance type is t2.medium. You can change it to your choice of instance.
Note − Fill the Permitted Range as 0.0.0.0/0 for allowing any IP Address.
By default, the number of consul servers are three. You can change it to five for testing out more servers in the consul environment. Under the quick start configuration, you can see that a S3 bucket is also used and named to the quick start-reference by default. When you are done with the changes, click on the Next button at the bottom of the screen.
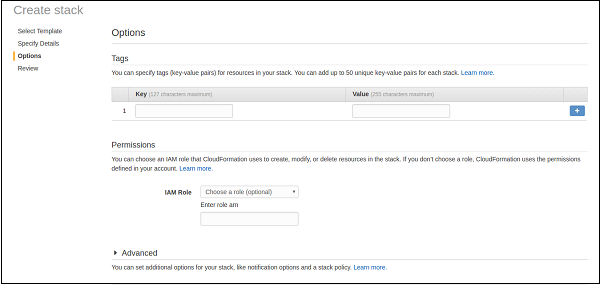
In the above screenshot, you can see that there is an option to use Tags for better identification and usage. Along with it, you are also given an option to choose the IAM Role for providing access to others to your VPC Stack. You can choose according to your choice of options.
For more advanced options, please select the advanced tab, where you can enable Amazon SNS for your VPC for its notifications. Please proceed to the Next option when you have completed the details.
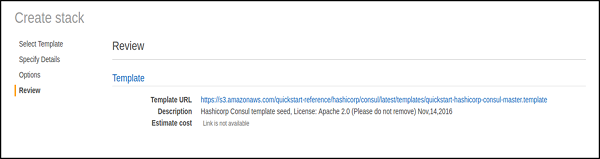
The above screen shows you reviewed details of the consul stack which you have chosen. You can review the selected options for the VPC stack and proceed to the bottom of the screen, check the box of the acknowledgement for creation of IAM Resources and proceed to click on the Create button to complete the formation of stack.
You can check the output under the CloudFormation Stack section of the AWS management console. As per the VPC output, you can also check it out at the VPC Section of the AWS Console as shown in the screenshot below.
If you are only testing out the Consul Template, please make sure that you delete the resources you have used. You can easily do that by deleting the CloudFormation Stack under the CloudFormation section and the VPC on the VPC Dashboard.
