- Consul - Home
- Consul - Introduction
- Consul - Architecture
- Consul - Installation
- Consul - Working with Microservices
- Consul - Bootstrapping & DNS
- Consul - Querying Nodes
- Consul - Failover Events
- Consul - Using UI
- Consul - Using Consul on AWS
Consul - Bootstrapping & DNS
In this chapter, we will discuss how the following components are used in Consul.
- Automatic bootstrapping
- Manual bootstrapping
- Using DNS Forwarding
- DNS Caching
Let us now discuss each of these in detail.
Automatic Bootstrapping
Bootstrapping is one of the core features of Consul. When you install consul for the first time, it is automatically configured to detect, identify and join nodes it comes across. During its cluster formation, automatic bootstrapping is a built-in feature of Consul. To gain more information on consul, the best way is to use the command below −
$ sudo consul info
The output would be as shown in the following screenshot.
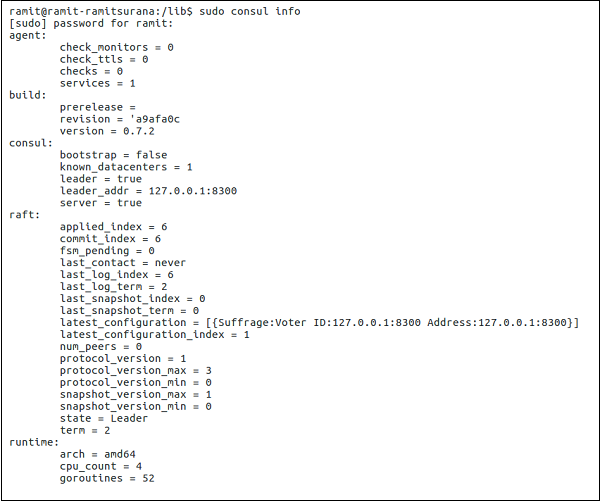
This command will show the actual working of consul in real working scenarios. It will display the Raft Algorithm working in Consul. The automatic bootstrapping command can be shown using the following command −
$ consul agent -server -data-dir = /tmp/consul -bootstrap-expect 3
Automatic bootstrapping cannot be done in -dev mode.
This option informs Consul of the expected number of server nodes and automatically bootstraps when servers are available.
Manual Bootstrapping
Manual Bootstrapping is an old and useful feature of Consul. Actually, during Consul's earlier version, bootstrapping has to be done manually when installing and using consul for the first time. Later, it was realized that it was not possible to perform this command line operation at different times. Hence, automatic bootstrapping was introduced. You can always use bootstrapping manually by using the following commands.
In this case, we will assume that a 3-node consul cluster is to be built.
There are two options to do manual bootstrapping
Running commands over 2 nodes: On Node B and Node C you can do the following −
$ consul join <Node A Address>
Running command over 1 node −
$ consul join <Node B Address> <Node C Address>
Using DNS Forwarding
DNS is served from port 53. The DNS forwarding can be done using BIND, dnsmasq and iptables. By default, the Consul agent runs a DNS server listening on port 8600. By submitting DNS requests to the Consul agents DNS server, you can get the IP address of a node running the service in which you are interested.
The Consul DNS interface makes the port information for a service available via the SRV records. Without manually adding logic in your code, you are generally limited just to the IP address info (i.e. a record) of the service you are querying.
The best option is to have multiple BIND servers each running a Consul agent locally. Any queries received by a BIND server would be forwarded to its local Consul Agent DNS Server.
Using Bind
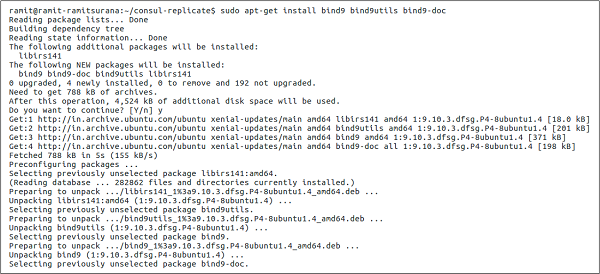
We can use DNS Forwarding using the Bind function. It can be done by using the following command.
$ sudo apt-get install bind9 bind9utils bind9-doc
The output would be as shown in the following screenshot.
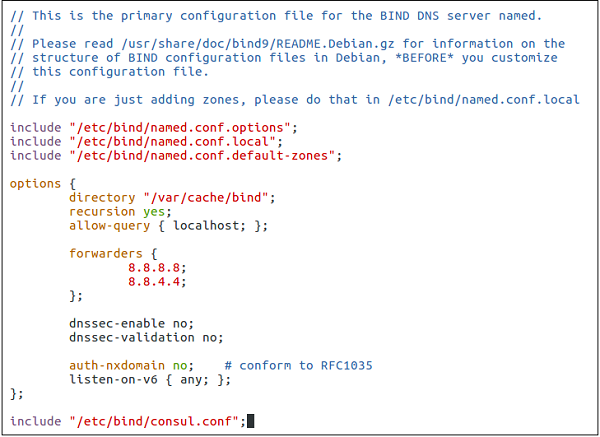
Let us edit the /etc/bind/named.conf file with the following command.
$ sudo vim /etc/bind/named.conf
In the file, please add the following lines below the last line of the code.
options {
   directory "/var/cache/bind";
   recursion yes;
   allow-query { localhost; };

   forwarders {
      8.8.8.8;
      8.8.4.4;
   };
   dnssec-enable no;
   dnssec-validation no;
   auth-nxdomain no; # conform to RFC1035
   listen-on-v6 { any; };
};
include "/etc/bind/consul.conf";
The output would be as shown in the following screenshot.
You can take the following Bind command to configure Consul.
$ sudo vim /etc/bind/consul.conf
Add the following lines when you create the file −
zone "consul" IN {
   type forward;
   forward only;
   forwarders { 127.0.0.1 port 8600; };
};
Now you can start running your consul agent by using the following command. (Remember to restart the bind9 service as well.)
$ sudo service bind9 restart
$ consul agent -server -bootstrap-expect 1 -data-dir = /tmp/consul -configdir = [Path]
The system needs to be configured to send queries to the local Consul agents DNS server. This is done by updating the resolv.conf file on the system to point to 127.0.0.1. In most cases, Consul will need to be configured to run on port 53.
You can add the following information to the /etc/resolv.conf:
nameserver 127.0.0.1
DNS Caching
Consul serves all DNS results with a 0 TTL (Time to Live) value. This prevents any caching. However, due to the TTL values, it can be set to allow DNS results to be cached with downstream of Consul. Higher TTL values reduce the number of lookups on the Consul servers and speed lookups for clients, at the cost of increasingly stale results.
For this purpose, we are going to use DNS caching using the method below −
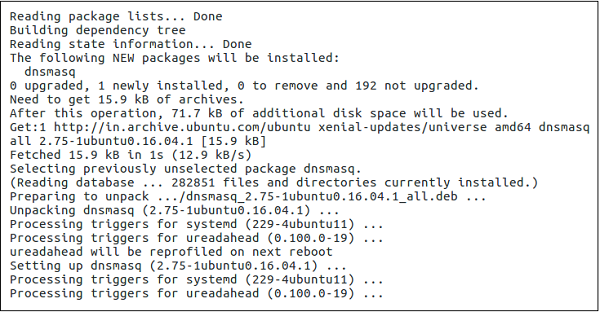
$ sudo apt-get install dnsmasq
The output would be as shown in the following screenshot.
Now, we can do a very simple configuration −
$ echo "server = /consul/127.0.0.1#8600" > /etc/dnsmasq.d/10-consul
All we are doing here is specifying that DNS requests for consul services, which are to be dealt with by the DNS server at 127.0.0.1 on port 8600. Unless you change the consul defaults, this should work.
In normal cases, the following command should be used.
$ dig @127.0.0.1 -p 8600 web.service.consul
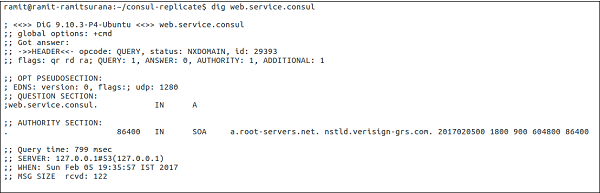
With Dnsmasq, you should use the following command.
$ dig web.service.consul
The output would be as shown in the following screenshot.