- Consul - Home
- Consul - Introduction
- Consul - Architecture
- Consul - Installation
- Consul - Working with Microservices
- Consul - Bootstrapping & DNS
- Consul - Querying Nodes
- Consul - Failover Events
- Consul - Using UI
- Consul - Using Consul on AWS
Consul - Querying Nodes
In this chapter, we will learn how to query nodes with the following functions −
- Using dig
- Using the Monitor command
- Using the Watch command
- By Registering External Services
Let us understand each of these functions in detail.
Using Dig
Consul listens on 127.0.0.1:8600 for DNS queries in the consul. The way it determines which nodes are available to provide a service is using checks that can be either −
A Script that is executed and it returns a nagios compliant code.
An HTTP check that returns an HTTP response code.
A TCP check that is checking if a port is open.
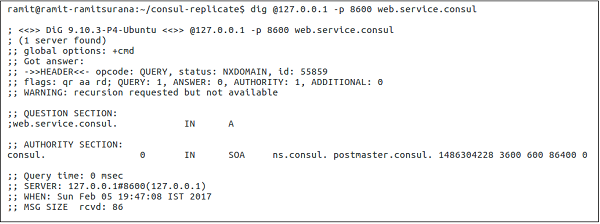
The general command for trying out dig is −
$ dig @127.0.0.1 -p <port> <service-name>.consul
Now, let us try out a sample dig command −
$ dig @127.0.0.1 -p 8600 web.service.consul
The output would be as shown in the following screenshot.
Using the Monitor Command
It is used to connect and show the logs of a running Consul agent. This command will show the recent logs. It also allows you to log the agent at a relatively high log level. It consists of various log levels, which you can follow, such as Trace, Debug, Info, Warn and Err.
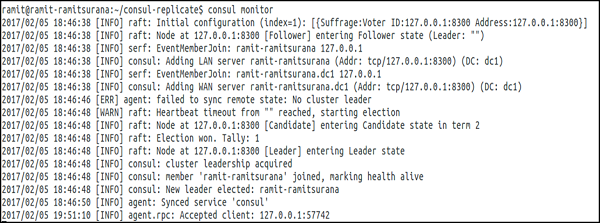
Let us try out the following command −
$ consul monitor
The output would be as shown in the following screenshot.
You can also set the monitor command using the sub-commands such as -log-level and -rpc-address. By default, the address of the RPC is 127.0.0.1:8400. For more info, click here.
Using the Watch Command
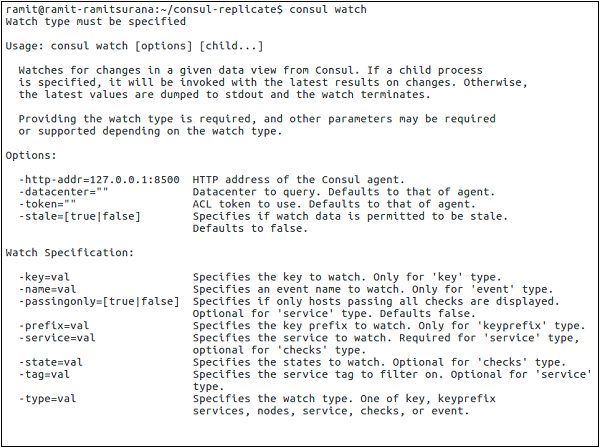
This command provides us with a mechanism to watch for changes in the list of nodes, service members, key value, etc. It also invokes a process with the latest values of the view. If no process is specified, the current values are processed to STDOUT, which can be a useful way to inspect data in Consul. The Consul Watch Command help has a variety of different options as shown in the following screenshot −
Let us try out a demo with -type = service as shown in the following command.
$ consul watch -type = service -service = consul
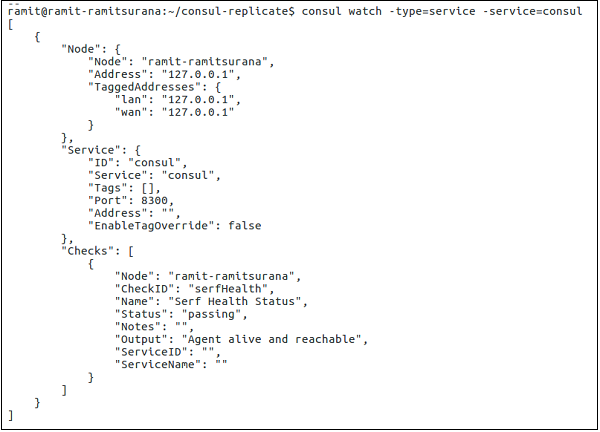
For more information on this topic, you can click here.
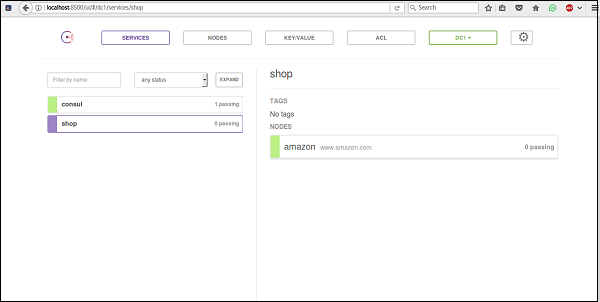
By Registering External Services
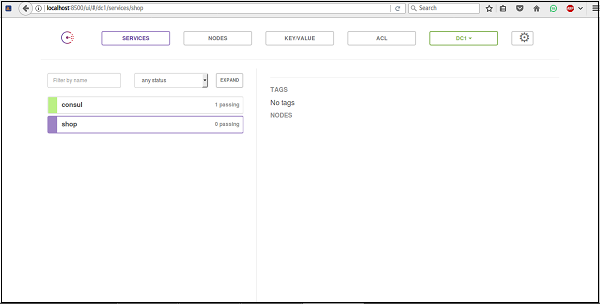
Once registered, the DNS interface will be able to return the appropriate A Records or CNAME Records for the service. Let us register an external service, such as Amazon as shown in the following code block and the screenshot as well.
$ sudo curl -X PUT -d '{"Datacenter": "dc1", "Node": "amazon",
"Address": "www.amazon.com",
"Service": {"Service": "shop", "Port": 80}}'
http://127.0.0.1:8500/v1/catalog/register

The above command specifies a service called as shop. This Node is called as amazon with its URL available at www.amazon.com on Port 80. Let us check the output on consul to make sure we have correctly installed this service. For this, please open the browser window at localhost:8500.
To remove the service, we can simply use the following command.
$ curl -X PUT -d '{"Datacenter": "dc1", "Node": "amazon"}'
http://127.0.0.1:8500/v1/catalog/deregister

Let us check the UI for it as shown in the following screenshot.