- Consul - Home
- Consul - Introduction
- Consul - Architecture
- Consul - Installation
- Consul - Working with Microservices
- Consul - Bootstrapping & DNS
- Consul - Querying Nodes
- Consul - Failover Events
- Consul - Using UI
- Consul - Using Consul on AWS
Consul - Failover Events
In this chapter, we will learn regarding the Failover Events in Consul. This will be done with the help of the following functionalities −
- Single Cluster Failure
- Jepsen Testing
- Multiple Cluster Failure
- Taking snapshots
Let us understand each of these in detail.
Single Cluster Failure
In a single cluster failure, the cluster placed in one of the datacenter starts failing. In every case scenario, it is important to make sure that in case of a failover the system cannot only prevent it, but also have a backup that it can rely on. For preventing Consul Failover events, we are going to use something called as Consul-alerts. The main project can be found at https://github.com/AcalephStorage/consul-alerts.
Consul-alerts is a highly available daemon for sending notifications and reminders based on Consul Health checks. This project runs a daemon and API at localhost:9000 and connects to the local consul agent (localhost:8500) with the default datacenter (dc1).
There are two methods to get started with the project. The first method is to install it via GO. For users, who have GO installed and configured, they can follow the steps given below −
$ go get github.com/AcalephStorage/consul-alerts
$ go install
$ consul-alerts start
The last command can be easily used to override the default ports for consul-alert, datacenter option, consul-acl token, etc. The command can also be written as given below −
$ consul-alerts start --alert-addr = localhost:9000 --consul-addr = localhost:8500
--consul-dc = dc1 --consul-acl-token = ""
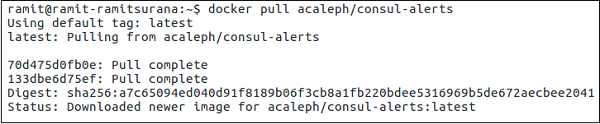
The second method involves the user to use Docker. Both the methods are equally useful in different scenarios. For using Consul-alerts over Docker, let us pull the image from the Docker Hub by using the following command.
$ docker pull acaleph/consul-alerts
Into the Docker method, we can consider the following three options −
- Using Consul Agent that is built in the container itself.
- Using the Consul Agent running over another Docker Container.
- Using the Consul-alerts to link over a Remote Consul Instance.
Let us now discuss both of these in detail.
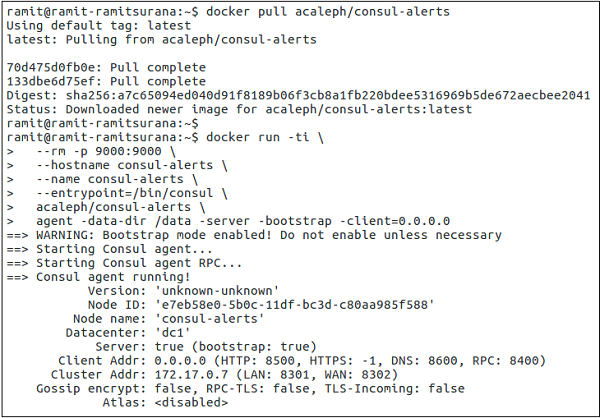
Using Consul Agent that is built in the container itself
Let us start the consul agent using the following command −
$ docker run -ti \
   --rm -p 9000:9000 \
   --hostname consul-alerts \
   --name consul-alerts \
   --entrypoint = /bin/consul \
   acaleph/consul-alerts \
   agent -data-dir /data -server -bootstrap -client = 0.0.0.0
Here, we are overriding the entrypoint for Consul as mentioned by the flag --entrypoint. Along with it, we are bootstrapping the client by mentioning the port used by using -p flag, data directory /data using the flag -data-dir and client as 0.0.0.0.
On a new terminal window, let us start the consul-alerts option.
$ docker exec -ti consul-alerts /bin/consul-alerts start --alertaddr = 0.0.0.0:9000
--log-level = info --watch-events --watch-checks
Here, in the above steps, we are executing the consul-alerts to start in the interactive mode. The alert address port is mentioned as 9000. The watch checks whether the consul agents are enabled or not along with the consul checks.
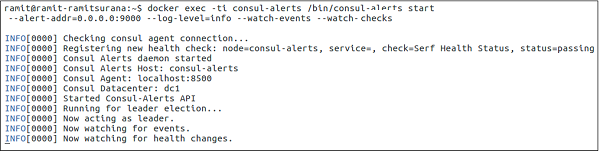
We can clearly see that the consul alerts have easily started and it has registered a new health check with addition of the consul agent. The datacenter is taken as dc1, which can be changed according to the user.
Using the Consul Agent running over another Docker Container
Here, you can use any type of a consul image to be run over the Docker Container. Using the consul-alerts image, we can easily link the consul container with the consul-alerts container. This is done using the --link flag.
Note − Before using the following command, please make sure that the consul container is already running on another terminal.
$ docker run -ti \
   -p 9000:9000 \
   --hostname consul-alerts \
   --name consul-alerts \
   --link consul:consul \
   acaleph/consul-alerts start \
   --consul-addr=consul:8500 \
   --log-level = info --watch-events --watch-checks
Using the Consul-alerts to link over a Remote Consul Instance
Here, we should use the following command to use the Consul-alerts to link over a remote consul instance.
$ docker run -ti \
   -p 9000:9000 \
   --hostname consul-alerts \
   --name consul-alerts \
   acaleph/consul-alerts start \
   --consul-addr = remote-consul-server.domain.tdl:8500 \
   --log-level = info --watch-events --watch-checks
Jepsen Testing
Jespen is a tool written to test the partial tolerance and networking in any system. It tests the system by creating some random operations on the system. Jepsen is written in Clojure. Unfortunately, for demo, Jepsen testing requires a huge level of cluster formation with database systems and hence is out of scope to be covered here.
Jepsen works by setting up the data store under test on five different hosts. It creates a client, for the data store under test, pointing each of the five nodes to send requests. It also creates a special series of client(s) called as Nemesis, which wreak havoc in the cluster like, cutting links between nodes using iptables. Then it proceeds to make requests concurrently against different nodes while alternately partitioning and healing the network.
At the end of the test run, it heals the cluster, waits for the cluster to recover and then verifies whether the intermediate and final state of the system is as expected.
For more info on Jepsen Testing, check it here.
Multiple Cluster Failure
During a Multiple Cluster Failover event, the clusters deployed in multiple datacenter fail to support the services supported to the customer. Consul enables us to ensure that when one of such condition occurs, Consul has features that help you to enable services in such type of conditions.
For this to happen, we will look through a project that helps us to enable replicating Consul from One Cluster to Multiple Clusters. The project provides us a way to replicate K/V pairs across multiple Consul Data centers using the consul-replicate daemon. You can view this Hashicorp project on − https://github.com/hashicorp/consul-replicate. Some of the prerequisites for trying out this project include −
- Golang
- Docker
- Consul
- Git
Let us get started with the following commands −
Note − Before running the following command, please make sure you have Git properly installed and configured on your machine.
$ git clone − https://github.com/hashicorp/consul-replicate.git
The output would be as shown in the following screenshot.

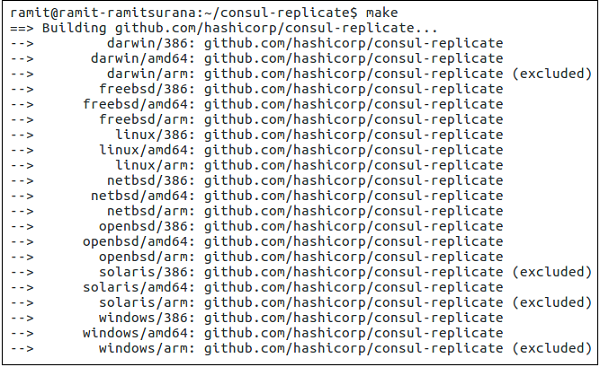
$ cd consul-replicate
$ make
The output would be as shown in the following screenshot.
If you are having some trouble building the binary, you can also try pulling the Docker images manually by using the following command −
$ docker pull library/golang:1.7.4
The above-mentioned command will create bin/consul-replicate, which can be invoked as a binary. The following table shows the full list of sub-commands that it covers −
| Option | Description |
|---|---|
| auth | The basic authentication username (and optional password), separated by a colon. There is no default value. |
| consul* | The location of the consul instance to query (may be an IP address or FQDN) with port. |
| max-stale | The maximum staleness of a query. If specified, Consule will distribute work among all servers instead of just the leader. The default value is 0 (none). |
| ssl | Use HTTPS while talking to Consul. Requires the consule server to be configured to server secure connections. The default value is false. |
| ssl-verify | Verify certificates when connecting via SSL. This requires the use of -ssl. The default value is true. |
| syslog | Send log output to syslog (in addition to stdout and stderr). The default value is false |
| syslog-facility | The facility to use when sending to syslog. This requires the use of -syslog. The default is LOCAL |
| token | The Consul API token. There is no default value. |
| prefix* | The source prefix including the, with options destination prefix, separated by a colon(:). This option is additive and may be specified multiple times for multiple prefixes to replicate. |
| exclude | A prefix to exclude during replication. This option is additive and may be specified multiple times for multiple prefixes to exclude. |
| wait | The minium(:maximum) to wait for stability before replicating, separated by a colon(:). If the optional maximum value is omitted, it is assumed to be 4x the required minimum value. There is no default value. |
| retry | The amount to time to wait if Consule returns an error when communicating with the API. The default value is 5 seconds. |
| config | The path to a configuration file or directory of configuration files on disk, relative to the current working directory. Values specified on the CLI take precedence over values specified in the configuration file. There is no default value. |
| log-level | The log level for output. This applies to the stdout/stderr logging as well as syslog logging (if eneabled). Valid values are "debug", "info", "warn, and "err". The default value is "warn". |
| once | Run Consule Replicate once and exit (as opposed to the default behavior of daemon). (CLI-only) |
| version | Output version information and quit. (CLI-only) |
Taking Snapshots
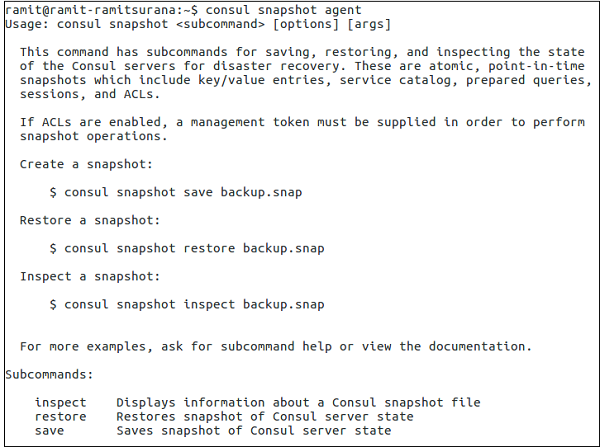
Snapshots are an essential and important part for managing the Consul cluster in case of backups. By default, Consul provides us a way to save snapshots of the consul cluster. Consul provides us four separate sub-commands using which we can use consul to create snapshots, which are −
- Consul snapshot save
- Consul snapshot agent
- Consul snapshot inspect
- Consul snapshot restore
Let us understand each of these in detail.
Consul Snapshot Save
This command is set to retrieve an atomic, point-in-time snapshot of the state of the Consul Servers, which includes Key/Value Entries, Service Catalog, Prepared Queries, Sessions and ACLs. The snapshot is saved to the file name mentioned.
$ consul snapshot save <name-of-the-file>.snap
The output would be as shown in the following screenshot.
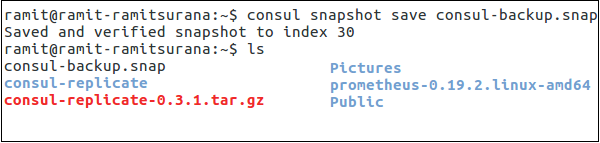
To check the presence of the file in the current directory, please check it via running it in your current directory. In the case of a non-leader node, please execute the following command −
$ consul snapshot save -stale <name-of-file>.snap
Consul Snapshot Agent
This sub-command starts a process that takes snapshots of the state of the Consul servers and saves them locally, or pushes them to an optional remote storage service.
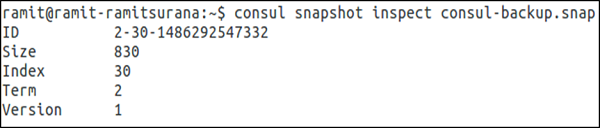
Consul Snapshot Inspect
It is used to inspect the point-in-time snapshot of the state of the Consul servers, which includes key/value entries, service catalog, prepared queries, sessions, and ACLs. The command can be executed as follows −
Note − Remember that the following command can only be run in the Directory, where the snapshot is saved.
$ consul snapshot save <name-of-the-file>.snap
The output would be as shown in the following screenshot.
Consul Snapshot Restore
The snapshot restore command is used to restore a point-in-time snapshot of the state of the Consul servers, which includes key/value entries, service catalog, prepared queries, sessions, and ACLs. The snapshot is read from the saved backup file.
Note − Remember that the following command can only be run in the directory, where the snapshot is saved.
$ consul snapshot restore <name-of-the-file>.snap
The output would be as shown in the following screenshot.

If you are working on Consul with AWS, this project might help you save some time − https://github.com/pshima/consul-snapshot.
