- Advanced Android - Home
- Advanced Android - Material Design
- Advanced Android - Sliding Menu
- Advanced Android - Tabs
- Advanced Android - Sliders
- Advanced Android - Floating Labels
- Advanced Android - ViewPager
- Material Login & Registration
- Advanced Android - Snackbar
- Expandable List View
- Search Functionality
- Count Down Functionality
- Draw Spritesheet
- Advanced Android - Linkify Class
- Advanced Android - ViewFlipper
- Advanced Android - loader
- Advanced Android - Slider Menu
- SwipeRefreshLayout
- Shake to Refresh
- Advanced Android - Color Palette
- Crumbling Layout
- Advanced Android - Page Flip
- Ken Burns effect
- Advanced Android - Parallax Header
- Borderless Dialog
- Advanced Android - Holder View
- Scrolling TextView by Ticker
- Floating Action Menu
- Spinner Data from Database
- Advanced Android - Flexbox Layout
- Advanced Android - YouTube API
- Video Streaming
- Cardview & Recycleview
Advanced Android - Expandable List View
Expandable list view is used to group list data by categories. It has the capability of expanding and collapsing the groups when user touches header.
Example
This example demostrate about how to integrate Android Expandable list view
Step 1 − Create a new project in Android Studio, go to File ⇒ New Project and fill all required details to create a new project.
Step 2 − Add the following code to res/layout/activity_main.xml.
<?xml version = "1.0" encoding = "utf-8"?>
<LinearLayout xmlns:android = "http://schemas.android.com/apk/res/android"
   android:layout_width = "fill_parent"
   android:layout_height = "fill_parent"
   android:orientation = "vertical"
   android:background = "#f4f4f4">
   <ExpandableListView
      android:id = "@+id/lvExp"
      android:layout_height = "match_parent"
      android:layout_width = "match_parent"/>
</LinearLayout>
Step 3 − Add the following code to src/MainActivity.java
package myapplication.example.com.myapplication;

import java.util.ArrayList;
import java.util.HashMap;
import java.util.List;

import android.app.Activity;
import android.os.Bundle;
import android.widget.ExpandableListView;

public class MainActivity extends Activity {
   ExpandableListAdapter listAdapter;
   ExpandableListView expListView;
   List<String> listDataHeader;
   HashMap<String, List<String>> listDataChild;

   @Override
   protected void onCreate(Bundle savedInstanceState) {
      super.onCreate(savedInstanceState);
      setContentView(R.layout.activity_main);
      expListView = (ExpandableListView) findViewById(R.id.lvExp);

      prepareListData();
      listAdapter = new ExpandableListAdapter(this, listDataHeader, listDataChild);
      expListView.setAdapter(listAdapter);
   }

   private void prepareListData() {
      listDataHeader = new ArrayList<String>();
      listDataChild = new HashMap<String, List<String>>();
      listDataHeader.add("Top 250");
      listDataHeader.add("Now Showing");
      listDataHeader.add("Coming Soon..");
      List<String> top250 = new ArrayList<String>();

      top250.add("The Shawshank Redemption");
      top250.add("The Godfather");
      top250.add("The Godfather: Part II");
      top250.add("Pulp Fiction");
      top250.add("The Good, the Bad and the Ugly");
      top250.add("The Dark Knight");
      top250.add("12 Angry Men");

      List<String> nowShowing = new ArrayList<String>();
      nowShowing.add("The Conjuring");
      nowShowing.add("Despicable Me 2");
      nowShowing.add("Turbo");
      nowShowing.add("Grown Ups 2");
      nowShowing.add("Red 2");
      nowShowing.add("The Wolverine");

      List<String> comingSoon = new ArrayList<String>();
      comingSoon.add("2 Guns");
      comingSoon.add("The Smurfs 2");
      comingSoon.add("The Spectacular Now");
      comingSoon.add("The Canyons");
      comingSoon.add("Europa Report");

      listDataChild.put(listDataHeader.get(0), top250); // Header, Child data
      listDataChild.put(listDataHeader.get(1), nowShowing);
      listDataChild.put(listDataHeader.get(2), comingSoon);
   }
}
Step 4 − Add the following code to src/ExpandableListAdapter.java
package myapplication.example.com.myapplication;

import java.util.HashMap;
import java.util.List;

import android.content.Context;
import android.graphics.Typeface;
import android.view.LayoutInflater;
import android.view.View;
import android.view.ViewGroup;
import android.widget.BaseExpandableListAdapter;
import android.widget.TextView;

public class ExpandableListAdapter extends BaseExpandableListAdapter {
   private Context _context;
   private List<String> _listDataHeader; // header titles

   // child data in format of header title, child title
   private HashMap<String, List<String>> _listDataChild;

   public ExpandableListAdapter(Context context, List<String> listDataHeader,
      HashMap<String, List<String>> listChildData) {

      this._context = context;
      this._listDataHeader = listDataHeader;
      this._listDataChild = listChildData;
   }

   @Override
   public Object getChild(int groupPosition, int childPosititon) {
      return this._listDataChild.get(this._listDataHeader.get(groupPosition))
      .get(childPosititon);
   }

   @Override
   public long getChildId(int groupPosition, int childPosition) {
      return childPosition;
   }

   @Override
   public View getChildView(int groupPosition, final int childPosition,
      boolean isLastChild, View convertView, ViewGroup parent) {

      final String childText = (String) getChild(groupPosition, childPosition);
      if (convertView == null) {
         LayoutInflater infalInflater = (LayoutInflater) this._context
            .getSystemService(Context.LAYOUT_INFLATER_SERVICE);
         convertView = infalInflater.inflate(R.layout.list_item, null);
      }
      TextView txtListChild = (TextView) convertView .findViewById(R.id.lblListItem);
      txtListChild.setText(childText);
      return convertView;
   }

   @Override
   public int getChildrenCount(int groupPosition) {
      return this._listDataChild.get(this._listDataHeader.get(groupPosition)) .size();
   }

   @Override
   public Object getGroup(int groupPosition) {
      return this._listDataHeader.get(groupPosition);
   }

   @Override
   public int getGroupCount() {
      return this._listDataHeader.size();
   }

   @Override
   public long getGroupId(int groupPosition) {
      return groupPosition;
   }

   @Override
   public View getGroupView(int groupPosition, boolean isExpanded, View convertView,
      ViewGroup parent) {

      String headerTitle = (String) getGroup(groupPosition);
      if (convertView == null) {
      LayoutInflater infalInflater = (LayoutInflater) this._context
         .getSystemService(Context.LAYOUT_INFLATER_SERVICE);
         convertView = infalInflater.inflate(R.layout.list_group, null);
      }
      TextView lblListHeader = (TextView) convertView .findViewById(R.id.lblListHeader);
      lblListHeader.setTypeface(null, Typeface.BOLD);
      lblListHeader.setText(headerTitle);
      return convertView;
   }

   @Override
   public boolean hasStableIds() {
      return false;
   }

   @Override
   public boolean isChildSelectable(int groupPosition, int childPosition) {
      return true;
   }
}
Step 5 − Add the following code to res/layout/list_group.xml.
<?xml version = "1.0" encoding = "utf-8"?>
<LinearLayout xmlns:android = "http://schemas.android.com/apk/res/android"
   android:layout_width = "fill_parent"
   android:layout_height = "wrap_content"
   android:orientation = "vertical"
   android:padding = "8dp"
   android:background = "#000000">
   <TextView
      android:id = "@+id/lblListHeader"
      android:layout_width = "fill_parent"
      android:layout_height = "wrap_content"
      android:paddingLeft = "?android:attr/expandableListPreferredItemPaddingLeft"
      android:textSize = "17dp"
      android:textColor = "#f9f93d" />
</LinearLayout>
Step 6 − Add the following code to res/layout/list_item.xml
<?xml version = "1.0" encoding = "utf-8"?>
<LinearLayout xmlns:android = "http://schemas.android.com/apk/res/android"
   android:layout_width = "match_parent"
   android:layout_height = "55dip"
   android:orientation = "vertical" >
   <TextView
      android:id = "@+id/lblListItem"
      android:layout_width = "fill_parent"
      android:layout_height = "wrap_content"
      android:textSize = "17dip"
      android:paddingTop = "5dp"
      android:paddingBottom = "5dp"
      android:paddingLeft = "?android:attr/expandableListPreferredChildPaddingLeft" />
</LinearLayout>
Step 7 − No need to change of manifest.xml file
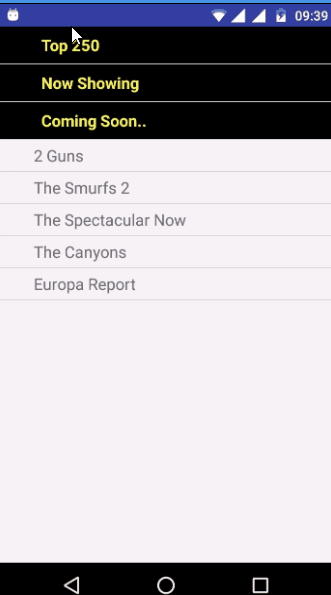
Let's try to run your application. I assume you have connected your actual Android Mobile device with your computer. To run the app from android studio, open one of your project's activity files and click Run  icon from the toolbar. Select your mobile device as an option and then check your mobile device which will display your default screen −