
 Data Structure
 Networking
 RDBMS
RDBMS Operating System
 Java
Java MS Excel
 iOS
iOS HTML
HTML CSS
CSS Android
 Python
 C Programming
 C++
C++ C#
C# MongoDB
 MySQL
MySQL Javascript
 PHP
PHP
- Selected Reading
- UPSC IAS Exams Notes
- Developer's Best Practices
- Questions and Answers
- Effective Resume Writing
- HR Interview Questions
- Computer Glossary
- Who is Who
Activity State Changes in Android with Example
Introduction
Every android application which is being installed on a mobile device consists of one or more activities within it. These activities are used to perform certain actions within android applications. The activities to be used within android applications are having their own lifecycle methods which are being called even if an activity undergoes certain actions. There are seven different methods which are being called when the state of an activity changes within an android application. In this article we will take a look at the different activity state changes in android application along with examples.
Different States of Activity in Android Application
The activity to be displayed in an android application is having seven different states. Each state is called based on the specific event performed by that activity within the android application. Below are the seven different methods which are being triggered by the activity under certain conditions.
onCreate()
onStart()
onRestart()
onResume()
onPause()
onStop()
onDestory()
Now we will individually take a look at each activity lifecycle method which is being used within an android application.
onCreate()
The onCreate() method is the first method that is called when an activity is created. It is responsible for initializing the activity and performing any setup that may be necessary. In this method, the activity is provided with a Bundle object that contains any data that was sent to the activity when it was launched. The onCreate() method also sets up the layout for the activity and instantiates any views that the activity will need.
onStart()
The onStart() method is called after the onCreate() method, when the activity is about to become visible to the user. This is the stage in which the activity is prepared to start interacting with the user. During this stage, the activity's views may be configured and any listeners may be registered.
onResume()
The onResume() method is called when the activity is visible and ready to interact with the user. This is the stage when the activity is in the foreground and the user is able to interact with it. During this stage, the activity can retrieve any data it needs to display and can respond to user input.
onPause()
The onPause() method is called when the activity is no longer visible to the user. This is the stage when the activity is still in the foreground, but it is no longer interacting with the user. During this stage, the activity can save any data that needs to be retained and can release any resources that are no longer needed.
onStop()
The onStop() method is called when the activity is no longer visible and is about to be destroyed. This is the stage when the activity is no longer in the foreground and all of its resources have been released. During this stage, the activity can perform any final cleanup it needs to do before it is destroyed.
onRestart()
The onRestart() method is called when the activity is restarted after it has been stopped. This is the stage when the activity is visible again and can interact with the user. During this stage, the activity can retrieve any data it needs to display and can respond to user input.
onDestroy()
The onDestroy() method is called when the activity is about to be destroyed. This is the stage when the activity is no longer in the foreground and all of its resources have been released. During this stage, the activity can perform any final cleanup it needs to do before it is destroyed.
Implementation
We will be creating a simple application in which we will be calling all the lifecycle methods within our android application and we will be displaying the toast message for each method so that we will get to see the toast message within our android application when any of the method is being triggered.
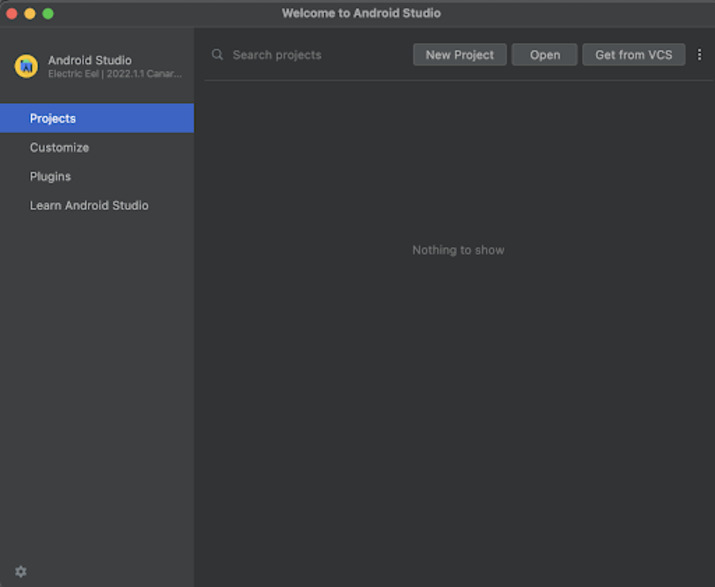
Step 1 ? Creating a new project in Android Studio
Navigate to Android studio as shown in below screen. In the below screen click on New Project to create a new Android Studio Project.
After clicking on New Project you will get to see the below screen.
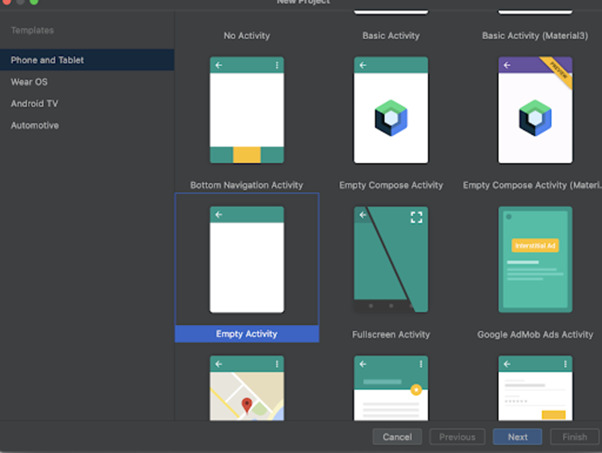
Inside this screen we have to simply select Empty Activity and click on Next. After clicking on next you will get to see the screen below.
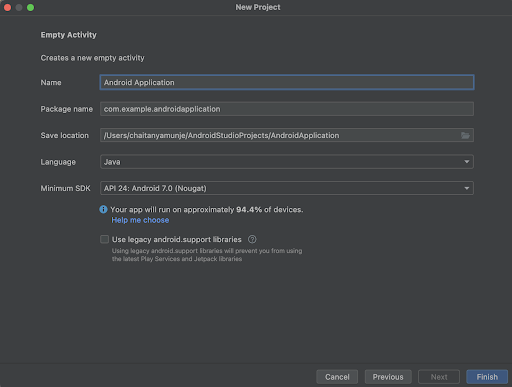
Inside this screen we have to simply specify the project name. Then the package name will be generated automatically.
Note ? Make sure to select the Language as Java.
After specifying all the details click on Finish to create a new Android studio project.
Once our project has been created we will get to see 2 files which are open i.e activity_main.xml and MainActivity.java file.
Step 3 ? Working with activity_main.xml
Navigate to activity_main.xml. If this file is not visible. To open this file. In the left pane navigate to app>res>layout>activity_main.xml to open this file. After opening this file. Add the below code to it. Comments are added in the code to get to know in detail.
<?xml version="1.0" encoding="utf-8"?>
<RelativeLayout xmlns:android="http://schemas.android.com/apk/res/android"
   xmlns:app="http://schemas.android.com/apk/res-auto"
   xmlns:tools="http://schemas.android.com/tools"
   android:id="@+id/idRLLayout"
   android:layout_width="match_parent"
   android:layout_height="match_parent"
   android:orientation="vertical"
   tools:context=".MainActivity">
   <!--Heading Text View-->
   <TextView
       android:id="@+id/idTVHeading"
       android:layout_width="match_parent"
       android:layout_height="wrap_content"
       android:layout_centerInParent="true"
       android:layout_centerHorizontal="true"
       android:text="Activity State Changes in Android"
       android:textAlignment="center"
       android:textColor="@color/black"
       android:textSize="20sp"
       android:textStyle="bold" />
</RelativeLayout>
Explanation: In the above code we are simply creating a root layout as Relative Layout inside which we are creating a simple text view for displaying the heading of our application. We are aligning this text view to the center of the screen.
Step 4: Working with MainActivity.java file.
Navigate to MainActivity.java. If this file is not visible. To open this file. In the left pane navigate to app>res>layout>MainActivity.java to open this file. After opening this file. Add the below code to it. Comments are added in the code to get to know in detail.
package com.example.androidjavaapp;

import android.os.Bundle;
import android.widget.Toast;
import androidx.appcompat.app.AppCompatActivity;

public class MainActivity extends AppCompatActivity {

   @Override
   protected void onCreate(Bundle savedInstanceState) {
      super.onCreate(savedInstanceState);
      setContentView(R.layout.activity_main);
      // on below line displaying toast message
      Toast.makeText(this, "On Create Method called.", Toast.LENGTH_SHORT).show();
   }

   // on below line calling on start method
   @Override
   protected void onStart() {
      super.onStart();
      // displaying toast message on below line.
      Toast.makeText(this, "On Start Method called.", Toast.LENGTH_SHORT).show();
   }

   // on below line calling on start method
   @Override
   protected void onStop() {
      super.onStop();
      // displaying toast message on below line.
      Toast.makeText(this, "On Stop Method called.", Toast.LENGTH_SHORT).show();
   }

   // on below line calling on start method
   @Override
   protected void onRestart() {
      super.onRestart();
      // displaying toast message on below line.
      Toast.makeText(this, "On Restart Method called.", Toast.LENGTH_SHORT).show();
   }

   // on below line calling on start method
   @Override
   protected void onResume() {
      super.onResume();
      // displaying toast message on below line.
      Toast.makeText(this, "On Resume Method called.", Toast.LENGTH_SHORT).show();
   }

   // on below line calling on start method
   @Override
   protected void onPause() {
      super.onPause();
      // displaying toast message on below line.
      Toast.makeText(this, "On Pause Method called.", Toast.LENGTH_SHORT).show();
   }

   // on below line calling on start method
   @Override
   protected void onDestroy() {
      super.onDestroy();
      // displaying toast message on below line.
      Toast.makeText(this, "On Destory Method called.", Toast.LENGTH_SHORT).show();
   }
}
Explanation ? In the above code we can get to see the onCreate method in which we are inflating the layout file which we have to display. Inside this onCreate method we are displaying a toast message. Similarly we are calling all seven methods of the activity lifecycle and we are displaying the toast message for each method.
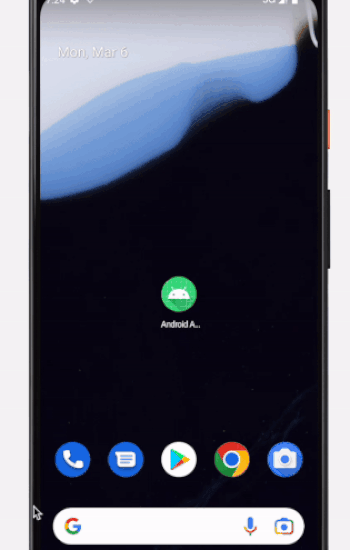
After adding the above code now we have to simply click on the green icon in the top bar to run our application on a mobile device.
Note ? Make sure you are connected to your real device or emulator.
Output
Conclusion
In the above tutorial we have taken a look at different activity lifecycle methods in android application. We have also taken a look on How we can use these methods within an android application.

1K+ Views
