 Data Structure
 Networking
 RDBMS
RDBMS Operating System
 Java
Java MS Excel
 iOS
iOS HTML
HTML CSS
CSS Android
 Python
 C Programming
 C++
C++ C#
C# MongoDB
 MySQL
MySQL Javascript
 PHP
PHP
- Selected Reading
- UPSC IAS Exams Notes
- Developer's Best Practices
- Questions and Answers
- Effective Resume Writing
- HR Interview Questions
- Computer Glossary
- Who is Who
Content Providers in Android with Example
What are Content Providers in Android ?
Content Providers in Android are a component of the Android operating system that enable applications to store and share data with other applications. A Content Provider provides an interface between an application and the Android data sources such as databases, files, and SharedPreferences. Content Providers are one of the four fundamental components of Android application development, along with activities, services, and broadcast receivers. Applications that need to access data from other applications use Content Providers.
Content Providers are usually used to store and retrieve data from a storage medium. This storage medium can be a database, a file, or shared preferences. Content Providers can also be used to share data with other applications, allowing applications to communicate and transfer data. Content Providers are particularly useful for storing and retrieving data from a remote source, such as a web server.
Content Providers are created by extending the ContentProvider class and defining a URI (Uniform Resource Identifier) that identifies the content provider. This URI is then used to access data from the content provider. Content providers are typically accessed using the ContentResolver class. The ContentResolver class provides methods to query and manipulate data provided by the Content Provider.
Content Providers are used to store and retrieve data such as contacts, images, videos, music, and other media. For example, the Android Contacts application uses a content provider to store and retrieve contacts data. The Contacts application provides a content provider that other applications can use to access contacts data. Similarly, the Android Media Store application uses a content provider to store and retrieve media files.
In this article we will be building a simple application in which we will be fetching the data from our device contact application and display that data within our android application in the form of a list view. In this application we are using the content of Contacts Application to be displayed within our application.
Implementation of Content Providers in Android
We will be creating a simple application in which we will be displaying a listview. Inside this listview we will be displaying different programming languages and adding on click listener for our items inside our list view. On clicking on the item of listview we will be displaying a toast message with the item name to our user. We will be following a step by step guide to implement addition of two numbers in Android.
Step 1 ? Creating a new project in Android Studio
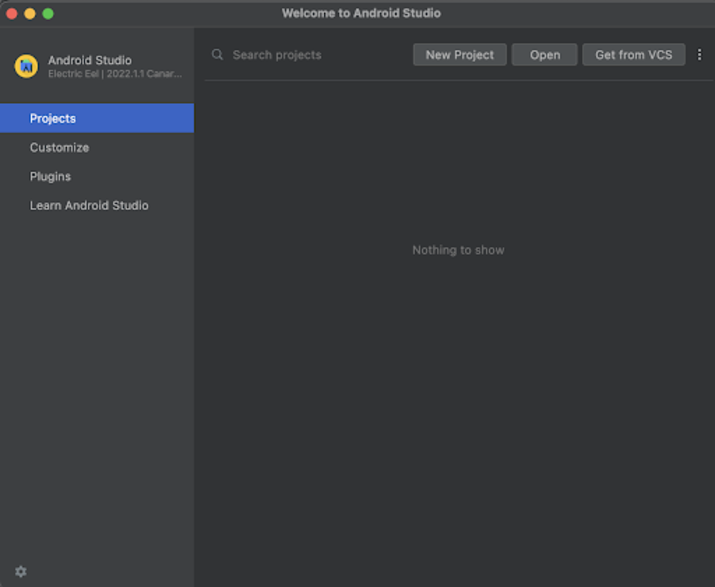
Navigate to Android studio as shown in below screen. In the below screen click on New Project to create a new Android Studio Project.

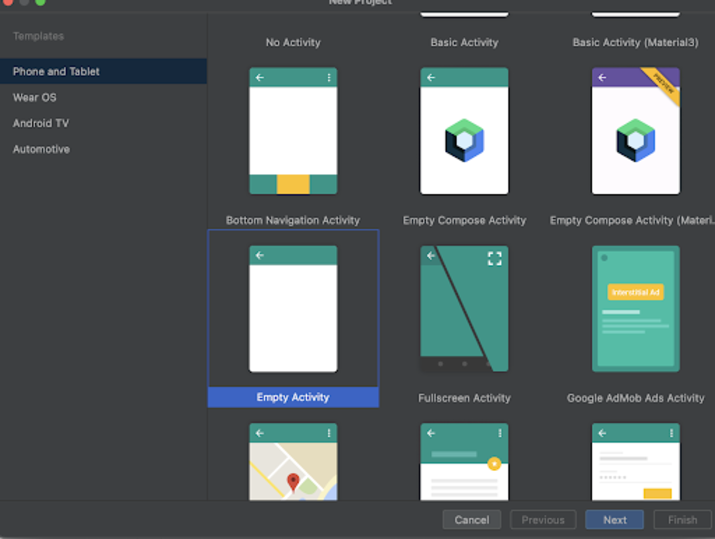
After clicking on New Project you will get to see the below screen.

Inside this screen we have to simply select Empty Activity and click on Next. After clicking on next you will get to see the screen below.

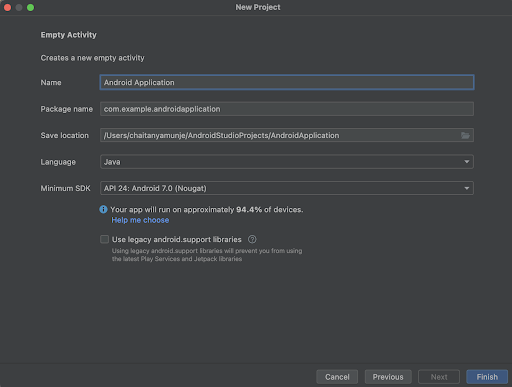
Inside this screen we have to simply specify the project name. Then the package name will be generated automatically.
Note ? Make sure to select the Language as Java.
After specifying all the details click on Finish to create a new Android studio project.
Once our project has been created we will get to see 2 files which are open i.e activity_main.xml and MainActivity.java file.
Step 3 ? Working with activity_main.xml.
Navigate to activity_main.xml. If this file is not visible. To open this file. In the left pane navigate to app>res>layout>activity_main.xml to open this file. After opening this file. Add the below code to it. Comments are added in the code to get to know in detail.
<?xml version="1.0" encoding="utf-8"?>
<RelativeLayout xmlns:android="http://schemas.android.com/apk/res/android"
   xmlns:app="http://schemas.android.com/apk/res-auto"
   xmlns:tools="http://schemas.android.com/tools"
   android:id="@+id/idRLLayout"
   android:layout_width="match_parent"
   android:layout_height="match_parent"
   android:orientation="vertical"
   tools:context=".MainActivity">
   <!--Creating a list view on below line-->
   <ListView
      android:id="@+id/listView"
      android:layout_width="match_parent"
      android:layout_height="match_parent" />
</RelativeLayout>
Explanation ? In the above code we are creating a Relative layout as a root layout and inside that we are creating our listview widget to display the list of programming languages. For the list view widget we are specifying height and width as match_parent. And adding a unique id to it which we will be using to set the data in our list view.
Step 4: Create a custom layout file for the item of List View
Navigate to app>res>Right click on it>New>Layout Resource file and name it as contacts_list_item and add below code to it. Comments are added in the code to get to know in detail.
<?xml version="1.0" encoding="utf-8"?>
<LinearLayout xmlns:android="http://schemas.android.com/apk/res/android"
   android:layout_width="match_parent"
   android:layout_height="wrap_content"
   android:layout_margin="3dp"
   android:orientation="vertical">

   <!-- on below line creating a text view for contact name-->
   <TextView
      android:id="@+id/idTVContactName"
      android:layout_width="match_parent"
      android:layout_height="wrap_content"
      android:padding="4dp"
      android:text="Contact Name"
      android:textColor="@color/black"
      android:textSize="18sp"
      android:textStyle="bold" />

   <!-- on below line creating a text view for contact number -->
   <TextView
      android:id="@+id/idTVContactNumber"
      android:layout_width="match_parent"
      android:layout_height="wrap_content"
      android:padding="4dp"
      android:text="Number"
      android:textColor="@color/black"
      android:textSize="16sp" /

</LinearLayout>
Explanation ? In the above code we are creating a Relative Layout as a parent layout. Inside this layout we are creating two text views. One text view is being used to display the name of the contact and another text view is used to display the contact number of that contact within our list view.
Step 5 : Working with MainActivity.java file.
Navigate to MainActivity.java. If this file is not visible. To open this file. In the left pane navigate to app>res>layout>MainActivity.java to open this file. After opening this file. Add the below code to it. Comments are added in the code to get to know in detail.
package com.example.androidjavaapp;

import android.database.Cursor;
import android.os.Bundle;
import android.provider.ContactsContract;
import android.widget.ListView;
import android.widget.SimpleCursorAdapter;
import androidx.appcompat.app.AppCompatActivity;

public class MainActivity extends AppCompatActivity {

   // on below line creating a variable for list view.
   private ListView contactsLV;

   @Override
   protected void onCreate(Bundle savedInstanceState) {
      super.onCreate(savedInstanceState);
      setContentView(R.layout.activity_main);

      // on below line we are initializing our variables.
      contactsLV = findViewById(R.id.listView);

      // create cursor and querying the data on below line
      Cursor cursor = getContentResolver().query(ContactsContract.CommonDataKinds.Phone.CONTENT_URI, null, null, null, null);

      // on below line calling method to manage the cursor.
      startManagingCursor(cursor);

      // on below line getting the data from contacts
      String[] data = {ContactsContract.CommonDataKinds.Phone.NUMBER, ContactsContract.CommonDataKinds.Phone.DISPLAY_NAME, ContactsContract.CommonDataKinds.Phone._ID};

      // on below line specifying id to which we have to set the data.
      int[] to = {R.id.idTVContactNumber, R.id.idTVContactName};

      // on below line creating and initializing simple cursor adapter and passing the layout file which we have to display.
      SimpleCursorAdapter adapter = new SimpleCursorAdapter(this, R.layout.contacts_list_item, cursor, data, to);

      // on below line setting adapter to our list view.
      contactsLV.setAdapter(adapter);

      // on below line setting choice mode for list view.
      contactsLV.setChoiceMode(ListView.CHOICE_MODE_MULTIPLE);
   }

}
Explanation ? In the above code firstly we are creating variables for listview. Inside the onCreate method we are initializing the listview variable with the id which we have given in our activity_main.xml file. After that we are creating and initializing the variable for our cursor, then we are setting the manager for the cursor by calling start managing cursor method. After that we are creating a string array for getting contact numbers and contact names. Then we are creating an integer array in which we are specifying the ids of the text view to which we have to set the data. Then we are creating and initializing our adapter and we are passing the data to it. Lastly we are setting adapters to our list view.
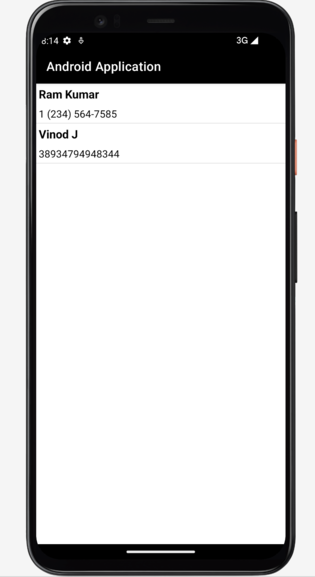
After adding the above code now we have to simply click on the green icon in the top bar to run our application on a mobile device.
Note ? Make sure you are connected to your real device or emulator.
Output

Conclusion
In the above tutorial we have taken a look at What are Content Providers in Android and How we can use them in different ways to get the data from other applications within our application. We have also built a Contact Parser application which will read all the contacts from our devices contacts application.

