- Angular Tutorial
- Angular - Home
- Angular - Overview
- Angular - Features
- Angular - Advantages & Disadvantages
- Angular Basics
- Angular - Environment setup
- Angular - First Application
- Angular - MVC Architecture
- Angular Components
- Angular - Components
- Angular - Component Lifecycle
- Angular - View Encapsulation
- Angular - Emulated Encapsulation
- Angular - ShadowDom Encapsulation
- Angular - Component Interaction
- Angular - Using @Input Decorator
- Angular - Using @Output Decorator
- Angular - Using Local Variable
- Angular - Using @ViewChild Decorator
- Angular - Using Services
- Angular - Component Styles
- Angular - Nested Components
- Angular - Content projection
- Angular - Single-slot Content Projection
- Angular - Multi-slot Content Projection
- Angular - Conditional Content Projection
- Angular - Dynamic components
- Angular - Using NgComponentOutlet
- Angular - Using ViewContainerRef
- Angular - Elements
- Angular Templates
- Angular - Templates
- Angular - Template statements
- Angular - Template Variables
- Angular - SVG as Templates
- Angular Binding
- Angular - Data Binding
- Angular - Interpolation
- Angular - Event Binding
- Angular - Property Binding
- Angular - Attribute Binding
- Angular - Class Binding
- Angular - Style Binding
- Angular - Two-way Binding
- Angular Directives
- Angular - Directives
- Angular - Attribute Directives
- Angular - Structural Directives
- Angular - Custom Directives
- Angular Pipes
- Angular - Pipes
- Angular - Built-in Pipes
- Angular - Custom Pipes
- Angular Forms
- Angular - Forms
- Angular - Template Driven Forms
- Angular - Reactive Forms
- Angular - Form Validation
- Angular - Dynamic Forms
- Angular Dependency Injection
- Angular - Dependency Injection
- Angular - Injectable Service
- Angular Routing
- Angular - Routing
- Angular - Dynamic Routes
- Angular - Wildcard Routes
- Angular - Nested Routes
- Angular - Navigation
- Angular - Routing in SPA
- Angular - Custom Route Matches
- Angular - Router Reference
- Angular HTTP Client programming
- Angular - Services
- Angular - HTTP Client
- Angular - Express based REST API
- Angular - Request
- Angular - Request Response Workflow
- Angular - Response
- Angular - Express based Upload API
- Angular - GET
- Angular - POST
- Angular - PUT
- Angular - DELETE
- Angular - JSONP
- Angular - CRUD Operations Using HTTP
- Angular Modules
- Angular - Introduction to Modules
- Angular - Root Module
- Angular - Feature Module
- Angular - Sharing Module
- Angular - Routing Module
- Angular - NgModules
- Angular Animation
- Angular - Animations
- Angular Service Workers & PWA
- Angular - Service Workers & PWA
- Angular Testing
- Angular - Testing Overview
- Angular Design Patterns
- Angular - Design Patterns
- Angular - Lazy Loading
- Angular - Singleton Pattern
- Angular - Observer Pattern
- Angular Libraries
- Angular - Libraries
- Angular - Angular Material
- Angular - PrimeNG
- Angular - RxJS
- Angular Advanced
- Angular - Signals
- Angular - Authentication & Authorization
- Angular - Internationalization
- Angular - Standalone Component
- Angular - Accessibility
- Angular - Web Workers
- Angular - Server Side Rendering
- Angular - Ivy Compiler
- Angular - Building with Bazel
- Angular - Backward Compatibility
- Angular - Reactive Programming
- Angular Tools
- Angular - CLI
- Angular Material UI Elements
- Angular - Paginator
- Angular - Datepicker
- Angular - Select Drop-down
- Angular Miscellaneous
- Angular - Third Party Controls
- Angular - Configuration
- Angular - Displaying Data
- Angular - Decorators & Metadata
- Angular - Basic Example
- Angular - Error Handling
- Angular - Testing & Building a Project
- Angular - Lifecycle Hooks
- Angular - User Input
- Angular - What's New?
- Angular Useful Resources
- Angular - Quick Guide
- Angular - Useful Resources
- Angular - Discussion
Angular - Forms
Forms are used to collect input data from users and enable users to interact with the application. A general form consists of various input fields such as text boxes, radio buttons, checkboxes, and dropdowns, along with a submit button that triggers the action of sending data to a server or performing some other operation within the application.
In this tutorial, we will learn what are Angular forms, how they work and their use cases.
Forms in Angular
Angular forms are a way to accept user input in an Angular application. They receive input events from users through the template view, validate the input given by the user, create a form model and data model to update, and also, provide a way to track changes. It is important to note that the Angular forms are structured using the HTML form tag.
An Angular application that contains a form, keeps the view in sync with the component model and the component model in sync with the view. When users type or update values through the view, the new values are reflected in the data model. Similarly, if the program logic updates values in the data model, those values are also reflected in the view.
Features and Uses of Angular Forms
Following are the features and uses of Angular Forms −
- Angular forms support two-way data binding. It is a type of data binding that allows two-way interaction between component and view.
- You can find various built-in validators in Angular forms that help to check whether the user has entered valid data or not before submitting the form.
- Angular forms also allow developers to add, remove, and modify form controls dynamically as per the needs of the user interface.
- Developers can organize form controls into logical groups using FormGroup. It helps to manage and track the state of different sections of the form.
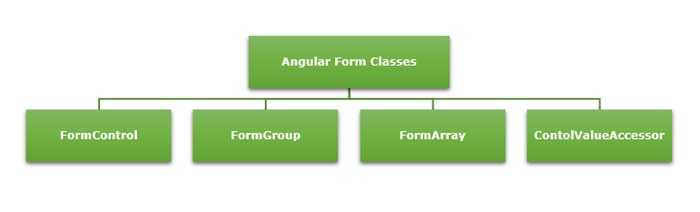
Angular Form Classes
The Angular forms are built on the following four foundation classes −
FormControl: Represents a single form input field. It tracks the value, validation status, and user interactions for the individual input control.
FormGroup: This foundation class represents a collection of FormControl instances or nested FormGroup instances. You can group related form controls together using this class. It's used to manage the state of a form section (e.g., user details, address information).
FormArray: It is used to handle an array of form controls, such as a list of checkboxes or input fields.
ControlValueAccessor: It connects Angular FormControl instances to built-in DOM elements.
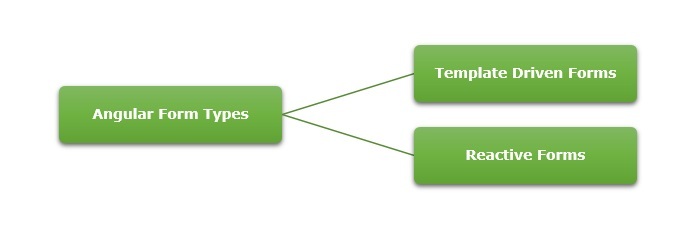
Types of Form in Angular
Angular supports two types of forms. They are as follows −
-
Template-Driven Forms: As the name suggests, the template-driven forms are closely associated with Angular Templates. User input validation and behaviors are defined using directives within the template. For data flow, these forms use two-way data binding. You can build any kind of simple form within your Angular application, such as login forms and contact forms. Remember, if you have very basic form requirements and prefer to manage it solely using the template, then template-driven forms may be a suitable choice.
-
Reactive Forms: The reactive forms follow a model-driven approach. Compared to template-driven forms, they are more robust, scalable and suitable for complex forms. Instead of a template, these forms are controlled from the Angular Component class. Use this type of form, if forms are a key part of your Angular application.
Difference between Reactive Forms and Template-Driven Forms
The table below shows how Reactive Forms are different from Template-Driven Forms −
| Reactive Forms | Template-Driven Forms |
|---|---|
They follow a model-driven approach. |
They follow a view-driven approach |
Forms are created and controlled from the component class. |
Forms are created and validations are handled directly in the template. |
The flow of data is Synchronous. |
Asynchronous data flow. |
It is flexible and scalable for complex forms with dynamic behavior. |
More suitable for simple and static forms. |
In reactive forms, the form control instances are accessed using FormControl and FormGroup. |
Form controls are accessed using template reference variables. |
Form validations are applied using the built-in validator functions. |
Form validations are applied using the built-in directives. |
Form Validation
Form validation is a process used to check whether the user input is in the correct format or not before submission. The validation process can be used to verify the format of email addresses and phone numbers as they have specific formats. Also, you can verify if the given input meets specific constraints like a minimum or maximum length. The form validation can prevent errors by catching invalid input before it is processed or sent to the server.
The Validator class in Angular provides a set of built-in validator functions that validate the form controls. A few example of validators are min, max, required, email, pattern and so on.
Dynamic Form?
A form generated or modified at the run time based on the application state or user interaction is called a dynamic form. It makes the forms adaptable to changes in data model. For example, if a user selects a country, the form could dynamically adjust to show additional fields like postal code, state, or country code.
You can learn how to create and use dynamic forms in angular by visiting this link: dynamic form.
Multiple Choice Questions on Angular Forms
You have reached the end of this chapter. Now, it's time to check your understanding of the angular forms. Please try to give correct answers to the questions given below −
Q. 1 - Which Angular form class represents a single form input field?
Answer : C
Explanation
FormControl represents a single form input field. It tracks the value, validation status, and user interactions for an individual form control.
Q. 2 - Which type of Angular form is more suitable for complex forms?
Answer : B
Explanation
Reactive Forms are more suitable for complex forms.
