- Angular Tutorial
- Angular - Home
- Angular - Overview
- Angular - Features
- Angular - Advantages & Disadvantages
- Angular Basics
- Angular - Environment setup
- Angular - First Application
- Angular - MVC Architecture
- Angular Components
- Angular - Components
- Angular - Component Lifecycle
- Angular - View Encapsulation
- Angular - Emulated Encapsulation
- Angular - ShadowDom Encapsulation
- Angular - Component Interaction
- Angular - Using @Input Decorator
- Angular - Using @Output Decorator
- Angular - Using Local Variable
- Angular - Using @ViewChild Decorator
- Angular - Using Services
- Angular - Component Styles
- Angular - Nested Components
- Angular - Content projection
- Angular - Single-slot Content Projection
- Angular - Multi-slot Content Projection
- Angular - Conditional Content Projection
- Angular - Dynamic components
- Angular - Using NgComponentOutlet
- Angular - Using ViewContainerRef
- Angular - Elements
- Angular Templates
- Angular - Templates
- Angular - Template statements
- Angular - Template Variables
- Angular - SVG as Templates
- Angular Binding
- Angular - Data Binding
- Angular - Interpolation
- Angular - Event Binding
- Angular - Property Binding
- Angular - Attribute Binding
- Angular - Class Binding
- Angular - Style Binding
- Angular - Two-way Binding
- Angular Directives
- Angular - Directives
- Angular - Attribute Directives
- Angular - Structural Directives
- Angular - Custom Directives
- Angular Pipes
- Angular - Pipes
- Angular - Built-in Pipes
- Angular - Custom Pipes
- Angular Forms
- Angular - Forms
- Angular - Template Driven Forms
- Angular - Reactive Forms
- Angular - Form Validation
- Angular - Dynamic Forms
- Angular Dependency Injection
- Angular - Dependency Injection
- Angular - Injectable Service
- Angular Routing
- Angular - Routing
- Angular - Dynamic Routes
- Angular - Wildcard Routes
- Angular - Nested Routes
- Angular - Navigation
- Angular - Routing in SPA
- Angular - Custom Route Matches
- Angular - Router Reference
- Angular HTTP Client programming
- Angular - Services
- Angular - HTTP Client
- Angular - Express based REST API
- Angular - Request
- Angular - Request Response Workflow
- Angular - Response
- Angular - Express based Upload API
- Angular - GET
- Angular - POST
- Angular - PUT
- Angular - DELETE
- Angular - JSONP
- Angular - CRUD Operations Using HTTP
- Angular Modules
- Angular - Introduction to Modules
- Angular - Root Module
- Angular - Feature Module
- Angular - Sharing Module
- Angular - Routing Module
- Angular - NgModules
- Angular Animation
- Angular - Animations
- Angular Service Workers & PWA
- Angular - Service Workers & PWA
- Angular Testing
- Angular - Testing Overview
- Angular Design Patterns
- Angular - Design Patterns
- Angular - Lazy Loading
- Angular - Singleton Pattern
- Angular - Observer Pattern
- Angular Libraries
- Angular - Libraries
- Angular - Angular Material
- Angular - PrimeNG
- Angular - RxJS
- Angular Advanced
- Angular - Signals
- Angular - Authentication & Authorization
- Angular - Internationalization
- Angular - Standalone Component
- Angular - Accessibility
- Angular - Web Workers
- Angular - Server Side Rendering
- Angular - Ivy Compiler
- Angular - Building with Bazel
- Angular - Backward Compatibility
- Angular - Reactive Programming
- Angular Tools
- Angular - CLI
- Angular Material UI Elements
- Angular - Paginator
- Angular - Datepicker
- Angular - Select Drop-down
- Angular Miscellaneous
- Angular - Third Party Controls
- Angular - Configuration
- Angular - Displaying Data
- Angular - Decorators & Metadata
- Angular - Basic Example
- Angular - Error Handling
- Angular - Testing & Building a Project
- Angular - Lifecycle Hooks
- Angular - User Input
- Angular - What's New?
- Angular Useful Resources
- Angular - Quick Guide
- Angular - Useful Resources
- Angular - Discussion
Sharing Data Between Child & Parent Directives/Components
Angular provides option to pass data from parent component to child component and vice versa. Angular provides two decorator, @Input and @Output. Input decorator pass the value from parent to child using child attributes. Output decorator pass the value from child to parent using event emitted from child component. Parent component have to watch for change event from child component, catch the event information and have to use it.
Let us learn how to use Input and Output decorator in this chapter.
@Input
Configuring Input decorator is very simple. Just append the input decorator to a property in the child component and then pass the data from parent component through child component attributes.
Let us consider that we want to pass a counter from parent to child component.
Step1: Create a property in the child component, counter and decorate it with @Input
@Input() counter: number = 0;
Here,
@Input() is the decorator
counter is the input property
number is the data type of the input property and it is optional
0 is the initial value of the counter. It will be used if no input is provided.
Step2: Initialize a variable, say counterValue in the parent component.
counterValue: number = 10
Step3: Pass the counter input from parent component using child component attribute (counter)
<app-child-component [counter]="counterValue" />
Step4: Finally, use the counter value in the child component template as you wish
counter: {{counter}}
Let us create two component, parent and child and then try to pass the data from parent to child and render it in the child component.
Step1: Create a parent component, InOutSample using angular CLI as shown below −
$ ng generate component InOutSample
CREATE src/app/in-out-sample/in-out-sample.component.css (0 bytes)
CREATE src/app/in-out-sample/in-out-sample.component.html (28 bytes)
CREATE src/app/in-out-sample/in-out-sample.component.spec.ts (596 bytes)
CREATE src/app/in-out-sample/in-out-sample.component.ts (228 bytes)
UPDATE src/app/app.module.ts (1289 bytes)
Step2: Add a counter variable in the component as shown below −
import { Component } from '@angular/core';

@Component({
   selector: 'app-in-out-sample',
   templateUrl: './in-out-sample.component.html',
   styleUrls: ['./in-out-sample.component.css']
})
export class InOutSampleComponent {
   counter: number = 10;
}
Step3: Create a new child component, InOutChildSample using angular CLI as shown below −
$ ng generate component InOutChildSample
CREATE src/app/in-out-child-sample/in-out-child-sample.component.css (0 bytes)
CREATE src/app/in-out-child-sample/in-out-child-sample.component.html (34 bytes)
CREATE src/app/in-out-child-sample/in-out-child-sample.component.spec.ts (632 bytes)
CREATE src/app/in-out-child-sample/in-out-child-sample.component.ts (251 bytes)
UPDATE src/app/app.module.ts (1417 bytes)
Step4: Add a counter property in the child component and decorate it with @Input() decorator as shown below −
import { Component, Input } from '@angular/core';

@Component({
   selector: 'app-in-out-child-sample',
   templateUrl: './in-out-child-sample.component.html',
   styleUrls: ['./in-out-child-sample.component.css']
})
export class InOutChildSampleComponent {
   @Input() counter : number = 0;
}
Step5: Open the child component template, in-out-child-sample.component.html and use the counter property as shown below −
<div>
   <p>Counter: {{counter}}</p>
</div>
Step6: Open the parent component template, in-out-sample.component.html and render the child component along with counter attribute as shown below −
<app-in-out-child-sample [counter]="counter" />
Step7: Open the app components template and render the parent component as shown below −
<app-in-out-sample />

<router-outlet></router-outlet>
Step8: Finally, run the application and check that the counter shows that the value passed from parent component as shown below −

Let us try to change the counter variable in the parent component using a button and click event and then see whether it affects the child component.
Step1: Add a function to increment the counter value in the parent component as shown below
inc() {
   this.counter++
}
Step2: Add a button in the parent components template and bind the function as shown below −
<button (click)="inc()">Increment counter</button>

<app-in-out-child-sample [counter]="counter" />
Step3: Finally, run the application and check whether the changes in variable in parent reflects in the child component.

@Output
Output decorator is quite simple similar to Input decorator expect that the output is actually an event emitter passing the data (output) along with event. The parent component can be subscribe to the event in the child component and get the emitted value from the child component whenever the data is changed in the child component.
Step1: Create a event emitter in the child component by decorating with Output decorator.
@Output() counterEvent = new EventEmitter<number>();
Step2: Emit the counter event whenever the data gets changed in the child component
this.counterEvent.emit(changedValue)
Step3: Capture the event in the parent component and get the data from the callback function.
<parent-component (counterEvent)="get($event)" />
Step4: Do whatever you want with the captured value in the parent component.
Let us write an output decorator in our child component, InOutChildSample component and try to get the output from the parent component, InOutSample component.
Step1: Create an output event emitter in the child component, in-out-child-sample.component.ts as shown below −
@Output() counterEvent = new EventEmitter<number>();
Step2: Create a method to pass the value of the counter by emitting the event along with counter data in the child component, In-out-child-sample.component.ts
passCounterToParent() {
   this.counterEvent.emit(this.counter)
}
The complete listing of the child component is as follows −
import { Component, Input, Output, EventEmitter } from '@angular/core';

@Component({
   selector: 'app-in-out-child-sample',
   templateUrl: './in-out-child-sample.component.html',
   styleUrls: ['./in-out-child-sample.component.css']
})
export class InOutChildSampleComponent {
   @Input() counter : number = 0;
   @Output() counterEvent = new EventEmitter<number>();

   passCounterToParent() {
      this.counterEvent.emit(this.counter)
   }

}
Step3: Open the child component template, in-out-child-sample.component.html and add a button to invoke the counter event while the user clicks the button
<div>
   <p>Counter: {{counter}}</p>

   <button (click)="passCounterToParent()">Pass Counter to Parent</button>
</div>
Here,
click is the button click event and it is configured to run passCounterToParent() function when it is clicked.
Step4: Add a variable in the parent component to hold the output data passed through event from child component.
childCounter: number = 0
Step5: Add a function in the parent component to get the output data passed through event from child component.
get(val: number) {
   this.childCounter = val;
}
The complete listing of the parent component is as follows −
import { Component } from '@angular/core';
@Component({
   selector: 'app-in-out-sample',
   templateUrl: './in-out-sample.component.html',
   styleUrls: ['./in-out-sample.component.css']
})
export class InOutSampleComponent {
   counter: number = 10;
   childCounter: number = 0;

   inc() {
      this.counter++
   }
   get(val: number) {
      this.childCounter = val;
   }
}
Step6: Open the parent component template, in-out-sample.component.html and subscribe to the event, counterEvent of the child component and set the get method as callback function as shown below −
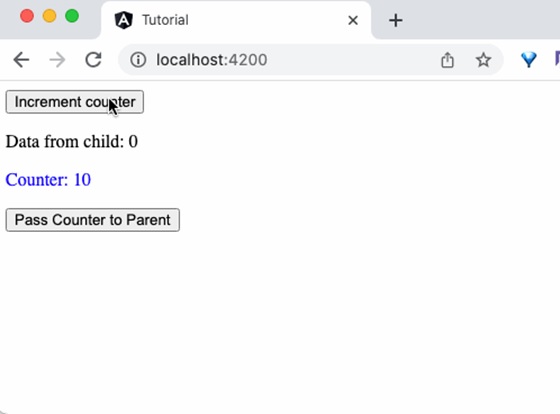
<button (click)="inc()">Increment counter</button>
<p>Data from child: {{childCounter}}</p>
<app-in-out-child-sample [counter]="counter" (counterEvent)="get($event)" />
Here,
counterEvent is the event from the child component
counterEvent is the callback function. \$event will hold the current counter value.
childContent is the data from the child component
Step7: Finally, run the application and you can see that the child component will send the updated counter value to the parent component when the button in the child component is clicked.
Summary
Input and Output decorator simplifies the passing of data between parent and child component and provides a rich interaction between parent and child component.
