- Vim Tutorial
- Vim - Home
- Vim - Introduction
- Vim - Installation & Configuration
- Vim - It’s friends
- Vim - Getting familiar
- Vim - Getting help
- Vim - Editing
- Vim - Navigating
- Vim - Revisiting Editing
- Vim - Searching
- Vim - Working With Multiple Things
- Vim - Markers
- Vim - Macros
- Vim - Registers
- Vim - Folding
- Vim - Diff
- Vim - Plug-ins
- Vim - Using Vim as IDE
- Vim - Remote File Editing
- Vim - Tips & Tricks
- Vim - Personalization
- Vim - Conclusion
- Vim Useful Resources
- Vim - Quick Guide
- Vim - Useful Resources
- Vim - Discussion
Vim - Quick Guide
Vim - Introduction
Vim editor is one of the more popular text editors we use today. It is a clone of the Vi editor and is written by Bram Moolenaar. It is cross platform editor and available on most popular platforms like Windows, Linux, Mac and other UNIX variants. In this chapter, we will discuss following items −
- Introduction
- Features of Vim
- Why Vim was created?
Introduction
Vim is acronym for Vi IMproved. It is free and open source text editor written by Bram Moolenaar. It was first released in 1991 for UNIX variants and its main goal was to provide enhancement to the Vi editor, which was released way back in 1976.
Vim is considered as clone Vi editor. Like Vi, it is also command centric editor. One of the advantage of learning Vim is – it is available everywhere. Take any UNIX variant like Linux, Mac, HP-UX, AIX and many more, Vim is there by default. Vim traditionally does not have GUI but now there is separate installer called gVim which provides GUI.
Features of Vim
This section discusses some of the important features of Vim −
Its memory footprint is very low
It is command centric. You can perform complex text related task with few commands
It is highly configurable and uses simple text file to store its configuration
There are many plug-in available for Vim. Its functionality can be extended in great manner using these plug-in
It supports multiple windows. Using this feature screen can be split into multiple windows
Same as multiple windows, it also supports multiple buffers
It supports multiple tabs which allows to work on multiple files
It supports recording features which allows to record and play Vim commands in repeated manner
Why Vim was Created
Vim is based on original Vi editor, which was created by Bill Joy in 1976. During 90’s Vi was lacking behind in-the so called the editor war existed between the Vi and Emacs editor. So Bram implemented a lots of missing features that the Emacs community used as argument for why Emacs was better that Vi/Vim.
Vim - Installation And Configuration
Vim is lightweight package and its installation is really simple. In this chapter, we will discuss following items −
- Installation on Windows platform
- Installation on Debian based Linux
- Installation on RPM based Linux
Installation on Windows platform
Vim doesn’t have any specific requirements. It is simple software bundle which provides all dependencies.
Installation
To download Vim visit vim.org
Click on Download option from left pane
Click on PC - MS-DOS and MS-Windows option
Download .exe installer from this page. At the time of writing this tutorial installer name was gvim80.exe
Double click on installer and follow on screen instructions to complete installation
Configuration
Vim stores its configuration in simple text file namely _vimrc and it is located under home directory of user.
To find current user’s home directory execute below command in terminal −
$ echo %userprofile%
Navigate to home directory and create a new file namely _vimrc. Ensure that this file doesn’t have any extension.
Open this file in text editor, enter following text and save it −
set nu
Now Vim will show line numbers when file is opened. We’ll add more options to this file latter on.
Installation on Debian based Linux
Installation on Linux platform is quite simple as compared to Windows. This section describes installation and configuration on Debian based Linux.
Installation
Execute below command in terminal −
$ sudo apt-get update
$ sudo apt-get install vim
To ensure Vim is correctly installed execute below command −
$ which vim
It should print the location of Vim binary. In my case it was −
/usr/bin/vim
Configuration
Vim stores its configuration in simple text file namely .vimrc and it is located under home directory of user.
To find current user’s home directory execute below command in terminal −
$ echo $HOME
Navigate to home directory and create a new file namely .vimrc. Ensure that this file doesn’t have any extension.
Open this file in text editor, enter following text and save it −
set nu
Now Vim will show line numbers when file is opened. We’ll add more options to this file latter on.
Installation on RPM based Linux
This section describes installation and configuration on RPM based Linux.
Installation
Execute below command in terminal −
$ su -
$ yum install vim
To ensure Vim is correctly installed execute below command −
$ which vim
It should print the location of Vim binary. In my case it was −
/usr/bin/vim
Configuration
Vim stores its configuration in simple text file namely .vimrc and it is located under home directory of user.
To find current user’s home directory execute below command in terminal −
$ echo $HOME
Navigate to home directory and create a new file namely .vimrc. Ensure that this file doesn’t have any extension.
Open this file in text editor, enter following text and save it −
set nu
Now Vim will show line numbers when file is opened. We’ll add more options to this file latter on.
Vim - It's Friends
Vim is clone of original Vi editor. In this chapter, we will discuss about other Vi clones. Main purpose of this chapter to know other clones and its compatibility with original Vi editor.
In this chapter, we will discuss following items −
- Vi
- Stevie
- Elvis
- nvi
- vile
- Compatibility with original Vi
Vi
Vi is acronym for Visual. It is screen-oriented text editor originally created for UNIX. The original code for Vi was written by Bill Joy in 1976 and first released on BSD platform. Vi was extension of ed editor which was most common at that time.
Vim was the first editor to introduce multiple modes. There is a separate mode for editing text, selecting text and executing command. Vim editor supports all these modes. Later sections of this tutorial describe these modes.
Stevie
Stevie editor was developed for Atari ST platform. It was released in 1987 it is an abbreviation for ST Editor for VI enthusiastic.
It was very simple and provided only very small subset of the original Vi editor. However, it provided familiar environment to user moving on Atari ST platform.
Elvis
Elvis’s main intention was to remove Stevie editor limitation. Stevie used to load entire file in RAM, Elvis removed this limitation by introducing buffers. Also it added some functionality into it like syntax highlighting, multiple window support, networking support and simple GUI.
nvi
nvi stands for new Vi. It was a result of license dispute between AT & T lab and Computer Science Research Group(CSRC) at university of California, Berkeley. Vi was based on ed editor and was under license of AT & T which restricted them to distribute Vi with BDS. Hence they rewrote Vi and released it under BSD license.
Vim
Vim is improved version of Vi and it added many features where Vi was lagging. It added many useful features like −
- Multiple windows/tabs/buffers
- Introduction of Vim scripting language
- Syntax highlighting for more than 200 languages
- Integration with compilers, interpreters and debuggers
Vile
Vile is an abbreviation which stands for Vi like Emacs and it was an attempt to bring popular features from both editor and combine it into one. Few popular features of Vile are −
- One editing mode for each file type
- Introduction of Vile procedural language
- Named functions to bound keys according to user choice
Compatibility with Vioriginal Vi
Though above discussed editors are considered as Vi clones they are not 100% compatible with original Vi. Below table shows more details about their compatibility −
| Clone | Vi compatibility | Notes |
|---|---|---|
| STEVIE | 10% | Limited features were common |
| Vile | 10% | Limited features and Vi modes were common |
| Elvis | 80% | Larger features were common |
| nvi | 95% | Larger features were common |
| Vim | 99% | Almost identical to Vi with some additional features |
Vim - Getting Familiar
Beginning with this section we will get our hands dirty with Vim. In this chapter, we will discuss following items −
Start Vim
Vim modes
Create new file
View file in read-only mode
Edit existing file
Start Vim
Vim is little bit different than today’s GUI based editor. It can be started and used from GUI as well as terminal.
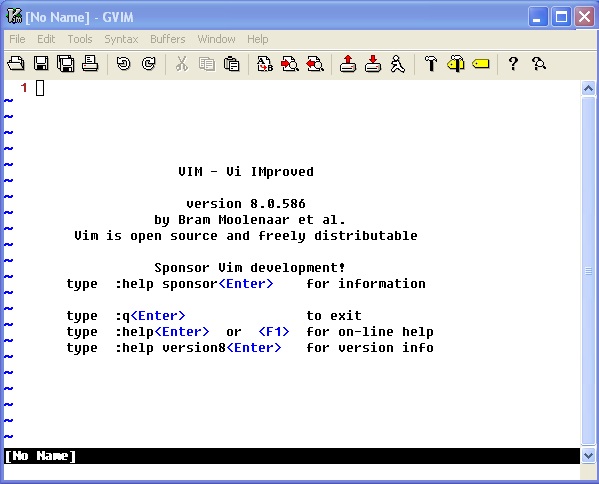
Use graphical launcher
To start Vim from graphical launcher just double click on gVim icon. It will open editor window as follows −
Use terminal
Using Vim from terminal will be identical on Windows as well as Linux platform. Perform following steps to start and quit Vim from terminal −
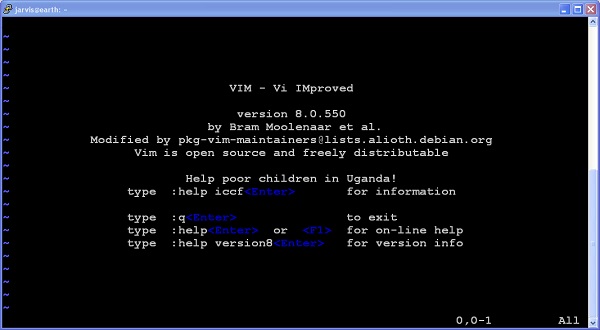
Open terminal and enter vim command as follows −
$ vim
It will open Vim in terminal as follows −
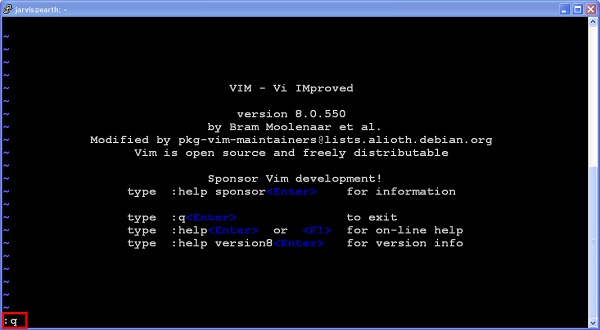
To close this, press Esc key followed by colon(:) and q. In Vim q command stands for quit. This command will be shown in bottom left corner of editor itself −
Vim modes
Vim supports multiple modes. This section discusses some of the important modes which will be used on day-to-day basis.
Command mode
This is the default mode in which Vim starts. We can enter editor commands in this mode. We can use variety of commands in this mode like copy, paste, delete, replace and many more. We’ll discuss these commands in later sections.
NOTE − Here onwards, any Vim command without colon indicates that we are executing that command in command mode.
Insert mode
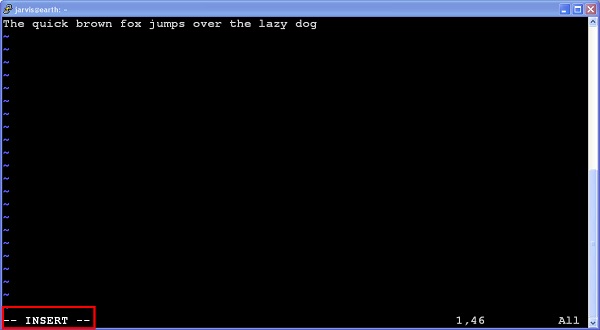
You can use this mode to enter/edit text. To switch from default command to insert mode press i key. It will show current mode in bottom left corner of editor.
We can enter any text once we are in insert mode. Below image shows this −
Use Escape key to switch back to command mode from this mode.
Command line mode
This mode is also used to enter commands. Commands in this mode starts with colon(:). For instance, in previous section quit command was entered in this mode. We can go to this mode either from command or insert mode.
To switch from command mode to this mode just type colon
To switch from insert mode to this mode press Escape and type colon
In below image colon at bottom left indicates line mode.

NOTE − Here onwards, any Vim command starting with colon indicates that we are executing that command in command line mode.
Visual mode
In this mode we can visually select text and run commands on selected sections.
To switch from command mode to visual mode type v
To switch from any other mode to visual mode first switch back to command mode by pressing Escape, then type v to switch to visual mode
In below image bottom left corner shows visual mode.
Create new file
Perform below steps to create and save new file −
Execute following command to open Vim
$ vim
Type following command in Vim
:edit message.txt
Switch to insert mode
It will reload file if, it exist already
i
Enter some text
Switch back to command mode
Esc
Save changes to file
:w
Now message.txt file will be created.
Quit Vim
:q
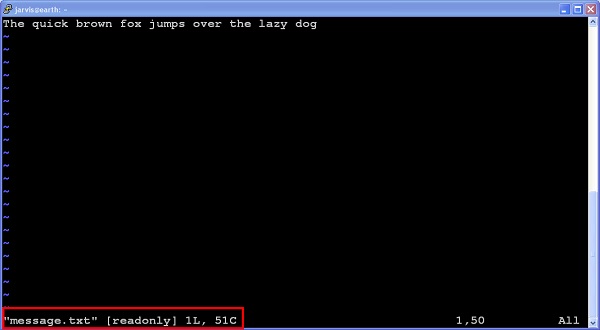
Open file in read-only mode
Use –R option to open file in read-only mode
$ vim -R message.txt
In below image bottom left corner shows read-only mode −
Alternatively you can use view command to achieve same result.
$ view message.txt
Edit existing file
Perform below steps to edit existing file −
Open file using Vim
$ vim message.txt
Switch to insert mode and enter some text there.
i
Quit editor without saving changes
:q!
Save changes and quit editor using following command −
OR
:wq
Vim - Getting Help
Vim is feature rich editor hence remembering everything about it will be difficult. But there is no need to worry, we can always ask for help. Fortunately this help is provided by Vim itself.
In this chapter, we will discuss following items −
- Access help manual
- Help on specific topic
- Search help phrase in manual
- Access online help
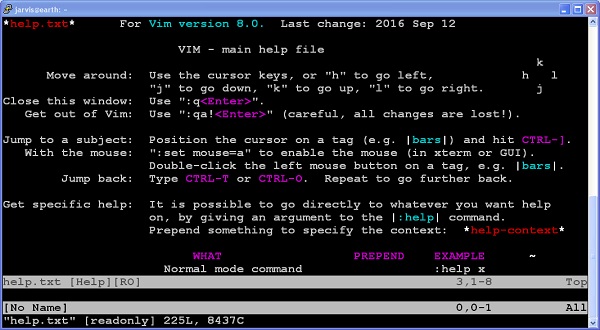
Access help manual
Help manual is shipped with Vim editor itself and it is really comprehensive. To access help execute below command −
:help
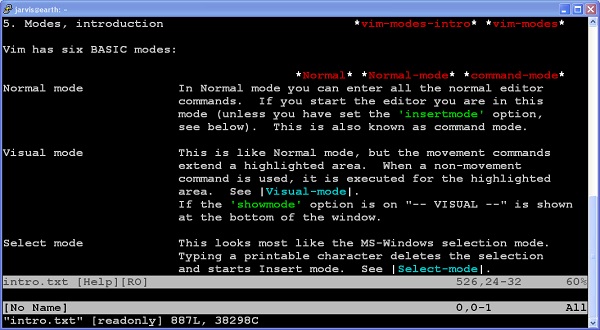
Help on specific topic
Help manual will show entire help about Vim. But what if, we are only interested in certain topic. Vim provides command for that as well with following syntax
:help <topic-name>
In above command replace <topic-name> with topic in which you are interested. Forinstance to access help about vim mode, execute following command
:help modes
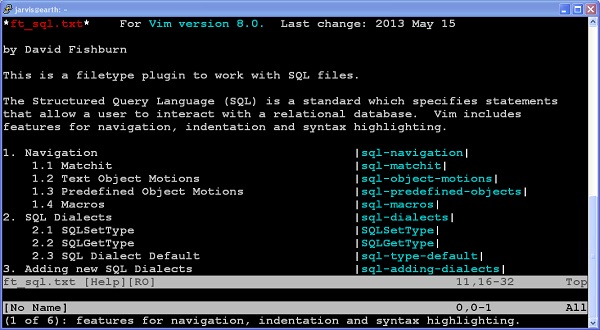
Search help phrase in manual
You can search specific topic only if you know its name. But what if, you don’t know the exact name of help topic. In that case you can use below command −
:helpgrep <phrase>
For instance, to access help about navigation in Vim execute below command
:helpgrep navigation
Access online help
Vim also provides online help. To access online help −
Vim - Editing
Vim provides many commands which make editing functionality really powerful. In this chapter, we will discuss following items −
- Insert
- Append
- Open new line
- Substitute
- Change
- Replace
- Join
Insert text before cursor
To insert text before cursor perform following steps −
- To insert text before cursor perform following steps
- Switch to insert mode
i
Insert text at the beginning of line
Let us suppose you are in the middle of line and you want to insert text at the beginning of current line then perform following steps −
- Switch to command mode
Esc
- Activate insert mode
I
This action will move cursor to the beginning of current line and switch Vim in insert mode
Append text after cursor
To append text after cursor perform following steps
- Switch to command mode and move cursor to appropriate position
Esc
- Switch to insert mode
a
This action will move cursor next by one position and switch Vim in insert mode.
Append text at the end of line
Let us suppose you are in the middle of line and you want to append text at the end of current line then perform following steps −
- Switch to command mode
Esc
- Switch to insert mode
A
This action will move cursor to the end of line and switch Vim in insert mode
Open new line below cursor
Let us suppose you are in the middle of line and you want to open new line below current line then perform following steps −
- Switch to command mode
Esc
- Switch to insert mode
o
This action will insert blank line below current line and switch Vim in insert mode
Open new line above cursor
Let us suppose you are in the middle of line and you want to open new line above current line then perform following steps −
- Switch to command mode
Esc
- Switch to insert mode
o
This action will insert blank line above current line and switch Vim in insert mode
Substitute text
Let us suppose you want to substitute single character then perform following steps −
- Switch to command mode
Esc
- Move cursor to appropriate position
- Switch to insert mode
s
This action will delete character under cursor and switch Vim in insert mode To substitute entire line use −
s
This action will delete entire line and switch Vim in insert mode.
Change text
Let us suppose you want to change text in current line then perform following steps −
- Switch to command mode
Esc
- Execute following command −
cc
This is similar to substitute action using S
To change text from current cursor position, execute following command
C
This action will delete text after current cursor position and switch Vim in insert mode.
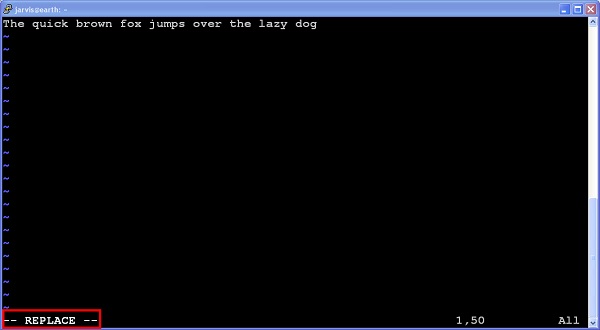
Replace text
To replace single character perform following steps −
- Switch to command mode
Esc
- Move cursor to appropriate position
- Execute following command −
r
- Enter character to be substituted.
Note that this command will not switch Vim in insert mode
To replace entire line execute −
R
It will switch Vim in replace mode as shown in below image −
Join text
To join two lines perform following steps −
- Switch to command mode
Esc
- Move cursor to appropriate line
- Execute following command −
J
Vim - Navigating
Vim has great support for advanced navigation. In this chapter, we’ll discuss some of the popular navigation techniques which help to improve productivity.
Basic navigation
In basic navigation we can navigate to left, right, up and down by position. Below commands can be used for this −
| Sr.No | Command & Description |
|---|---|
| 1 | h
Move cursor to left by one position |
| 2 | l
Move cursor to right by one position |
| 3 | k
Move cursor to upward direction by one line |
| 4 | j
Move cursor to downward direction by one line |
To perform multi-position navigation use number with these commands. For instance to navigate cursor 10 line below from current line, execute following command −
10j
You can use numbers with remaining commands as well.
In addition to this, below commands also perform some useful navigation.
| Sr.No | Command & Description |
|---|---|
| 1 | 0
Move cursor to the beginning of current line |
| 2 | $
Move cursor to the end of current line |
| 3 | Ctrl + f
Scroll down entire page |
| 4 | Ctrl + b
Scroll up entire page |
Navigate to lines
Below command can be used to navigate to specific line −
| Sr.No | Command & Description |
|---|---|
| 1 | :n
Jump to the nth line |
| 2 | :0
Jump to the start of file |
| 3 | :$
Jump to the end of file |
Word navigation
We can use following commands for word navigation −
| Sr.No | Command & Description |
|---|---|
| 1 | w
Move cursor to the beginning of the next word |
| 2 | e
Move cursor to the end of the current word |
| 3 | b
Move cursor to the beginning of the previous word |
Using jumps
Vim keeps track of your navigation using a jump list. You can go backward and forward through that list.
The jump list keeps tracks of all the places you’ve been to by tracking file name, line number and column number.
To view jump list execute following command −
:jumps
Following command are based on jump list −
| Sr.No | Command & Description |
|---|---|
| 1 | Ctrl + o
Jump back to the previous position |
| 2 | Ctrl + i
Jump to the next position |
Vim - Revisiting Editing
We have seen basic editing earlier. Let us understand some other editing features of Vim. In this section, we will discuss following items −
- Buffer
- Swap files
- Cut, copy, delete, paste actions
- Undo and redo actions
Buffer
Buffer is temporary memory used by Vim. When we open a file in editor, Vim loads its contents from disk drive. These contents are stored in memory (RAM) whenever we edit a file we are actually editing file from buffer. Once we finish editing and save file that time only buffer contents are transferred to appropriate file.
Swap
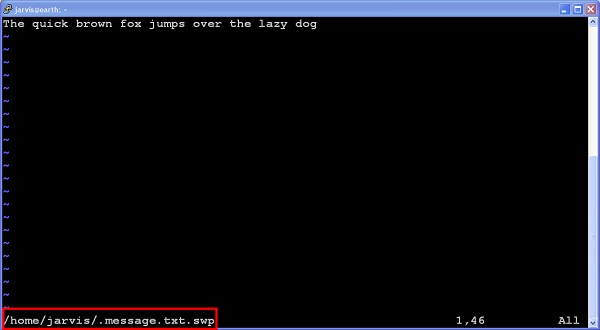
Swap area is a file created by Vim to store buffer contents periodically. While editing file our changes may be lost because of any reasons and Vim provides swap files to provide data recovery.
To get actual name of swap file execute following command −
:swapname
For instance in my case name was message.txt.swp as show in below image −
Cut, Copy and paste actions
We often perform cut, copy and paste actions on text. Vim provides following commands to perform these actions (y stands for yank and p stands for paste action) −
| Sr.No | Command & Description |
|---|---|
| 1 | x
Delete character from cursor position |
| 2 | X
Delete previous character from cursor position |
| 3 | y
Copy single character from cursor position |
| 4 | p
Paste character after cursor position |
| 5 | P
Paste character before cursor position |
Multi-position command
We can use cut, copy and paste commands with words and sentences as well. Below table shows this −
| Sr.No | Command & Description |
|---|---|
| 1 | dw
Delete word from cursor position |
| 2 | D
Delete entire line from cursor position |
| 3 | dd
Delete entire line |
| 4 | Y
Copies entire line |
| 5 | yy
Copies entire line |
To perform multi-line/multi-word actions just use numbers with command. You can use this syntax with other commands as well. For instance, to delete 3 words use −
3dw
Undo
We can undo single or multiple actions. To perform one time undo action execute −
u
To perform multiple undo action, use number with same command. For instance, below command will undo last 3 actions −
3u
In addition to this, to undo all execute following command −
U
Redo
Redo is apposite action of undo. Execute any of the command to perform redo action.
Ctrl + r
OR
: red
Vim - Searching
Search is very common action and it is one of the actions we use most of the time. In this chapter we will see some command which will allow performing these actions effectively.
In this chapter, we will discuss following items −
- Search settings
- Search in current file
- Search in multiple files
- Search in help files
Search related settings
To perform incremental search execute following command −
:set incsearch
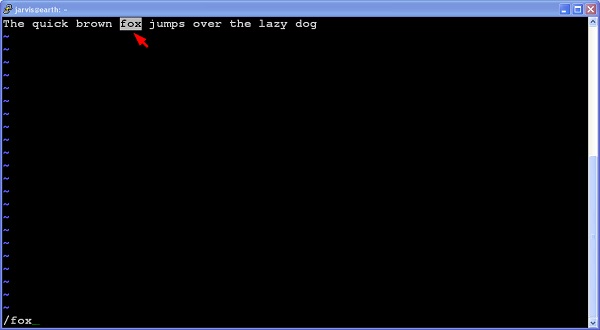
To highlight search execute following command −
:set hlsearch
This command will automatically highlight current matches. For instance in below image fox word is highlighted −
To disable incremental and highlighted search execute following commands −
:set noincsearch
:set nohlsearch
Search in current file
Search in forward direction
Use following commands to perform search in forward direction −
| Sr.No | Command & Description |
|---|---|
| 1 | /<expression>
Search expression in forward direction |
| 2 | n
Find next occurrence. This is same and find next |
| 3 | N
Find previous occurrence. This is same as find previous |
| 4 | //
Repeat previous forward search |
Search in backward direction
Use following commands to perform search in backward direction
| Sr.No | Command & Description |
|---|---|
| 1 | ?<expression>
Search expression in backward direction |
| 2 | n
Find previous occurrence. This is same and find previous |
| 3 | N
Find next occurrence. This is same as find next |
| 4 | ??
Repeat previous backward search |
Search word under cursor
Place cursor under any word and execute following commands to perform search operation −
| Sr.No | Command & Description |
|---|---|
| 1 | *
Search next occurrence of current word |
| 2 | #
Search previous occurrence of current word |
Search in multiple files
Using vimgrep command we can search <expression> in multiple files. For instance below command searches string - Jarvis in all text files.
:vimgrep Jarvis *.txt
Note that to go to next and previous occurrence we have to use following commands −
| Sr.No | Command & Description |
|---|---|
| 1 | :cn
Go to next occurrence of expression |
| 2 | :cN
Go to previous occurrence of expression |
Vim - Working With Multiple Things
Vim is very powerful editor. It supports many advanced features to work with multiple files, buffer and windows. In this section, we will discuss following items −
- Multiple files
- Multiple buffers
- Multiple tabs
- Multiple windows
Multiple files
Let us suppose you are editing a file and you want to open another file in same Vim session. In that case, you can use Vim’s edit command. Below table shows these commands
| Sr.No | Command & Description |
|---|---|
| 1 | :e
Load new file in buffer for editing |
| 2 | :edit
Same as :e |
| 3 | :e <tab>
List the files for editing from current directory |
| 4 | :edit <tab>
Same as :e <tab> |
Multiple buffers
We have already seen what Vim buffers are. Vim supports multiple buffers. Below commands will be useful will working with buffers −
| Sr.No | Command & Description |
|---|---|
| 1 | :badd <file>
Add file into new buffer |
| 2 | :bN
Switch to Nth buffer. For instance to switch to 3rd buffer use :b3 |
| 3 | :bnext
Move to the next buffer in buffer list |
| 4 | :bprevious
Move to the previous buffer in buffer list |
| 5 | :buffers
List all buffers |
| 6 | :bfirst
Move to the first buffer |
| 7 | :blast
Move to the last buffer |
| 8 | :ball
Load all buffers |
For instance, below command adds new file to buffer −
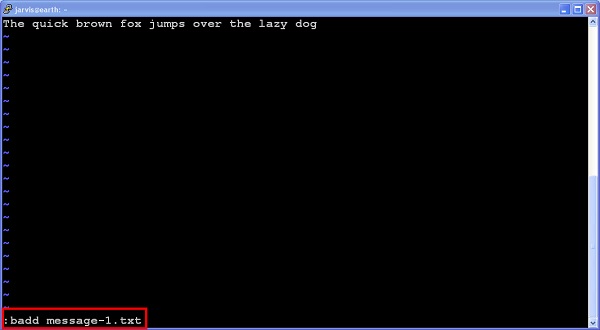
Now, there are two files in buffer. Execute below command to show this −
:buffers
It will show following output −

Multiple tabs
Like other editors we can also open multiple tabs in Vim. Below table describes tab related commands −
| Sr.No | Command & Description |
|---|---|
| 1 | :tabnew
Open new tab |
| 2 | :tabnew <file>
Open new file in tab |
| 3 | :tabclose
Close current tab |
| 4 | :tabnext
Move to the next tab |
| 5 | :tabprevious
Move to the previous tab |
| 6 | :tabfirst
Move to the first tab |
| 7 | :tablast
Move to the last tab |
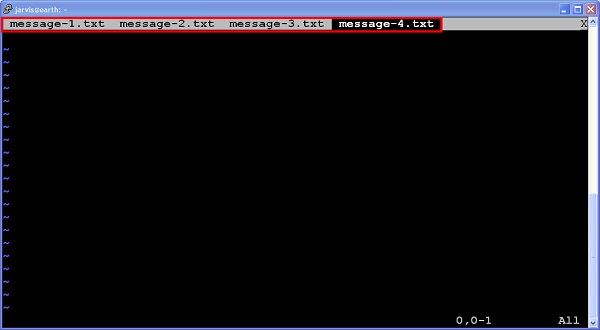
For instance, below images shows multiple tabs
Multiple windows
In Vim we can create new window using following commands −
| Sr.No | Command & Description |
|---|---|
| 1 | :new <file>
Open new window |
| 2 | :new <file>
Open file in new window |
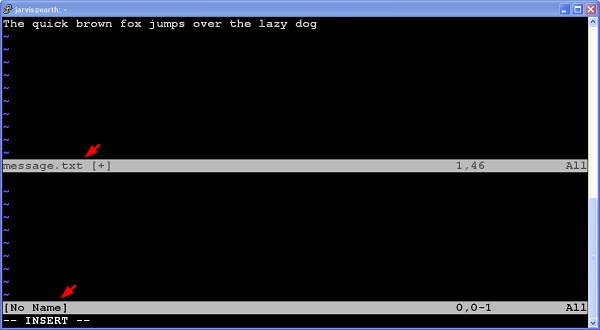
In below image, we can see that current Vim window is split into 2 parts after executing following commands −
$vim message.txt
:new
Vim - Markers
Vim supports bookmark feature. Using this feature we can make navigation within file really faster. In this chapter, we will discuss following items −
- Create bookmark
- Jump to bookmark
- List all bookmarks
- Delete bookmarks
- Local bookmarks
- Global bookmarks
Create bookmark
To create bookmark execute following command −
m{bookmark-name}
In above example bookmark-name is single alphabetical character. For instance, below command creates bookmark of name a.
ma
Jump to bookmark
Once bookmark is created we can jump there. Following command can be use to jump to bookmark −
| Sr.No | Command & Description |
|---|---|
| 1 |
`{bookmark-name}
Move to the exact location of bookmark. Please note that this character is back quote |
| 2 | ‘{bookmark-name}
Jump to the beginning of bookmark line. Please note that this character is single quote |
List all bookmarks
To list all bookmarks execute following command −
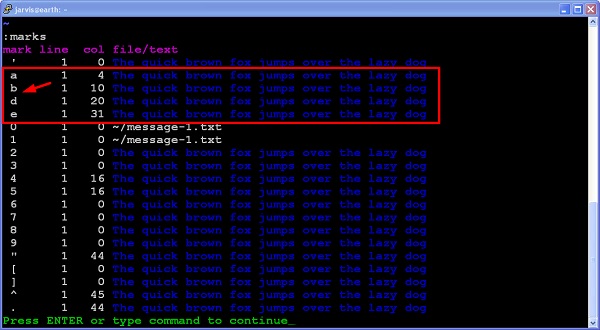
:marks
In below image it show list of bookmarks for current file
Delete bookmark
To delete bookmarks execute following command −
:delmarks {bookmark-name}
For instance, below command delete bookmark with name a.
:delmarks a
Local bookmarks and global bookmarks
When you have multiple files open and if you want to go to a particular position in any one of the open files, then you can use global mark feature of Vim.
If the bookmark name is an upper case letter, then that is a global Bookmark. Above discussed commands are applicable for both local and global bookmarks.
Vim - Macros
Macro is record and play feature. When this is combined with Vim commands it becomes really powerful combination. In this section, we will discuss following items −
- Start recording
- Perform Vim actions
- Stop recording
- Play recording
Start recording
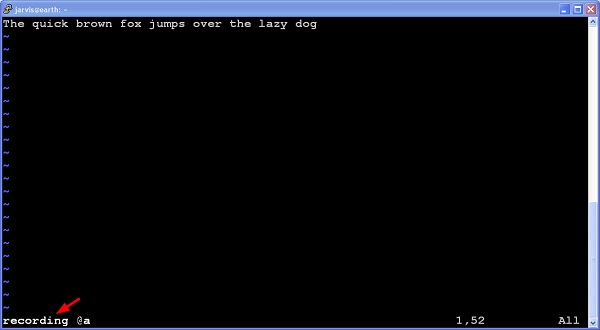
To start recording press q followed by any lower case letter as a macro name. For instance in below example I have used “a” as a macro name
Perform Vim actions
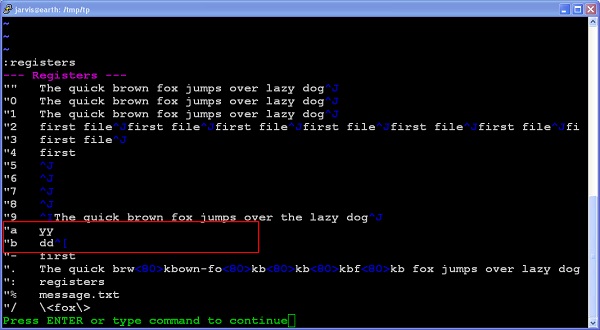
In this step you can perform any Vim actions like: cut, copy, delete, replace and so on.You can see these actions by executing following command −
:registers
For instance, below command shows that yank and delete actions were performed −
Stop recording
Once you are done with actions, press q again to stop recording. Now recording mode will disappear as shown below −

Play
To play execute below command −
@{macro-name}
For instance to execute macro “a”, execute below command −
@a
To play same macro multiple times use numbers with it. For instance, to execute same macro 10 times execute following command −
10@a
Vim - Registers
Vim provides many registers. We can use these registers as multiple clipboards. This feature is really useful while working with multiple files. In this chapter, we will discuss following items −
- Copy text in register
- Paste text from register
- List available registers
- Register types
Copy text in register
For copying, we can use normal yank command i.e. yy and to store it in register we can use following syntax −
“<register-name><command>
For instance, to copy text in register “a” use following command −
“ayy
Paste text from register
To paste text from register use −
“<register-name>p
For instance, below command copies text from register “a” −
“ap
List available registers
To list all available registers use following command
:registers
Register types
Vim supports following types of registers −
Unnamed registers
Unnamed register is denoted by “”. Vim stores deleted or copied text in this register
Named registers
We can use 26 named registers; we can use a-z or A-Z. By default vim doesn’t uses these registers.
If we use lower case register name then contents will be overwritten and if we use uppercase name then contents will be appended in that register.
Numbered registers
We can use 0 to 9 named registers. Vim fills these registers with text from yank and delete command.
- Numbered register 0 contains the text from the most recent yank command.
- Numbered register 1 contains the text deleted by the most recent delete or change command
Default registers
Following are the default registers −
| Sr.No | Register & Description |
|---|---|
| 1 | %
Name of the current file |
| 2 | #
Name of the alternate file for the current window |
| 3 | :
Most recently executed command |
| 4 | .
Contains the last inserted text |
| 5 | “
Last used register |
Vim - Folding
Fold functionality will be useful when file contents large text. Using this feature we can only show selected potion of file. This feature is particularly useful while working with programming languages. In this chapter, we will discuss following items −
- Activate and deactivate fold functionality
- Various fold actions
Fold activation and deactivation
To activate fold use following command −
:set foldenable
:set foldmethod = indent
To deactivate fold use following command
:set nofoldenable
Fold actions
Close fold
To fold code, go to any method and execute following command −
zc
For example below image shows the result of this action −
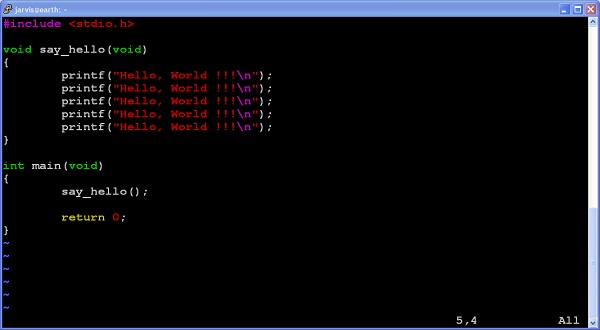
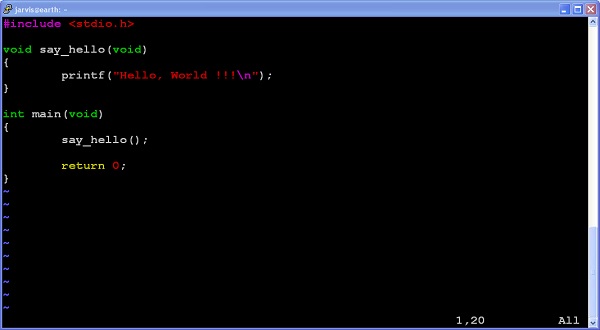
Open fold
To open fold use following command −
zo
Below image shows the result of this action −
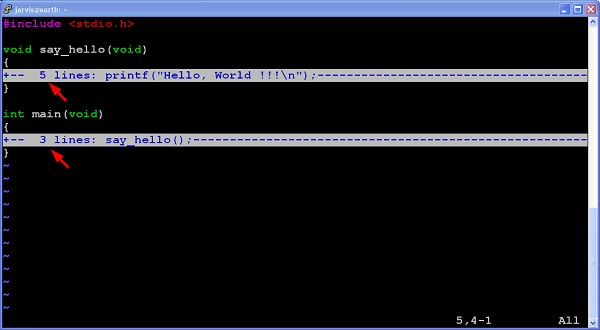
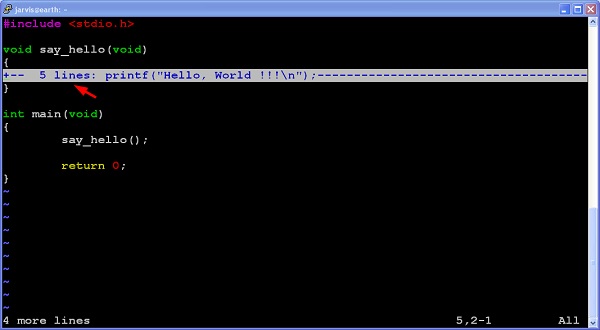
Close all folds
To close all folds execute following command
zM
Below image shows the result of this action
Unfold all
To unfold all execute following −
zR
Below image shows the result of this action −
Vim - Diff
Similar to UNIX diff command we can use Vim to show diff in much better manner. It will show diff in colorful manner. In this chapter, we will discuss following items −
- Show differences between files
- Activate and deactivate diff mode
- Navigation in diff mode
- Applying changes from diff window
Show difference
To show differences between files execute below command −
$ vimdiff <file> <file>
OR
$ vim –d <file> <file>
For instance below command shows differences −

In above image, text highlighted in magenta color is common. Remaining text is highlighted in red color which indicates that there are some differences after common text.
Activate and deactivate diff mode
If you are already in vim and you want to perform diff action, then use one of the following command −
diffsplit
Use below command to perform horizontal split −
:diffsplit filename
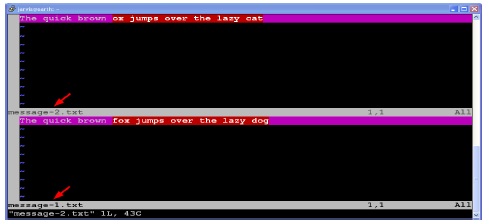
Above images shows that we are comparing two files namely message-1.txt and message-2.txt.
Vertical diffsplit
To perform vertical split use following command −
:vert diffsplit <filename>
It opens following window −
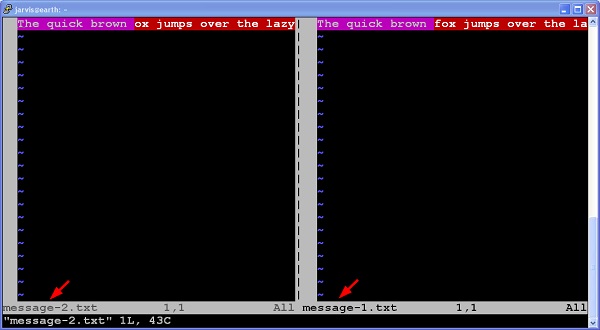
Above images shows that we are comparing two files namely message-1.txt and message-2.txt.
Navigation in diff mode
Navigation in diff mode is little bit different. For instance, when you scroll text from one window then text from adjacent window also scrolled. This is called scrollbind. To enable this use −
:set scrollbind
To disable this use −
:set noscrollbind
If you edit file in this mode then use following command to update diff −
:diffupdate
Switch between diff window
To switch between diff windows execute following command −
Ctrl + w Ctrl + w
Please note that, we have to press Ctrl + w 2 times.
Jump to previous change
In diff window, execute following command to jump to previous change −
[c
Jump to next change
In diff window, execute following command to jump to next change −
]c
Apply changes from diff window
Applying change in current diff windows
To apply change from adjacent diff window to current diff windows execute −
:diffget
For instance, if you are in left window and you want to take change from right window to current window then you will execute above command.
Apply change from current pane to another
To apply change from current diff window to adjacent diff window execute −
:diffput
For instance, if you are in left window and you want apply change from current window to right window then you will execute above command.
Vim - Plug-Ins
Using plug-ins, we can extends the functionality of Vim. Vim supports many plug-ins and most of them are available freely. This chapter is about Vim plug-ins and we will discuss following items −
- Plug-in management
- Some useful plug-ins
Plug-in management
This section discusses plug-in management. Vim provides various plug-ins managers but we won’t be using any plug-in manager, instead we’ll be doing all these steps manually for better understanding. Once you understand these steps, you can go with plug-in manager.
Install plug-in
To install any plug-in perform following steps −
- Create .vim/bundle directory in user’s home directory
- Copy plug-in inside this directory
- Set runtimepath in vim
Let us install badwolf plug-in in Vim. It is a color scheme for vim.
$ mkdir -p ~/.vim/bundle
$ cd ~/.vim/bundle/
$ git clone https://github.com/sjl/badwolf.git
$ echo "set runtimepath^ = ~/.vim/bundle/badwolf" > ~/.vimrc
Now plug-in is installed, so we can use badwold color scheme as follows −
:colorscheme badwolf
Update plug-in
If we observe carefully, plug-in is a just collection of files and if we want to update that plug-in then just update appropriate plug-in directory from ~/.vim/bundle.
Remove plug-in
Removing plug-in in Vim is really simple. To remove plug-in perform following steps −
- Remove plug-in directory from ~/.vim/bundle
- Modify runtimepath appropriately
Some useful plug-ins
Below is list of some useful Vim plug-ins
| Sr.No | Name & Description |
|---|---|
| 1 | DumpX
Disassemble C/C++ code |
| 2 | awk.vim
Indenting for AWK script |
| 3 | Pathogen
Vim package manager |
| 4 | git-switcher.vim
Automatically save and load vim session based on switching of git branch |
| 5 | Pyflakes
Provide liniting for python files |
Vim - Using Vim As Ide
We can configure Vim to use it as an IDE. In this section, we will discuss following items
- Syntax highlighting
- Smart indentation
- Bounce
- Execute shell commands
- Configuring ctags and csope
- Auto-completion and auto-suggestion
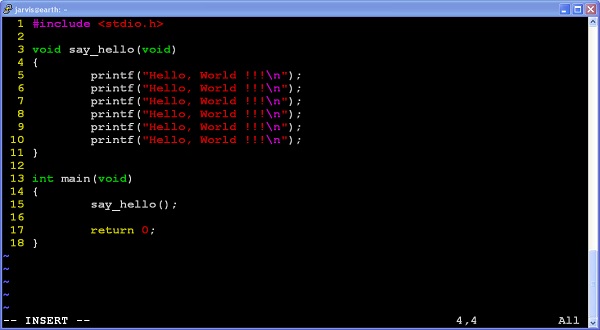
Syntax highlighting
Syntax highlighting is one of the important features of IDE. To enable syntax highlighting use −
:syntax on
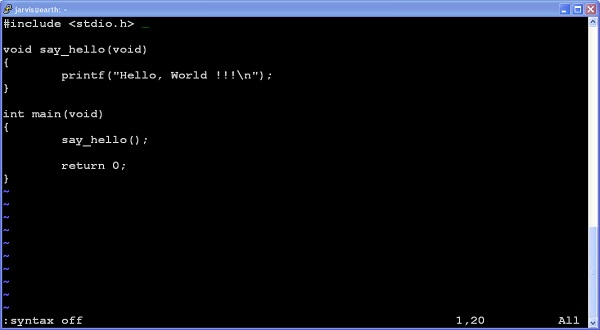
For instance, below image show syntax highlighting for C code −
To disable syntax highlighting use −
:syntax off
When syntax highlighting is disabled, it will show following output −
Smart indentation
To perform auto and smart indentation use following commands −
: set autoindent
: set smartindent
In addition to this you can use below command to auto-indent C code −
: set cindent
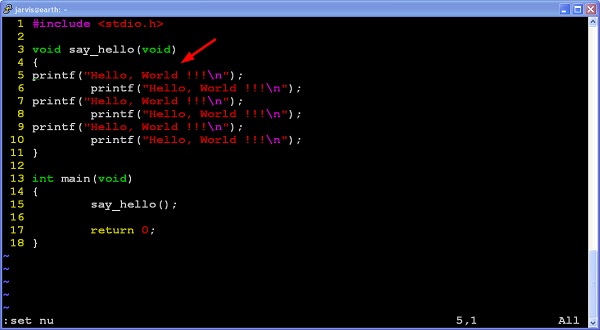
Bounce
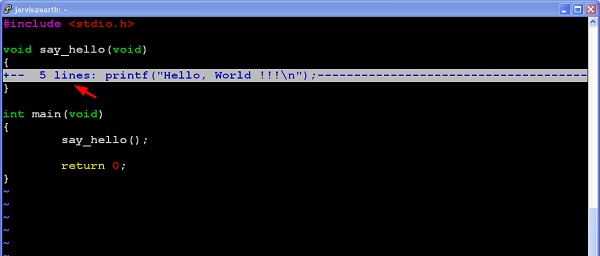
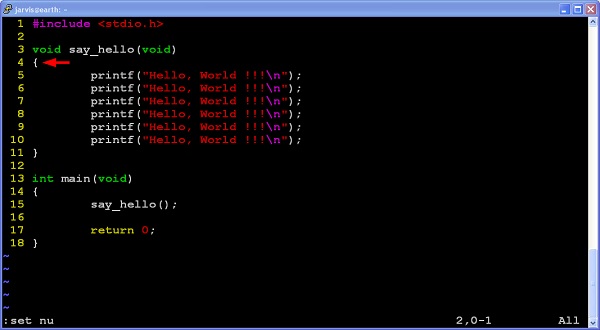
If you are using programming language which uses curly braces to combine multiple statements then % key will be your friend. This key will jump between start and end of curly braces quickly.
For instance, you are at line 11 and execute % command then it will move cursor the line 4. Below image shows this −
Execute shell commands
To execute single command from Vim editor user −
:!<command>
For instance, to execute pwd command use following syntax −
:!pwd
However, if you want to multiple shell commands then execute following command −
:shell
Above command will give you terminal access, where you can execute multiple commands. Once you are done with it, just type exit command which will return back to Vim session.
Configure ctags and cscope
Combination of ctags and csope provides many useful features like go to function definition, go to function declaration, find function calls, search file, and many more. Perform below steps to configure these tool −
- Generate tags using following command −
$ ctags <file>
This command will generate new file namely tags
- Provide tag file to vim using following command −
:set tags = tag
- Now move your cursor under function name and press Ctrl + ] to go to function definition.
- Use Ctrl + t to come back to previous position.
To install and configure cscope perform following steps −
- Install cscope
$ sudo apt-get install cscope
- Generate ctags and launch main window
$ cscope –R
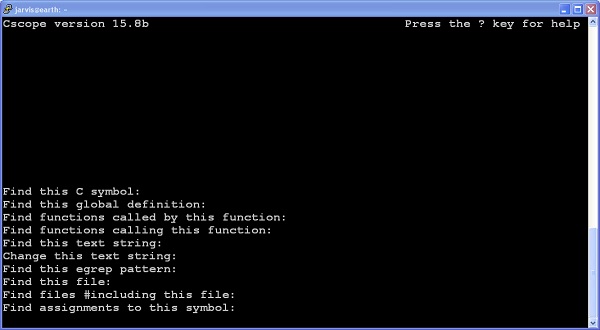
- User Ctrl + d to close cscope window
Auto-completion and auto-suggesting
We can use following commands for auto-completion −
| Sr.No | Command & Description |
|---|---|
| 1 | Ctrl + x Ctrl + N
Word completion |
| 2 | Ctrl + x Ctrl + L
Line completion |
| 3 | Ctrl + x Ctrl + F
File name completion |
Note that we have to use these commands in insert mode.
Vim - Remote File Editing
Many times we need to work with remote servers. And often we edit files from those remote servers. One of the obvious solution to edit those files is to log in to the remote sever and edit files. But sometimes it is convenient to edit those files from local machine because we might have installed and configured various plug-in on our local system. In this chapter, we will discuss following items −
- Access remote files
- Understand netread and netwrite
- Other supported protocol
Accessing remote files
Vim supports remote file editing using following syntax −
$vim scp://user@server.com/filepath
In above example vim will recognize that it has to use scp protocol and it will access file using that protocol. For instance −
$ vim scp://jarvis@remote-server.com//tmp/message.txt
Above command will open /tmp/message.txt file from remote-server. It will use SCP protocol and jarvis user’s credentials for authentication.
Using nread and nwrite
Vim supports nread and nwrite functionality which stands for net read and net write respectively. Previous section shows method to access remote file while launching Vim. But what if you are already in Vim? Then you can use following commands −
:Nread scp://jarvis@localhost//tmp/message.txt
In addition to reading we can also modify file on remote server directly. In that case use Nwrite command as follows −
:Nwrite scp://jarvis@localhost//tmp/message.txt
Once file is opened, you can use regular Vim commands.
Other supported protocols
In addition to SCP, Vim supports following protocols −
- FTP
- SFTP
- HTTP (read-only)
- rsync
Vim - Tips And Tricks
Now we got fair idea about Vim. Let us discuss few tips and tricks of Vim to improve productivity. In this section, we will discuss following items −
- Convert spaces to tabs and vice-versa
- Highlight miss-spelled words
- Word completion
- Copy line character by character
- Indent code
- Change file format
Convert spaces to tabs and vice-versa
Convert tabs to spaces
If you are editing a file and you want to convert entered tab character to spaces then execute following command −
:set expandtab
Note that, this command will not change existing tabs to spaces. To achieve this execute following command −
:set tabstop = 4 shiftwidth = 4 expandtab
:retab
In above command we are instructing Vim to convert tabs into 4 spaces
Convert spaces to tabs
To convert spaces to tabs execute below command −
:set noexpandtab :retab!
Highlight miss-spelled words
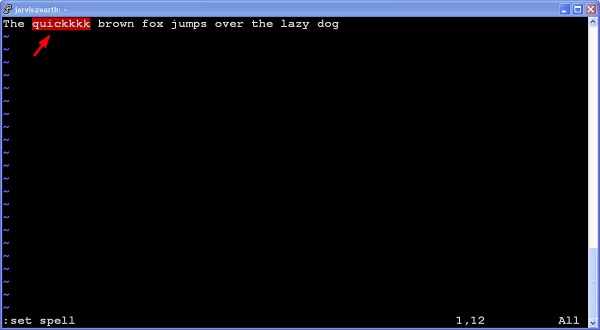
We can instruct Vim to highlight miss-spelled words. To do this execute following command −
:set spell
Below image highlights misspelled word in Vim −
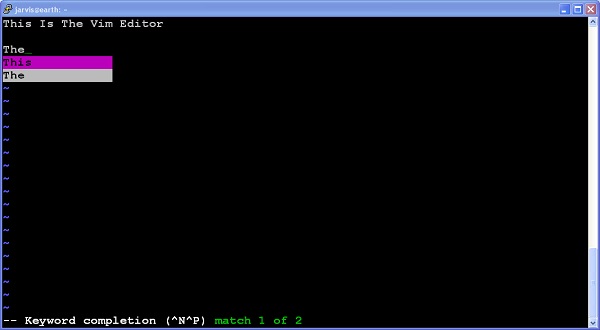
Word completion
Vim also provides word completion. For this execute following command in insert mode −
Ctrl + p
Copy character line by line
Use following command to copy and paste line character by character −
| Sr.No | Command & Description |
|---|---|
| 1 | Ctrl + y
Copy and paste text located above the cursor |
| 2 | Ctrl + e
Copy and paste text located below the cursor |
Note the we have to use these commands in insert mode.
Indent code
If you have un-indented code to indent it execute following command −
=%
For instance, if you have un-indented code like this −
Then go to line 4 and execute =% command. It will indent code like this −
Change file format
To change file format to UNIX execute following command −
:set ff = unix
To change file format to DOS execute following command −
:set ff = dos
Vim - Personalization
We can personalize Vim according to our requirement. In this section, we will discuss following items −
- Configuration files
- Changing fonts
- Changing color scheme
- Personal highlighting
- Status line
Configuration files
For Vim configuration files can be at user level or global level. User specific settings will be stored in user level files while global settings will be stored in global level files.
Vimrc file
Global vimrc
To find out global vimrc file execute following command in editor
:echo $VIM
OR
:echo \%VIM\%
On Linux this file will be located under /usr/share/vim directory while on Window it will be under C:\Program Files\Vim folder
Local vimrc
Local vimrc will be located under user’s home directory. For instance, on Linux it will be under /home/<USER> directory while on Windows it will be under C:\Documents and Setting\<USER>/ folder
Note that, on Windows file name will be _vimrc whereas on Linux it will be .vimrc.
Gvimrc
Global gvimrc
On Linux this file will be located under /usr/share/gvim directory while on Window it will be under C:\Program Files\Vim folder
Local gvimrc
Local gvimrc will be located under user’s home directory. For instance, on Linux it will be under /home/<USER> directory while on Windows it will be under C:\Documents and Setting\<USER>/ folder
Note that, on Windows file name will be _gvimrc whereas on Linux it will be 55 .gvimrc.
exrc
exrc files are used for backward compatibility. These files are ignored if either vimrc or gvimrc file is present.
Global exrc
On Linux this file will be located under /usr/share/vim directory while on Window it will be under C:\Program Files\Vim folder
Local exrc
Local exrc will be located under user’s home directory. For instance, on Linux it will be under /home/<USER> directory while on Windows it will be under C:\Documents and Setting\<USER>/_exrc folder
Changing fonts
To change font execute following command in gVim −
:set guifont = courier
Above command will change font to courier.
Change colorscheme
To change color scheme execute following command −
:colorscheme <tab>
When you press tab character, it will show available color schemes for Vim.
Personal highlighting
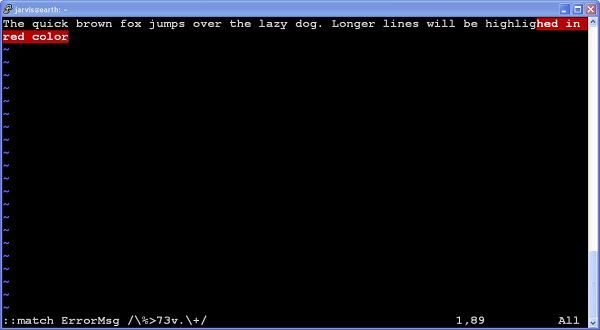
Highlight characters after certain columns
Execute below command to highlight columns greater than 73 −
:match ErrorMsg /\%>73v.\+/
Below image shows this −
Below is description of this command −
| Sr.No | Command & Description |
|---|---|
| 1 | \%>
Match after column |
| 2 | 73
This is column number |
| 3 | V
It should work for virtual columns only |
| 4 | .\+
Match one or more characters |
Add line number
To add line number execute following command −
:set number
To disable this execute following command −
:set nonumber
Set number width
To set number width execute following command −
:set numberwidth = <num>
Spell check
To enable spell check execute following command −
:set spell
And to set spell language execute following command −
:set spelllang = <language>
For example to set German use following comman −
:set spelllang = de
Abbreviation
Using abbreviation we can create shortcuts for long string. For instance below command creates abbreviation namely “quick”.
:abbr quick the quick brown fox
If you type “quick” and press tab then it will be replaced by “the quick brown fox” string
We can use this to correct some typos. For instance below command does this −
:abr teh the
Status line
Status line is shown at the bottom of editor. To enable status line execute following command −
:set laststatus = 2
To remove this for current session execute following command −
:set laststatus = 0
Vim - Conclusion
Vim is really powerful editor and now you can get your hands dirty with it. Mastering Vim will really improve your productively. Using Vim you can solve many complex tasks with few commands. You can refer following documentation to know more about Vim.
Vim official documentation
You can access Vim’s official documentation from following website −
Vim Scripting guide
You can enhance vim further by writing scripts to it. It has its own scripting language. To know more about it, visit following link −
https://vim.sourceforge.io/scripts/index.php
Vim plug-ins
Vim plug-ins further extend its functionality and makes you more productive. You can install, configure and even write plug-ins for Vim. You can refer documentation regarding this from their official website.