- Spring Cloud Tutorial
- Spring Cloud - Home
- Spring Cloud - Introduction
- Dependency Management
- Service Discovery Using Eureka
- Synchronous Communication with Feign
- Spring Cloud - Load Balancer
- Circuit Breaker using Hystrix
- Spring Cloud - Gateway
- Streams with Apache Kafka
- Distributed Logging using ELK and Sleuth
- Spring Cloud Useful Resources
- Spring Cloud - Quick Guide
- Spring Cloud - Useful Resources
- Spring Cloud - Discussion
Spring Cloud - Quick Guide
Spring Cloud - Introduction
Before we look at Spring Cloud, let’s have a brief overview on Microservice Architecture and the role of Spring Boot in creating microservices.
Microservice Architecture
Microservice architecture is a style of application development where the application is broken down into small services and these services have loose coupling among them. Following are the major advantages of using microservice architecture −
Easy to maintain − Microservices are small in size and are supposed to handle only single business task. So, they are simple to develop and maintain.
Independent Scaling & Deployment − Microservices have their individual deployment pattern and cadence. So, each service can be scaled based on the load which that service is supposed to cater to. Each service can be deployed based on its schedule.
Independent Technology Usage − Microservices have their code base segregated from the deployment environment, so the language and the technology that a microservice needs to use can be decided based on the use-case. There is no need to have a common stack to be used in all microservices.
More details about Microservice Architecture can be found at Microservice Architecture
Spring Boot
Spring Boot is a Java-based framework which is used to create microservices which are used in microservice architecture. It further brings down the time needed to develop a Spring application. Following are the major benefits it provides −
It is easy to understand and develop a Spring application
Increases productivity
Reduces the development time
More info on Spring Boot can be found at −Spring Boot
Spring Cloud
Spring Cloud provides a collection of components which are useful in building distributed applications in cloud. We can develop these components on our own, however that would waste time in developing and maintaining this boilerplate code.
That is where Spring Cloud comes into picture. It provides ready-to-use cloud patterns for common problems which are observed in a distributed environment. Some of the patterns which it attempts to address are −
Distributed Messaging
Load Balancing
Circuit Breakers
Routing
Distributed Logging
Service Registration
Distributed Lock
Centralized Configuration
That is why, it becomes a very useful framework in developing applications which require high scalability, performance, and availability.
In this tutorial, we are going to cover the above-listed components of Spring Cloud.
Benefits of Using Spring Cloud
Developers focus on Business Logic − Spring Cloud provides all the boilerplate code to implement common design patterns of the cloud. Developers thus can focus on the business logic without the need to develop and maintain this boilerplate code.
Quick Development Time − As the developers get the boilerplate for free, they can quickly deliver on the required projects while maintaining code quality.
Easy to use − Spring Cloud projects can easily be integrated with existing Spring Projects.
Active Project − Spring Cloud is actively maintained by Pivotal that is the company behind Spring. So, we get all the new features and bug-fixes for free just by upgrading the Spring Cloud version.
Microservice architecture has multiple advantages; however, one of its most critical drawbacks is its deployment in a distributed environment. And with the distributed systems, we have some common problems that frequently creep up, for example −
How does service A know where to contact service B, i.e., address of service B?
How do multiple services communicate with each other, i.e., what protocol to use?
How do we monitor various services in our environment?
How do we distribute the configuration of the service with the service instance?
How do we link the calls which travel across services for debugging purposes?
and so on…
These are the set of problems which Spring Cloud tries to address and provide common solution to.
While Spring Boot is used for quick application development, using it along with Spring Cloud can reduce time to integrate our microservices which we develop and deploy in a distributed environment.
Spring Cloud Components
Let us now take a look at the various components which Spring Cloud provides and the problems these components solve
| Problem | Components |
|---|---|
| Distributed Cloud Configuration | Spring Cloud Configuration, Spring Cloud Zookeeper, Spring Consul Config |
| Distributed Messaging | Spring Stream with Kafka, Spring Stream with RabbitMQ |
| Service Discovery | Spring Cloud Eureka, Spring Cloud Consul, Spring Cloud Zookeeper |
| Logging | Spring Cloud Zipkin, Spring Cloud Sleuth |
| Spring Service Communication | Spring Hystrix, Spring Ribbon, Spring Feign, Spring Zuul |
We will look at a few of these components in the upcoming chapters.
Difference between Spring Cloud and Spring Boot
This a very common question that arises when starting with Spring Cloud. Actually, there is no comparison here. Both Spring Cloud and Spring Boot are used to achieve different goals.
Spring Boot is a Java framework which is used for quicker application development, and is specifically used in Microservice architecture.
Spring cloud is used for integrating these microservices so that they can easily work together in a distributed environment and can communicate with each other
In fact, to avail maximum benefits like less development time, it is recommended to use Spring Boot along with Spring Cloud.
Spring Cloud - Dependency Management
In this chapter, we will build our very first application using Spring Cloud. Let's go over the project structure and the dependency setup for our Spring Cloud Application while using Spring Boot as the base framework.
Core Dependency
Spring Cloud group has multiple packages listed as dependency. In this tutorial, we will be using multiple packages from the Spring Cloud group. To avoid any compatibility issue between these packages, let us use Spring Cloud dependency management POM, given below −
<dependencyManagement>
   <dependencies>
      <dependency>
         <groupId>org.springframework.cloud</groupId>
         <artifactId>spring-cloud-dependencies</artifactId>
         <version>Hoxton.SR8</version>
         <type>pom</type>
         <scope>import</scope>
      </dependency>
   </dependencies>
</dependencyManagement>
The Gradle user can achieve the same by using the following −
buildscript {
   dependencies {
      classpath "io.spring.gradle:dependency-management-plugin:1.0.10.RELEASE"
   }
}
apply plugin: "io.spring.dependency-management"
dependencyManagement {
   imports {
   mavenBom "org.springframework.cloud:spring-cloud-dependencies:
'Hoxton.SR8')"
   }
}
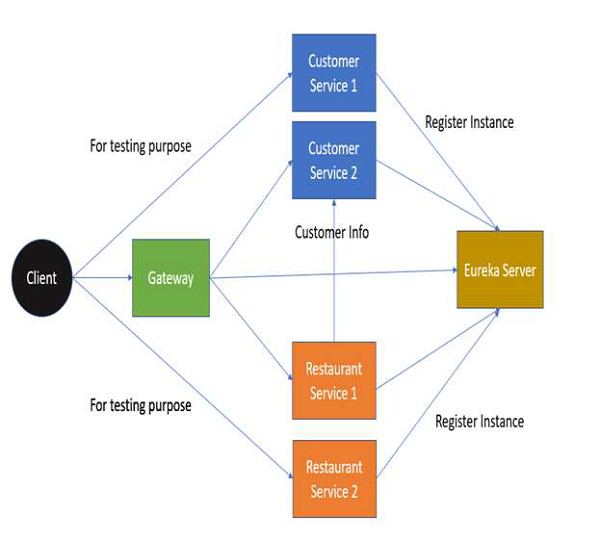
Project Architecture and Structure
For this tutorial, we will use the case of a Restaurant −
Restaurant Service Discovery − Used for registering the service address.
Restaurant Customer Service − Provides Customer information to the client and other services.
Restaurant Service − Provides Restaurant information to the client. Uses Customer service to get city information of the customer.
Restaurant Gateway − Entry point for our application. However, we will use this only once in this tutorial for simplicity sake.
On a high level, here is the project architecture −
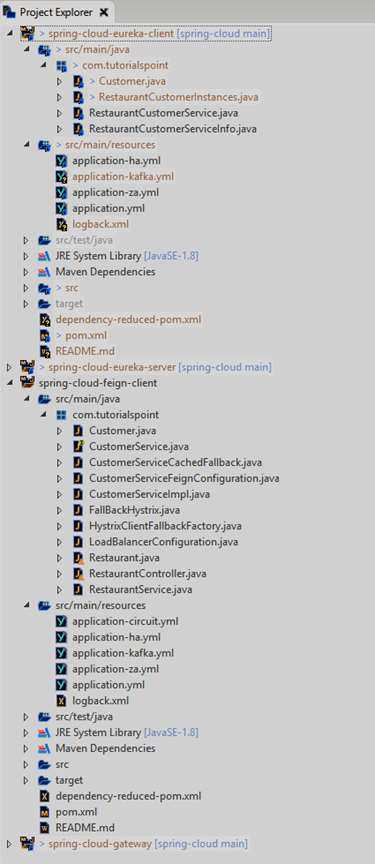
And we will have the following project structure. Note that we will look at the files in the upcoming chapters.
Project POM
For simplicity sake, we will be using Maven-based builds. Below is the base POM file, which we will use for this tutorial.
<?xml version="1.0" encoding="UTF-8"?>
<project xmlns="http://maven.apache.org/POM/4.0.0"
xmlns:xsi="http://www.w3.org/2001/XMLSchema-instance"
xsi:schemaLocation="http://maven.apache.org/POM/4.0.0
http://maven.apache.org/xsd/maven-4.0.0.xsd">
   <modelVersion>4.0.0</modelVersion>
   <groupId>com.tutorials.point</groupId>
   <artifactId>spring-cloud-eureka-client</artifactId>
   <version>1.0</version>
   <packaging>jar</packaging>
   <properties>
      <maven.compiler.source>1.8</maven.compiler.source>
      <maven.compiler.target>1.8</maven.compiler.target>
   </properties>
   <dependencyManagement>
      <dependencies>
         <dependency>
            <groupId>org.springframework.cloud</groupId>
            <artifactId>spring-cloud-dependencies</artifactId>
            <version>2020.0.1</version>
            <type>pom</type>
            <scope>import</scope>
         </dependency>
         <dependency>
            <groupId>org.springframework.boot</groupId>
            <artifactId>spring-boot-dependencies</artifactId>
            <version>2.4.0</version>
            <type>pom</type>
            <scope>import</scope>
         </dependency>
      </dependencies>
   </dependencyManagement>
   <dependencies>
      <dependency>
         <groupId>org.springframework.boot</groupId>
         <artifactId>spring-boot-starter-web</artifactId>
      </dependency>
   </dependencies>
   <build>
      <plugins>
         <plugin>
            <groupId>org.springframework.boot</groupId>
            <artifactId>spring-boot-maven-plugin</artifactId>
            <executions>
               <execution>
                  <goals>
                     <goal>repackage</goal>
                  </goals>
               </execution>
            </executions>
         </plugin>
      </plugins>
   </build>
</project>
Points to note −
The POM dependency management section almost includes all the projects which we require.We will add the dependency section as and when we require.
We will use Spring Boot as the base Framework for the development of our application and that is why you see it listed as a dependency.
Spring Cloud - Service Discovery Using Eureka
Introduction
Service discovery is one of the most critical parts when an application is deployed as microservices in the cloud. This is because for any use operation, an application in a microservice architecture may require access to multiple services and the communication amongst them.
Service discovery helps tracking the service address and the ports where the service instances can be contacted to. There are three components at play here −
Service Instances − Responsible to handle incoming request for the service and respond to those requests.
Service Registry − Keeps track of the addresses of the service instances. The service instances are supposed to register their address with the service registry.
Service Client − The client which wants access or wants to place a request and get response from the service instances. The service client contacts the service registry to get the address of the instances.
Apache Zookeeper, Eureka and Consul are a few well-known components which are used for Service Discovery. In this tutorial, we will use Eureka
Setting up Eureka Server/Registry
For setting up Eureka Server, we need to update the POM file to contain the following dependency −
<dependencies>
   <dependency>
      <groupId>org.springframework.cloud</groupId>
      <artifactId>spring-cloud-starter-netflix-eureka-server</artifactId>
   </dependency>
   <dependency>
      <groupId>org.springframework.boot</groupId>
      <artifactId>spring-boot-starter-web</artifactId>
   </dependency>
</dependencies>
And then, annotate our Spring application class with the correct annotation, i.e.,@EnableEurekaServer.
package com.tutorialspoint;
import org.springframework.boot.SpringApplication;
import org.springframework.boot.autoconfigure.SpringBootApplication;
import org.springframework.cloud.netflix.eureka.server.EnableEurekaServer;
@SpringBootApplication
@EnableEurekaServer
public class RestaurantServiceRegistry{
   public static void main(String[] args) {
      SpringApplication.run(RestaurantServiceRegistry.class, args);
   }
}
We also need a properties file if we want to configure the registry and change its default values. Here are the changes we will make −
Update the port to 8900 rather than the default 8080
In production, one would have more than one node for registry for its high availability. That’s is where we need peer-to-peer communication between registries. As we are executing this in standalone mode, we can simply set client properties to false to avoid any errors.
So, this is how our application.yml file will look like −
server:
   port: 8900
eureka:
   client:
      register-with-eureka: false
      fetch-registry: false
And that is it, let us now compile the project and run the program by using the following command −
java -jar .\target\spring-cloud-eureka-server-1.0.jar
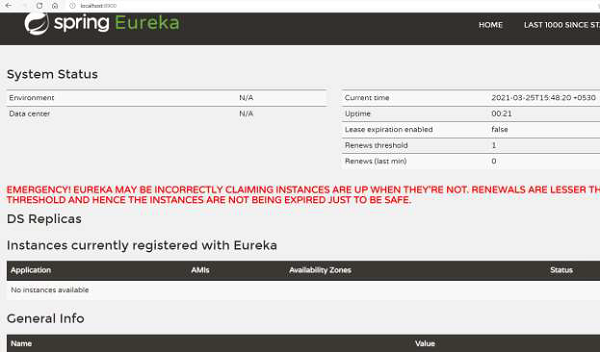
Now we can see the logs in the console −
...
2021-03-07 13:33:10.156 INFO 17660 --- [ main]
o.s.b.w.embedded.tomcat.TomcatWebServer : Tomcat initialized with port(s): 8900
(http)
2021-03-07 13:33:10.172 INFO 17660 --- [ main]
o.apache.catalina.core.StandardService : Starting service [Tomcat]
...
2021-03-07 13:33:16.483 INFO 17660 --- [ main]
DiscoveryClientOptionalArgsConfiguration : Eureka HTTP Client uses Jersey
...
2021-03-07 13:33:16.632 INFO 17660 --- [ main]
o.s.c.n.eureka.InstanceInfoFactory : Setting initial instance status as:
STARTING
2021-03-07 13:33:16.675 INFO 17660 --- [ main]
com.netflix.discovery.DiscoveryClient : Initializing Eureka in region useast-
1
2021-03-07 13:33:16.675 INFO 17660 --- [ main]
com.netflix.discovery.DiscoveryClient : Client configured to neither register
nor query for data.
2021-03-07 13:33:16.686 INFO 17660 --- [ main]
com.netflix.discovery.DiscoveryClient : Discovery Client initialized at
timestamp 1615104196685 with initial instances count: 0
...
2021-03-07 13:33:16.873 INFO 17660 --- [ Thread-10]
e.s.EurekaServerInitializerConfiguration : Started Eureka Server
2021-03-07 13:33:18.609 INFO 17660 --- [ main]
c.t.RestaurantServiceRegistry : Started RestaurantServiceRegistry in
15.219 seconds (JVM running for 16.068)
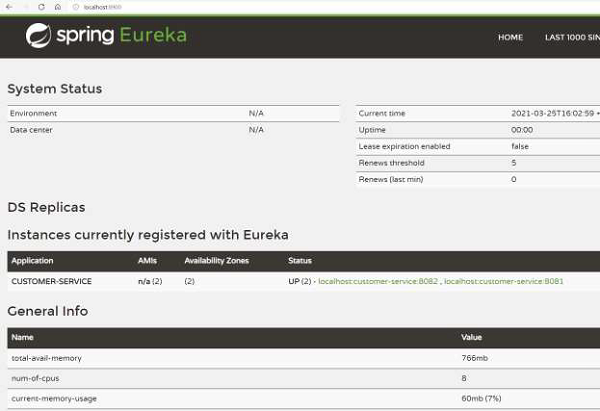
As we see from the above logs that the Eureka registry has been setup. We also get a dashboard for Eureka (see the following image) which is hosted on the server URL.
Setting up Eureka Client for Instance
Now, we will set up the service instances which would register to the Eureka server. For setting up Eureka Client, we will use a separate Maven project and update the POM file to contain the following dependency −
<dependencies>
   <dependency>
      <groupId>org.springframework.cloud</groupId>
      <artifactId>spring-cloud-starter-netflix-eureka-client</artifactId>
   </dependency>
   <dependency>
      <groupId>org.springframework.boot</groupId>
      <artifactId>spring-boot-starter-web</artifactId>
   </dependency>
</dependencies>
And then, annotate our Spring application class with the correct annotation, i.e.,@EnableDiscoveryClient
package com.tutorialspoint;
import org.springframework.boot.SpringApplication;
import org.springframework.boot.autoconfigure.SpringBootApplication;
import org.springframework.cloud.client.discovery.EnableDiscoveryClient;
@SpringBootApplication
@EnableDiscoveryClient
public class RestaurantCustomerService{
   public static void main(String[] args) {
      SpringApplication.run(RestaurantCustomerService.class, args);
   }
}
We also need a properties file if we want to configure the client and change its default values. Here are the changes we will make −
We will provide the port at runtime while jar at execution.
We will specify the URL at which Eureka server is running.
So, this is how our application.yml file will look like
spring:
   application:
      name: customer-service
server:
   port: ${app_port}
eureka:
   client:
      serviceURL:
         defaultZone: http://localhost:8900/eureka
For execution, we will have two service instances running. To do that, let's open up two shells and then execute the following command on one shell −
java -Dapp_port=8081 -jar .\target\spring-cloud-eureka-client-1.0.jar
And execute the following on the other shell −
java -Dapp_port=8082 -jar .\target\spring-cloud-eureka-client-1.0.jar
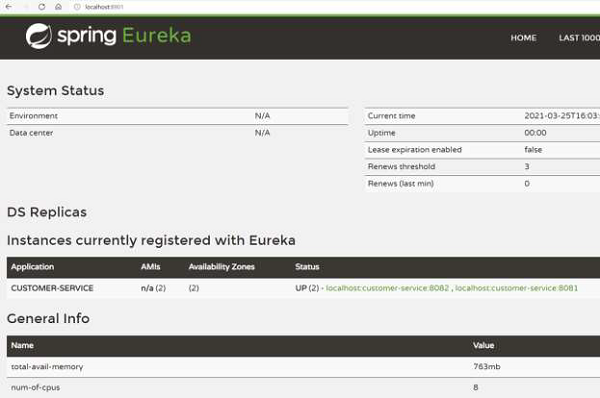
Now we can see the logs in the console −
...
2021-03-07 15:22:22.474 INFO 16920 --- [ main]
com.netflix.discovery.DiscoveryClient : Starting heartbeat executor: renew
interval is: 30
2021-03-07 15:22:22.482 INFO 16920 --- [ main]
c.n.discovery.InstanceInfoReplicator : InstanceInfoReplicator onDemand
update allowed rate per min is 4
2021-03-07 15:22:22.490 INFO 16920 --- [ main]
com.netflix.discovery.DiscoveryClient : Discovery Client initialized at
timestamp 1615110742488 with initial instances count: 0
2021-03-07 15:22:22.492 INFO 16920 --- [ main]
o.s.c.n.e.s.EurekaServiceRegistry : Registering application CUSTOMERSERVICE
with eureka with status UP
2021-03-07 15:22:22.494 INFO 16920 --- [ main]
com.netflix.discovery.DiscoveryClient : Saw local status change event
StatusChangeEvent [timestamp=1615110742494, current=UP, previous=STARTING]
2021-03-07 15:22:22.500 INFO 16920 --- [nfoReplicator-0]
com.netflix.discovery.DiscoveryClient : DiscoveryClient_CUSTOMERSERVICE/
localhost:customer-service:8081: registering service...
2021-03-07 15:22:22.588 INFO 16920 --- [ main]
o.s.b.w.embedded.tomcat.TomcatWebServer : Tomcat started on port(s): 8081
(http) with context path ''
2021-03-07 15:22:22.591 INFO 16920 --- [ main]
.s.c.n.e.s.EurekaAutoServiceRegistration : Updating port to 8081
2021-03-07 15:22:22.705 INFO 16920 --- [nfoReplicator-0]
com.netflix.discovery.DiscoveryClient : DiscoveryClient_CUSTOMERSERVICE/
localhost:customer-service:8081 - registration status: 204
...
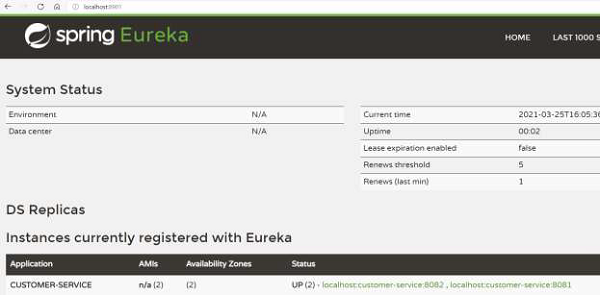
As we see from above logs that the client instance has been setup. We can also look at the Eureka Server dashboard we saw earlier. As we see, there are two instances of “CUSTOMER-SERVICE” running that the Eureka server is aware of −

Eureka Client Consumer Example
Our Eureka server has got the registered client instances of the “Customer-Service” setup. We can now setup the Consumer which can ask the Eureka Server the address of the “Customer-Service” nodes.
For this purpose, let us add a controller which can get the information from the Eureka Registry. This controller will be added to our earlier Eureka Client itself, i.e., “Customer Service”. Let us create the following controller to the client.
package com.tutorialspoint;
import java.util.List;
import org.springframework.beans.factory.annotation.Autowired;
import org.springframework.cloud.client.ServiceInstance;
import org.springframework.cloud.client.discovery.DiscoveryClient;
import org.springframework.web.bind.annotation.RequestMapping;
import org.springframework.web.bind.annotation.RestController;
@RestController
class RestaurantCustomerInstancesController {
   @Autowired
   private DiscoveryClient eurekaConsumer;
   @RequestMapping("/customer_service_instances")
Note the annotation @DiscoveryClient which is what Spring framework provides to talk to the registry.
Let us now recompile our Eureka clients. For execution, we will have two service instances running. To do that, let's open up two shells and then execute the following command on one shell −
java -Dapp_port=8081 -jar .\target\spring-cloud-eureka-client-1.0.jar
And execute the following on the other shell −
java -Dapp_port=8082 -jar .\target\spring-cloud-eureka-client-1.0.jar
Once the client on both shells have started, let us now hit the http://localhost:8081/customer_service_instances we created in the controller. This URL displays complete information about both the instances.
[
   {
      "scheme": "http",
      "host": "localhost",
      "port": 8081,
      "metadata": {
         "management.port": "8081"
      },
      "secure": false,
      "instanceInfo": {
         "instanceId": "localhost:customer-service:8081",
         "app": "CUSTOMER-SERVICE",
         "appGroupName": null,
         "ipAddr": "10.0.75.1",
         "sid": "na",
         "homePageUrl": "http://localhost:8081/",
         "statusPageUrl": "http://localhost:8081/actuator/info",
         "healthCheckUrl": "http://localhost:8081/actuator/health",
         "secureHealthCheckUrl": null,
         "vipAddress": "customer-service",
         "secureVipAddress": "customer-service",
         "countryId": 1,
         "dataCenterInfo": {
            "@class": "com.netflix.appinfo.InstanceInfo$DefaultDataCenterInfo",
            "name": "MyOwn"
         },
         "hostName": "localhost",
         "status": "UP",
         "overriddenStatus": "UNKNOWN",
         "leaseInfo": {
            "renewalIntervalInSecs": 30,
            "durationInSecs": 90,
            "registrationTimestamp": 1616667914313,
            "lastRenewalTimestamp": 1616667914313,
            "evictionTimestamp": 0,
            "serviceUpTimestamp": 1616667914313
         },
         "isCoordinatingDiscoveryServer": false,
         "metadata": {
            "management.port": "8081"
         },
         "lastUpdatedTimestamp": 1616667914313,
         "lastDirtyTimestamp": 1616667914162,
         "actionType": "ADDED",
         "asgName": null
      },
      "instanceId": "localhost:customer-service:8081",
      "serviceId": "CUSTOMER-SERVICE",
      "uri": "http://localhost:8081"
   },
   {
      "scheme": "http",
      "host": "localhost",
      "port": 8082,
      "metadata": {
         "management.port": "8082"
      },
      "secure": false,
      "instanceInfo": {
      "instanceId": "localhost:customer-service:8082",
      "app": "CUSTOMER-SERVICE",
      "appGroupName": null,
      "ipAddr": "10.0.75.1",
      "sid": "na",
      "homePageUrl": "http://localhost:8082/",
      "statusPageUrl": "http://localhost:8082/actuator/info",
      "healthCheckUrl": "http://localhost:8082/actuator/health",
      "secureHealthCheckUrl": null,
      "vipAddress": "customer-service",
      "secureVipAddress": "customer-service",
      "countryId": 1,
      "dataCenterInfo": {
         "@class": "com.netflix.appinfo.InstanceInfo$DefaultDataCenterInfo",
         "name": "MyOwn"
      },
      "hostName": "localhost",
      "status": "UP",
      "overriddenStatus": "UNKNOWN",
      "leaseInfo": {
         "renewalIntervalInSecs": 30,
         "durationInSecs": 90,
         "registrationTimestamp": 1616667913690,
         "lastRenewalTimestamp": 1616667913690,
         "evictionTimestamp": 0,
         "serviceUpTimestamp": 1616667913690
      },
      "isCoordinatingDiscoveryServer": false,
      "metadata": {
         "management.port": "8082"
      },
      "lastUpdatedTimestamp": 1616667913690,
      "lastDirtyTimestamp": 1616667913505,
      "actionType": "ADDED",
      "asgName": null
     },
     "instanceId": "localhost:customer-service:8082",
     "serviceId": "CUSTOMER-SERVICE",
     "uri": "http://localhost:8082"
   }
]
Eureka Server API
Eureka Server provides various APIs for the client instances or the services to talk to. A lot of these APIs are abstracted and can be used directly with @DiscoveryClient we defined and used earlier. Just to note, their HTTP counterparts also exist and can be useful for Non-Spring framework usage of Eureka.
In fact, the API that we used earlier, i.e., to get the information about the client running “Customer_Service” can also be invoked via the browser using http://localhost:8900/eureka/apps/customer-service as can be seen here −
<application slick-uniqueid="3">
   <div>
      <a id="slick_uniqueid"/>
   </div>
   <name>CUSTOMER-SERVICE</name>
   <instance>
         <instanceId>localhost:customer-service:8082</instanceId>
         <hostName>localhost</hostName>
         <app>CUSTOMER-SERVICE</app>
         <ipAddr>10.0.75.1</ipAddr>
         <status>UP</status>
         <overriddenstatus>UNKNOWN</overriddenstatus>
         <port enabled="true">8082</port>
         <securePort enabled="false">443</securePort>
         <countryId>1</countryId>
         <dataCenterInfo
class="com.netflix.appinfo.InstanceInfo$DefaultDataCenterInfo">
               <name>MyOwn</name>
         </dataCenterInfo>
         <leaseInfo>
            <renewalIntervalInSecs>30</renewalIntervalInSecs>
            <durationInSecs>90</durationInSecs>
            <registrationTimestamp>1616667913690</registrationTimestamp>
            <lastRenewalTimestamp>1616668273546</lastRenewalTimestamp>
            <evictionTimestamp>0</evictionTimestamp>
            <serviceUpTimestamp>1616667913690</serviceUpTimestamp>
         </leaseInfo>
         <metadata>
            <management.port>8082</management.port>
         </metadata>
         <homePageUrl>http://localhost:8082/</homePageUrl>
         <statusPageUrl>http://localhost:8082/actuator/info</statusPageUrl>
   <healthCheckUrl>http://localhost:8082/actuator/health</healthCheckUrl>
         <vipAddress>customer-service</vipAddress>
         <secureVipAddress>customer-service</secureVipAddress>
         <isCoordinatingDiscoveryServer>false</isCoordinatingDiscoveryServer>
         <lastUpdatedTimestamp>1616667913690</lastUpdatedTimestamp>
         <lastDirtyTimestamp>1616667913505</lastDirtyTimestamp>
         <actionType>ADDED</actionType>
   </instance>
   <instance>
         <instanceId>localhost:customer-service:8081</instanceId>
         <hostName>localhost</hostName>
         <app>CUSTOMER-SERVICE</app>
         <ipAddr>10.0.75.1</ipAddr>
         <status>UP</status>
         <overriddenstatus>UNKNOWN</overriddenstatus>
         <port enabled="true">8081</port>
         <securePort enabled="false">443</securePort>
         <countryId>1</countryId>
         <dataCenterInfo
class="com.netflix.appinfo.InstanceInfo$DefaultDataCenterInfo">
            <name>MyOwn</name>
         </dataCenterInfo>
         <leaseInfo>
               <renewalIntervalInSecs>30</renewalIntervalInSecs>
               <durationInSecs>90</durationInSecs>
               <registrationTimestamp>1616667914313</registrationTimestamp>
               <lastRenewalTimestamp>1616668274227</lastRenewalTimestamp>
               <evictionTimestamp>0</evictionTimestamp>
               <serviceUpTimestamp>1616667914313</serviceUpTimestamp>
         </leaseInfo>
         <metadata>
            <management.port>8081</management.port>
         </metadata>
         <homePageUrl>http://localhost:8081/</homePageUrl>
         <statusPageUrl>http://localhost:8081/actuator/info</statusPageUrl>
   <healthCheckUrl>http://localhost:8081/actuator/health</healthCheckUrl>
         <vipAddress>customer-service</vipAddress>
         <secureVipAddress>customer-service</secureVipAddress>
         <isCoordinatingDiscoveryServer>false</isCoordinatingDiscoveryServer>
         <lastUpdatedTimestamp>1616667914313</lastUpdatedTimestamp>
         <lastDirtyTimestamp>1616667914162</lastDirtyTimestamp>
         <actionType>ADDED</actionType>
   </instance>
</application>
Few other useful APIs are −
| Action | API |
|---|---|
| Register a new service | POST /eureka/apps/{appIdentifier} |
| Deregister the service | DELTE /eureka/apps/{appIdentifier} |
| Information about the service | GET /eureka/apps/{appIdentifier} |
| Information about the service instance | GET /eureka/apps/{appIdentifier}/ {instanceId} |
More details about the programmatic API can be found here https://javadoc.io/doc/com.netflix.eureka/eureka-client/latest/index.html
Eureka – High Availability
We have been using Eureka server in standalone mode. However, in a Production environment, we should ideally have more than one instance of the Eureka server running. This ensures that even if one machine goes down, the machine with another Eureka server keeps on running.
Let us try to setup Eureka server in high-availability mode. For our example, we will use two instances.For this, we will use the following application-ha.yml to start the Eureka server.
Points to note −
We have parameterized the port so that we can start multiple instances using same the config file.
We have added address, again parameterized, to pass the Eureka server address.
We are naming the app as “Eureka-Server”.
spring:
   application:
      name: eureka-server
server:
   port: ${app_port}
eureka:
   client:
      serviceURL:
         defaultZone: ${eureka_other_server_url}
Let us now recompile our Eureka server project. For execution, we will have two service instances running. To do that, let's open two shells and then execute the following command on one shell −
java -Dapp_port=8900 '-Deureka_other_server_url=http://localhost:8901/eureka' -
jar .\target\spring-cloud-eureka-server-1.0.jar --
spring.config.location=classpath:application-ha.yml
And execute the following on the other shell −
java -Dapp_port=8901 '-Deureka_other_server_url=http://localhost:8900/eureka' -
jar .\target\spring-cloud-eureka-server-1.0.jar --
spring.config.location=classpath:application-ha.yml
We can verify that the servers are up and running in high-availability mode by looking at the dashboard. For example, here is the dashboard on Eureka server 1 −
And here is the dashboard of Eureka server 2 −
So, as we see, we have two Eureka servers running and in sync. Even if one server goes down, the other server would keep functioning.
We can also update the service instance application to have addresses for both Eureka servers by having comma-separated server addresses.
spring:
   application:
      name: customer-service
server:
   port: ${app_port}
eureka:
   client:
      serviceURL:
         defaultZone: http://localhost:8900/eureka,
http://localhost:8901/eureka
Eureka – Zone Awareness
Eureka also supports the concept of zone awareness. Zone awareness as a concept is very useful when we have a cluster across different geographies. Say, we get an incoming request for a service and we need to choose the server which should service the request. Instead of sending and processing that request on a server which is located far, it is more fruitful to choose a server which is in the same zone. This is because, network bottleneck is very common in a distributed application and thus we should avoid it.
Let us now try to setup Eureka clients and make them Zone aware. For doing that, let us add application-za.yml
spring:
   application:
      name: customer-service
server:
   port: ${app_port}
eureka:
   instance:
      metadataMap:
         zone: ${zoneName}
   client:
      serviceURL:
         defaultZone: http://localhost:8900/eureka
Let us now recompile our Eureka client project. For execution, we will have two service instances running. To do that, let's open two shells and then execute the following command on one shell −
java -Dapp_port=8080 -Dzone_name=USA -jar .\target\spring-cloud-eureka-client-
1.0.jar --spring.config.location=classpath:application-za.yml
And execute the following on the other shell −
java -Dapp_port=8081 -Dzone_name=EU -jar .\target\spring-cloud-eureka-client-
1.0.jar --spring.config.location=classpath:application-za.yml
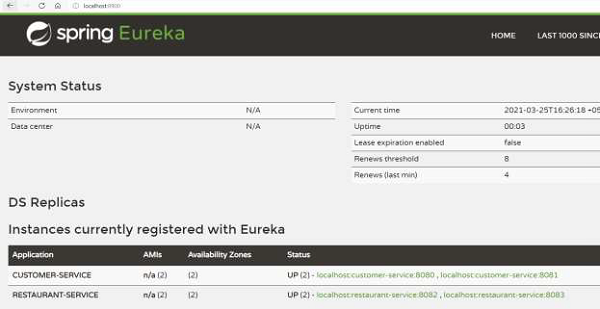
We can go back to the dashboard to verify that the Eureka Server registers the zone of the services. As seen in the following image, we have two availability zones instead of 1, which we have been seeing till now.
Now, any client can look at the zone it is present in. Say the client is located in USA, it would prefer the service instance of USA. And it can get the zone information from the Eureka Server.
Spring Cloud - Synchronous Communication with Feign
Introduction
In a distributed environment, services need to communicate with each other. The communication can either happen synchronously or asynchronously. In this section, we will look at how services can communicate by synchronous API calls.
Although this sounds simple, as part of making API calls, we need to take care of the following −
Finding address of the callee − The caller service needs to know the address of the service which it wants to call.
Load balancing − The caller service can do some intelligent load balancing to spread the load across callee services.
Zone awareness − The caller service should preferably call the services which are in the same zone for quick responses.
Netflix Feign and Spring RestTemplate (along with Ribbon) are two well-known HTTP clients used for making synchronous API calls. In this tutorial, we will use Feign Client.
Feign – Dependency Setting
Let us use the case of Restaurant we have been using in the previous chapters. Let us develop a Restaurant Service which has all the information about the restaurant.
First, let us update the pom.xml of the service with the following dependency −
<dependencies>
      <dependency>
            <groupId>org.springframework.cloud</groupId>
            <artifactId>spring-cloud-starter-openfeign</artifactId>
      </dependency>
      <dependency>
         <groupId>org.springframework.cloud</groupId>
         <artifactId>spring-cloud-starter-netflix-eureka-client</artifactId>
      </dependency>
      <dependency>
         <groupId>org.springframework.boot</groupId>
         <artifactId>spring-boot-starter-web</artifactId>
      </dependency>
</dependencies>
And then, annotate our Spring application class with the correct annotation, i.e., @EnableDiscoveryClient and @EnableFeignCLient
package com.tutorialspoint;
import org.springframework.boot.SpringApplication;
import org.springframework.boot.autoconfigure.SpringBootApplication;
import org.springframework.cloud.client.discovery.EnableDiscoveryClient;
import org.springframework.cloud.openfeign.EnableFeignClients;
@SpringBootApplication
@EnableFeignClients
@EnableDiscoveryClient
public class RestaurantService{
   public static void main(String[] args) {
      SpringApplication.run(RestaurantService.class, args);
   }
}
Points to note in the above code −
@ EnableDiscoveryClient − This is the same annotation which we use for reading/writing to the Eureka server.
@EnableFeignCLient − This annotation scans our packages for enabled feign client in our code and initializes it accordingly.
Once done, now let us look briefly at Feign Interfaces which we need to define the Feign clients.
Using Feign Interfaces for API calls
Feign client can be simply setup by defining the API calls in an interface which can be used in Feign to construct the boilerplate code required to call the APIs. For example, consider we have two services −
Service A − Caller service which uses the Feign Client.
Service B − Callee service whose API would be called by the above Feign client
The caller service, i.e., service A in this case needs to create an interface for the API which it intends to call, i.e., service B.
package com.tutorialspoint;
import org.springframework.cloud.openfeign.FeignClient;
import org.springframework.web.bind.annotation.PathVariable;
import org.springframework.web.bind.annotation.RequestMapping;
@FeignClient(name = "service-B")
public interface ServiceBInterface {
   @RequestMapping("/objects/{id}", method=GET)
   public ObjectOfServiceB getObjectById(@PathVariable("id") Long id);
   @RequestMapping("/objects/", method=POST)
   public void postInfo(ObjectOfServiceB b);
   @RequestMapping("/objects/{id}", method=PUT)
   public void postInfo((@PathVariable("id") Long id, ObjectOfBServiceB b);
}
Points to note −
The @FeignClient annotates the interfaces which will be initialized by Spring Feign and can be used by rest of the code.
Note that the FeignClient annotation needs to contain the name of the service, this is used to discover the service address, i.e., of service B from Eureka or other discovery platforms.
We can then define all the API function name which we plan to call from service A. This can be general HTTP calls with GET, POST, PUT, etc., verbs.
Once this is done, service A can simply use the following code to call the APIs of service B −
@Autowired
ServiceBInterface serviceB
.
.
.
ObjectOfServiceB object = serviceB. getObjectById(5);
Let us look at an example, to see this in action.
Example – Feign Client with Eureka
Let us say we want to find restaurants which are in the same city as that of the customer. We will use the following services −
Customer Service − Has all the customer information. We had defined this in Eureka Client section earlier.
Eureka Discovery Server − Has information about the above services. We had defined this in the Eureka Server section earlier.
Restaurant Service − New service which we will define which has all the restaurant information.
Let us first add a basic controller to our Customer service −
@RestController
class RestaurantCustomerInstancesController {
   static HashMap<Long, Customer> mockCustomerData = new HashMap();
   static{
      mockCustomerData.put(1L, new Customer(1, "Jane", "DC"));
      mockCustomerData.put(2L, new Customer(2, "John", "SFO"));
      mockCustomerData.put(3L, new Customer(3, "Kate", "NY"));
   }
   @RequestMapping("/customer/{id}")
   public Customer getCustomerInfo(@PathVariable("id") Long id) {
      return mockCustomerData.get(id);
   }
}
We will also define a Customer.java POJO for the above controller.
package com.tutorialspoint;
public class Customer {
   private long id;
   private String name;
   private String city;
   public Customer() {}
   public Customer(long id, String name, String city) {
      super();
      this.id = id;
      this.name = name;
      this.city = city;
   }
   public long getId() {
      return id;
   }
   public void setId(long id) {
      this.id = id;
   }
   public String getName() {
      return name;
   }
   public void setName(String name) {
      this.name = name;
   }
   public String getCity() {
      return city;
   }
   public void setCity(String city) {
      this.city = city;
   }
}
So, once this is added, let us recompile our project and execute the following query to start −
java -Dapp_port=8081 -jar .\target\spring-cloud-eureka-client-1.0.jar
Note − Once the Eureka server and this service is started, we should be able to see an instance of this service registered in Eureka.
To see if our API works, let's hit http://localhost:8081/customer/1
We will get the following output −
{
   "id": 1,
   "name": "Jane",
   "city": "DC"
}
This proves that our service is working fine.
Now let us move to define the Feign client which the Restaurant service will use to get the customer city.
package com.tutorialspoint;
import org.springframework.cloud.openfeign.FeignClient;
import org.springframework.web.bind.annotation.PathVariable;
import org.springframework.web.bind.annotation.RequestMapping;
@FeignClient(name = "customer-service")
public interface CustomerService {
   @RequestMapping("/customer/{id}")
   public Customer getCustomerById(@PathVariable("id") Long id);
}
The Feign client contains the name of the service and the API call we plan to use in the Restaurant service.
Finally, let us define a controller in the Restaurant service which would use the above interface.
package com.tutorialspoint;
import java.util.HashMap;
import java.util.List;
import java.util.stream.Collectors;
import org.springframework.beans.factory.annotation.Autowired;
import org.springframework.web.bind.annotation.PathVariable;
import org.springframework.web.bind.annotation.RequestMapping;
import org.springframework.web.bind.annotation.RestController;
@RestController
class RestaurantController {
   @Autowired
   CustomerService customerService;
   static HashMap<Long, Restaurant> mockRestaurantData = new HashMap();
   static{
      mockRestaurantData.put(1L, new Restaurant(1, "Pandas", "DC"));
      mockRestaurantData.put(2L, new Restaurant(2, "Indies", "SFO"));
      mockRestaurantData.put(3L, new Restaurant(3, "Little Italy", "DC"));
}
   @RequestMapping("/restaurant/customer/{id}")
   public List<Restaurant> getRestaurantForCustomer(@PathVariable("id") Long
id) {
      String customerCity = customerService.getCustomerById(id).getCity();
      return mockRestaurantData.entrySet().stream().filter(
entry -> entry.getValue().getCity().equals(customerCity))
.map(entry -> entry.getValue())
.collect(Collectors.toList());
   }
}
The most important line here is the following −
customerService.getCustomerById(id)
which is where the magic of API calling by Feign client we defined earlier happens.
Let us also define the Restaurant POJO −
package com.tutorialspoint;
public class Restaurant {
   private long id;
   private String name;
   private String city;
   public Restaurant(long id, String name, String city) {
      super();
      this.id = id;
      this.name = name;
      this.city = city;
   }
   public long getId() {
      return id;
   }
   public void setId(long id) {
      this.id = id;
   }
   public String getName() {
      return name;
   }
   public void setName(String name) {
      this.name = name;
   }
   public String getCity() {
      return city;
   }
   public void setCity(String city) {
      this.city = city;
   }
}
Once this is defined, let us create a simple JAR file with the following application.properties file −
spring:
   application:
      name: restaurant-service
server:
   port: ${app_port}
eureka:
   client:
      serviceURL:
         defaultZone: http://localhost:8900/eureka
Now let us a compile our project and use the following command to execute it −
java -Dapp_port=8083 -jar .\target\spring-cloud-feign-client-1.0.jar
In all, we have the following items running −
Standalone Eureka server
Customer service
Restaurant service
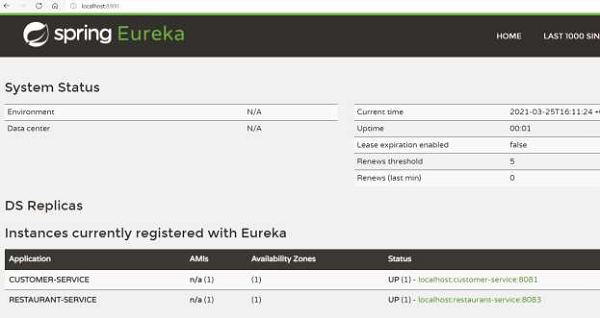
We can confirm that the above are working from the dashboard on http://localhost:8900/
Now, let us try to find all the restaurants which can serve to Jane who is placed in DC.
For this, first let us hit the customer service for the same: http://localhost:8080/customer/1
{
   "id": 1,
   "name": "Jane",
   "city": "DC"
}
And then, make a call to the Restaurant Service: http://localhost:8082/restaurant/customer/1
[
   {
      "id": 1,
      "name": "Pandas",
      "city": "DC"
   },
   {
      "id": 3,
      "name": "Little Italy",
      "city": "DC"
   }
]
As we see, Jane can be served by 2 restaurants which are in DC area.
Also, from the logs of the customer service, we can see −
2021-03-11 11:52:45.745 INFO 7644 --- [nio-8080-exec-1]
o.s.web.servlet.DispatcherServlet : Completed initialization in 1 ms
Querying customer for id with: 1
To conclude, as we see, without writing any boilerplate code and even specifying the address of the service, we can make HTTP calls to the services.
Feign Client – Zone Awareness
Feign client also supports zone awareness. Say, we get an incoming request for a service and we need to choose the server which should serve the request. Instead of sending and processing that request on a server which is located far, it is more fruitful to choose a server which is in the same zone.
Let us now try to setup a Feign client which is zone aware. For doing that, we will use the same case as in the previous example. we will have following −
A standalone Eureka server
Two instances of zone-aware Customer service (code remains same as above, we will just use the properties file mentioned in “Eureka Zone Awareness”
Two instances of zone-aware Restaurant service.
Now, let us first start the customer service which are zone aware. Just to recap, here is the application property file.
spring:
   application:
      name: customer-service
server:
   port: ${app_port}
eureka:
   instance:
      metadataMap:
         zone: ${zoneName}
   client:
      serviceURL:
         defaultZone: http://localhost:8900/eureka
For execution, we will have two service instances running. To do that, let's open two shells and then execute the following command on one shell −
java -Dapp_port=8080 -Dzone_name=USA -jar .\target\spring-cloud-eureka-client-
1.0.jar --spring.config.location=classpath:application-za.yml
And execute the following on the other shell −
java -Dapp_port=8081 -Dzone_name=EU -jar .\target\spring-cloud-eureka-client-
1.0.jar --spring.config.location=classpath:application-za.yml
Let us now create restaurant services which are zone aware. For this, we will use the following application-za.yml
spring:
   application:
      name: restaurant-service
server:
   port: ${app_port}
eureka:
   instance:
      metadataMap:
         zone: ${zoneName}
client:
   serviceURL:
      defaultZone: http://localhost:8900/eureka
For execution, we will have two service instances running. To do that, let's open two shells and then execute the following command on one shell:
java -Dapp_port=8082 -Dzone_name=USA -jar .\target\spring-cloud-feign-client-
1.0.jar --spring.config.location=classpath:application-za.yml
And execute following on the other shell −
java -Dapp_port=8083 -Dzone_name=EU -jar .\target\spring-cloud-feign-client-
1.0.jar --spring.config.location=classpath:application-za.yml
Now, we have setup two instances each of restaurant and customer service in zone-aware mode.
Now, let us test this out by hitting http://localhost:8082/restaurant/customer/1 where we are hitting USA zone.
[
   {
      "id": 1,
      "name": "Pandas",
      "city": "DC"
   },
   {
      "id": 3,
      "name": "Little Italy",
      "city": "DC"
   }
]
But the more important point here to note is that the request is served by the Customer service which is present in the USA zone and not the service which is in EU zone. For example, if we hit the same API 5 times, we will see that the customer service which runs in the USA zone will have the following in the log statements −
2021-03-11 12:25:19.036 INFO 6500 --- [trap-executor-0]
c.n.d.s.r.aws.ConfigClusterResolver : Resolving eureka endpoints via
configuration
Got request for customer with id: 1
Got request for customer with id: 1
Got request for customer with id: 1
Got request for customer with id: 1
Got request for customer with id: 1
While the customer service in EU zone does not serve any requests.
Spring Cloud - Load Balancer
Introduction
In a distributed environment, services need to communicate with each other. The communication can either happen synchronously or asynchronously. Now, when a service communicates synchronously, it is better for those services to load balance the request among workers so that a single worker does not get overwhelmed. There are two ways to load balance the request
Server-side LB − The workers are fronted by a software which distributes the incoming requests among the workers.
Client-side LB − The caller service themselves distribute the requests among the workers. The benefit of client-side load balancing is that we do not need to have a separate component in the form of a load balancer. We do not need to have high availability of the load balancer etc. Also, we avoid the need to have extra hop from client to LB to worker to get the request fulfilled. So, we save on latency, infrastructure, and maintenance cost.
Spring Cloud load balancer (SLB) and Netflix Ribbon are two well-known client-side load balancer which are used to handle such situation. In this tutorial, we will use Spring Cloud Load Balancer.
Load Balancer Dependency Setting
Let’s use the case of restaurant we have been using in the previous chapters. Let us reuse the Restaurant Service which has all the information about the restaurant. Note that we will use Feign Client with our Load balancer.
First, let us update the pom.xml of the service with following dependency −
<dependency>
      <groupId>org.springframework.cloud</groupId>
      <artifactId>spring-cloud-starter-openfeign</artifactId>
</dependency>
<dependency>
      <groupId>org.springframework.cloud</groupId>
      <artifactId>spring-cloud-starter-loadbalancer</artifactId>
</dependency>
<dependency>
      <groupId>org.springframework.cloud</groupId>
      <artifactId>spring-cloud-starter-netflix-eureka-client</artifactId>
</dependency>
<dependency>
      <groupId>org.springframework.boot</groupId>
      <artifactId>spring-boot-starter-web</artifactId>
</dependency>
Our load balancer would be using Eureka as a discovery client to get information about the worker instances. For that, we will have to use @EnableDiscoveryClient annotation.
package com.tutorialspoint;
import org.springframework.boot.SpringApplication;
import org.springframework.boot.autoconfigure.SpringBootApplication;
import org.springframework.cloud.client.discovery.EnableDiscoveryClient;
import org.springframework.cloud.openfeign.EnableFeignClients;
@SpringBootApplication
@EnableFeignClients
@EnableDiscoveryClient
public class RestaurantService{
   public static void main(String[] args) {
      SpringApplication.run(RestaurantService.class, args);
   }
}
Using Spring Load Balancer with Feign
@FeignClient annotation that we had used in Feign actually packs in a default setup for the load balancer client which round-robins our request. Let us test this out. Here is the same Feign client from our Feign section earlier.
package com.tutorialspoint;
import org.springframework.cloud.openfeign.FeignClient;
import org.springframework.web.bind.annotation.PathVariable;
import org.springframework.web.bind.annotation.RequestMapping;
@FeignClient(name = "customer-service")
public interface CustomerService {
   @RequestMapping("/customer/{id}")
   public Customer getCustomerById(@PathVariable("id") Long id);
}
And here is the controller which we will use. Again, this has not been changed.
package com.tutorialspoint;
import java.util.HashMap;
import java.util.List;
import java.util.stream.Collectors;
import org.springframework.beans.factory.annotation.Autowired;
import org.springframework.web.bind.annotation.PathVariable;
import org.springframework.web.bind.annotation.RequestMapping;
import org.springframework.web.bind.annotation.RestController;
@RestController
class RestaurantController {
   @Autowired
   CustomerService customerService;
   static HashMap<Long, Restaurant> mockRestaurantData = new HashMap();
   static{
      mockRestaurantData.put(1L, new Restaurant(1, "Pandas", "DC"));
      mockRestaurantData.put(2L, new Restaurant(2, "Indies", "SFO"));
      mockRestaurantData.put(3L, new Restaurant(3, "Little Italy", "DC"));
      mockRestaurantData.put(4L, new Restaurant(4, "Pizeeria", "NY"));
   }
   @RequestMapping("/restaurant/customer/{id}")
   public List<Restaurant> getRestaurantForCustomer(@PathVariable("id") Long
id) {
      System.out.println("Got request for customer with id: " + id);
      String customerCity = customerService.getCustomerById(id).getCity();
      return mockRestaurantData.entrySet().stream().filter(
         entry -> entry.getValue().getCity().equals(customerCity))
         .map(entry -> entry.getValue())
         .collect(Collectors.toList());
   }
}
Now that we are done with the setup, let us give this a try. Just a bit background here, what we will do is the following −
Start the Eureka Server.
Start two instances of the Customer Service.
Start a Restaurant Service which internally calls Customer Service and uses the Spring Cloud Load balancer
Make four API calls to the Restaurant Service. Ideally, two requests would be served by each customer service.
Assuming, we have started the Eureka server and the Customer service instances, let us now compile the Restaurant Service code and execute with the following command −
java -Dapp_port=8082 -jar .\target\spring-cloud-feign-client-1.0.jar
Now, let us find restaurants for Jane who is based in DC by hitting the following API http://localhost:8082/restaurant/customer/1 and let us hit the same API three times again. You would notice from the logs of the Customer Service that both the instances serve 2 requests. Each of the Customer Service shell would print the following −
Querying customer for id with: 1
Querying customer for id with: 1
This effectively means that the request was round robin-ed.
Configuring Spring Load Balancer
We can configure the load balancer to change the type of algorithm or we can also provide customized algorithm. Let us see how to tweak our load balancer to prefer the same client for the request.
For that purpose, let us update our Feign Client to contain load balancer definition.
package com.tutorialspoint;
import org.springframework.cloud.loadbalancer.annotation.LoadBalancerClient;
import org.springframework.cloud.openfeign.FeignClient;
import org.springframework.web.bind.annotation.PathVariable;
import org.springframework.web.bind.annotation.RequestMapping;
@FeignClient(name = "customer-service")
@LoadBalancerClient(name = "customer-service",
configuration=LoadBalancerConfiguration.class)
public interface CustomerService {
   @RequestMapping("/customer/{id}")
   public Customer getCustomerById(@PathVariable("id") Long id);
}
If you notice, we have added the @LoadBalancerClient annotation which specifies the type of load balancer which would be used for this Feign client. We can create a configuration class for the load balancer and pass on the class to the annotation itself. Now let us define LoadBalancerConfiguratio.java
package com.tutorialspoint;
import org.springframework.cloud.loadbalancer.core.ServiceInstanceListSupplier;
import org.springframework.context.ConfigurableApplicationContext;
import org.springframework.context.annotation.Bean;
import org.springframework.context.annotation.Configuration;
@Configuration
public class LoadBalancerConfiguration {
   @Bean
   public ServiceInstanceListSupplier
discoveryClientServiceInstanceListSupplier(
         ConfigurableApplicationContext context) {
      System.out.println("Configuring Load balancer to prefer same instance");
      return ServiceInstanceListSupplier.builder()
               .withBlockingDiscoveryClient()
               .withSameInstancePreference()
               .build(context);
      }
}
Now, as you see, we have setup our client-side load balancing to prefer the same instance every time. Now that we are done with the setup, let us give this a try. Just a bit background here, what we will do is the following −
Start the Eureka Server.
Start two instances of the Customer Service.
Start a Restaurant Service which internally calls Customer Service and uses the Spring Cloud Load balancer
Make 4 API calls to the Restaurant Service. Ideally, all four requests would be served by the same customer service.
Assuming, we have started the Eureka server and the Customer service instances, let us now compile the Restaurant Service code and now execute with the following command −
java -Dapp_port=8082 -jar .\target\spring-cloud-feign-client-1.0.jar
Now, let us find restaurants for Jane who is based in DC by hitting the following API http://localhost:8082/restaurant/customer/1 and let us hit the same API three times again. You would notice from the logs of the Customer Service that a single instance serves all 4 requests −
Querying customer for id with: 1
Querying customer for id with: 1
Querying customer for id with: 1
Querying customer for id with: 1
This effectively means that the requests have preferred the same customer service agent.
On similar lines, we can have various other load balancing algorithms to use sticky sessions, hintbased load balancing, zone preference load balancing, and so on.
Spring Cloud - Circuit Breaker using Hystrix
Introduction
In a distributed environment, services need to communicate with each other. The communication can either happen synchronously or asynchronously. When services communicate synchronously, there can be multiple reasons where things can break. For example −
Callee service unavailable − The service which is being called is down for some reason, for example − bug, deployment, etc.
Callee service taking time to respond − The service which is being called can be slow due to high load or resource consumption or it is in the middle of initializing the services.
In either of the cases, it is waste of time and network resources for the caller to wait for the callee to respond. It makes more sense for the service to back off and give calls to the callee service after some time or share default response.
Netflix Hystrix, Resilince4j are two well-known circuit breakers which are used to handle such situations. In this tutorial, we will use Hystrix.
Hystrix – Dependency Setting
Let us use the case of Restaurant that we have been using earlier. Let us add hystrix dependency to our Restaurant Services which call the Customer Service. First, let us update the pom.xml of the service with the following dependency −
<dependency>
   <groupId>org.springframework.cloud</groupId>
   <artifactId>spring-cloud-starter-netflix-hystrix</artifactId>
   <version>2.7.0.RELEASE</version>
</dependency>
And then, annotate our Spring application class with the correct annotation, i.e., @EnableHystrix
package com.tutorialspoint;
import org.springframework.boot.SpringApplication;
import org.springframework.boot.autoconfigure.SpringBootApplication;
import org.springframework.cloud.client.circuitbreaker.EnableCircuitBreaker;
import org.springframework.cloud.client.discovery.EnableDiscoveryClient;
import org.springframework.cloud.netflix.hystrix.EnableHystrix;
import org.springframework.cloud.openfeign.EnableFeignClients;
@SpringBootApplication
@EnableFeignClients
@EnableDiscoveryClient
@EnableHystrix
public class RestaurantService{
   public static void main(String[] args) {
      SpringApplication.run(RestaurantService.class, args);
   }
}
Points to Note
@ EnableDiscoveryClient and @EnableFeignCLient − We have already looked at these annotations in the previous chapter.
@EnableHystrix − This annotation scans our packages and looks out for methods which are using @HystrixCommand annotation.
Hystrix Command Annotation
Once done, we will reuse the Feign client which we had defined for our customer service class earlier in the Restaurant service, no changes here −
package com.tutorialspoint;
import org.springframework.cloud.openfeign.FeignClient;
import org.springframework.web.bind.annotation.PathVariable;
import org.springframework.web.bind.annotation.RequestMapping;
@FeignClient(name = "customer-service")
public interface CustomerService {
   @RequestMapping("/customer/{id}")
   public Customer getCustomerById(@PathVariable("id") Long id);
}
Now, let us define the service implementation class here which would use the Feign client. This would be a simple wrapper around the feign client.
package com.tutorialspoint;
import org.springframework.beans.factory.annotation.Autowired;
import org.springframework.stereotype.Service;
import com.netflix.hystrix.contrib.javanica.annotation.HystrixCommand;
@Service
public class CustomerServiceImpl implements CustomerService {
   @Autowired
   CustomerService customerService;
   @HystrixCommand(fallbackMethod="defaultCustomerWithNYCity")
   public Customer getCustomerById(Long id) {
      return customerService.getCustomerById(id);
   }
   // assume customer resides in NY city
   public Customer defaultCustomerWithNYCity(Long id) {
      return new Customer(id, null, "NY");
   }
}
Now, let us understand couple of points from the above code −
HystrixCommand annotation − This is responsible for wrapping the function call that is getCustomerById and provide a proxy around it. The proxy then gives various hooks through which we can control our call to the customer service. For example, timing out the request,pooling of request, providing a fallback method, etc.
Fallback method − We can specify the method we want to call when Hystrix determines that something is wrong with the callee. This method needs to have same signature as the method which is annotated. In our case, we have decided to provide the data back to our controller for the NY city.
Couple of useful options this annotation provides −
Error threshold percent − Percentage of request allowed to fail before the circuit is tripped, that is, fallback methods are called. This can be controlled by using cicutiBreaker.errorThresholdPercentage
Giving up on the network request after timeout − If the callee service, in our case Customer service, is slow, we can set the timeout after which we will drop the request and move to fallback method. This is controlled by setting execution.isolation.thread.timeoutInMilliseconds
And lastly, here is our controller which we call the CustomerServiceImpl
package com.tutorialspoint;
import java.util.HashMap;
import java.util.List;
import java.util.stream.Collectors;
import org.springframework.beans.factory.annotation.Autowired;
import org.springframework.web.bind.annotation.PathVariable;
import org.springframework.web.bind.annotation.RequestMapping;
import org.springframework.web.bind.annotation.RestController;
@RestController
class RestaurantController {
   @Autowired
   CustomerServiceImpl customerService;
   static HashMap<Long, Restaurant> mockRestaurantData = new HashMap();
   static{
      mockRestaurantData.put(1L, new Restaurant(1, "Pandas", "DC"));
      mockRestaurantData.put(2L, new Restaurant(2, "Indies", "SFO"));
      mockRestaurantData.put(3L, new Restaurant(3, "Little Italy", "DC"));
      mockRestaurantData.put(3L, new Restaurant(4, "Pizeeria", "NY"));
   }
   @RequestMapping("/restaurant/customer/{id}")
   public List<Restaurant> getRestaurantForCustomer(@PathVariable("id") Long
id)
{
   System.out.println("Got request for customer with id: " + id);
   String customerCity = customerService.getCustomerById(id).getCity();
   return mockRestaurantData.entrySet().stream().filter(
      entry -> entry.getValue().getCity().equals(customerCity))
      .map(entry -> entry.getValue())
      .collect(Collectors.toList());
   }
}
Circuit Tripping/Opening
Now that we are done with the setup, let us give this a try. Just a bit background here, what we will do is the following −
Start the Eureka Server
Start the Customer Service
Start the Restaurant Service which will internally call Customer Service.
Make an API call to Restaurant Service
Shut down the Customer Service
Make an API call to Restaurant Service. Given that Customer Service is down, it would cause failure and ultimately, the fallback method would be called.
Let us now compile the Restaurant Service code and execute with the following command −
java -Dapp_port=8082 -jar .\target\spring-cloud-feign-client-1.0.jar
Also, start the Customer Service and the Eureka server. Note that there are no changes in these services and they remain same as seen in the previous chapters.
Now, let us try to find restaurant for Jane who is based in DC.
{
   "id": 1,
   "name": "Jane",
   "city": "DC"
}
For doing that, we will hit the following URL: http://localhost:8082/restaurant/customer/1
[
   {
      "id": 1,
      "name": "Pandas",
      "city": "DC"
   },
   {
      "id": 3,
      "name": "Little Italy",
      "city": "DC"
   }
]
So, nothing new here, we got the restaurants which are in DC. Now, let's move to the interesting part which is shutting down the Customer service. You can do that either by hitting Ctrl+C or simply killing the shell.
Now let us hit the same URL again − http://localhost:8082/restaurant/customer/1
{
   "id": 4,
   "name": "Pizzeria",
   "city": "NY"
}
As is visible from the output, we have got the restaurants from NY, although our customer is from DC.This is because our fallback method returned a dummy customer who is situated in NY. Although, not useful, the above example displays that the fallback was called as expected.
Integrating Caching with Hystrix
To make the above method more useful, we can integrate caching when using Hystrix. This can be a useful pattern to provide better answers when the underlying service is not available.
First, let us create a cached version of the service.
package com.tutorialspoint;
import java.util.HashMap;
import java.util.Map;
import org.springframework.beans.factory.annotation.Autowired;
import org.springframework.stereotype.Service;
import com.netflix.hystrix.contrib.javanica.annotation.HystrixCommand;
@Service
public class CustomerServiceCachedFallback implements CustomerService {
   Map<Long, Customer> cachedCustomer = new HashMap<>();
   @Autowired
   CustomerService customerService;
   @HystrixCommand(fallbackMethod="defaultToCachedData")
   public Customer getCustomerById(Long id) {
      Customer customer = customerService.getCustomerById(id);
      // cache value for future reference
      cachedCustomer.put(customer.getId(), customer);
      return customer;
   }
   // get customer data from local cache
   public Customer defaultToCachedData(Long id) {
      return cachedCustomer.get(id);
   }
}
We are using hashMap as the storage to cache the data. This for developmental purpose. In Production environment, we may want to use better caching solutions, for example, Redis, Hazelcast, etc.
Now, we just need to update one line in the controller to use the above service −
@RestController
class RestaurantController {
   @Autowired
   CustomerServiceCachedFallback customerService;
   static HashMap<Long, Restaurant> mockRestaurantData = new HashMap();
   …
}
We will follow the same steps as above −
Start the Eureka Server.
Start the Customer Service.
Start the Restaurant Service which internally call Customer Service.
Make an API call to the Restaurant Service.
Shut down the Customer Service.
Make an API call to the Restaurant Service. Given that Customer Service is down but the data is cached, we will get a valid set of data.
Now, let us follow the same process till step 3.
Now hit the URL: http://localhost:8082/restaurant/customer/1
[
   {
      "id": 1,
      "name": "Pandas",
      "city": "DC"
   },
   {
      "id": 3,
      "name": "Little Italy",
      "city": "DC"
   }
]
So, nothing new here, we got the restaurants which are in DC. Now, let us move to the interesting part which is shutting down the Customer service. You can do that either by hitting Ctrl+C or simply killing the shell.
Now let us hit the same URL again − http://localhost:8082/restaurant/customer/1
[
   {
      "id": 1,
      "name": "Pandas",
      "city": "DC"
   },
   {
      "id": 3,
      "name": "Little Italy",
      "city": "DC"
   }
]
As is visible from the output, we have got the restaurants from DC which is what we expect as our customer is from DC. This is because our fallback method returned a cached customer data.
Integrating Feign with Hystrix
We saw how to use @HystrixCommand annotation to trip the circuit and provide a fallback. But we had to additionally define a Service class to wrap our Hystrix client. However, we can also achieve the same by simply passing correct arguments to Feign client. Let us try to do that. For that, first update our Feign client for CustomerService by adding a fallback class.
package com.tutorialspoint;
import org.springframework.cloud.openfeign.FeignClient;
import org.springframework.web.bind.annotation.PathVariable;
import org.springframework.web.bind.annotation.RequestMapping;
@FeignClient(name = "customer-service", fallback = FallBackHystrix.class)
public interface CustomerService {
   @RequestMapping("/customer/{id}")
   public Customer getCustomerById(@PathVariable("id") Long id);
}
Now, let us add the fallback class for the Feign client which will be called when the Hystrix circuit is tripped.
package com.tutorialspoint;
import org.springframework.stereotype.Component;
@Component
public class FallBackHystrix implements CustomerService{
   @Override
   public Customer getCustomerById(Long id) {
      System.out.println("Fallback called....");
      return new Customer(0, "Temp", "NY");
   }
}
Lastly, we also need to create the application-circuit.yml to enable hystrix.
spring:
   application:
      name: restaurant-service
server:
   port: ${app_port}
eureka:
   client:
      serviceURL:
         defaultZone: http://localhost:8900/eureka
feign:
   circuitbreaker:
      enabled: true
Now, that we have the setup ready, let us test this out. We will follow these steps −
Start the Eureka Server.
We do not start the Customer Service.
Start the Restaurant Service which will internally call Customer Service.
Make an API call to Restaurant Service. Given that Customer Service is down, we will notice the fallback.
Assuming 1st step is already done, let's move to step 3. Let us compile the code and execute the following command −
java -Dapp_port=8082 -jar .\target\spring-cloud-feign-client-1.0.jar --
spring.config.location=classpath:application-circuit.yml
Let us now try to hit − http://localhost:8082/restaurant/customer/1
As we have not started Customer Service, fallback would be called and the fallback sends over NY as the city, which is why, we see NY restaurants in the following output.
{
   "id": 4,
   "name": "Pizzeria",
   "city": "NY"
}
Also, to confirm, in the logs, we would see −
….
2021-03-13 16:27:02.887 WARN 21228 --- [reakerFactory-1]
.s.c.o.l.FeignBlockingLoadBalancerClient : Load balancer does not contain an
instance for the service customer-service
Fallback called....
2021-03-13 16:27:03.802 INFO 21228 --- [ main]
o.s.cloud.commons.util.InetUtils : Cannot determine local hostname
…..
Spring Cloud - Gateway
Introduction
In a distributed environment, services need to communicate with each other. However, this is interservice communication. We also have use-cases where a client outside our domain wants to hit our services for the API. So, either we can expose the address of all our microservices which can be called by clients OR we can create a Service Gateway which routes the request to various microservices and responds to the clients.
Creating a Gateway is much better approach here. There are two major advantages −
The security for each individual services does not need to maintained.
And, cross-cutting concerns, for example, addition of meta-information can be handled at a single place.
Netflix Zuul and Spring Cloud Gateway are two well-known Cloud Gateways which are used to handle such situations. In this tutorial, we will use Spring Cloud Gateway.
Spring Cloud Gateway – Dependency Setting
Let us use the case of Restaurant which we have been using. Let us add a new service (gateway) in front of our two services, i.e., Restaurant services and Customer Service. First, let us update the pom.xml of the service with the following dependency −
<dependencies>
   <dependency>
         <groupId>org.springframework.cloud</groupId>
         <artifactId>spring-cloud-starter-netflix-eureka-client</artifactId>
   </dependency>
   <dependency>
         <groupId>org.springframework.cloud</groupId>
         <artifactId>spring-cloud-starter-gateway</artifactId>
   </dependency>
</dependencies>
And then, annotate our Spring application class with the correct annotation, i.e., @EnableDiscoveryClient.
package com.tutorialspoint;
import org.springframework.boot.SpringApplication;
import org.springframework.boot.autoconfigure.SpringBootApplication;
import org.springframework.cloud.client.discovery.EnableDiscoveryClient;
@SpringBootApplication
@EnableDiscoveryClient
public class RestaurantGatewayService{
   public static void main(String[] args) {
      SpringApplication.run(RestaurantGatewayService.class, args);
   }
}
We are annotating with @EnableDiscoveryClient because we want to use Eureka service discovery to get the list of hosts which are serving a particular use-case
Dynamic Routing with Gateway
The Spring Cloud Gateway has three important parts to it. Those are −
Route − These are the building blocks of the gateway which contain URL to which request is to be forwarded to and the predicates and filters that are applied on the incoming requests.
Predicate − These are the set of criteria which should match for the incoming requests to be forwarded to internal microservices. For example, a path predicate will forward the request only if the incoming URL contains that path.
Filters − These act as the place where you can modify the incoming requests before sending the requests to the internal microservices or before responding back to the client.
Let us write a simple configuration for the Gateway for our Restaurant and Customer service.
spring:
   application:
      name: restaurant-gateway-service
   cloud:
      gateway:
      discovery:
         locator:
            enabled: true
      routes:
         - id: customers
            uri: lb://customer-service
            predicates:
            - Path=/customer/**
         - id: restaurants
            uri: lb://restaurant-service
            predicates:
            - Path=/restaurant/**
server:
   port: ${app_port}
eureka:
   client:
      serviceURL:
         defaultZone: http://localhost:8900/eureka
Points to note about the above configuration −
We have enabled the discovery.locator to ensure that the gateway can read from the Eureka server.
We have used Path predicated here to route the request. What this means is that any request which begins with /customer would be routed to Customer Service and for /restaurant, we will forward that request to Restaurant Service.
Now let us setup other services prior to the Gateway service −
Start the Eureka Server
Start the Customer Service
Start the Restaurant Service
Now, let us compile and execute the Gateway project. We will use the following command for the same −
java -Dapp_port=8084 -jar .\target\spring-cloud-gateway-1.0.jar
Once this is done, we have our Gateway ready to be tested on port 8084. Let’s first hit http://localhost:8084/customer/1 and we see the request is correctly routed to Customer Service and we get the following output −
{
   "id": 1,
   "name": "Jane",
   "city": "DC"
}
And now, hit our restaurant API, i.e., http://localhost:8084/restaurant/customer/1 and we get the following output −
[
   {
      "id": 1,
      "name": "Pandas",
      "city": "DC"
   },
   {
      "id": 3,
      "name": "Little Italy",
      "city": "DC"
   }
]
This means that both the calls were correctly routed to the respective services.
Predicates & Filters Request
We had used Path predicate in our above example. Here are a few other important predicates −
| Predicate | Description |
|---|---|
| Cookie predicate (input: name and regex) | Compares the cookie with the ‘name’ to the ‘regexp’ |
| Header predicate (input: name and regex) | Compares the header with the ‘name’ to the ‘regexp’ |
| Host predicate (input: name and regex) | Compares the ‘name’ of the incoming to the ‘regexp’ |
| Weight Predicate (input: Group name and the weight) | Weight Predicate (input: Group name and the weight) |
Filters are used to add/remove data from the request before sending the data to the downstream service or before sending the response back to the client.
Following are a few important filters for adding metadata.
| Filter | Description |
|---|---|
| Add request header filter (input: header and the value) | Add a ‘header’ and the ‘value’ before forwarding the request downstream. |
| Add response header filter (input: header and the value) | Add a ‘header’ and the ‘value’ before forwarding the request upstream that is to the client. |
| Redirect filter (input: status and URL) | Adds a redirect header along with the URL before passing over o the downstream host. |
| ReWritePath (input: regexp and replacement) | This is responsible for rewriting the path by replacing the ‘regexp’ matched string with the input replacement. |
The exhaustive list for filters and predicates is present at https://cloud.spring.io/spring-cloudgateway/reference/html/#the-rewritepath-gatewayfilter-factory
Monitoring
For monitoring of the Gateway or for accessing various routes, predicates, etc., we can enable the actuator in the project. For doing that, let us first update the pom.xml to contain the actuator as a dependency.
<dependency>
      <groupId>org.springframework.boot</groupId>
      <artifactId>spring-boot-starter-actuator</artifactId>
</dependency>
For monitoring, we will use a separate application property file which would contain flags to enable the actuator. So, here is how it would look like −
spring:
   application:
      name: restaurant-gateway-service
   cloud:
      gateway:
         discovery:
            locator:
               enabled: true
         routes:
            - id: customers
              uri: lb://customer-service
              predicates:
              - Path=/customer/**
            - id: restaurants
              uri: lb://restaurant-service
              predicates:
              - Path=/restaurant/**
server:
   port: ${app_port}
eureka:
   client:
      serviceURL:
         defaultZone: http://localhost:8900/eureka
management:
   endpoint:
      gateway:
         enabled: true
   endpoints:
      web:
         exposure:
            include: gateway
Now, to list all the routes, we can hit: http://localhost:8084/actuator/gateway/routes
[
   {
      "predicate": "Paths: [/customer/**], match trailing slash: true",
      "route_id": "customers",
      "filters": [],
      "uri": "lb://customer-service",
      "order": 0
   },
   {
      "predicate": "Paths: [/restaurant/**], match trailing slash: true",
      "route_id": "restaurants",
      "filters": [],
      "uri": "lb://restaurant-service",
      "order": 0
   }
]
Other important APIs for monitoring −
| API | Description |
|---|---|
| GET /actuator/gateway/routes/{id} | Get information about a particular route |
| POST /gateway/routes/{id_to_be assigned} | Add a new route to the Gateway |
| DELETE /gateway/routes/{id} | Remove the route from Gateway |
| POST /gateway/refresh | Remove all the cache entries |
Spring Cloud - Streams with Apache Kafka
Introduction
In a distributed environment, services need to communicate with each other. The communication can either happen synchronously or asynchronously. In this section, we will look at how services can communicate by asynchronously using message brokers.
Two major benefits of performing asynchronous communication −
Producer and Consumer speed can differ − If the consumer of the data is slow or fast, it does not affect the producer processing and vice versa. Both can work at their own individual speeds without affecting each other.
Producer does not need to handle requests from various consumers − There maybe multiple consumers who want to read the same set of data from the producer. With a message broker in between, the producer does not need to take care of the load these consumers generate. Plus, any outages at producer level would not block the consumer from reading older producer data, as this data would be available in the message brokers.
Apache Kafka and RabbitMQ are two well-known message brokers used for making asynchronous communication. In this tutorial, we will use Apache Kafka.
Kafka – Dependency Setting
Let’s use the case of Restaurant that we have been using earlier. So, let us say we have our Customer Service and the Restaurant Service communicating via asynchronous communication. To do that, we will use Apache Kafka. And we will need to use that in both services, i.e., Customer Service and Restaurant Service.
To use Apache Kafka, we will update the POM of both services and add the following dependency.
<dependency>
      <groupId>org.springframework.cloud</groupId>
      <artifactId>spring-cloud-starter-stream-kafka</artifactId>
</dependency>
We also need to have Kafka instances running. There are multiple ways through which it can be done,but we will prefer starting Kafka using Docker container. Here are a few images we can consider using −
Whichever image we use, the important thing here to note is that once the image is up and running,please ensure that the Kafka cluster is accessible at localhost:9092
Now that we have the Kafka cluster running on our image, let's move to the core example.
Binding & Binders
There are three important concepts when it comes to Spring Cloud streams −
External Messaging System − This is the component which is managed externally and is responsible to store the events/messages produced by the application that can be read by their subscriber/consumer. Note that this is not managed within the app/Spring. Few examples being Apache Kafka, RabbitMQ
Binders − This is the component which provides integration with messaging system, for example, consisting of IP address of messaging system, authentication, etc.
Bindings − This component uses the Binders to produce messages to the messaging system or consume the message from a specific topic/queue.
All the above properties are defined in the application properties file.
Example
Let us use the case of Restaurant that we have been using earlier. So, let us suppose whenever a new service is added to the Customer Service, we want to notify the customer info to the nearby Restaurants about him/her.
For this purpose, let us update our Customer Service first to include and use Kafka. Note that we will use Customer Service as a producer of the data. That is, whenever we add the Customer via API, it will also be added to the Kafka.
spring:
   application:
      name: customer-service
   cloud:
      stream:
         source: customerBinding-out-0
         kafka:
            binder:
            brokers: localhost:9092
            replicationFactor: 1
      bindings:
         customerBinding-out-0:
            destination: customer
            producer:
               partitionCount: 3
server:
   port: ${app_port}
eureka:
   client:
      serviceURL:
         defaultZone: http://localhost:8900/eureka
Points to note −
We have defined a binder with the address of our local Kafka instances.
We have also defined the binding ‘customerBinding-out-0’ which uses ‘customer’ topic to output the messages in.
We have also mentioned our binding in the stream.source so that we can imperatively use that in our code.
Once this is done, let us now update our controller by adding a new method ‘addCustomer’ which is responsible to serve the POST request. And then, from the post request, we send the data to the Kafka Broker.
package com.tutorialspoint;
import java.util.HashMap;
import org.springframework.beans.factory.annotation.Autowired;
import org.springframework.cloud.stream.function.StreamBridge;
import org.springframework.web.bind.annotation.PathVariable;
import org.springframework.web.bind.annotation.RequestMapping;
import org.springframework.web.bind.annotation.RequestMethod;
import org.springframework.web.bind.annotation.RestController;
@RestController
class RestaurantCustomerInstancesController {
   @Autowired
   private StreamBridge streamBridge;
   static HashMap<Long, Customer> mockCustomerData = new HashMap();
   static{
      mockCustomerData.put(1L, new Customer(1, "Jane", "DC"));
      mockCustomerData.put(2L, new Customer(2, "John", "SFO"));
      mockCustomerData.put(3L, new Customer(3, "Kate", "NY"));
   }
   @RequestMapping("/customer/{id}")
   public Customer getCustomerInfo(@PathVariable("id") Long id) {
      System.out.println("Querying customer for id with: " + id);
      return mockCustomerData.get(id);
   }
   @RequestMapping(path = "/customer/{id}", method = RequestMethod.POST)
   public Customer addCustomer(@PathVariable("id") Long id) {
      // add default name
      Customer defaultCustomer = new Customer(id, "Dwayne", "NY");
      streamBridge.send("customerBinding-out-0", defaultCustomer);
      return defaultCustomer;
   }
}
Points to note
We are Autowiring StreamBridge which is what we will use to send the messages.
The parameters we use in the ‘send’ method also specify the binding we want to use to send the data to.
Now let us update our Restaurant Service to include and subscribe to ‘customer’ topic. Note that we will use Restaurant Service as a consumer of the data. That is, whenever we add the Customer via API, the Restaurant Service would come to know about it via Kafka.
First, let us update the application properties file.
spring:
   application:
      name: restaurant-service
   cloud:
      function:
         definition: customerBinding
      stream:
         kafka:
            binder:
               brokers: localhost:9092
               replicationFactor: 1
            bindings:
               customerBinding-in-0:
               destination: customer
server:
   port: ${app_port}
eureka:
   client:
      serviceURL:
         defaultZone: http://localhost:8900/eureka
Once this is done, let us now update our controller by adding a new method ‘customerBinding’ which is responsible to fetch the request and provide a function which will print the request along with its metadata details.
package com.tutorialspoint;
import java.util.HashMap;
import java.util.List;
import java.util.function.Consumer;
import java.util.function.Supplier;
import java.util.stream.Collectors;
import org.springframework.beans.factory.annotation.Autowired;
import org.springframework.cloud.stream.annotation.StreamListener;
import org.springframework.cloud.stream.function.StreamBridge;
import org.springframework.context.annotation.Bean;
import org.springframework.kafka.support.Acknowledgment;
import org.springframework.kafka.support.KafkaHeaders;
import org.springframework.messaging.Message;
import org.springframework.messaging.support.MessageBuilder;
import org.springframework.web.bind.annotation.PathVariable;
import org.springframework.web.bind.annotation.RequestMapping;
import org.springframework.web.bind.annotation.RestController;
@RestController
class RestaurantController {
   @Autowired
   CustomerService customerService;
   @Autowired
   private StreamBridge streamBridge;
   static HashMap<Long, Restaurant> mockRestaurantData = new HashMap();
   static{
      mockRestaurantData.put(1L, new Restaurant(1, "Pandas", "DC"));
      mockRestaurantData.put(2L, new Restaurant(2, "Indies", "SFO"));
      mockRestaurantData.put(3L, new Restaurant(3, "Little Italy", "DC"));
      mockRestaurantData.put(4L, new Restaurant(4, "Pizeeria", "NY"));
   }
   @RequestMapping("/restaurant/customer/{id}")
   public List<Restaurant> getRestaurantForCustomer(@PathVariable("id") Long id) {
      System.out.println("Got request for customer with id: " + id);
      String customerCity = customerService.getCustomerById(id).getCity();
      return mockRestaurantData.entrySet().stream().filter(
entry -> entry.getValue().getCity().equals(customerCity))
.map(entry -> entry.getValue())
.collect(Collectors.toList());
   }
   @RequestMapping("/restaurant/cust/{id}")
   public void getRestaurantForCust(@PathVariable("id") Long id) {
      streamBridge.send("ordersBinding-out-0", id);
   }
   @Bean
   public Consumer<Message<Customer>> customerBinding() {
      return msg -> {
         System.out.println(msg);
      };
   }
}
Points to note −
We are using ‘customerBinding’ which is supposed to pass on the function which would be called when a message arrives for this binding.
The name that we use for this function/bean also needs to be used in the YAML file while creating the bundling and specifying the topic.
Now, let us execute the above code as always, start the Eureka Server. Note that this is not hard requirement and is present here for the sake of completeness.
Then, let us compile and start updating Customer Service using the following command −
mvn clean install ; java -Dapp_port=8083 -jar .\target\spring-cloud-eurekaclient-
1.0.jar --spring.config.location=classpath:application-kafka.yml
Then, let us compile and start updating Restaurant Service using the following command −
mvn clean install; java -Dapp_port=8082 -jar .\target\spring-cloud-feign-client-
1.0.jar --spring.config.location=classpath:application-kafka.yml
And we are set, let us now test our code pieces by hitting the API −
curl -X POST http://localhost:8083/customer/1
Here is the output that we will get for this API −
{
   "id": 1,
   "name": "Dwayne",
   "city": "NY"
}
And now, let us check the logs for the Restaurant Service −
GenericMessage [payload=Customer [id=1, name=Dwayne, city=NY],
headers={kafka_offset=1,...
So, effectively, you see that using Kafka Broker, Restaurant Service was notified about the newly added Customer.
Partitions & Consumer Groups
Partitions and Consumer Groups are two important concepts that you should be aware of while using Spring Cloud streams.
Partitions − They are used to partition the data so that we can divide the work between multiple consumers.
Let us see how to partition the data in Spring Cloud. Say, we want to partition the data based on the Customer ID. So, let us update our Customer Service for the same. For that, what we will need to tell
Let us update our Customer Service application property to specify the key for our data.
spring:
   application:
      name: customer-service
   cloud:
      function:
         definition: ordersBinding
      stream:
         source: customerBinding-out-0
         kafka:
            binder:
               brokers: localhost:9092
               replicationFactor: 1
         bindings:
            customerBinding-out-0:
               destination: customer
               producer:
                  partitionKeyExpression: 'getPayload().getId()'
                  partitionCount: 3
server:
   port: ${app_port}
eureka:
   client:
      serviceURL:
         defaultZone: http://localhost:8900/eureka
For specifying the key, i.e., “partitionKeyExpression” we provide Spring Expression Language. The expression assumes the type as GenericMessage<Customer> since we are sending the Customer data in the message. Note that GenericMessage is the Spring Framework class used for wrapping the payload and the headers in a single object. So, we get the payload from this message which is of the type Customer and then we call the getId() method on the customer.
Now, let us also update our consumer, i.e., the Restaurant Service to log more info while consuming the request.
Now, let us execute the above code as always, start the Eureka Server. Note that this is not a hard requirement and is present here for the sake of completeness.
Then, let us compile and start updating Customer Service using the following command −
mvn clean install ; java -Dapp_port=8083 -jar .\target\spring-cloud-eurekaclient-
1.0.jar --spring.config.location=classpath:application-kafka.yml
Then, let us compile and start updating Restaurant Service using the following command −
mvn clean install; java -Dapp_port=8082 -jar .\target\spring-cloud-feign-client-
1.0.jar --spring.config.location=classpath:application-kafka.yml
And we are set, let us now test our code pieces. As part of testing, here is what we will do −
Insert a customer with Id 1: curl -X POST http://localhost:8083/customer/1
Insert a customer with Id 1: curl -X POST http://localhost:8083/customer/1
Insert a customer with Id 1: curl -X POST http://localhost:8083/customer/5
Insert a customer with Id 1: curl -X POST http://localhost:8083/customer/3
Insert a customer with Id 1: curl -X POST http://localhost:8083/customer/1
We do not care much about the output of the API. Rather, we care more about the partition to which the data is sent to. Since we are using customer ID as the key, we expect that the customer with the same ID would end up in the same partition.
And now, let us check the logs for the Restaurant Service −
Consumer: org.apache.kafka.clients.consumer.KafkaConsumer@7d6d8400
Consumer Group: anonymous.9108d02a-b1ee-4a7a-8707-7760581fa323
Partition Id: 1
Customer: Customer [id=1, name=Dwayne, city=NY]
Consumer: org.apache.kafka.clients.consumer.KafkaConsumer@7d6d8400
Consumer Group: anonymous.9108d02a-b1ee-4a7a-8707-7760581fa323
Partition Id: 1
Customer: Customer [id=1, name=Dwayne, city=NY]
Consumer: org.apache.kafka.clients.consumer.KafkaConsumer@7d6d8400
Consumer Group: anonymous.9108d02a-b1ee-4a7a-8707-7760581fa323
Partition Id: 2
Customer: Customer [id=5, name=Dwayne, city=NY]
Consumer: org.apache.kafka.clients.consumer.KafkaConsumer@7d6d8400
Consumer Group: anonymous.9108d02a-b1ee-4a7a-8707-7760581fa323
Partition Id: 0
Customer: Customer [id=3, name=Dwayne, city=NY]
Consumer Group: anonymous.9108d02a-b1ee-4a7a-8707-7760581fa323
Partition Id: 1
Customer: Customer [id=1, name=Dwayne, city=NY]
So, as we see, Customer with Id 1 ended up in the same partition every time, i.e., partition 1.
Consumer Group − A consumer group is the logical grouping of consumers reading the same topic for the same purpose. Data in a topic is partitioned between the consumers in a consumer group so that only one consumer from a given consumer group can read a partition of a topic.
To define a consumer group, all we need to do is define a group in the bindings where we use the Kafka topic name. For example, let us define the consumer group name in our application file for our controller.
spring:
   application:
      name: restaurant-service
   cloud:
      function:
         definition: customerBinding
      stream:
         kafka:
            binder:
               brokers: localhost:9092
               replicationFactor: 1
            bindings:
               customerBinding-in-0:
               destination: customer
               group: restController
server:
   port: ${app_port}
eureka:
   client:
      serviceURL:
         defaultZone: http://localhost:8900/eureka
Let us recompile and start the Restaurant Service. Now, let us generate the event by hitting the POST API on the Customer Service −
Insert a customer with Id 1: curl -X POST http://localhost:8083/customer/1
Now, if we check the logs of our Restaurant Service, we will see the following −
Consumer: org.apache.kafka.clients.consumer.KafkaConsumer@7d6d8400
Consumer Group: restContoller
Partition Id: 1
Customer: Customer [id=1, name=Dwayne, city=NY]
So, as we see from the output, we have a consumer group called ‘rest-contoller’ created, whose consumers are responsible to read the topics. In the above case, we just had a single instance of the service running, so all the partition of the ‘customer’ topic was assigned to the same instance. But, if we have multiple partitions, we will have partitions distributed among the workers.
Distributed Logging using ELK and Sleuth
Introduction
In a distributed environment or in a monolithic environment, application logs are very critical for debugging whenever something goes wrong. In this section, we will look at how to effectively log and improve traceability so that we can easily look at the logs.
Two major reasons why logging patterns become critical for logging −
Inter-service calls − In a microservice architecture, we have async and sync calls between services. It is very critical to link these requests, as there can be more than one level of nesting for a single request.
Intra-service calls − A single service gets multiple requests and the logs for them can easily get intermingled. That is why, having some ID associated with the request becomes important to filter all the logs for a request.
Sleuth is a well-known tool used for logging in application and ELK is used for simpler observation across the system.
Dependency Setting
Let us use the case of Restaurant that we have been using in every chapter. So, let us say we have our Customer service and the Restaurant service communicating via API, i.e., synchronous communication. And we want to have Sleuth for tracing the request and the ELK stack for centralized visualization.
To do that, first setup the ELK stack. To do that, first, we will setup the ELK stack. We will be starting the ELK stack using Docker containers. Here are the images that we can consider −
Once ELK setup has been performed, ensure that it is working as expected by hitting the following APIs −
Elasticsearch − localhost:9200
Kibana − localhost:5601
We will look at logstash configuration file at the end of this section.
Then, let us add the following dependency to our Customer Service and the Restaurant Service −
<dependency>
      <groupId>org.springframework.cloud</groupId>
      <artifactId>spring-cloud-starter-sleuth</artifactId>
</dependency>
Now that we have the dependency setup and ELK running, let us move to the core example.
Request Tracing inside Service
On a very basic level, following are the metadata that are added by Sleuth −
Service name − Service currently processing the request.
Trace Id − A metadata ID is added to the logs which is sent across services for processing an input request. This is useful for inter-service communication for grouping all the internal requests which went in processing one input request.
Span Id − A metadata ID is added to the logs which is same across all log statements which are logged by a service for processing a request. It is useful for intra-service logs. Note that Span ID = Trace Id for the parent service.
Let us see this in action. For that, let us update our Customer Service code to contain log lines. Here is the controller code that we would use.
package com.tutorialspoint;
import java.util.HashMap;
import org.slf4j.Logger;
import org.slf4j.LoggerFactory;
import org.springframework.beans.factory.annotation.Autowired;
import org.springframework.messaging.Message;
import org.springframework.web.bind.annotation.PathVariable;
import org.springframework.web.bind.annotation.RequestMapping;
import org.springframework.web.bind.annotation.RequestMethod;
import org.springframework.web.bind.annotation.RestController;
@RestController
class RestaurantCustomerInstancesController {
   Logger logger =
LoggerFactory.getLogger(RestaurantCustomerInstancesController.class);
   static HashMap<Long, Customer> mockCustomerData = new HashMap();
   static{
      mockCustomerData.put(1L, new Customer(1, "Jane", "DC"));
      mockCustomerData.put(2L, new Customer(2, "John", "SFO"));
      mockCustomerData.put(3L, new Customer(3, "Kate", "NY"));
   }
   @RequestMapping("/customer/{id}")
   public Customer getCustomerInfo(@PathVariable("id") Long id) {
      logger.info("Querying customer with id: " + id);
      Customer customer = mockCustomerData.get(id);
      if(customer != null) {
         logger.info("Found Customer: " + customer);
      }
      return customer;
   }
}
Now let us execute the code, as always, start the Eureka Server. Note that this is not a hard requirement and is present here for the sake of completeness.
Then, let us compile and start updating Customer Service using the following command −
mvn clean install ; java -Dapp_port=8083 -jar .\target\spring-cloud-eurekaclient-
1.0.jar
And we are set, let us now test our code pieces by hitting the API −
curl -X GET http://localhost:8083/customer/1
Here is the output that we will get for this API −
{
   "id": 1,
   "name": "Jane",
   "city": "DC"
}
And now let us check the logs for Customer Service −
2021-03-23 13:46:59.604 INFO [customerservice,
b63d4d0c733cc675,b63d4d0c733cc675] 11860 --- [nio-8083-exec-7]
.t.RestaurantCustomerInstancesController : Querying customer with id: 1
2021-03-23 13:46:59.605 INFO [customerservice,
b63d4d0c733cc675,b63d4d0c733cc675] 11860 --- [nio-8083-exec-7]
.t.RestaurantCustomerInstancesController : Found Customer: Customer [id=1,
name=Jane, city=DC]
…..
So, effectively, as we see, we have the name of the service, trace ID, and the span ID added to our log statements.
Request Tracing across Service
Let us see how we can do logging and tracing across service. So, for example, what we will do is to use the Restaurant Service which internally calls the Customer Service.
For that, let us update our Restaurant Service code to contain log lines. Here is the controller code that we would use.
package com.tutorialspoint;
import java.util.HashMap;
import java.util.List;
import java.util.function.Consumer;
import java.util.function.Supplier;
import java.util.stream.Collectors;
import org.slf4j.Logger;
import org.slf4j.LoggerFactory;
import org.springframework.beans.factory.annotation.Autowired;
import org.springframework.context.annotation.Bean;
import org.springframework.web.bind.annotation.PathVariable;
import org.springframework.web.bind.annotation.RequestMapping;
import org.springframework.web.bind.annotation.RestController;
@RestController
class RestaurantController {
   @Autowired
   CustomerService customerService;
   Logger logger = LoggerFactory.getLogger(RestaurantController.class);
   static HashMap<Long, Restaurant> mockRestaurantData = new HashMap();
   static{
      mockRestaurantData.put(1L, new Restaurant(1, "Pandas", "DC"));
      mockRestaurantData.put(2L, new Restaurant(2, "Indies", "SFO"));
      mockRestaurantData.put(3L, new Restaurant(3, "Little Italy", "DC"));
      mockRestaurantData.put(4L, new Restaurant(4, "Pizeeria", "NY"));
   }
   @RequestMapping("/restaurant/customer/{id}")
   public List<Restaurant> getRestaurantForCustomer(@PathVariable("id") Long id) {
      logger.info("Get Customer from Customer Service with customer id: " + id);
      Customer customer = customerService.getCustomerById(id);
      logger.info("Found following customer: " + customer);
      String customerCity = customer.getCity();
      return mockRestaurantData.entrySet().stream().filter(
      entry -> entry.getValue().getCity().equals(customerCity))
      .map(entry -> entry.getValue())
      .collect(Collectors.toList());
   }
}
Let us compile and start updating Restaurant Service using the following command −
mvn clean install; java -Dapp_port=8082 -jar .\target\spring-cloud-feign-client-1.0.jar
Ensure that we have the Eureka server and the Customer service running. And we are set, let us now test our code pieces by hitting the API −
curl -X GET http://localhost:8082/restaurant/customer/2
Here is the output that we will get for this API −
[
   {
      "id": 2,
      "name": "Indies",
      "city": "SFO"
   }
]
And now, let us check the logs for Restaurant Service −
2021-03-23 14:44:29.381 INFO [restaurantservice,
6e0c5b2a4fc533f8,6e0c5b2a4fc533f8] 19600 --- [nio-8082-exec-6]
com.tutorialspoint.RestaurantController : Get Customer from Customer Service
with customer id: 2
2021-03-23 14:44:29.400 INFO [restaurantservice,
6e0c5b2a4fc533f8,6e0c5b2a4fc533f8] 19600 --- [nio-8082-exec-6]
com.tutorialspoint.RestaurantController : Found following customer: Customer
[id=2, name=John, city=SFO]
Then, let us check the logs for Customer Service −
2021-03-23 14:44:29.392 INFO [customerservice,
6e0c5b2a4fc533f8,f2806826ac76d816] 11860 --- [io-8083-exec-10]
.t.RestaurantCustomerInstancesController : Querying customer with id: 2
2021-03-23 14:44:29.392 INFO [customerservice,
6e0c5b2a4fc533f8,f2806826ac76d816] 11860 --- [io-8083-exec-10]
.t.RestaurantCustomerInstancesController : Found Customer: Customer [id=2,
name=John, city=SFO]…..
So, effectively, as we see, we have the name of the service, trace ID, and the span ID added to our log statements. Plus, we see the trace Id, i.e., 6e0c5b2a4fc533f8 being repeated in Customer Service and the Restaurant Service.
Centralized Logging with ELK
What we have seen till now is a way to improve our logging and tracing capability via Sleuth. However, in microservice architecture, we have multiple services running and multiple instances of each service running. It is not practical to look at the logs of each instance to identify the request flow. And that is where ELK helps us.
Let us use the same case of inter-service communication as we did for Sleuth. Let us update our Restaurant and Customer to add logback appenders for the ELK stack.
Before moving ahead, please ensure that ELK stack has been setup and Kibana is accessible at localhost:5601. Also, configure the Lostash configuration with the following setup −
input {
   tcp {
      port => 8089
      codec => json
   }
}
output {
   elasticsearch {
      index => "restaurant"
      hosts => ["http://localhost:9200"]
   }
}
Once this is done, there are two steps we need to do to use logstash in our Spring app. We will perform the following steps for both our services. First, add a dependency for logback to use appender for Logstash.
<dependency>
<groupId>net.logstash.logback</groupId>
   <artifactId>logstash-logback-encoder</artifactId>
   <version>6.6</version>
</dependency>
And secondly, add an appender for logback so that the logback can use this appender to send the data to Logstash
<?xml version="1.0" encoding="UTF-8"?>
<configuration>
   <appender name="logStash"
class="net.logstash.logback.appender.LogstashTcpSocketAppender">
      <destination>10.24.220.239:8089</destination>
      <encoder class="net.logstash.logback.encoder.LogstashEncoder" />
   </appender>
   <appender name="console" class="ch.qos.logback.core.ConsoleAppender">
      <encoder>
         <pattern>%d{HH:mm:ss.SSS} [%thread] %-5level %logger{36} -
%msg%n</pattern>
      </encoder>
   </appender>
   <root level="INFO">
      <appender-ref ref="logStash" />
      <appender-ref ref="console" />
   </root>
</configuration>
The above appender would log to console as well as send the logs to logstash. Now one this is done, we are all set to test this out.
Now, let us execute the above code as always, start the Eureka Server.
Then, let us compile and start updating Customer Service using the following command −
mvn clean install ; java -Dapp_port=8083 -jar .\target\spring-cloud-eurekaclient- 1.0.jar
Then, let us compile and start updating Restaurant Service using the following command −
mvn clean install; java -Dapp_port=8082 -jar .\target\spring-cloud-feign-client- 1.0.jar
And we are set, let us now test our code pieces by hitting the API −
curl -X GET http://localhost:8082/restaurant/customer/2
Here is the output that we will get for this API −
[
   {
      "id": 2,
      "name": "Indies",
      "city": "SFO"
   }
]
But more importantly, the log statements would also be available on Kibana.
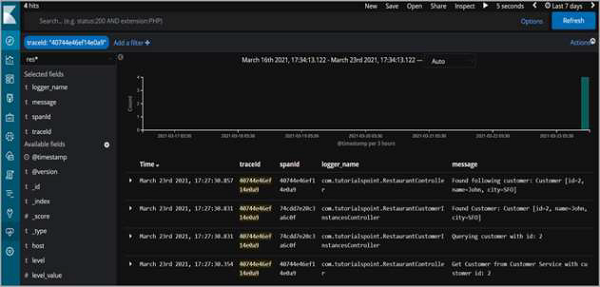
So, as we see, we can filter for a traceId and see all the log statements across services which were logged to fulfill the request.