- PySimpleGUI Tutorial
- PySimpleGUI - Home
- PySimpleGUI - Introduction
- PySimpleGUI - Environment Setup
- PySimpleGUI - Hello World
- PySimpleGUI - Popup Windows
- PySimpleGUI - Window Class
- PySimpleGUI - Element Class
- PySimpleGUI - Events
- PySimpleGUI - Menubar
- PySimpleGUI - Matplotlib Integration
- PySimpleGUI - Working with PIL
- PySimpleGUI - Debugger
- PySimpleGUI - Settings
- PySimpleGUI Useful Resources
- PySimpleGUI - Quick Guide
- PySimpleGUI - Useful Resources
- PySimpleGUI - Discussion
PySimpleGUI - Input Element
This type of widget is most popular in any GUI toolkit. The Input element is based on the Entry widget in TKinter. The object of this class gives a input text field of single line.
In addition to the common properties, those specific to the Input element are as follows −
| Sr.No. | Property & Description |
|---|---|
| 1 | default_text Text initially shown in the input box as a default value |
| 2 | disabled Set disable state for element |
| 3 | use_readonly_for_disable If True (the default) tkinter state set to 'readonly'. Otherwise state set to 'disabled' |
| 4 | password_char Password character if this is a password field |
The Input class defines the get() method which returns the text entered by the user. The update() method changes some of the settings for the Input Element. Following properties are defined:
| Sr.No. | Property & Description |
|---|---|
| 1 | value new text to display as default text in Input field |
| 2 | disabled disable or enable state of the element |
| 3 | select if True, then the text will be selected |
| 4 | visible change visibility of element |
| 5 | move_cursor_to Moves the cursor to a particular offset. Defaults to 'end' |
| 6 | password_char Password character if this is a password field |
| 7 | paste If True "Pastes" the value into the element rather than replacing the entire element. If anything is selected it is replaced. The text is inserted at the current cursor location. |
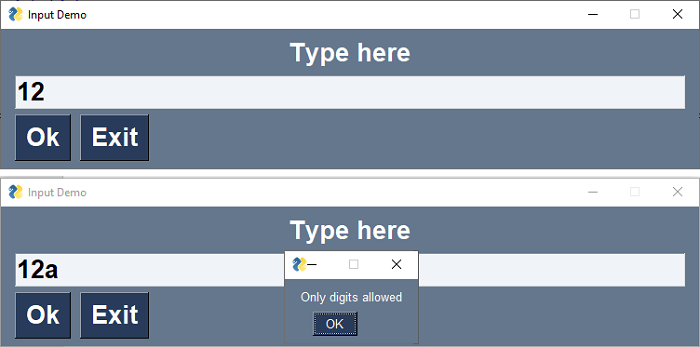
In the example give below, the window has an Input element to accept user input. It is programmed to accept only digits. If any non-digit key is pressed, a message pops up informing that it is not allowed. For that, the last character from the Input is compared with a string made of digit characters. If the last key pressed is not a digit, it is removed from the Input box.
import PySimpleGUI as psg
l1 = psg.Text('Type here', key='-OUT-', font=('Arial Bold', 20), expand_x=True, justification='center')
t1 = psg.Input('', enable_events=True, key='-INPUT-', font=('Arial Bold', 20), expand_x=True, justification='left')
b1 = psg.Button('Ok', key='-OK-', font=('Arial Bold', 20))
b2 = psg.Button('Exit', font=('Arial Bold', 20))
layout = [[l1], [t1], [b1, b2]]
window = psg.Window('Input Demo', layout, size=(750, 150))
while True:
   event, values = window.read()
   print(event, values)
   if event == '-INPUT-':
      if values['-INPUT-'][-1] not in ('0123456789'):
         psg.popup("Only digits allowed")
         window['-INPUT-'].update(values['-INPUT-'][:-1])
   if event == psg.WIN_CLOSED or event == 'Exit':
      break
window.close()
It will produce the following output window −
Multiline Element
If you wish to input a text consisting of mor than one lines, you can use Multiline element instead of Input element. In fact, it is used as an input as well as output element. If the length of the text is more than the height/width of the text entered/displayed, the scroll bars appear to the element.
Following properties are specific to Multiline element −
| Sr.No. | Property & Description |
|---|---|
| 1 | default_text Initial text to show |
| 2 | autoscroll If True the contents of the element will automatically scroll as more data added to the end |
| 3 | auto_size_text If True (the default) tkinter state set to 'readonly'. Otherwise state set to 'disabled' |
| 4 | horizontal_scroll Controls if a horizontal scrollbar should be shown. If True a horizontal scrollbar will be shown in addition to vertical |
| 5 | reroute_stdout If True, then all output to stdout will be output to this element |
| 6 | reroute_cprint If True, your cprint calls will output to this element. |
| 7 | no_scrollbar If False, then a vertical scrollbar will be shown (the default) |
Like the Input element, the Multiline class also has a get() method to retrieve its text content. The Update() method changes the values of some properties of this element. For example −
value − new text to display
append − If True, then the new value will be added onto the end of the current value. if False then contents will be replaced.
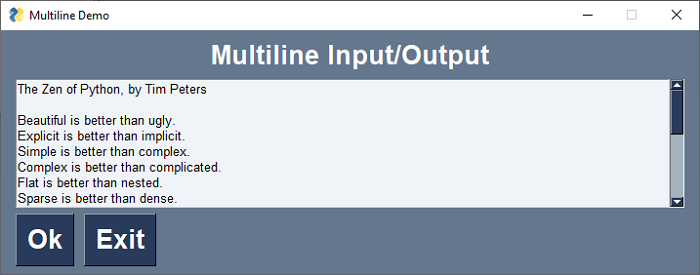
In the following example, a Multiline textbox is used to display the contents of a text file −
import PySimpleGUI as psg
file = open("zen.txt")
text = file.read()
l1 = psg.Text('Multiline Input/Output', font=('Arial Bold', 20), expand_x=True, justification='center')
t1 = psg.Multiline(text, enable_events=True, key='-INPUT-', expand_x=True, expand_y=True, justification='left')
b1 = psg.Button('Ok', key='-OK-', font=('Arial Bold', 20))
b2 = psg.Button('Exit', font=('Arial Bold', 20))
layout = [[l1], [t1], [b1, b2]]
window = psg.Window('Multiline Demo', layout, size=(715, 250))
while True:
   event, values = window.read()
   if event == psg.WIN_CLOSED or event == 'Exit':
      break
window.close()
The program will produce the following output window −