- PyQt5 Tutorial
- PyQt5 - Home
- PyQt5 - Introduction
- PyQt5 - What’s New
- PyQt5 - Hello World
- PyQt5 - Major Classes
- PyQt5 - Using Qt Designer
- PyQt5 - Signals & Slots
- PyQt5 - Layout Management
- PyQt5 - Basic Widgets
- PyQt5 - QDialog Class
- PyQt5 - QMessageBox
- PyQt5 - Multiple Document Interface
- PyQt5 - Drag & Drop
- PyQt5 - Database Handling
- PyQt5 - Drawing API
- PyQt5 - BrushStyle Constants
- PyQt5 - QClipboard
- PyQt5 - QPixmap Class
- PyQt5 Useful Resources
- PyQt5 - Quick Guide
- PyQt5 - Useful Resources
- PyQt5 - Discussion
PyQt5 - QBoxLayout Class
QBoxLayout class lines up the widgets vertically or horizontally. Its derived classes are QVBoxLayout (for arranging widgets vertically) and QHBoxLayout (for arranging widgets horizontally). Following table shows the important methods of QBoxLayout class −
| Sr.No. | Methods & Description |
|---|---|
| 1 |
addWidget() Add a widget to the BoxLayout |
| 2 |
addStretch() Creates empty stretchable box |
| 3 |
addLayout() Add another nested layout |
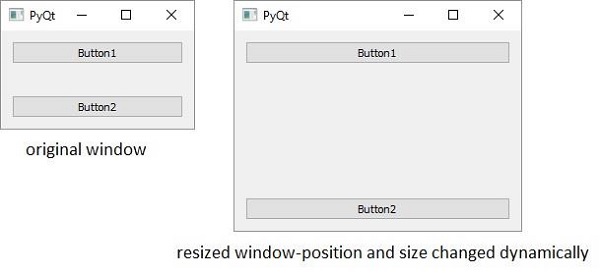
Example
Here two buttons are added in the vertical box layout. A stretchable empty space is added between them by addStretch() method. Therefore, if the top level window is resized, the position of buttons automatically gets relocated.
import sys
from PyQt5.QtCore import *
from PyQt5.QtGui import *
from PyQt5.QtWidgets import *

def window():
   app = QApplication(sys.argv)
   win = QWidget()

   b1 = QPushButton("Button1")
   b2 = QPushButton("Button2")

   vbox = QVBoxLayout()
   vbox.addWidget(b1)
   vbox.addStretch()
   vbox.addWidget(b2)
   win.setLayout(vbox)

   win.setWindowTitle("PyQt")
   win.show()
   sys.exit(app.exec_())

if __name__ == '__main__':
   window()
Output
The above code produces the following output −
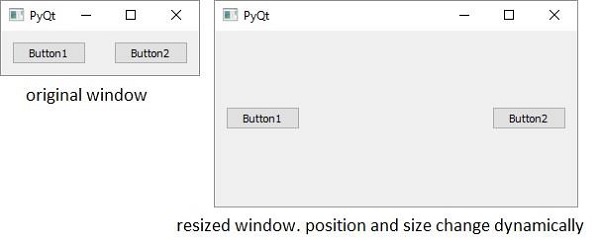
Example
This example uses horizontal box layout. addStretch() method inserts a stretchable empty space between the two button objects. Hence, as the window is resized, the size and position of the button changes dynamically.
import sys
from PyQt5.QtCore import *
from PyQt5.QtGui import *
from PyQt5.QtWidgets import *

def window():
   app = QApplication(sys.argv)
   win = QWidget()

   b1 = QPushButton("Button1")
   b2 = QPushButton("Button2")

   hbox = QHBoxLayout()
   hbox.addWidget(b1)
   hbox.addStretch()
   hbox.addWidget(b2)
   win.setLayout(hbox)
   win.setWindowTitle("PyQt")
   win.show()
   sys.exit(app.exec_())

if __name__ == '__main__':
   window()
Output
The above code produces the following output −
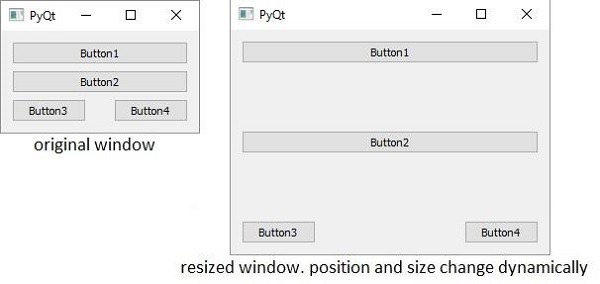
Example
This example shows how the layouts can be nested. Here, two buttons are added to vertical box layout. Then, a horizontal box layout object with two buttons and a stretchable empty space is added to it. Finally, the vertical box layout object is applied to the top level window by the setLayout() method.
import sys
from PyQt5.QtCore import *
from PyQt5.QtGui import *
from PyQt5.QtWidgets import *

def window():
   app = QApplication(sys.argv)
   win = QWidget()

   b1 = QPushButton("Button1")
   b2 = QPushButton("Button2")

   vbox = QVBoxLayout()
   vbox.addWidget(b1)
   vbox.addStretch()
   vbox.addWidget(b2)
   hbox = QHBoxLayout()

   b3 = QPushButton("Button3")
   b4 = QPushButton("Button4")
   hbox.addWidget(b3)
   hbox.addStretch()
   hbox.addWidget(b4)

   vbox.addStretch()
   vbox.addLayout(hbox)
   win.setLayout(vbox)

   win.setWindowTitle("PyQt")
   win.show()
   sys.exit(app.exec_())

if __name__ == '__main__':
   window()
Output
The above code produces the following output −