- PyQt5 Tutorial
- PyQt5 - Home
- PyQt5 - Introduction
- PyQt5 - What’s New
- PyQt5 - Hello World
- PyQt5 - Major Classes
- PyQt5 - Using Qt Designer
- PyQt5 - Signals & Slots
- PyQt5 - Layout Management
- PyQt5 - Basic Widgets
- PyQt5 - QDialog Class
- PyQt5 - QMessageBox
- PyQt5 - Multiple Document Interface
- PyQt5 - Drag & Drop
- PyQt5 - Database Handling
- PyQt5 - Drawing API
- PyQt5 - BrushStyle Constants
- PyQt5 - QClipboard
- PyQt5 - QPixmap Class
- PyQt5 Useful Resources
- PyQt5 - Quick Guide
- PyQt5 - Useful Resources
- PyQt5 - Discussion
PyQt5 - Database Handling
PyQt5 library contains QtSql module. It is an elaborate class system to communicate with many SQL based databases. Its QSqlDatabase provides access through a Connection object. Following is the list of currently available SQL drivers −
| Sr.No. | Driver Type & Description |
|---|---|
| 1 |
QDB2 IBM DB2 |
| 2 |
QIBASE Borland InterBase Driver |
| 3 |
QMYSQL MySQL Driver |
| 4 |
QOCI Oracle Call Interface Driver |
| 5 |
QODBC ODBC Driver (includes Microsoft SQL Server) |
| 6 |
QPSQL PostgreSQL Driver |
| 7 |
QSQLITE SQLite version 3 or above |
| 8 |
QSQLITE2 SQLite version 2 |
Example
For this chapter, a connection with a SQLite database is established using the static method −
db = QtSql.QSqlDatabase.addDatabase('QSQLITE')
db.setDatabaseName('sports.db')
Other methods of QSqlDatabase class are as follows −
| Sr.No. | Methods & Description |
|---|---|
| 1 |
setDatabaseName() Sets the name of the database with which connection is sought |
| 2 |
setHostName() Sets the name of the host on which the database is installed |
| 3 |
setUserName() Specifies the user name for connection |
| 4 |
setPassword() Sets the connection object’s password if any |
| 5 |
commit() Commits the transactions and returns true if successful |
| 6 |
rollback() Rolls back the database transaction |
| 7 |
close() Closes the connection |
QSqlQuery class has the functionality to execute and manipulate SQL commands. Both DDL and DML type of SQL queries can be executed. First step is to create SQlite database using the following statements −
db = QSqlDatabase.addDatabase('QSQLITE')
db.setDatabaseName('sportsdatabase.db')
Next, obtain Query object with QSqlQuery() method and call its most important method exec_(), which takes as an argument a string containing SQL statement to be executed.
query = QtSql.QSqlQuery()
query.exec_("create table sportsmen(id int primary key, " "firstname varchar(20), lastname varchar(20))")
The following script creates a SQLite database sports.db with a table of sportsperson populated with five records.
import sys
from PyQt5.QtSql import *
from PyQt5.QtCore import *
from PyQt5.QtGui import *
from PyQt5.QtWidgets import *

def createDB():
   db = QSqlDatabase.addDatabase('QSQLITE')
   db.setDatabaseName('sportsdatabase.db')

   if not db.open():
      msg = QMessageBox()
      msg.setIcon(QMessageBox.Critical)
      msg.setText("Error in Database Creation")
      retval = msg.exec_()
      return False
   query = QSqlQuery()

   query.exec_("create table sportsmen(
      id int primary key, ""firstname varchar(20), lastname varchar(20))")

   query.exec_("insert into sportsmen values(101, 'Roger', 'Federer')")
   query.exec_("insert into sportsmen values(102, 'Christiano', 'Ronaldo')")
   query.exec_("insert into sportsmen values(103, 'Ussain', 'Bolt')")
   query.exec_("insert into sportsmen values(104, 'Sachin', 'Tendulkar')")
   query.exec_("insert into sportsmen values(105, 'Saina', 'Nehwal')")
   return True

if __name__ == '__main__':
   app = QApplication(sys.argv)
   createDB()
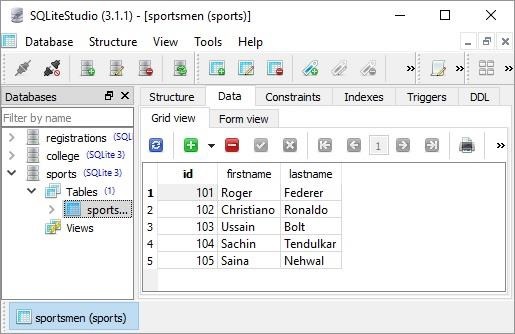
To confirm that the SQLite database is created with above records added in sportsmen table in it, use a SQLite Gui utility called SQLiteStudio.
QSqlTableModel class in PyQt is a high-level interface that provides editable data model for reading and writing records in a single table. This model is used to populate a QTableView object. It presents to the user a scrollable and editable view that can be put on any top level window.
A QSqlTableModel object is declared in the following manner −
model = QtSql.QSqlTableModel()
Its editing strategy can be set to any of the following −
| QSqlTableModel.OnFieldChange | All changes will be applied immediately |
|---|---|
| QSqlTableModel.OnRowChange | Changes will be applied when the user selects a different row |
| QSqlTableModel.OnManualSubmit | All changes will be cached until either submitAll() or revertAll() is called |
Example
In the following example, sportsperson table is used as a model and the strategy is set as −
model.setTable('sportsmen')
model.setEditStrategy(QtSql.QSqlTableModel.OnFieldChange)
   model.select()
QTableView class is part of Model/View framework in PyQt. The QTableView object is created as follows −
view = QtGui.QTableView()
view.setModel(model)
view.setWindowTitle(title)
return view
This QTableView object and two QPushButton widgets are added to the top level QDialog window. Clicked() signal of add button is connected to addrow() which performs insertRow() on the model table.
button.clicked.connect(addrow)
def addrow():
   print model.rowCount()
   ret = model.insertRows(model.rowCount(), 1)
   print ret
The Slot associated with the delete button executes a lambda function that deletes a row, which is selected by the user.
btn1.clicked.connect(lambda: model.removeRow(view1.currentIndex().row()))
The complete code is as follows −
import sys
from PyQt5.QtSql import *
from PyQt5.QtCore import *
from PyQt5.QtGui import *
from PyQt5.QtWidgets import *

def initializeModel(model):
   model.setTable('sportsmen')
   model.setEditStrategy(QSqlTableModel.OnFieldChange)
   model.select()
   model.setHeaderData(0, Qt.Horizontal, "ID")
   model.setHeaderData(1, Qt.Horizontal, "First name")
   model.setHeaderData(2, Qt.Horizontal, "Last name")

def createView(title, model):
   view = QTableView()
   view.setModel(model)
   view.setWindowTitle(title)
   return view

def addrow():
   print (model.rowCount())
   ret = model.insertRows(model.rowCount(), 1)
   print (ret)

def findrow(i):
   delrow = i.row()

if __name__ == '__main__':
   app = QApplication(sys.argv)
   db = QSqlDatabase.addDatabase('QSQLITE')
   db.setDatabaseName('sportsdatabase.db')
   model = QSqlTableModel()
   delrow = -1
   initializeModel(model)

   view1 = createView("Table Model (View 1)", model)
   view1.clicked.connect(findrow)

   dlg = QDialog()
   layout = QVBoxLayout()
   layout.addWidget(view1)

   button = QPushButton("Add a row")
   button.clicked.connect(addrow)
   layout.addWidget(button)

   btn1 = QPushButton("del a row")
   btn1.clicked.connect(lambda: model.removeRow(view1.currentIndex().row()))
   layout.addWidget(btn1)

   dlg.setLayout(layout)
   dlg.setWindowTitle("Database Demo")
   dlg.show()
   sys.exit(app.exec_())
The above code produces the following output −
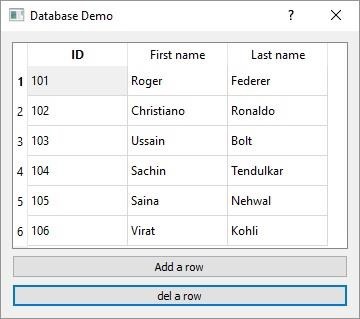
Try adding and deleting a few records and go back to SQLiteStudio to confirm the transactions.